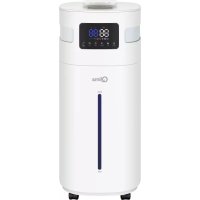
H408 - Humidifier QLIMA - Free user manual and instructions
Find the device manual for free H408 QLIMA in PDF.
User questions about H408 QLIMA
0 question about this device. Answer the ones you know or ask your own.
Ask a new question about this device
Download the instructions for your Humidifier in PDF format for free! Find your manual H408 - QLIMA and take your electronic device back in hand. On this page are published all the documents necessary for the use of your device. H408 by QLIMA.
USER MANUAL H408 QLIMA
natural_image
White Qlima air fryer with black control knob (no visible text or symbols)guarantee
2
YEARS
| D | GEBRAUCHSANWEISUNG | 2 |
| E | INSTRUCCIONES DE USO | 10 |
| F | MANUEL D’UTILISATION | 18 |
| GB | OPERATING MANUAL | 26 |
| I | ISTRUZIONI D’USO | 34 |
| NL | GEBRUIKSAANWIJZING | 42 |
| SLO | NAVODILA ZA UPORABO | 50 |
text_image
Technical diagram of a portable device with numbered parts for identification and assembly reference.natural_image
Symbol of a trash bin crossed with no text or numbers, representing waste sorting or disposal (no text present)text_image
Technical diagram of a portable device with numbered parts for identification and assembly reference.natural_image
Symbol of a trash bin crossed with two crossed lines and a solid black rectangle below (no text or labels)text_image
Technical diagram of a portable device with numbered parts for identification and assembly reference.PRINCIPAUX ÉLÉMENTS
natural_image
Symbol of a trash bin crossed with two diagonal lines, no text or labels presentCongratulations with the purchase of your humidifier. You have acquired a high quality product which will give you many years of pleasure, if you use it responsibly. Please read the user's manual first in order to ensure the optimum life span of your humidifier. On behalf of the manufacturer, we provide a two-year warranty on material- or manufacturing defects.
Enjoy your humidifier.
Yours sincerely,
PVG Holding B.V.
Customer Service Department
1 PLEASE READ THE USER'S MANUAL FIRST.
2 IF YOU HAVE ANY DOUBTS, CONSULT YOUR DEALER.
text_image
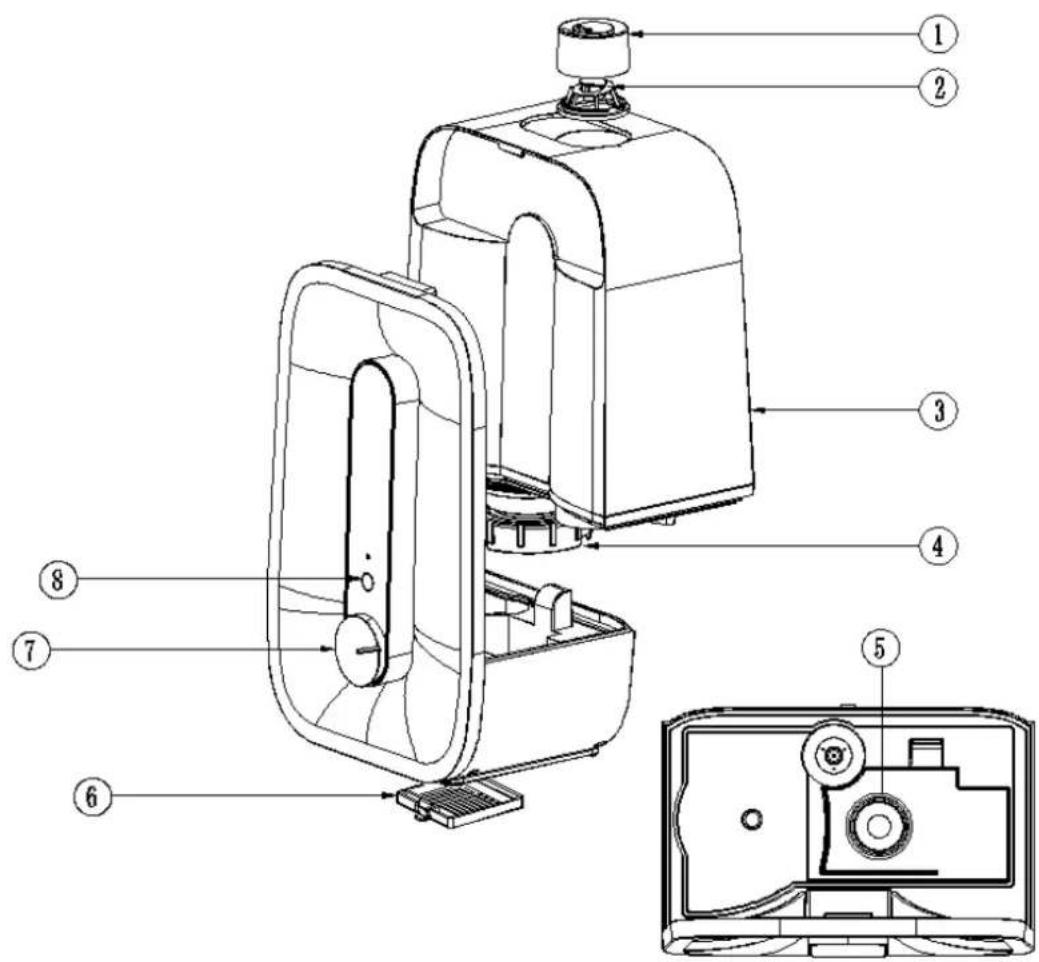
Technical diagram of a portable device with numbered parts for identification and assembly reference.IMPORTANT COMPONENTS
① Mist nozzle
② Aroma box
③ Water tank
④ Water softening filter (not included)
⑤ Ultrasonic Transducer
6 Ash damper
⑦ Control knob
⑧ Night light switch
1. SAFETY
- Read this user manual carefully before you using the appliance and keep it for future reference.
- The installation must be completely in accordance with local regulations, ordinances and standards.
- This product is only suitable for use a humidifier in normal indoor household operations.
- The appliance is suitable for mains voltages ranging from 100-240V / 50-60Hz.
- The capacity of the humidifier depends on the temperature and the humidity in the room.
- This appliance is not intended for use by persons (including children) with reduced physical, sensory or mental capabilities, or lack of experience and knowledge, unless they have been given supervision or instruction concerning use of the appliance by a person responsible for their safety.
- The electricity supply to the device must be checked by a recognized professional if you have any doubts regarding the compatibility.
- Always take the plug out of the socket when the device is not in use.
- Do not insert objects into the openings of the device.
- Keep the spraying mouth from directly facing furniture or electronic equipment to avoid damage.
- Never turn on when waterless.
- Never move the appliance when there's water inside.
-
Never submerge the product in water or other fluids.
-
Due to the emission of steam care should be taken when using the appliance.
- Tap water can only be used when the hardness of the water is between 40 and 75 mg of Calcium Carbonate per litre. Water with a higher level of Calcium Caronate will likely cause scaling inside the product and/or on surfaces or items surrounding the product (f.e. furniture). Hard water can cause the product to be damaged and to break. This is not covered by the warranty.
- Use a de-scaling fluid to remove scaling.
- To prevent legionella infections, it is necessary to replace the water in the water tank at least once a week.
- Never turn on the unit, when the water in the water tank is in there for over a week.
- Do not add other fluids to the (demineralised) water to the water container. Fluids like aroma oils could cause damage to the product.
- This appliance can be used by children aged from 8 years and above and persons with reduced physical, sensory or mental capabilities or lack of experience and knowledge if they have been given supervision or instruction concerning use of the appliance in a safe way and understand the hazards involved.
• Children shall not play with the appliance. - Cleaning and user maintenance shall not be made by children without supervision.
- Unplug the appliance during filling and cleaning. The appliance should always be placed on a firm, flat, waterproof surface at least 1.2 m away from bedside and 30 cm from the wall.
2. INSTALLATION
1 Do not place this machine near human body to avoid discomfort of human body;
2 Do not place this machine near wooden furniture to prevent furniture become damp and damaged;
3 Place this machine evenly and keep distance from wall at least 30 cm to keep it running normally;

ATTENTION
Before use please check ultrasonic transducer first. When ultrasonic transducer is damaged, do not use this machine.
1 Be sure the humidifier is switched off (knob turned all the way to the left). Remove the tank from the main housing. Bring the tank to the sink, turn upside down and twist off the tank cap by turning counter clockwise. Fill tank with cool, fresh tap water. DO NOT fill with warm water as this may cause leaking. Replace the cap on tank FIRMLY. Place tank back on to the base. The tank will immediately begin to empty into the base.
2 Connect this machine with 220-240V power socket, then it enters stand-by status. To turn the unit on, turn the Volume Control knob clockwise, and the LED indicator would turn to green color. Turning the knob all the way to the right will produce the highest moisture. Turning to the left will produce lower moisture with longer run time.
3 When the humidifier runs out of water, the LED indicator will turn to red, the transducer and fan will automatically shut off. Once the tank is empty, turn the Power Off and unplug the unit.
4 There is an aroma box in the mist nozzle, you can open the nozzle and put few drops of essential oil in the sponge, then fix the nozzle. When the humidifier is turn on, the aroma would come out together with the mist.
3. OPERATION
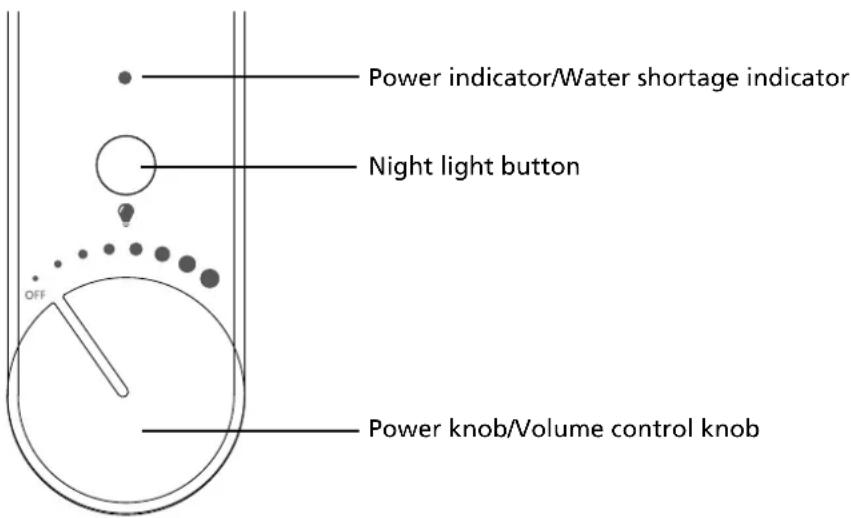
text_image
Power indicator/Water shortage indicator Night light button OFF Power knob/Volume control knob1 Turn the power knob clockwise, power indicator is on in green color; Turn the knob counterclockwise to OFF position, the indicator light is OFF;
2 To turn the unit on, turn the Volume Control knob clockwise. Turning the knob all the way to the right will produce the highest moisture. Turning to the left will produce lower moisture with longer run time.
3 Press the night light button would turn on the night light, press again to turn off the night light.
4 When the water level is low, the water shortage indicator would trun to red color and the humidifier would turn off automatically, please refill the water tank.
4. WARNINGS
1 Never fill the water reservoir with water hotter than 30^ C.
2 Never fill the reservoir through the mist nozzle.
3 Ensure that the filler cap of the reservoir is not leaking. Close the filler cap tightly.
4 Ensure that the device and the reservoir are always clean. Remove any dirt before using the device.
5 Do not position the outlet of the cold mist nozzle too close to equipment, furniture etc. to avoid water damage.
6 Check the actual air humidity regularly in the room to prevent any damage to furniture, equipment etc. from a too high humidity.
5. MAINTENANCE

WARNING
Before clean and maintain this machine, do turn it off and pull out the plug. Make sure machine is powered off to avoid electric shock;
A. CLEAN OSCILLATING PLATE
1 Take out water tank of humidifier.
2 Pour out residual water in the water sink
3 Use clean brush to clean oscillating plate. Do not use household cleaners to clean oscillating plate which will affect its lifetime. Do not suggest expose humidifier under candle/ lampblack, fireplace ash and smoke.

ATTENTION
Do wear gloves when clean oscillating plate to avoid hand scald by hot water in water sink.
B. CLEAN OUTER APPEARANCE OF HUMIDIFIER
1 Power off and pull out the plug
2 Dip a little soap water by towel to clean outer appearance of humidifier
3 Do not make water flow into inside of machine. It may cause damage on your machine and electric shock.
4 After cleaning, place this machine in ventilating place to make it dry (do not expose to sun). Only when machine is completely dry can you use it.
6. FAULTS
| Common problems Failure analysis Solutions | ||
| Machine doesn’t work | 1.Power switch is not on2.Forget to plug the power3.Water shortage4.Floating ball has failure | 1.Open switch button2. Check whether power is connected3.Fill water4. Check if floating ball is assembled in proper place |
| Bad mist effect | 1.Mist outlet is blocked2. Water level in water sink is too high | 1. Check and make sure mist outlet is not blocked2. Empty the water tank and the basin and refill tank with cool tap water |
7. TECHNICAL SPECIFICATIONS
| Model H 408 | |
| Mains 220-240~50/60Hz | |
| Electrical consumption 23 W | |
| Capacity water container 5.6 l | |
| Maximum evaporation capacity 7.5 l/day | |
| Dimensions mm (w x d x h) 259x182x328 | |
| Net weight 2.30 KG |
8. CONDITIONS OF WARRANTY
There is a two-year warranty on your humidifier from the date of purchase. All material or manufacturing defects will be repaired free of charge. The following applies:
- All claims for compensation, including consequential damage, will not be entertained.
- Any repairs or replacement of components during the warranty period will not result in an extension of the warranty period.
- The warranty will expire if any alterations have been made, not genuine components have been fitted or if the humidifier has been repaired by a third party.
- Components subject to normal wear and tear, such as the air filter, are not covered by the warranty.
- The warranty is only valid on presentation of the original, unaltered, and date stamped purchase receipt.
- The warranty does not cover damage caused by actions that deviate from those as described in the user's manual or by neglect.
- Transportation costs and the risks involved during the transportation of the humidifier or components shall always be for the account of the purchaser.
To prevent unnecessary expenses, we recommend that you always carefully read the user's manual first. If this does not provide a solution, take the humidifier to your distributor for repair.
natural_image
Symbol of a trash bin crossed with no text or numbers, representing waste sorting or disposal (no text present)Do not dispose of electrical appliances as unsorted municipal waste, use separate collection facilities. Contact your local government for information regarding the collection systems available. If electrical appliances are disposed of in landfills or dumps, hazardous substances can leak into the groundwater and get into the food chain, damaging your health and well-being. When replacing old appliances with new once, the retailer is legally obligated to take back your old appliance for disposal at least for free of charge.
INTERNET
In order to better be able to be of service to you the most recent version of the user, installation and/or service guide can be downloaded from www.qlima.com.
Egregio signore, gentile signora,
text_image
Technical diagram of a portable device with numbered parts for identification and assembly reference.COMPONENTI PRINCIPALI
natural_image
Symbol of a trash bin crossed with a diagonal line and a horizontal bar below (no text or labels)text_image
Technical diagram of a portable device with numbered parts for identification and assembly reference.BELANGRIJKE ONDERDELEN
① Mistsproeier
② Geurdoos
3 Watertank
4 Water-
onthardingsfilter
⑤ Ultrasonetransducer
6 Asklep
⑦ Regelknop
⑧ Schakelaar
nachtverlichting
1. VEILIGHEID
natural_image
Symbol of a trash bin crossed with no text or numbers, representing waste sorting or disposal (no text present)text_image
Technical diagram of a portable device with numbered parts for identification and assembly reference.POMEMBNI SESTAVNI DELI
① Šoba za meglico
② Enota za dišave
③ Rezervoar za vodo
④ Filter za mehčanje vode
⑤ Ultrazvočni
pretvornik
6 Loputa za pepel
⑦ Nadzorni gumb
⑧ Stikalo za nočno lučko
1. VARNOST
natural_image
Symbol of a trash bin crossed with no text or numbers, accompanied by a black rectangular block below (no text or symbols present)Distributed in Europe by PVG Holding B.V.
D Benötigen Sie weitere Informationen oder treten Probleme auf, besuchen Sie bitte unsere Website www.qlima.com, oder setzen Sie sich mit unserem Kundendienst in Verbindung (Telefonnummer auf www.qlima.com).
For alle yderligere oplysninger eller ved eventuelle problemer med apparatet henvises til www.qlima.com eller det lokale Kundecenter (telefonnumre findes i www.qlima.com).
EB Si necesita información o si tiene algún problema, visite nuestra página Web www.qlima.com, o póngase en contacto con el servicio cliente (hallará el número de teléfono en www.qlima.com).
F Si vous souhaitez obtenir des informations supplémentaires ou si vous rencontrez un problème, rendez-vous sur notre site Web (www.qlima.com) ou contactez notre service client (vous trouverez l'adresse et numéro de téléphone sur www.qlima.com).
FHN Jos haluat huoltoapua, lisätietoja tai laitteen kanssa tulee ongelmia, tutustu verkkosivustoon osoitteessa www.qlima.com tai kysy neuvoa PVG kuluttajapalvelukeskuksesta (www.qlima.com).
(60) If you need information or if you have a problem, please visit the our website (www.qlima.com) or contact our sales support (you find its phone number on www.qlima.com)
Per informazioni e in caso di problemi, visitate il sito Web www.qlima.com oppure contattate il Centro Assistenza Clienti (per conoscere il numero di telefono, consultate www.qlima.com).
Hvis du trenger informasjon, eller hvis du har et problem med produktet, kan du gå til nettsidene www.qlima.com. Alternativt kan du kontakte med PVG' forbrukertjeneste (telefonnummeret i www.qlima.com).
Als u informatie nodig hebt of als u een probleem hebt, bezoek dan de onze website (www.qlima.com) of neem contact op met de afdeling sales support (adres en telefoon op www.qlima.com).
Se necessitar de informações ou se tiver problemas, visite o Web site www.qlima.com ou contacte o Centro de Assistência (número de telefone o www.qlima.com)
W przypadku problemów i w celu uzyskania szczegółowych informacji odwiedź stronę internetową Qlima dostępną pod adresem www.qlima.com lub skontaktuj się z Centrum kontaktów Qlima (www.qlima.com)
Om du behöver service eller information eller har problem med apparaten kan du besöka www.qlima.com eller kontakta Qlima kundtjänst (du hittar telefonnumret på www.qlima.com).
Če želite dodatne informacije, obiščite spletno mesto podjetja na naslovu www.qlima.com ali pokličite na telefonsko (www.qlima.com).
Daha fazla bilgiye ihtiyaç duyarsanız veya bir sorunla karşılaşırsanız, www.qlima.com adresindeki Qlima Internet sitesini ziyaret edin veya ülkenizde bulunan Qlima müşteri merkeziyle iletişim kurun (telefon numarasını: www.qlima.com).