OM871ZT - Oven ETNA - Free user manual and instructions
Find the device manual for free OM871ZT ETNA in PDF.

User questions about OM871ZT ETNA
0 question about this device. Answer the ones you know or ask your own.
Ask a new question about this device
Download the instructions for your Oven in PDF format for free! Find your manual OM871ZT - ETNA and take your electronic device back in hand. On this page are published all the documents necessary for the use of your device. OM871ZT by ETNA.
USER MANUAL OM871ZT ETNA
Other important instructions 7
Operation of the oven 7
Oven functions 8
Maintenance
Cleaning the appliance 9
Removing and cleaning the guide rails 9
Aqua Clean function 10
Removing the oven door 11
Dismantling/assembling the interior glass of the door 11
Replacing the oven light bulb 12
Installation
Before installation 13
Electrical connection 14
Oven installation 14
Troubleshooting
15
Your oven and the environment
Disposal of the appliance and packaging 16
Introduction
Congratulations on choosing this Etna oven. This product is designed with simple operation and optimum comfort in mind. The oven has a wide range of settings enabling you to select the correct cooking method every time.
This manual shows how you can best use this oven. In addition to information about operating the oven, you will also find background information that may be useful when using the appliance.
Read the separate safety instructions before using the appliance!
Read this manual before using the appliance and keep it in a safe place for future use.
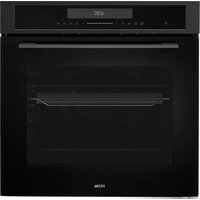
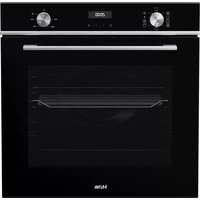
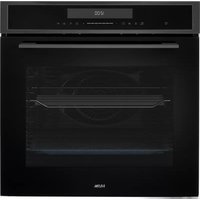
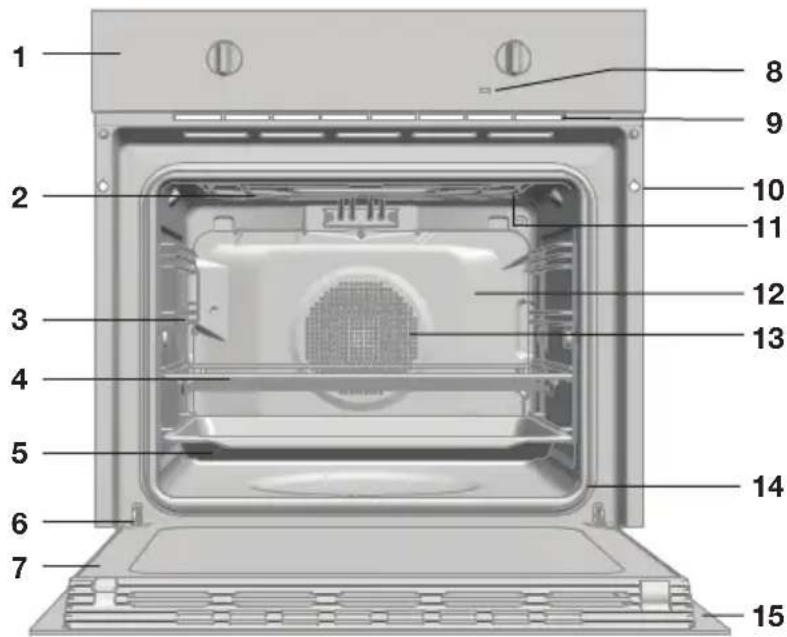
Description
- Control panel
- Grill element
- Tray supports
- Oven rack
- Baking tray
- Hinge
- Inner Glass
- Temperature indicator light
- Air cooling outlet
- Unit mounting
- Oven lighting
- Back Wall Panel
- Fan
- Oven Seal
- Door
- Function control dial
- Temperature control dial
Accessories
Your appliance is accompanied by a range of accessories, depending on the model. Only use original accessories; they are specially suited to your appliance. Be sure that all the accessories that are being used are able to withstand the temperature settings of the chosen oven function.
Note: not all accessories are suitable/available for every appliance (it may also differ by country). When purchasing, always provide the exact identification number of your appliance. Please see the sales brochures or check online for more details about optional accessories.
Note: never place an accessory on the bottom of the oven!
- Baking tray; to be used for pastries and cakes.
- Oven rack; mainly used for grilling. A steam dish or pan with food can also be placed on the oven rack.
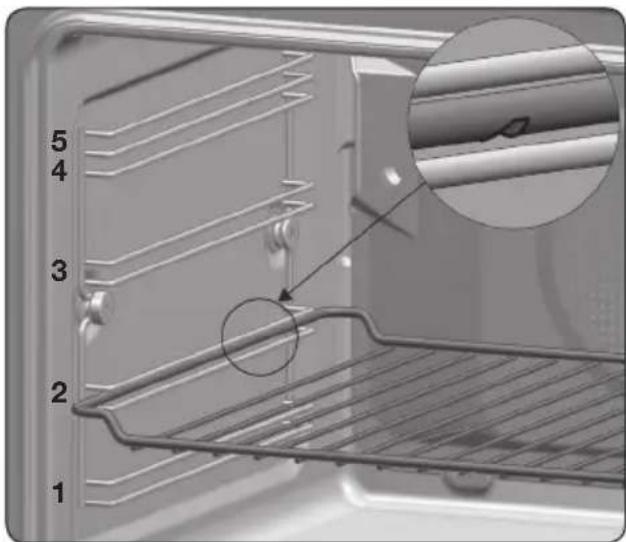
Guide rails
- The oven has five guide rails. Level 1 is mainly used in combination with bottom heat. Levels 4 and 5 are suitable for grilling and toasting.
- Place the oven rack or baking tray in the gap between the guide rail sliders.
- The oven rack and some of the trays have retention grooves to prevent them from accidentally being removed. Place these grooves towards the back of the oven, facing downwards.
- The surface of the rack on which the oven dish will rest must be below the side rails. This prevents the oven dish from accidentally sliding.

First use
There may be traces of fat and other substances in the oven as a result of the manufacturing process. These should be removed using the following procedure:
- Remove all the packaging from your oven, including the protective plastic, if present.
- Turn your oven to , at 200^ for 1 hour.
- Cool the oven with the door open so that it ventilates and no odours remain inside it.
- Once cold, clean the oven and the accessories.

During this first operation, smoke and smells will be produced. The kitchen should therefore be well ventilated.
Other important instructions
- Do not pour water on the bottom surface when in use; this may damage the enamel.
It is normal for condensation to occur on the oven door when cooking food with a high liquid content. - When closing the oven door during cooking, the sound of the air inside it can be heard. This effect is normal due to the pressure exerted by the door when it is closed, guaranteeing the sealing of the cavity.
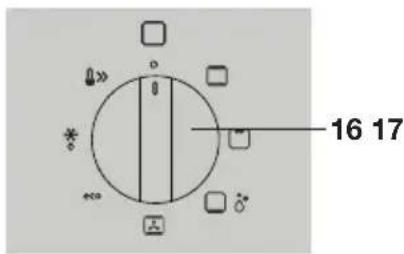
Operation of the oven
- Select an oven function.
- Select a temperature.
- Set the controls to turn off the oven.
Oven functions

Attention
Please note that the available functions will vary according to each model.
Consult the table to select the preferred function. Also consult the instructions for preparation on the dish packaging.
| Function | Description |
| Top Heat + Bottom Heat This function is for use when baking cakes where the heat should be even to give a spongy texture. | |
| Grill Toasting and browning. This setting allows the surface to be browned without affecting the inside of the food. Suitable for flat foods such as steaks, ribs, fish and toast. | |
| Bottom Heat Heat only comes from the lower part. Suitable for warming dishes or letting dough or similar products rise. | |
| Aqua Clean The Aqua Clean function makes it easy to remove grease and other food debris that may have stuck to the sides of the oven. During the cleaning cycle the light inside the oven will remain off. | |
| Top Heat + Bottom Heat + Fan Suitable for roasts and baking. The fan distributes the heat evenly around the inside of the oven to reduce cooking time and temperature. | |
| eco | Eco For cooking in the oven with the minimum energy consumption possible. The oven uses convention heating, and depending on the model, switches off a few minutes before the end of cooking, using the residual heat inside the oven and completing the dish perfectly. Recommended for fish and all types of meat roasts. |
| Defrost This function is suitable for slowly defrosting food, particularly food consumed unheated, such as soups, pastries, tarts, cakes, etc. | |
| Fast preheat This function allows the oven to be quickly pre-heated to the selected temperature. Use this function when your recipe requires the oven to be at a specific temperature before use. |
Cleaning the appliance
Clean your appliance regularly to prevent a build-up of grease and food particles, especially on interior and exterior surfaces, the door and door gasket.
- Clean the exterior surfaces with a soft cloth and soapy warm water.
- Wipe afterwards with a clean, damp cloth and dry the surfaces.
- Remove splashes and stains on the interior surfaces with a soapy cloth.
- Wipe afterwards with a clean, damp cloth and dry the surfaces.

Take care that no water enters the vents. Never use abrasive cleaning agents or chemical solvents. Ensure that the door gasket is always clean. This will prevent a build-up of dirt so that the door can close properly.
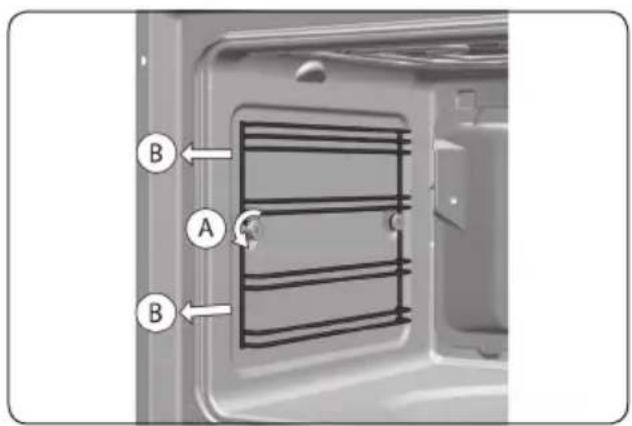
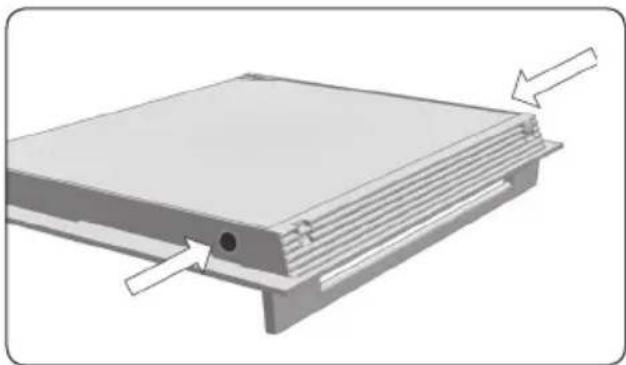
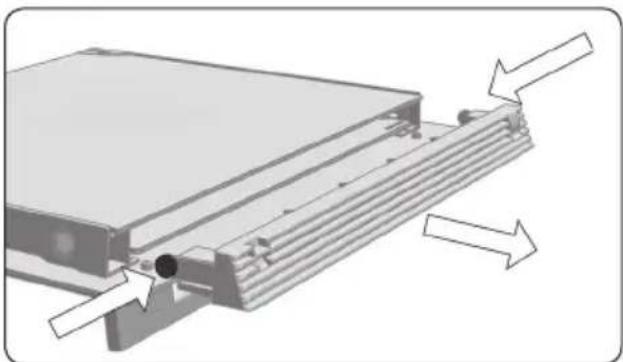
Removing and cleaning the guide rails
- Remove all accessories.
- Completely loosen the nut at the front of the fastening element (A).
- Pull the guide rails forward (B) and remove them.
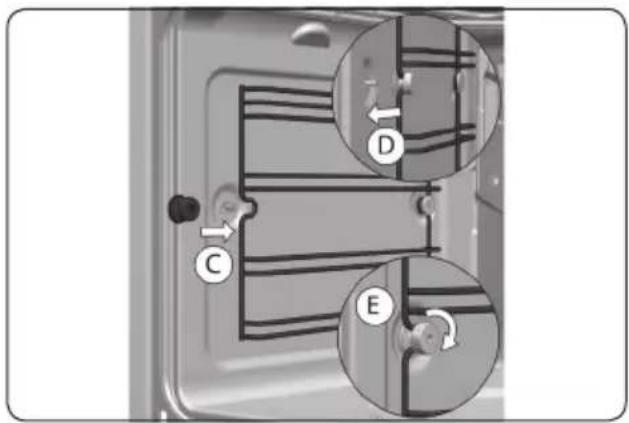
- Use conventional cleaning products to clean the guide rails.
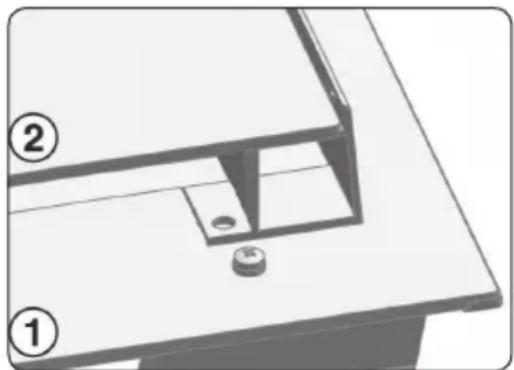
- Assembling the guide rails; insert the rear notch into the rear fastening nut.
- Fix the front fastening nut (C) in the front notch of the support.
- Secure the support with the nut (D) and turn until it is fully adjusted (E).
Aqua Clean function
This function makes it easy to remove grease and other food debris that may have stuck to the sides of the oven. For easier cleaning, do not allow dirt to accumulate. Clean the oven frequently.

Attention
Do not pour water into a hot oven as this can damage the enamel of the oven. Always run the cycle on a cold oven. The result could be affected and the varnish damaged if it is run when the oven is too hot.
- First, remove all accessories and guide rails from the oven interior.
- With the oven cold, spread a cloth out on the bottom of the oven.
- Gently pour 200ml of water onto the cloth on the bottom of the oven cavity.

For best results, add a teaspoon of mild washing up detergent to the glass of water before pouring onto the cloth.
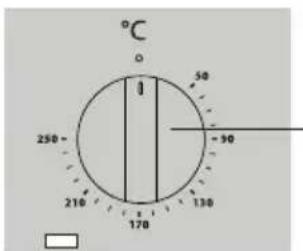
- Turn the function control dial to the position.
- Turn the temperature control dial to 90^ C.
- After 24 minutes; turn the function control dial and the temperature control dial to .
- Wait for about 20 minutes for the interior of the oven to cool.
Any traces of dirt and excess water can now be removed from the oven with the damp cloth.

Attention
Do not open the oven door until the Aqua Clean function is complete. The cooling cycle is necessary for the function to work properly. Before touching the inside surface of the oven, make sure that it has cooled properly.

The Aqua Clean function takes place at a low temperature. However, cooling times can vary depending on the room temperature. If a deeper clean is required after using the Aqua Clean function, use neutral detergents and non-abrasive sponges.
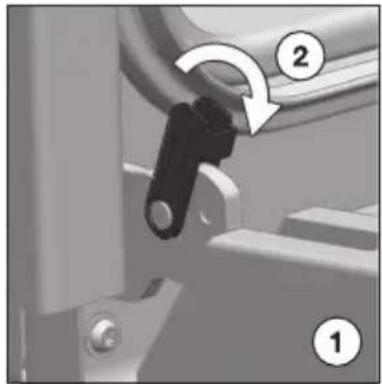
Removing the oven door

Keep your fingers away from the oven door hinges.
The springs of the hinges are under high tension and can cause injuries.
Make sure the hinges are always properly locked.
- Open the oven door fully.
- Block the hinge by turning the latches to the front.
- Close the door to the locked position.
- Hold the door with both hands holding on to both sides, lift up and pull out the oven door.
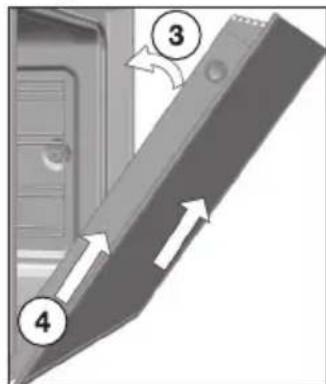
- To assemble the door, carry out the steps in the reverse order.
Dismantling/assembling the interior glass of the door
- First, remove the oven door.
- Using your fingers, press the buttons located at the top of both sides of the oven door.
- Keep them pressed and pull on the plastic seal above the door.
- Remove the glass panes from the door.

Pay attention to the order and position of the glass panes when removing them as they must be reassembled in the same order and position when you have finished cleaning them.
- Clean the glass panes with a glass cleaner or soap and water and a soft cloth.
- Insert the glass panes.
Insert pane no. 2 with the printed part facing toward the iner side of the door.
- Re-attach the top seal of the door, making sure that the side tabs fit into their housings (click).

Attention!
Never switch on the oven if any of the glass panes on the door are missing.
Replacing the oven light bulb

The light bulb is a consumer item and therefore does not fall under the guarantee. Before replacing the light bulb, disconnect the appliance from electricity by unplugging it or switching off the fuse in the circuit breaker box!

The light bulb in this household appliance is designed exclusively for lighting this appliance. The light bulb is not suitable for lighting a household area.
Replacing the light bulb
- Turn the cover to remove it.
- Replace the defective lamp with a lamp of the same type and reassemble the glass cover.

This information is exclusively for the installer who is responsible for assembly and electrical connection. The manufacturer will not accept liability for possible damage caused if you install the oven yourself.
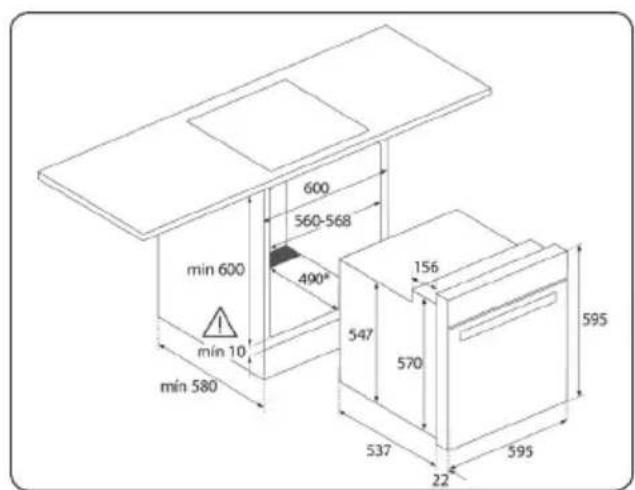
Before installation
- To move the oven, use the grips at the sides. Do not use the door handle to lift the oven.
- When installing the oven under a counter, follow the instructions for installing it.
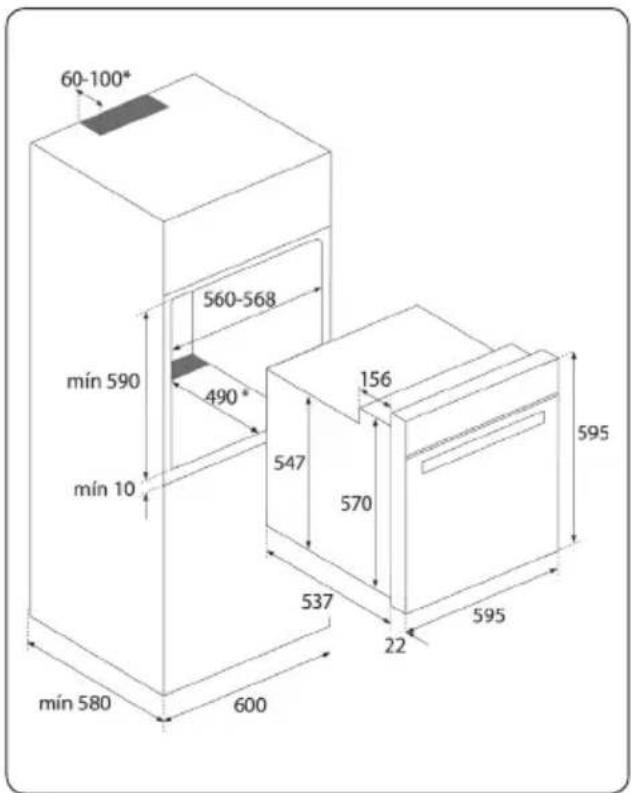
In general, protruding elements (furniture reinforcements, pipes, socket bases, etc.) at the back of the unit must be avoided. - The unit in which the oven is installed and adjacent units must withstand temperatures higher than 85^ .
- The installation instructions must be adhered to strictly. If not, the oven's ventilation circuit may become blocked, causing high temperatures that could damage the kitchen unit and the appliance itself.
- For this purpose, check the unit measurements and those of the holes to be drilled in the units, as shown in the figures.
Electrical connection
The fitter must ensure that:
- The mains power voltage and frequency correspond to what is marked on the identification plate.
- The domestic wiring system can withstand the maximum power marked on the identification plate.
- After connecting the power supply, check that all electrical parts of the oven are working correctly.
Oven installation
- Position the oven inside the unit and ensure that the feed cable is not trapped or in contact with parts of the oven that heat up.
- Make sure that the body of the oven is not in contact with the walls of the unit and that there is a minimum space of 2mm between adjacent units.
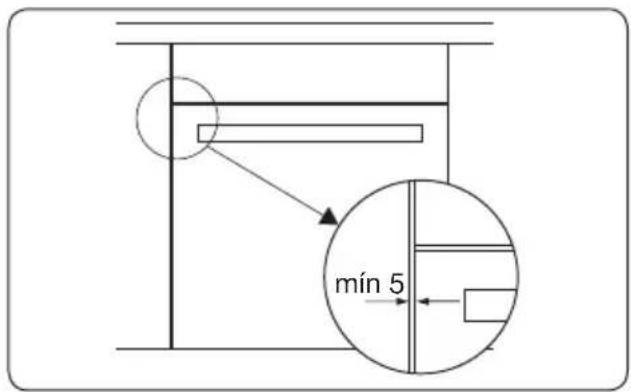
- Centre the oven in the unit so that there is a minimum space of 5mm between the oven and the doors of the furniture that surrounds it.
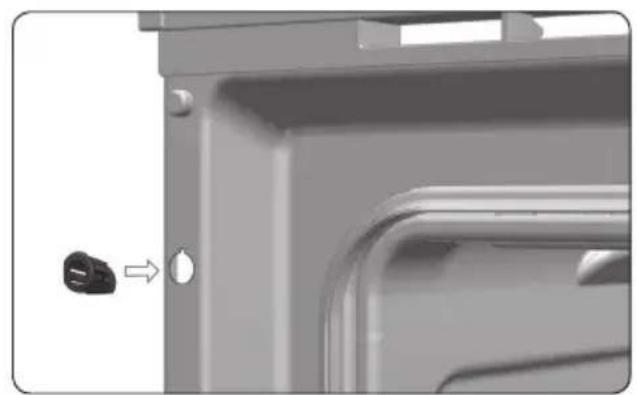
- Open the door and insert the plastic plugs supplied with the oven into their respective housings.
- Fasten the oven to the unit with the screws supplied, screwing them into the unit through the stops.
Try the solutions below if you have problems with your oven. You could save yourself the time and effort of an unnecessary phone call to customer services.
The oven doesn't work
- Check whether an oven function and temperature have been selected.
- Check that the electricity is working properly (fuse in the circuit breaker box/ plug in the socket).
The temperature indicator light does not come on
- Select a temperature.
- Select a function.
- It should only come on while the oven is heating up to the selected temperature.
There is smoke during use of the oven
Normal during first use.
- Clean the oven regularly.
- Reduce the amount of fat or oil in the baking tray.
The food is overcooked or undercooked
- Check whether the correct oven setting has been selected.
- Check whether the correct temperature has been set.
Condensation appears inside the oven.
- This is normal. Wipe the oven clean after use.
The fan continues to operate after the oven has been switched off.
- This is normal. The fan will keep working for a while after the oven has been switched off.

Repairs should only be performed by a qualified service technician. If maintenance is required, take the plug out of the socket and contact the Etna customer service.
Have the following information at hand when you call:
- The model number and serial number. This information is on the oven identification plate which is on one side of the opened door.
- Warranty details.
- A clear description of the problem.

Choose a clean, dry place if you have to store the oven temporarily, as dust and moisture can damage the appliance.
Disposal of the appliance and packaging
This product is made from sustainable materials. However, the appliance must be disposed of responsibly at the end of its useful life. The government can provide you with information about this.
The appliance packaging can be recycled. The following materials have been used:
cardboard
polyethylene wrap (PE)
CFC-free polystyrene (hard PS foam)
Dispose of these materials responsibly in accordance with legal provisions.

The product has a pictogram of a crossed-out waste container. This indicates that household appliances must be disposed of separately. This means that the appliance may not be processed via the regular waste flow at the end of its useful life. You should take it to a special municipal waste depot or a sales outlet that offers to do this for you.
Collecting household equipment separately prevents harm to the environment and public health. The materials used in manufacturing this appliance can be recycled, which provides considerable savings in energy and raw materials.

Declaration of conformity
We hereby declare that our products comply with the relevant European directives, standards and regulations as well as all requirements referred to in the standards.

721886