
MC4000 - DJ Equipment DENON - Free user manual and instructions
Find the device manual for free MC4000 DENON in PDF.
| Brand | Denon |
| Model | MC4000 |
| Category | DJ Controller |
| Product type | 2-deck DJ controller with integrated audio interface |
| Dimensions (approx.) | 30 x 40 x 10 cm |
| Weight (approx.) | 3 kg |
| Power supply | 5 V DC, 3 A power adapter, center positive |
| Compatible software | Serato DJ (included), others via MIDI mapping |
| Number of channels | 2 channels with faders and 3-band EQ |
| Filter per channel | Low-pass / high-pass filter with rotary control |
| Capacitive platter | Touch-sensitive platter with vinyl mode for scratch and pitch bend |
| Performance pads | 4 hot cue pads per deck, 4 sample pads |
| Looping | Auto-loop, loop in/out, reloop, loop divide/multiply |
| Effects | FX Level, FX On/Select, FX Tap, beat control |
| Microphone inputs | 2 combo XLR/6.35 mm jack inputs with volume and EQ |
| Master outputs | Balanced XLR and unbalanced RCA, stereo/mono selector |
| Booth output | 6.35 mm jack with dedicated volume |
| Headphone output | 6.35 mm and 3.5 mm jacks with volume, pan and split cue mode |
| Auxiliary input | Stereo RCA input with volume |
| USB connectivity | 1 USB-B port for computer connection |
| Care and cleaning | Clean with a soft dry or slightly damp cloth. Avoid abrasive products. |
| Safety | Use the provided adapter. Power on in order: sources → MC4000 → amplifiers. Power off in reverse order. |
| Spare parts and repairability | Contact Denon customer service or an authorized repair center. Kensington lock for anti-theft. |
| General information | Full manual available at notice-facile.com. Firmware updates at denondj.com. |
Frequently Asked Questions - MC4000 DENON
User questions about MC4000 DENON
0 question about this device. Answer the ones you know or ask your own.
Ask a new question about this device
Download the instructions for your DJ Equipment in PDF format for free! Find your manual MC4000 - DENON and take your electronic device back in hand. On this page are published all the documents necessary for the use of your device. MC4000 by DENON.
USER MANUAL MC4000 DENON
User Guide (English)
Introduction
Package Contents
MC4000 Software Download Card User Guide
USB Cable Serato DJ Voucher Card Safety & Warranty Manual
Power Adapter
Support
For the latest information about this product (system requirements, compatibility information, etc.) and product registration, visit denondj.com.
Setup
Important: Occasionally, we may update MC4000's firmware to improve its performance. Visit denondj.com to check for available firmware updates, especially after you update your software (firmware updates may address new software features).
Note: Items not listed under the Introduction > Package Contents are sold separately.
- Windows users only: Download and install the latest drivers from denondj.com.
- Download and install the latest version of Serato DJ Intro from serato.com.
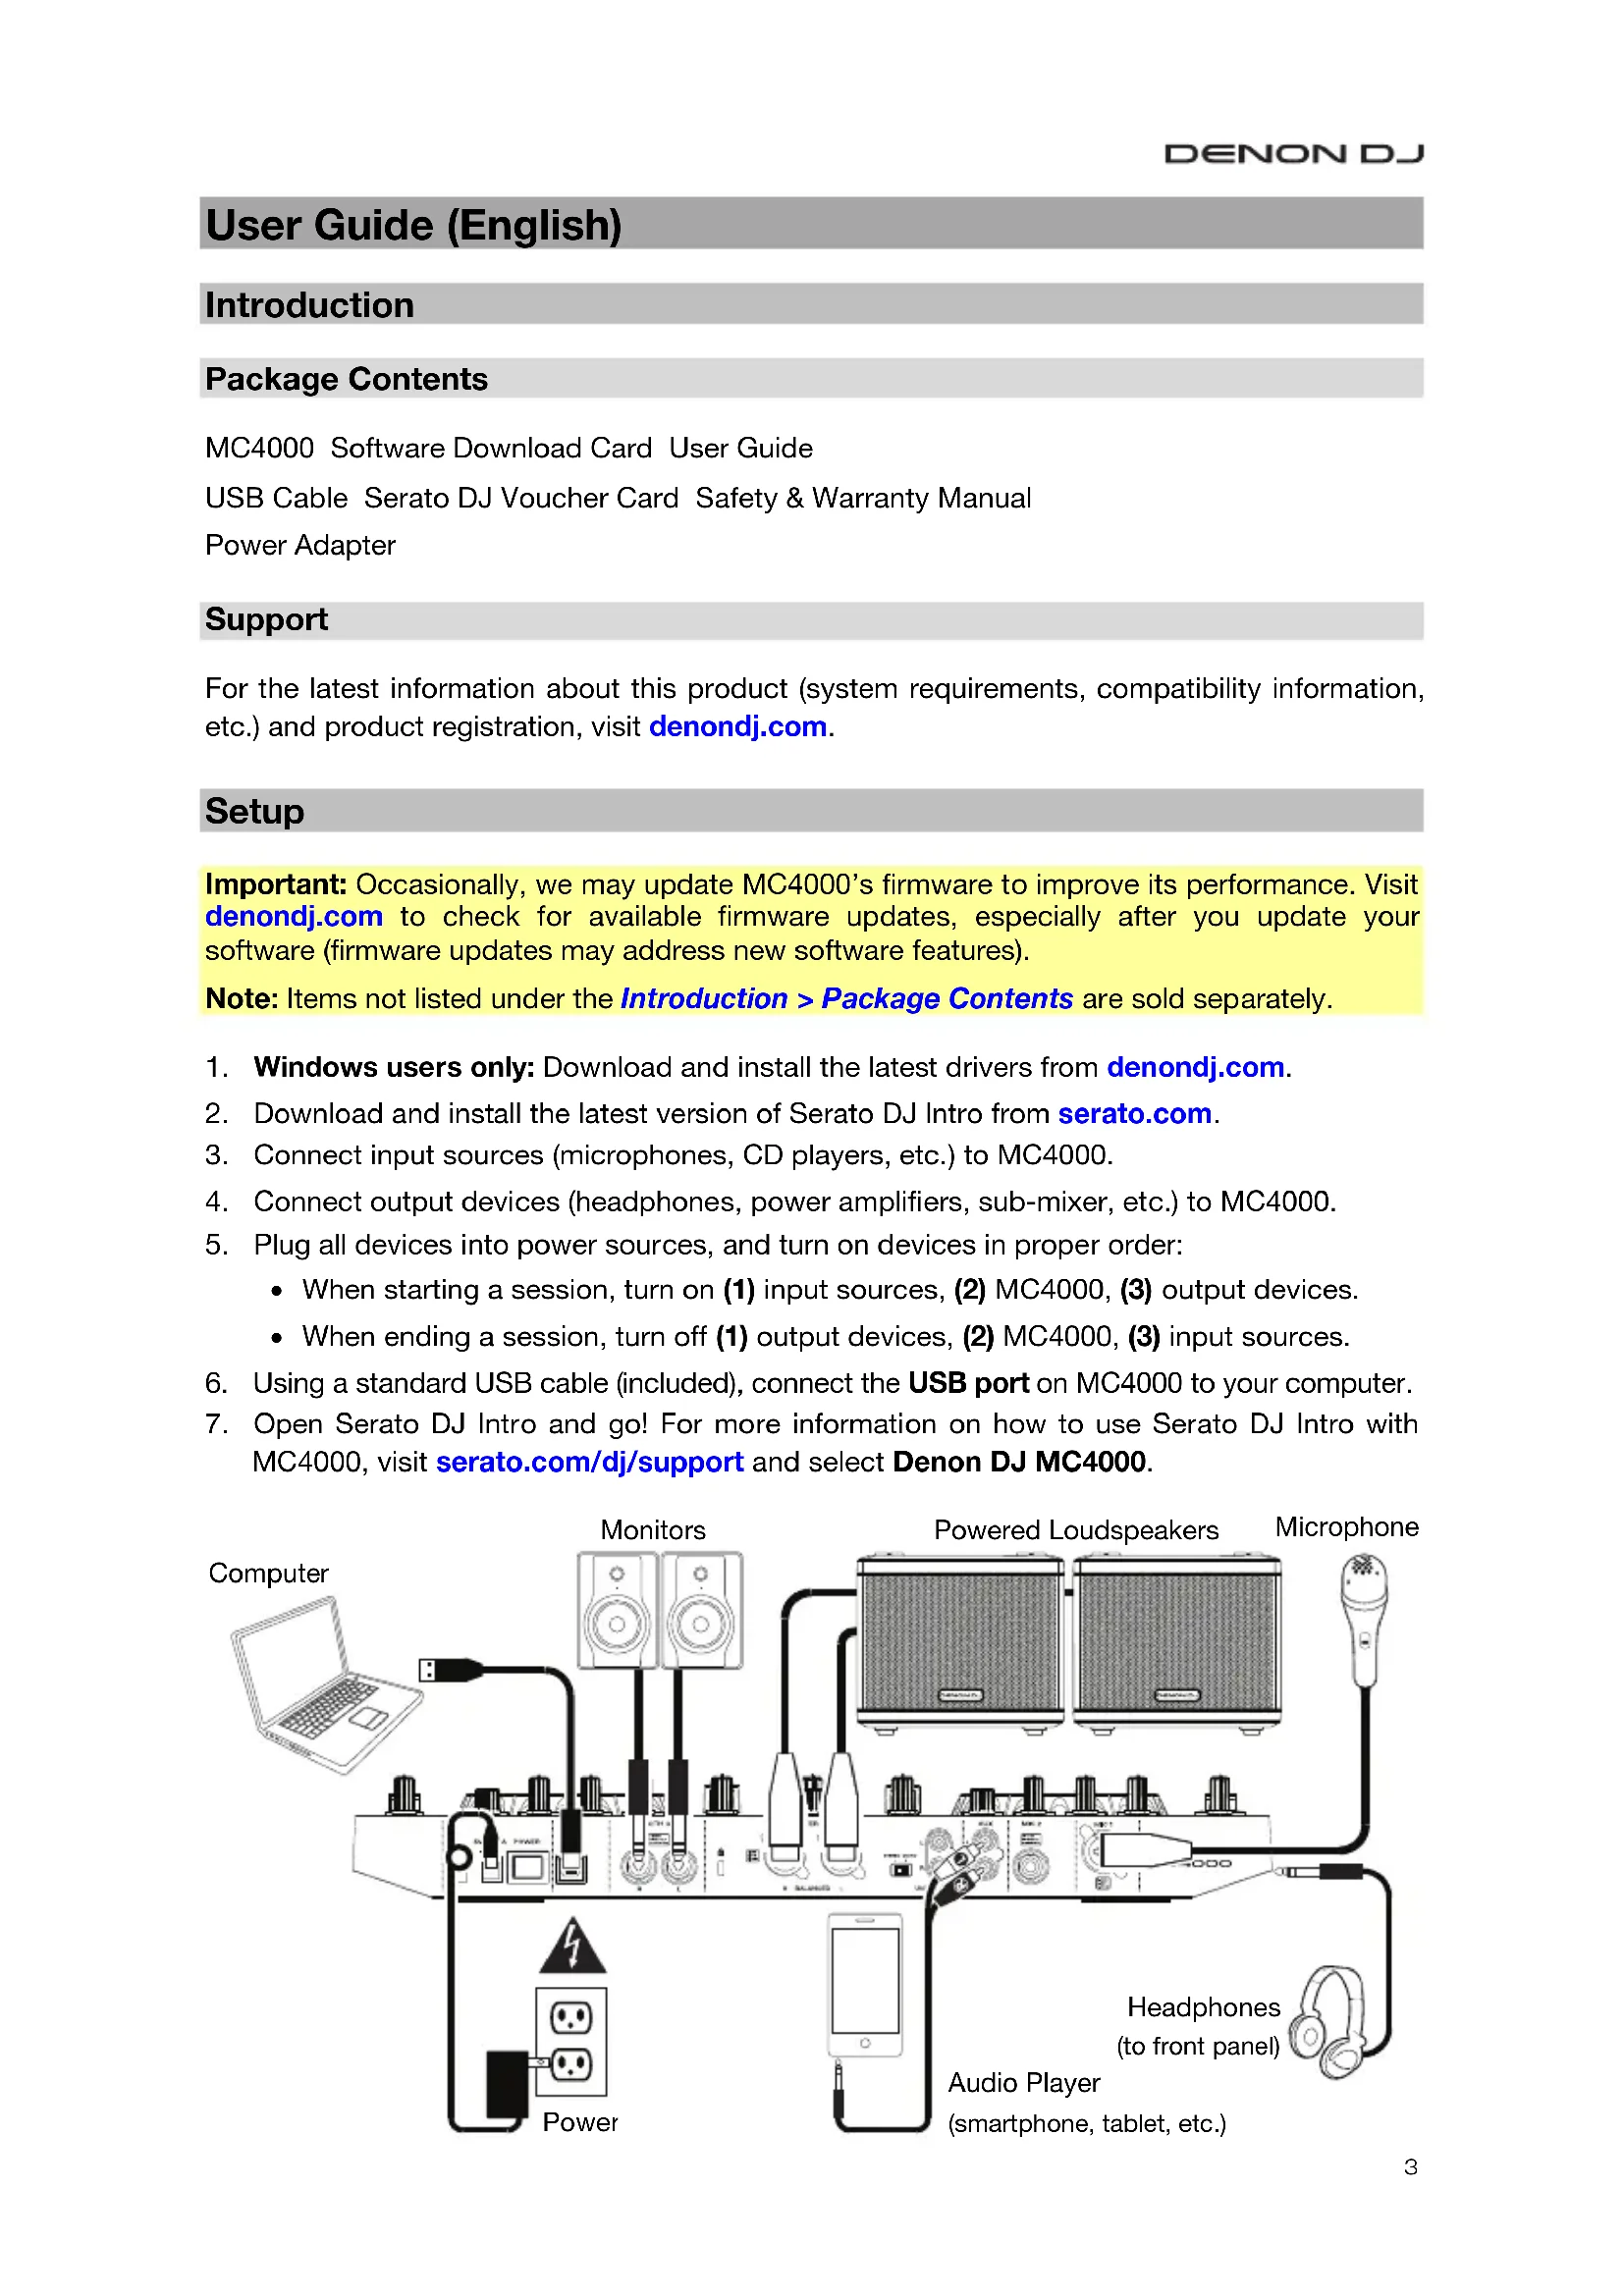
- Connect input sources (microphones, CD players, etc.) to MC4000.
- Connect output devices (headphones, power amplifiers, sub-mixer, etc.) to MC4000.
-
Plug all devices into power sources, and turn on devices in proper order:
-
When starting a session, turn on (1) input sources, (2) MC4000, (3) output devices.
-
When ending a session, turn off (1) output devices, (2) MC4000, (3) input sources.
-
Using a standard USB cable (included), connect the USB port on MC4000 to your computer.
- Open Serato DJ Intro and go! For more information on how to use Serato DJ Intro with MC4000, visit serato.com/dj/support and select Denon DJ MC4000.

Features
Top Panel
-
Channel Level: Turn this knob to adjust the level of the pre-fader, pre-EQ audio signal for the channel.
-
Channel EQ: Turn these knobs to boost or cut the high, mid-range, and low frequencies for the channel.
-
Channel Filter: Tum this knob to adjust the filter applied to the channel. Turn the knob counterclockwise to apply a low-pass filter. Turn the knob clockwise to apply a high-pass filter.
-
Channel Cue: Press this button to send the channel's pre-fader signal to the headphones' cue channel.
-
Channel Fader: Use this fader to adjust the channel's volume level.
-
Crossfader: Use this crossfader to mix between the two decks.
-
Shift: Press and hold this button to access secondary functions of other controls.
-
Sync / Sync Off: Press this button to automatically match the corresponding Deck's tempo with the opposite Deck's tempo and phase.
Press and hold Shift and press this button to deactivate Sync.
- Cue / Track Start: During playback, press this button to return the track to a temporary cue point. If you have not set a temporary cue point, then press this button to return to the start of the track. (To set a temporary cue point, make sure the track is paused, move the platter to place the audio playhead at the desired location, and then press this button.)
If the deck is paused, press and hold this button to play the track from the temporary cue point. Release the button to return the track to the temporary cue point and pause it. To continue playback without returning to the temporary cue point, press and hold this button and then press and hold the Play button, and then release both buttons.
Press and hold Shift and then press this button to return to the start of the track.
- Play/Pause / Stutter: This button pauses or resumes playback.
Press and hold Shift and then press this button to "stutter-play" the track from the last set cue point.
-
Hot Cues: Press any of these 4 pads to set and jump to a hot cue point. To set a hot cue point, press an unlit pad at the desired location in the track (the pad will then be lit). To jump to that hot cue point, press the lit pad. To delete a hot cue point, press and hold Shift and then press a lit pad.
-
Pad Mode: Use this button to access advanced pad modes when using Serato DJ.
-
Platter: This capacitive, touch-sensitive platter controls the audio playhead when the wheel is touched and moved. When the Vinyl button is on, move the platter to "scratch" the track as you would with a vinyl record. When the Vinyl button is off (or if you are touching only the side of the platter), move the platter to temporarily adjust the track's speed.
While editing a loop, move the platter to adjust the Loop In or Loop Out point.
Press and hold Shift and then move the platter to move quickly through the track.
- Vinyl / Censor: Press this button activate/deactivate a "vinyl mode" for the platter. When activated, you can use the platter to "scratch" the track as you would with a vinyl record.
Press and hold Shift and then press and hold this button to activate the Censor feature: the playback of the track will be reversed, but when you release the button, normal playback will resume from where it would have been if you had never engaged the Censor feature (i.e., as if the track had been playing forward the whole time).
- Key Lock / Range: Press this button to activate/deactivate Key Lock. When Key Lock is activated, the track's key will remain the same even if you adjust its speed.
Press and hold Shift and then press this button to cycle through the available ranges of the pitch fader.
- Pitch Bend - / + / / : Press and hold one of these buttons to momentarily reduce or increase (respectively) the speed of the track.
Press and hold Shift and then press and hold one of these buttons to rewind or fast-forward (respectively) through the track.
-
Pitch Fader: Move this fader to adjust the speed (pitch) of the track. You can adjust its total range with the Key Lock / Range button.
-
FX Level: Turn this knob to adjust the level of the corresponding effect. The FX On button under the knob must be lit for this knob to function.
Press and hold Shift and then turn this knob to scroll through the list of effects.
-
FX Beats: Turn this knob to adjust the rate of time-based effects on that deck.
-
FX On / Select: Press this button to turn the corresponding effect on or off. Press and hold Shift and then press this button to select an effect in the software.
-
FX Tap: Tap this button repeatedly at the desired tempo to set the rate of the effects' low-frequency oscillators (LFOs). Press and hold this button to reset Beat Multiplier to the Deck's BPM.
-
Auto-Loop / Auto 4: Press this button to create an auto-loop with the length that is set in the software. Press and hold Shift and then press this button to create a 4-bar auto-loop, regardless of the auto-loop length setting.
-
X 1/2 Loop / Loop In: Press this button to halve the length of the current loop. Press and hold Shift and then press this button to create a Loop In point at the current location.
-
X 2 Loop / Loop Out: Press this button to double the length of the current loop. Press and hold Shift and then press this button to create a Loop Out point at the current location.
-
Reloop: Press this button to skip to the last-played loop and activate it immediately.
-
Browse / Library Knob: Turn this knob to navigate through the software. Press the knob to select an item. Press and hold Shift and then turn this knob to browse quickly through the tracks in your library.
- Load: Press this button to load the currently selected track to the deck. Press it quickly twice to load the same track to both decks ("instant doubles").
- Back / Panel: Press this button to move to the previous window of the software. Press and hold Shift and then press this button to cycle through the panels in the software.
- Load Prep / Open Prep: Press this button to load the currently selected track to the Prepare Crate.
Press and hold Shift and then press this button to jump to the Prepare Crate in the software.
- Sampler Pads: Press these pads to play their corresponding samples in the software's sampler (1-4). Press and hold Shift and then press a pad to stop its sample playback.
- Sample Level: Turn this knob to adjust the volume level of the software's sampler.
- Level Meters: These LEDs display the audio signal depending on the state of each deck and Channel Fader. The meters are not affected by the position of the Master Knob.
If a Channel Fader is at its minimum position, the meter will show the deck's pre-fader level. The left meter represents Deck 1, and the right meter represents Deck 2.
If a Channel Fader is higher than its minimum position, both meters will show the summed, post-fader output of the playing deck(s).
Press the Cue button on a deck to split the meters between a cued deck (Channel Fader at its minimum position) and a playing deck (Channel Fader higher than its minimum position). The LEDs for the Cue deck will change only if audio is playing. Otherwise, it will continue showing the summed, post-fader output of the playing deck.
- Mic Volume: Turn these knobs to adjust the volume levels of the corresponding microphone inputs. The Peak light next to each knob indicates the current signal level by its color: green (low), amber (normal/optimal), or red (maximum/peak).
Important: The audio signals from the microphones are routed directly to the Master Outputs. They are not routed into/through the software.
- Mic Echo: Press this button to activate/deactivate the reverb effect on the microphones' audio signal.
- Mic Talk Over / Post: Press this button to activate/deactivate the "talkover" feature, which automatically reduces the volume level of the master mix when you speak into the microphone.
Press and hold Shift and then press this button to activate/deactivate the "post" feature. When on, the microphones' signal will not be sent to the Booth Outputs.
- Master: Turn this knob to adjust the volume level of the Master Outputs.
- Booth: Turn this knob to adjust the volume level of the Booth Outputs.
- Aux: Turn this knob to adjust the input volume of the Aux Inputs.
Front Panel

- Phones Outputs (1/4" or 1/8" / 6.35 mm or 3.5 mm): Connect headphones to these 1/4" (6.35 mm) and 1/8" (3.5 mm) jacks for monitoring the signal. The headphone volume is controlled using the Monitor Level knob.
- Monitor Level: Adjusts the volume for headphone cueing in the software.
-
Monitor Pan: Adjusts the software's audio output to the headphones, mixing between the cue output and the master mix output.
-
Split Cue: When this switch is in the On position, the headphone audio will be "split" such that all channels sent to cue channel are summed to mono and sent to the left headphone channel and the master mix is summed to mono and sent to the right channel. When the switch is in the Off position, the cue channel and master mix will be "blended" together.
- Mic EQ: Turn these knobs to boost or cut the high and low frequencies for the corresponding microphones.
- Mic Echo Level: Turn this knob to adjust the amount of the reverb effect on the microphones' audio signal.
Rear Panel

- Power Input: Use the included power adapter (5 VDC, 3 A, center-positive) to connect this input to your power source.
- Cable Restraint: You can secure cables to this restraint to help avoid disconnecting them accidentally.
- Power Button: Press this button to power MC4000 on or off. Power on MC4000 only after you have connected all of your input devices and before you power on your amplifiers and loudspeakers. Power off your amplifiers and loudspeakers before powering off MC4000.
- USB Port: Use a standard USB cable (included) to connect this USB port to an available USB port on yoru computer. This connection sends and receives audio and control information to and from the computer.
- Master Outputs (XLR, balanced): Use standard RCA cables to connect these outputs to loudspeakers or an amplifier system. Use the Master knob on the top panel to control the volume level.
- Master Outputs (RCA, unbalanced): Use standard RCA cables to connect these outputs to loudspeakers or an amplifier system. Use the Master knob on the top panel to control the volume level.
- Stereo/Mono: Use this switch to set the channel configuration of the Master Outputs: Stereo (binaural audio using separate left and right channels) or Mono (summed monaural audio through both left and right channels).
- Booth Outputs (1/4" / 6.35 mm): Use standard RCA cables to connect these outputs to booth monitors or a booth amplifier system. Use the Booth knob on the top panel to control the volume level.
- Aux Inputs: Use standard RCA cables to connect these line-level inputs to an external audio source (smartphone, tablet, media player, etc.). Use the Aux knob on the top panel to control the volume level.
- Mic 1 Input (XLR or 1/4'' / 6.35mm ): Use a standard XLR or 1/4'' ( 6.35mm ) cable (not included) to connect a standard dynamic microphone to this input. Use the Mic 1 Volume knob on the top panel to control the volume level.
- Mic 2 Input (1/4" / 6.35 mm): Use a standard 1/4" (6.35 mm) cable (not included) to connect a standard dynamic microphone to this input. Use the Mic 2 Volume knob on the top panel to control the volume level.
- Kensington® Lock: Use this slot to secure MC4000 to a table or other surface.
- Play/Pause / Stutter: Anything that is not a good idea?
Trademarks and Licenses
Denon is a trademark of D&M Holdings Inc., registered in the U.S. and other countries.
Serato, Serato DJ, and the Serato logo are registered trademarks of Serato Audio Research.
Kensington and the K & Lock logo are registered trademarks of ACCO Brands.
All other product or company names are trademarks or registered trademarks of their respective owners.
Technical Specifications
Specifications are subject to change without notice.
| Frequency Response | 20 Hz - 20 kHz (±1.0 dB) | |
| Dynamic Range Digital-to-Analog Converter | >112 dB (A-weighted) | |
| Total | >105 dB (A-weighted) | |
| Signal-to-Noise Ratio | >88 dB, A-weighted | |
| Headroom | Aux Input | >17 dB |
| Mic Input | >20 dB | |
| Outputs | >20 dB | |
| THD+N | <0.01% (1 kHz at unity) | |
| Channel Separation | < -80 dB (1 kHz at unity) | |
| Analog Input | Microphone | -60 dBu (minimum), -40 dBu (unity) |
| Aux | +17 dBV (maximum), 0 dBV (unity) | |
| Analog Output | Master (XLR) | +24 dBu (maximum), +4 dBu (unity) |
| Master (RCA) | +19 dBu (maximum), 0 dBu (unity) | |
| Booth | +24 dBu (maximum), +4 dBu (unity) | |
| Headphone | >100 mW at 40 Ω | |
| Microphone Input Equivalent Input Noise | < -116 dBu (Rs = 150 Ω, DIN) | |
| Common Mode Rejection Ratio >75 dB | ||
| Microphone Effects | Talkover | -20 dB attenuation |
| 40 ms attack time | ||
| 250 ms hold time | ||
| 100 ms release time | ||
| Echo | 199 ms rate | |
| -6 dB feedback | ||
| -∞ to 0 dB range (-9 dB center) | ||
| EQ | ±15 dB high band (1 kHz cutoff) | |
| ±15 dB low band (1 kHz cutoff) | ||
| USB Audio / MIDI Interface | Port | USB 2.0 (full-speed), 12 Mbps |
| Sampling Rate | 44.1, 48 kHz (0 channels in, 4 channels out) | |
| Bit Depth | 24 bit | |
| USB MIDI I/O | MIDI 1.0 (1 channel in, 1 channel out) | |
| Operating Systems | Windows, Mac OS X | |
| Operation Conditions | Temperature | 41-95 °F, 5-35 °C |
| Humidity | 25-85% (non-condensing) | |
| Connections | 2 XLR outputs (master left/right, balanced) | |
| 2 RCA outputs (master left/right, unbalanced) | ||
| 2 1/4" (6.35 mm) outputs (booth left/right) | ||
| 1 1/4" (6.35 mm) stereo headphone output | ||
| 1 1/8" (3.5 mm) stereo headphone output | ||
| 2 RCA inputs (aux left/right, unbalanced) | ||
| 1 XLR+1/4" (6.35 mm) microphone input | ||
| 1 1/4" (6.35 mm) microphone input | ||
| 1 USB port | ||
| 1 power adapter input | ||
| Power Power Adapter | 5 V DC, 3 A, center-positive | |
| Input Voltage | 110-230 VAC, 50/60 Hz | |
| Consumption | 9.5 W | |
| Dimensions (width x depth x height) | 19.9" x 12.3" x 2.7" | |
| 505 mm x 312 mm x 69 mm | ||
| Weight | 8.95 lbs. | |
| 4.06 kg | ||
MIDI Commands
For all LEDs,Receive commands are identical to their Send commands.
Sending a value of 0 turns the LED off. Sending any other value (1-127) turns the LED on.
The Pad Mode button and 4 Hot Cue pads are bi-colored and can be set to blue, red, or purple by sending the corresponding "color value" (0-3) from the Value column.
| # | MC4000 Control | MIDI Command (Send) | |||||||||
| Command Number Shift Number Value | |||||||||||
| Channel(Deck 1 / Deck 2) | Event | Hex | Dec | Hex | Note | Dec | Hex | Note | Dec | ||
| 1 | Platter Touch | (1 / 2) | Note On Note Off | 0x9n0x8n | 6 | 0 | x 6 F | # | - | 2 | Note On: 127 |
| 2 | Vinyl Mode | 7 | 0x7 | G-2 | 16 | 0x10 | C#-2 | ||||
| 3 | Key Lock | 13 | 0xD | C#-1 | 14 | 0xE | D-1 | ||||
| 4 | Pitch Bend - | 12 | 0xC | C-1 | 32 | 0x20 | G#0 | ||||
| 5 | Pitch Bend + | 11 | 0xB | B-2 | 33 | 0x21 | A0 | ||||
| 6 | Sync | 2 | 0x2 | D-2 | 3 | 0x3 | D#-2 | ||||
| 7 | Cue (initial) | 1 | 0x1 | C#-2 | 5 | 0x5 | F-2 | ||||
| 8 | Play/Pause | 0 | 0x0 | C-2 | 4 | 0x4 | E-2 | ||||
| 9 | Cue (headphone) | 27 | 0x1B | D#0 | |||||||
| 10 | Auto | (5 / 6) | 50 | 0x32 | D2 | 63 | 0x3F | D#3 | |||
| 11 | x1/2 | 52 | 0x34 | E2 | 56 | 0x38 | G#2 | ||||
| 12 | x2 | 53 | 0x35 | F2 | 57 | 0x39 | A2 | ||||
| 13 | Reloop | 51 | 0x33 | D#2 | 62 | 0x3E | D3 | ||||
| 14 | Hot Cue Pad 1 | 20 | 0x14 | G#-1 | 28 | 0x1C | E0 | Color Values: 0 = Off 1 = Blue 2 = Red 3 = Purple | |||
| 15 | Hot Cue Pad 2 | 21 | 0x15 | A-1 29 0x1D F0 | |||||||
| 16 | Hot Cue Pad 3 | 22 | 0x16 | A#-1 | 30 | 0x1E | F#0 | ||||
| 17 | Hot Cue Pad 4 | 23 | 0x17 | B-1 | 31 | 0x1F | G0 | ||||
| 18 | FX 1 On | (9 / 10) | 0 | 0x0 | C-2 | 11 | 0xB | B-2 | Note On: 127 | ||
| 19 | FX 2 On | 1 | 0x1 | C#-2 | 12 | 0xC | C-1 | ||||
| 20 | FX 3 On | 2 | 0x2 | D-2 | 13 | 0xD | C#-1 | Note Off: 0 | |||
| 21 | Tap | 4 | 0x4 | E-2 | 10 | 0xA | A#-2 | ||||
| 22 | Beats | 65 | 0x41 | F3 | |||||||
| 23 | Pad Mode | (11 / 12) | 127 | 0x7F | G8 | Color Values: 0 = Off / 1 = Blue 2 = Red / 3 = Purple | |||||
| 24 | Shift | 0x1C E0 | 50 | 0x32 | D2 | Note On: 127 | |||||
| 25 | Split Cue 28 | ||||||||||
| 26 | Load 1 | 2 | 0x2 | D-2 | |||||||
| 27 | Library | 31 | 0x1F | G0 | |||||||
| 28 | Load 2 | 3 | 0x3 | D#-2 | |||||||
| 29 | Back | 7 | 0x7 | G-2 | 17 | 0x11 | F-1 | ||||
| 30 | Load Prep | 27 | 0x1B | D#0 | 16 | 0x10 | E-1 | ||||
| 31 | Sampler Pad 1 | 33 | 0x21 | A0 | 40 | 0x28 | E1 | ||||
| 32 | Sampler Pad 2 | 34 | 0x22 | A#0 | 41 | 0x29 | F1 | ||||
| 33 | Sampler Pad 3 | 35 | 0x23 | B0 | 42 | 0x2A | F#1 | ||||
| 34 | Sampler Pad 4 | 36 | 0x24 | C1 | 43 | 0x2B | G1 | ||||
Hex
| # | MC4000 Control | MIDI Command (Send) | ||||||||
| Command Number | Shift Number | Value | ||||||||
| Channel(Deck 1 / Deck 2) | Event | Hex | Dec | Hex | Dec | Hex | Dec | Hex | ||
| 35 | Jog Wheel (1 / 2) | CC | 0xBn | 6 | 0x6 | Reverse:127-64Forward:1-63Slow to fastRelative data | Reverse:0x7F-0x40Forward:0x01-0x3FSlow to fastRelative data | |||
| 36 | Beats Encoder (9 / 10) 3 0x3 | |||||||||
| 37 | Library Encoder | 16 | 0 | 0x0 | 1 | 0x1 | ||||
| 38 | FX Knob 1 | (9 / 10) | 0 0x0 | 11 | 0xB | 0-127 | 0x0-0x7F | |||
| 39 | FX Knob 2 | 1 0x1 | 12 | 0xC | ||||||
| 40 | FX Knob 3 | 2 0x2 | 13 | 0xD | ||||||
| 41 | Level Knob | (1 / 2) | 22 | 0x16 | ||||||
| 42 | Hi Knob | 23 | 0x17 | |||||||
| 43 | Mid Knob | 24 | 0x18 | |||||||
| 44 | Low Knob | 25 | 0x19 | |||||||
| 45 | Filter Knob | 26 0x1 A | ||||||||
| 46 | Channel Fader | 28 0x1C | ||||||||
| 47 | Sampler Knob | 16 | 26 0x1 A | |||||||
| 48 | Crossfader | 8 0x8 | ||||||||
| 49 | Monitor LevelKnob | 12 | 0xC | |||||||
| 50 | Monitor PanKnob | 13 | 0xD | |||||||
| 51 | Pitch Fader | (1 / 2) | 9(LSB) | 0x09(LSB) | 41(MSB) | 0x29(MSB) | ||||
| # | MC4000 Control | MIDI Command (Receive) | |||
| Channel | Event | Dec | Hex | ||
| 52 | LED Meters (both) | 16 | CC | 24 | 0x18 |
| 53 | LED Meters (left) | 16 | CC | 68 | 0x44 |
| 54 | LED Meters (right) | 16 | CC | 69 | 0x45 |
(All meter LEDs on)
| LED State | Meter Value | |
| 0 = Off / 1 = On | Dec | Hex |
| 1111111 | 109 -127 | 6D-7F |
| 1111110 | 91-108 | 5B-6C |
| 1111100 | 73-90 | 49-5A |
| 1111000 | 55-72 | 37-48 |
| 1110000 | 37-54 | 25-36 |
| 1100000 | 19-36 | 13-24 |
| 1000000 | 1-18 | 1-12 |
| 0000000 | 0 | 0 |
(All meter LEDs off)
| # | MC4000 Control | MIDI Command (Receive) | ||||
| Channel | Event | Dec | Hex | Value | ||
| 55 | All LEDs on | 1 | CC | 117 | 0x75 | 0 = Off 1-127 = On |
denondj.com

Brand : DENON
Model : MC4000
Category : DJ Equipment