Primaroma 1010 - Elliptical bike Solis - Free user manual and instructions
Find the device manual for free Primaroma 1010 Solis in PDF.
Download the instructions for your Elliptical bike in PDF format for free! Find your manual Primaroma 1010 - Solis and take your electronic device back in hand. On this page are published all the documents necessary for the use of your device. Primaroma 1010 by Solis.
USER MANUAL Primaroma 1010 Solis
Please read through this user manual thoroughly before using your Solis Primaroma espresso machine, so that you become familiar with your appliance and can use it safely. We thoroughly recommend that you keep these instructions and, if you pass the appliance on, that you also hand these instructions to the new owner. For your own safety, please observe the following safety measures when using elec trical appliances:
1. To avoid electric shock, neither the appliance itself nor the
power cord and power plug must come into contact with water or other liquids. Water can enter the housing and damage the appliance! Should the appliance resp. the power cord or the power plug come into contact with water, immediately pull the power plug from the socket using dry rubber gloves.
2. Do not operate or unplug the appliance with wet or moist
3. Before using the appliance, check that the voltage stated on
the type plate matches your mains voltage.
4. Do not leave the power cord hanging over table edges so that
it can be pulled. Make sure that it does not come into contact with hot surfaces, such as hotplates or a radiator, or that they come into contact with the appliance.
5. Keep the appliance away from hot gas, hot ovens and other
heat-emitting appliances or heat sources. Never use the appli- ance on a hot or wet surface. Never place the appliance near moisture, heat and naked flames. Keep the appliance away from moving parts or appliances.
6. Never carry the appliance by the power cord and do not place
anything on the power cord. Never pull on the power cord to disconnect the appliance from the power mains. Only pull on the plug.
7. We recommend that you do not use an extension cord with
this appliance. Do not place the appliance directly underneath a power socket.
8. Always ensure the appliance is turned off before plugging in or
unplugging the appliance from the power socket.
9. While the appliance is in operation, it must sit on a stable, level
and dry surface, like a table or a worktop. Do not place the appliance near the edge of a worktop or table. Do not use the appliance outdoors or in moving vehicles or boats.
10. Always switch off the appliance py pressing the ON / OFF button
(press the ON / OFF button for at least 3 seconds to switch off) and unplug it if the appliance is not in use or left unattended, and before cleaning. We recommend the use of a residual cur- rent device (RCD safety switch) to provide additional protection during the use of electrical appliances. It is advisable to use a safety switch with a rated residual operating current of 30 mA maximum. For professional advice consult an electrician.
11. Do not make any adjustments to the appliance, cord, plug or
12. Incorrect use may cause injury!
13. Never take hold of an appliance that has fallen into water. Al-
ways take the plug out of the power socket before removing the appliance from the water. Do not use the appliance again until you have had it's ability to function safely checked by Solis or a Solis approved service centre.
14. Never place the appliance where it could fall into water or may
come into contact with water (e.g. in a sink).
15. Never submerge the appliance, power cord or plug in water,
or bring it into contact with water.
16. Place the appliance so that it is never exposed to direct sunlight.
17. Never put sharp or pointed objects and tools into the appliance
openings. The appliance may become damaged – danger of electric shock!
18. Do not shake or relocate the appliance while it is in operation.
19. Only use the appliance as described in this manual. Only use
with the provided accessories or accessories recommended by Solis, incorrect accessories can lead to damage of the appli- ance, resp. to fire, electric shock or personal damage.7372 GB GB
20. Never start the appliance using a remote or timer.
21. This appliance is only for household use and is not suitable for
22. Remove and discard all packaging materials and potential stick-
ers or labels before using the appliance for the first time.
23. Check the appliance before each use and ensure that the ap-
pliance, power cord and plug are not damaged and no parts have come loose.
24. In order to avoid electric shock, do not use the appliance if the
power cord or plug are damaged or the appliance is otherwise faulty, dropped or damaged or if parts have come loose. Never attempt repairs yourself, except cleaning and descaling the appliance, but take your appliance to Solis or a Solis approved service centre in order to get it inspected or mechanically and electrically repaired, in order to avoid a hazard.
25. People with limited physical, sensorial or mental capabilities
as well as unknowing or inexperienced people (incl. children) must not use the espresso machine except when supervised or thoroughly instructed on how to use the appliance by a person responsible for their safety. Additionally, they must be aware of the dangers arising from the appliance and know how to oper- ate it safely. Cleaning and maintenance of the appliance must not be done by unsupervised children. Under no circumstances must the appliance be used by children under 8 years of age.
26. Always keep the appliance and power cord out of the reach
27. Children must be supervised, so that they do not play with the
28. Use only cold tap water in the water tank. Do not use any other
29. Never use the espresso machine without water in the water
brewing group before using the appliance.
31. Never touch the hot appliance parts like the steam wand, the
metal part of the portafilter or the filter insert during or shortly after use. Only touch the heat insulated handles, buttons or selectors.
32. Never remove the portafilter while the appliance is in the pro-
cess of brewing or steaming milk – the appliance is under pressure!
33. Do not leave the espresso machine unattended when in use.
This applies especially when children are nearby.
34. CAUTION: the appliance becomes very hot during use! Allow
the appliance to cool down before removing or attaching parts, moving, relocating or cleaning it.
35. Do not place anything other than cups on top of the shelf of
the appliance. Do not place any other object on the espresso machine!
36. Keep the appliance and accessories clean. Please refer to the
information given in the manual.
37. Unwind the power cord fully before plugging the plug into the
38. Oils or lubricants must not be used with this appliance.
39. The ambient temperature for use and storage should not come
below 0 °C.7574 GB GB I Steam and Espresso selector J Water tank lid K Cup shelf
CONTROL LIGHTS EXPLAINED
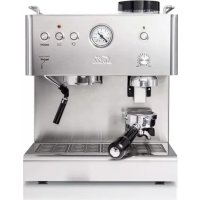
Upper (red) control light Middle (green) control light Lower (white) control light Operation status of machine off off off The machine is switched off resp. not connected to the power. lit up flashes slowly off Coffee mode. Heating up. Coffee or steam extraction not possible. lit up lit up off Coffee mode. Ready for coffee extraction. Steam extraction not possible. lit up off flashes slowly Steam mode. Heating up. Coffee or steam extraction not possible. lit up off lit up Steam mode. Ready for steam extraction. Coffee extraction not possible. lit up flashes quickly off Coffee mode. Cooling down after steam mode to prepare for coffee mode. Coffee or steam extraction not possible. The cooling down process can take a very long time. To speed it up, you can wait for approx. one minute and then insert the portafilter with the empty two portion insert. Now let hot water run through for approx. 20–30 seconds – like you would when making coffee – to cool the appli- ance down to coffee temperature (lower white control light is off and the middle green control light is lit up). ACCESSORIES – Filter inserts – either for one or for two cups – Measuring spoon with tamper
A ON / OFF button The red function light lights up after you have switched the machine on with this button. The green temperature control light flashes slowly while the ma- chine is heating up for coffee mode. If the temperature required for coffee extraction has been reached, the green control light in the middle lights up permanently. However, if the appliance is in steam mode, the white control light flashes slowly in the heating-up phase and lights up permanently if the steam temperature has been reached B Function button with green and white temperature control light Button not pushed in: Brewing function for espresso Button pushed in: Steam function C Brewing group with brewing head Allows easy portafilter insertion. D Aluminum portafilter E Removable drip tray and drip grid F Moveable steam wand with unscrewable steaming nozzle With this, you can easily steam milk or warm up beverages. G Heat insulated steam wand grip H Removable 1,5 liter water tank7776 GB GB RINSE THE APPLIANCE BEFORE THE FIRST AND EVERY USE To rinse the inner parts of the appliance, you should let the water of the filled water tank run through completely before using it for the first time. Generally, we recommend rinsing the appliance before every use for approx. 20 seconds to warm up all the appliance parts and stabilize the brewing process temperature – like that, the first cup of espresso will be a right and hot pleasure! In both cases, proceed as follows: – Place a filter insert (without ground coffee) in the portafilter, the bulge on the filter insert has to be placed exactly above the notch on the portafilter to make the filter insert glide into the portafilter completely. – Insert the portafilter into the brewing group: ' Hold the portafilter under the brewing head so that the handle is beneath the marking INSERT, to the left.
– Carefully remove the appliance from the packaging and remove all stickers, labels (except for the type plate) and packaging materials. – Remove all accessories from the appliance. – Remove the water tank. Clean the water tank, the lid and the filter inserts as well as the portafilter with warm water and some mild dish washing liquid. Then, rinse well and dry. – Also, wipe the casing of the espresso machine and the drip tray with the drip grid clean with a soft, damp cloth and dry everything. CAUTION: The appliance chassis, the power cord and the power plug must never be submerged in or come into contact with water or any other liquid! NOTE: The parts of the espresso machine and the accessories are not dish- washer safe. – Fill the water tank with cold tap water to the MAX marking. Put the lid back on. – Reinsert the water tank by hanging both hooks of the water tank into the two black suspension brackets on the appliance back side.7978 GB GB – Push the portafilter up, against the brewing head, and turn the handle counter clock wisely to the right until you feel some resistance and the handle is in the LOCK position. The handle will then roughly be in a 90 ° angle to the machine. – Place a cup on the drip tray under the portafilter outlets (before the first use, take a larger tank). – Check if the selector is set to the standby position in the center l. – Plug the power plug into a suitable wall power outlet. – Press the ON/OFF button, the appliance is switched on. The red function light lights up and the green control light flashes slowly. – Also check if the function button is not pressed in and is set to the brewing posi- tion . Once the machine reaches the operation temperature for coffee extrac- tion, the green temperature control light lights up constantly and the appliance is ready for use. – Now, turn the selector to the left to the cup position : the hot water will flow out of the portafilter. Before the first use, let the water of the filled water tank run through (if necessary, empty the tank placed on the drip tray multiple times!). When using the appli- ance again afterwards, it should be enough to let water run through for approx. 20 seconds to warm up the appliance parts. – Then, turn the selector back to the standby position in the center l, the water flow stops. – Turn the portafilter handle clock wisely to the left, towards INSERT. – Pull portafilter and filter insert downwards and out. CAUTION: Both parts are hot, do not scald yourself. – Once the red and green control light light up, your appliance is ready for making coffee. NOTE: When water is pumped through the appliance for the first time, air getting into the appliance might cause a slightly louder noise. After approx. 20 seconds the noise will go away.
NOTE: Check the water level in the water tank before every use. Change the water daily. Fill the water tank with fresh, cold tap water before every use. Do not use any distilled water, soda or other liquids. FILLING THE FILTER INSERT WITH GROUND COFFEE AND TAMPING – Choose the right filter insert: Use the smaller filter for 1 cup and the larger filter for 2 cups. If you want to make a big cup of coffee, please use – depending on the desired intensity – the filter insert for 2 cups and let more water run through. – Wipe the filter insert clean with a dry cloth. – Place the filter insert in the portafilter (watch out for bulge in filter insert and notch in portafilter!). – Fill the filter insert with ground coffee. Count 1–2 measuring spoons per cup. – Gently tap the portafilter against the worktop so that the ground coffee in the filter insert is spread out evenly. Use the tamper to compress the ground coffee. – After tamping, remove coffee leftovers from the portafilter edge so that it can be correctly attached to the brewing head.
INSERTING THE PORTAFILTER
– Attach the portafilter to the brewing group: Hold the portafilter under the brewing head so that the handle is located to the left, under the INSERT marking.8180 GB GB
The stainless steel steam wand with steaming nozzle turns fresh, cold milk into creamy, warm, steamed milk for making delicious cappuccino. NOTE: To make steamed milk, the portafilter with filter insert has to be in the brewing group! Proceed as follows: – First, make an espresso in a bigger cup, then turn the selector back to the standby position in the center l. – Push in the function button to set the appliance to the steam function . The green control light goes out and the white control light flashes slowly. Wait for the white control light to light up permanently, then the appliance is hot enough to produce steam. – During the heating-up phase, pour fresh, cold whole milk from the fridge into a tall, narrow milk jug (best made from stainless steel). Calculate for approx. 100 ml milk per cappuccino and take into account that the volume of cold milk will double once it is steamed. – Once the white temperature control light is lit up, lower the steam wand with the thermo-insulated rubber handle to position it over the holes in the drip tray. – Now, turn the selector to the right to the steam position . Let hot steam shoot from the steam wand into the drip tray for approx. 10 seconds to clean out the steam wand. – Then, turn the selector back to the standby position in the center l. – Swivel the steam wand up, using the heat insulated rubber grip. – Lower the steaming nozzle of the steam wand roughly 2 cm into the milk, then turn the selector to the right to the steam position : steam escapes. – Keep the steaming nozzle directly under the milks surface resp. move the milk jug up and down, slightly turning it, until nice, creamy, steamed milk has formed. – When the milk is steamed enough, turn the selector back to the standby position in the center l. Only then remove the milk jug. – Gently tap the milk jug against a worktop to let potential air bubbles escape. Gently sway the jug to even out the consistency. – Pour the steamed milk directly onto the espresso. – Lower the steam wand back down over the holes in the drip tray with the heat insulated rubber grip, return the selector to the steam position and let some steam escape into the drip tray to flush milk remains out of the steam wand. Then, wipe the steam wand clean with a damp cloth. – Push the portafilter upwards against the brewing head and turn the handle coun- ter clock wisely to the right until you feel resistance and the handle is set to LOCK. The handle will then roughly be in a 90 ° angle to the machine. – Place one or two empty cups on the drip tray (best pre-warmed by the previous rinse) under the portafilter outlets. ESPRESSO MAKING – The selector has to be set to the standby position in the center l. – Plug the power plug into the outlet, switch the appliance on with the ON / OFF button. The red function light lights up. The green control light flashes slowly during the heating-up phase. – The function button must not be pressed in to set the appliance to brewing mode
– Once the green temperature control light illuminates constantly, turn the selector to the left to the cup position : The espresso will flow from the portafilter. – Once the desired amount of espresso is in the cup (resp. once the espresso flowing out assumes a light color) return the selector to the standby position in the center l. NOTE: It is normal for the green temperature control light to flash slowly during the brewing process. CAUTION: Never leave the espresso machine unattended while making espresso!8382 GB GB
HEATING WATER OR BEVERAGES
WITH THE STEAM FUNCTION
You can use the steam wand to heat up beverages or water and make e.g. tea or hot chocolate. Proceed as follows: – Fill the water tank with fresh water. The MAX marking should not be exceeded. – Unscrew the steaming nozzle of the steam wand by hand. – Plug the power plug into the outlet. – Press the ON / OFF button to switch on the appliance, the red function light will illuminate. – Press the function button inwards into the steam position and wait for the white temperature control light to light up permanently. – Dip the steam wand (without steaming nozzle) into the liquid you wish to heat up, then turn the selector to the right to the steam position
– Once the beverage has reached the desired temperature, return the selector to the standby position in the center l. – Press the function button again as well, so that it is no longer pushed in and back in brewing function. Switch the appliance off with the ON / OFF button by pressing this button for at least 3 seconds. – Pull the power plug.
ENERGY SAVING FUNCTION: AUTOMATIC SHUTDOWN
To save energy, the Primaroma espresso machine will automatically shut down when it is not used or operated for approx. 10 minutes or longer. To reactivate the appliance, simply press the ON / OFF button. – Press the function button again so that it is no longer pushed in and is reset to brewing function. The green control light flashes quickly. NOTE: After you have steamed the milk, you should let the espresso machine cool down (the white control light is off and the green control light lights up permanently) before making the next espresso, otherwise the espresso might have a slightly “burnt” taste.
AFTER MAKING ESPRESSO / CAPPUCCINO – After making espresso / cappuccino, switch the appliance off with the ON/OFF button. All function lights go out. Please note that the ON / OFF button has to be pressed for at least 3 seconds to switch the appliance off. – After that, pull the power plug from the socket. – Return the portafilter handle to the left to INSERT and carefully pull the portafilter out of the brewing head. CAUTION: Portafilter, filter insert and especially the coffee dregs mixed with hot water are very hot! Be very careful during removal, you could scald yourself! – To knock out the coffee dregs, tilt up the filter insert bracket – like this, the filter insert will not fall out of the portafilter! Then, turn the portafilter 180 ° degrees and knock the coffee dregs out of the filter insert. Please dispose of the coffee dregs in the household waste and do not pour them down the drain, as this might clog up the wastewater pipes. – Carefully rinse the filter insert and the portafilter under running water. Dry both parts with a paper towel.8584 GB GB
CLEANING AND MAINTENANCE
CLEANING THE STEAM WAND
The steam wand should be cleaned after every time milk is steamed. Proceed as follows:
1. The appliance has to be plugged in and switched on with the ON / OFF button,
the function button has to be pushed in and set to the steam position . Wait for the white control light to light up permanently.
2. Point the steam wand into the drip tray and turn the selector to the right to the
steam position . Let steam escape for a few seconds: by doing so, you remove potential milk remains in the steam wand.
3. Return the selector to the standby position in the center l. Press the function
button so that it is no longer pushed in. Switch the machine off with the ON / OFF button and let the appliance cool down. Press the ON / OFF button for at least 3 seconds to switch the appliance off.
4. Wipe the outside of the steam wand clean with a damp cloth.
5. Should the steam wand be clogged up, stick a needle into the opening of the
6. Should the steam wand still be clogged up, you can unscrew the nozzle of the
7. First, place the nozzle in a glass with hot water, then try to remove the blocking
with a needle again. Screw the nozzle back on to the steam wand. CLEANING THE FILTER INSERTS,
THE PORTAFILTER AND THE BREWING GROUP
Regularly let hot water run through the brewing group with the portafilter inserted, but empty. This will flush potential coffee powder remains from the brewing group. Wash the portafilter and the filter inserts separately and by hand in warm dishwater and rinse everything under running water. Dry well afterwards. We recommend periodically cleaning the portafilter and the filter inserts with SOLITABS to remove coffee grease and other residues (approx. every month, at least after 250 cups). For the exact process, please refer to the instructions included with SOLITABS. CLEANING THE CASING AND THE CUP SHELF Before the casing is cleaned, the appliance should be switched off and un- plugged. Clean the casing and the cup shelf with a soft, damp cloth, then dry it with a dry cloth. In general, do not use any abrasive or aggressive cleaning agents, rough sponges or cloths, as they might scratch the surface. CLEANING THE DRIP TRAY WITH DRIP GRID Before cleaning the drip tray, the appliance should be switched off and un- plugged. Remove, empty and clean the drip tray with drip grid regularly and every time it is full. Remove the drip grid and pull the drip tray out to the front. Hand wash the drip tray and the drip grid with warm dish water. Do not use any aggressive cleaning agents or scouring sponges. Rinse the tray and the grid with clear water and carefully dry both parts. CAUTION: Drip tray and drip grid are not dishwasher safe. Reinsert the drip tray and place the grid back on the drip tray.
STORING THE SOLIS PRIMAROMA
Turn the selector to the standby position in the center l and switch the appliance off with the ON / OFF button (press for at least 3 seconds). Pull the power plug from the socket. Store away all accessory parts. Store the cooled down, cleaned and dry machine in an upright position, ideally in the original packaging. Do not place any items on the appliance.8786 GB GB
14. To rinse out the machine as well and to remove all descaler residues, please
repeat steps 5 to 10 until only a small amount of water remains in the water tank. The soaking time of 15 minutes as mentioned in step 11 does not have to be kept.
15. Remove the water tank again, empty it and refill it with fresh tap water.
16. Remove the portafilter from the brewing group and rinse it under running water,
after that, dry it. NOTE: Please wipe potential splashes of descaling solution on the appliance casing away immediately, as the agent might damage the surface.
WARNING: Never submerge power cord, power plug or the appliance itself
in water or any other liquid. During descaling, never remove the water tank or allow it to empty completely.
DESCALING Prolonged use or hard water can cause limestone deposits to form in and on many functioning parts of your machine and reduce operating performance – which, in turn, reduces the quality of the espresso. This is why Solis recommends regularly (depending on water hardness but at least once a month) descaling your Primaroma with a mixture of SOLIPOL
special and water. Please use only SOLIPOL
special (Art.-No. 703.02) for descaling the ma- chine. Damages caused by the use of improper descaling agent are not covered by warranty. Proceed as follows:
1. Insert the portafilter (without ground coffee) into the brewing head. Pour a
special and water in a ratio of 1:1 into the water tank and fill it to the MAX marking.
2. Connect the power plug to the socket.
3. Press the ON / OFF button so that the red function light illuminates and the ap-
pliance is switched on.
4. Place a large tank under the brewing head resp. the portafilter and an empty
milk jug under the steam wand.
5. The function button should not be pushed in but be in the brewing position
instead. The selector is set to the standby position in the center l.
6. Wait for the green temperature control light to light up permanently. Turn the
selector to the left to the cup position and let approx. 2 cups of water run through.
and wait for the white temperature control light to light up permanently.
9. Then, turn the selector to the right to the steam position
and let steam escape from the steam wand into the prepared, empty milk jug (or directly into the drip tray) for approx. 2 minutes.
11. Press the ON / OFF button for at least 3 seconds to switch the appliance off. Let
the descaling solution sit for 15 minutes.
12. Switch the appliance back on after 15 minutes and repeat steps 5 to 11 at least
3 times until the descaling solution is almost used up.
13. When the descaling solution is almost used up, remove the water tank and
carefully rinse it with fresh water to flush out all the descaler residues, then refill it with fresh tap water.8988 GB GB Problem Possible cause Solution The steam fails to steam the milk. The white control light has not lit up.
The milk jug is too big or the jug shape is unsuitable. You have used skimmed milk. Only when the appliance has reached the right operation temperature for the steam function it can generate steam. Therefore, always wait for the white control light to light up. Always use a tall and narrow tank, best made from stainless steel. Use unskimmed or semi-skimmed milk. Should none of the above-stated reasons apply, please refer to Solis or an authorised Solis service center.
TROUBLESHOOTING Problem Possible cause Solution Coffee doesn’t run through. Machine is not switched on or power plug is not plugged in. Water tank is empty. Coffee is ground too finely. Too much coffee in filter insert. Ground coffee is tamped too strongly. Filter insert is clogged up. The appliance is set to steam extraction (white control light flashes or lights up). Make sure that the power plug is plugged in, the ON/OFF button has been pressed and the red and green control light are lit up. Fill water tank. Ensure appropriate degree of grinding. Ensure appropriate amount. Tamp ground coffee less strongly. Clean the filters. Switch the appliance to coffee extrac- tion and wait for the green control light to light up permanently (please refer to the table on page 75). Coffee runs through too quickly. Coffee is ground too coarsely. Too little coffee in filter insert. Ground coffee is not tamped strong enough. Ensure appropriate degree of grinding. Ensure appropriate amount. Tamp ground coffee more strongly. Coffee is cold. Cups not pre-warmed. Milk not hot enough (for Cappuccino or Caffè Latte). Pre-warm cups with warm water. The temperature is right when the bot- tom of the milk jug is too hot to touch. Water is pooled under the espresso machine. The drip tray is filled with water. The espresso machine is faulty. Empty and clean drip tray. Contact Solis service center. The espresso tastes of descaling solution or sour. No rinsing process was performed after descaling. The ground coffee was stored in a warm, humid room for extended periods of time and is spoiled. Rinse the espresso machine multiple times as described in “Before first use”. Always use freshly ground coffee and store the unopened packs in a cool, dry room. After opening, reseal the pack as airtighly as possible and best store in the fridge.9190 GB GB
The following accessories, supplies and coffee variants are available for your Solis Primaroma espresso machine: Art. no. 960.94 SOLIS Scala Plus coffee grinder Art. no. 978.40 SOLIS coffee grinder knock-out drawer Art. no. 703.02 SOLIPOL
special descaling agent (1’000 ml) Art. no. 993.02 SOLITABS cleaning tablets (10 pcs.) Art. no. 992.04 SOLIS Intense Espresso coffee beans (500 g) Art. no. 992.60 SOLIS Smooth Crema coffee beans (500 g) Accessories and supplies for your Solis Primaroma espresso machine are available from specialist retailers or from Solis. You can find the contact addresses at the end of this manual.
EU 2011/65/EU Information for correct disposal of the product in accordance with the Euro- pean Directive EU 2011/65/EU. At the end of its working life this equipment must not be disposed of as an house- hold waste. It must be taken to special local community waste collection centres or to a dealer providing this service. Disposing of electrical and electronic equipment separately avoids possible negative effects on the environment and human health deriving from an inappropriate disposal and enables its components to be recov- ered and recycled to obtain significant savings in energy and resources. In order to underline the duty to dispose of this equipment separately, the product is marked with a crossed-out dustbin. Solis of Switzerland Ltd reserves the right to carry out technical and visual changes and modifications to improve the product at any time. SOLIS HELPLINE This item stands out due to its long-life cycle and reliability. Despite this though, if a malfunction ever occurs, simply give us a call. Often a breakdown can be easily and quickly remedied with the right tip or technique without having to straight away send off the device for repair. We will give you all the advice and practical support you require. The contact addresses can be found at the end of this manual. Keep the original packaging in a safe place so that you may use it in the event that transportation or shipping of the product becomes necessary. EU 2012/19/EU EU 2012/19/EU.9392 NL NL
WATER OF DRANKEN MET
Solis customer service Please contact us in advance of sending in products for return or repair. We will gladly give you the respective address. Alternatively, you can simply visit www.solis.com.