PROMIX230DSP - DJ Equipment HQ - Free user manual and instructions
Find the device manual for free PROMIX230DSP HQ in PDF.



User questions about PROMIX230DSP HQ
0 question about this device. Answer the ones you know or ask your own.
Ask a new question about this device
Download the instructions for your DJ Equipment in PDF format for free! Find your manual PROMIX230DSP - HQ and take your electronic device back in hand. On this page are published all the documents necessary for the use of your device. PROMIX230DSP by HQ.
USER MANUAL PROMIX230DSP HQ
natural_image
Close-up of a printed circuit board with various electronic components and traces (no visible text or symbols)USER MANUAL
GEBRUIKERSHANDLEIDING
NOTICE D'EMPLOI
MANUAL DEL USUARIO
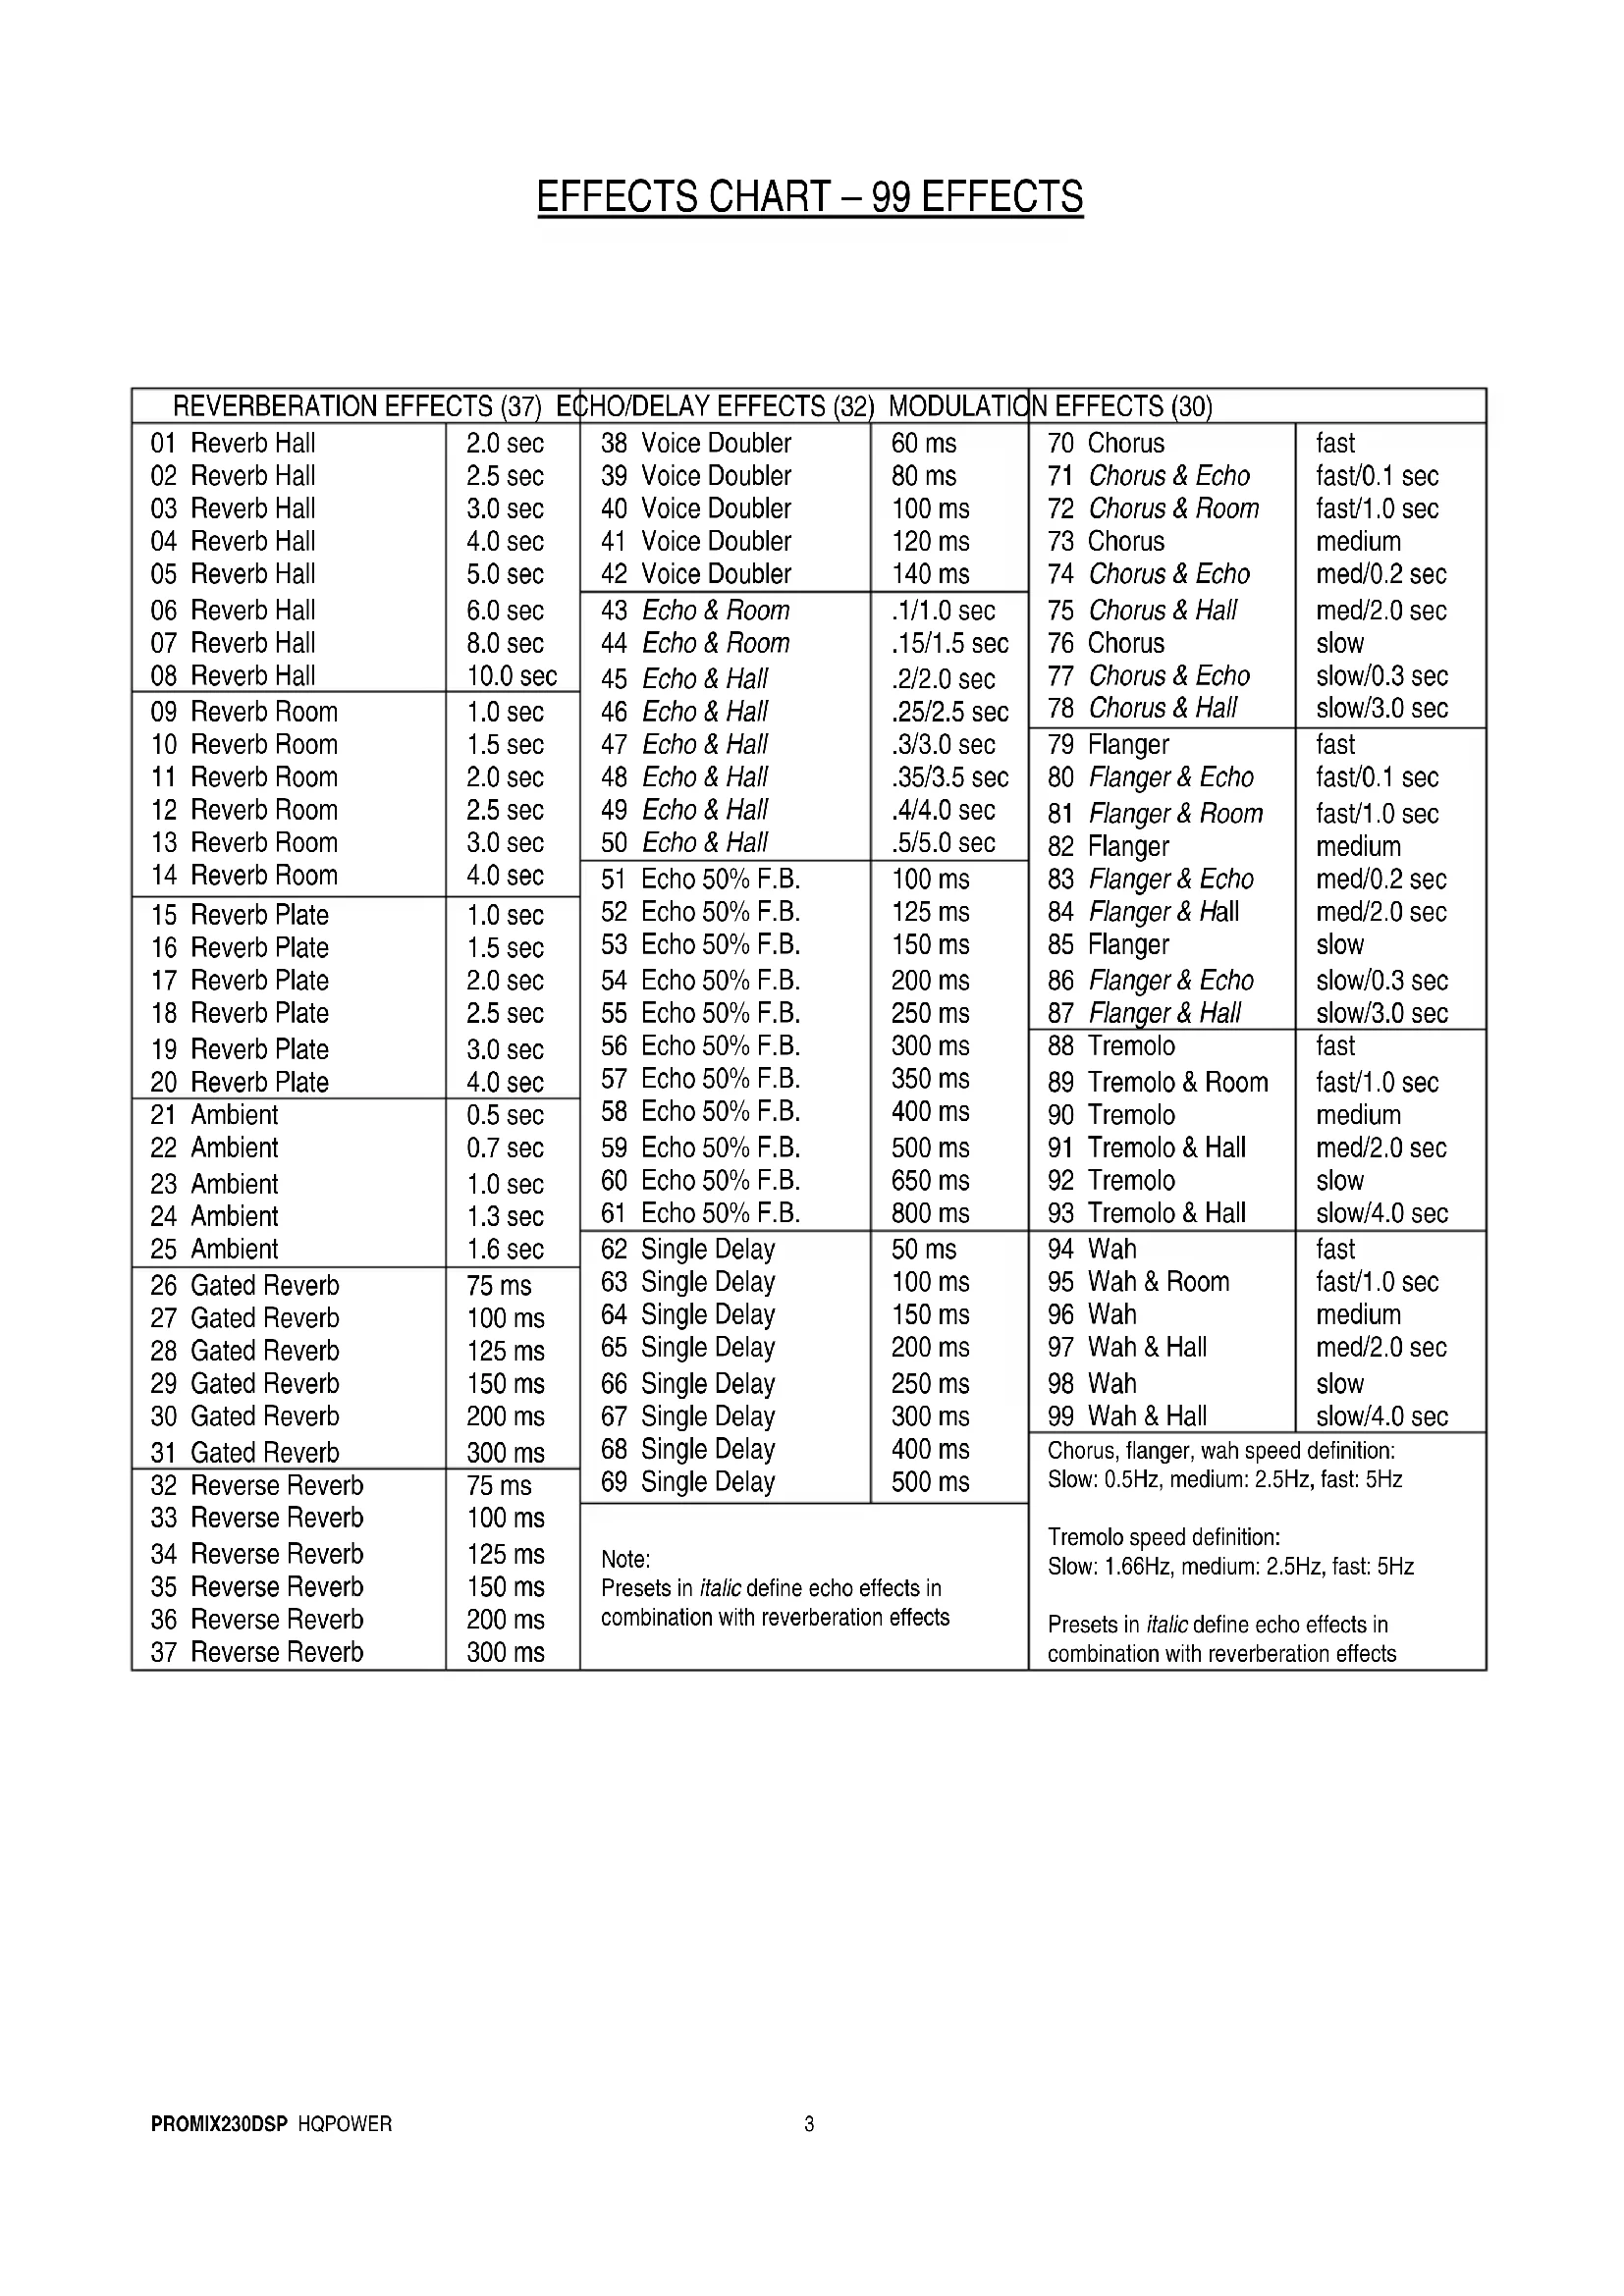
| REVERBERATION EFFECTS (37) ECHO/DELAY EFFECTS (32) MODULATION EFFECTS (30) | |||||
| 01 Reverb Hall | 2.0 sec | 38 Voice Doubler | 60 ms | 70 Chorus | fast |
| 02 Reverb Hall | 2.5 sec | 39 Voice Doubler | 80 ms | 71 Chorus & Echo | fast/0.1 sec |
| 03 Reverb Hall | 3.0 sec | 40 Voice Doubler | 100 ms | 72 Chorus & Room | fast/1.0 sec |
| 04 Reverb Hall | 4.0 sec | 41 Voice Doubler | 120 ms | 73 Chorus | medium |
| 05 Reverb Hall | 5.0 sec | 42 Voice Doubler | 140 ms | 74 Chorus & Echo | med/0.2 sec |
| 06 Reverb Hall | 6.0 sec | 43 Echo & Room | .1/1.0 sec | 75 Chorus & Hall | med/2.0 sec |
| 07 Reverb Hall | 8.0 sec | 44 Echo & Room | .15/1.5 sec | 76 Chorus | slow |
| 08 Reverb Hall | 10.0 sec | 45 Echo & Hall | .2/2.0 sec | 77 Chorus & Echo | slow/0.3 sec |
| 46 Echo & Hall | .25/2.5 sec | 78 Chorus & Hall | slow/3.0 sec | ||
| 09 Reverb Room | 1.0 sec | 47 Echo & Hall | .3/3.0 sec | 79 Flanger | fast |
| 10 Reverb Room | 1.5 sec | 48 Echo & Hall | .35/3.5 sec | 80 Flanger & Echo | fast/0.1 sec |
| 11 Reverb Room | 2.0 sec | 49 Echo & Hall | .4/4.0 sec | 81 Flanger & Room | fast/1.0 sec |
| 12 Reverb Room | 2.5 sec | 50 Echo & Hall | .5/5.0 sec | 82 Flanger | medium |
| 13 Reverb Room | 3.0 sec | 83 Flanger & Echo | med/0.2 sec | ||
| 14 Reverb Room | 4.0 sec | 51 Echo 50% F.B. | 100 ms | 84 Flanger & Hall | med/2.0 sec |
| 52 Echo 50% F.B. | 125 ms | 85 Flanger | slow | ||
| 15 Reverb Plate | 1.0 sec | 53 Echo 50% F.B. | 150 ms | 86 Flanger & Echo | slow/0.3 sec |
| 16 Reverb Plate | 1.5 sec | 54 Echo 50% F.B. | 200 ms | 87 Flanger & Hall | slow/3.0 sec |
| 17 Reverb Plate | 2.0 sec | 55 Echo 50% F.B. | 250 ms | ||
| 18 Reverb Plate | 2.5 sec | 56 Echo 50% F.B. | 300 ms | 88 Tremolo | fast |
| 19 Reverb Plate | 3.0 sec | 57 Echo 50% F.B. | 350 ms | 89 Tremolo & Room | fast/1.0 sec |
| 20 Reverb Plate | 4.0 sec | 58 Echo 50% F.B. | 400 ms | 90 Tremolo | medium |
| 21 Ambient | 0.5 sec | 59 Echo 50% F.B. | 500 ms | 91 Tremolo & Hall | med/2.0 sec |
| 22 Ambient | 0.7 sec | 60 Echo 50% F.B. | 650 ms | 92 Tremolo | slow |
| 23 Ambient | 1.0 sec | 61 Echo 50% F.B. | 800 ms | 93 Tremolo & Hall | slow/4.0 sec |
| 24 Ambient | 1.3 sec | ||||
| 25 Ambient | 1.6 sec | 62 Single Delay | 50 ms | 94 Wah | fast |
| 63 Single Delay | 100 ms | 95 Wah & Room | fast/1.0 sec | ||
| 26 Gated Reverb | 75 ms | 64 Single Delay | 150 ms | 96 Wah | medium |
| 27 Gated Reverb | 100 ms | 65 Single Delay | 200 ms | 97 Wah & Hall | med/2.0 sec |
| 28 Gated Reverb | 125 ms | 66 Single Delay | 250 ms | 98 Wah | slow |
| 29 Gated Reverb | 150 ms | 67 Single Delay | 300 ms | 99 Wah & Hall | slow/4.0 sec |
| 30 Gated Reverb | 200 ms | 68 Single Delay | 400 ms | ||
| 31 Gated Reverb | 300 ms | 69 Single Delay | 500 ms | Chorus, flanger, wah speed definition:Slow: 0.5Hz, medium: 2.5Hz, fast: 5Hz | |
| Note: Presets in italic define echo effects in combination with reverberation effects | Tremolo speed definition:Slow: 1.66Hz, medium: 2.5Hz, fast: 5Hz | ||||
| 32 Reverse Reverb | 75 ms | ||||
| 33 Reverse Reverb | 100 ms | ||||
| 34 Reverse Reverb | 125 ms | ||||
| 35 Reverse Reverb | 150 ms | ||||
| 36 Reverse Reverb | 200 ms | ||||
| 37 Reverse Reverb | 300 ms | ||||
PROMIX230DSP
PROFESSIONAL DJ MIXER - 2 CHANNELS - DSP EFFECTS
1. Introduction
To all residents of the European Union
Important environmental information about this product
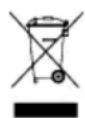
This symbol on the device or the package indicates that disposal of the device after its lifecycle could harm the environment. Do not dispose of the unit (or batteries) as unsorted municipal waste; it should be taken to a specialized company for recycling. This device should be returned to your distributor or to a local recycling service. Respect the local environmental rules.
If in doubt, contact your local waste disposal authorities.
Thank you for choosing HQPOWER! Please read the manual thoroughly before bringing this device into service. If the device was damaged in transit, don't install or use it and contact your dealer.
2. Features
• 1 microphone, 2 phono and 4 line/CD inputs
- DJ mic 14 " and XLR input
- talkover switch
- gain control for each channel
• bass and treble controls on DJ mic channel
- bass, middle and treble controls on channel 1 and 2 with -26dB cut
- separate stereo kill switch for low, mid and high frequencies
- cue section with switch, level and cue/pgm pan controls
• 20-bit digital multi-effect processor (DSP) with 99 programs, on switch, source assign, effect return level
• 2-line LCD (16 characters) with all 99 preset names and audio input level monitor
- replaceable crossfader with reverse control
• BPM display and beat offset indicators
- punch-in control
- unbalanced master output with output level controls
• headphone output with level control
• LED VU-meter for master output
3. Safety Instructions
- Damage caused by disregard of certain guidelines in this manual is not covered by the warranty and the dealer will not accept responsibility for any ensuing defects or problems.
- Do not install this device near heat sources.
- Do not switch the device on immediately after it has been exposed to changes in temperature. Protect the device against damage by leaving it switched off until it has reached room temperature.
- Make sure that the available voltage does not exceed the voltage stated in the specifications of this manual.
- Do not crimp the power cord and protect it against damage. Have an authorised dealer replace it if necessary.
- Disconnect the device from the mains to clean it or when it is not in use. Handle the power cord by the plug only.
- Do not let the power cord come in contact with other cables.
- Place all faders and volume controls in their minimum position ("0") before activating the device.
- Place the power switch in the off position before connecting to the mains.
- Switch the amplifier off first and switch on last.
- Keep the device away from splashing and dripping liquids. Never put objects filled with liquid on top of the device.
- Note that damage caused by user modifications to the device is not covered by the warranty.
- Keep the device away from children and unauthorised users.
4. Controls (see fig. on page 2)
1. Power Switch
Press to switch the mixer on or off. Make sure to switch on the mixer before switching on the amplification system.
2. Power Indicator
This LED burns when the mixer is switched on.
3. Output Level
This knob controls the overall level leaving the mixer at the master outputs.
4. Headphone Mix
Move to the left to route the cue signal to the headphones and monitor display. Move to the right to send the output signal to the headphones and monitor. Any position between these extremes is a variable mix of the cued input signal and the mixer output.
5. Headphones Socket (standard 14 " phone plug)
This is a stereo front-mounted phone jack (L channel = tip, R channel = ring, ground = sleeve, min. load impedance = 32Ω, output level = 50mW).
6. Headphones Level
Set the desired level of the headphones.
7. Punch Button
Press to create effects by transposing the program from one side of the crossfader directly onto the other side.
8. Input Selector
Each input channel has three stereo input options. This switch lets you select which of the inputs plugged into your mixer you wish to use. Both channels have 1 phono input, 1 CD input and 1 line input.
9. Gain Control
Each input channel has a gain control offering a < - 80dB \~ + 10dB gain range to allow compensation for differing input levels.
The 3-band EQ not only offers an ample 12dB boost but each EQ band can be attenuated by at least 26dB. This provides the ability to cut certain frequencies such as bass and treble.
10. EQ Control HI
Cut and boost control over high frequencies.
11. EQ Control MID
Cut and boost control over mid frequencies.
12. EQ Control LO
Cut and boost control over low frequencies.
13. HI Kill Button
Instantly removes the high frequencies from the input signal, regardless of the HI EQ control setting.
14. MID Kill Button
Instantly removes the mid frequencies from the input signal, regardless of the MID EQ control setting.
15. LO Kill Button
Instantly removes the low frequencies from the input signal, regardless of the LO EQ control setting.
16. Cue Selector
This control selects the input signal on the respective channel and routes it to the cue channel on the headphones and monitor.
17. Input Fader
This is a 45mm fader for controlling the mix level of the input to the main output.
18. Crossfader
This is a fast-action, dipless crossfader between the input channels. The dipless action means that the signal only changes in level after the halfway point.
19. Crossfade (X) Reverse
Selecting this switch reverses the operation of the crossfade.
ABS (auto beat sensor) BPM counters: Each channel has a 3-digit display that gives a BPM read-out of the music content on that channel to an accuracy of +/- 1 beat. The ABS will update approximately every 2.5 seconds with each change of BPM. This facility is intended as an aid to beat matching, i.e. by using the pitch control of the input source(s) you can match the BPM of one source to another. To achieve this most effectively, tracks containing a strong, constant beat should be used.
Tracks that do not contain clear and constant beats will not be accurately tracked by the ABS and will therefore produce erratic readings.
- BPM Display Channel 1
- BPM Display Channel 2
- BPM Offset Indicator
This is an additional feature to the BPM display that allows you to visually track the difference in BPM between the two music sources. The 7-LED display will illuminate a single LED at a time and favour towards the channel with the faster BPM, e.g. if channel 1 is faster the lit LED will be towards the left and towards the right for channel 2. When the BPMs are matched the blue LED in the centre of the display will illuminate. For this feature to function, the difference between the two sources must be 10 BPM or less. If the difference is greater, the LEDs will not light.
- Microphone Input
An XLR and 1/4" jack combination is mounted on the front face of the mixer offering a balanced or unbalanced connection.
- Microphone Gain
This control changes the level of the microphone. It will accommodate most microphones of both low and high impedances up to 600Ω (range < -30dB \~ + 52dB).
- Microphone EQ Control HI
Cut and boost control over high frequencies of the microphone input.
- Microphone EQ Control LO
Cut and boost control over low frequencies of the microphone input. Excessive bass can lead to amplifier overload on the mixer output. If distortion is heard, reduce the gain control to compensate.
- Microphone Function Switch
This switch offers the facility to attenuate the main music program automatically when the microphone input is active.
OFF: this switches the microphone signal off.
ON: this places the microphone on air.
O'RIDE: when selected, the live music program will be attenuated by 12dB when the microphone is used.
- Cue/Output Display
A 10-segment LED ladder with PPM characteristics and peak hold facility on -9dB \~ +8dB relative. Indication range is -22 \~ +8dB.
Digital Signal Processor
- LCD
2 lines and 16 characters LCD interface which indicates all 99 preset names plus an audio input level meter. The upper display line is acting as an analogue bargraph level meter. The indicated audio level is independent of the selected preset. If the effects switch is switch off, the bargraph level meter indication will be replaced by [EFFECT MUTED]. The lower display line indicates the selected preset with number and the associated name (see table on page 3).
- Assign
This selector lets you determine which input signals are routed to the DSP processor.
- Effect On Switch
Use this switch to run the effect on or off.
- Up/Down
These keys allow you to select the different programs. A continuous pressed key will increase the preset number at scrolling speed.
- Return Level Control
This control is used to determine the volume of the effects signal.
- Phono Inputs
Stereo phono inputs (input impedance = 47k Ω, source impedance = typical magnetic cartridge, input sensitivity = 5.5mV RMS (-42dBu) max.).
- CD Inputs
Input impedance = typically 10k Ω, source impedance = 2k Ω max., nominal sensitivity = 775mV RMS (0dBu).
- Line Inputs
Input impedance = typically 10k Ω, source impedance = 2k Ω max., nominal sensitivity = 775mV RMS (0dBu).
- Unbalanced Master Output (High)
Stereo output program is provided by standard unbalanced phono sockets. Level = +6dBu (1.55V RMS), output impedance = <50Ω, load impedance = 5k Ω max.
38. Unbalanced Master Output (Low)
Output is provided by standard unbalanced phono sockets. Level = 0dBu (775mV RMS), output impedance = < 50Ω, load impedance = 5k Ω max.
39. AC Power Socket
A standard IEC socket is provided to connect the mixer via the supplied lead to the local AC power supply. The power consumption of this mixer is 15V.
WARNING: THIS MIXER MUST BE EARTHED FOR SAFETY AND GOOD GROUNDED PRACTICES IN MIXING
In the event of ground-loop problems in the audio system, DO NOT disconnect the AC supply earth to any equipment before consulting the equipment instruction manual. Most power amplifiers have audio ground lift switches or are designed specifically to avoid ground-loop problems connected to earthed mixers.
Ensure the mixer has a clean AC supply from the mains socket that is not used for other equipment that would lead to interference such as lights, refrigerators, etc.
The IEC power socket has an internal fuse holder that takes a 20mm fuse. Always replace a blown fuse with the same type as specified on the rear of the mixer. Always disconnect the AC power cord before changing the fuse.
40. Earth Stud
This is an earth point for auxiliary equipment, e.g. a turntable.
5. Technical Specifications
| Parameter Mic Phono CD/Line | |||
| Sensitivity - 52dBu (2mV) - 42dBu (5.5mV) - 8dBu (300mV) | |||
| Input Impedance 2k 47k 50k | |||
| S/N Ratio >65dB >75dB | 64dB | ||
| Frequency Response | 20Hz ~ 26kHz | RIAA | 20Hz ~ 26kHz |
| THD | < 0.05% | < 0.005% | |
| Microphone Equalisation | |||
| HI = ±12dB @ 6kHz | |||
| LO = ±12dB @ 80Hz | |||
| Microphone | |||
| Override Depth | -12dB on music channels | ||
| Music Channel Equalisation | |||
| HI = ±12dB-26dB @ >10kHz | |||
| MID = ±12dB @ 1kHz-26dB @ 1kHz | |||
| LO = ±12dB-26dB @ < 100Hz | |||
| Headphones | |||
| Load | 32Ω min. | ||
| Power | 125mW (2.0V RMS) @ 32Ω | ||
| Output Level (Unbalanced) | |||
| Low | 0dBu (0.775mV RMS) | ||
| High | +6dBu (1.55V RMS) | ||
| Max. Output (w/out clip) | +16dBu (4.88V RMS) | ||
| Headphones | |||
| Load | 32Ω min. | ||
| Power | 125mW (2.0V RMS) @ 32Ω | ||
| Dimensions | 254 x 120 x 341mm | ||
| Weight | 4.2kg | ||
| Power Supply | 230VAC/50Hz | ||
Use this device with original accessories only. Velleman nv cannot be held responsible in the event of damage or injury resulted from (incorrect) use of this device.
For more info concerning this product, please visit our website www.hqpower.com.
The information in this manual is subject to change without prior notice.