
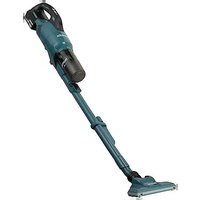
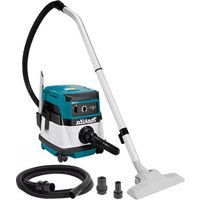
DVC864LZX - Cordless vacuum MAKITA - Free user manual and instructions
Find the device manual for free DVC864LZX MAKITA in PDF.

| Product Type | Cordless Vacuum Cleaner |
| Brand | Makita |
| Model | DVC864LZX |
| Dimensions (L x W x H) | 366 mm x 334 mm x 368 mm |
| Net weight (with battery) | 7.7 - 8.4 kg |
| Power supply | 36 V DC, lithium-ion battery (compatible with BL1815N, BL1820, BL1820B, BL1830, BL1830B, BL1840, BL1840B, BL1850, BL1850B, BL1860B) |
| Tank capacity | 8 L |
| Airflow rate | 2.1 m³/min (with 38 mm x 2.5 m hose and BL1850B battery) |
| Max. suction pressure | 98 hPa |
| Standard filter type | HEPA powder filter (for dry dust), pre-filter, damper |
| Noise level | 70 dB(A) or less (may exceed 80 dB(A) during operation) |
| Vibration | 2.5 m/s² or less (uncertainty K=1.5 m/s²) |
| Main features | Wireless activation (Bluetooth 4.1), adjustable suction power, wheels with locking brake, retractable transport handle, compatibility with paper bag and polyethylene bag, integrated tool box |
| Intended use | Collection of dry dust, commercial use (hotels, schools, hospitals, factories, etc.) |
| Safety | Protection against overload, overheating, and total battery discharge; automatic shut-off; safety instructions compliant with standards |
| Maintenance and cleaning | Regular cleaning of the HEPA filter and pre-filter (shake or wash with water, dry in the shade); do not use chemicals |
| Spare parts and repairability | Use only genuine Makita parts; repair by an authorized Makita service center |
| Included accessories | HEPA powder filter, pre-filter, damper, hose (diameter 38 mm x 2.5 m), flat nozzle, round brush, tool box |
| Optional accessories | Additional hoses, sleeves, bent tube, paper bag, polyethylene bag, genuine Makita batteries and chargers |
| Warranty | Manufacturer's warranty (check with retailer) |
Frequently Asked Questions - DVC864LZX MAKITA
User questions about DVC864LZX MAKITA
0 question about this device. Answer the ones you know or ask your own.
Ask a new question about this device
Download the instructions for your Cordless vacuum in PDF format for free! Find your manual DVC864LZX - MAKITA and take your electronic device back in hand. On this page are published all the documents necessary for the use of your device. DVC864LZX by MAKITA.
USER MANUAL DVC864LZX MAKITA
natural_image
Line drawing of a portable industrial vacuum cleaner with control panel and wheels (no text or symbols)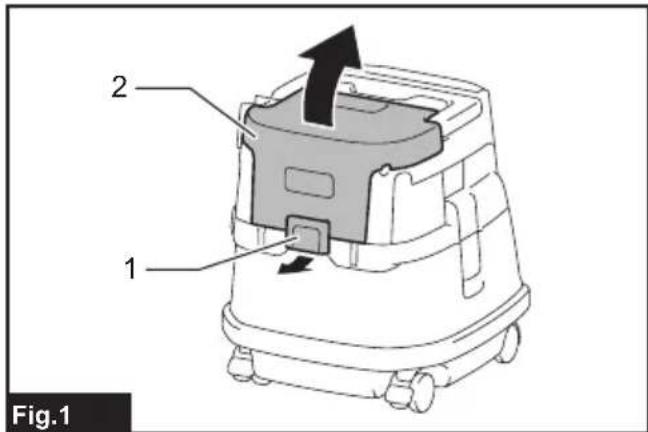
natural_image
Technical line drawing of a mechanical device with no visible text or symbols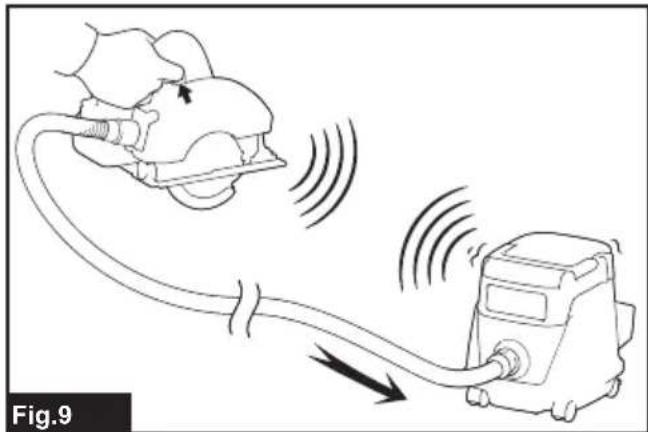
natural_image
Diagram of a device emitting sound waves from a cable, labeled Fig.9 (no text or symbols on diagram)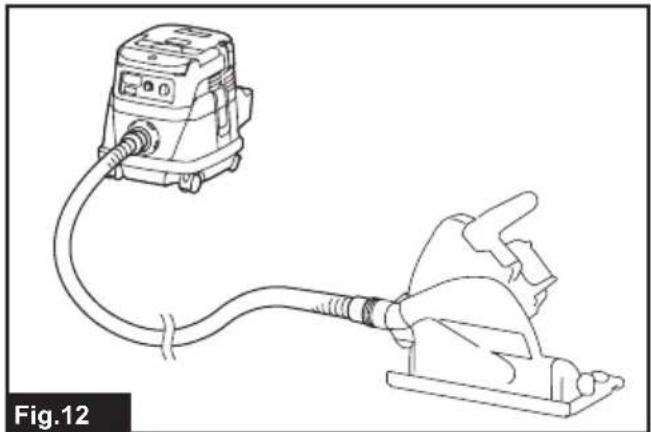
natural_image
Line drawing of a handheld vacuum cleaner connected to a mechanical clamp (no text or symbols)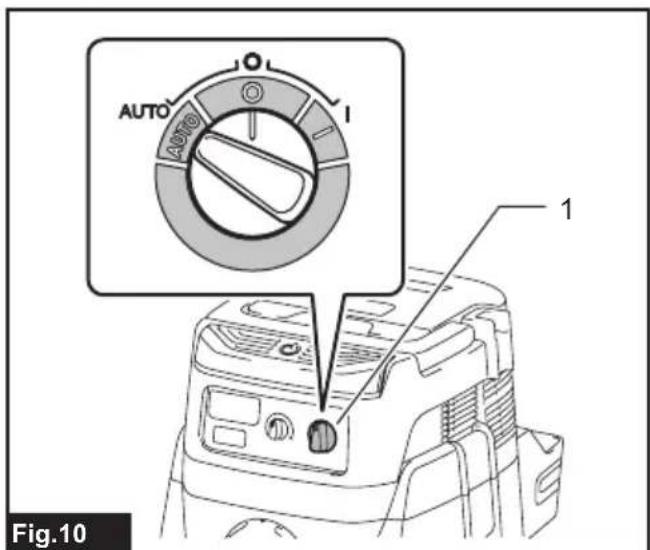


natural_image
Technical line drawing of a mechanical device with labeled components (no text or symbols beyond labels)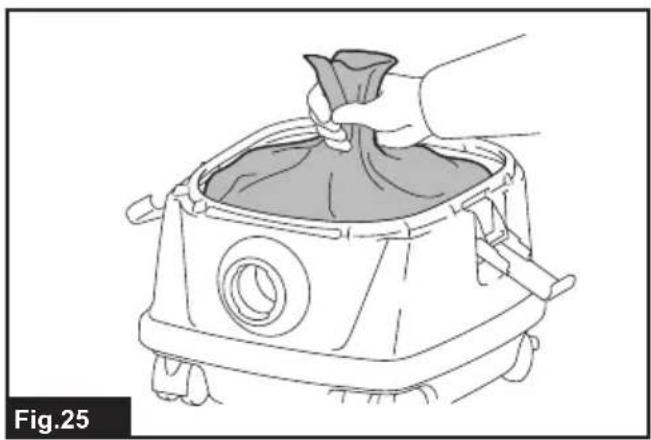
natural_image
Line drawing of a kitchen grater with a handle and lid, labeled Fig.25 (no text or symbols on the diagram itself)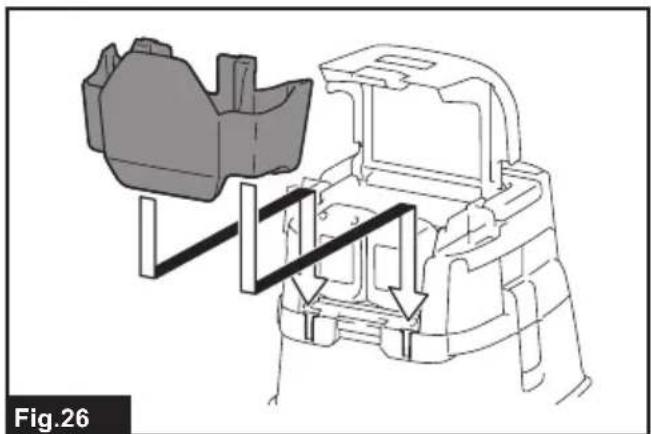
natural_image
Technical line drawing of a mechanical assembly with no visible text or symbols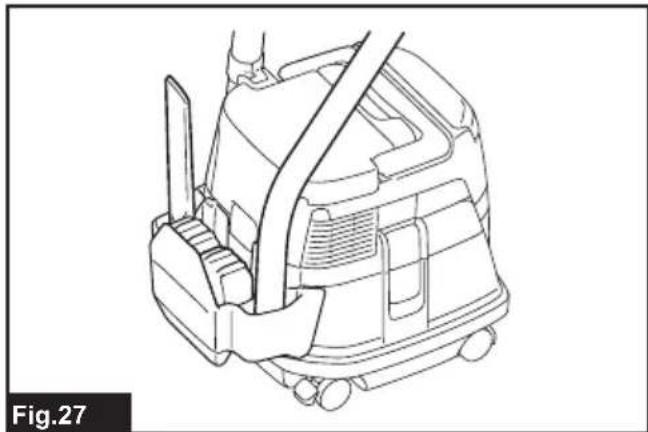
natural_image
Line drawing of a car interior with visible seatbelt and dashboard (no text or symbols)
natural_image
Diagram of a coiled cable or hose assembly with an inset showing a connector (no text or symbols present)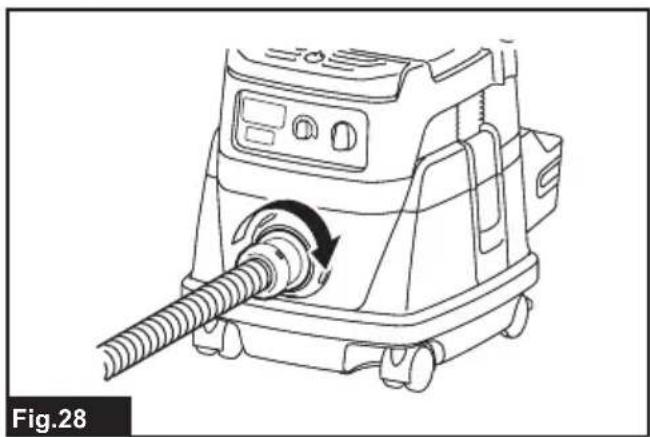
natural_image
Line drawing of a vacuum cleaner with a hose inserted, labeled Fig.28 (no text or symbols on the diagram itself)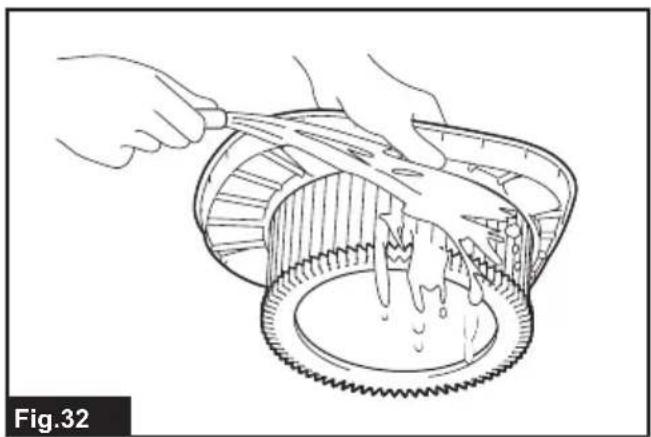
natural_image
Illustration of hands using a tool to lift or spread material into a mechanical component (no text or symbols)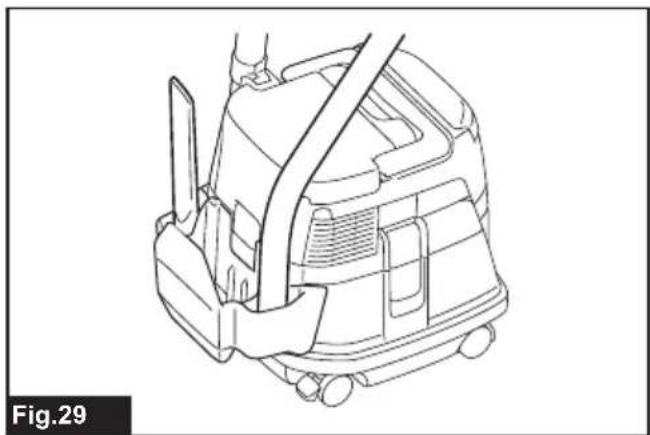
natural_image
Line drawing of a mechanical device with no visible text or symbols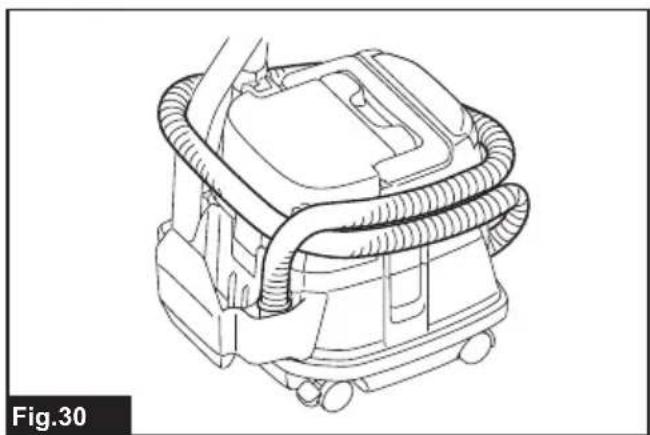
natural_image
Line drawing of a mechanical device with coiled tubing and wheels (no text or symbols)WARNING
This appliance can be used by children aged from 8 years and above and persons with reduced physical, sensory or mental capabilities or lack of experience and knowledge if they have been given supervision or instruction concerning use of the appliance in a safe way and understand the hazards involved. Children shall not play with the appliance. Cleaning and user maintenance shall not be made by children without supervision.
SPECIFICATIONS
| Model: DVC864L | |
| Standard filter type Powder filter (for dry dust) | |
| Volume flow (air) (with BL1850B, ø38 mm x 2.5 m hose) 2.1 m | ^3 /min |
| Vacuum (with BL1850B, ø38 mm x 2.5 m hose) 98 hPa | |
| Recoverable capacity 8 L | |
| Dimensions (L x W x H) 366 mm x 334 mm x 368 mm | |
| Rated voltage D.C. 36 V | |
| Standard battery cartridge BL1815N, BL1820, BL1820B, BL1830, BL1830B, BL1840, BL1840B, BL1850, BL1850B, BL1860B | |
| Net weight 7.7 - 8.4 kg | |
| Bluetooth®version 4.1 (Bluetooth low energy) | |
| Frequency band 2,402 - 2,480 MHz | |
| Maximum radio-frequency power | 1.0 dBm (EIRP) |
| Transmission range | Approximately 10 m |
• Due to our continuing program of research and development, the specifications herein are subject to change without notice.
• Specifications and battery cartridge may differ from country to country.
- The weight does not include accessories but battery cartridge(s). The lightest and heaviest combination weight of the appliance and battery cartridge(s) are shown in the table.

Bluetooth
The Bluetooth ^® word mark and logos are registered trademarks owned by the Bluetooth SIG, Inc. and any use of such marks by Makita is under license. Other trademarks and trade names are those of their respective owners.
Symbols
The following show the symbols used for the equipment. Be sure that you understand their meaning before use.


Read instruction manual.
Take particular care and attention.
Warning! The cleaner may contain hazardous dust.


Never stand on the cleaner.
Dust class L (light). The cleaners are capable of picking up dust class L. Follow your country's regulations relating to dusts and to occupational health and safety.
Do not dispose of electric equipment or battery pack together with household waste material! In observance of the European Directives, on Waste Electric and Electronic Equipment and Batteries and Accumulators and Waste Batteries and Accumulators and their implementation in accordance with national laws, electric equipment and batteries and battery pack(s) that have reached the end of their life must be collected separately and returned to an environmentally compatible recycling facility.
Intended use
The tool is intended for collecting dry dust. The tool is suitable for commercial use, for example in hotels, schools, hospitals, factories, shops, offices and rental businesses.
Noise
The typical A-weighted noise level determined according to EN60335:
Sound pressure level ( L_pA ): 70 dB(A) or less
Uncertainty (K) : 2.5 dB(A)
The noise level under working may exceed 80 dB (A).

WARNING: Wear ear protection.
Vibration
The vibration total value (tri-axial vector sum) determined according to EN60335:
Vibration emission (ah,M): 2.5 m/s ^2 or less
Uncertainty (K) : 1.5 m/s ^4
NOTE: The declared vibration emission value has been measured in accordance with the standard test method and may be used for comparing one tool with another.
NOTE: The declared vibration emission value may also be used in a preliminary assessment of exposure.

WARNING: The vibration emission during actual use of the power tool can differ from the declared emission value depending on the ways in which the I is used.

WARNING: Be sure to identify safety measures protect the operator that are based on an estimate of exposure in the actual conditions of use (taking amount of all parts of the operating cycle such as times when the tool is switched off and when it is turning idle in addition to the trigger time).
EC Declaration of Conformity
For European countries only
The EC declaration of conformity is included as Annex A to this instruction manual.
SAFETY WARNINGS
Cordless vacuum cleaner safety warnings

WARNING: IMPORTANT! READ CAREFULLY
all safety warnings and all instructions BEFORE
USE. Failure to follow the warnings and instructions may result in electric shock, fire and/or serious injury.
- Before use, make sure that this cleaner must be used by people who have been adequately instructed on the use of this cleaner.
- Do not use the cleaner without the filter. Replace a damaged filter immediately.
- AVOID UNINTENTIONAL STARTING. Be sure switch is OFF when installing battery (ies).
- Do not attempt to pick up flammable materials, fire works, lighted cigarettes, hot ashes, hot metal chips, sharp materials such as razors, needles, broken glass or the like.
- NEVER USE THE CLEANER IN THE VICINITY OF GASOLINE, GAS, PAINT, ADHESIVES OR OTHER HIGHLY EXPLOSIVE SUBSTANCES.
The switch emits sparks when turned ON and OFF. And so does the motor commutator during operation. A dangerous explosion may result. - Never vacuum up toxic, carcinogenic, combustible or other hazardous materials such as asbestos, arsenic, barium, beryllium, lead, pesticides, or other health endangering materials.
- Never use the cleaner outdoors in the rain.
- Do not use close to heat sources (stoves, etc.).
- Do not block cooling vents. These vents permit cooling of the motor. Blockage should be carefully avoided otherwise the motor will burn out from lack of ventilation.
- Keep proper footing and balance at all times.
- Do not fold, tug or step on the hose.
- Stop the cleaner immediately if you notice poor performance or anything abnormal during operation.
- REMOVE THE BATTERY(IES). When not in use, before servicing, and when changing accessories.
- Clean and service the cleaner immediately after each use to keep it in tiptop operating condition.
- MAINTAIN THE CLEANER WITH CARE. Keep the cleaner clean for better and safer performance. Follow instructions for changing accessories. Keep handles dry, clean, and free from oil and grease.
- CHECK DAMAGED PARTS. Before further use of the cleaner, a guard or other part that is damaged should be carefully checked to determine that it will operate properly and perform its intended function. Check for alignment of moving parts, binding of moving parts, breakage of parts, mounting, and any other conditions that may affect its operation. A guard or other part that is damaged should be properly repaired or
replaced by an authorized service center unless otherwise indicated elsewhere in this instruction manual. Have defective switches replaced by authorized service center. Don't use the cleaner if switch does not turn it on and off.
- REPLACEMENT PARTS. When servicing, use only identical replacement parts.
- STORE IDLE CLEANER. When not in use, the cleaner should be stored indoors.
- Be kind to your cleaner. Rough handling can cause breakage of even the most sturdily built cleaner.
- Do not attempt to clean the exterior or interior with benzine, thinner or cleaning chemicals. Cracks and discoloration may be caused.
- Do not use cleaner in an enclosed space where flammable, explosive or toxic vapors are given off by oil-base paint, paint-thinner, gasoline, some mothproofing substances, etc., or in areas where flammable dust is present.
- Do not operate the this or any tool while under the influence of drugs or alcohol.
- As a basic rule of safety, use safety goggles or safety glasses with side shields.
- Use a dust mask in dusty work conditions.
- This machine is not intended for use by persons including children with reduced physical, sensory or mental capabilities, or lack of experience and knowledge.
- Young children should be supervised to ensure that they do not play with the cleaner.
- Never handle battery(ies) and cleaner with wet hands.
- Use extreme caution when cleaning on stairs.
- Do not use the cleaner as a stool or work bench. The machine may fall down and may result in personal injury.
Battery tool use and care
- Recharge only with the charger specified by the manufacturer. A charger that is suitable for one type of battery pack may create a risk of fire when used with another battery pack.
- Use power tools only with specifically designated battery packs. Use of any other battery packs may create a risk of injury and fire.
- When battery pack is not in use, keep it away from other metal objects, like paper clips, coins, keys, nails, screws or other small metal objects, that can make a connection from one terminal to another. Shorting the battery terminals together may cause burns or a fire.
- Under abusive conditions, liquid may be ejected from the battery; avoid contact. If contact accidentally occurs, flush with water. If liquid contacts eyes, additionally seek medical help. Liquid ejected from the battery may cause irritation or burns.
- Do not use a battery pack or tool that is damaged or modified. Damaged or modified batteries may exhibit unpredictable behaviour resulting in fire, explosion or risk of injury.
-
Do not expose a battery pack or tool to fire or excessive temperature. Exposure to fire or temperature above 130 °C may cause explosion.
-
Follow all charging instructions and do not charge the battery pack or tool outside the temperature range specified in the instructions. Charging improperly or at temperatures outside the specified range may damage the battery and increase the risk of fire.
SAVE THESE INSTRUCTIONS.
WARNING: DO NOT let comfort or familiarity with product (gained from repeated use) replace strict adherence to safety rules for the subject product. MISUSE or failure to follow the safety rules stated in this instruction manual may cause serious personal injury.
Important safety instructions for battery cartridge
- Before using battery cartridge, read all instructions and cautionary markings on (1) battery charger, (2) battery, and (3) product using battery.
- Do not disassemble battery cartridge.
- If operating time has become excessively shorter, stop operating immediately. It may result in a risk of overheating, possible burns and even an explosion.
- If electrolyte gets into your eyes, rinse them out with clear water and seek medical attention right away. It may result in loss of your eyesight.
- Do not short the battery cartridge:
(1) Do not touch the terminals with any conductive material.
(2) Avoid storing battery cartridge in a container with other metal objects such as nails, coins, etc.
(3) Do not expose battery cartridge to water or rain.
A battery short can cause a large current flow, overheating, possible burns and even a breakdown.
- Do not store the tool and battery cartridge in locations where the temperature may reach or exceed 50 °C (122 °F).
- Do not incinerate the battery cartridge even if it is severely damaged or is completely worn out. The battery cartridge can explode in a fire.
- Be careful not to drop or strike battery.
- Do not use a damaged battery.
- The contained lithium-ion batteries are subject to the Dangerous Goods Legislation requirements.
For commercial transports e.g. by third parties, forwarding agents, special requirement on packaging and labeling must be observed.
For preparation of the item being shipped, consulting an expert for hazardous material is required.
Please also observe possibly more detailed national regulations.
Tape or mask off open contacts and pack up the battery in such a manner that it cannot move around in the packaging.
- Follow your local regulations relating to disposal of battery.
- Use the batteries only with the products specified by Makita. Installing the batteries to non-compliant products may result in a fire, excessive heat, explosion, or leak of electrolyte.
SAVE THESE INSTRUCTIONS.
⚠️CAUTION: Only use genuine Makita batteries.
Use of non-genuine Makita batteries, or batteries that have been altered, may result in the battery bursting causing fires, personal injury and damage. It will also void the Makita warranty for the Makita tool and charger.
Tips for maintaining maximum battery life
- Charge the battery cartridge before completely discharged. Always stop tool operation and charge the battery cartridge when you notice less tool power.
- Never recharge a fully charged battery cartridge. Overcharging shortens the battery service life.
- Charge the battery cartridge with room temperature at 10 °C - 40 °C (50 °F - 104 °F). Let a hot battery cartridge cool down before charging it.
- Charge the battery cartridge if you do not use it for a long period (more than six months).
Important safety instructions for wireless unit
- Do not disassemble or tamper with the cleaner. The wireless unit in the cleaner cannot be removed.
- Do not operate the wireless activation function in places where medical instruments, heart pace makers, or automated devices, such as automatic doors and fire alarms, are nearby.
- Do not use the cleaner in places where the temperature exceeds 50^ C ( 122^ F).
- The wireless unit is an accurate instrument. Be careful not to drop or strike the cleaner.
- Do not leave the cleaner in a place where static electricity or electrical noise could be generated.
FUNCTIONAL DESCRIPTION
CAUTION: Always be sure that the tool is switched off and the battery cartridge is removed before adjusting or checking function on the tool.
Installing or removing battery cartridge
CAUTION: Always switch off the tool before installing or removing of the battery cartridge.
CAUTION: Hold the tool and the battery cartridge firmly when installing or removing battery cartridge. Failure to hold the tool and the battery cartridge firmly may cause them to slip off your hands and result in damage to the tool and battery cartridge and a personal injury.
CAUTION: Be careful not to pinch your fingers when opening or closing the battery cover. Failure to do so may cause personal injury.
To install the battery cartridge, release the lock first, and open the battery cover. And then, insert the battery cartridge.
▶ Fig.1: 1. Lock 2. Battery cover
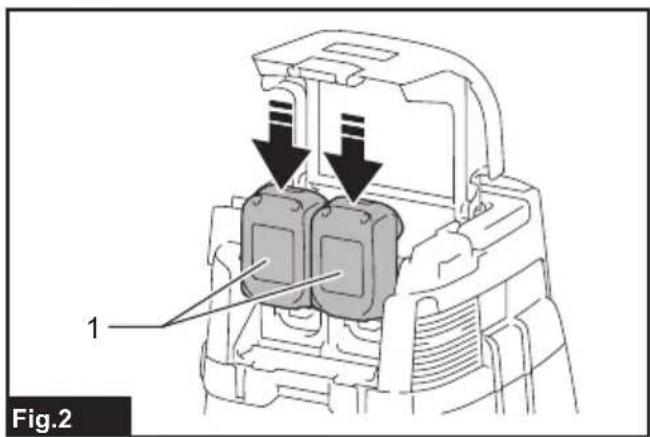
Align the tongue on the battery cartridge with the groove in the housing and slip it into place. Insert it all the way until it locks in place with a little click. Then lock the battery cover.
▶ Fig.2: 1. Battery cartridge
To remove the battery cartridge, slide it from the tool while sliding the button on the front of the cartridge.
CAUTION: Always install the battery cartridge fully until the red indicator cannot be seen. If not, it may accidentally fall out of the tool, causing injury to you or someone around you.
⚠️ CAUTION: Do not install the battery cartridge forcibly. If the cartridge does not slide in easily, it is not being inserted correctly.
NOTE: The cleaner does not work with only one battery cartridge.
Indicating the remaining battery capacity
Only for battery cartridges with the indicator
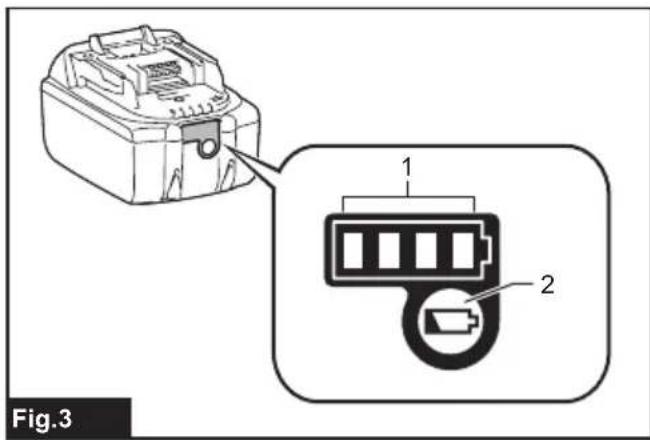
▶ Fig.3: 1. Indicator lamps 2. Check button
Press the check button on the battery cartridge to indicate the remaining battery capacity. The indicator lamps light up for a few seconds.
| Indicator lamps Remaining | capacity | ||
| [XX01]Lighted Off |  Blinking Blinking | [HJKC] | |
 | 75% to 100% | ||
 | 50% to 75% | ||
 | 25% to 50% | ||
 | 0% to 25% | ||
 | Charge the battery. | ||
 * *  | The battery may have malfunctioned. | ||
NOTE: Depending on the conditions of use and the ambient temperature, the indication may differ slightly from the actual capacity.
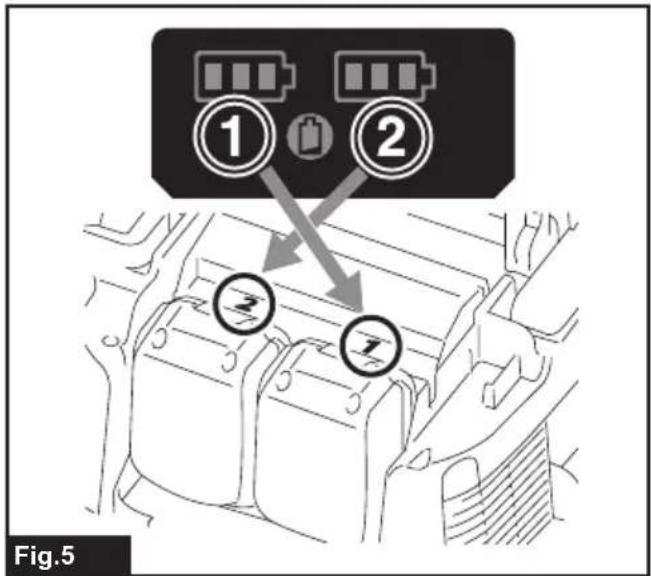
Indicating the remaining battery capacity
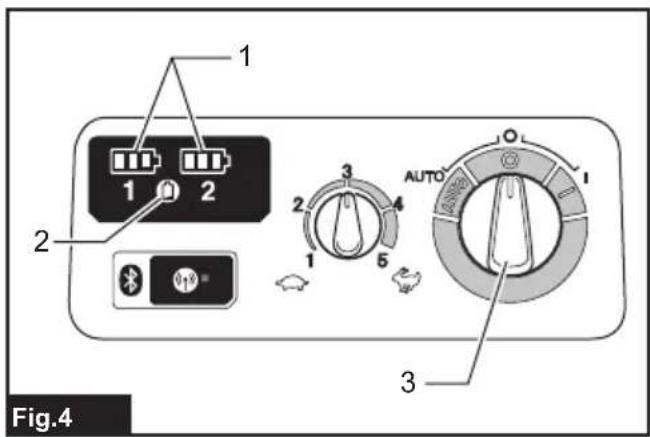
▶ Fig.4: 1. Battery indicator 2. Check button 3. Stand-by switch
▶ Fig.5
Press the check button to indicate the remaining battery capacities. The battery indicators correspond to each battery.
| Battery indicator status Remaining | battery capacity | ||
| On | Off | Blinking | |
 | 50% to 100% | ||
 | 20% to 50% | ||
 | 0% to 20% | ||
 | Charge the battery | ||
NOTE: During the cleaner turned on with the stand-by switch set to "AUTO", the battery indicator does not work.
Tool / battery protection system
The tool is equipped with a tool/battery protection system. This system automatically cuts off power to the motor to extend tool and battery life. The tool will automatically stop during operation if the tool or battery is placed under one of the following conditions:
Overload protection
When the tool is operated in a manner that causes it to draw an abnormally high current, the tool automatically stops without any indication. In this situation, turn the tool off and stop the application that caused the tool to become overloaded. Then turn the tool on to restart.
Overheat protection
| On Blinking | |
 | |
When the tool is overheated, the tool stops automatically, and the battery indicator blinks about 60 seconds. In this situation, let the tool cool down before turning the tool on again.
Overdischarge protection
When the battery capacity becomes low, the tool stops automatically. If the product does not operate even when the switches are operated, remove the batteries from the tool and charge the batteries.
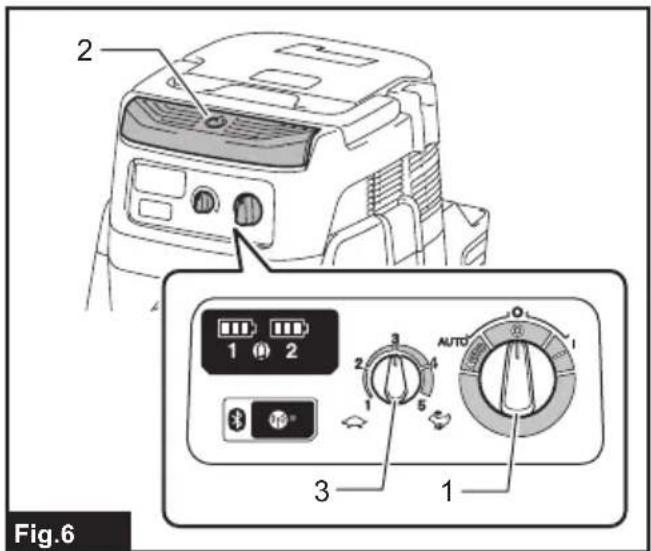
Switch action
▶ Fig.6: 1. Stand-by switch 2. Power button 3. Suction force adjusting knob
To start the cleaner:
-
Set the stand-by switch to the "I" side. The cleaner gets into stand-by state.
-
Press the power button.
To make the cleaner get into stand-by mode, press the power button again.
To turn off the cleaner, set the stand-by switch to the "O" side.
The suction power can be adjusted according to your work need. Suction power can be increased by turning the suction force adjusting knob from the 🔗 symbol to the 🔗 symbol.
NOTICE: Always set the stand-by switch to the "O" side when not using the cleaner for long time. The cleaner consumes power during stand-by state.
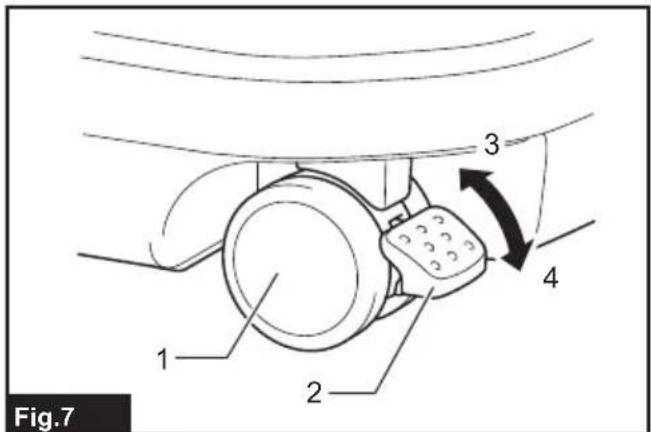
Locking or unlocking the caster
▶ Fig.7: 1. Caster 2. Stopper lever 3. FREE position 4. LOCK position
Locking the caster is convenient when storing the cleaner, stopping the work on the way and keeping the cleaner still. To operate the stopper, move it by hand.
To lock the caster with a stopper, lower the stopper lever and the caster no longer will rotate. To release the caster from the locked position, raise the stopper lever.
NOTE: When moving the cleaner, make sure that the caster is unlocked. Moving the cleaner with the caster in the locked position may cause damage to the caster.
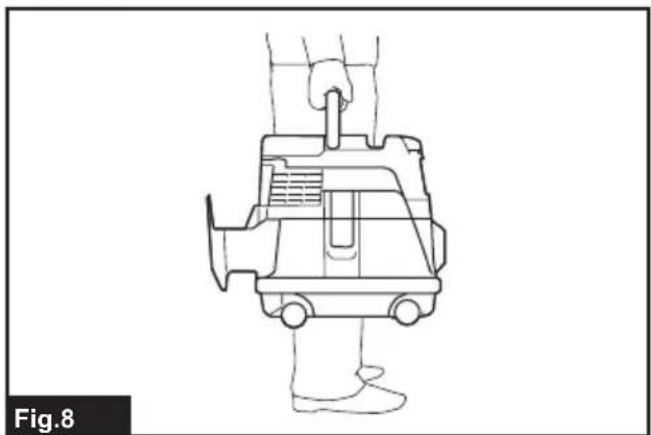
Carriage handle
When carrying the cleaner, carry it by holding the handle on the head. The handle is retractable at the head when not in use.
▶ Fig.8
WIRELESS ACTIVATION FUNCTION
What you can do with the wireless activation function
The wireless activation function enables clean and comfortable operation. By connecting a supported tool to the cleaner, you can run the cleaner automatically along with the switch operation of the tool.
▶ Fig.9
NOTICE: Be sure to refer to the instruction manual of the tool when using the cleaner with wireless activation function.
NOTICE: Do not disassemble or tamper with the wireless unit.
NOTICE: Always close the lid of the wireless unit in the tool when operating or storage.
NOTICE: Do not remove the wireless unit from the tool while the power is being supplied to the tool. Doing so may cause a malfunction of the wireless unit.
NOTICE: Do not press the wireless activation button too hard and/or press the button with an object with a sharp edge.
NOTE: Wireless activation needs Makita tools equipped with the wireless unit.
NOTE: Prior to the initial use of the wireless activation function with each tool, the tool registration is required. Once the registration is finished with the tool, the re-registration is not required unless it is cancelled.
NOTE: Before registration, be sure to the wireless unit is properly inserted into the tool.
NOTE: One cleaner can register up to 10 tools. If more than 10 tools are registered to the cleaner, the tool registered earliest will be cancelled automatically.
NOTE: The position of the wireless activation button varies depending on the tool.
NOTE: The cleaner also starts by pressing the power button when the stand-by switch is set to "AUTO". However the power button will not actuate when the wireless activation function is used.
Tool registration for the cleaner
NOTE: A Makita tool supporting the wireless activation function is required for the tool registration.
NOTE: Finish installing the wireless unit to the tool before starting the tool registration.
NOTE: During the tool registration, do not pull the switch trigger on the tool or turn on the power switch on the cleaner.
NOTE: Refer to the instruction manual of the tool, too.
If you wish to activate the cleaner along with the switch operation of the tool, finish the tool registration beforehand.
- Install the batteries to the cleaner and the tool.
- Set the stand-by switch on the cleaner to "AUTO".
▶ Fig.10: 1. Stand-by switch
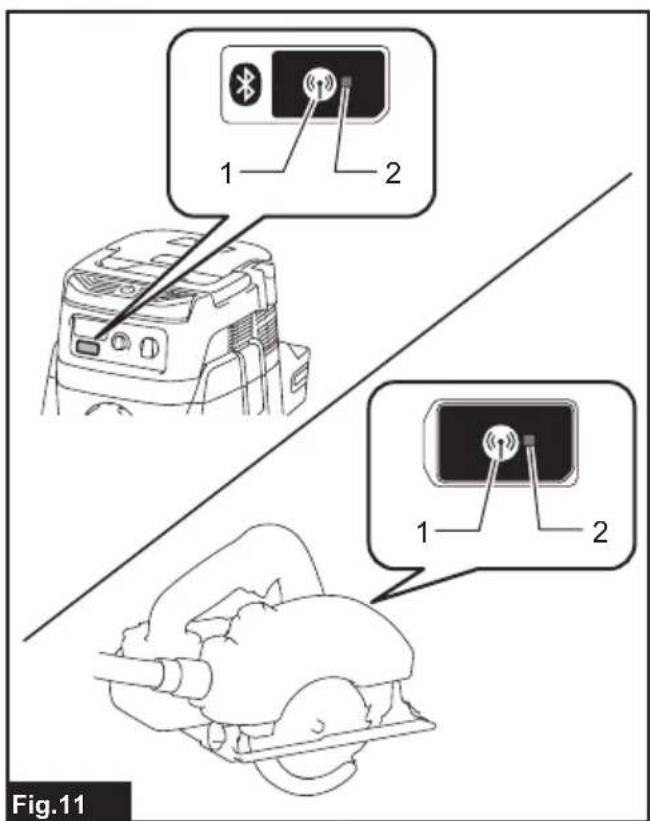
- Press the wireless activation button on the cleaner for 3 seconds until the wireless activation lamp blinks in green. And then press the wireless activation button on the tool in the same way.
▶ Fig.11: 1. Wireless activation button 2. Wireless activation lamp
If the cleaner and the tool are linked successfully, the wireless activation lamps will light up in green for 2 seconds and start blinking in blue.
NOTE: The wireless activation lamps finish blinking in green after 20 seconds elapsed. Press the wireless activation button on the tool while the wireless activation lamp on the cleaner is blinking. If the wireless activation lamp does not blink in green, push the wireless activation button briefly and hold it down again.
NOTE: When performing two or more tool registration for the cleaner, finish the tool registration one by one.
Starting the wireless activation function
NOTE: Finish the tool registration for the cleaner for wireless activation.
NOTE: Always place the cleaner so that you can see the status of the wireless activation lamp.
NOTE: Refer to the instruction manual of the tool, too.
After registering a tool to the cleaner, the cleaner will automatically runs along with the switch operation of the tool.
- Install the wireless unit to the tool.
- Connect the hose of the cleaner with the tool.
▶ Fig.12
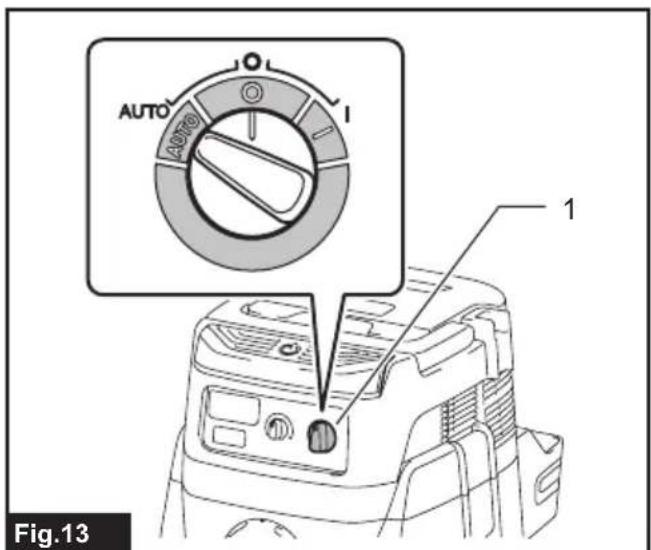
- Set the stand-by switch on the cleaner to "AUTO".
▶ Fig.13: 1. Stand-by switch -
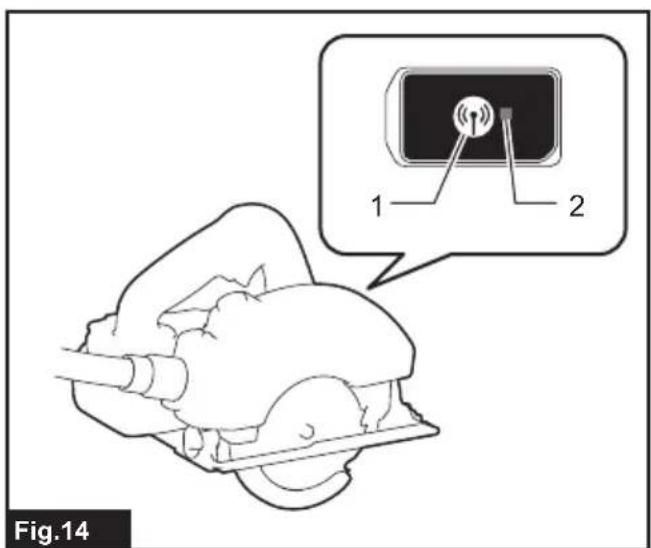
Push the wireless activation button on the tool briefly. The wireless activation lamp will blink in blue.
▶ Fig.14: 1. Wireless activation button 2. Wireless activation lamp -
Pull the switch trigger of the tool. Check if the cleaner runs while the switch trigger on the tool is being pulled.
To stop the wireless activation, push the wireless activation button on the tool, or set the stand-by switch on the cleaner to "I" or "O".
NOTE: The wireless activation lamp on the tool will stop blinking in blue when there is no operation for 2 hours. In this case, set the stand-by switch on the cleaner to "AUTO" and press the wireless activation button on the tool again.
NOTE: The cleaner starts/stops with a delay. There is a time lag when the cleaner detects a switch operation of the tool.
NOTE: The transmission distance of the wireless unit may vary depending on the location and surrounding circumstances.
NOTE: When two or more tools are registered to one cleaner, the cleaner may start running even if you don't pull the switch trigger because other user is using the wireless activation function.
Cancelling tool registration for the cleaner
Perform the following procedure when cancelling the tool registration for the cleaner.
- Install the batteries to the cleaner and the tool.
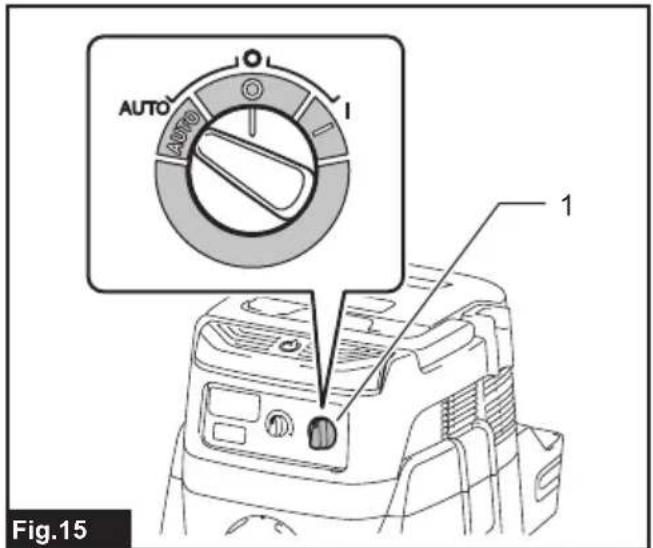
- Set the stand-by switch on the cleaner to "AUTO".
▶ Fig.15: 1. Stand-by switch
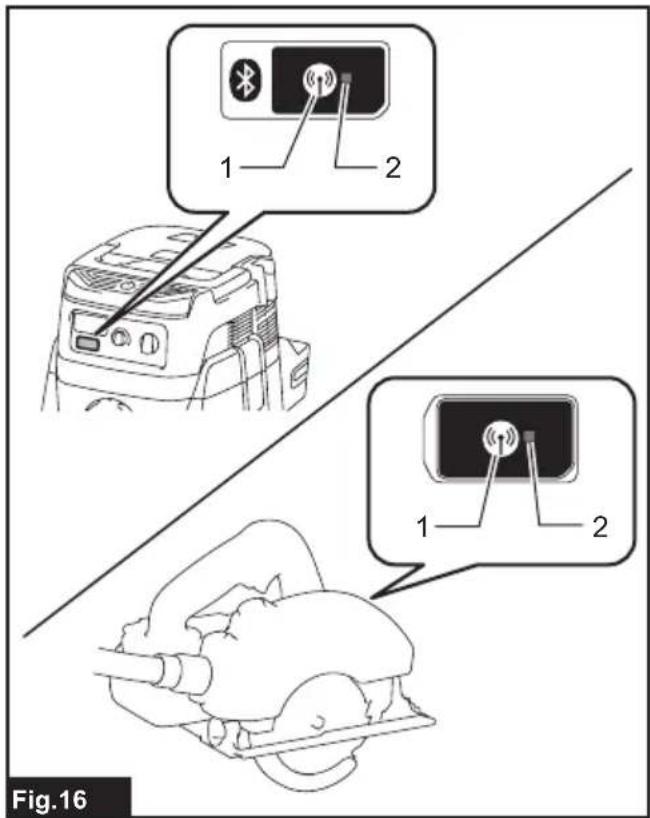
- Press the wireless activation button on the cleaner for 6 seconds. The wireless activation lamp blinks in green and then become red. After that, press the wireless activation button on the tool in the same way.
▶ Fig.16: 1. Wireless activation button 2. Wireless activation lamp
If the cancellation is performed successfully, the wireless activation lamps will light up in red for 2 seconds and start blinking in blue.
NOTE: The wireless activation lamps finish blinking in red after 20 seconds elapsed. Press the wireless activation button on the tool while the wireless activation lamp on the cleaner is blinking. If the wireless activation lamp does not blink in red, push the wireless activation button briefly and hold it down again.
Erasing all tool registrations
You can erase all tool registrations from the cleaner as follows.
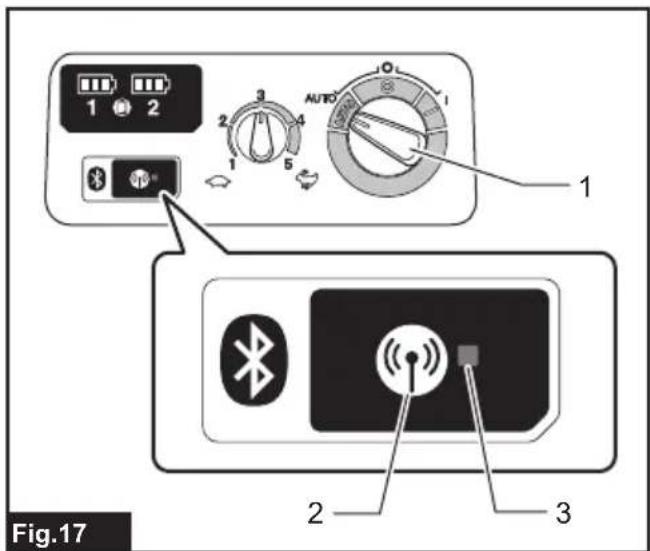
▶ Fig.17: 1. Stand-by switch 2. Wireless activation button 3. Wireless activation lamp
- Install the batteries to the cleaner.
- Set the stand-by switch to "AUTO".
- Hold down the wireless activation button for about 6 seconds until the wireless activation lamp blinks in red (about twice per one second).
- When the wireless activation lamp starts blinking in red, release your finger from the wireless activation button. Thereafter, hold down the wireless activation button again for about 6 seconds.
- When the wireless activation lamp starts blinking fast (about 5 times per one second) in red, release your finger from the wireless activation button. When the wireless activation lamp lights up in red and later lights off, all tool registrations are erased.
NOTE: If the wireless activation lamp does not blink in red, press the wireless activation button briefly and try again.
Description of the wireless activation lamp status
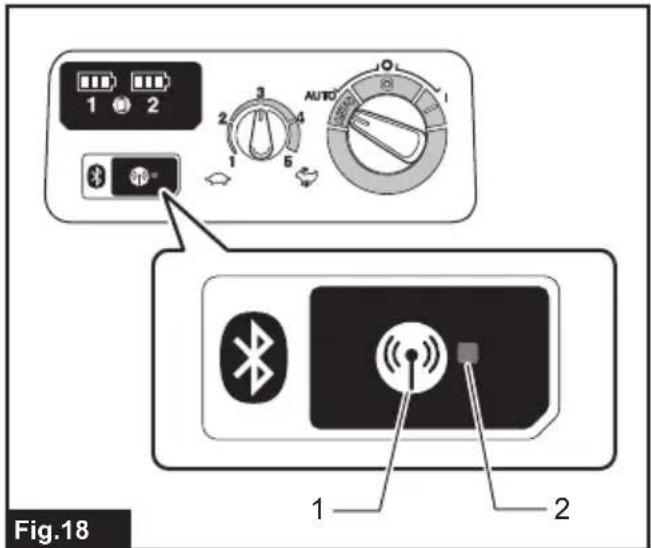
▶ Fig.18: 1. Wireless activation button 2. Wireless activation lamp
The wireless activation lamp shows the status of the wireless activation function. Refer to the below table for the meaning of the lamp status.
| Status Wireless activation lamp Description | |||||
| Standby B | ue | Cleaner: continuingTool: 2 hours | Waiting for the tool registration or the wireless activation function is available.The lamp on the cleaner blinks when the stand-by switch is set in AUTO. The lamp on the tool blinks when the wireless activation button is pushed. The lamp on the tool will automatically turn off when no operation is performed for 2 hours. | ||
| When the tool is running. | The wireless activation of the cleaner is available and the tool is running. | ||||
| Tool registration | Green | 20 seconds Ready for the tool registration. Searching the tool to be registered. | |||
| 2 seconds The tool registration has been finished. The wireless activation lamp will start blinking in blue. | |||||
| Cancelling/ erasing tool registration | Red | 20 seconds Ready for the cancellation of the tool registration. Searching the tool to be cancelled. | |||
| When the wireless acti- vation button is pressed down. | Ready to erase all tool registrations. | ||||
| 2 seconds The tool registration has been cancelled/erased. The wireless activation lamp will start blinking in blue. | |||||
| Others Red | 3 seconds | The power is supplied to the wireless unit and the wireless activa- tion function is starting up. | |||
| Off - - The stand-by switch is not set to "AUTO". | |||||
Troubleshooting for wireless activation function
Before asking for repairs, conduct your own inspection first. If you find a problem that is not explained in the manual, do not attempt to dismantle the tool. Instead, ask Makita Authorized Service Centers, always using Makita replacement parts for repairs.
| State of abnormality Probable cause | (malfunction) Remedy | |
| The wireless activation lamp does not light/blink. | The wireless unit is not installed into the tool.The wireless unit is improperly installed into the tool. | Install the wireless unit correctly in the tool. |
| The terminal of the wireless unit and/or the slot is dirty. | Gently wipe off dust and dirt on the terminal of the wireless unit and clean the slot of the tool. | |
| The wireless activation button on the tool has not been pushed. | Push the wireless activation button on the tool briefly. | |
| The stand-by switch on the cleaner is not set to "AUTO". | Set the stand-by switch on the cleaner to "AUTO". | |
| No power supply Supply the power to the tool and the cleaner. | tool and the cleaner. | |
| Cannot finish tool registration / cancelling tool registration successfully. | The wireless unit is not installed into the tool.The wireless unit is improperly installed into the tool. | Install the wireless unit correctly in the tool. |
| The terminal of the wireless unit and/or the slot is dirty. | Gently wipe off dust and dirt on the terminal of the wireless unit and clean the slot of the tool. | |
| The stand-by switch on the cleaner is not set to "AUTO". | Set the stand-by switch on the cleaner to "AUTO". | |
| No power supply Supply the power to the tool and the cleaner. | tool and the cleaner. | |
| Incorrect operation Push the wireless activation button briefly and perform the tool registration/cancellation procedures again. | Get the tool and the cleaner closer to each other. The maximum transmission distance is approximately 10 m however it may vary according to the circumstances. | |
| The tool and cleaner is away from each other (out of the transmission range). | Push the wireless activation button briefly and perform the tool registration/cancellation procedures again. | |
| Before finishing the tool registration/cancellation;- the switch trigger on the tool is pulled or;- the power button on the cleaner is turned on. | Perform the tool registration procedures for the tool and the cleaner at the same timing. | |
| Radio disturbance by other appliances which generate high-intensity radio waves. | Keep the tool and the cleaner away from the appliances such as Wi-Fi devices and microwave ovens. | |
| The cleaner does not run along with the switch operation of the tool. | The wireless unit is not installed into the tool.The wireless unit is improperly installed into the tool. | Install the wireless unit correctly in the tool. |
| The terminal of the wireless unit and/or the slot is dirty. | Gently wipe off dust and dirt on the terminal of the wireless unit and clean the slot of the tool. | |
| The wireless activation button on the tool has not been pushed. | Push the wireless activation button briefly and make sure that the wireless activation lamp is blinking in blue. | |
| The stand-by switch on the cleaner is not set to "AUTO". | Set the stand-by switch on the cleaner to "AUTO". | |
| More than 10 tools are registered to the cleaner. | Perform the tool registration again.If more than 10 tools are registered to the cleaner, the tool registered earliest will be cancelled automatically. | |
| The cleaner erased all tool registrations. | Perform the tool registration again. | |
| No power supply Supply the power to the tool and the cleaner. | tool and the cleaner. | |
| The tool and cleaner is away from each other (out of the transmission range). | Get the tool and the cleaner closer to each other.The maximum transmission distance is approximately 10 m however it may vary according to the circumstances. | |
| Radio disturbance by other appliances which generate high-intensity radio waves. | Keep the tool and the cleaner away from the appliances such as Wi-Fi devices and microwave ovens. | |
| The cleaner runs while the tool's switch trigger is not pulled. | Other users are using the wireless activation of the cleaner with their tools. | Turn off the wireless activation button of the other tools or cancel the tool registration of the other tools. |
| Cannot erase all tool registrations in the cleaner. | Pressing the wireless button on the tool. | Press the wireless button on the cleaner for erasing all tool registrations. |
| The stand-by switch on the cleaner is not set to "AUTO". | Set the stand-by switch on the cleaner to "AUTO". | |
| The wireless activation button is not hold down correctly. | Hold down the wireless activation button for more than 6 seconds and then release it when the wireless activation lamp blinks in red. Hold down the wireless activation button for more than 6 seconds again until the wireless activation button rapidly blinks in red and then release the button. |
PARTS DESCRIPTION
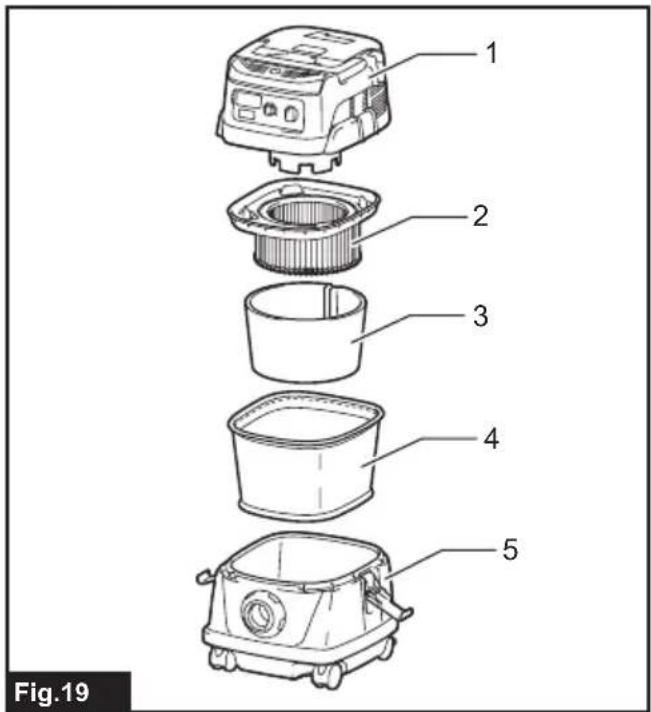
▶ Fig.19: 1. Tank cover 2. Powder filter (HEPA)
3. Damper 4. Prefilter 5. Tank
ASSEMBLY
⚠️CAUTION: Always be sure that the tool is switched off and the battery cartridge is removed before carrying out any work on the tool.
⚠️CAUTION: Always wear dust mask during assembly or maintenance.
Installing the powder filter (HEPA) and prefilter (for dry dust)
CAUTION: Never pick up water or other liquids or wet dusts when using the powder filter. Picking up such things may cause the powder filter breakage.
To use powder filter:
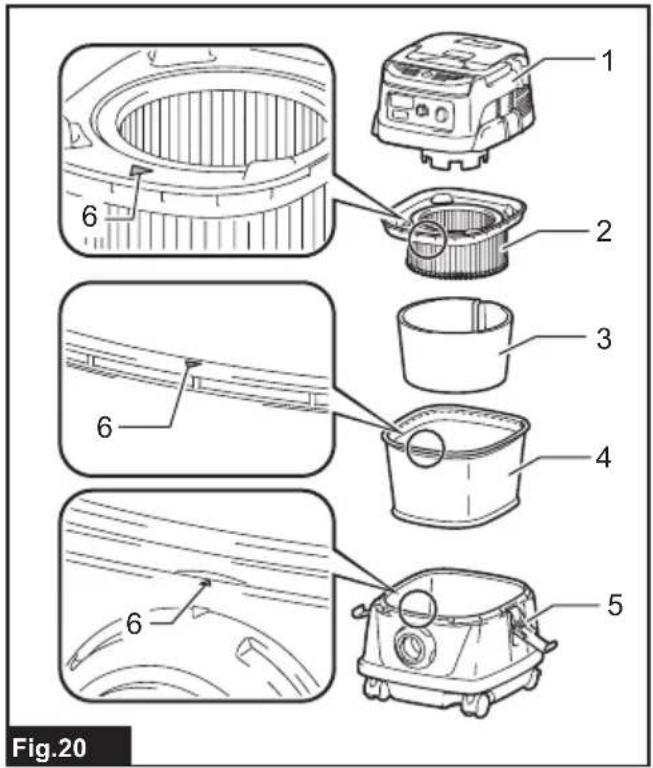
- Place the prefilter in the tank with aligning the mounting position markings.
-
Mount the damper on the powder filter and then place them in the prefilter with aligning the mounting position markings.
-
Finally, mount the tank cover and lock it.
▶ Fig.20: 1. Tank cover 2. Powder filter (HEPA) 3. Damper 4. Prefilter 5. Tank 6. Mounting position marking
NOTICE: Before using the powder filter, make sure that prefilter and damper are always used together. It is not allowed to install powder filter solely.
Installing the paper pack
Optional accessory
⚠ WARNING: When using the paper pack, also use the prefilter together that is preinstalled on the tool. Failure to use the prefilter together may cause unusual noise and heat, resulting in a fire.
⚠️CAUTION: Before using the paper pack, make sure that powder filter, damper and prefilter are always used together.
- Remove the rubber holder.
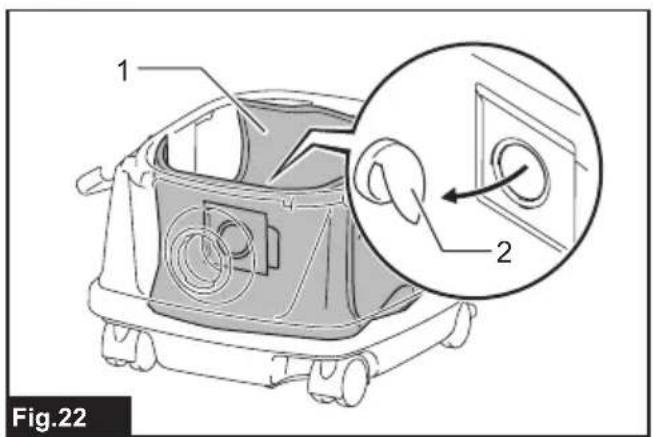
▶ Fig.21: 1. Rubber holder - Extend the paper pack.
- Align the paper pack opening with the dust suction opening of the cleaner.
- Insert the cardboard of the paper pack onto the holder so that it is positioned at the end beyond the detent protrusion.
▶ Fig.22: 1. Paper pack 2. Holder
Installing the polyethylene bag
Cleaner can also be used without polyethylene bag. However, using polyethylene bag is easier to empty the tank without letting your hands dirty.
Spread the polyethylene bag in the tank. Insert it between the holder plate and the tank, and pull it to the hose inlet.
▶ Fig.23: 1. Holder plate 2. Polyethylene bag
Spread the bag around the top of the tank so that the prefilter edge can catch and hold the bag securely.
▶ Fig.24: 1. Prefilter
NOTE: A polyethylene bag available on the market can be used. 0.04 mm or thicker one is recommended.
NOTE: Too much dust will tear the bag easily, so do not collect the dust more than the half of the bag capacity.
Emptying the polyethylene bag
WARNING: Always make sure that the cleaner is switched off and the battery cartridge is removed before emptying the polyethylene bag. Failure to do so may cause an electric shock and serious personal injury.
⚠️CAUTION: Do not apply a great impact on the tank. Applying a great impact may cause deformation and damage to the parts.
⚠CAUTION: Empty the tank at least once a day although this depends on picked-up dust volume in the tank. Or, the suction force will weaken and the motor may be broken.
⚠️CAUTION: Do not grab the hook when emptying the tank. Grabbing the hook may cause the hook to break.
Unhook and lift up the tank cover.
Shake off the dust from the prefilter and then take the polyethylene bag out of the tank.
▶ Fig.25
NOTE: Take the polyethylene bag carefully out of the tank so that the polyethylene bag cannot be caught and torn by the protrusion inside the tank when emptying it.
NOTE: Empty the polyethylene bag before it becomes full. Too much dust in the tank may cause the polyethylene bag to be torn.
Installing the tool box
- Release the lock of the battery cover, and open the battery cover.
- Set the rails on the tool box along the grooves on the housing.
- Close the battery cover and apply the lock.
▶ Fig.26
The tool box is convenient for carrying batteries, pipe, or cuffs.
▶ Fig.27
Connecting the hose
NOTICE: Never force the hose for bending or stamp it. Never move the cleaner by a hose. Forcing, stamping and pulling the hose may cause a breakage or deformation of the hose.
NOTICE: When picking up large wastes such as planer carvings, concrete dusts or similar other than small wastes, use the 38 mm inner diameter hose (optional accessory). Using the 28 mm inner diameter hose (optional accessory) may cause a hose stuffing and damage.
Insert the hose onto the mounting port of the tank and turn it clockwise until it locks.
▶ Fig.28
MAINTENANCE
CAUTION: Always be sure that the tool is switched off and the battery cartridge is removed before attempting to perform inspection or maintenance.
NOTICE: Never use gasoline, benzine, thinner, alcohol or the like. Discoloration, deformation or cracks may result.
Storage of accessories
The pipes can be placed into the pipe holder when not using the cleaner for a short time.
▶ Fig.29
▶ Fig.30
The hose can be stored around the tool by connecting each ends.
▶ Fig.31
Cleaning of powder filter (HEPA) and prefilter
Clogged powder filter, prefilter and damper cause poor suction performance. Clean out the filters and dampers from time to time.
To remove dust or particles adhering to the filters, shake the frame bottom quickly several times.
▶ Fig.32
Occasionally wash the powder filter in water, rinse and dry thoroughly in the shade before use. Never wash filters in a washing machine.
NOTE: Do not rub or scratch the powder filter, the prefilter or the damper with hard objects such as a brush and a paddle.
NOTE: The filters wear out in course of time. It is recommended to have some spares for them.
To maintain product SAFETY and RELIABILITY, repairs, any other maintenance or adjustment should be performed by Makita Authorized or Factory Service Centers, always using Makita replacement parts.
OPTIONAL ACCESSORIES
⚠️CAUTION: These accessories or attachments are recommended for use with your Makita tool specified in this manual. The use of any other accessories or attachments might present a risk of injury to persons. Only use accessory or attachment for its stated purpose.
If you need any assistance for more details regarding these accessories, ask your local Makita Service Center.
- Hose
- Front cuff (22, 24, 38)
- Straight pipe
- Corner nozzle
- Round brush
• Powder filter, HEPA (for dry dust) - Damper
- Prefilter
- Nozzle assembly
- Bent pipe
- Polyethylene bag
- Paper pack
- Holder set
- Makita genuine battery and charger
NOTE: Some items in the list may be included in the tool package as standard accessories. They may differ from country to country.
AVERTISSEMENT
VEILIGHEIDSWAAR- SCHUWINGEN
WAARSCHUWING: BELANGRIJK! LEES
OPTIONELE ACCESSOIRES
3-11-8, Sumiyoshi-cho,
Anjo, Aichi 446-8502 Japan
- WARNING
- Bluetooth
- Symbols
- Intended use
- Noise
- Vibration
- EC Declaration of Conformity
- For European countries only
- SAFETY WARNINGS
- Cordless vacuum cleaner safety warnings
- WARNING: IMPORTANT! READ CAREFULLY
- all safety warnings and all instructions BEFORE
- Battery tool use and care
- SAVE THESE INSTRUCTIONS.
- Important safety instructions for battery cartridge
- ⚠️CAUTION: Only use genuine Makita batteries.
- Tips for maintaining maximum battery life
- Important safety instructions for wireless unit
- FUNCTIONAL DESCRIPTION
- Installing or removing battery cartridge
- Indicating the remaining battery capacity
- Tool / battery protection system
- Overload protection
- Overheat protection
- Overdischarge protection
- Switch action
- Locking or unlocking the caster
- Carriage handle
- WIRELESS ACTIVATION FUNCTION
- What you can do with the wireless activation function
- Tool registration for the cleaner
- Starting the wireless activation function
- Cancelling tool registration for the cleaner
- Erasing all tool registrations
- Description of the wireless activation lamp status
- Troubleshooting for wireless activation function
- PARTS DESCRIPTION
- ASSEMBLY
- Installing the powder filter (HEPA) and prefilter (for dry dust)
- Installing the paper pack
- Optional accessory
- Installing the polyethylene bag
- Emptying the polyethylene bag
- Installing the tool box
- Connecting the hose
- MAINTENANCE
- Storage of accessories
- Cleaning of powder filter (HEPA) and prefilter
- ▶ Fig.32
- OPTIONAL ACCESSORIES
- AVERTISSEMENT
- VEILIGHEIDSWAAR- SCHUWINGEN
- WAARSCHUWING: BELANGRIJK! LEES
- OPTIONELE ACCESSOIRES
Brand : MAKITA
Model : DVC864LZX
Category : Cordless vacuum