
HHF360V - Electric heater HONEYWELL - Free user manual and instructions
Find the device manual for free HHF360V HONEYWELL in PDF.
| Brand | Honeywell |
| Model | HHF360V |
| Product type | Electric heater |
| Dimensions (W x D x H) | 19.3 x 19.3 x 28.7 cm |
| Weight | Approximately 2.5 kg |
| Power supply | 120 V, 60 Hz |
| Maximum power | 1500 W |
| Minimum power | 750 W |
| Heat levels | 2 (Low and High) |
| Control type | Manual |
| Thermostat | Adjustable with auto shutoff |
| Heat distribution | 360° Surround Heat |
| Safety devices | 360° tip-over switch, overheat protection, thermal fuse |
| Use | Indoor use only |
| Maintenance | Clean with a dry cloth at least once a month |
| Warranty | 3-year limited |
| Material | High quality safety plastic |
Frequently Asked Questions - HHF360V HONEYWELL
User questions about HHF360V HONEYWELL
0 question about this device. Answer the ones you know or ask your own.
Ask a new question about this device
Download the instructions for your Electric heater in PDF format for free! Find your manual HHF360V - HONEYWELL and take your electronic device back in hand. On this page are published all the documents necessary for the use of your device. HHF360V by HONEYWELL.
USER MANUAL HHF360V HONEYWELL
natural_image
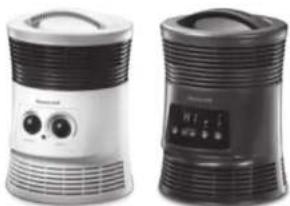
Two electric heating fans shown side by side, one with black ventilation grille and two control knobs, the other with digital display (no visible text or symbols)WARNING
IMPORTANT SAFETY INSTRUCTIONS
WARNING – READ AND SAVE THESE OPERATING AND SAFETY INSTRUCTIONS BEFORE USING THIS HEATER. IF YOU DO NOT UNDERSTAND THESES INSTRUCTIONS OR PRODUCT LABELS PLEASE CALL OUR CUSTOMER REPRESENTIVIES AT (800) 477-0457 FOR ASSISTANCE BEFORE USING THIS PRODUCT.
Warning – Failure to follow any of these safety instructions could result in fire, injury or death.
YOUR RESPONSIBILITIES
Electrical appliances may expose people to hazards that can cause severe injury as well as death. The use of electrical products may create hazards that include, but are not limited to, injury, fire, electrical shock and electrical system damage. These instructions are intended to provide you with the information you need to use the product and to avoid such hazards.
When using electrical appliances, basic precautions should always be followed to reduce risk of fire, electric shock, and injury to persons including the following:
- Warning – Read all instructions before using this heater.
-
Warning – This heater is hot when in use. To avoid burns, do not let bare skin touch hot surfaces. If, provided, use handles when moving this heater. Keep combustible materials, such as furniture, pillows, bedding, papers, clothes, and curtains at least 3 feet (0.9 m) from the front of the heater and keep them away from the sides and rear.
-
Warning – Extreme caution is necessary when any heater is used by or near children or invalids, and whenever the heater is left operating and unattended.
-
Warning – Always unplug heater when not in use.
-
Warning – Do not operate any heater with a damaged cord or plug or after the heater malfunctions, has been dropped or damaged in any manner. Discard heater or return heater to authorized service facility for examination and/or repair.
-
Warning – For residential use only.
-
Warning – Do not use outdoors.
-
Warning – This heater is not intended for use in bathrooms, laundry areas and similar indoor locations. Never locate heater where it may fall into a bathtub or other water container.
-
Warning – Do not run cord under carpeting. Do not cover cord with throw rugs, runners, or similar coverings. Do not route cord under furniture or appliances. Arrange cord away from traffic area and where it will not be tripped over.
-
CAUTION - THIS APPLIANCE HAS A POLARIZED PLUG (ONE BLADE IS WIDER THAN THE OTHER). TO REDUCE THE RISK OF SHOCK, THIS PLUG IS INTENDED TO FIT ONLY ONE WAY IN A POLARIZED OUTLET. IF THE PLUG DOES NOT FIT SECURELY IN THE OUTLET, REVERSE THE PLUG. IF IT STILL DOES NOT FIT, CONTACT A QUALIFIED ELECTRICIAN. DO NOT ATTEMPT TO DEFEAT THIS SAFETY FEATURE.
- Warning – It is normal for the plug to feel warm to the touch; however, a loose fit between the AC outlet (receptacle) and plug may cause overheating and distortion of the plug. contact a qualified electrician to replace loose or worn outlet.
- Warning - To disconnect the heater, first turn off the product, then grip the plug body and pull it from the wall outlet. Never pull by the cord.
- Warning – Do not insert or allow foreign objects to enter any ventilation or exhaust opening as this may cause an electric shock or fire, or damage the heater.
- Warning – To prevent a possible fire, do not block air intakes or exhaust in any manner. Do not use on soft surfaces, like a bed, or where openings may become blocked.
- Warning – A heater has hot and arcing or sparking parts inside. Do not use it in areas where gasoline, paint or flammable liquids are used or stored.
- Warning – Use this heater only as described in this manual. Any other use not recommended by the manufacturer may cause fire, electric shock, or injury to persons.
- Warning – Always plug heater directly into a wall outlet/receptacle. Never use with an
extension cord or relocatable power tap (outlet/power strip).
- Warning – Never tamper with this product or attempt to fix it. Any tampering with, or modification of this product can result in serious injury, death, or fire. Risk of electric shock. Do not open. No user serviceable parts inside.
- Warning – Do not remove product labels that contain warnings or safety instruction.
- Caution - The output of this heater may vary and its temperature may become intense enough to burn exposed skin. Use of this heater is not recommended for persons with reduced sensitivity to heat or an inability to react to avoid burns.
- Caution - Before cleaning, or storage, or when not in use, turn the product's controls to the OFF position and unplug the heater from the electrical outlet and allow to cool.
- Caution - Place the heater on a firm, level, open surface free from obstructions and at least 3 feet (0.9m) away from any combustible materials. DO NOT use on an unstable surface such as bedding or deep carpeting. Be sure the heater is not in a position where it may be tripped over by small children or pets. The heater's rubber feet will hold it firmly in position.
- Caution – If your home has aluminum wiring have a licensed electrician check your receptacle's connections. When using a 1500 watt heater, aluminum wire connections can cause a safety issue.
- SAVE THESE INSTRUCTIONS
SET-UP
- Place the heater on a firm, level, open surface free from obstructions and at least 3 feet (0.9m) away from any wall or any combustible material. DO NOT use on an unstable surface such as bedding or deep carpeting.
BE SURE THE HEATER IS NOT IN A POSITION WHERE IT MAY BE TRIPPED OVER BY CHILDREN OR PETS.
MOVING THE HEATER
- Turn off the heater.
- Allow it to cool for ten minutes.
- Unplug heater and move. Heaters are equipped with a Cool Touch Handle for your convenience.
OPERATION
NOTE: The 360° Surround Heat® Heater requires no assembly.
• NOTE: NEVER LEAVE AN OPERATING UNIT UNATTENDED
- The 360^ Surround Heat ^® Heater is designed to disperse heat in a 360^ range.
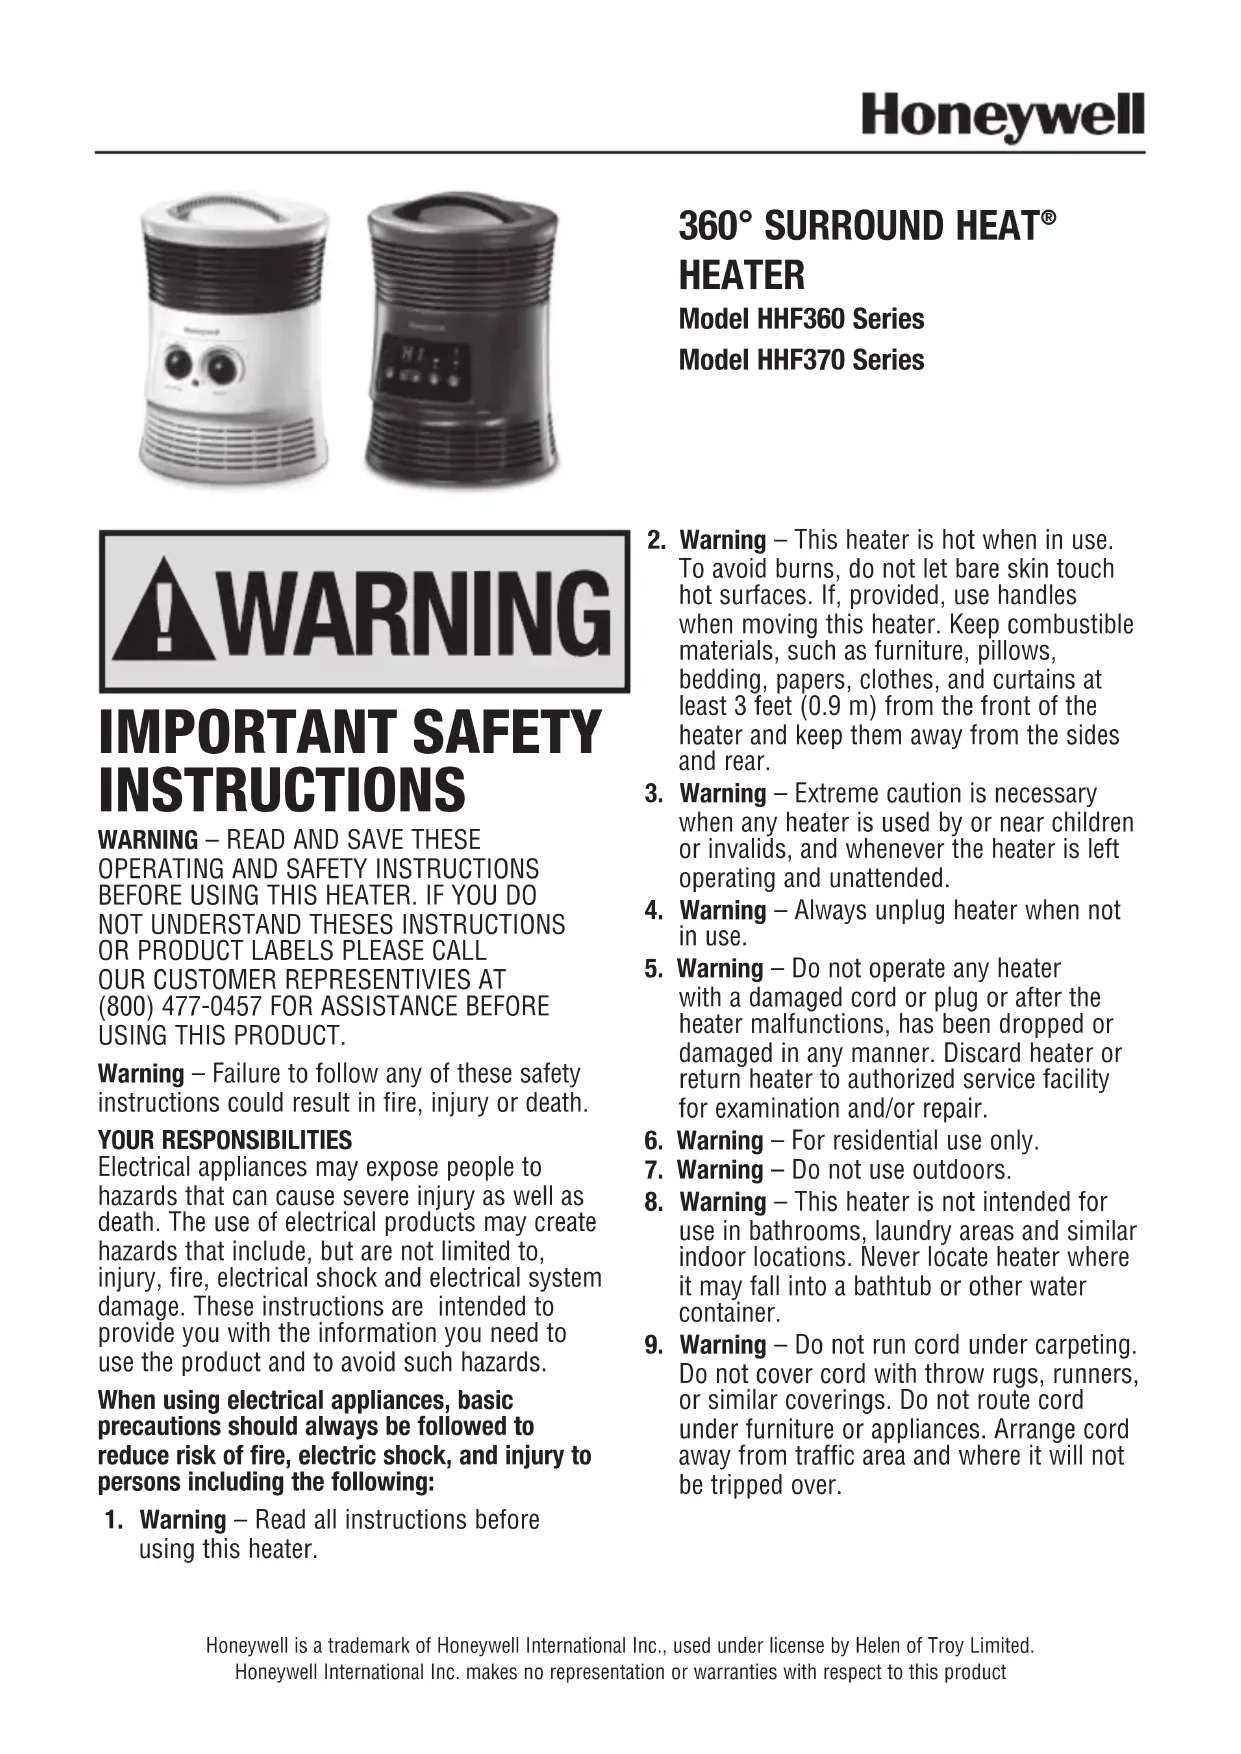
Model HHF360 Series – Manual Surround Heat® Heater Operation
- With the Power Knob in the OFF (O) position, plug the heater into a polarized 120V outlet. DO NOT FORCE THE POLARIZED PLUG INTO THE OUTLET; it will only fit one way.
- The Power Knob is equipped with two (2) settings, Low and High. The Low setting uses 750 watts of power and the High setting uses 1500 watts of power. You can select the proper setting to accommodate your comfort level with the Power Knob. When you choose any setting the red Power Light will come on. Because the Low setting does not require as much electricity to operate, it is more energy efficient and may be a better option if you are concerned about the amperage draw on a circuit when the heater is on the High setting.
- Turn the Thermostat Control fully clockwise to the highest setting.
- When the room reaches a comfortable temperature, slowly turn the Thermostat Control counter-clockwise until the heating element goes off (the red Power Light will not be shut off). This is the point at which the Thermostat setting equals the room temperature. At this setting, the Thermostat will automatically turn the heater on and off to maintain the selected temperature.
- Turn the Power Knob to OFF (O) and unplug the heater when you are finished using it.
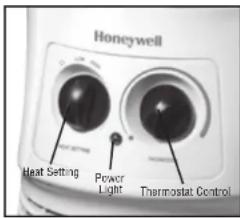
Model HHF370 Series - Digital 360° Surround Heat® Heater with Remote Operation
Turn heater on by pressing the Power Button on (⏻) and the heater will start at the HI Heat Level Setting.
• To set the Heat Level, press ( ) :
1. For Low (LO), this setting uses 750 watts of power
2. For High (HI), this setting uses 1500 watts of power
Note: Because the Low (LO) setting does not require as much electricity to operate, it is more energy efficient and may be a better option if you are concerned about saving energy.
- To set the thermostat, press the up (∧) or down (▽) arrows until Desired Temperature is reached. Note: the Desired Temperature will flash three
times and then Current Temperature in the room will display as a steady blue.
- To constantly run the heater without a thermostat setting, press the ( ) button until HI or LO is displayed in Temperature Display. In this mode, make sure to manually shut the heater OFF when done using this appliance.
- To set the Timer, press the ( ) button to select 1, 2, 4, or 8 hour setting. The heater will run for that chosen period in the selected mode, counting down the remaining time in the display bar and automatically shut off after the desired time has passed.
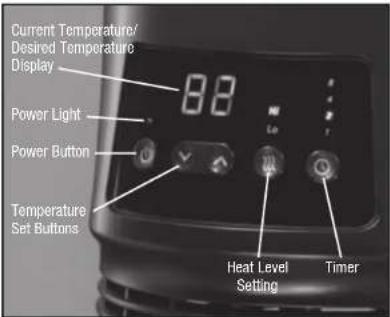
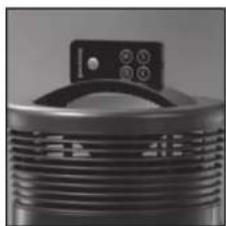
Remote Control
The Digital 360° Surround Heat ^3 Heater can be completely controlled with the remote. One (1) CR2025 3V battery is required (included). To install battery:
- Remove the cover located on the back of the remote control.
- Insert one CR2025 3V battery positioning it correctly (see instructions in the battery compartment).
- Replace the cover.
Remote Control Operation
- Locate remote control packed in the top insert.
- Press ( ⏻ ) to turn heater on or off.
- Press ( ) to choose LO (750) or HI (1500W) Heat Level Setting.
- Press ( Ⓤ ) to choose 1, 2, 4 or 8 hour setting.
- Press the up ( ▲ ) or down ( ) arrows to choose a thermostat setting. Desired Temperature will flash three times and then Current Temperature in the room will display as a steady blue.
- Place remote control in the holder within the handle of the heater when not in use.
natural_image
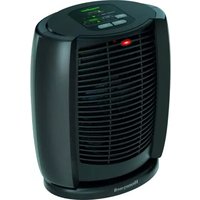
Close-up of a black industrial fan or vent with a control panel and ventilation grille (no visible text or symbols)SAFETY FEATURES
The 360° Surround Heat ^® Heater is equipped with several devices and features for added protection:
- 360° SafetyTIP™ is an all-around tip-over switch that disables the heater if it is accidentally tipped in any direction.
- A high temperature safety control prevents overheating.
- This heater is also equipped with a thermal cut-off fuse that will permanently shut down the heater should it operate at a higher than normal temperature.
• This heater was created using a high quality safety plastic.
CLEANING
We recommend that the 360° Surround Heat® Heater be cleaned at least once a month and before off-season storage.
- Turn the heater OFF (0) or (1) and unplug it. Allow it to cool.
- Use a dry cloth only to clean the external surfaces of the heater. DO NOT USE WATER, WAXES, POLISHES OR ANY CHEMICAL SOLUTION.
STORAGE
- Clean your 360° Surround Heat ° Heater using the above-mentioned steps. Wrap the cord around the unit. Place in its original box and store it in a cool, dry place.
• This heater does not disassemble.
TROUBLESHOOTING
If your 360° Surround Heat ^® Heater shuts off unexpectedly or fails to operate, one of your heater safety features may have been activated to prevent overheating.
- Be sure it is plugged in and that the electrical outlet is working.
- Check your Thermostat Control setting. The unit may simply be off because you have reached your desired heat setting.
- Check for any obstructions. If you find an obstruction, turn the heater OFF (O) or (and unplug it. Allow the heater to cool completely, then remove the obstruction. Wait at least 10 minutes, then re-plug the heater in and follow the OPERATION instructions.
- Be sure it is plugged in and that the electrical outlet is working. - Check your Thermostat Control setting. The unit may simply be off because you have reached your desired heat setting. - Check for any obstructions. If you find an obstruction, turn the heater OFF (O) or (and unplug it). Allow the heater to cool completely, then remove the obstruction. Wait at least 10 minutes, then re-plug the heater in and follow the OPERATION instructions.
PRODUCT SPECIFICATIONS
Model HHF360 Series, HHF370 Series
Unit dims 7.6" L x 7.6" W x 11.3" H
Amps 12.5
Unit Voltage 120V, 60Hz
Max Watts 1500
Max BTUs 5118
Operation Cost* To estimate the cost to operate this heater, multiple the watts used times .001 to convert into a kilowatts measure and multiple by your local kilowatt electric rate for however long you run the heater. For example, if your electric rate is \1196** per kilowatt hour and you ran this heater in constant high mode (1500 watts) for 4 hours, it would cost you \71 cents to run the heater (1500 watts x 4 hours x.001) x .1196kwp = .71 cents.
NOTE: Because the Low setting does not require as much electricity to operate, it is more energy efficient and may be a better option if you are concerned about the higher power consumption when the heater is on the High setting.
* Calculation (Total Wattage x .001) x Cost per Kilowatt Hour = Cost to operate
** Average Retail Price of Electricity to Ultimate Customer by End-Use, US Energy Information Administration, March 2013.
CONSUMER RELATIONS
Mail questions or comments to:
Kaz USA, Inc.
Consumer Relations Dept.
250 Turnpike Road
Southborough, MA 01772
Call us toll-free at: 1-800-477-0457
E-mail: consumerrelations@kaz.com
Or visit our website at:
www.HoneywellPluggedIn.com/Heaters
Please be sure to specify a model number.
NOTE: IF YOU EXPERIENCE A PROBLEM, PLEASE CONTACT CONSUMER RELATIONS FIRST OR SEE YOUR WARRANTY. DO NOT RETURN THE HEATER TO THE ORIGINAL PLACE OF PURCHASE. DO NOT ATTEMPT TO OPEN THE MOTOR HOUSING YOURSELF, DOING SO MAY VOID YOUR WARRANTY AND CAUSE DAMAGE TO THE PRODUCT OR PERSONAL INJURY.
3 YEAR LIMITED WARRANTY
You should first read all instructions before attempting to use this product.
A. This 3 year limited warranty applies to repair or replacement of product found to be defective in material or workmanship. This warranty does not apply to damage resulting from commercial, abusive, unreasonable use or supplemental damage. Defects that are the result of normal wear and tear will not be considered manufacturing defects under this warranty. KAZ USA, INC. IS NOT LIABLE FOR INCIDENTAL OR CONSEQUENTIAL DAMAGES OF ANY NATURE. ANY IMPLIED WARRANTY OF MERCHANTABILITY OR FITNESS FOR A PARTICULAR PURPOSE ON THIS PRODUCT IS LIMITED IN DURATION TO THE DURATION OF THIS WARRANTY. Some jurisdictions do not allow the exclusion or limitation of incidental or consequential damages or limitations on how long an implied warranty lasts, so the above limitations or exclusions may not apply to you. This warranty gives you specific legal rights, and you also may have other rights which vary from jurisdiction to jurisdiction. This warranty applies only to the original purchaser of this product from the original date of purchase.
B. At its option, Kaz USA, Inc. will repair or replace this product if it is found to be defective in material or workmanship.
C. This warranty does not cover damage resulting from any unauthorized attempts to repair or from any use not in accordance with the instruction manual.
D. Return defective product to Kaz USA, Inc. with a brief description of the problem. Include proof of purchase and a \10 US/\15.50 CAN check or money order for handling, return packing and shipping charges. Please include your name, address and a daytime phone number. You must prepay shipping charges. We suggest having tracking or delivery confirmation. Send to:
In U.S.:
Helen of Troy Kaz
Attn: Returns Department
1 Helen of Troy Plaza
El Paso, TX 79912
USA
In Canada:
Kaz Canada, Inc.
Attn: Returns Department
510 Bronte Street South
Milton, ON L9T 2X6
Canada
© 2015 Kaz USA, Inc. All Rights Reserved.
Manufactured by Kaz USA, Inc.
250 Turnpike Rd.
Southborough, MA 01772
Distributed by Kaz Canada, Inc.
510 Bronte St S
Milton, ON L9T 2X6
Surround Heat is a registered trademark of Helen of Troy Limited.
Safety Tip is a trademark of Helen of Troy Limited.
P/N: 31IMH367190
Honeywell
natural_image
Two electric heating fans with visible heat sinks and control knobs, one black-and-white and one gray (no text or symbols)
CONSIGNES DE SÉCURITÉ IMPORTANTES
AVERTISSEMENT - LISEZ ET CONSERVEZ CES MESURES DE SÉCURITÉ ET CES INSTRUCTIONS AVANT D'UTILISER CET APPAREIL DE CHAUFFAGE. SI VOUS NE COMPRENEZ PAS CES INSTRUCTIONS OU LES ÉTIQUETTES SUR L'APPAREIL, VEUILLEZ APPELER NOS REPRÉSENTANTS AU SERVICE À LA CLIENTÈLE AU 1 800 477-0457 POUR OBTENIR DE L'AIDE AVANT D'UTILISER CET APPAREIL.
SPÉCIFICATIONS DU PRODUIT
Helen of Troy Kaz Attn: Returns Department 1 Helen of Troy Plaza El Paso, TX 79912 USA
AU CANADA :
Kaz Canada, Inc. Attn : Returns Department 10 Bronte Street South Milton (Ontario) L9T 2X6 Canada
natural_image
Close-up of a black industrial fan or vent with a control panel and ventilation grille (no visible text or symbols)Consumer Relations Dept.
250 Turnpike Road
Southborough, MA 01772
Attn: Returns Department
1 Helen of Troy Plaza
El Paso, TX 79912
USA
En Canadá:
Kaz Canada, Inc.
Attn: Returns Department
510 Bronte Street South
Milton, ON L9T 2X6
Canada
Southborough, MA 01772
Category: tri-lingual owners manual
Models: HHF360/370 Series
Artwork Part #'s: 31IMH367190
Die Line Part #: NA
Oracle Desc.: OM, HHF360/370 SURROUND SERIES, ENGLISH/SPANISH/FRENCH, 2015
Subject: Heater
Region: US
Size: IN: W5.5 x H8 Folded
MM: W NA x H NA
Scale: 1/1
Material: 70# Gloss or Matte Text Bindery is saddle stitch
Page count: 22
Revision: 4
Date: 23APR15
Release Date: 23APR15
Rerelease Date:
Colors:
Dielines (Do not print)
Cyan 100%
Magenta 100%
Yellow 100%
Process Black 100%
Spot Colors
PMS XXXX
PMS XXXX


Coating: Overall Gloss

Vamish: Spot UV
Special Instructions:
Quality Requirement of Artwork and Quality
Clarification Process of Artwork Printing:
Meet Eng-QS-06&02
Kaz USA, Inc.
Creative Services, 250 Turnpike Road
Southborough, 01772 MA, USA
+1 508 490 7000

- WARNING
- IMPORTANT SAFETY INSTRUCTIONS
- YOUR RESPONSIBILITIES
- SET-UP
- MOVING THE HEATER
- OPERATION
- Model HHF360 Series – Manual Surround Heat® Heater Operation
- Model HHF370 Series - Digital 360° Surround Heat® Heater with Remote Operation
- Remote Control
- Remote Control Operation
- SAFETY FEATURES
- CLEANING
- STORAGE
- TROUBLESHOOTING
- PRODUCT SPECIFICATIONS
- CONSUMER RELATIONS
- YEAR LIMITED WARRANTY
- In U.S.:
- In Canada:
- Honeywell
- CONSIGNES DE SÉCURITÉ IMPORTANTES
- SPÉCIFICATIONS DU PRODUIT
- AU CANADA :
- Colors:
- Special Instructions:
Brand : HONEYWELL
Model : HHF360V
Category : Electric heater