
UR190WE - Radio Soundmaster - Free user manual and instructions
Find the device manual for free UR190WE Soundmaster in PDF.
| Brand | Soundmaster |
| Model | UR190WE |
| Product type | DAB+ / FM alarm clock radio |
| FM tuning range | 87.50 - 108.00 MHz |
| DAB tuning range | 174.928 - 239.200 MHz |
| Preset stations | 10 FM + 10 DAB |
| Power supply | Mains adapter 100-240V~ 50/60 Hz, output 5V DC 1.5 A |
| Display | Backlit LCD screen |
| Main functions | DAB+, FM RDS, alarms (2), sleep, snooze timer, equalizer, USB charging |
| Headphone jack | Yes (3.5 mm jack) |
| USB port | Yes (device charging) |
| Antenna | Telescopic antenna |
| Audio settings | Equalizer (Normal, Classic, Jazz, Pop, Rock, Voice, My EQ) |
| Alarms | 2 independent alarms with source selection (DAB, FM, Buzzer), repeat (Daily, Once, Weekends, Weekdays), duration and snooze |
| Sleep function | Adjustable timer from 15 to 90 minutes |
| Auto standby | Adjustable inactivity standby (2h, 4h, 5h, 6h) |
| Information display | DLS, signal strength, program type, clock, date, etc. |
| Menu languages | Multilingual (French, German, English, etc.) |
| Care and cleaning | Soft damp cloth, without abrasive or solvent products |
| Safety | Do not open, do not expose to moisture, disconnect during storms |
| Spare parts and repairability | Repair only by an approved center; contact customer service |
| General information | Importer: Wörlein GmbH, Germany. Compliant with directive 2014/53/EU |
Frequently Asked Questions - UR190WE Soundmaster
User questions about UR190WE Soundmaster
0 question about this device. Answer the ones you know or ask your own.
Ask a new question about this device
Download the instructions for your Radio in PDF format for free! Find your manual UR190WE - Soundmaster and take your electronic device back in hand. On this page are published all the documents necessary for the use of your device. UR190WE by Soundmaster.
USER MANUAL UR190WE Soundmaster
Dynamic Label Segment (DLS)
Signal strength (Signalstärke)
Program type (PTY) (Programmart)
Ensemble name (Ensemblename)
Frequency (Frequenz)
Signal error rate (Signalfehlerrate)
Bitrate codec (Codec-Bitrate)
Time (Uhrzeit)
Date (Datum)
89.45MHz Scanning...
Alarm 1 Wizard Source Buzzer
Set sleep time 30 minutes
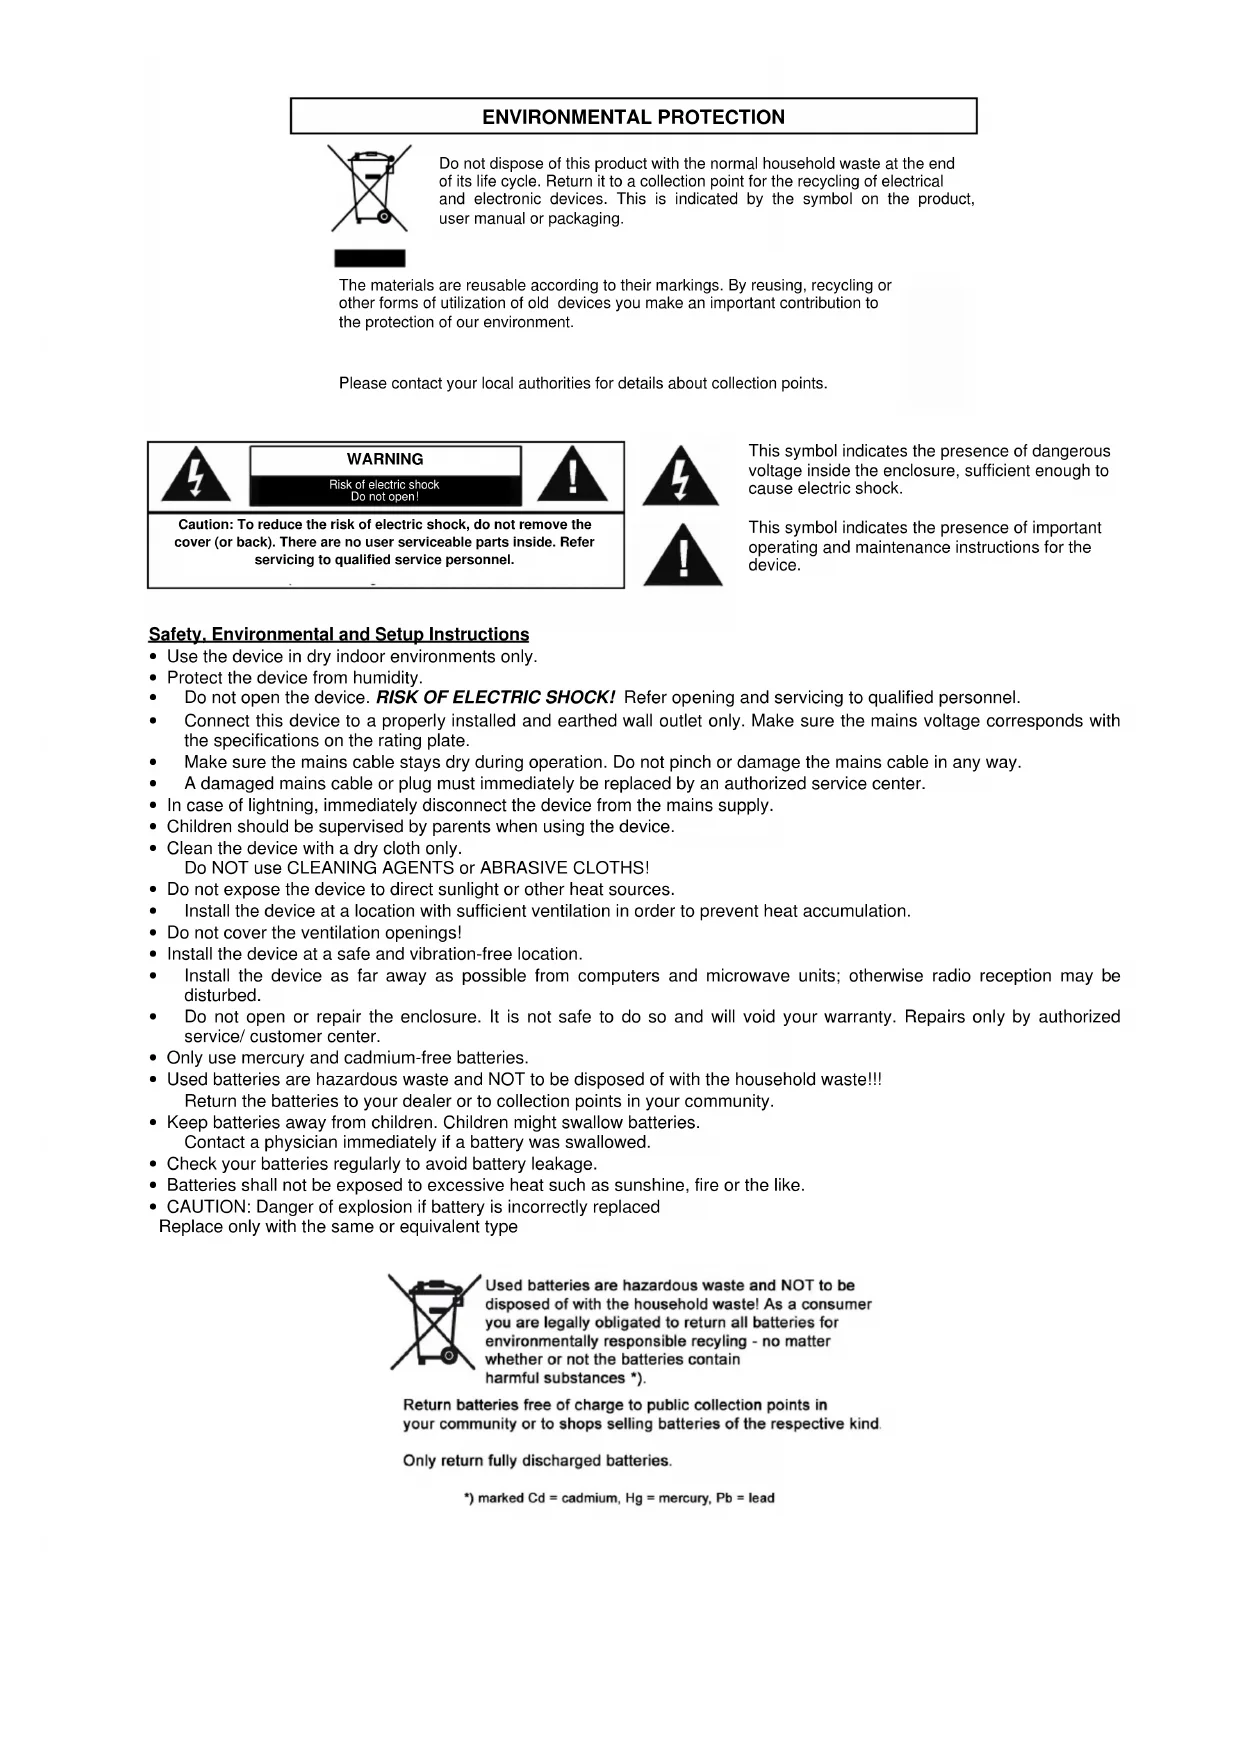
Do not dispose of this product with the normal household waste at the end of its life cycle. Return it to a collection point for the recycling of electrical and electronic devices. This is indicated by the symbol on the product, user manual or packaging.

The materials are reusable according to their markings. By reusing, recycling or other forms of utilization of old devices you make an important contribution to the protection of our environment.
Please contact your local authorities for details about collection points.

WARNING
Risk of electric shock Do not open!

Caution: To reduce the risk of electric shock, do not remove the cover (or back). There are no user serviceable parts inside. Refer servicing to qualified service personnel.

This symbol indicates the presence of dangerous voltage inside the enclosure, sufficient enough to cause electric shock.

This symbol indicates the presence of important operating and maintenance instructions for the device.
Safety, Environmental and Setup Instructions
- Use the device in dry indoor environments only.
- Protect the device from humidity.
- Do not open the device. RISK OF ELECTRIC SHOCK! Refer opening and servicing to qualified personnel.
- Connect this device to a properly installed and earthed wall outlet only. Make sure the mains voltage corresponds with the specifications on the rating plate.
Make sure the mains cable stays dry during operation. Do not pinch or damage the mains cable in any way. - A damaged mains cable or plug must immediately be replaced by an authorized service center.
- In case of lightning, immediately disconnect the device from the mains supply.
Children should be supervised by parents when using the device. - Clean the device with a dry cloth only.
Do NOT use CLEANING AGENTS or ABRASIVE CLOTHS!
- Do not expose the device to direct sunlight or other heat sources.
Install the device at a location with sufficient ventilation in order to prevent heat accumulation. - Do not cover the ventilation openings!
- Install the device at a safe and vibration-free location.
- Install the device as far away as possible from computers and microwave units; otherwise radio reception may be disturbed.
Do not open or repair the enclosure. It is not safe to do so and will void your warranty. Repairs only by authorized service/ customer center. - Only use mercury and cadmium-free batteries.
- Used batteries are hazardous waste and NOT to be disposed of with the household waste!!
- Return the batteries to your dealer or to collection points in your community.
- Keep batteries away from children. Children might swallow batteries. Contact a physician immediately if a battery was swallowed.
- Check your batteries regularly to avoid battery leakage.
- Batteries shall not be exposed to excessive heat such as sunshine, fire or the like.
- CAUTION: Danger of explosion if battery is incorrectly replaced
- Replace only with the same or equivalent type

Used batteries are hazardous waste and NOT to be disposed of with the household waste! As a consumer you are legally obligated to return all batteries for environmentally responsible recycling - no matter whether or not the batteries contain harmful substances *).
Return batteries free of charge to public collection points in your community or to shops selling batteries of the respective kind
Only return fully discharged batteries.
*) marked Cd = cadmium, Hg = mercury, Pb = lead
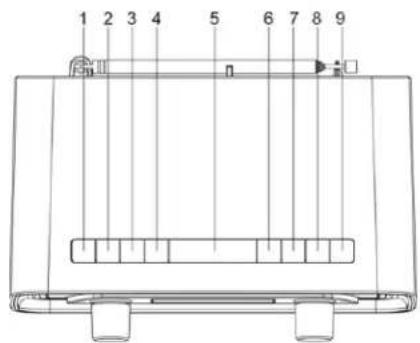
LOCATIONS OF CONTROLS
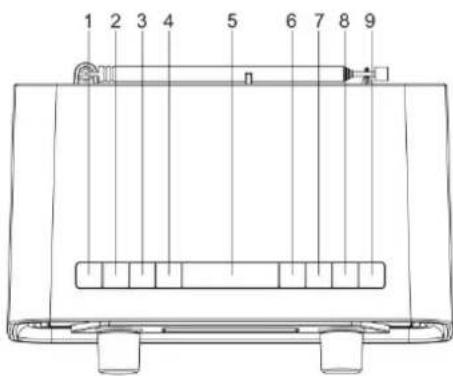
- ON/OFF: Selects between "On" mode and "Standby" mode (showing clock and date). Cancel sleep function and a sounding alarm.
- SOURCE: Selects between DAB and FM audio sources.
- MENU: Shows menus of the current mode.
- ALARM: Enters alarm wizard or cancels the alarm (when it sounds), and cycles through alarm on/off settings in standby mode.
- SLEEP/SNOOZE: When the radio is playing, selects duration before the radio automatically switches itself to standby mode. When the alarm sounds, activates the snooze function.
- INFO: Cycles through information screens
- BACK: Returns to the previous screen.
- PRESET: Selects a preset station.
- SCAN: In DAB mode, searches all available stations. In FM mode, searches the next available station.
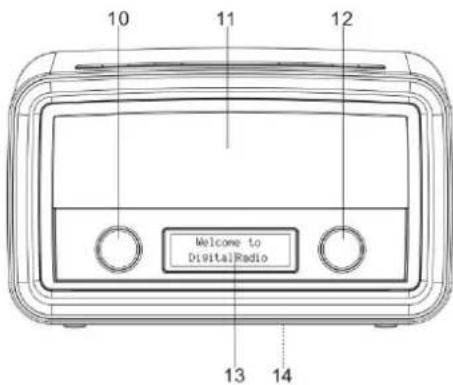
- VOLUME: Rotate the knob to control the volume.
- Speakers
- SELECT: In DAB mode, rotate to select a DAB station. In FM mode, rotate to tune FM frequency. In menus, rotate to cycle through the options. Press the knob to confirm a selection.
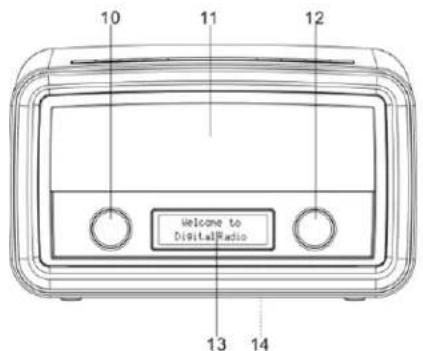
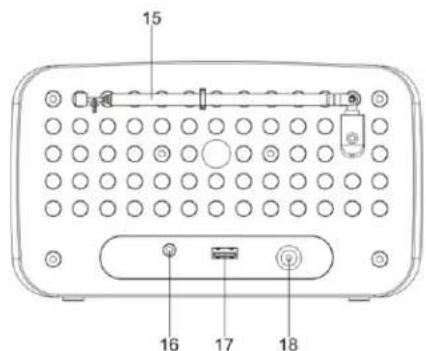
- Display
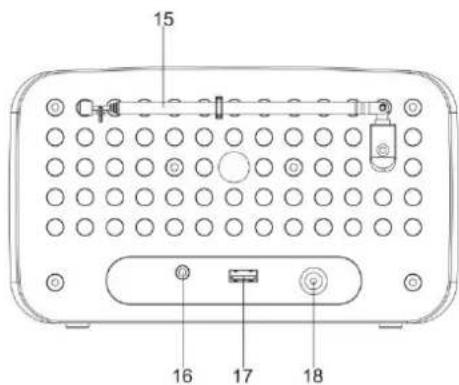
- Rating label
- Antenna
- Headphone jack
- USB jack For external device charging
- DC IN jack: Connects the power adapter.
GETTING STARTED
Connect to power
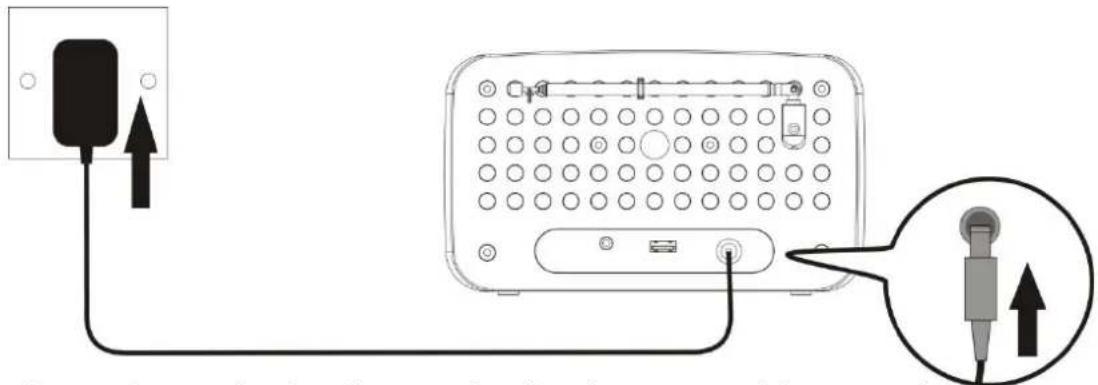
- Before operation, please make sure that the voltage mentioned on the power supply is same as the voltage of your local area.
- Connect the cord of the power adapter to the "DC IN" jack of the radio.
- Connect the plug of the power adapter to a wall socket.
The radio is powered and in standby mode when you see the display is switched on.
Turning on or off
- Press "ON/OFF" (1) in standby mode to turn the radio on.
- Press "ON/OFF" (1) when the radio is turned on to switch it to standby mode. The time and date show on the display in standby mode.
22:26:42
28-4-2016
To completely disconnect the radio from power, remove the plug of the power adapter from the wall socket.
Setting the clock
The date and time of the radio is automatically set once it receives radio broadcast signals (and when such info is available). You may also set the date and time through the setting menu. To do so:
- Press "ON/OFF" (1) to turn the radio on.
- Press "MENU" (3) once.
- Rotate "SELECT" (12) until you see "System" on the display and then press "SELECT" (12).

- Rotate "SELECT" (12) until you see "Time" on the display and then press "SELECT" (12).

- Rotate "SELECT" (12) until you see "Set Time/Date" on the display and then press "SELECT" (12).

- Rotate "SELECT" (12) to set hour time and then press "SELECT" (12) to confirm.
- Repeat step 6 to continue setting minute time, date, month and year.
For more date and time settings, see chapter "Time".
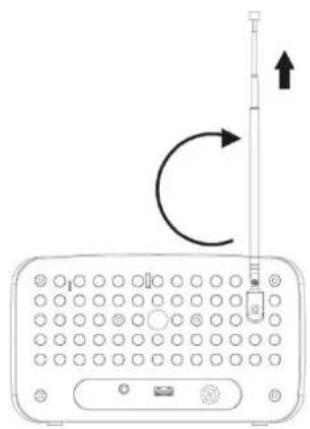
Using the antenna
Using the antenna can improve signal reception.
- Pull the antenna upward.
- Extend the antenna by pulling at its end.
- If necessary, adjust the position of the antenna for best reception.
Controlling the volume
- Rotate "VOLUME" (10) to the right to increase and to the left to decrease the volume.

LISTENING TO DAB BROADCASTS
Selecting DAB mode
- Press "ON/OFF" (1) to turn the radio on.
- Press "SOURCE" (2) to select DAB mode.
DAB
Scanning for DAB stations
The first time you use the radio, or if the station list is empty, the radio automatically performs a station search. You may also perform a station search manually. To do so:
In DAB mode, press "SCAN" (9) to activate the automatic station search. The radio automatically stores radio stations with sufficient signal strength. After the search is complete, the first stored station is broadcast automatically.

Tuning to a DAB station
- In DAB mode, rotate "SELECT" (12) to cycle through the DAB stations in the station list.

- Press "SELECT" (12) to tune to the selected DAB station.
Storing preset stations
You can store up to 10 DAB stations as preset stations.
- Tune to a DAB station.
- Press and hold "PRESET" (8) until "Preset Store" shows on the display.
- Rotate "SELECT" (12) to select a preset number.

- Press "SELECT" (12) to confirm.
The DAB station is stored with the selected preset number.
Repeat steps 1-4 to store more preset stations.
- To tune to a preset station, press "PRESET" (8) once, then rotate "SELECT" (12) to cycle through the list of preset stations and then press "SELECT" (12) to confirm the selection.
To change the DAB station assigned to a preset number, repeat steps 1 to 4 above to overwrite the existing DAB station.
Displaying DAB information
Press "INFO"6) (repeatedly to cycle through the following information (if available).
Dynamic label segment (DLS)
Signal strength
Program type (PTY)
Ensemble name
Frequency
Signal error rate
Bitrate codec
Time
Date
Using the DAB menus
- In DAB mode, press to access the DAB menus.
- Rotate "SELECT" (12) to cycle through the below options.
“Full scan”
“Manual tune”
“DRC”
“Prune"
"System"
See below for details of each option.
Full scan
Full scan is used to perform a wide range search for DAB stations.
- Press "SELECT" (12) to start scanning for available DAB stations. After the scanning is complete, the first detected station is broadcast automatically.

Manual tune
- Press "SELECT" (12) to confirm the selection "Manual tune".

- Rotate "SELECT" (12) to tune the frequency manually and confirm the selected frequency by pressing "SELECT" (12).
Range Control)
DRC adds or removes a degree of compensation for the differences in the dynamic range between radio stations.
- Press "SELECT" (12) to confirm the selection "DRC".
- Rotate "SELECT" (12) to cycle through the below options. The asterisk behind the option indicates the current setting.
"DRC off": No compensation applied.
"DRC low": Medium compensation applied.
"DRC high": Maximum compensation applied.
- Press "SELECT" (12) to confirm the selected option.
Prune
This feature removes any stations that are in the list but have no service in your area.
-
Press "SELECT" (12) to confirm the selection "Prune".
-
Rotate "SELECT" (12) to cycle through the below options.
"No": Return to the previous menu.
Yes: Remove invalid stations from the station list.
- Press "SELECT" (12) to confirm the selected option.
System
See chapter "System menu" for details.
LISTENING TO FM BROADCASTS
Selecting FM mode
- Press "ON/OFF" (1) to turn the radio on.
- Press "SOURCE" (2) to select FM mode.
FM
Scanning for FM stations
In FM mode, press "SCAN" (9) or "SELECT" (12) to activate the automatic search for the next available FM station.
89.45MHz
Scanning...
After a strong FM radio station is detected, the search stops, and the FM radio station is broadcast.
Tuning the FM frequency
In FM mode, rotate "SELECT" (12) to tune up or down the frequency.
Once you have tuned up or down the frequency, press "SCAN" or "SELECT" (12) to activate the automatic search for the next available FM station in the selected tune up or down direction.
Storing preset stations
You can store up to 10 FM stations as preset stations.
- Tune to an FM station.
- Press and hold "PRESET" (8) until "Preset Store" shows on the display.
- Rotate "SELECT" (12) to select a preset number.
- Press "SELECT" (12) to confirm.
- The FM station is stored with the selected preset number.
Repeat steps 1-4 to store more preset stations.
To tune to a preset station, press "PRESET" (12) once, then rotate "SELECT" (12) to cycle through the list of preset stations and then press "SELECT" (12) to confirm the selection.
Displaying RDS information
Radio Data System (RDS) is a service that allows FM stations to transmit additional information. When you tune to an FM radio station that transmits RDS signals, the station name is displayed.
Press "INFO" (6) repeatedly to cycle through the following RDS information (if available).
Radio text
Program type (such as NEWS, SPORT, POP M)
Program service
Mono/Stereo
Time
Date
Using the FM menu
- In FM mode, press "MENU" (3) to access the FM menus.
- Rotate "SELECT" (12) to cycle through the below options.
Scan setting
System
See below for details of each option.
Scan setting
- Press "SELECT" (12) to confirm the selection "Scan setting".

- Rotate "SELECT" (12) to cycle through the below options.
"Strong stations only": Search for strong stations only.
"All stations": Search for all stations regardless of the signal strength.
- Press "SELECT" (12) to confirm the selected option.
System
See chapter "System menu" for details.
USING THE ALARMS
Setting alarms
The radio lets you have 2 alarm settings.
To set the alarm:
- Press "ON/OFF" (1) to turn the radio on, press "ALARM" (4) to select between Alarm 1 and Alarm 2 and then press "SELECT" (12) to confirm the selection.
Alarm 1 Setup
- Rotate "SELECT" (12) to set the hour time of the alarm and then press "SELECT" (12).
Alarm 1 Wizard On time 07:50
- Rotate "SELECT" (12) to set the minute time of the alarm and then press "SELECT" (12).
- Rotate "SELECT" (12) to cycle through the duration options and then press "SELECT" (12) to confirm the selection.
Alarm 1 Wizard Duration 15
The duration defines the time before the radio returns to standby mode if the alarm is not deactivated. Duration options: 15, 30, 45, 60, 90 and 120 minutes.
- Rotate "SELECT" (12) to cycle through the source options and then press "SELECT" (12) to confirm the selection.
Alarm 1 Wizard Source Buzzer
The source defines the sound source of the alarm. Source options: "DAB", "FM" and "Buzzer".
If DAB or FM is selected, you will also be prompted to select the last played station or one of the preset stations (if set) as the alarm.
- Rotate "SELECT" (12) to cycle through the interval options and then press "SELECT" (12) to confirm the selection.
Alarm 1 Wizard Daily
The interval defines on which days the alarm is active. Interval options: Daily, Once, Weekends and Weekdays. If "Once" is selected, you will also be prompted to set a specific date.
- Rotate "SELECT" (12) to adjust the volume level and then press "SELECT" (12).
Alarm 1 Wizard

This setting defines the sound volume of the alarm.
- Rotate "SELECT" (12) to select alarm on or off and then press "SELECT" (12) to confirm the selection.
Alarm 1 Wizard Alarm On
When the alarm setting is active, the corresponding alarm icon (1 for Alarm 1 and 2 for Alarm 2) will show on the display. At the set time, the alarm will sound. The volume will increase gradually until it reaches the set volume level. The corresponding alarm icon will also flash on the display.
Turning the alarms on or off in standby mode
- In standby mode, press "ALARM" repeatedly to cycle through the alarm on or off settings. See the table below for details.
| Pressing ALARM | Alarm 1 | Alarm 2 |
| 1× | Off | Off |
| 2× | On | Off |
| 3× | Off | On |
| 4× | On | On |
- Press "SELECT" (12) to confirm the setting.
When the alarm setting is active, the corresponding alarm icon (alarm 1 and alarm 2) will show on the display.
Deactivating a sounding alarm
Press "ON/OFF" (1) or "ALARM" (4) to switch the radio to standby mode.
Snoopze
To temporarily silence a sounding alarm, press "SLEEP/SNOOZE" (5).
To change the snooze period, press "SLEEP/SNOOZE" (5) repeatedly.
Snoopze 5 minutes
The snooze period can be selected according to the duration of the alarm (see chapter "Setting alarms").
| Duration of alarms | Selectable snooze periods |
| 15 min | 5, 10 min |
| 30 min | 5, 10, 15 min |
| 45 min | 5, 10, 15, 30 min |
| 60 min | 5, 10, 15, 30 min |
| 90 min | 5, 10, 15, 30 min |
| 120 min | 5, 10, 15, 30 min |
Note: If the remaining duration of the alarms is shorter than 10 minutes, the only selectable snooze period is 5 minutes. If the remaining duration is shorter than 5 minutes, the snoozer period cannot be set.
The radio will return to standby mode during the snooze period. The alarm will sound again when the snooze period is over.
To cancel the snooze period and the alarm, press "ON/OFF" (1).
Sleep
This sleep function defines the duration of time before the radio switches itself off automatically.
- When the radio is switched on, press "SLEEP/SNOOZE" (5) repeatedly to select a sleep period (Options: Off, 15, 30, 45, 60 and 90 minutes).
Set sleep time 30 minutes
- Press "SELECT" (12) to confirm the selection.
Once a sleep period is set, the sleep icon (S) will show on the display. The radio will automatically switch off when the sleep period is over.
SYSTEM MENU
To access the system menu:
- Press "MENU" (3) in DAB or FM mode.
- Rotate "SELECT" (12) to cycle through the options until you see "System".
DAB
- Press "SELECT" (12) to confirm the selection "System".
- Rotate "SELECT" (12) to cycle through the below options.
Equaliser
Time
Backlight
Inactive Standby
Language
Factory Reset
Software Version
See below for details of each option.
Equaliser
- Press "SELECT" (12) to confirm the selection "Equaliser".

- Rotate "SELECT" (12) to cycle through the below equalizer options. The asterisk behind the option indicates the current setting.
My EQ (see chapter "Setting My EQ")
Normal
Classic
Jazz
Pop
Rock
Speech
- Press "SELECT" (12) to confirm the selected option.
Setting My EQ
- After "My EQ" has been selected, rotate "SELECT" (12) to select between "Treble" and "Bass". Press "SELECT" (12) to confirm the selection.
- Rotate "SELECT" (12) to adjust the treble or bass level and then press "SELECT" (12) to confirm the settings. The asterisk behind the level indicates the current setting.
Time
- Press "SELECT" (12) to confirm the selection "Time".

-
Rotate "SELECT" (12) to cycle through the below options. The asterisk behind the option indicates the current setting.
-
Set Time/Date
- Auto Update
- Set 12/24 hour
- Set date format
See below for details of each option.
Set Time/Date
See chapter "Setting the clock".
Auto Update
This setting defines how the radio updates the time and date information.
- Press "SELECT" (12) to confirm the selection "Auto Update".
- Rotate "SELECT" (12) to cycle through the below options. The asterisk behind the option indicates the current setting.
Update from "Any": Update the time and date from any available signals.
Update from "DAB": Update the time and date from DAB signals.
Update from "FM": Update the time and date from FM signals.
"No update": Do not update the time and date.
- Press "SELECT" (12) to confirm the selected option.
Set 12/24 hour
- Press "SELECT" (12) to confirm the selection "Set 12/24 hour".
- Rotate "SELECT" (12) to cycle through the below time format options. The asterisk behind the option indicates the current setting.
12: Show the time in 12-hour format.
24: Show the time in 24-hour format.
- Press "SELECT" (12) to confirm the selected option.
Set date format
- Press "SELECT" (12) to confirm the selection "Set date format".
- Rotate "SELECT" (12) to cycle through the below date format options. The asterisk behind the option indicates the current setting.
dd-mm-yyyy
mm-dd-yyyy
- Press "SELECT" (12) to confirm the selected option.
Backlight
- Press "SELECT" (12) to confirm the selection "Backlight".

- Rotate "SELECT" (12) to cycle through the below options. The asterisk behind the option indicates the current setting.
Timeout
On level
Dim level
See below for details of each option.
Timeout
This setting defines the duration of the backlight before it is dimmed.
- Press "SELECT" (12) to confirm the selection "Timeout".
- Rotate "SELECT" (12) to cycle through the below timeout options (in seconds). The asterisk behind the option indicates the current setting.
On (the backlight does not dim)
10sec
20 sec
30 sec
45 sec
60 sec
90 sec
120 sec
180sec
- Press "SELECT" (12) to confirm the selected option.
On level
This setting defines the brightness level when the backlight is switched on.
- Press "SELECT" (12) to confirm the selection "On level".
- Rotate "SELECT" (12) to cycle through the below brightness levels. The asterisk behind the option indicates the current setting.
Low
Mid
High
- Press "SELECT" (12) to confirm the selected option.
Dim level
This setting defines the brightness level when the backlight is dimmed.
- Press "SELECT" (12) to confirm the selection "Dim level".
- Rotate "SELECT" (12) to cycle through the below brightness levels. The asterisk behind the option indicates the current setting.
Low
Mid
High
- Press "SELECT" (12) to confirm the selected option.
Inactive Standby
This setting defines the duration of time before the radio switches itself off automatically.
- Press "SELECT" (12) to confirm the selection "Inactive Standby".

- Rotate "SELECT" (12) to cycle through the below time options. The asterisk behind the option indicates the current setting.
Off
2 hour
4 hour
5 hour
6 hour
- Press "SELECT" (12) to confirm the selected option.
Language
This setting defines the language used in the menus.
- Press "SELECT" (12) to confirm the selection "Language".

- Rotate "SELECT" (12) to cycle through the below language options. The asterisk behind the option indicates the current setting.
English
Francais (French)
Deutsch (German)
Italiano (Italian)
- Press "SELECT" (12) to confirm the selected option.
Factory Reset
This setting clears all user-defined settings and replaces them with the original default settings.
- Press "SELECT" (12) to confirm the selection "Factory Reset".

- Rotate "SELECT" (12) to select "Yes" and then press "SELECT" (12) to confirm factory reset.
Note: All stations and setting will be lost.
Software Version
This option displays the current software version.

CHARGING EXTERNAL DEVICE
Connect an external device (e.g. smartphone, mp3 player) via a USB cable (not provided) to the USB jack on the back of the radio for charging. The radio cannot access the contents in the connected external device.
Care and maintenance
- Clean the radio with a soft damp cloth and let all parts dry completely after cleaning.
- Do not use any aggressive cleaners, brushes with nylon bristles, sharp or metallic cleaning utensils, knives, hard scrapers and the like. They could damage the surfaces of the radio.
- Do not immerse the radio in water and do not let water getting into the housing of the radio.
Storage
- Unplug the power adapter and clean the radio before storage.
Always store the radio in a dry and clean place.
SPECIFICATIONS
Tuner Range: FM: 87.50 - 108.00 MHz
DAB: 174.928 - 239.200 MHz
Number of preset radio stations: 10 (FM), 10 (DAB)
AC power adaptor: Input: AC 100-240 V, 50/60Hz
Output: DC 5 V 1.5A
IMPORTER
89.45MHz Scanning...
Alarm 1 Wizard Source Buzzer
Set sleep time 30 minutes
Francais
Francais (French)
Deutsch (German)
Italiano (Italian)
Manual tune
“DRC”
"Prune"
System
89.45MHz Scanning...
Alarm 1 Wizard Source Buzzer
Intervaloptions: Daily, Once, Weekends en Weekdays.
Set sleep time 30 minutes
10 sec
20 sec
30 sec
45 sec
60 sec
90 sec
120 se
180 sec
Inactive Standby (Inactive stand-by)
HET EXTERNE APPARAAT OPLADEN
89.45MHz Scanning...
Alarm 1 Wizard Source Buzzer
Set sleep time 30 minutes
10 sec
20 sec
30 sec
45 sec
60 sec
90 sec
120 sec
180 sec
Italiano
Francais (French)
Deutsch (German)
Italiano (Italian)
DLS (Dynamic Label Segment)
Signalstyrke
Programtype (PTY)
Ensemble(gruppe)-navn
Frekvens
Signaifeilrate
Bitrate codec
Tid
Dato
Bruke DAB-menyene
Alarm 1 Wizard Source Buzzer
Kilden bestemmer lydkilden for alarmen.
Kildealternative: «DAB», «FM» og «Buzzer».
Set sleep time 30 minutes
- Trykk pa «SELECT» (12) for à bekrefte valget.
*) markerade Cd = kadmium, Hg = kvicksilver, Pb = bly
PLACERING AV REGLAGE
Sökning after DAB-stationer
"Full scan
"Manual tune"
"DRC"
"Prune"
System
Se narmare information nedan for respektive alternativ.
Fullständig sökning
89.45MHz Scanning...
Alarm 1 Wizard Source Buzzer
Set sleep time 30 minutes
- Tryck pa "SELECT" (12) for att bekrafta valet.
Sogning after DAB-stationer
Sogning after FM-stationer
89.45MHz Scanning...
Nar radioen finder en sterk FM-radiostation, afbrydes sogningen, og radioen stiller ind pa FM-stationen.
Manuel indstilling på en FM-frekvens
Vaelg FM og drej knappen "SELECT" (12) for at vaelge, om du vil soge op ell erer ned ad frekvensbandet.
Alarm 1 Wizard Source Buzzer
Source angiver den signalkilde, alarmen skal anvende.
Set sleep time 30 minutes
Jazz
Pop
Rock
Speech (tale)
89.45MHz Scanning...
Alarm 1 Wizard Source Buzzer
Zdroj definuje zdroj zvuku pro budik.
Set sleep time 30 minutes
- Stiskem regulator "SELECT" (12) potvr'de volbu.
10 sec
20 sec
30 sec
45 sec
60 sec
90 sec
120 sec
180 sec
Cesky
Francais (French)
Deutsch (German)
Italiano (Italian)
- Stisknutim regulatoru „SELECT" (12) potvrde vybranou moznost.
Resetovani na vychozi nastaveni
D 90556 Cadolzburg, Germany
Tel: +49 9103 71 67 0
Fax: +49 9103 71 67 12
E-Mail: info@soundmaster.de
Internet: www.soundmaster.de
Hereby, Worlein GmbH declares that this device is in compliance with the essential requirements and other relevant provisions of Directive 2014/53/EU.
A copy of the declaration of conformity can be obtained from the above address.


- 89.45MHz Scanning...
- Alarm 1 Wizard Source Buzzer
- Set sleep time 30 minutes
- WARNING
- Safety, Environmental and Setup Instructions
- LOCATIONS OF CONTROLS
- GETTING STARTED
- Connect to power
- Turning on or off
- Setting the clock
- Using the antenna
- Controlling the volume
- LISTENING TO DAB BROADCASTS
- Selecting DAB mode
- Scanning for DAB stations
- Tuning to a DAB station
- Storing preset stations
- Displaying DAB information
- Using the DAB menus
- Full scan
- Manual tune
- Range Control)
- Prune
- System
- LISTENING TO FM BROADCASTS
- Selecting FM mode
- Scanning for FM stations
- Tuning the FM frequency
- Displaying RDS information
- Using the FM menu
- Scan setting
- USING THE ALARMS
- Setting alarms
- Alarm 1 Setup
- Alarm 1 Wizard On time 07:50
- Alarm 1 Wizard Duration 15
- Alarm 1 Wizard Daily
- Alarm 1 Wizard
- Alarm 1 Wizard Alarm On
- Turning the alarms on or off in standby mode
- Deactivating a sounding alarm
- Snoopze
- Snoopze 5 minutes
- Sleep
- SYSTEM MENU
- DAB
- Equaliser
- Setting My EQ
- Time
- Set Time/Date
- Auto Update
- Set 12/24 hour
- Set date format
- Backlight
- Timeout
- On level
- Dim level
- Inactive Standby
- Language
- Factory Reset
- Software Version
- CHARGING EXTERNAL DEVICE
- Care and maintenance
- Storage
- SPECIFICATIONS
- IMPORTER
- Inactive Standby (Inactive stand-by)
- HET EXTERNE APPARAAT OPLADEN
- Bruke DAB-menyene
- PLACERING AV REGLAGE
- Sökning after DAB-stationer
- Fullständig sökning
- Sogning after DAB-stationer
- Sogning after FM-stationer
- Manuel indstilling på en FM-frekvens
- Resetovani na vychozi nastaveni
Brand : Soundmaster
Model : UR190WE
Category : Radio