
PerfectCare Compact Plus GC7923 - Iron PHILIPS - Free user manual and instructions
Find the device manual for free PerfectCare Compact Plus GC7923 PHILIPS in PDF.
| Product type | Steam generator iron |
| Brand | Philips |
| Model | PerfectCare Compact Plus GC7923 |
| Color | White/Purple (estimate) |
| Soleplate type | OptimalTEMP, no temperature adjustment |
| Water tank capacity | Removable, fill up to MAX level |
| Power | Not indicated, estimate 2000-2400 W |
| Continuous steam output | Variable, MAX mode for more powerful steam |
| Pressing function | Yes, double press on trigger for powerful 3-second burst |
| Vertical ironing | Yes |
| Auto shut-off | Yes, standby after 5 min, shutdown after 10 min |
| Anti-scale system | Intelligent anti-scale system with Calc-Clean reminder |
| Recommended water type | Tap water, if very hard water use demineralized or distilled water |
| Cleaning | Calc-Clean procedure with anti-scale container |
| Safety | Auto shut-off, do not direct steam at people, safety support |
| Power cord length | Not indicated, estimate 2 m |
| Weight | Not indicated, estimate 1.5 kg (iron only) |
| Dimensions (L x W x H) | Not indicated, estimate 30x20x25 cm (base) |
| Included accessories | Anti-scale container, user manual |
| Warranty | 2 years (according to local legislation) |
Frequently Asked Questions - PerfectCare Compact Plus GC7923 PHILIPS
User questions about PerfectCare Compact Plus GC7923 PHILIPS
0 question about this device. Answer the ones you know or ask your own.
Ask a new question about this device
Download the instructions for your Iron in PDF format for free! Find your manual PerfectCare Compact Plus GC7923 - PHILIPS and take your electronic device back in hand. On this page are published all the documents necessary for the use of your device. PerfectCare Compact Plus GC7923 by PHILIPS.
USER MANUAL PerfectCare Compact Plus GC7923 PHILIPS
PHILIPS GC7900 series

© 2021 Preissner Coatings Appliances Holding S. Co. (374-861-1980; 374-861-2592-2593-2594)

EN User Manual
DA Bragservejdening
DE Bedienungsanleitung
ES Manual del usuario
FI Käytöopas
FR Mode d'emploi
IT Manuale per l'attività
NL Gebruksaanwirting
NO Brukerhandbok
PT Manual do aktivierung
SV Anvindarhandbok
EL Eyepelio xipang
HE ommerny

120000000000000
77
ND
SNOMED-TRIBULUM OF THE CORDIC AND HYPOTHETICAL PROTEIN (CUTS) IN THE CLICHIDAE (CITILIN) AND THE CLICHIDAE (CITILIN) WITH A NEW COMPOUND OF 150 KTONS (CUTS) (CUTS-150KTON) (CUTS-150KTON) (CUTS-150KTON) (CUTS-150KTON) (CUTS-150KTON) (CUTS-150KTON) (CUTS-150KTON) (CUTS-150KTON) (CUTS-150KTON)
1 2 3 4 5 6 7 V=0.000000000000000000000000000000000000000000000000000000000000000000000000000000000000000000000 F#E E## 1987-1988-1989-1990-1991-1992-1993-1994-1995-1996-1997-1998-1999-2000-2001-2002-2003-2004-2005-2006-2007-2008-2009-21Q1-21Q2-21Q3-21Q4-21Q5-21Q6-21Q7-21Q8-21Q9-22Q10-22Q11-22Q12-22Q13-22Q14-22Q15-22Q16-22Q17-22Q18-22Q19-23Q20-23Q21-23Q22-23Q24-23Q25-23Q26-23Q27-23Q28-23Q29-24Q30-24Q31-24Q32-24Q33-24Q34-24Q35-24Q36-24Q37-24Q38-24Q39-24Q40-24Q41-24Q42-24Q43-24Q44-24Q45-24Q46-24Q47-24Q48-24Q49-24Q50-24Q51-24Q52-24Q53-24Q54-24Q55-24Q56-24Q57-24Q58-24Q59-24Q60-24Q61-24Q62-24Q63-24Q64-24Q65-24Q66-24Q67-24Q68-24Q69-24Q70-24Q71-24Q72-Q73-Q74-Q75-Q76-Q77-Q78-Q79-Q8O-Q81-Q82-Q83-Q84-Q85-Q86-Q87-Q88-Q89-Q9O-Q91-Q92-Q93-Q94-Q95-Q96-Q97-Q98-Q99-Q10O-Q1O1-Q1O2-Q1O3-Q1O4-Q1O5-Q1O6-Q1O7-Q1O8-Q1O9-Q1O1-Q1O3-Q1O4-Q1O5-Q1O6-Q1O7-Q1O8-Q1O9-Q1O1-Q1O3-Q1O4-Q1O5-Q1O6-Q1O7-Q1O8-Q1O9-Q1O1-Q1O3-Q1O4-Q1O5-Q1O6-Q1O7-Q1O8-Q1O9-Q1O1-Q1O2-Q1O3-Q1O4-Q1O5-Q1O6-Q1O7-Q1O8-Q1O9-Q1O1-Q1O3-Q1O4-Q1O5-Q1O6-Q1O7-Q1O8-Q1O9-Q1O1-Q1O3-Q1O4-Q1O5-Q1O6-Q1O7-Q1O8-Q1O
Y
HUNAN PHD. M.D.
ZHANG ZHENG CHEN, BIDUAN CHEN, DONG HAI CHEN, JIULIAN CHEN, YUAN CHEN, ZHUI CHEN, ZHOU CHEN, ZHENG CHEN, ZHENG CHEN, ZHENG CHEN, ZHENG CHEN, ZHENG CHEN, ZHENG CHEN, ZHENG CHEN, ZHENG CHEN, ZHENG CHEN, ZHENG CHEN, ZHENG CHEN, ZHENG CHEN, ZHENG CHEN, ZHENG CHEN, ZHENG CHEN, ZHENG CHEN, ZHENG CHEN,

2019/06/27 14:00:00 AEGY 13/15/2019 10:00:00 AEGY 13/15/2019 10:00:00 AEGY 13/15/2019 10:00:00 AEGY 13/15/2019 10:00:00 AEGY 13/15/2019 10:00:00 A
2018年4月26日星期五中圆
Congratulations on your purchase and welcome to Philips! To fully benefit from the support that Philips offers, register your product at www.philips.com/welcome. Read this user manual, the important information leaflet, and the quick start guide carefully before you use the appliance. Save them for future reference.
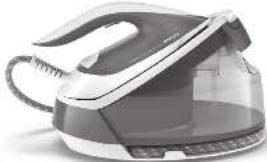
Product overview (Fig. 1)
1 Soleplate
2 'Iron ready' light
3 Steam trigger/Steam boost
4 Water supply hose
5 Iron platform
6 Carry lock release button
7 Water tank release lever
8 Filling hole
9 Detachable water tank
10 Water supply hose storage compartment
11 Mains cord with plug
12 Smart Calc-Clean container
13 CALC-CLEAN button with light
14 On/off button with power on and shut-off light
Preparing for use
Type of water to use
This appliance has been designed to be used with tap water. However, if you live in an area with hard water, fast scale build-up may occur. Therefore, it is recommended to use distilled or demineralized water (50% demineralized/distilled water mixed with water could be used as well) to prolong the lifetime of the appliance.
Warning: Do not use perfumed water, water from the tumble dryer, vinegar, starch, descaling agents, ironing aids, chemically descaled water or other chemicals, as they may cause water spitting, brown staining or damage to your appliance.
Filling the water tank
Fill the water tank before every use or when the water level in the water tank drops below the minimum level. You can refill the water tank at any time during use.
1 Press the lever in the water tank handle and remove the water tank from the base (Fig. 2).
2 Fill the water tank up to the MAX indication (Fig. 3).
3 Push the water tank back into the appliance until it locks in place ('click').
Using the appliance
Ironable fabrics
Do not iron non-ironable fabrics.
- Fabrics with these symbols (Fig. 4) are ironable, for example linen, cotton, polyester, silk, wool, viscose and rayon.
- Fabrics with this symbol (Fig. 5) are not ironable. These fabrics include synthetic fabrics such as Spandex or elastane, Spandex-mixed fabrics and polyolefins (e.g. polypropylene). Prints on garments are not ironable either.
Ironing
1 Place the appliance on a stable and even surface.
Note: In order to ensure safe ironing we recommend to always place the base on a stable ironing board, a table, or the floor.
2 Make sure that there is enough water in the water tank.
3 Remove the water supply hose from the storage compartment.
4 Put the mains plug in an earthed wall socket and press the on/off button to switch on the appliance (Fig. 6). Wait until the 'iron ready' light lights up continuously (Fig. 7). This takes about 2 minutes.
5 Press the carry lock release button to unlock the iron from the iron platform (Fig. 8).
6 Press and hold the steam trigger to start ironing (Fig. 9).
Note: When you start your ironing session and especially during the first usage of steam trigger, it may take more than 30 seconds for steam to come out of the appliance.
Note: The pump is activated each time you press the steam trigger. It produces subtle rattling sound. When there is no water in the water tank, the pump sound is louder.
7 For best ironing results, after ironing with steam, perform the last strokes without steam.
Note: If you do not release the trigger early enough and lift the iron to the base, you might notice that steam still comes out, which is normal. To avoid that effect, we recommend you to leave the iron on the board while rearranging the garment.
Warning: Never direct steam at people.
MAX mode function
For more powerful steam, you can use the MAX steam mode, which is safe on all ironable fabrics. For fabrics such as cotton, jeans and linen, you are recommended to use the MAX steam mode.
1 Press and hold the on/off button for 2 seconds until the light turns white.
2 To deactivate the MAX mode, press and hold the on/off button for 2 seconds again until the light turns blue.
Steam boost function
1 Press the steam trigger twice quickly to release a powerful boost of steam for 3 seconds (Fig. 10).
Note: It is recommended to use the steam boost function only for stubborn crease.
Vertical ironing
Warning: Hot steam is emitted from the iron. Never attempt to remove wrinkles from a garment while someone is wearing it (Fig. 11). Do not apply steam near your or someone else's hand.
You can use the steam iron in vertical position to remove wrinkles from hanging fabrics.
1 Hold the iron in vertical position, press the steam trigger and touch the garment lightly with the soleplate and move the iron up and down (Fig. 12).
Safe rest
Resting the iron while rearranging your garment
While rearranging your garment, you can rest the iron either on the iron platform or horizontally on the ironing board (Fig. 13). The OptimalTEMP technology ensures the soleplate will not damage the ironing board cover.
Auto shut-off
- The appliances enters the standby mode if it has not been used for 5 minutes. The light of the on/off button starts to flash.
- To activate the appliance again, press the on/off button or the steam trigger. The appliance starts to heat up again.
8 English
- The appliance switches off automatically if it has not been used for another 10 minutes after it enters the standby mode. The light in the on/off button goes off.
Warning: Never leave the appliance unattended when it is connected to the mains. Always unplug the appliance after use.
Cleaning and maintenance
Smart Calc-Clean System
Your appliance has been designed with a Smart Calc-Clean system to ensure that descending and cleaning is done regularly. This helps to maintain a strong steam performance and prevents dirt and stains coming out of the soleplate over time. To ensure that the cleaning process is performed, the appliance gives regular reminders.
Sound and light Calc-Clean reminder
After 1 to 3 months of use, the Calc-Clean light starts flashing and the appliance starts beeping to indicate that you have to perform the Calc-Clean process (Fig. 14).
Besides that, a second defense step to protect the appliance from scale is integrated: the steam function gets disabled if descending is not done (Fig. 15). After descending is done, the steam function will be restored. This takes place regardless of the type of water used.
Note: The Calc-Clean process can be performed at any time, even when the sound and light reminder is not activated yet.
Performing the Calc-Clean process with the Calc-Clean container
Warning: Do not leave the appliance unattended during the Calc-Clean process.
Caution: Always perform the Calc-Clean process with the Calc-Clean container. Do not interrupt the process by lifting the iron up from the Calc-Clean container, as hot water and steam will come out of the soleplate.
1 Fill up the water tank halfway.
Note: Make sure that the appliance is plugged in and switched ON during the Calc-Clean process.
2 Place the Calc-Clean container on the ironing board or any other even, stable surface.
3 Place the iron stably on the Calc-Clean container (Fig. 16).
4 Press and hold the CALC-CLEAN button for 2 seconds until you hear short beeps (Fig. 17).
Note: The Calc-Clean container has been designed to collect scale particles and hot water during the Calc-Clean process. It is perfectly safe to rest the iron on this container during the entire process.
5 During the Calc-Clean process, you hear short beeps and a pumping sound (Fig. 18).
6 Wait approximately 2 minutes for the appliance to complete the process (Fig. 19). When the Calc-Clean process is completed, the iron stops beeping and the CALC-CLEAN light stops flashing.
7 Wipe the iron with a piece of cloth and put it back on the base station (Fig. 20).
Caution: The iron is hot.
8 As the Calc-Clean container becomes hot during the Calc-Clean process, wait about 5 minutes before you touch it. Then carry the Calc-Clean container to the sink, empty it and store it for future use (Fig. 21).
9 If necessary, you can repeat steps 1 to 8. Make sure that you empty the Calc-Clean container before you start the Calc-Clean process.
Note: During the Calc-Clean process, clean water may come out of the soleplate if no scale has accumulated inside the iron. This is normal.
For more information on how to carry out the Calc-Clean process, refer to the videos in this link: http://www.philips.com/descaling-iron.
Storage
1 Switch off the appliance and unplug it.
Note: it is recommended to empty the water tank after every use.
2 Place the iron on the iron platform and lock it by pushing the carry lock release button (Fig. 22).
3 Fold the supply hose and wind the supply hose inside the supply hose storage compartment (Fig. 23).
4 Fold the mains cord and fasten it with the Velcro strip.
5 You can carry the appliance with one hand by the handle of the iron when the iron is locked on the iron platform.
Troubleshooting
This chapter summarizes the most common problems you could encounter with the appliance. If you are unable to solve the problem with the information below, visit www.philips.com/support for a list of frequently asked questions or contact the Consumer Care Center in your country.
Problem Possible cause Solution
| The iron does not produce any steam. | There is not enough water in the water tank. | Fill the water tank. Press and hold the steam trigger until steam comes out. It may take up to 30 seconds until steam comes out. |
| You did not press the steam trigger. | Press and hold the steam trigger until steam comes out. | |
| The steam function has been disabled until you have performed the Calc-Clean process. | Perform the Calc-Clean process to restore the steam function. (see chapter 'Cleaning and maintenance') | |
| At the start of your ironing session, the steam trigger has not been pressed long enough. | Press and hold the steam trigger until steam comes out. It may take up to 30 seconds until steam comes out. | |
| No steam comes out of the soleplate, the light of the CALC CLEAN button flashes and the appliance beeps. | You have not done or have not completed the Calc-Clean process. | Perform the Calc-Clean process to enable the steam function again (see chapter 'Cleaning and maintenance'). |
| Water droplets come out of the soleplate. | After the Calc-Clean process remaining water may drip out of the soleplate. | Wipe the soleplate dry with a piece of cloth. If the Calc-Clean light still flashes and the appliance still beeps, perform the Calc-Clean process (see chapter 'Cleaning and maintenance'). |
| You have used the steam boost function too frequently. | Use the steam boost function only for stubborn creases. It is recommended not to use it for more than 5 times within 3 minutes. | |
| The Calc-Clean process has not been completed. | You have to perform the Calc-Clean process again (see chapter 'Cleaning and maintenance'). | |
| Steam condenses into water in the hose when you use steam for the first time or have not used it for a long time. | This is normal. Hold the iron away from the garment and press the steam trigger. Wait until steam instead of water comes out of the soleplate. |
10 English
| Problem Possible cause Solution | ||
| Dirty water and impurities come out of the soleplate. | Impurities or chemicals present in the water have deposited in the steam vents and/or soleplate. | Perform the Calc-Clean process regularly (see chapter 'Cleaning and maintenance'). |
| Water flushes out of the soleplate. | You have accidentally started the Calc-Clean process (see chapter 'Cleaning and maintenance'). | Switch off the appliance. Then switch it back on again. Let the iron heat up until the 'iron ready' light lights up steadily. |
| The Calc-Clean process does not start. | You have not pressed the CALC-CLEAN button for 2 seconds until the appliance started beeping. | See chapter 'Cleaning and maintenance'. |
Introduction
JINIX Calc-Clean JNDT
7nnn nn 7 nnnn 7, qnnn nn nn nn n nn n nn n nn n nn n nn n nn n nn n nn n nn n nn n nn n nn n nn n nn n nn n nn n nn n nn n nn n nn n nn n nn n nn n nn n nn n nn n nn n nn n nn n nn n nn n nn n nn n nn n nn n nn n nn n nn n nn n nn n nn n nn n nn n nn n nn n nn n nn n nn n nn n nn
n7 nnnn n 19: nn nnnn n7 nnnn n7 nnnn n7 nnnn n7 nnnn n7 nnnn. (15) nn nn nn nn nn nn nn nn nn nn nn nn nn nn nn nn nn nn nn nn nn nn nn nn nn nn nn nn nn nn nn nn nn nn nn nn nn nn nn nn nn nn nn nn nn nn nn nn nn nn nn nn nn nn nn nn nn nn nn nn nn nn nn nn nn nn nn nn nn nn nn nn nn nn nn nn nn nn nn nn nn
7yin 7iYn nn nnnn nn nn nn nn nn nn nn nn nn nn nn nn nn nn nn nn nn nn nn nn nn nn nn nn nn nn nn nn nn nn nn nn nn nn nn nn nn nn nn nn nn nn nn nn nn nn nn nn nn nn nn nn nn nn nn nn nn nn nn nn nn nn nn nn nn nn nn nn nn nn nn nn nn nn nn nn nn nn nn nn nn nn nn nn nn nn nn nn nn nn nn nn nn nn nn nn nn
Calc-Clean 7n Dy Calc-Clean 7nn yix
. nnnn7 Calc-Clean nn nn nn nn nn nn nn nn nn nn nn nn nn nn nn nn nn nn nn nn nn nn nn nn nn nn nn nn nn nn nn nn nn nn nn nn nn nn nn nn nn nn nn nn nn nn nn nn nn nn nn nn nn nn nn nn nn nn nn nn nn nn nn nn nn nn nn nn nn nn nn nn nn nn nn nn nn nn nn
yannnnn nnynnnn nn yio7JN.Calc-Clean 70Dv Calc-Clean 70nn nn yin Dn .nnnnnnn DNI nn nn nn nn nn nn nn nn nn nn nn nn nn nn nn nn nn nn nn nn nn nn nn nn nn nn nn nn nn nn nn nn nn nn nn nn nn nn nn nn nn nn nn nn nn nn nn nn nn nn nn nn nn nn nn nn nn nn nn nn nn nn nn nn nn nn nn nn nn nn nn nn nn nn nn nn nn nn nn nn nn nn nn nn nn nn nn nn nn nn nn nn
- INNNTD
.Calc-Clean 77n7y9177wn7 77nn7 77n7 77n7
- TINN
(16)Calc-Clean 7n7y nnnn nn
3
.17 2 w 2 2
4
nui Diu Jw.Calc-Clean nnn nn Dn Dn nn 77n qo7 pinn Calc-Clean 77n 77nn nn 77n 77nn nn 77nn
(18) (7) 7777777777777777777777777777777777777777777777777777777777
5
709n yann, n07 yin Calc-Clean 77nW .(19 W) 77nn nn w 77nW Tyn 2- non7 .nwn7 np9n CALC-CLEAN nni q
6
7.(2011X)D
. on yannn nn
Calc-7n nn 177 5-7n7,Calc-Clean nnn nn nnn Cal-Clean 7nu
http://www.philips.com/descaling- :n nnnn nn nnnn nnnn nnnn nnnn nnnn nnnn nnnn nnnn nnnn nnnn nnnn nnnn nnnn nnnn nnnn nnnn nnnn nnnn nnnn nnnn nnnn nnnn nnnn nnnn nnnn nnnn nnnn nnnn nnnn nnnn nnnn nnnn nnnn nnnn
.iron
IONX
1.7nunny
.
(22) (1)
.23790N790NN711111111111111111111111111
2
3
4.777n
5
ynnn nn 7yynnnn, nnnnnn, TNN nn nn nn
68
.6 7777777777777777777777777777777777777
2.0007
3.10NNN
4
5
6.(9711x)7127
30-17 17 17 17 17 17 17 17 17 17 17 17 17
7 77777777777777777777777
7.1101720
17 17 n nn nn nn nn nn nn nn nn nn nn nn nn nn nn nn nn nn nn nn nn nn nn nn nn nn nn nn nn nn nn nn nn nn nn nn nn nn nn nn nn nn nn nn nn nn nn nn nn nn nn nn nn nn nn nn nn nn nn nn nn nn nn nn nn nn nn nn nn nn nn nn nn nn nn nn nn nn nn nn nn nn nn nn nn nn nn nn nn nn nn nn nn nn nn nn nn nn nn nn
DOWN DTN IID7 IN:NN
MAXn
.17 7 7 7 7 7 7 7 7 7 7 7 7 7 7
MAX 77777777777777777
1
n7n nnnn nn 2 nnnn nn nnnn nn nnnn MAX nn 7 2