
CR425 - Radio DENVER - Free user manual and instructions
Find the device manual for free CR425 DENVER in PDF.
| Product type | Clock radio |
| Brand | Denver |
| Model | CR425 |
| FM frequency range | 87.5 - 108 MHz |
| Maximum output power | 5 W |
| Mains power supply | DC adapter (included) |
| Battery power | 3 AA batteries (not included) |
| Time display | 12-hour mode |
| Alarm function | Yes, wake-up by buzzer or radio |
| Alarm snooze | Yes, 9 minutes |
| Clock backlight | Yes, activation via Snooze button (3 seconds) |
| Station search and memory | Automatic (hold TUN+/TUN- buttons) |
| Preset station selection | Successive presses of TUN+/TUN- |
| Volume adjustment | VOL+ and VOL- buttons |
| Power indicator | Red LED |
| Built-in speaker | Yes |
| Cleaning | Damp cloth, unplug before |
| Safety | Instructions: avoid water, heat, ventilation obstructions; do not open |
Frequently Asked Questions - CR425 DENVER
User questions about CR425 DENVER
0 question about this device. Answer the ones you know or ask your own.
Ask a new question about this device
Download the instructions for your Radio in PDF format for free! Find your manual CR425 - DENVER and take your electronic device back in hand. On this page are published all the documents necessary for the use of your device. CR425 by DENVER.
USER MANUAL CR425 DENVER
BEFORE OPERATING THIS PRODUCT, READ, UNDERSTAND, AND FOLLOW THESE INSTRUCTIONS.
Be sure to save this booklet for future reference.
www.facebook.com/denverelectronics
SAFETY INSTRUCTIONS
THESE IMPORTANT SAFETY INSTRUCTIONS ARE INCLUDED, AS APPLICABLE TO THE APPLIANCE, CONVEYING TO THE USER THE INFORMATION ITEMIZED BELOW
- Read instructions-All the safety and operating instructions should be read before the appliance is operated.
- Retain instructions-The safety and operating instructions should be retained for future reference.
3.Warnings-All warnings and cautions on the appliance and in the operating instructions should be adhered to. - Follow instructions-All operating and use instructions should be followed.
- Water and Moisture-The appliance should not be used near water, e.g. near a bathtub, washbowl, kitchen sink, laundry tub, in a wet basement, or near a swimming pool or the like.
- Wall or Ceiling Mounting-The appliance should not be mounted to a wall or ceiling.
- Ventilation-The appliance should be situated in the location or position which does not interfere with its proper ventilation. For example, the appliance should not be situated on a bed, sofa, rug or similar surface that may block the ventilation openings, or placed in a built-in installation, such as a bookcase or cabinet, that may impede the flow of air through the ventilation openings.
- Heat-The appliance should be situated away from heat sources such as radiators, heat registers, stoves, or other appliances (including amplifiers) that produce heat.
- Power Sources-The product should be operated only with the type of power supply indicated on the marking label. If you are not sure of the type of power supply to your home, consult your product dealer or local power company. For products intended to operate from battery power, or other sources, refer to the operation instructions.
- Grounding Polarization-This product may be equipped with a polarized alternating current line plug (a plug having one blade wider than the other). This plug will fit into the power outlet only one way this is a safety feature. If you are unable to insert the plug fully into the outlet, try reversing the plug. If the plug should still fail to fit, contact your electrician to replace your obsolete outlet. Do not defeat the safety purpose of the polarized plug.
- Power-Cord Protection-Power supply cords should be routed so that they are not likely to be walked on or pinched by items placed upon or against them, paying particular attention to cords at plugs, convenience receptacles, and the point where they exit from the appliance.
- Cleaning-The appliance should be cleaned only as recommended by the manufacturer.
- Not in use periods-The power cord of the appliance should be unplugged from the outlet when left or not use for a long period of time.
- Object and Liquid Entry-Care should be taken so that objects do not fall and liquids are not spilled into the product case through product openings.
- Damage for repairing-Unplug this product from the wall outlet and take it to qualified service personnel under the following conditions.
a) When the power-supply cord or plug is damaged.
b) If liquid has been spilled into, or objects have fallen into the product.
c) If the product has been exposed to rain or water.
d) If the product does not operate when used according to the operating instructions.
Adjust only those controls that are covered by the operating instructions as an improper adjustment of other controls may interfere with the product's normal operation.
e) If the product has been dropped or damaged in any way.
f) When the product exhibits a distinct change in performance this indicates a need for service.
- Servicing-The user should not attempt to service the product beyond that described in the operating instruction. All servicing should be referred to qualified service personnel.
- Power Lines-An outside antenna system should not be located in the vicinity of overhead power lines, or other electric light or power circuits, or where it can fall into such power lines or circuits. When installing an outside antenna system, extreme care should be taken to keep from touching power lines or circuits as contact with them might be fatal.
- If an outside antenna is connected to the receiver, be sure the antenna system is grounded so as to provide some protection against voltage surges and built up static. Section 810 of the National Electrical Code ANSI/NEFA 70 provides information with respect to proper grounding of the mast and supporting structure, grounding conductress, location of antenna-discharge unit, size of grounding electrodes, and requirements for the grounding electrode (see figure).
- Cleaning-Unplug this product from the wall outlet before cleaning. Do not use liquid cleaners or aerosol cleaners. Use a damp cloth for cleaning.
- Lightning-For added protection for this product during a lightning storm, or when it is left unattended and unused for long period of time, unplug it from the wall outlet and disconnect the antenna or cable system. This will prevent damage to the product due to lightning and power-line surges.
- Safety Check-Upon completion of any service or repairs to this product, ask the service technician to perform safety checks to determine that the product is in proper operation condition.
- Overloading-Do not overload wall outlets, extension cords, or integral convenience receptacles as this can result in a risk of fire or electric shock.
Product overview
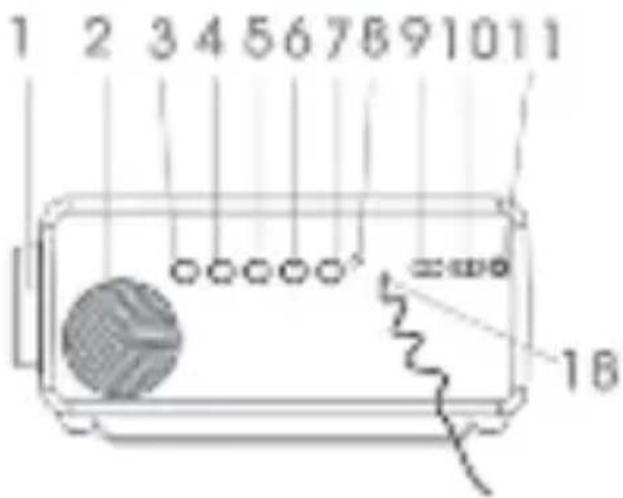
- ALARM SET KNOB
- SPEAKER
- POWER BUTTON
- VOL + BUTTON
- VOL - BUTTON
- TUN + BUTTON (to select next station)
- TUN - BUTTON (to select previous station)
- POWER LED INDICATOR
- ALARM-OFF/ON SWITCH
- ALARM SELECT SWITCH- BUZZER/RADIO
- DC JACK
- SOONZE BUTTON
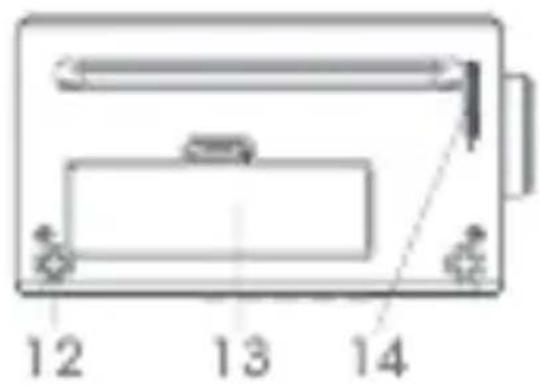
- BATTERY DOOR
- TIME SET KNOB
- ALARM SET DIAL (HOUR/MINUTE)
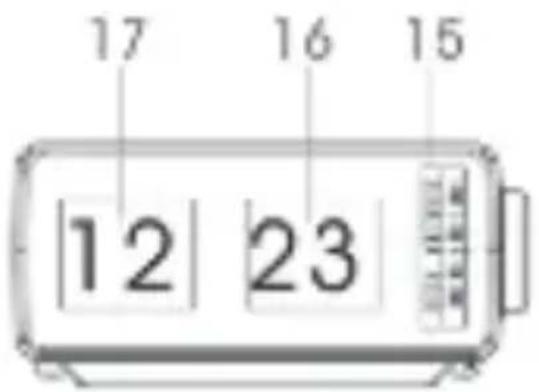
- TIME - MINUTE DISPLAY
- TIME - HOUR DISPLAY
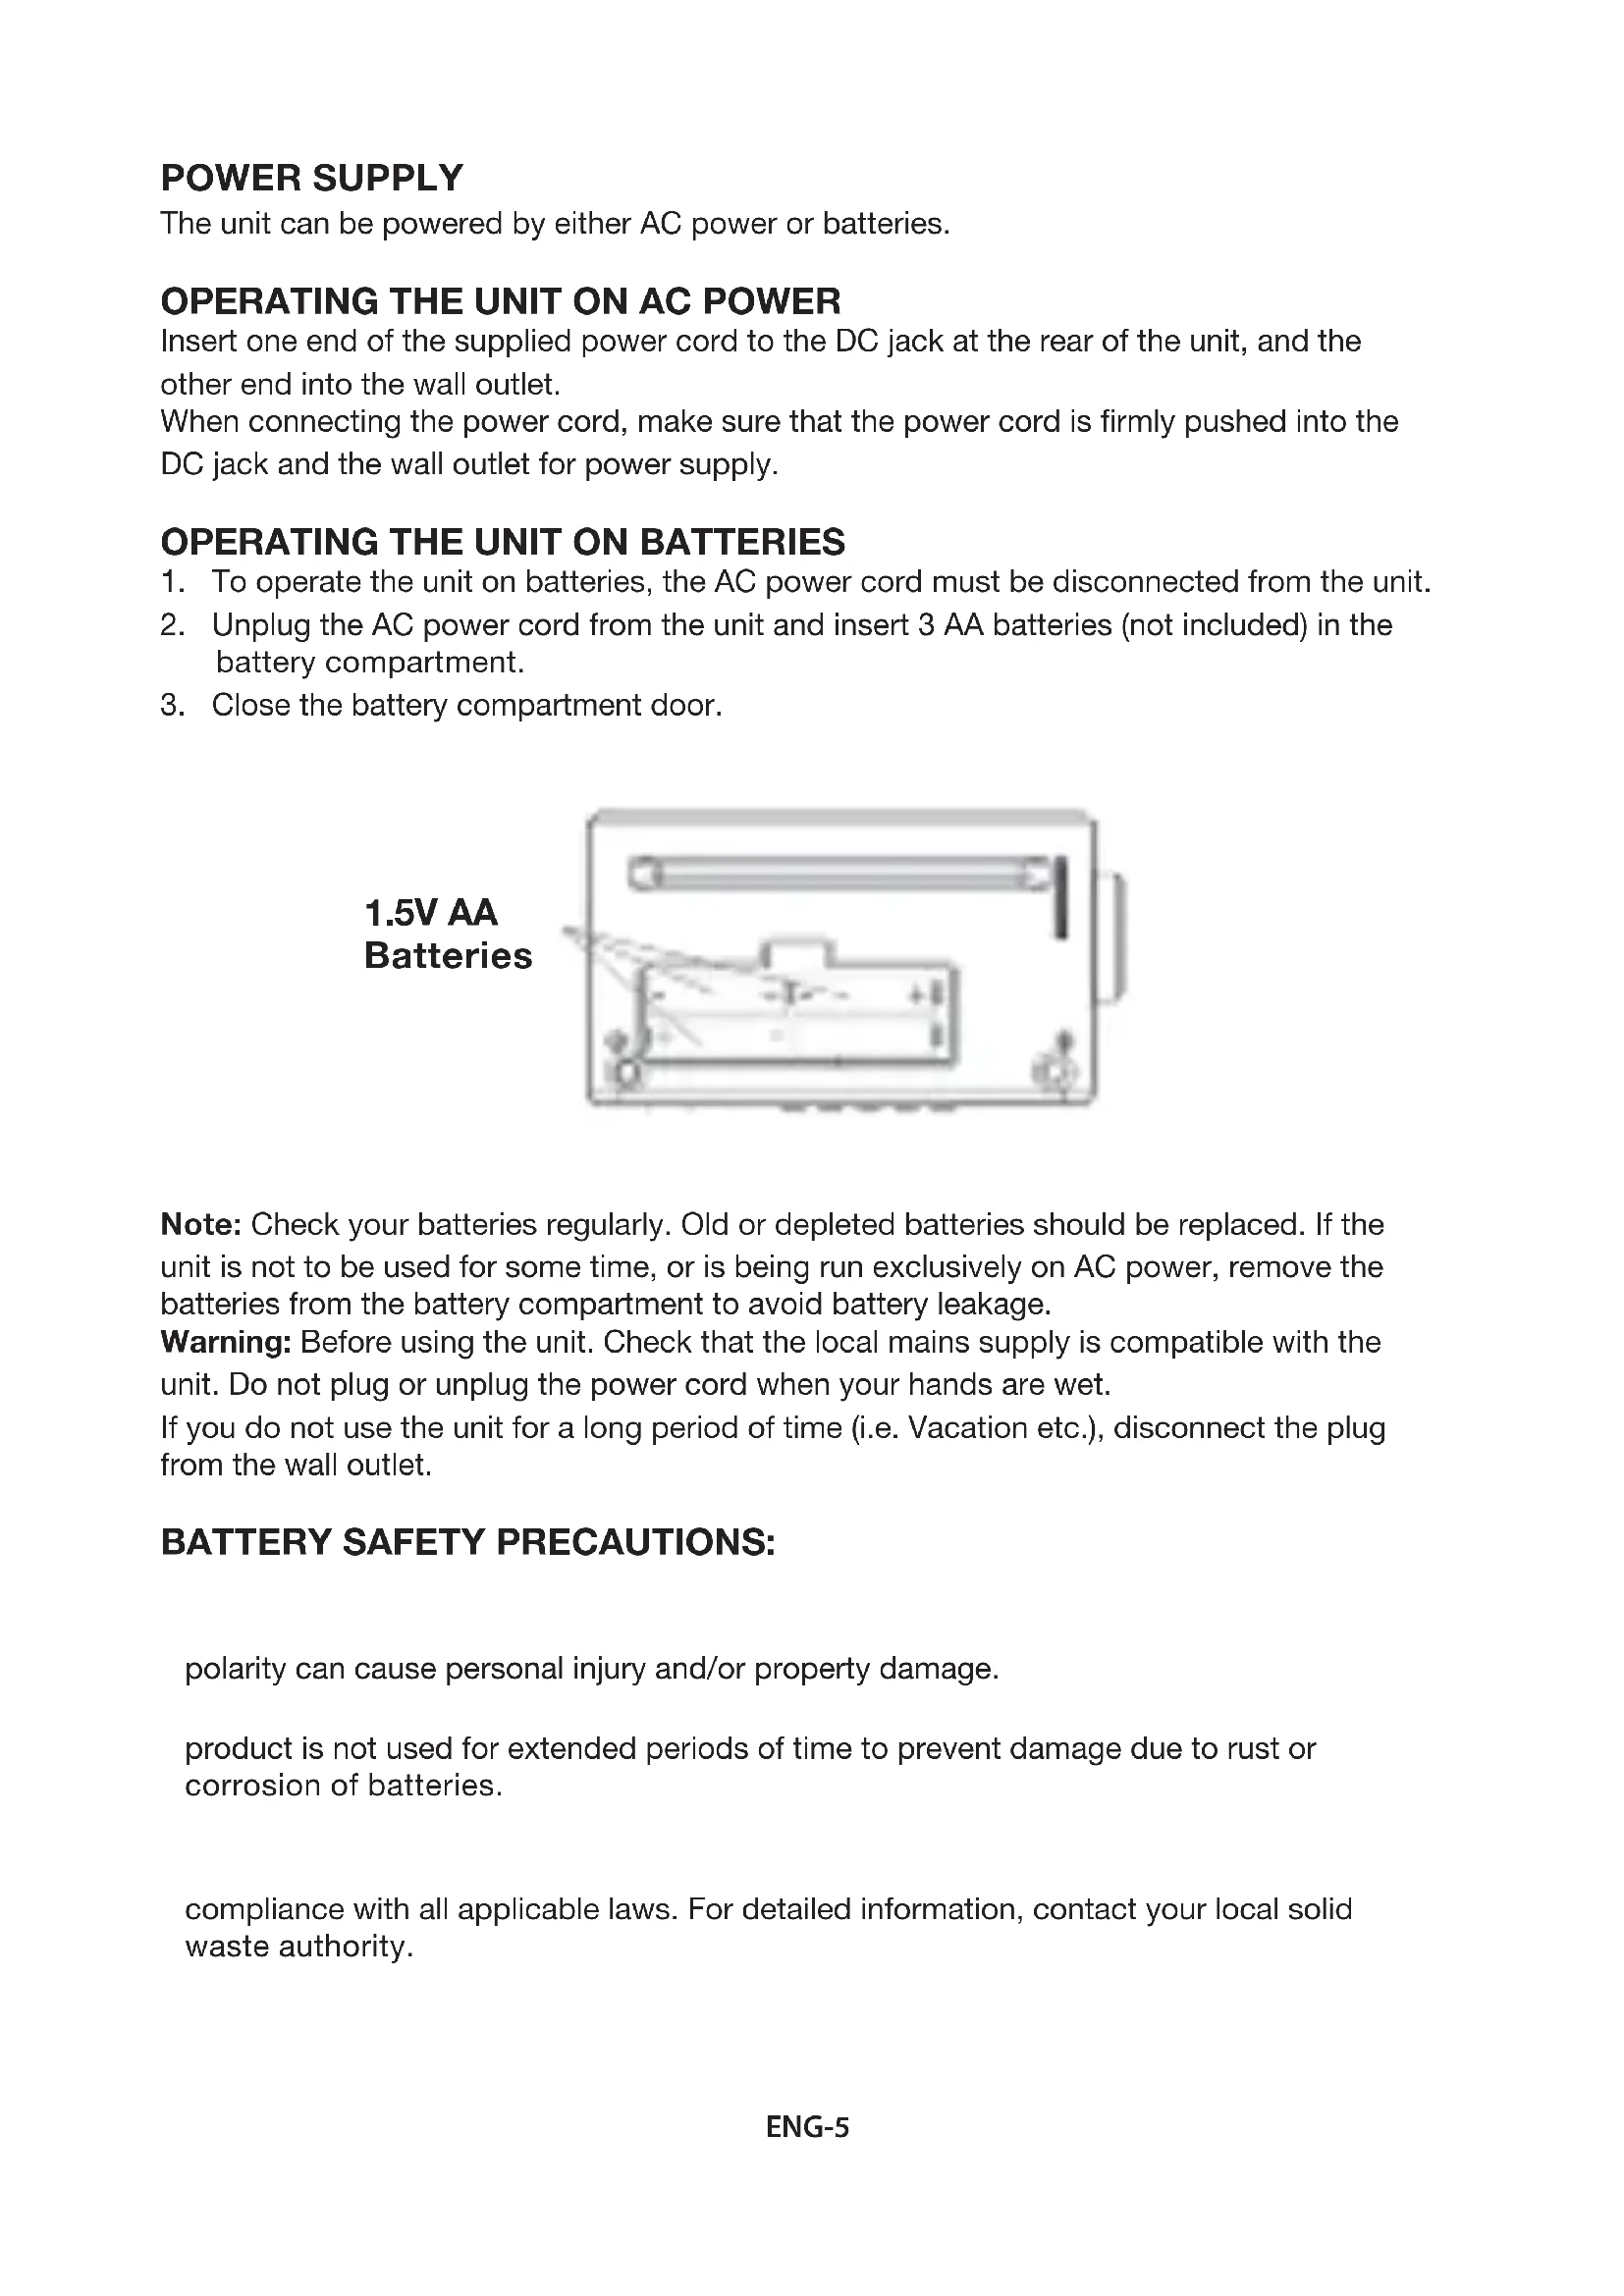
POWER SUPPLY
The unit can be powered by either AC power or batteries.
Insert one end of the supplied power cord to the DC jack at the rear of the unit, and the other end into the wall outlet.
When connecting the power cord, make sure that the power cord is firmly pushed into the
DC jack and the wall outlet for power supply.
- To operate the unit on batteries, the AC power cord must be disconnected from the unit.
- Unplug the AC power cord from the unit and insert 3 AA batteries (not included) in the battery compartment.
- Close the battery compartment door.
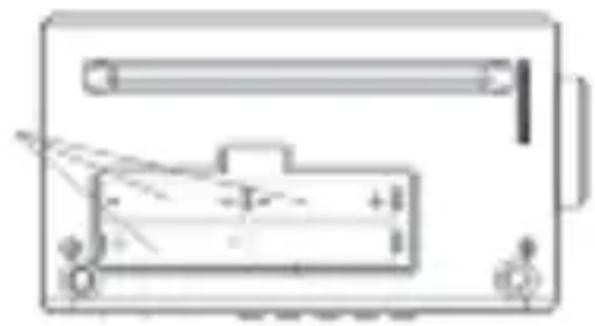
1.5V AA Batteries
Note: Check your batteries regularly. Old or depleted batteries should be replaced. If the unit is not to be used for some time, or is being run exclusively on AC power, remove the batteries from the battery compartment to avoid battery leakage.
Warning: Before using the unit. Check that the local mains supply is compatible with the unit. Do not plug or unplug the power cord when your hands are wet.
If you do not use the unit for a long period of time (i.e. Vacation etc.), disconnect the plug from the wall outlet.
BATTERY SAFETY PRECAUTIONS:
polarity can cause personal injury and/or property damage.
product is not used for extended periods of time to prevent damage due to rust or corrosion of batteries.
compliance with all applicable laws. For detailed information, contact your local solid waste authority.
TO SET THE TIME
Rotate the TIME SET KNOB in the direction indicated by the arrow to flip the minute and hour digits, when the minute digit reaches 59 then the hour will increase automatically.
Note: Both time and alarm are displayed in 12 hours mode.
TO SET THE ALARM
Rotate the ALARM SET KNOB in the direction indicated by the arrow (clockwise) to select an alarm time. Please do not rotate the alarm set knob anticlockwise as this can damage the mechanism and prevent the clock and alarm from working properly. The alarm set dial shows the hours on the left and the minutes in 15 minutes intervals on the right in the cycle of 00, 15, 30 and 45.
Switch the ALARM OFF/ON switch to ON to set the alarm and to switch it off when it is sounding. Use the ALARM select switch to choose buzzer or radio for the alarm.
In normal mode, press and hold the SNOOZE button for 3 seconds to turn on/off the clock backlight.
It will be off automatically after several seconds.
TO LISTEN TO THE RADIO
- Press the POWER button to turn on the unit. When the radio is ON, the power LED indicator will be lit solid red.
- Press and hold the TUN + or TUN - button to scan the radio station and store it automatically.
- Press the TUN + or TUN - button repeatedly to select the radio station stored as step 2.
- Press the POWER button again to turn off the unit.
VOLUME CONTROL
-
When device is in FM mode
-
Increase the volume by 1 unit by pressing VOL + button.
Long press the VOL + button to increase the volume to the desired unit. -
When device is in FM mode
Decrease the volume by 1 unit by pressing VOL - button.
Long press the VOL - button to decrease the volume to the desired unit.
- For alarm, set the alarm as previously instructed.
- After setting the time, slide the ALARM SELECT SWITCH- BUZZER/RADIO switch to BUZZER or RADIO position to choose to wake up from Buzzer or Radio.
SNOOZE FUNCTION
When the alarm sounds (buzzer or radio) you can switch it off temporarily (for 9 minutes) using the 'snooze function'. The snooze switch is located in the base of the radio (back left). Gently press the top of the radio on the left hand side at the back (as you face the radio) to activate snooze. You can press again to repeat when the alarm sounds again.
ALL RIGHTS RESERVED, COPYRIGHT DENVER ELECTRONICS A/S
DENVER
www.denver-electronics.com

Electric and electronic equipment and included batteries contains materials, components and substances that can be hazardous to your health and the environment, if the waste material (discarded electric and electronic equipment and batteries) is not handled correctly.
Electric and electronic equipment and batteries is marked with the crossed out trash can symbol, seen below. This symbol signifies that electric and electronic equipment and batteries should not be disposed of with other household waste, but should be disposed of separately.
As the end user it is important that you submit your used batteries to the appropriate and designated facility. In this manner you make sure that the batteries are recycled in accordance with legislature and will not harm the environment.
All cities have established collection points, where electric and electronic equipment and batteries can either be submitted free of charge at recycling stations and other collection sites, or be collected from the households. Additional information is available at the technical department of your city.
Hereby, Inter Sales A/S declares that the radio equipment type CR-425/CR-425UK is in compliance with Directive 2014/53/EU. The full text of the EU declaration of conformity is available at the following internet address: www.denver-electronics.com and then click the search ICON on topline of website. Write modelnumber: CR-425/CR-425UK. Now enter product page, and red directive is found under downloads/other downloads
Operating Frequency Range: FM87.5-108MHz
Max Output Power: 5W
DENVER ELECTRONICS A/S
Omega 5A, Soeften
DK-8382 Hinnerup
Denmark
www.facebook.com/denverelectronics
DENVER ELECTRONICS
INDSTILLING AF LYDSTYRKE


- SAFETY INSTRUCTIONS
- THESE IMPORTANT SAFETY INSTRUCTIONS ARE INCLUDED, AS APPLICABLE TO THE APPLIANCE, CONVEYING TO THE USER THE INFORMATION ITEMIZED BELOW
- Product overview
- POWER SUPPLY
- BATTERY SAFETY PRECAUTIONS:
- TO SET THE TIME
- TO SET THE ALARM
- TO LISTEN TO THE RADIO
- VOLUME CONTROL
- SNOOZE FUNCTION
- ALL RIGHTS RESERVED, COPYRIGHT DENVER ELECTRONICS A/S
- DENVER
- DENVER ELECTRONICS
- INDSTILLING AF LYDSTYRKE
Brand : DENVER
Model : CR425
Category : Radio