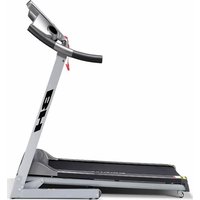
Slimrunner YF35 - Treadmills BH FITNESS - Free user manual and instructions
Find the device manual for free Slimrunner YF35 BH FITNESS in PDF.
| Product Type | Treadmill |
| Brand | BH FITNESS |
| Model | Slimrunner YF35 |
| Maximum user weight | 115 kg |
| Speed range | 1.0 – 10 km/h |
| Display | Time, speed, distance, calories |
| Power supply | 220-240 V, grounded outlet |
| Electronic protection | Automatic shutdown in case of overload or overheating |
| Safety device | Safety key with clothing clip |
| Folding | Yes, with pin locking system |
| Transport wheels | Yes, for easy relocation |
| Lubrication | Every 3 to 12 months depending on use |
| Cleaning | With a damp cloth; vacuum around visible parts |
| Warranty | 2 years |
| Customer service | 902 170 258 (Spain), sat@bhfitness.es |
| Spare parts | Available through after-sales service |
Frequently Asked Questions - Slimrunner YF35 BH FITNESS
User questions about Slimrunner YF35 BH FITNESS
0 question about this device. Answer the ones you know or ask your own.
Ask a new question about this device
Download the instructions for your Treadmills in PDF format for free! Find your manual Slimrunner YF35 - BH FITNESS and take your electronic device back in hand. On this page are published all the documents necessary for the use of your device. Slimrunner YF35 by BH FITNESS.
USER MANUAL Slimrunner YF35 BH FITNESS
You should always observe certain safety precautions when using electrical appliances, including the folly wing:
Carefully read through the instructions contained in this manual before using the treadmill. It provides you with important information about safety, use and maintenance.
ATTENTION! To reduce the risk of electrical shock: Unplug the appliance from the mains socket immediately after use and before proceeding to clean it.
Carefully read through the instructions contained in this manual. It provides you with important information about safety, use and maintenance of the treadmill.
1 Make sure that the mains supply voltage is suitable for the machine before plugging it in. The supply voltage must be the same as that stated on the characteristics plate and the holes in wall socket outlet must match the pins for plug on the machine. If this is not the case, please consult your supplier.
2 Make sure that the treadmill unit operates correctly before attempting to use it. Never use an appliance that might be faulty.
3 The owner is responsible for ensuring that anyone who uses the machine is duly informed about all of the necessary precautions.
4 This unit has been designed for home use only.
5 Make sure that the treadmill is switched off and unplugged before beginning any type of maintenance or assembly work on it.
6 Never leave the unit unattended when it is plugged. Unplug it from the wall socket after each exercise session
7 Do not unplug the treadmill by tugging on the mains cable.
8 Place your unit on a fl at surface, with at least 2 metres of free space at the rear. Do not place your unit on any surface that might block a ventilation opening. Place a protective sheet below your unit to protect the floor or carpet
from possible damage.
9 Parents and/or those responsible for children must always be aware of their curious nature and how this can often lead to hazardous situations and behaviour which could cause accidents. This is why they should always be supervised. Under no circumstances should this appliance be used as a toy.
10 The treadmill is supplied with a mains cable. It must only be plugged in to a suitably earthed wall socket. If the plug is not suitable for the wall socket then change it for one that matches, bearing in mind that the earth wire must always be connected.
11 Your unit is equipped with a safety key. The safety key must be inserted into its housing, otherwise the machine will not operate. When you are using the machine always clip the cord on the safety key to your clothing. Remove the safety key whenever the machine is not being used and keep it safe from children and others.
12 Your unit can only be used by one person at a time. It can only be used by people who weigh 115 kg or less.
13 Use the handrail to help you get on and off the treadmill and when changing the speed. Do not jump onto the belt while it is moving.
14 Keep your hands well away from any of the moving parts. Do not place your hands, feet or any other object below the treadmill belt.
15 Use suitable clothing and footwearake sure ll laces/cords are tied correctly. To avoid injury and unnecessary wear on the belt, make sure that your footwear is not dirty.
16 It is not advisable to keep your unit in a damp place for long periods as it will be prone to rust.
17 Make sure not to overlubricate the unit as this mig- ht stain the floor or carpeting where the unit stands.
18 Do not stand still on the belt while it is moving.
19 In the event of an emergency, place your feet on the side rails and hold onto the handrail until the unit stops.
SAFETY INSTRUCTIONS
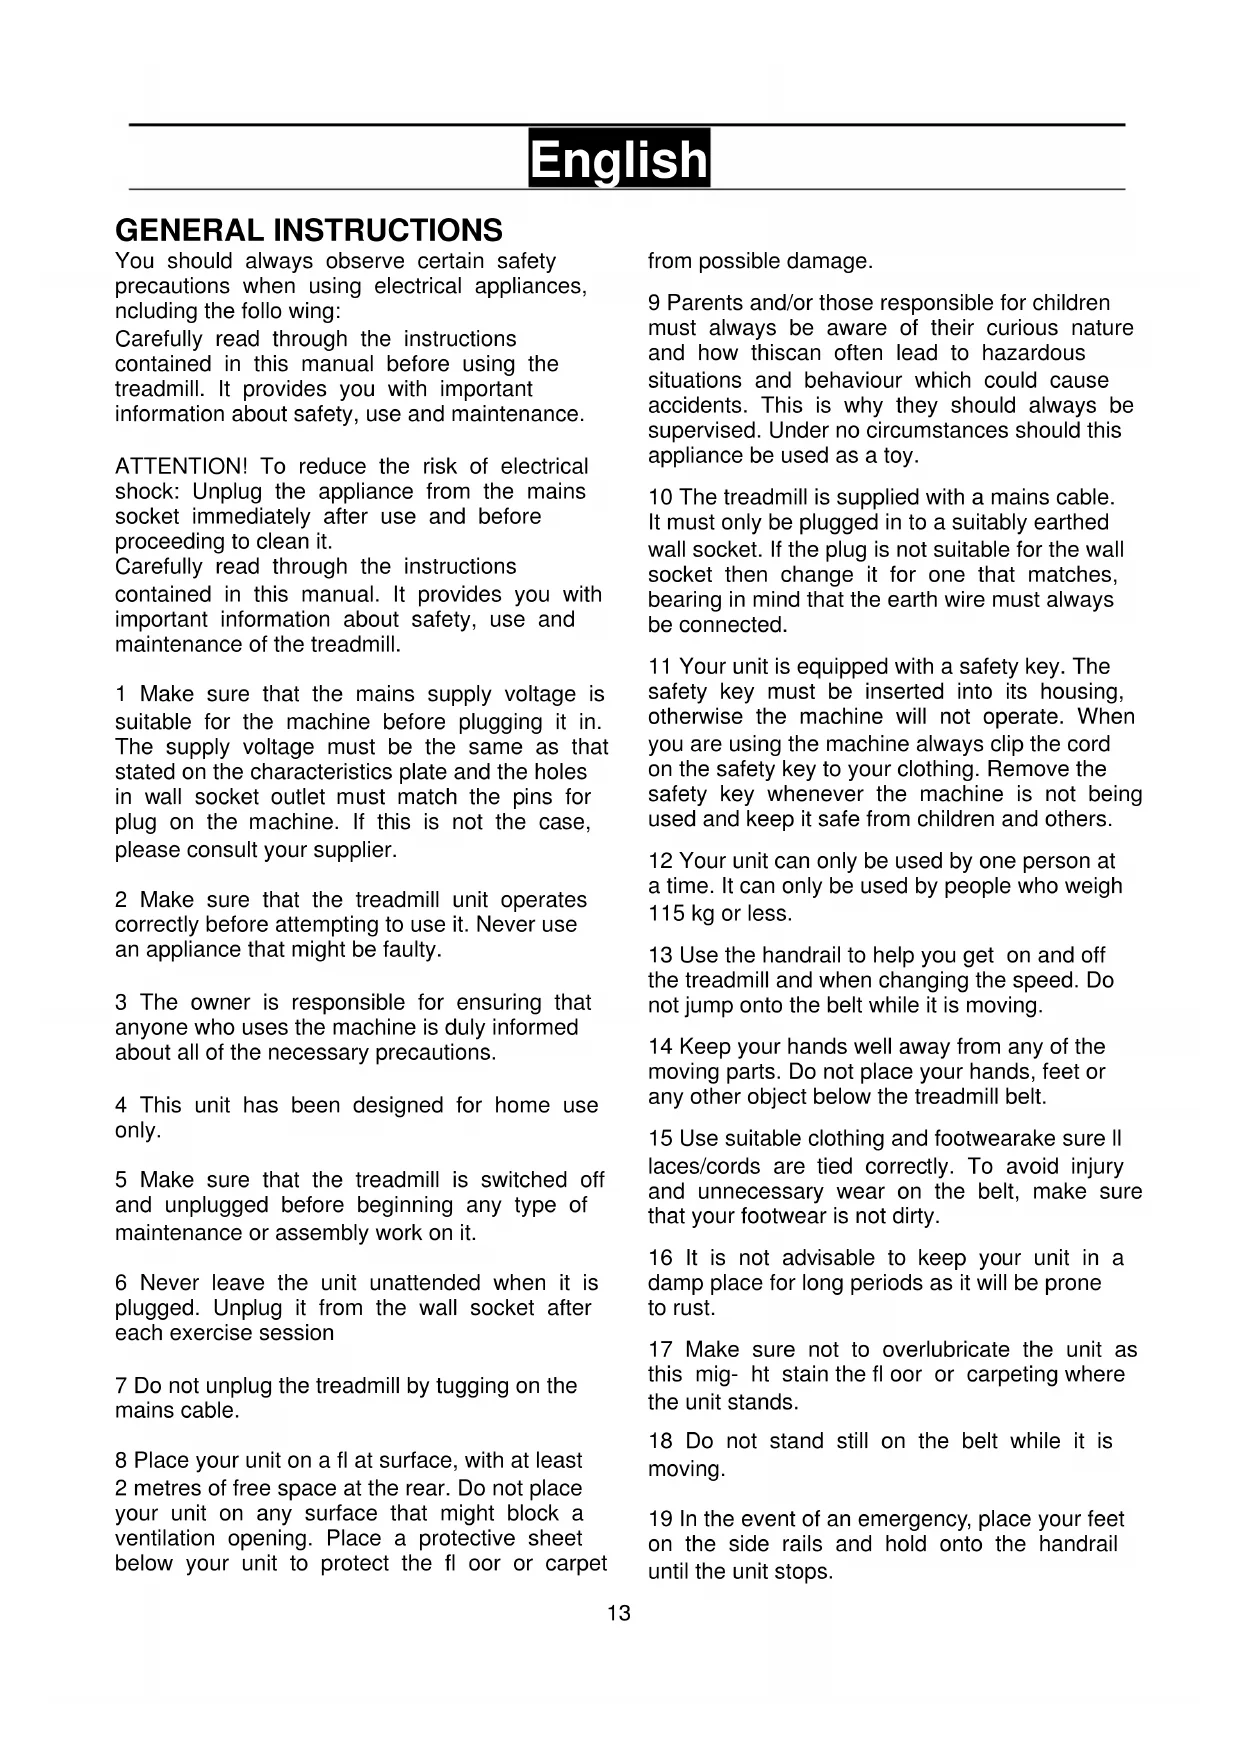
This product must have an earth connection. In the event that the appliance malfunctions then the earth connection will redirect the electrical current away from the machine and reduce the risk of an electrical shock. This product is supplied with a mains cable that has an earth wire and a plug with an earth pin. The plug must only be used with an appropriate wall socket, installed correctly and connected to earth, in accordance with local regulations.
DANGER! If the equipment is not earthed correctly then there is a risk of electrical shock. If in doubt, get an electrician or technical specialist to check that the earth connection is correct. Do not modify the plug supplied with the equipment, if it does not fit the wall socket then get an electrician to install an electrical socket that does. This product must only be used on a 220-240 volt circuit, with an earthed socket similar to that shown in Fig.A. Make sure that the appliance is only connected to a wall socket with the same pin layout as the plug. Do not use an adaptor with this appliance.
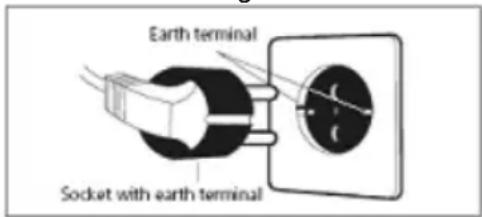
Fig.A
Always follow this advice when using electrical appliances.
1 Make sure that the mains supply voltage is suitable for the machine before plugging it in. The supply voltage must be the same as that stated on the characteristics plate and the holes in wall socket outlet must match the pins for plug on the machine. Do not use any type of adapter.
2 To reduce the risk of electrical shock, always unplug the unit immediately after use and before proceeding to clean it.
3 Only plug the machine into suitably earthed wall sockets, as shown in Figure A. An inadequate electrical connection may result in electrical shocks. If the plug is not suitable for the wall socket then change it for one that matches, bearing in mind that the earth wire must always be connected. If in doubt, call BH technical services.
4 Never leave the unit unattended when it is plugged in. Unplug it after use.
5 Do not allow children or the disabled to use the appliance without the strict supervision of a qualified person.
6 Never use accessories not recommended by the manufacturer.
7 Do not use the machine if the mains cable becomes damaged or worn.
8 Keep the mains cable away from hot surfaces.
9 Do not use the machine outdoors.
10 To unplug the machine, first put the switch to the "0" position and then unplug it from the wall socket.
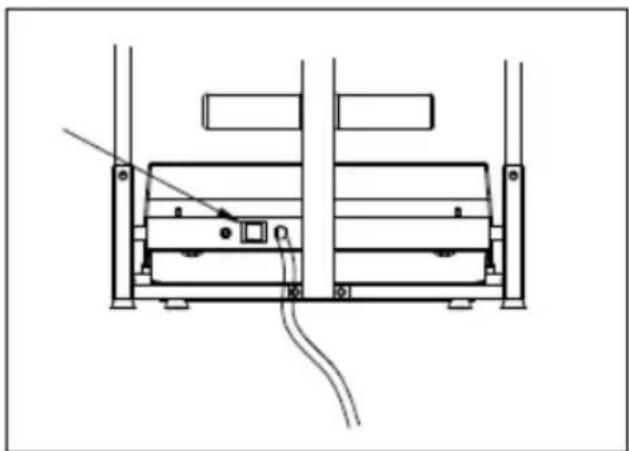
SAFETY BREAKER
This model is equipped with an electronic circuit breaker to protect both the electronic and electrical circuits. This safety device will be automatically triggered if the unit is subjected to abnormal force or heat. Should this occur:
1.- Set switch (L), located on the casing, to the "0" (OFF) position.
2.- Press the circuit button (C) to reset the unit.
3.- Next, set switch (L) to the "l" (ON) position and the unit will be ready for use again. Should the circuit breaker trip repeatedly then the most probable causes are:
- Abnormal working conditions,
- Treadmill belt in need of lubricant,
- solvent based lubricants used (use BH type),
- belt is too tight. Plug the unit into a wall socket with an EARTH terminal. Set switch (L) to Position [1] Fig.B.
DESCRIPTION
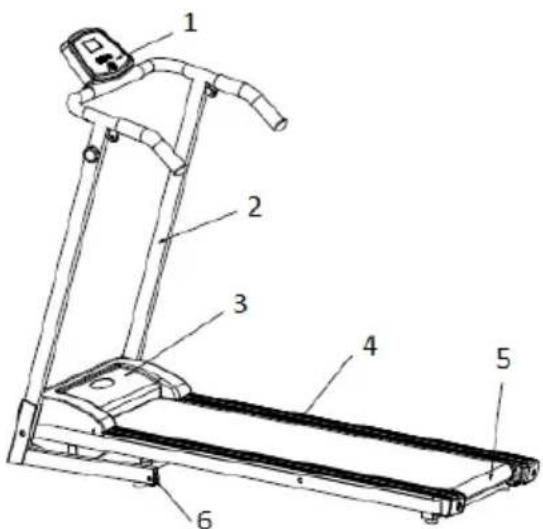
1-Monitor
2- Handrail
3-Motor cover
4- Main unit
5-Rear roller
6-Wheels
ASSEMBLY INSTRUCTIONS
Take the unit out of the box and place it on the floor as shown in figure 0.
We recommend another person's help for assembly.
Check to see that it has all its parts: (B) Main structure; (A) Set of fastening devices: (a) Bolt M8x15 4 units, (b) lock pins, (c) washers 4 units, (i) Allen keys, (k) Safety key, (l) Bottle of lubricant.
Follow each of the steps in the assembly instructions
1. RAILING ASSEMBLY.-
We recommend another person's help for this assembly step
Join the handrail (2) to the base (4) using the bolts and washers, securing each side as shown in Fig. 1.
2. FITTING THE MONITOR.
Connect the monitor (1) to the handrail (2) using the bolts and washers, as shown in Fig. 2.
3. FOLDING UP YOUR UNIT
To fold your unit, stop the machine completely and unplug it from the wall socket.
Lift the base of the machine, as shown in Fig. 3, and secure it with the lock pin (b). You can now release the machine.
4. UNFOLDING YOUR UNIT
To unfold the machine, follow the opposite steps to those done when folding it: Hold the machine with one hand and use the other to pullo ut the lock pin (b) and slowly lower the machine down to the ground, as shown in Fig. 4, When folding or unfolding the treadmill make sure that there are no children about or obstacles that might hinder the folding motion.
MOVEMENT & STORAGE The unit is equipped with wheels (6) to make it easier to move. Make sure that the mains cable is unplugged from the wall socket.
To prevent accidents DO NOT move the treadmill across uneven floors.
MAINTENANCE
Use the bottle of lubricant (I) to lubricate the inside of the belt in order to keep your unit in top condition and to ensure that friction between the belt and the board is kept to a minimum Fig. (5) (due to different running styles, always apply more lubrication to the area where you place your feet during the exercise). It is advisable to lubricate the base of the belt every 3-12 months, depending on how often it is used. If the belt starts to slip after lubrication, then check the tension of the belt. To tension the belt, take the 6mm Allen key (i) and with the machine set to 4km / h turn screws (R & L) one turn in a clockwise direction.
| Operating speed | Recommended lubrication period |
| 1~6 km | 1 year |
| 6~12 km | 6 months |
| 12~16 km | 3 months |
DO NOT USE SOLVENT BASED LUBRICANTS
ADJUSTING THE BELT
If your unit is not seated evenly on the four contact points, this may cause the belt (X) to shift sideways. Rigorous quality control adjusts and checks the running belt. However, due to weight differences and individual styles of running, the belt may be prone to shift sideways.
If the belt does shift to the left or right, stop the machine.
BELT OFFSET TO THE RIGHT
This procedure is very important. Follow these steps. In order to adjust the belt, set the unit in motion at a speed of 4km / h . If the belt has moved to the right, turn screw (R) on the right-hand side of the machine a 1/4 turn clockwise. Note the position of the belt, if after one minute the belt is not completely centred then repeat the operation. If you see that the belt has moved too far over to the left then turn the right screw back slightly in an anticlockwise direction. Figure 11.
As soon as you have adjusted the belt you can begin exercising again.
BELT OFFSET TO THE LEFT
In the event that the belt has moved to the left, turn screw (L) on the left-hand side of the machine a 1/4 turn clockwise. Note the position of the belt, if after one minute the belt is not completely centred then repeat the operation. If you see that the belt has moved too far over to the right then turn the left screw back slightly in an anticlockwise direction. Figure 11. Important: Overtightening of the belt can lead to a loss of speed on the machine and even stretch the belt itself. Bear In mind that one turn of the right screw (R) in a clockwise direction has the same effect on the position of the belt as one turn of the left screw (L) in an anticlockwise direction. Consequently, in the event of excessive belt movement you can use either of the two screws in order to avoid overtightening the belt
OPERATING INSTRUCTIONS
Plug the machine into the mains supply. Set the ON/OFF button at the back of the machine to the ON position, the LED will light up indicating that the machine is switched on. A beep will sound and the monitor will come on.
SAFETY KEY
The machine will only operate if the safety key (k) is inserted into the monitor. In case of emergency release the safety key (k). To switch the machine on again, set the ON/OFF button to the OFF position and then reinsert the safety key (k) into the monitor unit.
MONITOR
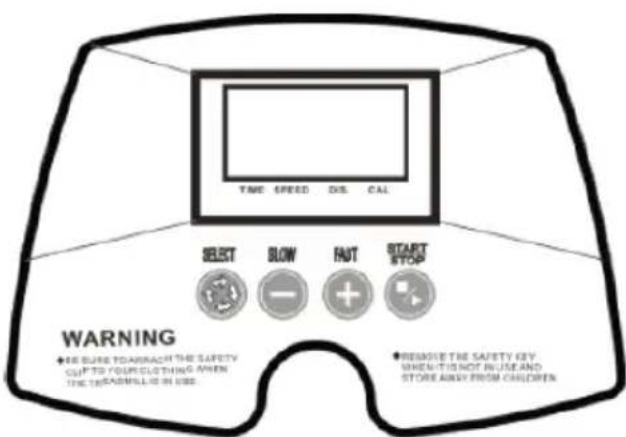
Technical specifications
Time: 00:00 - 99:00 min
Speed: 1.0 - 10km / h
Distance: 1.0 - 99.0km
Calories: 10 - 9990 Cal
Operating the monitor:
START/STOP
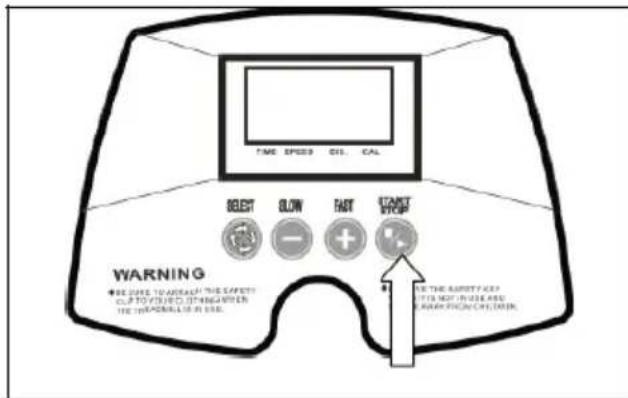
- Press the START/STOP button to start the exercise.
- Press the START/STOP button to interrupt the exercise.
- Press the START/STOP button to continue the exercise.
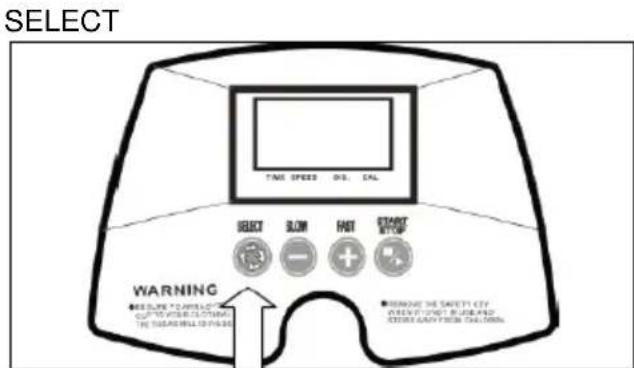
- Press the SELECT button to select the speed and duration of the exercise.
- Press the START/STOP button to start the exercise.
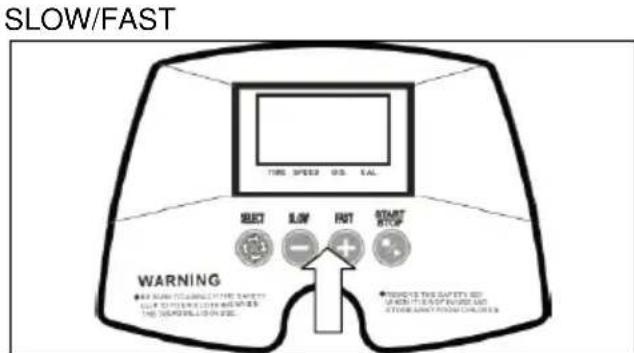
- Press the SLOW/FAST button to decrease/increase the speed or duration of the exercise. (The feature selected will flash)
Monitor display:
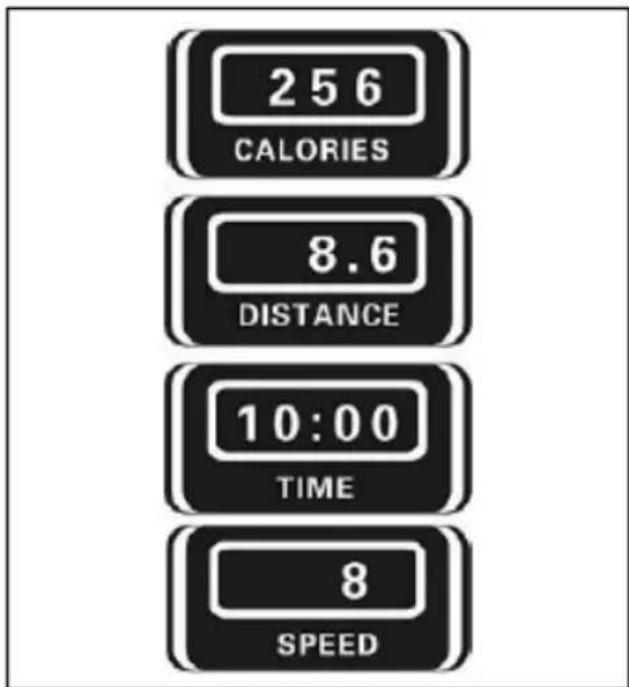
CALORIES: Shows calories burned
DISTANCE: Shows the distance covered or remaing, in kilometres.
TIME: Shows the time elapsed or remaining.
SPEED: Hows the speed.
FITNESS
Being fit means living life to the full. Modern society suffers greatly from stress. City life is basically sedentary There are too many calories and too much fat in our diet. All doctors agree that regular exercise is a good way to control our weight, make us fitter and help us to relax.
ADVANTAGES OF EXERCISE
Regular exercise below a certain level for 15/20 minutes becomes aerobic. Aerobic exercise is basically exercise that uses oxygen. Normally, this is a continuous exercise without pauses. In addition to sugars and fats, the body also needs oxygen. Regular exercise improves the body's ability to supply oxygen to all of the uscles and at the same time improve lung function, the heart's pumping capacity and better blood circulation. In short, the energy produced during exercise burns kilocalories (known as calories).
EXERCISE & WEIGHT CONTROL
The food we eat is transformed into, among other things, energy (calories) for our body. If we take in more calories than we burn then the result is an increase in weight and vice versa, if we burn more calories than we eat, we lose weight. When resting the body burns around 70 calories per hour to keep our vital functions active. The table shows approximate energy use for an average person doing various activities.
EXERCISE PROGRAM
Before starting any exercise program, bearing in mind that exercise programs vary depending on age and physical condition, it is advisable to consult your doctor given that you will achieve better results based on his/her advice or suggestions. Regardless of whether your goal is to become fitter, control your weight or for therapeutical use, always remember that your exercise should be gradual, planned, varied and not too demanding. We recommend that you should exercise 3 to 5 times per week.
Before beginning a session it is important to do a warm-up for 2-3 minutes at low speed. This will help protect your muscles and prepare your cardiorespiratory system.
The next stage will last 15-20 minutes at a pulse rate of between 65 to 75% , or between 75 to 85% for those already accustomed to exercise. At a later stage, once we have become fitter, we can divide this time between both levels but always remembering that the pulse rate must not exceed 85% (aerobic area) and never reach the maximum heart rate limit that corresponds to our age. We you have finished, it is important to relax the muscles. This can be done by walking at a low speed for 2-3 minutes until the heart rate drops below the 65% line. This will prevent muscle pain, especially after an intense session. It is also advisable to finish the program with some relaxation exercises on the floor.
FINAL NOTE We hope that you enjoy your unit. You will soon notice the benefits of your controlled exercise program, you will feel better, have more energy and suffer less stress. You will see for yourself that it is worth staying in shape with BH.
INSPECTION & MAINTENANCE
Switch the unit off and unplug the mains cable. Use a damp cloth or towel to clean the dust off the treadmill, especially the side bars and the
electronic console. Do not use solvents. Use a vacuum cleaner to carefully vacuum around the visible components (belt, structure, etc.). You can also vacuum the underside of the unit by resting it on one of its sides. Similarly, you can vacuum the inside of the motor housing by removing the cover that protects the motor (be careful with the wires). Periodically check that all of the fastening elements are duly tightened and connected correctly. Check and tighten all the parts on your unit every three months. Use of this machine with worn parts, e.g. the drive belt, running belt or rollers, may cause the user injury. If you are unsure about the condition of any part, we recommend that you replace it with original spare parts. The use of other spare parts may cause injuries or affect the performance of the machine.
BH RESERVES THE RIGHT TO MODIFY THE SPECIFICATIONS OF ITS PRODUCTS WITHOUT PRIOR NOTICE
FAULT FINDING CHART
| PROBLEM CHECKS SOLUTIONS | ||
| 1. The monitor does not switch on. | 1) Make sure that the machine is plugged in, the ON/OFF switch in position 1 and that the safety key is inserted. | 1) Plug the machine into the mains supply. Set the switch to position 1 and insert the safety key. |
| 2. The monitor switches on but the motor fails to start. | 2) Check that the current limiter is pressed in. | 2) Switch the machine off and press the circuit breaker in. Lubricate the treadmill band. |
| 3. Walking motion is jerky on the treadmill. | 3.a) Check that the belt is lubricated.3.b) Check the tension on the sliding belt.3.c) Check the tension on the drive belt. | 3.a) Lubricate the sliding belt.3.b) Adjust the belt tension.3.c) Adjust the drive belt tension. |
| 4. The machine stops (the breaker trips). | 4) Check that the band is lubricated. | 4) Reset the overload button with the On /Off switch at „0" and lubricate the treadmill band. |
| 5. Electrical shocks through the handrail. | 5) Check that the machine is plugged into an earthed mains socket. | 5) Plug the machine into an earthed mains socket. |
| 6. The treadmill belt skews off centre. | 6.a) Check that the machine is level on the floor.6.b) Check that the machine does not wobble. |
902 170 258
Warranty
This product is guaranteed for 2 years in accordance with that stated in Directive 1999/44/EC of the European Parliament and of the Council 25th May, 1999, regarding certain aspects of the sale of consumer goods and associated guarantees, incorporated into Spanish Law by virtue of Law 23/2003, 10th July; Guarantees on the sale of consumer goods.
To this effect, EXERCYCLE, S.L. VAT n° B-01029032, with business address c/ Zurrupitieta 22, Vitoria, Spain, guarantees this product.
Please keep the receipt as proof of purchase.
Should you have any queries please do not hesitate to phone our customer service line:
902170258
François
Specifications techniques
Distance:1.0-99.0 km
Calories:10-9990Cal
Velocidae (Speed): 1,0 - 10 km/h
Distancia (Distance): 1,0 - 99,0 km
Calorias (Calories): 10 - 9990 Cal
Distance (Distance): 1.0 - 99.0 km
Calorie (Calories): 10 - 9990 Cal
To order replacement parts: Corresponding parts Quantity
Toll free: +1 866 325 2339
No.139, Jhongshan Rd.
Daya Township
Taichung 428, Taiwan. R.O.C.
Tel.: +886 4 25609200
Fax: +886 4 25609280
e-mail: info@bhfitness.pt
BH SERVICE PORTUGAL
e-mail: info@bhfitness.pt
BH FITNESS MEXICO
BH Exercycle de Mexico S.A. de
CV
Eje 132/136
Zona Industrial, 2A Secc.
78395 San Luis Potosí
S:L.P: MEXICO
Tel.: +52 (444) 824 00 29
Fax: +52 (444) 824 00 31
www.bh.com.mx
BH FITNESS CHINA
BH China Co., Ltd.
Block A, NO.68, Branch Lane
455, Lane 822,
Zhen Nan RD., Li Zi Yuan,
Putuo, Shanghai 200331, P.R.C.
Tel: +86-021-5284 6694
Fax:+86-021-5284 6814
e-mail: info@i-bh.cn
BH FITNESS FRANCE
27 bis, Route de Pitoys
64600 ANGLET
Tel.: +33 05 59 42 04 71
Fax: +33 05 59 50 10 83
e-mail:
bhfrance@bhfitness.com
SAV FRANCE
Tél: +33 0810 000 301
Fax: +33 0810 00 290
e-mail:
savfrance@bhfitness.com
BH FITNESS UK
Halliards, Terrington Drive
Newcastle-under-Lyme
Staffordshire ST5 4NB
United Kingdom
email: info@bhfitness.com
www.bhfitness.com
BH SE RESERVRA EL DERECHO A MODIFICAR LAS ESPECIFACIONES DE SUS PRODUCTOS SIN PREVIO AVISO.
SPECIFICATIONS MAY BE CHANGED WITHOUT PRIOR NOTICE DUE TO OUR PROGRAMME OF CONTINUOUS PRODUCT DEVELOPMENT.
BH SE RÉSERVE LE DROIT DE MODIFIER LES SPECIFICATIONS DE SES PRODUITS SANS PREAVIS.