
Pure C9 - Vacuum Cleaner ELECTROLUX - Free user manual and instructions
Find the device manual for free Pure C9 ELECTROLUX in PDF.
User questions about Pure C9 ELECTROLUX
0 question about this device. Answer the ones you know or ask your own.
Ask a new question about this device
Download the instructions for your Vacuum Cleaner in PDF format for free! Find your manual Pure C9 - ELECTROLUX and take your electronic device back in hand. On this page are published all the documents necessary for the use of your device. Pure C9 by ELECTROLUX.
USER MANUAL Pure C9 ELECTROLUX
Bagless canister vacuum cleaner
GB INSTRUCTION BOOK. 6
FR MODE D'EMPLOI. 9
AR 12
BG BPOUYPAC C INHCTPYKUN15
CZ NAVOD KPOUZITI 18
DE GEBRAUCHSANWEISUNG. 21
DK VEJLEDNING. 24
EE KASUTUSJUHEND. 27
ES LIBRO DE INSTRUCCIONES 30
FA 33
FI OHJEKIRJA. 36
GR EΓXEPIIΔIO OΔHΓΩN 39
HR KNJIZICA S UPUTAMA 42
HU HASZNALATI UTMUTATIO 45
IT ISTRUZIONI 48
LT INSTRUKCIJU KNYGA 51
LV LIETOSANAS INSTRUKCIJA.54
NO BRUKSANVISNING. 57
PL INSTRUKCJA OBSLUGI 60
RO MANUAL DE INSTRUCTIUNI. 63
RU HHTPYKLIIN 66
SE BRUKSANVISING. 69
SI NAVODILA. 72
SK NAVOD NAPOUZITIE. 75
SR UPUTSTVO 78
TR EL KITABI 81
UA IOCIBHNIK KOPNCTYBAHA..84
1
OVERVIEW OF THE PRODUCT
K
R
S

W X Y Z
AA
- CERTAIN MODELS ONLY

INSTALLATION

USING THE PRODUCT
- CERTAIN MODELS ONLY
3
USING THE PRODUCT
* CERTAIN MODELS ONLY
12
13

4
DUST EMPTYING
14
5
CLEANING THE FILTERS
15

16
5
CLEANING THE FILTERS
17
6
MAINTENENCE
- CERTAIN MODELS ONLY
18

7
SYSTEM CHECK

19

SAFETY PRECAUTIONS
This appliance can be used by children aged from 8 years and above and persons with reduced physical, sensory or mental capabilities or lack of experience and knowledge if they have been given supervision or instruction concerning use of the appliance in a safe way and understand the hazards involved.
Children shall not play with the appliance.
Cleaning and maintenance shall not be done by children without supervision.
WARNING: Turbo nozzles* have a rotating brush where parts can get entrapped. Please use them with caution and only on intended surfaces. Please turn the vacuum cleaner off before removing entrapped parts or cleaning the brush.
Batteries must be removed from the remote control in the handle / LED lighted nozzle before scrapping the product**.
*Certain models only.
**Information on how to remove the battery is in section 6 and 7.
Always disconnect the plug from the mains before cleaning or maintaining the appliance or when removing the battery. The battery is to be disposed of safely.
If the cord is damaged, it must be replaced only by an authorized Electrolux service centre in order to avoid a hazard.
Pure C9 should only be used for normal vacuuming indoors and in a domestic environment. Make sure the vacuum cleaner is stored in a dry place. All service or repairs must be carried out by an authorized Electrolux service centre. Packaging material, e.g. plastic bags should not be accessible to children to avoid suffocation.
Never use the vacuum cleaner:
In wet areas.
Close to flammable gases, etc.
When the product shows visible signs of damage.
On sharp objects or fluids.
When the floor nozzle shows visible signs of a damages.
On hot or cold cinders, lighted cigarette butts, etc.
On fine dust, for instance from plaster, concrete, flour, hot or cold ashes.
Do not leave the vacuum cleaner in direct sunlight.
Avoid exposing the vacuum cleaner to strong heat or freezing temperatures.
Never use the vacuum cleaner without its filters.
Do not try to touch the brush roll while the cleaner is switched on and the brush roll is turning.
When the wheels are blocked.
Do not use your vacuum cleaner if the filters are injured or broken.
Power cord precautions
Check the plug and cord regularly. Never use the vacuum cleaner if the plug or cord is damaged.
Damage to the vacuum cleaner's cord is not covered by the warranty. Never pull or lift the vacuum cleaner by the cord.
Using the vacuum cleaner in the above circumstances may cause serious personal injury or damage to the product. Such injury or damage is not covered by the warranty or by Electrolux.
SERVICING AND WARRANTY
All service or repairs must be carried out by an authorized Electrolux service centre.
Damage to the vacuum cleaner's cord is not covered by the warranty. Damage to the motor caused by; vacuuming liquid, immersing appliance in liquid or using appliance with a damaged hose and nozzle is not covered by the warranty.
DISPOSAL

This symbol on the product indicates that this product contains a battery which shall not be disposed with normal household waste.

This symbol on the product or on its packaging indicates that the product may not be treated as household waste.
To recycle your product, please take it to an official collection point or to an Electrolux service center that can remove and recycle the battery and electric parts in a safe and professional way. Follow your country's rules for the separate collection of electrical products and rechargeable batteries.
Hereby, Electrolux Home Care and SDA, declares that the Vacuum Cleaner with radio equipment type HER2 and HER3 is in compliance with Directive 2014/53/EU.
ENGLISH
Thank you for choosing Electrolux Pure C9 vacuum cleaner. Always use original accessories and spare parts to get the best results. This product is designed with the environment in mind. All plastic parts are marked for recycling purposes.
BEFORE STARTING
- Read this manual carefully.
- Check that all parts described are included.
- Pay special attention to the safety precautions!
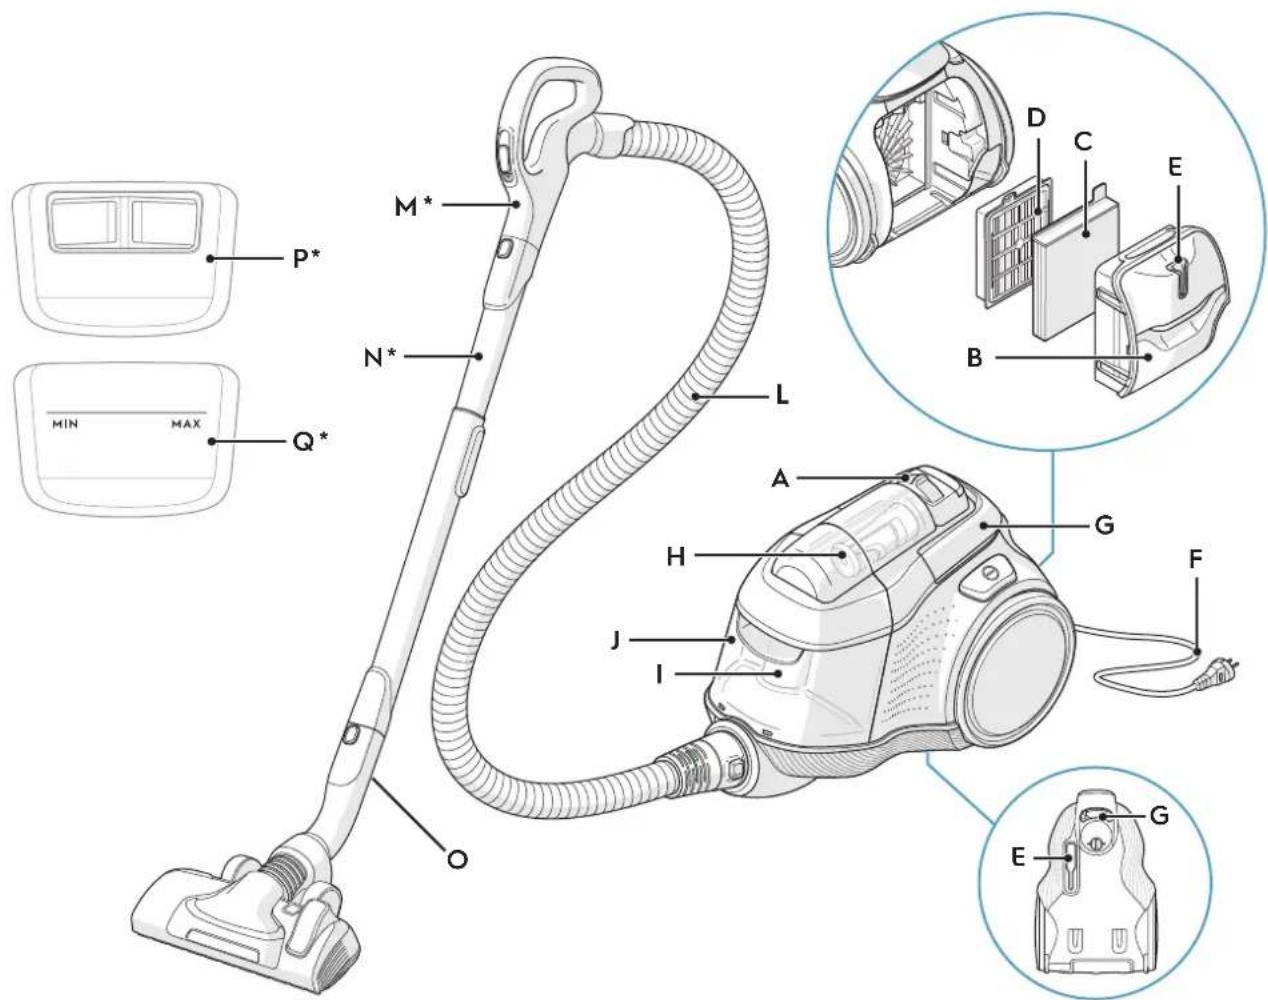
DESCRIPTION OF PURE C9 VACUUM CLEANER
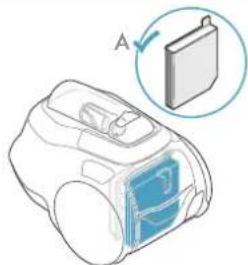
A. Display (see versions later)
B. Filters lid
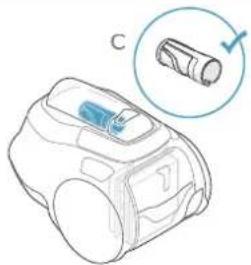
C. Fine dust filter
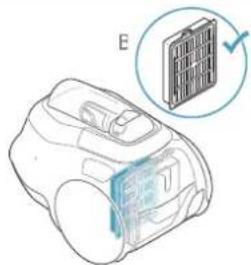
D. Pre-motor filter
E. Parking slots
F. Power cord
G. Carry handle
H. Cyclone compartment and nose cone filter
I. Air channel
J. Dust compartment
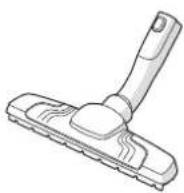
K. AeroPro 3in1 tool
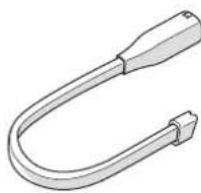
L. AeroPro hose
M. AeroPro handle (see versions later)
N. AeroPro telescopic tube
O. Parking clip
P. Display for models with rotary knob manual control*
Q. Display for models with remote control
R. AeroPro Classic handle
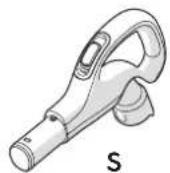
S. AeroPro Ergo handle
T. AeroPro Remote Control handle
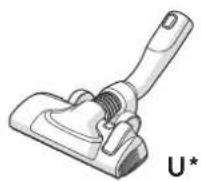
U. FlowMotion nozzle
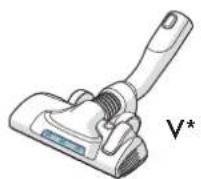
V. FlowMotion LED nozzle* (with front lights)*
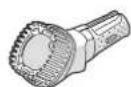
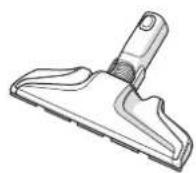
W. AeroPro Turbo nozzle
X. AeroPro Mini Turbo nozzle
Y. ParketoPro nozzle
Z. AeroPro FlexProPlus nozzle
AA. AeroPro Long crevice nozzle
*Certain models only
Picture page 2-6
HOW TO USE THE VACUUM CLEANER
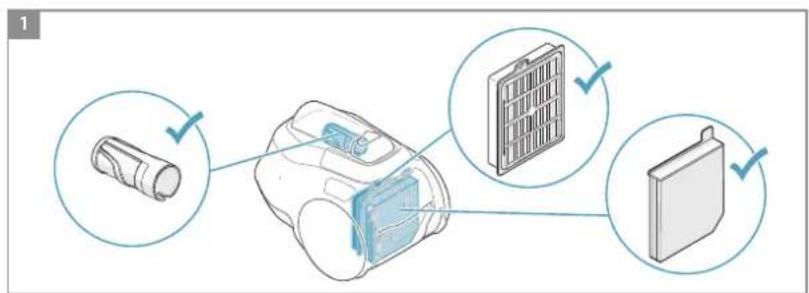
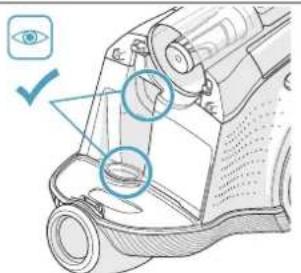
1 SCheck that all filters are properly placed before using the vacuum cleaner.
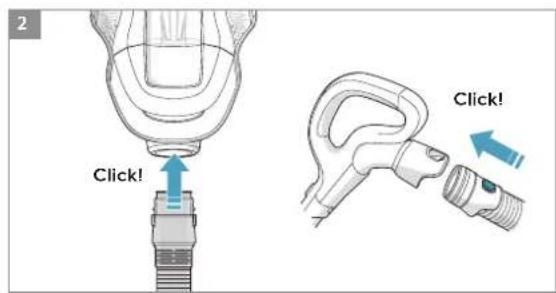
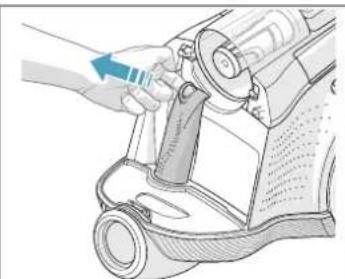
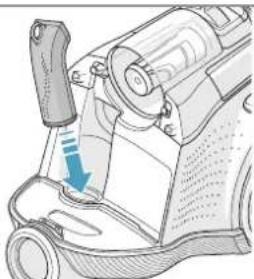
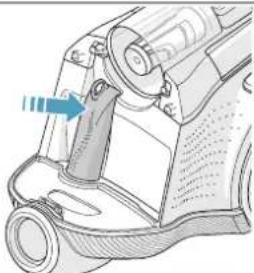
2 Insert the hose into the cleaner (to remove it, press the lock buttons and pull). Insert the hose into the hose handle until the lock button clicks (to release it, press the lock button and pull).
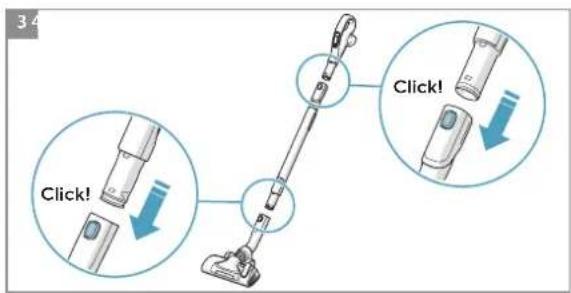
3 Attach the telescopic tube to the nozzle. Attach the telescopic tube to the hose handle (to remove it, press the lock button and pull).
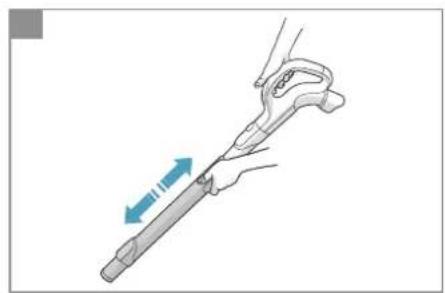
4 Adjust the telescopic tube by holding the lock with one hand and pulling the handle with the other hand.
3IN1 ACCESSORY TOOL
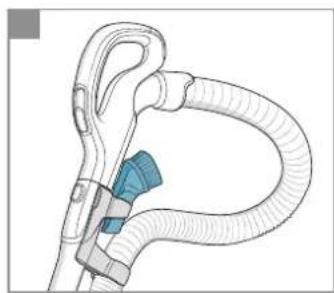
5 You can fasten the clip-on holder and 3in1 tool under the handle to have it easily accessible. The tool has 3 functions, see pictures on next page.
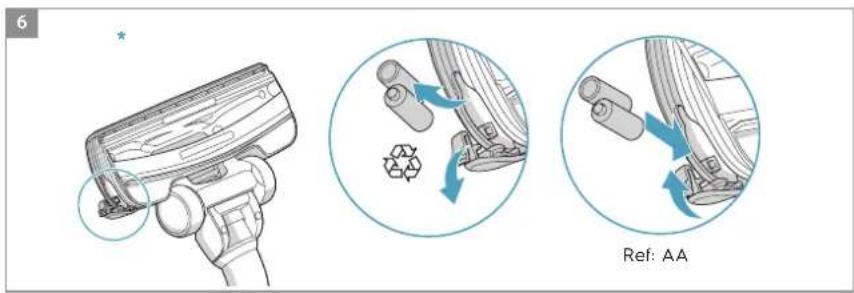
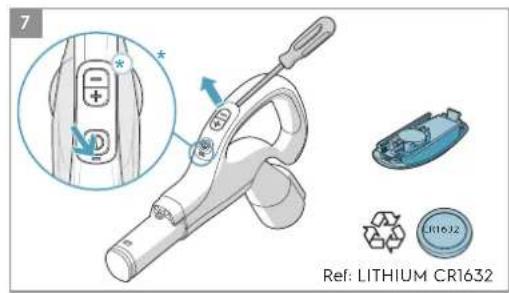
CHANGING THE BATTERIES*
6 Nozzle with front lights: Before first use, remove the protective film (on top of the batteries). Change batteries when front lights start blinking fast. Use 2 AA batteries.
7 Handle with remote control: Change battery when light indicator turns red or is not responding when pressing any button. Use only batteries type LITHIUM CR1632.
NB: Remove the batteries from the product before scrapping. Follow your country's rules for collection of batteries and electrical products.
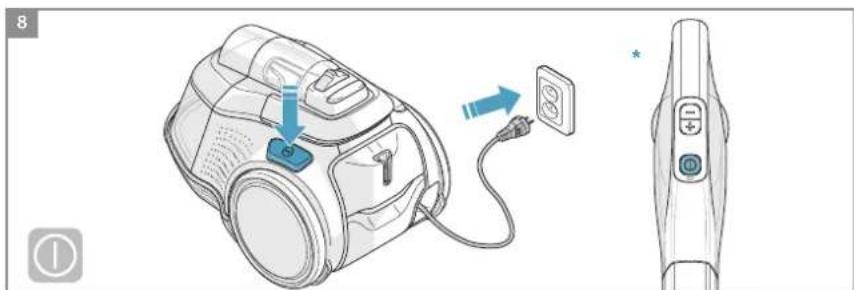
START/STOP THE VACUUM CLEANER AND ADJUST SUCTION POWER
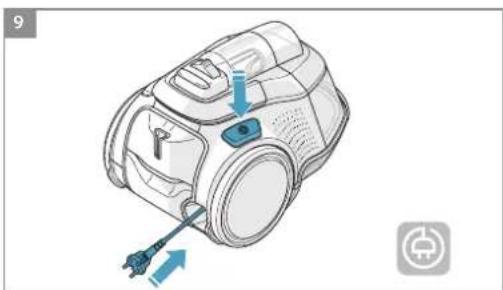
8 Pull out the power cord and plug it into the mains. Press the ON/OFF button to turn the cleaner on/off. Models with remote control can also be operated by the ON/OFF button on the handle.
9 After cleaning, push the REWIND button to rewind the cable.
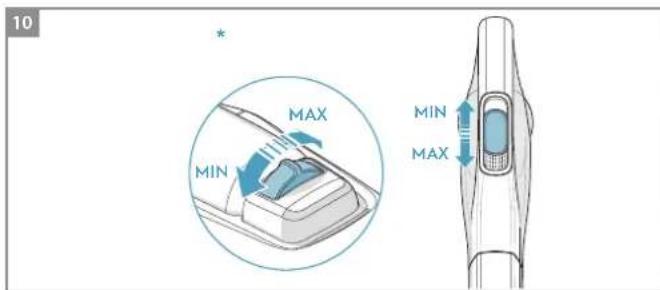
10 Adjust suction power (manual control models): Turn the rotary knob on the cleaner or use the air valve on the handle.
Adjust suction power (remote control models): Press +/- button on the handle. MIN/MAX and symbols indicators on display will show level of power.*
VACUUMING WITH THE UNIVERSAL NOZZLE (V^*,W^*)
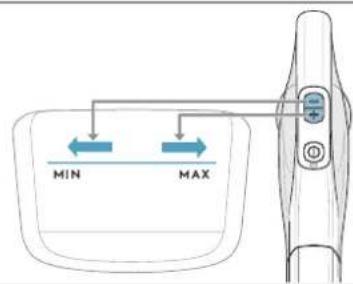
11 Change nozzle setting with the pedal. Icon illustrates recommended floor type (hard floor or carpet).
FlowMotion LED nozzle*: Move the nozzle forward. The front light turns on automatically after a few seconds. When the nozzle is not used, the light turns off automatically after a few seconds.
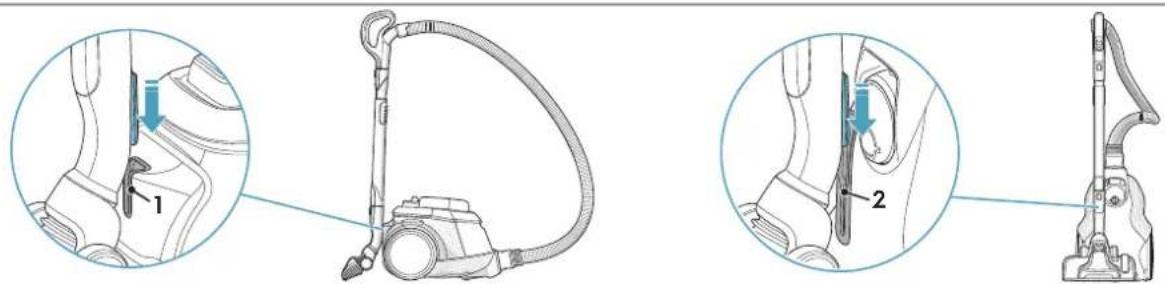
PARKING POSITIONS, MOVING THE VACUUM CLEANER
12 Use parking position (1), at the back of the vacuum cleaner, when you pause while vacuuming.
Use parking position (2), underneath the vacuum cleaner, to carry and store the vacuum cleaner.
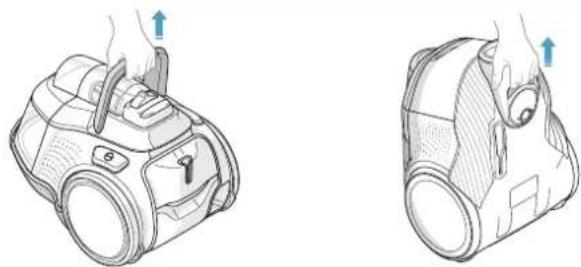
13 The vacuum cleaner has two carrying handles.
EMPTYING THE DUST COMPARTMENT
14 Empty the dust compartment when the level of dust has reached the maximum limit ("MAX"-mark).
Press the release button and pull to remove the dust compartment. Hold the dust compartment over a dust bin. Press the unlock button underneath the lid, open the lid by swinging it outwards. Empty dust into the dustbin. Refit in reverse order.
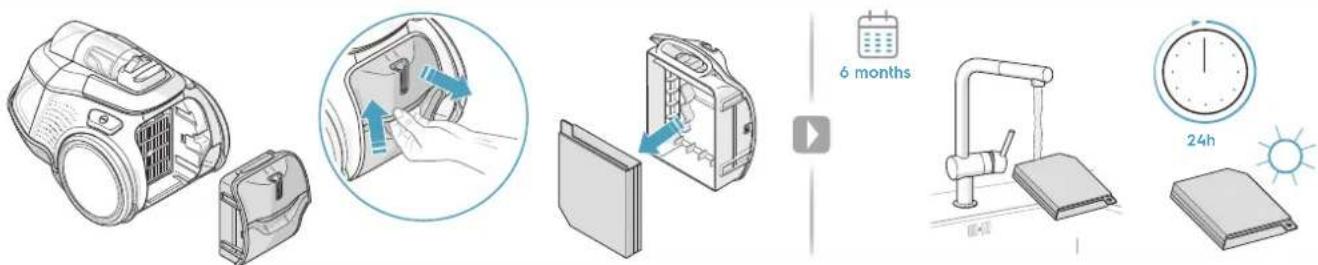
REPLACING THE FILTERS
15 Pull the FILTER button to open the filter lid.
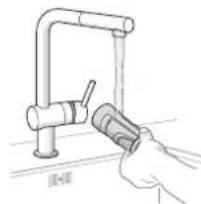
Clean the fine dust filter after six months of use. Pull the tab on the frame to remove the fine dust filter. Rinse the filter under running water.
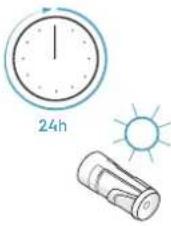
NB: Do not use cleaning agents. Let the filter dry completely (min. 24 h in room temperature) before putting back!
16 Press and slide the lock mechanism to the right to release the premotor filter. Remove the filter by pulling the filter frame tab.
Clean the pre-motor filter after twelve months of use. Only use original s-filter PureAdvantage, ref: EFSXXX. Rinse the inside (dirty side) in lukewarm tap water. Tap the filter frame to remove the water. Repeat the process four times.
NB: Do not use cleaning agents. Avoid touching the filter surface. Let the filter dry completely (min. 24 h in room temperature) before putting back! Change the washable filter at least once a year or when it is very dirty or damaged.
After replacing the filters, close the filter lid until it is clicked back into place.
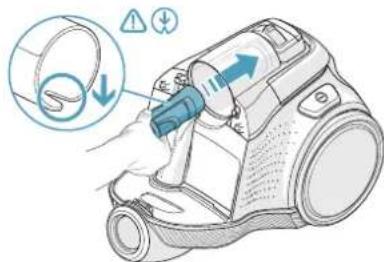
17 Cleaning the nose cone filter: the nose cone filter is located inside the cyclone compartment. Clean the nose cone filter if dust has entered. Pull the nose cone filter to remove. Remove dust with your hand.
Clean under running water if heavily soiled. Refit in reverse order.
NB: Do not use cleaning agents. Let the filter dry completely (min. 24 h in room temperature) before putting back!
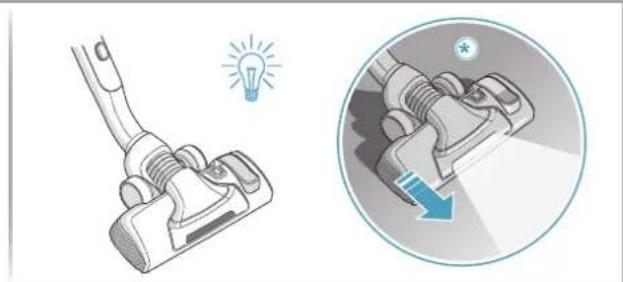
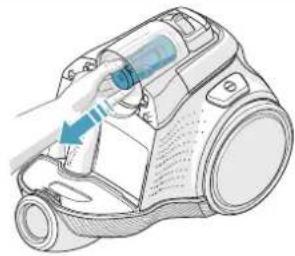
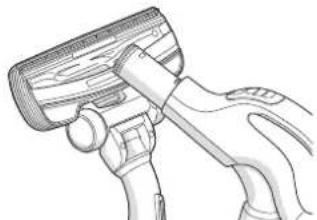
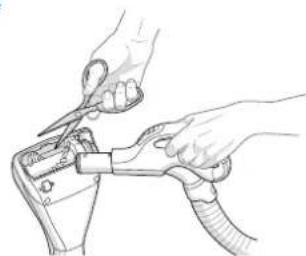
CLEANING THE UNIVERSAL NOZZLE (V^*,W^**) AND THE TURBO NOZZLE (X^*)
18 Disconnect the universal nozzle from the tube. Clean with the hose handle.
Disconnect the turbo nozzle from the tube and remove entangled threads etc by snipping them away with scissors. Use the hose handle to clean the nozzle.
Enjoy a great cleaning experience with Pure C9!
Electrolux reserves the right to change products, information and specifications without notice.
| NOZZLE/ACCESSORY USE FOR: NOZZLE | E/ACCESSORY USE FOR: | ||
| K. 3in1 accessory tool*1 2 3 | 3 tools in 1:1. Dusting tool for hard surfaces(bookshelves, skirting boards etc).2. Upholstery tool for textiles(curtains, upholstery etc).3. Crevice tool for narrow spaces(behind radiators etc). | U. FlowMotion nozzle*V. FlowMotion LEDnozzle* | Universal nozzle:- For all floor types, secures best dust pick up on both carpets and hard floors.- Change nozzle setting with the pedal.Icon will show recommended floor type.- Front light helps to detect dust and dirt in dark spaces (under furniture etc).PureVision only |
| W. Turbo nozzle* Carpet nozzle: | - Brushes and vacuums at the same time (best pick up of hair, fibres etc).- Brush roller is driven by the airflow of the vacuum cleaner.- Not suitable for carpets with very deep piles and long fringes, anti-slip carpets like door mats or water resistant carpets. Use universal nozzle instead. | X. Mini Turbo nozzle* Upholstery nozzle:- Brushes and vacuums at the same time (best pick up of hair, fibres etc).- For textile furniture, car seats, mattresses etc.- Brush roller is driven by the airflow of the vacuum cleaner.- Not suitable for carpets with very deep pile and long fringes as it can get stuck in the rotating brush roll. | |
| Y. ParketoPro nozzle* | Hard floor nozzle:- For gentle cleaning of hard floor(parquet, wooden floor, tiles etc).- Best dust pick up on hard floor with crevice. | Z. FlexProPlus nozzle* Hardfloor nozzle:- For reach under/between furniture, corners and other obstacles.- Can easily turn 180 degrees for direct access to narrow spaces. | |
| AA. Long crevice nozzle* | Extra long tool:- For areas hard to reach (top of shelves etc).- For narrow spaces (behind radiators, under car seats etc). | ||
| Models with manual power regulation-follow graphics on cleaner for optimal performance. | |||
TROUBLESHOOTING
| PROBLEM SOLUTION | |
| The vacuum cleaner does not start | ·Check that the cable is connected to the mains. ·Check that the plug and cable are not damaged. ·Check for a blown fuse. ·Check if the battery indicator lamp in the remote control handle responds (certain models only). |
| The cleaner stops | The cleaner might be overheated: disconnect it from the mains; check if the nozzle, tube, hose or filters are blocked. Let the cleaner cool down for 120 minutes before plugging it in again. If the cleaner still does not work, contact an authorized Electrolux service centre. |
| Reduction of suction capacity versus normal | ·Check if the dust compartment is full or blocked. ·Check if the air channel and inlet or outlet connection is blocked and needs to be cleared. ·Check if the pre-motor filter is clogged and needs changing. ·Check if nozzle is blocked and needs to be cleared. ·Check if hose is blocked by squeezing it gently. However, be careful in case the obstruction has been caused by glass or needles caught inside the hose. Note: The warranty does not cover any damage to the hose caused by cleaning it. |
| Water has been sucked into the vacuum cleaner | It will be necessary to replace the motor at an authorized Electrolux service centre. Damage to the motor caused by the penetration of water is not covered by the warranty. |
| For any further problems, contact an authorized Electrolux service centre. | |
CONSIGNES DE SECURITÉ
REEMPLACEMENT DES FILTRES
a a a a a a a a a a a a a a a a a a a a a a a a a a a a a a a a a a a a a a
jglj jla 1
y
1 1 1 1 1 1 1 1 1 1 1 1 1 1 1 1 1 1 1 1 1 1 1 1 1 1 1 1 1 1 1 1
**iill no jalil lLED - oolall a gill / *jaiell g d jn kll s y n clll
1a i 1j j
.76 1 1
J 1
Electrolux 1
Pure C9
sEclctrolux 1
1 1
jay jay jay jay jay jay jay jay jay jay jay jay jay jay jay jay jay jay jay jay jay jay jay jay jay jay jay jay jay jay jay jay jay jay jay jay jay jay jay jay jay jay jay jay jay jay jay jay jay jay jay
aaiiaaii iaiiie

a a
a jia aaiis gaii

aas jy 1
Electrolux
Ee 1
aaii aaiia i 15g j g jg jg jg jg jg jg
aallll lal lal, aaiysslll
Electrolux Home Care and SDA 45
53/2014
alba aayyell ay
aJbJ 1
j 1
aai, 1iie 1
aaiiai aieeae eae iie
1
1 1
s
Aaill 2jll jll lal j jll aai jll aai jll aai jll
y
j j
8ySso jao yjai all ayai ai pi
aalalalalalalalal
aaii iis
L
Aaiy
ailllll 11111111111111111111111
j 1
Eclctrolux 2
Jallll
dAeill Electrolux 1
Jn 0s clalall,claoaill,claiieh Electrolux is
Eclulux Pure C9 y
A
*2
(1)
AeroPro Classic P
jidi:di:bi.B
AeroPro Ergo*
gai jiu C
Remote Control T
1 1
AeroPro
FlowMotion*JU
2
FlowMotionLED V
Jall jia. G
211012
bji jilj jucy iH
AeroPro Turbo* .W
41 =
AeroPro Mini Turbo*
1
ParketoPro*a.Y
3in1 AeroPro 5iJ.K
AeroPro FlexProPlus*a.Z
AeroPro .M
AeroPro AA
()
aaii jia
AeroPro
0
Jaii jai jai jai jai F
i 5
5
ai + 1bi = aibi
1
()
()aaiyaiyaiyaiyaiyaiyaiyaiyaiyaiyaiyaiyaiyaiyaiyaiyaiyaiyaiyaiyaiyaiyaiyaiyaiyaiyaiyaiyaiyaiyaiyaiyaiyaiyaiyaiyaiyaiyaiyaiyaiyaiyaiyaiyaiyaiyaiyaiyaiyaiyai
a 1000000000000000000000000000000000000000000000
.LITHIUM CR1632
a 1 a 1 1 1 1 1 1 1 1 1 1 1 1 1 1 1
aaii 8g jia g aiyjyai iaii
On/Off jie gaiy, yiy jaiy 100000000000000000000000000000000000000000000000000000000000000000000000000000000000
aillll (e) REwIND g
paas gaii jai iai jai jai jai: (gaiyai ai jaijai) baijai 6e bai
.
gaaa aal 1+2ylae bai: (aee paai ci jia) haoi iae lae
(^W.^V) alele aegy gajgall ayjgysll amisell
A y aai 1 1 1 1 1 1 1 1 1 1 1 1 1 1 1 1 1 1 1 1 1
yLg 10000000000000000000000000000000000000000000000000000000000
| :laiee gaf laiee lalil laiee lalil laiee lalil laiee lalil laiee lalil laiee lalil laiee lalil laiee lalil laiee lalil laiee lalil laiee lalil laiee lalil laiee lalil laiee lalil laiee lalil lalil FlowMotion LED | *FlowMotion 3 *FlowMotion LED 1 * | *1 3 (all ga, c, al) all 2 (all ga, c, al) all 2 (all ga, c, al) all 3 | *1 3 (K 1 2 3 |
| :laiee gaf laiee lalil laiee lalil laiee lalil laiee lalil laiee lalil laiee lalil laiee lalil laiee lalil laiee lalil laiee lalil laiee lalil laiee lalil laiee lalill laiee lalil laiee lalil laiee lalil laiee lalil laiee lalil laiee lalil laiee lalil laiee lalil laiee lalil laiee lalil laiee lalil laiee lalil laiee lalil laiee lalil LA | * | * | * |
| FlexProPlus* 4g Z: (all lalil (1) all lalil (2) all lalil (3) all lalil (4) all lalil (5) all lalil (6) all lalil (7) all lalil (8) all lalil (9) all lalil (10) all lalil (11) all lalil (12) all lalil (13) all lalil (14) all lalil (15) all lalil (16) all lalil (17) all lalil (18) all lalil (19) all lalil (20) all lalil (21) all lalil (22) all lalil (23) all lalil (24) all lalil (25) all lalil (26) all lalil (27) all lalil (28) all lalil (29) all lalil (30) all lalil (31) all lalil (32) all lalil (33) all lalil (34) all lalil (35) all lalil (36) all lalil (37) all lalil (38) all lalil (39) all lalil (40) all lalil (41) all lalil (42) all lalil (43) all lalil (44) all lalil (45) all lalil (46) all lalil (47) all lalil (48) all lalil (49) all lalil (50) all lalil (51) all lalil (52) all lalil (53) all lalil (54) all lalil (55) all lalil (56) all lalil (57) all lalil (58) all lalil (59) all lalil (60) all lalil (61) all lalil (62) all lalil (63) all lalil (64) all lalil (65) all lalil (66) all lalil (67) all lalil (68) all lalil (69) all lalil (70) all lalil (71) all lalil (72) all lalil (73) all lalil (74) all lalil (75) all lalil (76) all lalil (77) all lalil (78) all lalil (79) all lalil (80) all lalil (81) all lalil (82) all lalil (83) all lalil (84) all lalil (85) all lalil (86) all lalil (87) all lalil (88) all lalil (89) all lalil (90) all lalil (91) all lalil (92) all lalil (93) all lalil (94) all lalil (95) all lalil (96) all lalil (97) all lalil (98) all lalil (99) all lalil (100) all lalil (101) all lalil (102) all lalil (103) all lalil (104) all lalil (105) all lalil (106) all lalil (107) all lalil (108) all lalil (109) all lalil (110) all lalil (111) all lalil (112) all lalil (113) all lalil (114) all lalil (115) all lalil (116) all lalil (117) all lalil (118) all lalil (119) all lalil (120) all lalil (121) all lalil (122) all lalil (123) all lalil (124) all lalil (125) all lalil (126) all lalil (127) all lalil (128) all lalil (129) all lalil (130) all lalil (131) all lalil (132) all lalil (133) all lalil (134) all lalil (135) all lalil (136) all lalil (137) all lalil (138) all lalil (139) all lalil (140) all lalil (141) all lalil (142) all lalil (143) all lalil (144) all lalil (145) all lalil (146) all lalil (147) all lalil (148) all lalil (149) all lalil (150) all lalil (151) all lalil (152) all lalil (153) all lalil (154) all lalil (155) all lalil (156) all lalil (157) all lalil (158) all lalil (159) all lalil (160) all lalil (161) all lalil (162) all lalil (163) all lalil (164) all lalil (165) all lalil (166) all lalil (167) all lalil (168) all lalil (169) all lalil (170) all lalil (171) all lalil (172) all lalil (173) all lalil (174) all lalil (175) all lalil (176) all lalil (177) all lalil (178) all lalil (179) all lalil (180) all lalil (181) all lalil (182) all lalil (183) all lalil (184) all lalil (185) all lalil (186) all lalil (187) all lalil (188) all lalil (189) all lalil (190) all lalil (191) all lalil (192) all lalil (193) all lalil (194) all lalil (195) all lalil (196) all lalil (197) all lalil (198) all lalil (199) all lalil (200) all lalil (201) all lalil (202) all lalil (203) all lalil (204) all lalil (205) all lalil (206) all lalil (207) all lalil (208) all lalil (209) all lalil (210) all lalil (211) all lalil (212) all lalil (213) all lalil (214) all lalil (215) all lalil (216) all lalil (217) all lalil (218) all lalil (219) all lalil (220) all lalil (221) all lalil (222) all lalil (223) all lalil (224) all lalil (225) all lalil (226) all lalil (227) all lalil (228) all lalil (229) all lalil (230) all lalil (231) all lalil (232) all lalil (233) all lalil (234) all lalil (235) all lalil (236) all lalil (237) all lalil (238) all lalil (239) all lalil (240) all lalil (241) all lalil (242) all lalil (243) all lalil (244) all lalil (245) all lalil (246) all lalil (247) all lalil (248) all lalil (249) all lalil (250) all lalil (251) all lalil (252) all lalil (253) all lalil (254) all lalil (255) all lalil (256) all lalil (257) all lalil (258) all lalil (259) all lalil (260) all lalil (261) all lalil (262) all lalil (263) all lalil (264) all lalil (265) all lalil (266) all lalil (267) all lalil (268) all lalil (269) all lalil (270) all lalil (271) all lalil (272) all lalil (273) all lalil (274) all lalil (275) all lalil (276) all lalil (277) all lalil (278) all lalil (279) all lalil (280) all lalil (281) all lalil (282) all lalil (283) all lalil (284) all lalil (285) all lalil (286) all lalil (287) all lalil (288) all lalil (289) all lalil (290) all lalil (291) all lalil (292) all lalil (293) all lalil (294) all lalil (295) all lalil (296) all lalil (297) all lalil (298) all lalil (299) all lalil (300) all lalil (301) all lalil (302) all lalil (303) all lalil (304) all lalil (305) all lalil (306) all lalil (307) all lalil (308) all lalil (309) all lalil (310) all lalil (311) all lalil (312) all lalil (313) all lalil (314) all lalil (315) all lalil (316) all lalil (317) all lalil (318) all lalil (319) all lalil (320) all lalil (321) all lalil (322) all lalil (323) all lalil (324) all lalil (325) all lalil (326) all lalil (327) all lalil (328) all lalil (329) all lalil (330) all lalil (331) all lalil (332) all lalil (333) all lalil (334) all lalil (335) all lalil (336) all lalil (337) all lalil (338) all lalil (339) all lalil (340) all lalil (341) all lalil (342) all lalil (343) all lalil (344) all lalil (345) all lalil (346) all lalil (347) all lalil (348) all lalil (349) all lalil (350) all lalil (351) all lalil (352) all lalil (353) all lalil (354) all lalil (355) all lalil (356) all lalil (357) all lalil (358) all lalil (359) all lalil (360) all lalil (361) all lalil (362) all lalil (363) all lalil (364) all lalil (365) all lalil (366) all lalil (367) all lalil (368) all lalil (369) all lalil (370) all lalil (371) all lalil (372) all lalil (373) all lalil (374) all lalil (375) all lalil (376) all lalil (377) all lalil (378) all lalil (379) all lalil (380) all lalil (381) all lalil (382) all lalil (383) all lalil (384) all lalil (385) all lalil (386) all lalil (387) all lalil (388) all lalil (389) all lalil (390) all lalil (391) all lalil (392) all lalil (393) all lalil (394) all lalil (395) all lalil (396) all lalil (397) all lalil (398) all lalil (399) all lalil (400) all lalil (401) all lalil (402) all lalil (403) all lalil (404) all lalil (405) all lalil (406) all lalil (407) all lalil (408) all lalil (409) all lalil (410) all lalil (411) all lalil (412) all lalil (413) all lalil (414) all lalil (415) all lalil (416) all lalil (417) all lalil (418) all lalil (419) all lalil (420) all lalil (421) all lalil (422) all lalil (423) all lalil (424) all lalil (425) all lalil (426) all lalil (427) all lalil (428) all lalil (429) all lalil (430) all lalil (431) all lalil (432) all lalil (433) all lalil (434) all lalil (435) all lalil (436) all lalil (437) all lalil (438) all lalil (439) all lalil (440) all lalil (441) all lalil (442) all lalil (443) all lalil (444) all lalil (445) all lalil (446) all lalil (447) all lalil (448) all lalil (449) all lalil (450) all lalil (451) all lalil (452) all lalil (453) all lalil (454) all lalil (455) all lalil (456) all lalil (457) all lalil (458) all lalil (459) all lalil (460) all lalil (461) all lalil (462) all lalil (463) all lalil (464) all lalil (465) all lalil (466) all lalil (467) all lalil (468) all lalil (469) all lalil (470) all lalil (471) all lalil (472) all lalil (473) all lalil (474) all lalil (475) all lalil (476) all lalil (477) all lalil (478) all lalil (479) all lalil (480) all lalil (481) all lalil (482) all lalil (483) all lalil (484) all lalil (485) all lalil (486) all lalil (487) all lalil (488) all lalil (489) all lalil (490) all lalil (491) all lalil (492) all lalil (493) all lalil (494) all lalil (495) all lalil (496) all lalil (497) all lalil (498) all lalil (500) all lalil (501) all lalil (502) all lalil (503) all lalil (504) all lalil (505) all lalil (506) all lalil (507) all lalil (508) all lalil (509) all lalil (510) all lalil (511) all lalil (512) all lalil (513) all lalil (514) all lalil (515) all lalil (516) all lalil (517) all lalil (518) all lalil (519) all lalil (520) all lalil (521) all lalil (522) all lalil (523) all lalil (524) all lalil (525) all lalil (526) all lalil (527) all lalil (528) all lalil (529) all lalil (530) all lalil (531) all lalil (532) all lalil (533) all lalil (534) all lalil (535) all lalil (536) all lalil (537) all lalil (538) all lalil (539) all lalil (540) all lalil (541) all lalil (542) all lalil (543) all lalil (544) all lalil (545) all lalil (546) all lalil (547) all lalil (548) all lalil (549) all lalil (550) all lalil (551) all lalil (552) all lalil (553) all lalil (554) all lalil (555) all lalil (556) all lalil (557) all lalil (558) all lalil (559) all lalil (560) all lalil (561) all lalil (562) all lalil (563) all lalil (564) all lalil (565) all lalil (566) all lalil (567) all lalil (568) all lalil (569) all lalil (570) all lalil (571) all lalil (572) all lalil (573) all lalil (574) all lalil (575) all lalil (576) all lalil (577) all lalil (578) all lalil (579) all lalil (580) all lalil (581) all lalil (582) all lalil (583) all lalil (584) all lalil (585) all lalil (586) all lalil (587) all lalil (588) all lalil (589) all lalil (590) all lalil (591) all lalil (592) all lalil (593) all lalil (594) all lalil (595) all lalil (596) all lalil (597) all lalil (598) all lalil (599) all lalil (600) all lalil (601) all lalil (602) all lalil (603) all lalil (604) all lalil (605) all lalil (606) all lalil (607) all lalil (608) all lalil (609) all lalil (610) all lalil (611) all lalil (612) all lalil (613) all lalil (614) all lalil (615) all lalil (616) all lalil (617) all lalil (618) all lalil (619) all lalil (620) all lalil (621) all lalil (622) all lalil (623) all lalil (624) all lalil (625) all lalil (626) all lalil (627) all lalil (628) all lalil (629) all lalil (630) all lalil (631) all lalil (632) all lalil (633) all lalil (634) all lalil (635) all lalil (636) all lalil (637) all lalil (638) all lalil (639) all lalil (640) all lalil (641) all lalil (642) all lalil (643) all lalil (644) all lalil (645) all lalil (646) all lalil (647) all lalil (648) all lalil (649) all lalil (650) all lalil (651) all lalil (652) all lalil (653) all lalil (654) all lalil (655) all lalil (656) all lalil (657) all lalil (658) all lalil (659) all lalil (660) all lalil (661) all lalil (662) all lalil (663) all lalil (664) all lalil (665) all lalil (666) all lalil (667) all lalil (668) all lalil (669) all lalil (670) all lalil (671) all lalil (672) all lalil (673) all lalil (674) all lalil (675) all lalil (676) all lalil (677) all lalil (678) all lalil (679) all lalil (680) all lalil (681) all lalil (682) all lalil (683) all lalil (684) all lalil (685) all lalil (686) all lalil (687) all lalil (688) all lalil (689) all lalil (690) all lalil (691) all lalil (692) all lalil (693) all lalil (694) all lalil (695) all lalil (696) all lalil (697) all lalil (698) all lalil (699) all lalil (700) all lalil (701) all lalil (702) all lalil (703) all lalil (704) all lalil (705) all lalil (706) all lalil (707) all lalil (708) all lalil (709) all lalil (710) all lalil (711) all lalil (712) all lalil (713) all lalil (714) all lalil (715) all lalil (716) all lalil (717) all lalil (718) all lalil (719) all lalil (720) all lalil (721) all lalil (722) all lalil (723) all lalil (724) all lalil (725) all lalil (726) all lalil (727) all lalil (728) all lalil (729) all lalil (730) all lalil (731) all lalil (732) all lalil (733) all lalil (734) all lalil (735) all lalil (736) all lalil (737) all lalil (738) all lalil (739) all lalil (740) all lalil (741) all lalil (742) all lalil (743) all lalil (744) all lalil (745) all lalil (746) all lalil (747) all lalil (748) all lalil (749) all lalil (750) all lalil (751) all lalil (752) all lalil (753) all lalil (754) all lalil (755) all lalil (756) all lalil (757) all lalil (758) all lalil (759) all lalil (760) all lalil (761) all lalil (762) all lalil (763) all lalil (764) all lalil (765) all lalil (766) all lalil (767) all lalil (768) all lalil (769) all lalil (770) all lalil (771) all lalil (772) all lalil (773) all lalil (774) all lalil (775) all lalil (776) all lalil (777) all lalil (778) all lalil (779) all lalil (780) all lalil (781) all lalil (782) all lalil (783) all lalil (784) all lalil (785) all lalil (786) all lalil (787) all lalil (788) all lalil (789) all lalil (790) all lalil (791) all lalil (792) all lalil (793) all lalil (794) all lalil (795) all lalil (796) all lalil (797) all lalil (798) all lalil (799) all lalil (800) all lalil (801) all lalil (802) all lalil (803) all lalil (804) all lalil (805) all lalil (806) all lalil (807) all lalil (808) all lalil (809) all lalil (810) all lalil (811) all lalil (812) all lalil (813) all lalil (814) all lalil (815) all lalil (816) all lalil (817) all lalil (818) all lalil (819) all lalil (820) all lalil (821) all lalil (822) all lalil (823) all lalil (824) all lalil (825) all lalil (826) all lalil (827) all lalil (828) all lalil (829) all lalil (830) all lalil (831) all lalil (832) all lalil (833) all lalil (834) all lalil (835) all lalil (836) all lalil (837) all lalil (838) all lalil (839) all lalil (840) all lalil (841) all lalil (842) all lalil (843) all lalil (844) all lalil (845) all lalil (846) all lalil (847) all lalil (848) all lalil (849) all lalil (850) all lalil (851) all lalil (852) all lalil (853) all lalil (854) all lalil (855) all lalil (856) all lalil (857) all lalil (858) all lalil (859) all lalil (860) all lalil (861) all lalil (862) all lalil (863) all lalil (864) all lalil (865) all lalil (866) all lalil (867) all lalil (868) all lalil (869) all lalil (870) all lalil (871) all lalil (872) all lalil (873) all lalil (874) all lalil (875) all lalil (876) all lalil (877) all lalil (878) all lalil (879) all lalil (880) all lalil (881) all lalil (882) all lalil (883) all lalil (884) all lalil (885) all lalil (886) all lalil (887) all lalil (888) all lalil (889) all lalil (890) all lalil |
He n3no3BaIte npaxocmykaKaTata:
B Mokpn NomeeHn.
B6n30cTda3anannmra3OBe n np.
Korato npoodykTbT noka3Ba BNDIMN npn3HaCu Ha nobpea.
BbpxoocpnnpedMeTuN TeuHocTn.
Korato nooBata nO3a nOKa3Ba BVnIMn npn3Haun Ha nobpeu.
Bbpxryopeua nn cTyeHa cTpyra,3anaenHn ciurapeHN yrapkn np.
Bbpxy Hn npax, Hanpimep oT Ma3nIka, 6eToH, 6paHNo, ropeua nn cn TcydeHa nenen.
He octabTne npaxocmykaKaTa Ha npa Ka CbHueBa CBETnHa.
I36raBaiTe da n3naRate npaxocmykaKaTa Ha cnHa TOnnHa nn TempeaTypa Ha 3ampb3BaHe.
HnKora He n3non3BaIe npaxocmykaKaTa 6e3 qntpu.
He ce ONTBAIte Da DOKOCHe TcTKaTa, DOKATO npaxocMyKaKaTa e BkIOUeHa, a YETKaTa Ce BbPTN.
Korato konenata ca 6nokpaHn.
He n3non3BaIte npaxocmykaKaTAt, aKo fIITpIe ca nobpeHn nnCuyneHn.
Ipepa3Hm MepK 3a 3axpaHbauu Ka6e
IpoBepaBaTepeoBHO uenCenaHa Ka6eHa. HnKora He n3non3BaTe npaxocmyKaUkata, ako uenCenbT mHa Ka6eBbT ca nobpeHn.
PobpeData Ha Ka6eHa Na npaxocmykaKaKaTa He ce NOKpNbA O T rapaHnIraT.
Hikora He Ibprnai Te NIOBUNaIe npaxocmykaKaKaTa qpe3 Ka6ena.
I3non3BaHeTo Ha npaxocmyKaKkata npn ropenoCohne 06ctoTeJICTBa MoKe da npuHn HcpeNoHapAraBe Hn nobpeHa Ha npodykta.
Takoba HapaHbAHe IIN NOBpeHa He ce NOKpBa OT rapaHcIyTa IIN OT Electrolux.
OBCLNYKBAHEIITAPAHUN
Bcayo6cbKaHe n peMOHT Tp8Ba Da ce n3BbPwBa OT OToPiHa cepBn3eH ueTbp Ha Electrolux.
Iobpeata Ha Ka6eHa Ha npaxocmykaKaTa He ce NOKPbBa OT rapaHnraTt. IobpeHa HdbrataeNpnuHHeHaOT; n3cMykBaHe Ha TeHoCT, notaHne
Ha ypeDa B TeuHoc INIIN IINIINI3BaHe Ha ypeD C NOBpeDeH MapKyu N IIO3a He ce NOKpNBa OT rapaHcNraTa.
U3XBbPJIaHE

To3n CmBON Bbpxy npOdykTa noka3Ba, Ye To3n npOdyKT cbIbPka 6aTepyra, KOrTO He Tp86Ba da Ce n3Xbprna 3aeHNO c O6nKHOBeHte 6ntOBn OTnabu.

To3n CmBON Bbpxy npOdykTa nnn Bbpyx HerOBaTOnakOBKa noka3Ba, Ye npOdykTbT He MoKe Da ce TpeTnpa KaTO 6ntob OTnabK.
3a da peuiknnpaTe npOyKta cn, Mon, 3aHecete ro B ophiuaen HnykT 3a cb6pnae Ha otNadbui nnB cepBn3e HcHTbp Ha Electrolux, KOto moKeJa npemaxHe npuknpa 6aTePnHa n ENEKtpnuecknte qactn no 6e3oNaee H npoeceNoHae Nauch. CneBaiTe npabnata Ha Baata Ta DpbXaba 3a pa3dennHO cb6pnae Ha eNEKtpnueckn npOyKtnn akymylatopnH 6aTepn.
C NaCTOto Electrolux Home Care n SDA JeKnapupa, Ye npaxocmykaKaTc a pao no o6OpyDbaHe Tn HER2 n HER3 e B cBoTBeCTBne C DnpeKtNbA 2014/53/EC.
bJIITAPCKI
Bnaoradapm Bn,ue n36paxte npaxocmykaqka Pure C9 Ha Electrolux. HnaruHnON3BaTe oprrnHaJIHn Akcecoapn n peepBnH qAcTn, 3a da nocturhe Na-bOppeynta. To3n npOyKt e npOeKtnpaH c Mncb3a OkOnHaTa cpeDa. BcnKn nnactmacoyn aCtN ca Mapknpan 3a enite Ha peuKnnpaHeTo.
PENEUHCTAINPAHE
-ПочуTeTe BHHMaTeHToTOBa pKOBoDcTBO.
PpOBepTe DaIN BCNUO INCAH YAcTN Ca BKNIOueHN.
- 06bphete cneuHaBnMaHHe Ha rnaBaTa 3a MepKu 3a 6e3onacHOCT!
ONICAHHE HA IIPAXOCMYKAUYKATA PURE C9
A.Диспел(BuKTe no-KbCHNTe Bepcun)
B. Kanak Ha qinTbp
C. ΦnH ΦnTTbp 3a npax
D. ΦπιTbpa HaДВиRaTeNЯ
E.「He3da 3a 3akpenBaHe
F.3axpaHbauKa6e
G.Дрьжka 3a HOceHe
H. LUKHOHNOOTDeNEHeN e HINTbPC HOCOBa Yact
1. Bb3dyweH kaHai
J. OTeHHeH3a npax
K. UNCTpyMeHT AeroPro 3 B 1
L. MapkyAeroPro
M.Дьжka AeroPro(BuxTe no-Kbchnte Bepcnte)
N. TeneckonuHa Tpb6a 3a Aeropro
O.Cko6a3a3akpenBaHe
P.Дипгелузmaолелсрьнулpene CБртuaце 6byTOH
Q. Mojden C ndctaHcnoHNOynpabHeHn
R. AeroPro Classicдрьхкa
S. AeroPro ErgoДрьЖкa
T. AeroPro Remote Control
Дръхка
U. FlowMotion HapkaHnK
V. FlowMotion LED HakpaHnK (c npdeHn CBETnHn)W
W.AeroPro Turbo HauKpaHnK
X. AeroPro Mini Turbo
HakpañHMK
Y. ParketoPro HakpaHnK
Z. AeroPro FlexProPlus HkpaHnK
AA.AeroPro Long crevice HkpaMHK
*CaMo3a HrkOn MoDenn
KAK DA 3NIOJ3BATE NOUCTBAHETO HA IPAXOCMYKAQATA
1IpoBepTe daN BCNUKn FmITpn ca NOCTaBeH npaBnHO, npeDn Da 3nON3BaTe npaxOCMyKaYkata.
2 NocTabeTe Mapkyu B NoicCTBaIoo YoCTpoiCTBO (3a Da ro n3BaIne, HATNCHeTe 6yToHInTe 3a 3aKIOUbaHe n 3dbpnaIte).NocTabeTe Mapkyu B DpBkaTa Ha Mapkyu,doKaTO UpaKaHe KIOUa 3a 3aKIOUbaHe (3a Da ro oCBo6OInTe, HATNCHeTe 6yToHa 3aKIOUbaHe n DpBnHete).
3 PnKpeneTe TeneckOnuHata Tpb6a KbM HakpaHnka. PnKpeneTe TeneckOnuHata Tpb6a KbM npbXkata Ha Mapkya (3a da y n3BaDnte, HaTCHete 6yToHa 3a 3aKnIOUbaHe u DpBnHeTe).
4 PerynpaTe TeneckOnmHata Tpb6a, KaTo IbpXnTe KInouanKaTa c eHa pbKa N dpbNHte DpBkKaTa Cpyrata pbKa.
KOMNJIeKT C INHCTPYMEHTN 3 B1
5 MoXeTe Da 3aTeHHeTe NoCTaBkata N INCHTpMeHTa 3 B 1 NOI dpbXkata, 3a Da IMate NeceH DoCTbN. INCHTpMeHTbT NMa 3 FyHKuN, BIXKTe CHIMKITE Ha CneBaUaTa CTpaHnla.
CMRAHAHABATEPUNTE*
6 HakpaHnK c npEHN CBETNIH: PnpE nnBpBa yNtpe6a oTcpanHe 3aunTHOTo NOKPNTne (Bbpxy 6atePNITE). CMeHete 6atePNITE, KOrato npEHNTE CBETNIH 3anOHTa da MIRAT 6bp3o. N3non3baIte 2 AA 6atePNIN.
7 npbKc c nctaHnOHO npabHeHne: CmeHeTe 6atePnra, KOrato CBETNIHHNt HNdkAToP CTane HepeBEN Hn He pearnpa np HaTtCKaHe Ha KOnTo N da e 6yToH. N3non3BaIne cMo 6atepn Ot Bnda LITHIUM CR1632. 3a6eneKka: N3BaTe 6atePnTe OT npOdyKa TnpEi Da ro npPeJap 3a PeuKnIpaHe. CnEbaIte npabnata Ha BaWata cTpaHa 3a cb6nPaHe Ha 6atePnN n EeKtpnueckn npOdykTn.
CTAPTMPAHE/CNIPAHE HA NOUICTBAHETO HA IPXACMVKAYKATA IN HACTPOBBAHE HA BCMYKATEJIHATA MOUHOCT
8 N3dbpnaTe 3axpaHbuaaKa6en Iro BkIIOye B eneKtpnueckata Mpeka. HatncheTe 6yToHa BKJ./N3KJI, 3a da cTaptnpaTe/N3KIOuHTe ypeJa. * MoEnC nDnCTaHnOHO ynpabneHne MOrAT da ce ynpablaBAt upe3 6yToHa BKJI./N3KJI. Ha dpbXkata.
9 Cnep nouCTBaHe HaTncHete 6yToHa REWIND,3a da npheHabneTe Ka6ena.
10 PerynpaTBe BcMyKaTeHnHaMoUHocT (MoDen 3a pBHo ynpabHe):3aBpTeBbPTaTOce KOnue Ha UpeHa 3a nouCTBaHe nnNnNnON3BaIe Bb3DyUnnKNaHn Ha DpXkTa. PerynpaTBe BcMyKaTeHnHaMoUHocT (MoDen 3a nctAunHO ynpabHe):HaTncHeTe bTyOnHa +/Ha npXkTa. HnAnKaTopnTe MIN/MAX n CmBONHe Na dncnneJe Ncokaxt HnBOTo Ha MOUHOCTTa.
BAKYMHO NOUCTBAHE C YHNBEPCAJEH HAKPAHMK (V^*,W^*)
11PpomeheHnactpoiKaTaHaHakpaHnkaCneJaA.Nkohata
mIOCTpnpa npenopbTuHTeHHnBnDn (TBbpN NOOBe HnKnnM). FlowMotion LED hakpaHnK: Pnpemctete HapkaHnKa Hanpe.
PepHaTcCBttnHaCe BKnIOyBa ABTomAtuHO CneHrKoIKe ckyHn. Korato hakpaHnBt He ce nON3Ba, CBtTNHaTe Ce NkIOUba abTomATuHO CneHrKoNKe cyHn.
I03NUN 3A NAPKUPAHE, MECTEHE HA IIPAXOCMYAKYKATA
12 3nnon3baite no3u(1)B3aHaTa Yact Ha npaxocmykaKkata, KoraTo cnipate no BpeMe ha pa6ota. 3nnon3baite no3u(2)no npaxocmykaKkata, 3a da npehacrte in np6npate npaxocmykaKkata 3a cbxpaHeHne.
13 PpaxocmykaKaTa pa3nonara c Dbe dpjxkn 3a Hoche.
U3PBAHE HA OTDEENHNETO 3A IPAX
14 N3npa3Hete otDeneHneTo 3a npax, KOrato HnBoto Ha npax e DOCTINHaIO MaKcMmaHTo HnBO (MapKnpoBkTa "MAX"). Hatnche6yToHa 3a OCBo6OkaDaBaHe n DpbHnTe, 3a da n3BaNte OTdeneHnTo 3a npax. IocTabeTe otDeHneTo 3a npax Na KaNA,OTbOpTe KaNA, KaTO r3aBbPTnE B nocoka HABbH. N3npa3Hete npaxa B KOHTeHepa MoHTnpaTne OTHOB B o6paTepe.
CMRAHA HA ONJTPNTE
15 N3bpaTne 6yToHa FILTER, 3a da OTbOpTe Kanaka Ha fHntbpa. POnctete FHHN HnNTbp 3a npax cneJe wecT Meeca yNoTpe6a. N3bpaTne e3NeTO Bpxy pAmkata, 3a da n3BaJte FHHN FnNTbp 3a npax. N3nKnHe TnNTbPa NoTceua Boda. 3aBexKa: He n3nO3BaIte NoocHTBaun npenapatn. Octabete FInhTpba Da n3cbXHe HAnbHIO (MnH.24 Yac pa Prn CtaHa TemnpaTypa), npedn da rO bphhe!
16 Hatnche n nn3Hete 3aknOuBaunmexAHn3bM HnCHO,3a Da oCbo6oDnTe fntbpa Ha DBnraTeJ.3BaJeTe fntbpa, KaTo m3bpnae eueyTo Ha pAmkata Ha fntbpa. Nocte fntbpaHa Dnrtela CneD DbaHaeCet Meceua yonptpe6a.
N3no3BaIte cmo opnHaHEn HnTpB PureAdvantage,pe. No EFSXXX. NnKnAHTe Btpe (3aMbpcHata CtpHa) B xndka Boda. Dokochete pAmKaTa Ha nntbpa, 3a da npemaxHete BoDaTa. NobTOpTe npocca HeTmPbTn.
3a6eJka:He n3non3BaIte noocTbaun npenapatn.136raBaiTe DOKOCBAHe naOBpXHocTHa Hnntbpa.OctabeTne nntbpa da 13cxbxHe HantblHO (MHN.24 yaca npn ctaHa TEMNepatypa),npedn da ro BbPhe! CmeHnTe Hnntbpa, KOITo Moke Ja ce Mne NoHE BeHbK rOanuHO nn KORAto e MHOrO 3ambpceHnn NobpeDeH. CKe KaTO CMeHnTe Hnntpna, 3aTbOpete KaNaka Ha nntbpa,doKaTo rBbPhe OTHOBO HA MCTOTO My.
17 NocntBaHe Ha Hocobata Cact: Toe ce HAMnpa B UHKIOHUYHOOTDeHHe. NOpCTe TnHOBATAcA, AOK B Hero e npOHKHAn npax. N3DbpaTe nHOBATA Ha HOCOBATAcT, 3a Da ro n3BaDnTe. OTrpHete npaxa c pbka. NOpCTe NOI Teuau BoDa, B cnUayue cunHo 3AmbpeCeh. MoTHnPaTe OTHOBO B o6paTe H pei
3a6eexka: He n3no13BaIte NoUcTbaIIN npenapatn. OCTabeTe fHnTbpa da n3cbxHe HAnbIHO (MnH. 24 u.) Ha cTaNHa Tempepatya), npedn da ro Bbphete o6paTHo!
CLEANING THE UNIVERSAL NOZZLE (V^*,W^**) AND THE TURBO NOZZLE (X^*)
18 OTeIeTe YHnBepcaJIeH HakpaHNIK OT Tpb6aTa. NOpICTeC dpbXkata Ha MapKyua. OTeIeTe turbo HApKaHNIK OT Tpb6aTa N3BaTeTe 3annTeHNTe KOHcNtT.H., KaTo rN OTCTpaHNTe C HoKHa. N3NoI3BaTIe DpXkKaTHa MAPKyua, 3a Da NoOHCTNE HApKaHNIka.*
HacnadeTe ce Ha ydecho nouctBahe c Pure C9!
Electrolux cn 3ana3Ba npaBoto da npomeHa npodykTu, INHOpMaunn n CneuФkaunn 6e3 npdun3BecTne.
| HAKPAHNIK/AKCECOAPR N3IIOJ3BAIYTE 3A: | HAKPAHNIK/AKCECOAPR | IV3IIOJ3BAIYTE 3A: | |||
| К. Komплесгс с Исторемпгд 3В 1*123 | 3 Исторемпгд 1:1. Почистаци Исторемпгд 3aТьрдз поьрхноctг (библnotеки,первази и др.).2. Исторемгд 3a тал上诉етя 3aTekstгд (Завеси, тал上诉етя и др.).3. Исторемгд 3a ТЕСНпостранстгд (Зад радиатоги и др.). | U. FlowMotion нakраимн* W. FlowMotion LED нakраимн (c predecessor's cotermin)* | УниBERPSCALEN HAKPIMH: -3a BCMUN TINOBe PONOBe, OCSITYPBA най-dobropotсьбИРANDE КИПIMN I Tьрдз PONOBe. Сmenete NaCTPOMKATA Na HAKPIMHCA с педда. ИконкATA ще пokам, пrelpopьчтел网у BVD ПОД. -Пreldnta CBTIINH NOMARa 3a OTKPIBVAHc Hn pax IMpbcoTIN B TbMHN постранстгы (пд MebeLIMI T.H.).camo FlowMotion LED | ||
| W. Turbo HAKPAINK* HAKPAINK 3a | Мoketн: -Почиства с четка и варум едоверемено (най-dobspOTO почиствае на КOCMн, Влakнa и др.). -Вьртушата с четка с здвижвот bьздушни поок на прахосмукayaka. -He e похODЯЗ 3a КИIMNc m mHORO Дьлги КOCMн и рechи, постювогл�дяшни с КИIMNc KATO Истривankи пли ВODОустийчИВи КИIMNc. ИЗрлЗвайт УниBERPSCALHЯ HAKPAINK BMECTO TOBa. | X. Mini Turbo нakраимн* | Hakpaimнза тал上诉етя: -Почиства с четка и варуm едоверемено (най-dobspOTO почиствае нak оksм, Влakнa и др.). -3a TEKSTIINH MebeNi, сedalknz 3a АВТOMOБИN, Матраши и др. -Вьртушата с четка с здвижвот Вьздушни поок на ррахосмукayaka. Т. He e похODЯЗ 3a КИIMNc m КOCMн и рechи, Ть кato може за ce Здплte ВьВьртушата с др; Т. He e похODЯЗ 3a КИIMNc m КOCMн и рechи, Ть кato можe за ce Здплte ВьВьртушата с др; Т. He e похODЯЗ 3a KИIMNc m КOCMн и рechи, Ть кato можe за ce Здплte ВьВьртушата с др; Т. He e похODЯЗ 3a KИIMNc m КOCMн и рechи, Ть кato можe за ce Здплte ВьВьртушата с др; T. He e noxOgUTA Т. He e noxOgUTA Т. He e noxOgUTA Т. He e noxOgUTA Т. He e noxOgUTA Т. He e noxOgUTA Т. He e noxOgUTA Т. He e noxOgUTA Т. He e noxOgUTA Т. He e noxOgUTA Т. Т. He e noxOgUTA Т. He e noxOgUTA Т. He e noxOgUTA Т. He e noxOgUTA Т. He e noxOgUTA Т. He e noxOgUTA Т. He e noxOgUTA Т. He e noxOgUTA Т. He e noxOgUTA T. He e noxOgUTA Т. He e noxOgUTA Т. He e noxOgUTA Т. He e noxOgUTA Т. He e noxOgUTA Т. He e noxOgUTA Т. He e noxOgUTA Т. He e noxOgUTA Т. He e noxOgUTA T. Т. He e noxOgUTA Т. He e noxOgUTA Т. He e noxOgUTA Т. He e noxOgUTA Т. He e noxOgUTA Т. He e noxOgUTA Т. He e noxOgUTA Т. He e noxOgUTA Т. He e noxOgUTA | Z.FlexProPlus нakраимн* | Hakpaimнза тал上诉етя: -3a DOCTRIANe PON/Mexky MebeIte, Тьлпente и дуггп петяп CTBИ. -Лесно може за с obчрп ha 180 Гразуca за дуpeКTeH DoCTbIdo Techni постранства. |
| AA. HAKPAINK 3a поцени* | Eksttra dIbIbг HAKPAINK: -3a райони, кочTo ca ТруДЮOSTBПИ (Вьрху paФТOBETe n.T.H.). -3a ТECHI постранства (Зад radиatopinte, по садалкITE ha abTomo6uila n.T.H.) | ||||
| Моdensсс рычно Perugларе на мошноства -cseдвайе графікіпіе за поствае за onтимална праизвodителноct | |||||
OTCTPAHRABAHE HA HEN3IPABHOCTM
| ПОНБЛЕМ PEUSHЕНЕ | |
| Прaxomicskaчкata He ce Bklnouba | · П robерете дали кабелт e CBьрзан Кьм[elektropeckata Мрека. · П robерете дали有很大 с给宝宝儿 Kьм[elektropeckata Мрека. · П robерете за ИЗгоргл праздаим. · П robерете дали Индизотрьт Haбатерияа В Дрьжka Та НИстанционноу упавлиенье OTROВаря (camo за наюй мосяп). |
| Почиствашит урет спupa | Почиствашит урет може DA prерета: ИЗklочete ro ot[elektropeckata Мрека; п robерете дали наравлиь в Салгшке на 120 minуту, реди DA go BKIOчITE OТЮBO. Ако почиствашит урет БС оsite He pa6OTи, CBьржete CE C yTNBIHOMOошen Сервизен ZeHTbp Na Electrolux. |
| Намаявае на калачитета на Замуквае спreamоHopмалпья | · П robерете дали OTДеленец TO 3a ррах e NBлно Иллбokирано. · П robерете дали Вьдуншени Калал Илл Врьзкata Na BxODа Илл ИЗХОД e NBOKирано И мma HУЖda OT Почиствае. · П robерете дали ФиNTьрьт Ha DBURAтеля e ZanPyшен I trЯбва DA ce Смени. · П robерете дали На Калайньст e NBOKиран Tрябва DA sbde ИЗчИстен. · П robерете дали МарКчьt e NBOKиран, КATO go HATINCHETe BHNIMATEHNo. BCE nak BHNIMaыite, ako nobveda t e pruchineha OT CTbKlno Илл Игли, унobени B МарКчa. 3abelexka: Гаганциате He NOkpriBa Nobveda Na MAPKчa, причинени OT почstваеу My. |
| В прах检маquкatura e BCMукана Вoda | Ше Trябва DA сmedITE DBURAтеля B OTOPINЗИРAN сервизен ZeHTbp Na Повdedа на DBURAтеля, pruchineha ONTOPONKBAHTo Na BODa, He ce NOkpriBa OT rapaHцЯта. |
| 3a по-натышни пообlemпс ce обрhoeпес KMь OTориизан сервизен ZeHTbp Na Electrolux. | |
BEZPECNOSTNI OPATRENI
K. AeroPro 3-in-1-Tool
Z. AeroPro FlexProPlus-Düse* AA. Lange AeroPro
L. AeroPro-Schlauch
Fugendüse*
m = 311 ;
1
S J 1
j0 21 j0 21
2 1
19
12x - 1 > 0 ②
1 + u7 = 70%
215 jiuol 3i ola 0a 0j g2 ju 1 2g4
EFSXXX s-filter PureAdvantage
15 1
1
1
1 + u1 - 1 = ( 1 + u) u1 < 1 = u
(1) a4 = a1 + 3 = 6,2b = 3
10
5 - 12 = 2
a 1
Y
1234567890
j2. j3. j4. j5. j6. j7. j8. j9. j10. j11. j12. j13. j14. j15
j 1 j
S ACD = S COD + S_ CDA
S 1
124
(^*X) yj jj+ (^*,^*)
1
a 1111111111111111111111
a.
Pure C9 y
1 2
必须
Ee 9
i 1
a 1
()
S APQ = S AQP + S_ QPQ
.
a. 12 b. 13 c. 14 d. 15
Pure C9
J 1
2020
jui jiu )
*AeroPro R
( 12 < 34 < 0) x > 0
*AeroPro S
:S 0
*AeroPro
PrecisionFlow* U
PrecisionFlowLEDJV
F
*(1 1
G
*AeroPro 1
aLb jia jie kua H
*AeroPro X
10
*ParketoPro J&Y
S S = 12 · A · B · = 12( 3 - )
*AeroPro FlexProPlus JJZ
AeroPro 日 日
*AeroPro JJJAA
AeroPro
1
jgsAeroProM
( 1,2,·s ,4q - 1) 0
AeroPro
( xt^2 + x) = 0
s1s2s3s4s5
*j#
j 1
1
1 1
()
()
y
3
Eav to npoiov npapouiaeipatc evdeltaicopac.
NávwOe aixmuavitkeiEvanypa
Ed to akoppuio danou napouiae opatec vseieic oopac.
NawoEeTeTcKpuEcOaXTEc,avauuEvAnotoiyapaK.
Naww aeIenTnOkovn,OnWcOkovn ano oobadec,ToiEvTo,aEupi kai Zeotec,KnpuocotaxTEc.
Mny apnveTe Tnv nAekptikn oKoouna ekTeOeIevn oe aepoo nlaiko wfC. Anopeuyte Tnv ekOeon Tnc nAekptiknc oKoounac oe akpaiec epuokpaoies cepuotntac n yxouc.
Mn xpoiouoite note thy nEeKpiK okouna xwpic taiptpa tnc.
Mny enixieipnoe va akoumuetae tn bouptoao-pofo otav n okauna eivai.
Eevpyonoinuev kai n bouptoaa-poio nepiortpeetai.
Otat poδákia εival μλokapióva.
MynxpnoiomoeiTe nynktnokounaocavtaiptpaivai aepiva xalaaoeva.
PpoulaEic yia To kaawdo Tpoopoosoiac
Elyyxete Taktka toic kai to kalwio. Mn xpoiunoeite note tyn nAekptikn okouna av to pi n to kalwio exov unootei cmuia.
H eyyunan dev kaunpei oopoc tou kalwdiou tnc nekptikic okoutac. Iote mny tpaate kai un onkwveTe Tnv nekptikn okouta an to kalwio.
H xphon TnC nEeKpiKc oKoUaC,OTc npanavw nepiWoeic mopei va npokaleoi oBapo tpaumaio oAouv n Cnua OTO npoiov. Teioiu Eisouc tpaumaioc n Cnua dev kaluntai an toyn eyyunon n an toy Electrolux.
ZEPBI KAI EITYH2H
OLeC oEpyaiec ePbcic n EIOKEuHn ppei va EkTeLoovtai ano Eouioobotnevo Kevtpo ePbc tnc Electrolux.
Heyyunon dev kalunpei opec tou kalwsiou tnc nektpiknocokounac.
Tuxov biaon otov kivtnpa nou pokkne an tv avapopnon ypuou, tn buoi tnc ouokeucn oe vpo n hn xpon tnc oukeucn me oanva ka akpouoio nou exouu unootei nua dev kalunteta an tv eyyunon.
ANOPPIPH

AutoTo ouuBoLo en Tou npoiovtoc unodnawve ot auToTnpoiov nepiexe matapia nou dev npene va anoppiphe i e taOuvnoikia aonppmuata.

Auto to oujboLo eni Tou npoiovtoc nTc ouokeuaic unOdbnawvei otipoiov dev ouykataeYetal oovnOikiaa anoppiuata.
Tia va avakukwote To npioov oac, nyaiveTo oe eva
enianmo aneio oulloyn c ae eva kevtpo aepic tnc Electrolux
tou mopei va apapeoi kai va avakukwoe tnV mntapia
kai ta nektpika epn me apaln kai enayyeuatiko tpno.
Akoauothe touk, kavovec tnc xwpac oac yia tvN exxwpotn
oulloyn nektpikow npioovtwv kai enavaopoptocevwv
mntapiwv.
Aia Tou napovtoc, n Electrolux Home Care and SDA IWCn HAEKTPIKJ KsOUNa ME aoupuato Eoanlao toun HER2 kai HER3 oumuopwpveTAL ME TNY Odyia 2014/53/EE.
EAAHNIKA
Sac euxapiotoune nou enieate tnv nkeptikn okouna Pure C9 tnc Electrolux. Xpnoiomoieite naTa ta auveTika ekaptniata kai avtaakktia yia va exete Ta bletiota anoteeouata.To npioiv auto exei oxediaotei lamabovotac unoiy to nepiabov. Oa ta nlaotikia epn eivai onmaoeva katalnae okoiovaavukawoov.
IPIN ANO THN ENAPEH AEITOYPTIA
-△iaβaote pnooektiká autó to evxepiδio.
- ELeyEte oTI nepiexovtai ola ta npn nou nepipapovtai oTO npov.
- PpooEeT 1iaTeepa Tc npoPuaEic aOpaAeiac!
IEPIIPAΦTHHAEKTPIKHΣKOYNIAPSURE C9
A. Oθovn (avatpeETE otic μeTENEITA EKDOOEIC)
B. Kanaki φιλτρου
C. DiIatpo Iemnic okoync
D. PpOPIAtpo tou mToE
E. Ytnofoxoc otaohueuong
F. Kaλδιορεύματος
G. Xειρολαβη μεταφορά
H. oxio kukwva kai kwviok
I. AepaywyoC
J. oxieoouloyncokovnc
K. EApntμa AeroPro 3in1
L. EukamToc oWAnVac Aen
M. AaBn AeroPro (avatpeEte otic μeTeneiTa ekdoaei
N. Tnλεκοπικός ωλήνας AeroPro
O. Kau TnpiEnc
P.OboyniaoovTeaμe Xepokivtoeayxo eaw PeipotpOpiKOU xeiptiTpiou
Q. Oθovn γia μοντέλa με ηλεχερισηριo
R. Aαβη AeroPro Classic
S. Aaβn AeroPro Ergo
T. Aαβη τηλεχεριοστηριου AeroPro
U. Akpoquo FlowMotion
V. Akpoupuio FlowMotion LED (με μπροσινες λυχνες)
W. Akpopuio AeroPro Turbo
X. Akpoqouo AeroPro Mini Turbo
Y. Akpojuio ParkettoPro
Z. Akpoquo AeroPro FlexProPlus
AA. Akpopuio yia oteva onmuia AeroPro Long
- Móvo OE opioéva muovéλa
TPONO XPHESHE THE HAEKTPIKHSEKOYNA
1 ELeyTe 0I Ola Ta qIATpa EIa WOTa TOnOeTneva niv XpnoIpoNIOeTe Tny nAekptikn Okouna.
2 Eioayayete Tov eokajnto oawna otn akouna (ya va tov apapaeote, natote ta koumia aopaiionc kai tpahte tov). Eioayayete To vekajnto oawna otnyavtoixn aenpixo To koumi aopaiionc naoumoei ev avnx KAI (ya va tov anaopaiaet, natoTote tokoumi aopaiionc kai tpahte tov).
3 SuVbEOTOV TnAeOKoKIOOaWlVa OTO Akpouio. SuVbEOTOV TnAeOKoNIOOaWlVa Otn LaBtov EukajTou WlVa (Yia va tov apaipeTe, natiote to koumi aqapaioc KAI tpaBTE TOV).
4 Purote ToV nAekoniko oArlva Kpatwvtac Tn v aopaleia Me to eva xepi kai TpaWvTac nAbaH Me to AALo.
EAPTHMA3IN1
5 Mnpelte va oTepeoete tyn unoxohn npoaaptanc kai to epyaio 3 oe 1 katw ano tn labn via eukoln npoaaoon. To eapntma exi 3 aeitoupyie, avatpeEe otic eikovc ony enoeyn oiaia
AAAANTQNMDATAPION
6 Akpoaioo ie npootivec auvitec*: Piv ano tny npwn xpon, apaiopeote nyn npootateutk taivia (naww ano tic matapiec). AAAKeTe tic matapiec otav oi npootivec auvitec apxioouva avaboanovuvyypopya. Xpnoiopoioie 2 matapiec AA.
7 AaBn ie TnEeipotnpia: AAAeTe Tnv mpatia oav n qwteiv n evdei yivekokiv n dev avanokipvatai otav natate onoiodnote kouml. Xpniopoielemuov matapiec toun LITHIUM CR1632.
Jnueiwo: Apaipote tic umatapiec ano to npoiov npiv ano tny anopoiuou Tou. Akoouhote tou kavovec, nC xupac oac yia tn oulloyn mntapapiw Ka NkETpkiw npovotvW.
ENEPROTONIHZ/ANIENEPRONOHHTHEHAEKTPIKHSEKOYIIAZ
KAI PYOMIEH THE IXXYOZ ANAPPOHHE
8 TpaBnE npoc ta Ew to kalwio tpofooioac kai ouvdeote to any npka. natoe to koumi EvpyoioiOn/anevypoioiOnc (ON/OFF) ia va evpyoioiOeote kai va aneevypoioiOeote tn okouna. Ta oovtea nou diaBctouv thExepoiopio jumopoov fa letoupyoov kui me to koumi ON/OFF (ENEPTONIOIHs/HAIENEPOIOnIHs) nou ploeketai onlaibn
9 Meta to kaBapiaqa, nathe To koupi REwIND yia va tuaiEte To kaAio.
10 Puoiote tvxu avappopnnc (movo ota movtea xepokivntou
eayou): Tuplate to neipotpoppke xepiortnpio nou unapxei otn okouna n
xpauonoinate tn baibda aepa onn labn.
Puoiote tvxu avappopnnc (movo ota movtea me tnlexeiptnpio):
natjote to kouuni +/- otn labn. Ovseieic MIN/MAX kai tuv oumuov otny
obovn ta deixvou v to eine do 1oxoc.
Never use the vacuum cleaner:
DULKIU SIURBLO, "PURED9" APRAŠYMAS
A. Ekranas (zr. versija toliau)
B. Filtro dangtelis
C. Smulkus dulkig filtras
D. Pries variklj esanti filtra
E. Novietosanas atveres
F. Barosanas vads
G. Nesimo rankena
H. Cikloninis skyrius ir siurbliokugisin filtras
I. Oro kanalas
J. Dulkiu skyrius
K. "AeroPro" trys viename" jrankis
L. "AeroPro" Zarna
M. AeroPro" rankena (zr. versija toliau)
N. "AeroPro" sustumiamas vamzdis
O. Pastatomyo spaustukas
P. Ekranas, skirtas modeliams susukamaja rankinio valdymorankene
Q. Ekranas, skirtas modeliams su nuotolinio valdymo pultu
R. "AeroPro Classic" rankena
S. "AeroPro Ergo" rankena
T. AeroPro Remote Control rankena
U. FlowMotion antgalis
V. "FlowMotion LED" antgalis (su lemuptemis prikeye)
W. AeroPro Turbo antgalis
X. AeroPro Mini Turbo antgalis
Y. ParkettoPro"antgalis
Z. AeroPro FlexProPlus" antgalis*
AA. "AeroPro Long" antgalis plysiams
Tik tam tikruose modeliuose
KAIP NAUDOTI DULKII SIURBLI
1 Pries naudodami dulki siurblj, patikrinkite, ar visi filtrai yra tinkamai jdeti.
2 Prijunkite zarna prie siurblio (noredami ja isimti, paspauskite fiksavimo mygtukus ir iStraukite). Kiskite zarna j zarnos rankena, kol fiksavimo mygtukai spragteles (noredami ja atlaisvinti, paspauskite fiksavimo mygtukar patraukite).
3 Prijunkite sustumama vamzdj prie antgalio. Prijunkite sustumama vamzdj prie zarnos rankenos (noredami jj nuimti, paspauskite fiksavimo mygtukj ir patraukite).
4 Pareguliukite sustumiam vamzdi, viena ranka prilaikydami fiksatoriy, o kita -traukdami ranken.
PAPILDOMAS IRANKIS,TRYSVIENAME
FlowMotion LED munnstykke*: Flytt munnstykket fremover. Frontlykten tennes automatisk etter få sekunder. När munnstykke违法犯罪 is a criminal offence, and the person who committed it will be charged with an imprisonment of 10 years.
LAGRINGSINNSTILLINGER, PARKERINGSPOSISJONER PASTVSUGEREN
TOMMING AV STOVBEHOLDEREN
14 Tøm støvbeholderen när stovnivæt har nadd maksimumsgrensen («MAX»-merket). Trykk på utloserknappen og dra for a fjerne støvbeholderen. Hold støvbeholderen over en støvbeholder. Trykk på lås opp-knappen under lokket, apne lokket ved a svinge det utover. Tøm støvet i soppelbøten. Sett inn i omvendtrekkefolge.
BYTTTE AV FILTER
MEPbI INPEOCTOPOXHOCTN
3TOT np6op moKet 3KcNpyaTnpoBaTbCra DeTbMn BO3pactOM OT 8 let n IuIaMn C orpaHueHHbIMn fN3UeCKIMn, ceHCOPhbIM Nnn yMCTBeHHbIMN cNoOc6HOCTaMn IN C HeIOCTaTOUHbIM ONbITOM Nnn 3HaHJAMN TOlbKO NOd pncmOTpOM IInca,OTBeuaOSeTo 3a nX 6e3OnaNCHocTB,INn NocNe NOnyueHn COOTBETCTByIOux INHCTpyKcN,NO3BOJIaOUX IM 6e3OnaCHO 3KcNpyaTnpoBaTb 3JeKtpOpnp6op n daIoIcx IM PpeCTabHeHne 6 OnaCHOCTu,CBraHHoCero 3KcNpyaTaunie.
He no3B0JNeTeTЯmIrpaTb c np6Opom.
OuNTKa n TexHnueckoe 06cnyKnBaHne He DonJXhbl BbINONHrTbcA DeTbMn 6e3 npNCMOTpa.
PNEpyPEXKDEHNE. Hacdkn Turbo* o6opydoBaHb BpaaioeJc 8eTKoB KOTopoMOrTy 3actpeBaT npedMeTb. NcnoIb3ynt He hacdkn Turbo ToIbko dIy OunchTK nOBepxHocTe, dIy KOtOpBX OHn npedHa3NaHeBly, IcoJIIOaIte npi 3TOM OCTOPOXHOCTb. PpeD n3BvueHEm 3actpRbWux npedMeTOB mN OunchKO JETKN BbIKIOuayIte nbIeCOC.
Ipepe ouncTkO np6opA n3 nybTa nctaHcNHO ynpabNeHn, coepkaeocB pykoTke* uHacak Co CBToNDNbIMn INdkKaTopamu*, cneyeT n3Bleyb 6aTapeu**.
*Ycmpoucmeo npedyMompeno mObKO e omdeIbHbIX moedJx.
**OnicaHne npoceIpybI n3BleueHn6aTapeu cm.B pa3dene 6 u7.
Ipeep ouncTkO uTexnueckm 06cnykuaHne npu6opa, a TaKke n3BneueHne 6aTapeo OTcoeHHyTe Bnky npu6opa o p03eTKn cetn 3JeKtpoNTaHna. 06ecnepty 6e3onacHoe yHuHToxKeHne 6aTapeo.
B cnyuae noBpeKdHn Hypa nHTAHn BO n36eXaHne onaChbIX cHTyaCn HHyp dONJKeH 6bITb 3aMeHeN CneuaJIInCTOM oHnnaIbHoro cepBcHOrO ueTpa Electrolux.
PbIeCoc Pure C9 noJIeKNT nCnONb3OBaHIO TOBko Ira O6bUHO y6OpKn BHyTpni NOMEeHn I B 6bITOBbIX ycIOBnx. XpaHInTe nbIEcOC B cyXOM MECTe.
Bce pa60tbo no 6cbnykuaHIO pemOHTy DOJXKbI BInONHrTbcra B OphiunabHom cepBnCHOM cHTpe Electrolux.
YnakobouhmyeepnHapnpmep,nonntneHObIe naKeTb,CneNyTeXpaHTB HedocraemOM DnJeTeMecTe npeoTBpaueHn pNcKa CmeptOn Oydu.
He nCnoB3yIe TneIeoc B CnEduuux ycNoBnaX:
HaBnKbIX NOBepxHOCTAX.
B HenocpeDCTBeHHo 6n3OCTn OT rOpUHX ra3OB n T. d.
PnHaHnHnYABhBIX npn3HaKOB NOBpeXJDeHNr npu6opa.
Для ouнstkn octpbix npeДмETOB n y6OpKn JxNkOKeTei.
PnHaHnHnBbX np3HaKOB NOBpeKdHnH HacKn dnona.
Iy6opkn ropnero nnXoNOrHO yrolbHoro Mycopa, HenoraeHHbx OKyPKOB N.T.D.
ДяуборкmenkoNBnHanpimep wtykaTpykn,6eToHa,MyKn, ropayennnxonoHNO30bl.
He octabTne nbIeNcOC TaM, rHe Ha Hero 6ydt nonadTaB npraMoI COJIHeuHbI CBET.
He noDBepraTe nbIeCoc Bo3eJCTBnIO JkapbI ININ XOJa.
HnBkoemcnyae He nCnonb3yTe nbJneoc6e3 hnBtpoB.
He kacaiTecb 1eTOHOro BaIIka, KOrda nblncoc BKIOueH N IeTOUHyB BAIk Bpauaetc.
He nCnObl3yIte nbIneoc, eCIn erO kOJIeCNK 3a6IOKIpOBaHbI.
He nCnONb3yTe nbIeoc CO cNoMaHHbIMN INN NOBpeKdEHHbIMN fHbTpAMN.
Mepbippeoctopoxkno,kaaoueceuhypa nntaHn
Perynno npobepaTe Bnky u hyp nTuHa. Hb KoeM cnyae He nCNoB3yIte bInecoc, eCnBnka nnu hUp nTuHaN NOBpeKdHb.
Ha noBpeKdHnIshypa nHTAHnI nbInecocarapAHTnHe pacnpoctpaHnETc.
HnB Koem Cnyae He TAHNTe Hne NOHMaTe Nbilecoc 3a SHyp nHTAHN.
3KcNpyataaIyIbncocBaONucaHHbIXBbIeYcNOBnX MoKeT npNBecTN K cepbe3HbIM TpaBMam NIN NOBpeJdeHIO np6Opa. Ha noo6HbIE TpaMBi NOBpeJdeHra pAHTe Electrolux He pacnpoctpaHareTc.
OBCLNYKUBAHNEI TAPAHTR
Bce pa6oTbI no 06cnyKBAHnIO n peMOHTy DOJKNHbI BbINOJIHTbcB OphiuaNBOM cepBnCHOM uehtpe Electrolux.
Ha nobpekeHn Hhpya nTaHn PbIncoca rapaHTn He
pacnpocptpaHreTc. Ha nobpekeHn DnIraTeN, KOtOpble BO3HKnB
b pe3yblate y6Opkn KnDkOteN, norpyxeHn np6Opa B XnDkOctb
nInn NcIpnlb3oBaHn np6Opa c NobpeKeDeHHbIMn WlaHrom N hacaKoN,
rapaHTn He paacnpocptpaHreTc.
YTNIN3AUIN

3TOT CUMBON Ha npnbope 03Haayet, TTO B npnbope cOepkntcra 6aTapey, KOTOPyIO 3aIpeIaeeTc BbIbpaCbIBaTB BmecTe C 06bHbIMN 6bITOBbIMN OTXoJaMn.

3TOT CUMBOI Ha npi6ope mnn ero ynaKOBke yka3bIbae HTo, 4TO npi6Op HeIb3a YTNIN3nPOBaT KaK O6blHble 6blTOBble OTXObl.
ДлгВTOPИHONеpepa60TKи3ДELINЯпOCIMOTHECTNEROB OФицalbHyIpyHKt c6opaUnIcEPBCHHyIeHTP Electrolux, rIe 6aTapernI n3EKePTpUeCKMe KCMHOENTb6yUTN3BLeueHbI npepe6OtaHbI 6e3OanChbIM nIpoFecCNOHaBbIM 6oPazOM.C6nOdaTe DeNCTByIOuNE B BaWey CtpaHepnabPa3dEnbHorO c6opa 3eKTPponpnpOBn aKKymIaTOphbx 6aTapei.
HacToaUM KomnHaHry Electrolux Home Care and SDA 3aBnAeT,TO nbIeocC paooobopyoBaHnem Tuna HER2 n HER3 coOTBeCTByet DInpeKTbE 2014/53/EU.
PYCCKM
BnaorapnB Bac 3a npno6peHne nbIeocca Electrolux Pure C9! Dnna NanyuHn HauyUnx p3eyntabot BCerda nncnblye fmpmeHbte BCNOMORATEhBle npncnocOBeHn EanachbteetAn. Pnp60 pa3pa60tAH C yETOM kONOrHneckXn Tpe6oBaHn. Dnna noCNeJeDyueyTuINMaaun HA Bcex DeTAEAN X3 IJIactMacCb IMeETCA COOTBECTByouaMapKupOpBAk.
NEPED NEPBbIM NCIOJIb3OBAHnEM
BHNMaTeNbHO npOuHTaHTe HAcTOnuee pyKoBOdCTBO.
- y6eHNTecb HnHnBcex OINcaHHbIX DeTanei.
- Ydeneite ocooBbHmHaHne Mepam npedocToPOxHOCTn!
ONNCAHNE NbJIIECOCA PURE C9
A.Диспennial(BapnaHTbI CM.NHxke).
B.KpbIkaФиNbTpa
C. ΦπJBTp TOHKO OUCTKN
D. ΦπúbTpá dBurrata
E. NapkoBOHbIXrHe3da
F. Lhpy nntaHn
G. Puyka dna nepehoocn.
H. LUKHOHHbI OTeCk N HOCOBO KoHYCHbI ΦnBtp
1.Bo3yHbKaHa
J.Пьпесбогнк
K. INHCTpymEnT AeroPro «TpN BOHOM»
L. JIinaH AeroPro.
M.PyKoTkaAeroPro(BapnaHTb CM.HNKe).
N. Teneckonnuecka Tpy6ka AeroPro.
0.3aueKkaDnIΦNKcauHacadok.
P.Диспл徳 ДдmaMDeNei C pyHbIM ynpaBHeHem C nOMOьI BpaAioSeiCnpyKn*.
Q.ДиСпн征 ДЯ мОдЕн CДИСТАнDUHOBIM ynpabNeHnEM.
R. PykoTka AeroPro Classic.
S. PykoTka AeroPro Ergo.
T. PykoRTka AeroPro Remote Control.
U. Hacáka FlowMotion.
V. Hacaika FlowMotion LED (c φpoHTaJIbHbIM OCBeueHem).
W. Hacáka AeroPro Turbo.
X. Hacaika AeroPro Mini Turbo.
Y. Hacáka ParketoPro.
Z. Hacáka AeroPro FlexProPlus.
AA. Μεπενα Καςκα AeroPro Long.
YCTPOINCTBO INPEDYMOTPEHO TONbKO B OTdJIbHbIX MOdEnX.
KAK NCIOLb3OBATb IIIECOC
Ipeepncnoh3oBAHnemnbinecoca y6eNTecb,yTO Bce pntbtpbl npabInbHo yCTaHOBnHebl.
2 BCTaBtBe 8 nbIeoc oHaHr (TTO6b H3BHeu WnHr N3 nbIeocOca, HAKMITE KONKn 6NOKPBOKn INOTAHnTe). BCTaBtBe 7 nAHTBpyKoRTy dNnJHaHRa TAK, TO6b KHOJa 6NOKIPOBKn IN3dana IeYoK (TO6b H3BHeu WnHr N3 pyKoRTKn, HAXMITE KONKn 6NOKIPOBKn INOTAHnTe).
3 PnKpeHte TeneckOnueckyIO ty6ky K hacaKe. PnKpeHte TeneckOnueckcyIO ty6ky K pyKoIeTke IJI WJHaTg (TO6bI CHaTb Ty6ky, HaxMMTe KHONKY 6NOKPOBKN INOTAHHTe).
4 Otperynpyte Teneckonneecky Tpy6ky; nla 3TOrO oHOny pyKoHaXMMTe uYepxNBAIte fKcAToP, aDpyro pyKoNotAHTE pyKoTky.
BCNOMORATEIbHbINHCTPYMEHTTPOBODHOM
5 DepxkTeBn HHTpyMeH T3-B-1M0xHO 3aKpEnNTb NOI pyKoINJn IerKOrO DoCTyNa. INCTpyMeH BblIOHNReT Tpi FyHKuN; CM. PcyHKHa cnedyoue CTpaHnce.
3AMEHA BATAPEN*
6 Hacajka c pOHTaHbHM OCBeueHHeM: Ppeep nepBbIM nCnONb3OBaHHeM CHNIMTe 3aunTHyO nneHky (NOBepx 6atapeek). Batapein noDnEkat 3aMehe B TOM CInyae, eCNI pOHTaHbHbIe OCBeNTeHbIe npIN6Opbl HAHHAIOT 6bICTPO MURATb. INcONb3yIte DBe 6atapen 2 AA.
7 PykoTka CnctaHOnHHbIM ynpabneHnem. BaTape nOpJnKNT 3ameHe B TOM CNYae, eCNI CBTOBO INDikatop HauHaet N3nyAtpb KpachBn CBET INI He pearpyet Ne HaxaTe TO ININ INHOH KHONK. IcNoIbayTe TOnbKO 6atapen Tnna LITHIUM CR1632.
PnmuueaHnepeytnnaaaneepn6opa 6bataepn Heo6xOIMO nBneCb. Co6nlaeTeJeCTBkyuine B bawe cTpaene npabnla c6opa 6bataepn nEekrptnp6obop.
BKJIIOUHNEI BbIKJIIOUHNEIbJIIECOCA;PERYJINPOBKA MOUHOCTN BCACbIBAHNIA
8 BbTAHHTe HHP NTaHnB KBIIOHTe BUNK BY PO3eTKy, YTObbl BKNIOHTb nn BBKIOHTb PBNEOC,HAKMTE KHOKNY ON/OFF (BKN./BBIKN.). TbIEcOC C DaTcAnuONHHb ynpabIeHNEM MOxHO BKNIOATb N BbIKIOUaTb c NOMOuBO KHOIN ON/OFF (BKN./BbIKN.), KOtOpA hXoDITcHa PykOaTke*.
9 TTo6b1 CMOTaTB WHyp NITaHIN NO OKOHuaHIN y6OpKn, HaxMITE KHOIky REWIND (CMOTATb).
10 YTo6bl OtperyuHnPoBaT MoUHocb BCaCbBAHN Ha NbIeCOce C pyHbIM UnpaBHeHMe, BInOINHTe CneDyUOnne DeIcTBNA. NoBepHNTe
BpauuOyocpyKy,pa3MeueHHyoHaNbIeNcoce,nnMCnObl3ynte BO3dyHbKlaanH,paCNOJIOKeHHbHa pykoTke.
TObIOTperyIpOBAbMoHOCb BcAcBHaHnHa NlneCoc C DnCTAHNOHBMYnpaBnHnEM, BbIOHOHTe CnDEyOuMe DeiCTBn. HAKMTe KhONky +/−, paCnOJKeHHyO Ha pyKoRtke. MoHOCb BcBaBHnA OTObpaKaIoT INdKAtOp MIN/MAX (MIn.H./MAKC.) n CmMBONbHbIe INdKAtOpbl Ha nnCnnee.
YBOPKA C NOMOUIBO YHNBEPCAJIbHOH HACAKN (V*, W*)
11ДлИЗМЕнEHnpeKIMpa6ObIhaHacdKnNcNoB3yETcneJaIb.3HaQOK 6o3Hauaet peKOMeHNyEmbI JINy b6OpKn TIN NOBepxHOCTn (TBePdoe nokpBrtne NIKOBPOBByk). HacdaKa FlowMotion LED*. IpeMeCTHe HacdKn BnpeE. HeckonbKOceKHyIbET abTomATNUeCKN BKNIOUeHO φpoHTaNbHoe OCBEuHEHe.ECln HacdKn He NcNoB3yETcRb TEueHHe HEcKONbKHX ceKHyD,ΦpoHTaNbHOe OCBEuHEHe ABtOMATNUeCKN BblKNIOUaeTcN.
IIOJOXEHN DnA ONUKCAUIN,NEPEMUEHNE NbILECOCA
12 BoBpemay3bYb6OpKe nepeBODnTe nbIeCoc BnapKOBOHoe nOIOXeHne (1)Ha 3aJHne Yactn KOPrCa. JnpeHocKn XpaHEnHn PbIeCoc a nepeBODnTe nbIeCoc B napKOBoVHoe nOIOXeHne (2).
13Пьиесoc ochaueh DByMa pyKamn InepeHockn.
ONOPOXHEHNEIbJIECBOPHNKA
14 Onopokhnte nbIec6bOpHnK, kOrda ypoBeHb nbIINIOCTNIHTMakcunmabHoro npedeNa (OTMeTKA «MAX»).Hakmite KHONKY pa36IoKnOpOBaHnN u CHIMITE nbIec6OpHnK.PoJHecNTe nbIec6bOpHNK.K KOP3nNE IyMaCopa.HaKmTE KHOKNy pa36IoKnOpBnNO pKDkpIiKoN, OTKpOInTe KpIiKU, OTKINHy ee HApNy. Onopokhnte nbIINB MyocPhyIO KOp3Hny. YcTaHOBnTE KOMNoHEHTHa MeCTO, BbINONHHOB ONCAHnBE paHeE onepaUNB O bOpaTHOM NOPrKe.
3AMEHAФИbTPOB
15 OtkpoIte KpbIbIKy FmnbTpA, Haxab KNbONKY FILTER (FmNbTP). FmnbTp drr MeNko Nbln CneJeT OunuAtb Nocne Wectn MecraeB nCNOb3OBAHn. TOnaHtte AByhOk Ha pAmKe drr N3BNeueHnE FmNbTp a DnmeKo Nbln. Ppomoe FmnbTp npD ctpye B0d. 6Opatnte BHMaHnE! He pImMeHnTe UcTaune CpeCDBa. IpeXke Yem yCTaHaBnBtB FmNbTp Ha MeCTo, DoXJnteCbE rno NnonHO RbCbXaHnA (3to 3aMomet KaK MInHMym 24 Yaca npR KomHaTHoT EmTepaType)!
16 Haxmte n CdbnBHe MexAHN3M 6boknOBKn BnpaBO JnBaBcBO6xJHn
fNbtpa DnBnAteTn. N3BleKeNTe fNtbp, NotraHyB 3a Ra3bUOK paMKn
fNtbpTa.
fNtbpDnBnAteTn cneyet Ouyuatab nocne DebeHaatm MecaeB
ncnObl30BaHn.
Ucnonb3yte ToIbKOpnHnHbIbI s-filter PureAdvantage, Homep: EFSXXX. Ipnomoe BHTpyenHO (rp3Hyo) ctoPOHY fnnbpa Tennno BOIO n3-nOJ kpaHa. YTObI ydAmBbOy, CnerKa noCTyNTe no pAMke fnnbpa. NoTbOPrE 3ry npocdyuy tbeIpe paa.
PnmeaHne. He npmeHnTe YnCTaune CpeCTBa. He npkacaiTecb K nobepxHoctn nIbtpa. PpKJe Qem yctahabnbatb pfNbTp Ha MeTo, DOxdtteB ero nonHoro BbcIxAHHa (30 To 3aimet kak MmHMMy 24 caca npi KOMHaTHo TEMepaType)! MoOuHcra fNbTp heo6xOIMMo 3aMeHATb NO MeHSeMpe Pa3 B rO nn pRn HauuCnIbHbX 3aqrpaHEHnn NnnpOBpeJdHn.
3aMeHnBΦNtPoB,3aKpOte KpbIuKyΦNbTpTaK,HTo6bI OHa H3dana ⅢeYOK NCTana Ha CBOE MeCTo.
17 OuchTka HOCOBORO KOHYCHORO ounbtpa: HOCOBOH KOHYCHBIH HOCOBOH KOHYCHBIH OHNTpe. EIN NbIbN ONana B HOCOBOH PHINbTPa NOTAHITE eRy. YdaNITe NbIb pyKo. PnCINBOM 3aPp3HeHHN pOMOHTe NOI pTOUHO BOIO. UCTAOHNTe KOMNOHEtHa Ha MeTO, BbIOJINHB OINCAHbBE paAene Opeaun B o6paTHOM nopdKe. O6patne BHMMAHNE! He npmehnTe uCTAAE CpeCTBa. PpeXJe cem yctahabmbatb FInbTpHa MeTo, DOxMNTcB eR OONHOro BbcXbXAHN (30 aIMET KaK MHNYM24 aca npn KOMHaTHOH TemnepaType)!
OYNCKA YHNBEPCAJIbHOH HACADKN (V*, W**) IN HACADKN TURBO (X*)
18 OToeHNHTe yHnBepcAih Hacadka ot Tpy6Kn. OUnCTte Hacadky c NOMOUBy pyKoTkn WHaHra. OToeHNHTe tyboHacAdKa ot Tpy6Kn n CpeXbTe C hAcADKn cyTaNHHbE HNTN T.D.INCNoB3yR HOxHnUb. OUnCTte Hacadky pyKoTko WHaHra
HaonKaaiTeB BnKoennHou y6opKo n Pure C9!
KompaniaElectrolux octabnaret 3a co6o npabo n3meHb n3dennn, nHΦopmauio n Texnueckne xapaKtepuctnkn 6e3 ybeomnene.
MEPE IPREIOCTPOXHOCTN
Obaj ypehaj mory da kopinste deca stapnja od 8 roDHa n ocObe ca cmaheHIM fN3uKm, ylnHIM nIi MeHTaHIM cnOCo6HoCTnMa, KAO n ocObe kojima HeIOCTaJy NCKcTBO n 3HaHe, yKoJIko IM ce oBe36eHn HAd3Op nIIM ce dajy uynTcBa o ynoTpe6n ypehaja Ha 6e36eDaH NaunH n yKoJIko CxBaTajy Moryhe ONaCHOCTn.
Deta He Tpe6a da ce irpajy OBm ypehajem.
UHHeN OndPkaBaHBe He Tpe6a da 0abJbajy Dea 6e3 Ha3Opa.
YNO3OPEHbE: Typ6o mna3nue imajy potnpajhy ueKy y kojmy da ce 3aIabe pa3Hn npedMeTn.
Kopnstte nx onpe3no n camo ha nobpunnama 3a koje cy hamehe. Nckbyuhte ycncnbau npe hero to noohTe da yknaBaTe 3arNaBbeHe npedMeTe nn Da chntte yeTky.
Batepije Mopajy 6ntn n3Bahe He n3 daIbHcKOr ynpabJbaya y puKn*/ mna3HnCi ca LED cBeTlOM* npe OndotheBa npOn3BOda Ha OTnad*.
^* Camo odpeheneMu modeju.
**HfOpMaunje o Tome KaKo Ce BaAn 6aTepuJa Haua3e CE y OndbUma 6 n 7.
Ipe uHHeBa nn OndpKaBaHa ypehaja nn BaHeBa 6aTePnje, yBeK npBO n3ByuTte yTuKaH n3 3nDHe yTuHnue. Batepnjy Tpe6a odnoKHTn Ha 6e36edan HauHn.
YkoNko je ka6n oWTeH, Mopa ra 3aMeHnTn OBnaShHeHn cepBnC KomnHnje Electrolux KaKo 6n ce n36erao CBAKN pU3NK.
Pure C9 Tpe6a KopnCTnTn NCKbUyHBO 3a yobuajeho ycncabaHe 3aTBOpEnx IpocToPa n y domaHnHCTBnMa. IocTapajTe ce da ycncBauchyBaTe ha cyBOM MecTy.
Cbe cepBnce nnn nonpaBke Mopa oabbataN OBlaWheH cepBnch N eHTap KOMnHaHne Electrolux.
MATEPnJAN 3a nakoBaHBe, Hnp. nIaTnue Hece, He Tpe6a Da 6yde DocTypan Deu KaKo 6n ce n36erno ryseHe.
YcncBaHnKaHeKOpuctHTe:
YBnaXHHN noDpyjMa.
Y6n3HH3aNaBbNbxTaCOBa nTd.
KaJaCyHa npOn3BDoY BnIbNbN 3Naun OwTeHeBa.
Ha owtpnmpnpeDmTeHMa nIIN TeuHOCTMa.
KaCyHaNoJHOJ Mla3HnC BnJbNBn 3Haun OwTeheHa.
Ha bpeHIM nIN XnaDnHM yraPcHIM, ypaJIbeHIM onyUHIMa cIurapTa nTDA. Ha fHIOJ npaShHn, Hn pImep od rInca, 6eToHa, 6paShA, TOnIg nIN xnaDHn HneneHa.
He octabbajte ycnBauHnloKeH nipeKTHoJ cyHueBoJ cBeTIOCTN.
I36erabajte n3naarahe ycnmbaayaja kOJ TOIOTN ININ 3y3eTHO HNCIM TemnepaTypama.
YcncnBaHnKaJaHeKOpNCtnte6e3fntepa.
He nokyuabajte da doinipheTe potnpajyhy etkydoj ye ycnmbayukbyuen mdoKe potnpajyha etka okpehe.
KaCy ToUKOBn 6NoKnpaHn.
HemojTe KopnCTnTu yCunBau yKoNko cy fntepn oTehen nn noIOMbeHN.
MepepeoctpoKHOCTyBe3ncaKa6nom3aHanajahe
PepOBHO npOBepaBajte yTuKaun Ka6n. HnKaJ He KopncTne ycncBau aKo cy yTuKaun nn Ka6n oUTeHeHn.
OwTeHeBeKa6Na yCnBaua Hne pKpBHeo rapaHunjom.
HnKaI He noJnxKe I He ByuIte ycncBaay 3a Ka6n.
Kopuhebe yucnbayayomeHyTM OKOHCTMa Moke 3a3BaTu 036nhe nopee nn othe ha npon3bOda. TaKBe nobpee nn owteheha Hcy nokpmbeha rapahujom nn od cTpaHe KOMPnaHne Electrolux.
CEPBUNCAHNEI TAPAHLIJA
CBe cepBnCe mN noPpAKe Mpa OabBaTn OBnAaHHe N cepBnCHn ceHTap KOMNaHnJe Electrolux.
OwTeHebeKa6bna yCnBauha HJe nokpmbHo rapaHnjom. OwTeHeBa MOTopa do KoJnx je doIoo ycIe; ycNcabaHa TeHocIn, ypaHbaHa npOn3B0da y TeHOCr Nm KopuShHeBa ypehaja ca oWTeHeHm UpeBOM mNa3HnOUMHCy nokpmbHeRa paHnjom.
ODIaIaIbE

Obaj cmm60n Ha npoun3bOy yka3ye da OBaj npoun3bO caDpKu 6aTepejny Koju He TpeBa Ondaratn ca Yo6nueHm OTnAOM n3 domaHnCTBa.

Obaj cunboHa npoun3bOdy nHa HberoBoj am6anaxn yka3yJe Ha To da ce Obaj npoun3bOHe MoKe OndarTu Kao OTnad N3 domaHnCTBa.
Ja 6nCTe peuKlnpauN OBaj npOn3BOD oHecnte ra Ha 3BaHnUHO MecTo npKynPbHa bIy U cepBnCHn CEHTap KOMNaJhe Electrolux rge Ce 6aTepuJa n EneKtpnuHn DeLoBN MOrY kNoHITn nepeuKlnpauTa HcRpyaH n PpoEceNoHaH aHuNH. PtnpkXabJe Ce npabIna Baale 3emBe 3a OBOJeO npKynPbHaBe eneKtpnuHnx npOn3BDoA n NyHbNx 6aTepuJa.
OvIM, Kompanija Electrolux Home Care and SDA, njaabnyje ja je yucnbau ca paqno onpemom Tuna HER2 u HER3 ycarnauen ca DnpekTbOM 2014/53/EU.
CPNCKN-CPN
Xbana 10c tce Oda6paHn ycncnBaY Pure C9. YBeK KopnCTte opunHaHnnp6op np3epBHe denoBe kako 6nte nocturn Haj6oBe peyntate. PpinnkOM n3aJnpaHa OBOR pOn3B0Da BOINCe paOeO X KBOHToj cpeHN.Cbn nnaTmHn denoBn cy o6eJeHen y CBpxpeuNKnnpaHa.
IPE NOKPETAbA YPe5AJA
- PAnKbIbO npoounjTe OBJ npnpuyHnK.
- PpOBepuTe Da Jn cy npINoxKeH CBN ONncAH NdIOBn.
- O6paTnTe nOceBHy naXhBy Ha Mepe npedocptpoxkHocT!
ONMC YCNCBAA4 PURE C9
A. Ekpan (kachnje norgneajre Bepnje)
B.ПoknonauФиntepa
C. Φπιπερ 3a φηну прашниу
D. Φιπτηρ ευκρεγμθόση
E. Napknpahe npope30Bn
F. Ka6n 3a Hanajahe
G.HocuTnApwka
H.Фиntep 3a Cyclone npperpaIy n HOCHI KOHyC
1. KaHaJ 3a Ba3dyx
J. Iperpaia 3a npaunHy
K.Догагak 3-y-1 AeroPro
L. Lipebo 3a AeroPro
M. Pуka AeroPro (kacnje
norgedajte bep3nje)
N. Teneckoncka UEB AeroPro
O. CnojHnua 3a napKnpaHe
P. Ekpah 3a MoDene ca OKpETHM yrMetOM 3a pyHOpynpaBbaHe*
Q. Ekpan 3a moene ca
ДаынckmУпраьbaьem
R. Klaçunha pyka AeroPro
S. Pyuka AeroPro Ergo
T. Puyka ca JaIbIHCKMM ynpabbaheM 3a AeroPro
U. Мдазниа FlowMotion
V. Mma3nua FlowMotion LED (ca npedbmbcBETnma)
W. Mna3HnHa AeroPro Turbo
X. Mna3Hmua AeroPro Mini Turbo
Y. Mma3Hnua ParketoPro
Z. Маэница AeroPro FlexProPlus
AA. Dyrayka MNa3Hnla Ca NpOCHaTm HAcTaBkOM AeroPro*
* Camo opehehen Moen
KAKO CE KOPNUCTN OBAJ YCNCBAAU
1 PpOBepnTe DaJIN Cy CBNPnIepeN npaBnHNOCTaBbeHn npe Hero 1TO KOpNCNTe yCNCNBa4.
2y6aunTe upeBO yucnBau (ako jennte da ra n3BaDnTe, npTNCHTe Dyme 3a 3akbyuabaBe n NobuynTe).Y6aunTe upeBO ypyky upeBa CBE DOK DYMe He kInke (ako jennte da ra ocno6oDnTe, npTNCHTe Dyme 3a 3akbyuabaBe n NobuynTe).
3 PnkaHTe TeneckONcKy eB Ha Mna3HnU. PnkaHTe TeneckONcKy eB HaKy UpeBa (aKe JxNITE da je 3BaJNTe, npntCHNTe Dyme 3a KaByuabaHe N Nobuytne).
4 TOnecTe TeNecKoNcKy eB TaKTo hTo heTepaTu6paBnuy jeHOM pykOM, aDpyrom pykOM Byh npky.
DODATAK3-y-1
5 Moxete da npuBpCTne Knnn npkaa n aataky 3y1 nocn puyke tako da moxe nao da im ce npctya.Obaj doatak mna 3 yHKunje, Bnnte cInke Ha cnedehoj ctpaan.
MEHbAbeBATEPUJA*
6Mla3Hnua ca npedbHM cbETnMa*:Ppe npBe ynoTpbe 8kNoHte 3aHTnHn fHIM (npeko 6atepja).PpomeHte 6atepje Kaia npedba CBetna noHy da tpepe 6p3o. KopcHTE nDe AA 6atepJe.
7 PyuKa ca daBnHcM ynpabBaayem: PpomeHte 6aTepyka KaDa CBETIO HnDnKAToPA NOCTAne UpBEHO nn KaHa He pearyje Ha npNTnCK 6nIO KOr dymeta. KopNCHTe cAmo IINTnjymcke 6aTepejne Tuna CR1632.
Imajte Ha ymy: N3baInTe 6aTepejne n3 npOn3B0da npe Hero wToypehaj 6aInTe Ha OTnAd. PnpJpkabajte ce npAwnla Bawse Zembe kojace OndOce Ha npKnyIbHaBe 6aTepejna J enEeKtpnHnx npOn3B0da.
CTAPTOBAHb/3AYCTABbAHb YE CUNBAuA INIODEJABAHe CHATEYUCABAHb
8 N3ByuTe Ka6n 3a HanajaHe n npKbYUme ra y 3nHy yTuHnUy. PtInmChnTe yUme ON/OFF (YKJb./NCKJb.) da Bcne YKbUyn/ NcKbUynn yCncBua. Moenjima ca TaabMckHM nppaBbaBem Mokee eynpbaTn uNoMoHy dymeta ON/OFF (YKJb./NCKJb.) ha puyn.*
9 HakoH uHHeHa, npuTncnTe Dyrrme REWIND (HAMOTABAHbE) KaKo 6NCte noHOBO HAOMaJI K6n.
10 POnecnte chary yucacaBaHa (MoJeIa cypHm ynpabBaBem): OkpeHnTE okpeTHO dyrme ycncBaBa uN KOpNCtTe Ba3dyuHN BeHTIN Ha pyuK.. POnecnte chary yucacaBaHa (MoEJIcMa ca daJbHckMm ynpabBaBem): PnITnCHNe dyrme +/- Ha pyuK. INdkaTopn MIN/MAX (MNH/MAKC.) n INdkaTopn cM6bona Ha ekpaHy npKaayj HNO CHare.
YCNCABAHECAYHNBEP3AIONMJA3HNIOM(V\*,W\*)
11 Tomohy nepa npoemHnTe noeewabaBe mna3Hnue. IKoHa mnyctpye npenopuyehn Tnnpa (TBPne nooBe mnu Tenuxa). Mna3Hnua FlowMotion LED*: PomepTE Mna3HnU HnpeIbE CBetno ce ayTomatcKn naHn HAKOH HeKOJIINO cekyHdN. KaDa ce Mna3Hnua He Kopuctn, CBETNo ce ayTomatcKn racn HaKOH HeKOJIINO cekyHdn.
IIOJOXAJN 3A IAPKINPAHbE, IPAXHbEHe IPEIpaDE 3A IPAUHy
12 KopnCTnte nonokaj 3a napknpaHbe (1),Ha 3aIbjoC tpaHN ycncnBaHa, KaJa naynipate yCncaBaHe. KopnCTnte nonokaj 3a napknpaHbe (2), nCnOy ycncnBaHa, 3a HoWehe n CmeUtaBe ycncuBha.
13 YcncnBaHMa DBe pyuKe 3a HooHe.
EMPTYING THE DUST COMPARTMENT
14 Icnpa3nHTe nperpady 3a npaunHy kada HbO npaunHe doCTNRHe MAKUMANHO orpaunuehe (o3haka MAX). PpNTCHNTE dyrme 3a otnyuTaHbe nOBuyuTne da 6ncte n3BaDnIn nperpady 3a npaunHy. PperpaDY 3a npaunHy dpKNTe nHaD Kopne 3a OTnAte. PpNTCHNTE dyMe 3a OTkByuBaHe nCNOJnOKnONua,OTBOPNE NOKNONau OKpetAHem K cNoBa. Icnpa3nHTe npaunHy n3 KaTbe 3a OTnAte. PohOBHcKnONITE o6pyTHm peOcNeDom.
3AMEHAΦNITEPAS
15 Nobuynte je3nuk FILTER da 6ncte otBopnnn noknonau fniTepa. OunCTne fniTep 3a npaunHy hakoN weCt Meceu KopnshHeBa. H3ByuNTe je3nuk Ha OKbpy Da 6ncte Mbaanu fniTep 3a fHny npaunHy. Vncpe nte fniTep nOd mnaom Bode. Imajte ha ymy: He kOpNCHTe cpeCTBa 3a npahe. Octabnte fniTep da ce do Kpaja ocyu (MnH.24 uHa co6hoj TemnpaTyPi) npe Hero wTO ra BpatNE!
16 Pnntncnne n noMepe Te MeXaHn3am 3aKaJbYauBaHe HaJeCHO da 6nCTe ocNo6oDnnn nnTep nCnped Motopa. N3BaJnTe nnTep TaKo wTo hete nobyn je3uayk Ha OKBpy nnTepa. Ouncnte nnTep nCnped motopa HaKOH DbaHaecT Meceun KOpniHbeBa.
Kopmtte Nckbuyuio opgrHannn s-fntep PureAdvantage, pef.: EFSXX. Opeptye HnytpaHby (npbaby cTpaHy) y mnaKoJ BODi. TAnhTe OKBnF npntep da bncte yknHOHNN BOy. PnoHOBNT Noctynak YteHnpyTA.
Majte hMy:He KopnCTnte cpeCTBa 3a npahe.136erabaje da Odoynjyeote nobpwnhy fntepa.Octanite fntep da ce do kpaja ocyn (MN.24Ha co6hoj temnpaTyPi npe Hrto ra BpTaTe! 3aMeHne nepBnFfntep bapem JeHOM rOmnHe nn KaJa je JakopnbabnnOntcehen.
HaKoH 3aMeHe fIInTePn, 3aTbOpNte noklonau cFInTepa CBe DOK He IerHe Ha CBOJe MeCTO.
17 Ynshhebe KOHcychor KOnchyh cHntep ce hana3nyTap 1nKIOHCKe nprrpe. OChCTte KOHcyh cHNTep aKj e ywna npaunHa. N3ByuTe KOHcyh cHNTep da 6ncte ra n3Baundn. N3BycUnte npaunHy pykOM. OChCTte NOJ mA3om BOBe aKj e BeOM 3anPbaH. PohOBHO CKlonHTe o6pHyTM peOcNEOM.
Imajte Ha ymy: He KopnCTNTe cpeCTBa 3a npaHe. OCTABTE qntep Da ce do kpaja ocyu (MnH.24)Ha co6hoj TemnpaTyPi npe Hero wto ra bpaTne!
3a6opohReTbC KOpNCTyBaTnC HnlocoM y TaKnx BnnaKaX:
ДЯпибиганьВОЛORИXДINHAOK;
- y MιCαχ BιΤΟΚγ τοριουχν ταλβίΤΟύ;
KIO npuJaM ICTb BUNMI O3HaKN NOIKOKeHHA
- Ha roctpux npedmetax a6o piinhi;
KuHcAkaIy nIINrMlCTnBnIMO3HaNnOwKOJKeHH;
IIN36puHHrapaHOro aOxONoHoro noneny,HeOnaNKBTo;
-ДЯЗИРANHДIpi6HOrOПИNY,HAnpIKnIaD3rIncy,6eToHy,6OpOuHa,rapaHOro a6oXOnOHDoro noneny;
He 3aIIwaIte nINOCOC iID npRMMn COHrHMn IpOMeHmN;
yHnKabaiTe IIHa NINOCOC CunbHoro TeNla a6o Tempeatyp HxKye Hyla;
6e3phiibtpiB;
He TopKaIeTcra Do ⅢKIOBOrO BaNkA, Ako NIOOCoc yBIMKHeHn i ⅢKOBm BAIK OeptaTeBC;
KkoKoNa3a6koBaHO.
He BnKOpNCTOByTe nINOC 3 noIkoJKeHmN fIbTpamN.
3ano6ixkhi 3axoDm 0do 0hypa kNbneHH
Perynno nepebipTe Bnky i Hyp KnBneHn. HikoN He Kopnyteca nnoocom, kso hyp a6o Bnky noKdoKeHo.
Ha nowkoKeHHaHypaKbHeHHra pahTHe po3noBcOxyeTbcn. HikOnn He TargHt Ta He nDhimaTe NINOcoc 3a Whyp.
BukopctaHn nnococy y 3a3haeHnx Bnue o6cbTaNHX MOKe npu3BeCTn do cepno3HNx TpaBM a6o nowkoJxHH nnpnaTy. Taki TpaBM a6o nowkoJxHH He noKpnuBaOtbcra rapaHTieO Electrolux.
CEPBICHE OBCIYTOBYBAHH TA IAPAHTI
Yci pemOHTHI po60Tu NOBHHI BUKOHYBaTnCA ABTOU3OBAHUM cepBICHUM ceHTPOM KOMnahII Electrolux.
Ha nowkoJxHn Huya JxNBLeHNr rapAHTie He po3noBcOxyTbC.
NookxJHn DBnryHa, BKNLkAni 36puaHnM pINn, 3aHypeHHm npnady B pINHy a0b BnKOpNCtAHnM npnady 3 noKoJxHeHM
wnAhrom Ta HacAdKOIO, He NOKPnBAOTcbraPaHTieIO.
YTNJI3ALJIA

Ley CUMBOI Ha Bnpo6i O3Haaye, 10e CE Bnp6 MICTNTb 6aTapeiKy, kY He MoXHa BnKDaTn 3I 3BnuAHHM NO6yTOBIM CMITTM.

LcH CmBON Ha Bnpo6i a6o Ha NOrO yNaKOBuI O3Haac, 10 BuPi6 Hne iinrae Tyniaui kno6ytoBIxOOn.
Дяутлзаць Вибов BiHecitb Horo B ophiuiHn nyHKT 36oby a6o cepBicHn ueHtp Electrolux, De 6e3neuHo Ta npofociHNO 3MoKytb BnHnTn yTuNl3yBaTn 6aTapeKn, a TaKoK demOHTyBaTn eNeKtpnHi detani. DToPmYtecb npaBn BaIoI kpaIIH nOdo pO3JIbHoro 36Opy eNeKtpnHnx Bwo6B Ta akymlyaTopHnx 6aTapei.
Даним Electrolux Home Care and SDA 3a8BnE, lo nnooc 3
paioycTaKbAHnM Tny HER2 ta HER3 biNoBidae BmOram DnpeKtNBn
2014/53/EU.
YKPAHcbKA
JaKyemo, 0o o6pannnnncoc Electrolux Pure C9.ДЯ3a6e3neueHHaHpaPoro p3eybTATy BIKOPNCTOByTe TINbKOpINrHAnBHi AkceCyapnTa zanachi cactnHm. Ue npOyKT CTBOpEHO 3 Typ6ToIO npO nobKnIb. BciNaactKOBIO detani MoTb N03HaNpNO pmo KOnMBCtBO NOBTOPi nepeop6Kn.
IEPEIIOYATKOMPOBOTU
- YbaXn npOHTaIe TIO IHCTpyKUIO 3 EKcnnyatauii.
- IpekeohaiTeC, 0o Bc onncaH DeTani BkIouehi Do KOMnneKry NoCTaAHHA.
- 3BepHtB oO6nHy yBaIy Ha 3axoIe63neKn.
ONUC NINOCOCA PURED9
A.ДиСпел(ИВ.MOДФИКАДI)
B.Kpwnka qinbtpa
C. ΦπbTp TOHkOrO OuHueHH
D. Φπbtpa dBnuγHa
E. OToBopn ⅡI 36epirahHn T.PyKa 3 nCTaHmHIM
F.Ka6eBbKmBnEHHH
G.Pyka dnnnepeHeceHH
H. 千KIOHHN BIDCIK KOHYCNH ΦIbTb
R. Knacnua pyka AeroPro
T.Pyka3dncTaHuiHHM
KepyBaHHaAeroPro
U. Hacáka FlowMotion
V. Hacapa FlowMotion LED (3 niCbitKIO Cnepedy)
I. NobitpHn KaHn
J. KoHTeINHep
K. HacaKa AeroPro Tpu B ODHOMy
L. Uhnr Aeropro
M. Pyuka AeroPro (DVB. MoDiΦiKauii dani)
N. TeneckoniuHa Tpy6ka Aeropro
0.3atnckaDnla36epirAHH
P. Dnncnei nn moene 3 pyuHm KepybaHHM IOOBOPTOHO pkyoio
Q. DnCnnei DnMa MoDenei 3 DnCTaHuiHMM KepyBaHHM
S. EproHomuHa pyka Aeropro
W. Hacáka AeroPro Turbo
X. Hacáka AeroPro Mini Turbo
Y. Hacanka ParkettoPro
Z. Hacáka AeroPro FlexProPlus
AA. IlinHnHa HacaiKa AeroPro Long*
*Iiue nIe IeKnx MoJeIe
KOPNCTYBAHHIINIOOCOM
1 Npeed BnKopntaHHm nInococa nepeBipTe, H npabunbHO BCTaHOBneHI BCI
BCTABTEUHrYINOCOC(uO6BNHHTNHO,HATNCHTbKONKN6NOKyBaHH Ta BITARHtB UNaHr).BCTABTEUHrpyKUyHnraDO KnaAHHRKONKN 6NOKyBaHH(uO63HnIuHO,HATNCHTbKONKY6NOKyBaHHTaNOTHtB).
3 PnpEaHae TeneckoniuHy Tpy6ky Do Hacaikn. PnpEHaIe TeneckoniuHy Tpy6ky do pyuKn uHaRa (uo6 3raHn ii, HATNCHTb KHONky 6NOKyBaHHa Ta notAHTb).
4 BiDpyrnoiTe TeneckonHny Tpy6ky, ytpmmyoH pikcatop oHnEIO pykoio Ta BnTaryOHy pnyk iHNO.
BnCOxHyTN (Mihmym 24 roa KimhaHToI Temnepatypn), npw Hix
BCTAHOBJIHOBATI NORO HA MICUE!
16 HATNCHTbI nocyheMe xexH3m 6nOkyBaHHn BnpaBOn DnBnBHeHHn pInbTaP aDnryHa.BnnMTb pInbTp,NotARHyBuIN 3a8nOKpAMKn pInbPa.
ΦInbTp DnBryHa cnid OuyuBaTu nCnIaDn BnAuaTm MicuBnBnKOpNCTAHn.
BnKOpNCTOBte opnrHnabHnI InbTp s-filter PureAdvantage, Homep: EF5XXX.
PpOmnTe 3cepeHNn (6pydHa cToPOHa) nID npoxoNoHO npToOnHO BOIO.
3nerKa NoctyKaIeNo paMJI pInbTa IaBnAenHn BOi. NTOBtIpCe npocec HOTnpa3n
Ybara. He Kopnctytec3ac6aMnIgN uuueHHe. He TpokaiTeCn nobepxhi fInptba. Daite pntpy noBHCIO BCOXHyTN (Miniym 24 roa 3a KimhaTHOI TEMnpaTp), npu HIX BCTAHOBNIbATn Ioro Ha MUCe! 3aMHIOITE pIFbtp, IO MMtbc, MiHIMm OINH pa3 ha pik aO KOIN biH dyke bpydn nn NooKOKeHN.
Iicra 3aMIHn fIbtpiB 3akpnTe KpuiKy fIbtpa,doKo BOHa He CtaHe Ha Micue (3byk knaaHn).
17 OunueHHa KOHcyHoro fInbtp: HOCOBn KOHcyHn fInbtp 3hXoAntbcB CBepeHNi uKNOHOro BldineHn. RaIO nn NotpanNB y KOHcyHn fInbtp,OnCTIb HorO. U6 BuHnTn KOHcyHn fInbtp,NotraHtB HorO. BuaNITb Nn pyKO.IPi CNbHOmy 3abpydHeHn npomnte nip npotOH BOIO.BCTaHOthf bInbtp Ha Micu, BuKohABnn Onncahpi Hpanihe onepa 3BOPOTHMO npAky.
Ybara.He KopnCTyTne3ac06aMnIpyuHEnHn.DaJIte pInbpy NOBHCIO BcOxHTy (MinHym 24 ro3 kIMHaTHoI TEMepatypn), nepu HIX BCTAOHBOTNHO HAICUe
OuHSEHHa YHIBEPCaJIbHOI HACAKN (V\*,W\*\*TATYPBO-HACAJKN (X\*)
18 BiD'EnaIte yHIBepcAba Hacadka BiTpy6Kn. OUnCTiB 3a DonomoroOp pyuKu shnaHa.
Bin'EnHaIe Tpyo HacJa bin TPv6Kn IHOKmMn BIDpiKe 3aHmKn HHTOK
TOIO. IO6 NOHCTINH HACADKY, KOPNCTYTECEPYKIO UHaHa.
HacolodkyTeb BiDminnHm np6panHHam 3 Pure C9!
Electrolux 3aJnWae 3a co6o npabO BVocnT 3mH y Bnp6n, IHOpMaio I TexHiXi XapaKTePntKn 6e3 nonepeHbOrO nobIDomHeHH.
When contacting Service, ensure that you have the following data available:
- Model Number
- PNC number
- Serial number
The information can be found on the rating plate.
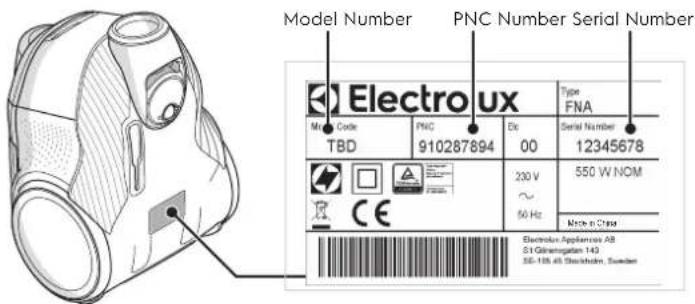
electrolux.com/shop Electrolux Appliances AB

S:t Goransgatan 143
S-105 45 Stockholm
Sweden
www.electrolux.com
