
KXTGMA45 - Cordless phone PANASONIC - Free user manual and instructions
Find the device manual for free KXTGMA45 PANASONIC in PDF.
| Product type | Additional DECT/GAP digital cordless handset |
| Brand and model | Panasonic KX-TGMA45EX |
| Dimensions (approximate) | 160 x 45 x 28 mm |
| Weight (with batteries) | Approx. 130 g |
| Power supply | 2 Ni-MH AAA (R03) rechargeable batteries, charger with AC adaptor PNLV226CE |
| Standby time | Up to 9 days (eco mode activated) |
| Talk time | Up to 13 hours (eco mode activated) |
| Charging time | Approximately 7 hours |
| Operating frequency | 1.88 - 1.90 GHz |
| RF transmission power | 10 mW (average per channel), max 250 mW |
| Display | Icon display (battery level, out of range, call, etc.) |
| Main functions | Tone control (hearing aid, tones), volume booster, voice volume booster, eco mode, noise reduction, HAC compatibility, memory dialing, phonebook, call list, Do Not Disturb mode, key lock |
| Hearing aid compatibility | T-coil and receiver collar (2.5 mm 3-pole headset jack) |
| Maintenance and cleaning | Soft damp cloth, no benzene or thinner |
| Safety | Use only Ni-MH AAA batteries, do not expose to moisture, unplug in case of malfunction |
| Spare parts and repairability | Rechargeable batteries (ref. see base manual), AC adaptor PNLV226CE, belt clip; repair by authorized center |
| General information | Additional handset, requires registration on base; CE compliance, recycling according to EU directives |
Frequently Asked Questions - KXTGMA45 PANASONIC
User questions about KXTGMA45 PANASONIC
0 question about this device. Answer the ones you know or ask your own.
Ask a new question about this device
Download the instructions for your Cordless phone in PDF format for free! Find your manual KXTGMA45 - PANASONIC and take your electronic device back in hand. On this page are published all the documents necessary for the use of your device. KXTGMA45 by PANASONIC.
USER MANUAL KXTGMA45 PANASONIC
Additional Digital Cordless Handset Model No. KX-TGMA45EX
natural_image
Line drawing of a classic mobile phone with a keypad and front panel (no text or symbols)Thank you for purchasing a Panasonic product.
You must register this handset with your base unit before it can be used. This installation manual describes only the steps needed to register and begin using the handset. Please read the base unit's operating instructions for further details.
Please read this installation manual before using the unit and save it for future reference.
Accessory information
Supplied accessories
| Accessory item/Part number Quantity | |
| Charger 1 | |
| AC adaptor/PNLV226CE0R 1 | |
| Rechargeable batteries^*1 | 2 |
| Handset cover^*2 | 1 |
| Belt clip 1 |
*1 Please read the base unit's operating instructions for replacement battery information.
*2 The handset cover comes attached to the handset.
Note:
- Please read the base unit's operating instructions for additional/replacement accessories. - Panasonic Entertainment & Communication Co., Ltd. declares that the radio equipment type (KX-TGMA45) is in compliance with Directive 2014/53/EU. The full text of the EU declaration of conformity is available at the following internet address:
https://www.ptc.panasonic.eu/compliance-documents
Authorised Representative in EU:
Panasonic Marketing Europe GmbH
Panasonic Testing Centre
Winsbergring 15, 22525 Hamburg, Germany
- Please read "Ecodesign information" of the base unit's operating instructions for information regarding ErP directive.
- Please read “Graphical symbols for use on equipment and their descriptions” of the base unit’s operating instructions.
For your safety
To prevent severe injury and loss of life/property, read this section carefully before using the product to ensure proper and safe operation of your product.

WARNING
Power connection
- Completely insert the AC adaptor/power plug into the power outlet. Failure to do so may cause electric shock and/or excessive heat resulting in a fire.
- Regularly remove any dust, etc. from the AC adaptor/power plug by pulling it from the power outlet, then wiping with a dry cloth. Accumulated dust may cause an insulation defect from moisture, etc. resulting in a fire.
- Unplug the product from power outlets if it emits smoke, an abnormal smell, or makes an unusual noise. These conditions can cause fire or electric shock. Confirm that smoke has stopped emitting and contact an authorised service centre.
Installation
- To prevent the risk of fire or electrical shock, do not expose the product to rain or any type of moisture.
- Do not place or use this product near automatically controlled devices such as automatic doors and fire alarms. Radio waves emitted from this product may cause such devices to malfunction resulting in an accident.
- Do not place the handset on the base unit when battery cover is removed.
- Do not place the handset on the base unit when the headset cover is opened.
Operating safeguards
- The use of excessive sound volume through earphones, headphones, or headsets may cause hearing loss.

CAUTION
Installation and location
- The AC adaptor is used as the main disconnect device. Ensure that the AC outlet is installed near the product and is easily accessible.
- The product is only use for mounting at heights ≤ 2 m.
Note:
- This height is not guaranteed for product reliability.
- To prevent serious injuries due to the product unexpectedly falling, the product must be installed at a height of 1.5 m or lower.
Battery
- We recommend using the supplied batteries or additional/replacement batteries noted in the base unit's operating instructions for replacement battery information. USE ONLY rechargeable Ni-MH batteries AAA (R03) size.
- Do not mix old and new batteries.
- Do not open or mutilate the batteries. Released electrolyte from the batteries is corrosive and may cause burns or injury to the eyes or skin. The electrolyte is toxic and may be harmful if swallowed.
- Exercise care when handling the batteries. Do not allow conductive materials such as rings, bracelets, or keys to touch the batteries, otherwise a short circuit may cause the batteries and/or the conductive material to overheat and cause burns.
- Charge the batteries provided with or identified for use with this product only, in accordance with the instructions and limitations specified in this manual.
- Only use a compatible base unit (or charger) to charge the batteries. Do not tamper with the base unit (or charger). Failure to follow these instructions may cause the batteries to swell or explode.
- Avoid the use in the following conditions:
– High or low extreme temperatures during use, storage or transportation.
- Replacement of a battery with an incorrect type that can defeat a safeguard.
- Disposal of a battery into fire or a hot oven, or mechanically crushing or cutting of a battery, that can result in an explosion.
- Extremely high temperature and/or extremely low air pressure that can result in an explosion or the leakage of flammable liquid or gas.
Important safety instructions
When using your product, basic safety precautions should always be followed to reduce the risk of fire, electric shock, and injury to persons, including the following:
- Do not use this product near water for example, near a bathtub, washbowl, kitchen sink, or laundry tub, in a wet basement or near a swimming pool.
- Do not use the telephone to report a gas leak in the vicinity of the leak.
- Use only the power cord and batteries indicated in this manual. Do not dispose of batteries in a fire. They may explode. Check with local codes for possible special disposal instructions.
SAVE THESE INSTRUCTIONS
Other information
- The applied nameplate is located at the bottom or rear of the product.
- Operating the product near electrical appliances may cause interference. Move away from the electrical appliances.
⚠️CAUTION: Risk of explosion if battery is replaced by an incorrect type. Dispose of used batteries according to the instructions.
Routine care
- Wipe the outer surface of the product with a soft moist cloth.
- Do not use benzine, thinner, or any abrasive powder.
Notice for product disposal, transfer, or return
- This product can store your private/confidential information. To protect your privacy/confidentiality, we recommend that you erase information such as phonebook or caller list entries from the memory before you dispose of, transfer, or return the product.
Disposal of Old Equipment and Batteries (Only for European Union and countries with recycling systems)
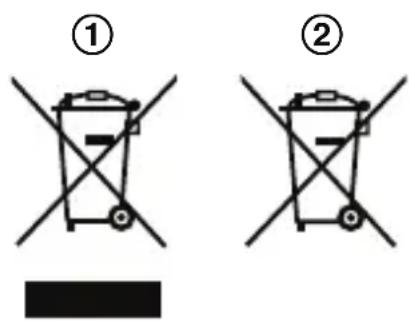
These symbols (①, ②) on the products, packaging, and/or accompanying documents mean that used electrical and electronic products and batteries must not be mixed with general household waste. For proper treatment, recovery and recycling of old products and used batteries, please take them to applicable collection points in accordance with your national legislation.
By disposing of them correctly, you will help to save valuable resources and prevent any potential negative effects on human health and the environment. For more information about collection and recycling, please contact your local authority. Penalties may be applicable for incorrect disposal of this waste, in accordance with national legislation.
For business users in the European Union
If you wish to discard electrical and electronic equipment, please contact your dealer or supplier for further information.
Information on Disposal in other Countries outside the European Union
These symbols (①, ②) are only valid in the European Union. If you wish to discard these items, please contact your local authorities or dealer and ask for the correct method of disposal.
Note for the battery symbol
This symbol (②) might be used in combination with a chemical symbol. In this case it complies with the requirement set by the Directive for the chemical involved.
Note for the battery removal procedure
Refer to "Battery installation/Battery charging" on page 7.
HAC (Hearing Aid Compatibility) Support
This handset meets the standard for hearing aid compatibility. It is designed to work well with a hearing aid, reducing noise.
Specifications
- Standard:
DECT (Digital Enhanced Cordless Telecommunications)
GAP (Generic Access Profile)
● Frequency range: 1.88 GHz to 1.90 GHz - RF transmission power: Approx. 10 mW (average power per channel) 250 mW (max.)
- Power source: 100–240 V AC, 50/60 Hz
- Rechargeable battery: AAA (R03) Ni-MH battery (1.2 V, 550 mAh)
● Power consumption: Charger:
Standby: 0.1 W
Maximum: 1.8 W
- Operating conditions: 0 °C – 40 °C, 20 % – 80 % relative air humidity (dry)
Setting up
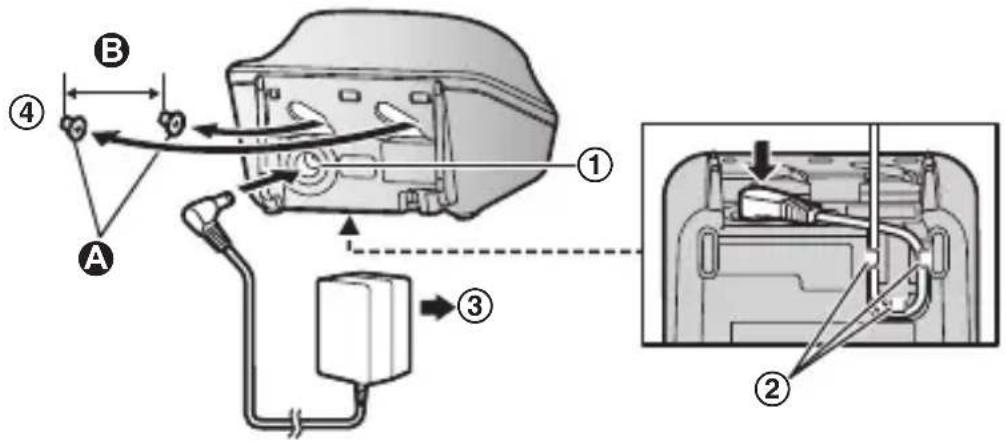
Connections/Wall mounting
① Connect the AC adaptor to the unit by pressing the plug firmly.
② Fasten the cord by hooking it.
③ Connect the AC adaptor to the power outlet.
④ Drive the screws (A) (not supplied) into the wall, if necessary.
B 25 mm
Note:
- Use only the supplied Panasonic AC adaptor PNLV226CE.
- The AC adaptor must remain connected at all times. (It is normal for the adaptor to feel warm during use.)
- Make sure that the wall and the fixing method are strong enough to support the weight of the unit.
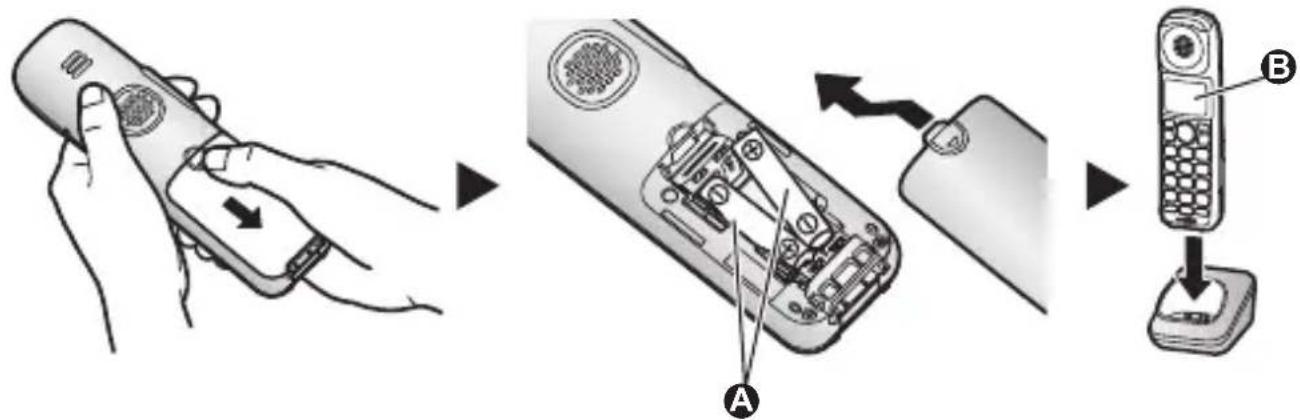
Battery installation/Battery charging
When the language selection is displayed after installing the batteries for the first time, you can select your desired language.
【◆】: Select your desired language. → [OK] → [💡]
Important:
- Use the supplied rechargeable batteries. For replacement, we recommend using the Panasonic rechargeable batteries noted in the base unit's operating instructions.
- USE ONLY rechargeable Ni-MH batteries AAA (R03) size ^A .
- Do NOT use alkaline/manganese/Ni-Cd batteries.
- Confirm correct polarities (+, ⊕)
Charge for about 7 hours.
- Confirm "Charging" is displayed (B).
- When the batteries are fully charged, "Fully Charged" is displayed.
Note:
- The handset display may show “Please wait for 1 minute.” when the handset is placed on the charger if it is not registered to the base unit.
- If the batteries are fully charged, but the operating time seems to be shorter, clean the battery ends (+), and the charge contacts with a dry cloth and charge again.
Handset battery level
| Icon Battery level | |
 | High |
 | Medium |
 | Low |
 | Needs charging. |
Ni-MH battery performance
| Operation Operating time | |
| In continuous use | 13 hours max.* ^1 |
| Not in use (standby) | 9 days max.* ^1 |
*1 If eco mode is on and booster is off.
Note:
- Actual battery performance depends on usage and ambient environment.
Display language
1 [ ]# 1 1 0
2 [▲]: Select your desired language. → [OK] → [💡]
Registering the handset to the base unit
Ensure that the handset is switched on. If it is not on, press and hold
【💡】for few seconds to turn the handset on.
1 H andset:
Lift the handset and press [💡].
2 Ba se unit:
Press and hold [●●●] for about 5 seconds.
- f all registered handsets start ringing, press [→] again to stop, then repeat this step.
3 Handset:
Place the handset on the base unit or charger.
- Continue the operation even when the handset display shows "Please wait for 1 minute.".
4 With the handset still on the base unit or charger, wait until a confirmation tone sounds and 📋 is displayed.
Note:
- If an error tone sounds, or if is displayed, register the handset according to the base unit's operating instructions.
Controls
Handset
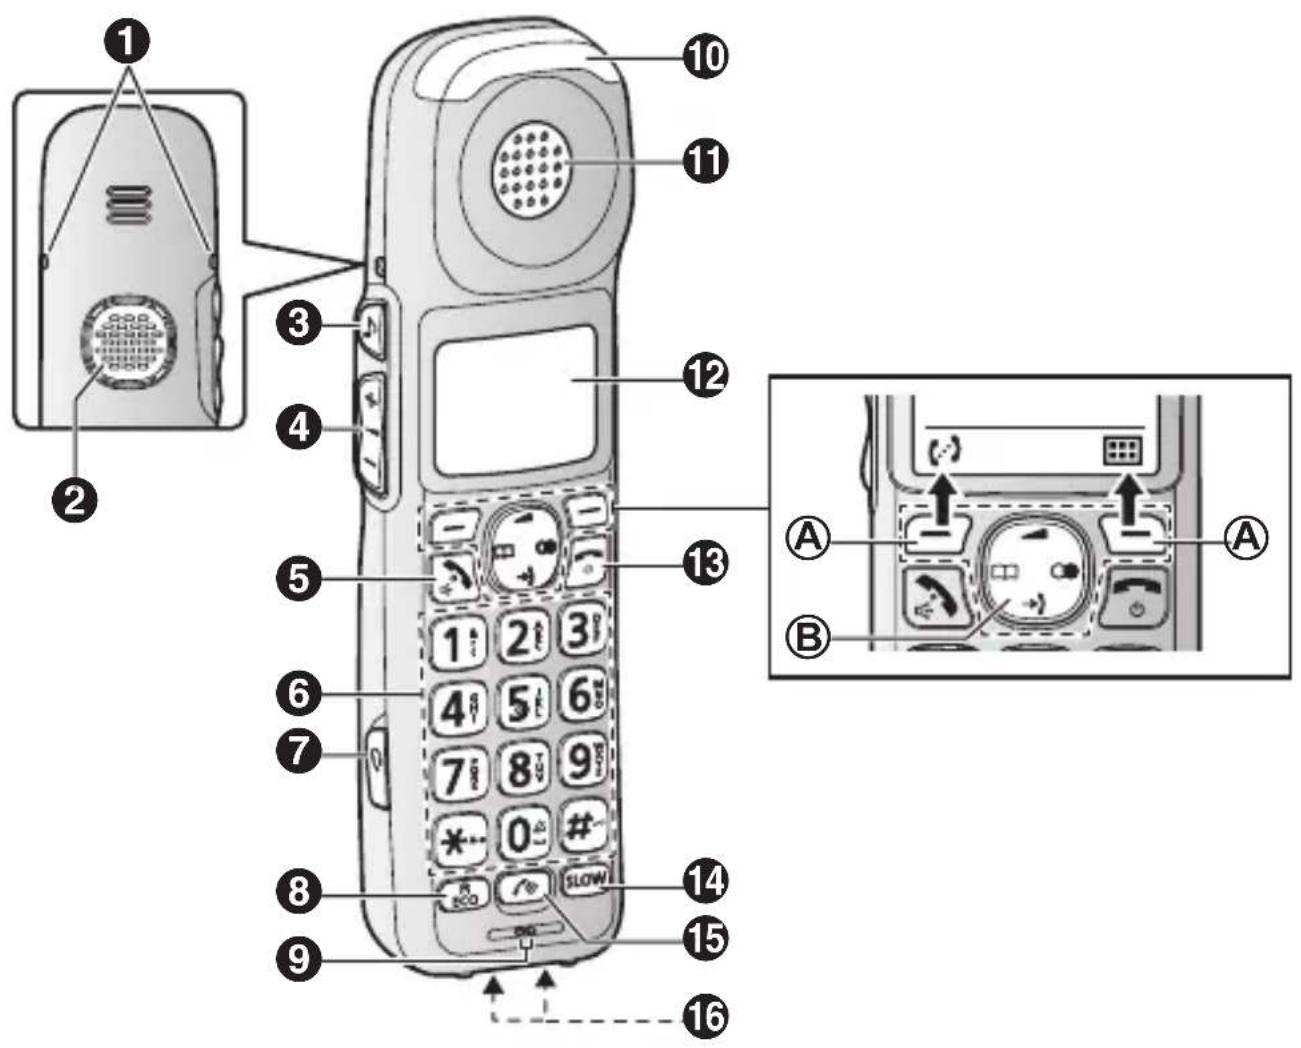
① Belt clip holes
② Speaker
③ 【♪】(Tone control)
④ [+]/[−] (▲: Volume up/down)
⑤ 【→】(Talk/Speakerphone)
6 Dial keypad
【2】(Ringer off)
【n0】(Key lock)
7 Headset jack
- This jack is used to connect a user-supplied neckloop to the handset. You must set the “Headset Type” setting to match the type of device connected.
8 [R/ECO]
R: Recall/Flash
ECO: Eco mode shortcut key
9 Microphone
10 Message indicator
11 Receiver
12 Display
13 【Off/Power】
14 【SLOW】(Slow talk)
Slow talk indicator
15 【】(Boost)
Boost indicator
- Light off: Volume booster is turned off.
Light in red: Volume booster is turned on.
Note that when the Boost indicator is lit in red, the volume booster feature is enabled and the product may emit sounds at very high volume.
16 Charge contacts
■ Control type
Ⓐ Soft keys
By pressing a soft key, you can select the feature shown directly above it on the display.
B Navigator key
Navigator keys functions as follows.
![[▲] [◄] [□] [►] [▼]](/content/2026/03/454806/images/c069c9301d11b13de818858234c4af3e9a23e55da266fd0126ed2629ebc9f14e.jpg)
- 【▲】, 【▼】, 【◀】, or 【▶】: Scroll through various lists and items.
- 【▲】or【▼】(▲): Adjust the receiver or speaker volume while talking.
- 【→(Caller list): View the caller list.
- 【□□】(Phonebook): View the phonebook entry.
- 【○】(Redial): View the redial list.
Display icons
Handset display items
| Item Meaning | |
 | Within base unit range |
 | Out of base unit range |
 | The line is in use.● When flashing: The call is put on hold.● When flashing rapidly: An incoming call is now being received. |
 | Speech booster is on. |
 | Eco mode is on. |
 | Noise reduction is set. |
 [SZ8D]CT [SZ8D]CT | Tone control level (Hearing aid, Tone 1-5 or Custom tone) |
| Speakerphone is on. | |
 | Ringer volume is off. |
 | Do not disturb mode is on. |
 | Privacy mode is on. |
 | Alarm is on. |
 | Battery level |
 | Nuisance call blocked |
| IN USE | Answering system is being used by another handset or the base unit. |
| Line in use | Someone is using the line. |
Accessibility
This product is designed to provide not only optimal volume, but optimal sound quality as well, ensuring that every call is heard loud and clear.
Tone control
This feature clarifies the voice of the person you are talking to, producing a more natural-sounding voice that is easier to hear and understand.
This feature can be set for each unit.
The following settings are available.
Handset:
- Receiver: "Hearing Aid", "Tone 1-5" and "Custom Tone 1-20"
- Speakerphone: "Tone 1-4"
- Headset: "Tone 1-4" and "Custom Tone 1-20"
Handset
You can select a tone control setting while talking on the phone. There are two methods available.
■ Using the ⚠ key
1 Press [♪] on the side repeatedly to select the desired setting while talking.
2 To exit, press [→] or wait for a few seconds.
- The selected setting is shown on the handset display while talking.
Note:
- To select one of the “Custom Tone” settings, follow the instructions in “Using the [icon] key”, page 13.
■ Using the [图标] key
1 P ress [图标] while talking.
2 [▲]: “Tone Control” → [OK]
3 [▲]: Select the desired setting. → [OK]
- If you select “Custom Tone”, select the desired type (“Type 1” - “Type 20”). → [OK]
- The selected setting is shown on the handset display while talking.
Hearing aid compatibility
If you wish to use this product with a hearing aid, please select "Hearing Aid" in the "Tone Control" settings for optimal performance.
■ Using the ⚠ key
1 Press [♪] on the side repeatedly. → “Hearing Aid”
2 To exit, press [→] or wait for a few seconds.
- The selected setting is shown on the handset display while talking.
■ Using the [田] key
1 Press [ ] while talking.
2 【▲】: “Tone Control” → [OK]
3 【▲】: “Hearing Aid” → [OK]
- The selected setting is shown on the handset display while talking.
Volume booster
This feature allows you to drastically increase the volume of the other party's voice. This feature can be set for each unit.
WARNING
- This feature is designed for users who are hard of hearing. If other users use the phone, be sure to turn this feature off.
- Do not use this feature unnecessarily. High volume emitted from the product may cause hearing damage.
- Pressing the [icon] key activates the volume booster feature. Use this key with care. At its loudest setting (volume and volume booster
features set to their highest settings), the product can output sound at up to 50 dB. To prevent hearing damage, we recommend that you set this product to the lowest volume setting at which you can hear adequately.
Turning on the volume booster
1 Pr ess [r] while on a call.
● The Boost indicator lights in red.
2 Press (+) or (−) on the side repeatedly to select the desired volume.
- The selected volume setting is shown on the handset display while talking.
- The selected volume setting is used for future calls when the booster is turned on.
Note:
- Noise reduction is automatically turned on when the booster is turned on. In this case, the menu that allows you to turn off noise reduction is not shown even after you press [icon] while on a call.
- Is not shown if the noise reduction feature was turned off before you turned on the volume booster.
Adjusting the volume
While on a call, you can adjust the volume by pressing (+) or (-) on the side repeatedly.
- The selected volume setting is shown on the handset display.
- The selected volume setting is applied immediately and is also used for future calls. A separate setting is used for when volume booster is on and when it is off.
Available volume settings
The available settings vary by model and whether volume booster is turned on or off.
| Boost indicator | Volume booster | Available volume settings | Default |
| Light off Turned | off Receiver: 1–15 | 3 | |
| Speakerphone: 1–21 15 | |||
| Headset: 1–15 3 | |||
| Light in red Turned on Receiver: 12 | -50 15 | ||
| Speakerphone: 18–40 21 | |||
| Headset: 12–50 15 | |||
Speech booster (making your voice louder)
This feature allows you to increase the volume of your voice heard by the other party.

WARNING
- The speech booster feature can be used to increase the volume of your voice heard by the other party. If this feature is used unnecessarily, your voice may be too loud. We recommend that you use this feature only if your voice is too quiet to be heard by the other party.
1 Press【■】while on a call.
2 [▲]: "Boost Speech On" or "Boost Speech Off" → [OK]
- The selected setting is applied immediately and is also used for future calls.
Key tones
Use this procedure to change the volume of the tones that sound when you press keys on the handset, or to turn them off. The default setting is “Low”. Includes confirmation tones and error tones, etc.
1 For handset: [ ]# 1 6 5
2 【▲】: Select the desired setting. → [OK] → [💡]
Message indicator
The message indicator on the handset can indicate unit status, as explained below.
| Indicator Status | |
| Flashing rapidly – Outside call or intercom call is being received. – The handset alarm is sounding. | |
| Flashing slowly – There are new messages. – There are missed calls. | |
Setting the message indicator
You can enable and disable the message indicator for each type of status.
- “Incoming Call” (default: On)
- “New Message” (default: On)
- "Missed Call" (default: Off)
- "Alarm" (default: On)
1 For handset: [ ]#278
2 [▲]: Select the desired setting and press [√].
- “√” is displayed next to enabled items.
- To disable an item, select it and press [√] again. “√” disappears.
3 [O K] → [電]
Using assistive listening devices
If you use hearing aids that are compatible with a neckloop, you can connect your neckloop to a handset and enjoy hands-free conversations. When talking on the phone, you can speak using the neckloop's microphone or the handset's microphone depending on the neckloop's features and the handset's settings.
– Hearing aids that are equipped with a telecoil (T-coil)
– Audio neckloops with a 3-pole, 2.5 mm plug
- Audio neckloops with a 3-pole, 3.5 ~mm plug ^*1
*1 In this case, a 3-pole 3.5 mm to 3-pole 2.5 mm adaptor is required.
To use with a T-coil-equipped hearing aid
1 S et your hearing aid to the "T" setting.
- Refer to your hearing aid's operating instructions for details.
2 Hold the handset near your hearing aid when talking.
To use a neckloop
When using a neckloop with the handset, you can speak using the neckloop's microphone or using the handset's microphone.
Important:
-
You must set the headset type before use (page 18).
1 Connect the neckloop to the headset jack on the side of the handset.
2 Use the handset as normal. -
Refer to your neckloop's operating instructions for details.
- If your neckloop does not have a microphone, speak into the handset's microphone.
- You can use volume booster (page 14), speech booster (page 16), tone control (page 13), and other features even when using a neckloop.
Setting the headset type
Set this setting to match the type of device connected.
"Headset" (default): Disables the handset's microphone. The connected headset is used for talking and listening.
"Neckloop with Mic": Disables the handset's microphone. The connected neckloop is used for talking and listening.
"Neckloop w/o Mic": Enables the handset's microphone. The connected neckloop is used for listening only.
1【#786
2 【◆】: Select the desired setting. → [OK] → [💡]
One-touch ringer off
Handset
Press and hold 0 until the handset beeps to turn the ringer off. While the ringer is turned off, the handset will not ring for calls.
- You can turn the ringer on again by pressing and holding 0 until the handset beeps.
Memory dial
For easy dialling, you can assign a phone number to each dial key (1 to 9) on the handset.
Adding phone numbers to memory dial keys
■ Byentering phone numbers:
1 Press and hold the desired memory dial key (1 to 9). → [→]
2 [▲]: "Manual" → [OK]
3 Enter the party's name (16 characters max.). → [OK]
4 Enter the party's phone number (24 digits max.). → [OK] 2 times → [💡]
■ Form the phonebook:
1 Press and hold the desired memory dial key (1 to 9). → [☐]
2 [▲]: "Phonebook" → [OK]
3 【▲】: Select the desired entry. → [OK] → [💡]
Note:
- If you edit a phonebook entry which is assigned to a memory dial key, the edited entry does not transfer to the memory dial key.
Editing an entry
1 Pr ess and hold the desired memory dial key (1 to 9). → 【■】
2 [▲]: "Edit" → [OK]
3 E dit the name if necessary. → [OK]
4 Edit the phone number if necessary. → [OK] 2 times → [💡]
Erasing an entry
1 P ress and hold the desired memory dial key (1 to 9). → [☐]
2 [▲]: “Erase” → [OK]
3 【▲】: “Yes” → [OK] → [💡]
Viewing an entry/Making a call using the handset
1 P ress and hold the desired memory dial key (1 to 9).
2 To make a call, press [ √/∅].

natural_image
Line drawing of a vintage mobile phone with a screen and keypad (no text or symbols)Panasonic Testing Centre
100–240 V C.A., 50/60 Hz
- Batterie rechargeable :
Batterie Ni-MH AAA (R03) (1,2 V, 550 mAh)
- Consommation :
Chargeur :
Veille : 0,1 W
Maximum : 1,8 W
Remarques :
Remarques :
natural_image
Line drawing of a vintage mobile phone with a screen and keypad (no text or symbols)Panasonic Testing Centre
Winsbergring 15, 22525 Amburgo, Germania
Nota:
Nota:
natural_image
Line drawing of a vintage mobile phone with a screen and keypad (no text or symbols)Panasonic Testing Centre
Nota:
Nota:
- 【▲】, 【▼】, 【◀】 o 【▶】: desplazarse por diversas listas y elementos.
1731 Zellik, Belgium
Panasonic Belgium is a branch of
Panasonic Marketing Europe GmbH
Hagenauer Strasse 43, D-65203
Wiesbaden
VAT BE0867.862.661 RPM/RPR Brussels
92238 Gennevilliers Cedex, France
Panasonic Switzerland
a branch of Panasonic
Panasonic Switzerland
a branch of Panasonic