WHMDF12C6E51 - Air-conditioner PANASONIC - Free user manual and instructions
Find the device manual for free WHMDF12C6E51 PANASONIC in PDF.

User questions about WHMDF12C6E51 PANASONIC
0 question about this device. Answer the ones you know or ask your own.
Ask a new question about this device
Download the instructions for your Air-conditioner in PDF format for free! Find your manual WHMDF12C6E51 - PANASONIC and take your electronic device back in hand. On this page are published all the documents necessary for the use of your device. WHMDF12C6E51 by PANASONIC.
USER MANUAL WHMDF12C6E51 PANASONIC
Operating Instructions
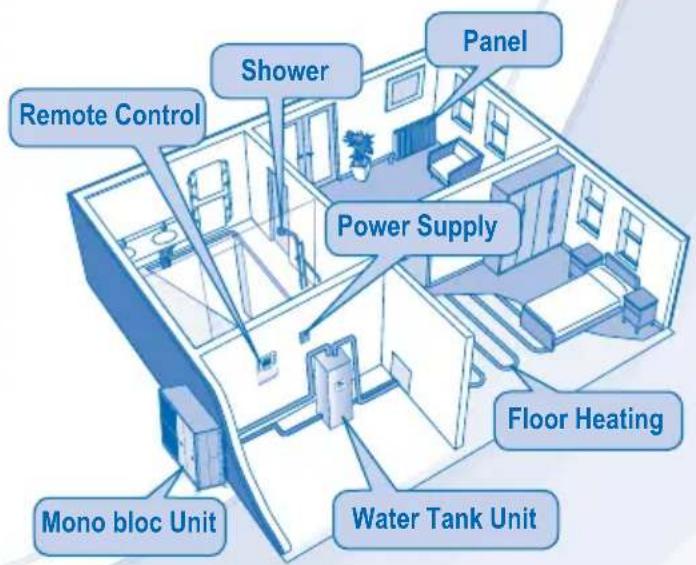
(Mono bloc) Air-to-Water Heatpump System
Model No.
Mono bloc Unit
WH-MDF12C6E5
WH-MDF14C6E5
WH-MDF16C6E5
(WH-MDF12C6E5-1)
(WH-MDF14C6E5-1)
(WH-MDF16C6E5-1)


ENGLISH
2 9
Before operating the unit, read these operating instructions thoroughly and keep them for future reference.
Before operating the unit, make sure the installation has been carried out correctly by authorized dealer correctly and precisely following the installation instructions given.
FRA NCAIS
10 17
© Panasonic Appliances Air-Conditioning Malaysia Sdn. Bhd. 2012. Unauthorized copying and distribution is a violation of law.
F568650
Thank you for purchasing Panasonic Product
TABLE OF CONTENTSTABLE
SAFETY PRECAUTIONS
2~3
REMOTE CONTROL
4~7
MONO BLOC UNIT
8
TROUBLESHOOTING
9
INFORMATION
74~76
NOTENOTE
The illustrations in this manual are for explanation purposes only and may differ from the actual unit. They are subjected to change without notice for future improvement.
OPERATION CONDITION
| Water outlet Temperature (°C) | ||
| HEATING | Max. 55 | |
| Min. 25 | ||
| Ambient Temperature (°C) | ||
| HEATING | Max. 35 | |
| Min. -20 | ||
NOTICE: When the outdoor temperature is out of the above temperature range, the heating capacity will drop significantly and mono bloc unit might stop for protection control. The unit will restart automatically after a short time when the outdoor temperature is back in the limits.
SAFETY PRECAUTIONS
- Panasonic (Mono bloc) Air-to-Water Heatpump is a system designed for combination with Panasonic Tank Unit. In case of non-Panasonic Tank Unit is being used with Panasonic (Mono bloc) Air-to-Water Heatpump System, Panasonic cannot guarantee neither good
OF CONTENTSability of the system.
- This manual describes how to operate the Heatpump system.
- Other operation such as water tank, radiator, external thermo controller and underfloor system, please refer to respective manufacturer operation manuals.
To prevent personal injury, injury to others, or property damage, please comply with the following.
Incorrect operation due to failure to follow instructions below may cause harm or damage, the seriousness of which is classified as below:

WARNING warns of death or serious injury.

This sign warns of injury or damage to CAUTION
The instructions to be followed are classified by the following symbols:

This symbol denotes an action that is PROHIBITED.


These symbols denote an action that is COMPULSORY.

WARNING
MONO BLOC UNIT

This appliance is not intended for use by persons (including children) with reduced physical, sensory or mental capabilities, or lack of experience and knowledge, unless they have been given supervision or instruction concerning use of the appliance by a person responsible for their safety. Children should be supervised to ensure that they do not play with the appliance.
Please consult authorized dealer or specialist to clean the internal parts, repair, install, remove and reinstall the unit. Improper installation and handling will cause leakage, electric shock or fire.
When repair or service refrigeration system, confirm to authorized dealer or specialist on usage of specified refrigerant type. Using of refrigerant other than the specified type may cause product damage, burst and injury etc.

Do not install the unit in a potentially explosive or flammable atmosphere. Failure to do so could result in fire.
Do not insert your fingers or other objects into the mono bloc unit, rotating parts may cause injury.

Do not touch the mono bloc unit during lightning, it may cause electric shock.
Do not sit or step on the unit, you may fall down accidentally.

| WARNING | |
| POWER SUPPLY | |
| Do not use a modifi ed cord, joint cord, extension cord or unspecified ed cord to prevent overheating and fire. To prevent overheating, fire or electric shock: · Do not share the same power outlet with other equipment. · Do not operate with wet hands. · Do not over bend the power supply cord. | Do not use a modifi ed cord, joint cord, extension cord or unspecified ed cord to prevent overheating and fire. To prevent overheating, fire or electric shock: · Do not share the same power outlet with other equipment. · Do not operate with wet hands. · Do not over bend the power supply cord. |
| If the supply cord is damage, it must be replaced by the manufacturer, its service agent or similarly qualified persons in order to avoid a hazard. | If the supply cord is damage, it must be replaced by the manufacturer, its service agent or similarly qualified persons in order to avoid a hazard. |
| This unit is equipped with Residue Current Circuit Breaker (RCCB). It is strongly recommended to check the operation of the RCCB after installation and periodically after servicing or maintenance by authorized dealer to ensure it is in good working order. Otherwise, it may cause electrical shock or fire in case of malfunction. | This unit is equipped with Residue Current Circuit Breaker (RCCB). It is strongly recommended to check the operation of the RCCB after installation and periodically after servicing or maintenance by authorized dealer to ensure it is in good working order. Otherwise, it may cause electrical shock or fire in case of malfunction. |
| It is strongly recommended to install Residual Current Device (RCD) on-site to prevent electric shock or fire. | It is strongly recommended to install Residual Current Device (RCD) on-site to prevent electric shock or fire. |
| Stop using the product if any abnormality/failure occurs and disconnect the power plug or turn off the power switch and breaker. (Risk of smoke/fe re/electric shock) Examples of abnormality/failure · The RCCB switches off by itself. · Burning smell, abnormal noise or vibration sound is observed when the unit is in use. · Hot water keeps on coming off the unit. Contact your local dealer immediately for maintenance/repair. | Stop using the product if any abnormality/failure occurs and disconnect the power plug or turn off the power switch and breaker. (Risk of smoke/fe re/electric shock) Examples of abnormality/failure · The RCCB switches off by itself. · Burning smell, abnormal noise or vibration sound is observed when the unit is in use. · Hot water keeps on coming off the unit. Contact your local dealer immediately for maintenance/repair. |
| It is recommended to wear gloves during servicing or maintenance in order to avoid hazard. | It is recommended to wear gloves during servicing or maintenance in order to avoid hazard. |
| This equipment must be earthed to prevent electrical shock or fire. | This equipment must be earthed to prevent electrical shock or fire. |
| Prevent electric shock by switching off the power supply when: - Before cleaning or servicing. | Prevent electric shock by switching off the power supply when: - Before cleaning or servicing. |
| This appliance is for multiple uses. All power supply circuits must be turn off before access to any of the terminals in the unit, to avoid electrical shock, burn or fatal injury. | This appliance is for multiple uses. All power supply circuits must be turn off before access to any of the terminals in the unit, to avoid electrical shock, burn or fatal injury. |
| CAUTION | |
| MONO BLOC UNIT | |
| Do not install the unit close to any combustible equipment or at bathroom. Otherwise, it may cause electric shock or fire. | |
| Do not touch the water discharge pipe during operation. | |
| Do not place anything on top or beneath of the unit. | |
| Do not touch the sharp aluminium fin, sharp parts may cause injury. | |
| Do not use the system during sterilization to prevent scalding or overheat during shower. | |
| Ensure drainage pipe is connected properly. Otherwise, leakage may occur. | |
| After a long period of use, make sure the installation rack does not deteriorate to prevent the unit from falling down. | |
| The sterilization function fi eld settings must be confi gured by the authorized dealer according to local laws and regulation. | |
| REMOTE CONTROL | |
| Do not let the remote control get wet. Otherwise, it may cause malfunction. | |
| Do not press the buttons on the remote control with hard, pointed objects. Otherwise, it may damage the unit. | |
| Do not wash the remote control with water, benzene, thinner or scouring powder. | |
| Do not inspect or service the remote control by your otherwise, it can damage or malfunction. | |
yourself. Please c
REMOTE CONTROL
- Some functions describe in this manual may not be applicable to your unit.
- Consult your nearest authorized dealer for further information.
- For normal operation, the RESET FORCE and SERVICE buttons are not in use.
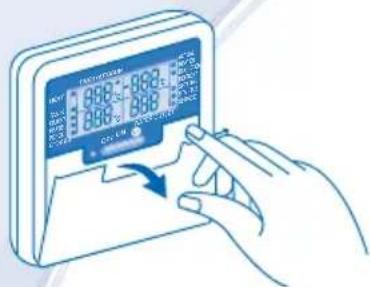
Open cover for buttons selections.
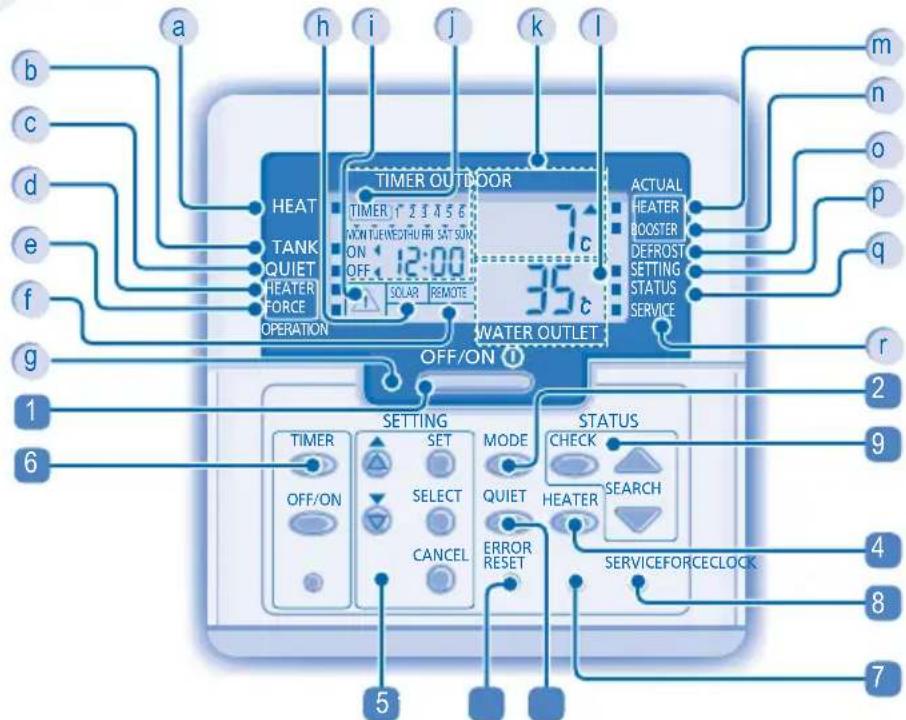
REMOTE CONTROL'S DISPLAY
a Heat Mode OFF/ON Indicator
Tank Mode Indicator
c Quiet Mode Indicator
d Backup Heater Enabled/Disabled Indicator
e Force Heater Request OFF/ON Indicator
f External Thermo Controller Connected Display
9 Operation LED
h Solar Display
i Caution (Tank Temperature above 60^) Indicator
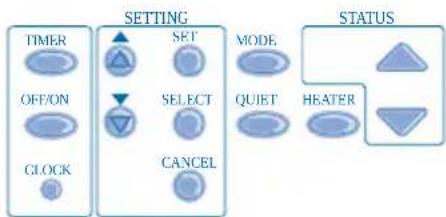
REMOTE CONTROL'S BUTTON
1 OFF/ON Button
2 Operation Mode Button
3 QuietOperationButton
4 Backup Heater Enabling Button
5 System Setting Mode Buttons
REMOTE CONTROL PREPARATION
Setting Current Day and Time
- Press CLOCK
- Press or to set current day.
- Press to confirm.
- Repeat steps 2 and 3 to set the current time.
Notes:
- The current day and time need to be set when:
- The power is turned on for the first time.
- After a long time has elapsed since the power was last turned on.
- The current time that has been set will be the standard time for all the Timer operations.
SETTING UP THE SPECIAL FUNCTIONS
After initial installation, you can manually adjust the settings. The initial setting remains active until the user changes it.
- The remote control can be used for multiple installations. Some functions may not be applicable to your unit.
- Ensure the operation LED is in OFF condition before setting.
- Press SET and CHECK simultaneously for 5 seconds to enter special setting mode. "SETTING" and "STATUS" indicator is ON.
- Press or to browse functions.
- Press SELECT to enter function.
- Press or to enable YES or disable NO function, or set other options.
- Press SET to confirm.
Set Remote Control's Display Description
| 1 | ro ai | con | External Thermo Controller (YES / NO) To set external thermo controller connection. |
| 2 | HEATER | CAP | Backup Heater Capacity Selection (3kW / 6kW / 9kW) To reduce the heater power whenever unnecessary. Options vary depending on model. |
| 3 | Rnt i | FrE | Water System Freeze Prevention Function (YES / NO) To activate or deactivate water system freeze prevention function when unit is OFF. |
| 4 | TANK | con | Tank Connection (YES / NO) To set tank connection. Note: If select "Tank connection" is "NO", Set 5 ~ 14 are skipped. |
| 5 | SOLAR | Priy | Solar Priority (YES / NO) To choose the solar use for water tank heat up. |
| 6 | HEAT | Priy | Heating Priority (YES / NO) To choose the room heating as priority during HEAT + TANK mode. Note: If select "Heating priority" is "YES", Set 7 ~ 8 are skipped. |
| 7 | HEAT | int | Heating operation Interval Set To set timer for Heat mode during HEAT + TANK mode (0.5hour ~ 10 hours). |
| 8 | TANK | int | Tank Heat-up Interval Set To set timer for Tank during HEAT + TANK mode (5minutes ~ 1hour 35minutes). |
| 9 | BOOSTER | htr | Booster Heater Function (YES/NO) To activate or deactivate tank booster heater function. Note: If select "Booster heater function" is "NO", Set 10 is skipped. |
| 10 | BOOSTER | dLY | Booster Heater Delay Timer Set To set delay timer for booster heater to ON if water tank temperature is not reached (20minutes ~ 1hour 35minutes). |
- Do not use the system during sterilization to prevent scalding or overheat during shower.
The sterilization function field settings must be configured by the authorized dealer according to local laws and regulation.
| 11 | StrL | Fun | Sterilization (YES/NO) To set sterilization, if required. Note: If select "Sterilization" is "NO", set 12 ~ 14 are skipped. |
| 12 | Str | Sterilization Day & Time Set To set timer for sterilization (only once a week, will operate even in standby condition). | |
| 13 | StrL | ba i | Sterilization Temperature Set To set temperature for sterilization function (40°C ~ 75°C). |
| 14 | Str | oPr | Sterilization Continue Time To set timer to maintain heating temperature in order to complete the sterilization function (5minutes ~ 1hour). |
BASIC OPERATION

TO TURN ON OR OFF THE UNIT
- When unit is ON, operation LED is lit and the actual temperature for water outlet and outdoor ambient are shown on the remote control display.

- To turn ON or OFF the panel/floor heating operation.
- In this mode, the mono bloc unit will provide heating capacity to the system.
- HEAT + TANK MODE
- In this mode, the mono bloc unit will provide heating capacity to the sanitary tank and the system.
- This operation is not used when the sanitary water tank is not installed.
TANK MODE
- To turn ON or OFF the sanitary tank operation.
- In this mode, the mono bloc unit will provide heating capacity to the sanitary tank.

TO ENJOY QUIET ENVIRONMENT
- This operation reduces mono bloc unit noise. In this condition, it may cause decrease in heating capacity.

TO ENABLE THE BACKUP HEATER
- The backup heater provides extra heating capacity during cold outdoor temperature and only can operated at heat mode operation when he was enabled by pushing this button.
- The backup heater will automatically turn ON when the setting conditions is fulfilled.
- To disabled the Heater operation manually, press the respective button again.
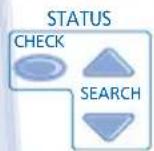
SYSTEM STATUS CHECK MODE
- Press CHECK for 5 seconds to enter STATUS mode.
- Press or to check the Water Inlet Temperature, Tank Temperature, Compressor Running Frequency or Error History.
Press CANCE to exit STATUS mode.
- Once STATUS mode is entered, "STATUS" indicator is ON.
STATUS mode cannot be activated when the "SETTING" indicator is ON.
ADVANCE OPERATION
It is strongly recommended to contact the nearest authorized dealer to change the water temperature range.
- Using the remote control could set the temperature range for water outlet temperature and outdoor ambient temperature.
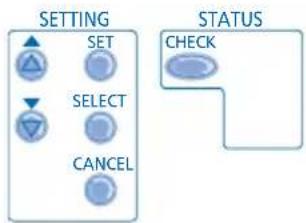
SYSTEM SETTING MODE
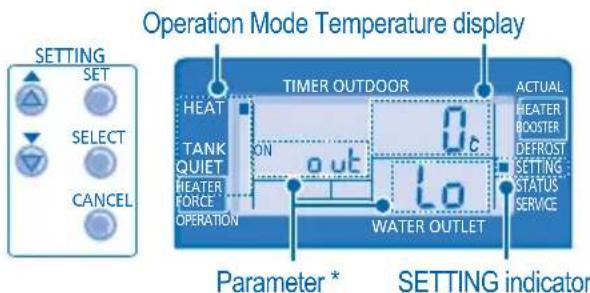
- Press SET for 5 seconds to enter "SETTING" mode. SETTING indicator is ON.
- Press or to choose a parameter.
- After selecting the desired parameter, press to enter the parameter.
- Press or to set the desired temperature.
- Press SET again to confirm the setting.
- Repeat steps 2 to 5 to set other parameters.
Operation Parameter \* Description Mode
HEAT 0ut Lo Low outdoor ambient set temperature (-15^ 15^) HEAT 0ut H1 High outdoor ambient set temperature (-15^ 15^) HEAT H20 Lo Water outlet set temperature at low outdoor ambient temperature (25^ 55^) HEAT H20 H1 Water outlet set temperature at high outdoor ambient temperature (25^ 55^) Water Temperature H20 Lo H20 H1 1
HEAT OFF Set temperature for turning OFF heating operation (5^ 35^) HEATER oont Outdoor ambient set temperature for turning ON heater operation (-15^ 20^) TANK SET Sanitary tank set temperature (40^ 75^)
WATER TEMPERATURE THERMO SHIFT SETTING
-
Press SET within 5 seconds.
-
Repeat steps 3 to 5 to set the desired shift temperature (-5^ 5^) .
Notes:
- Press or wait 30 seconds to exit "SETTING" mode.
- The setting temperature will be stored in the system once confirrm.
- "SETTING" mode cannot be activated when the "SERVICE" and "STATUS" indicator is ON.
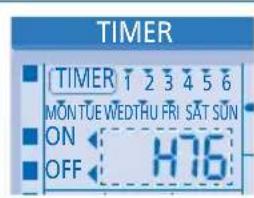
WEEKLY TIMER SETTING
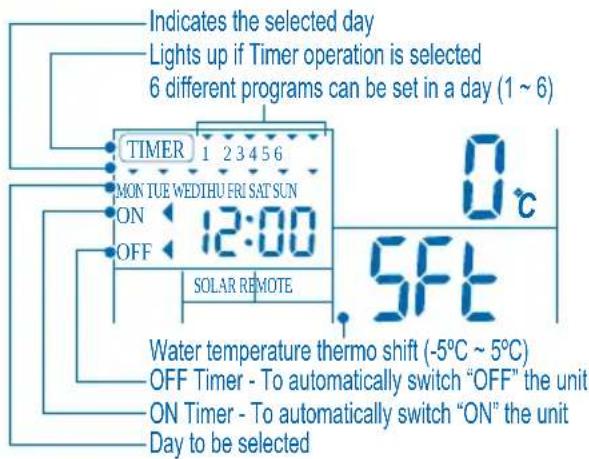
Function Step
Enter timer mode
Press
Set day & time
- Press or to select your desired day.
- Press to confirm.
- "1" will be blinking, press to set program 1.
- Press OFF/ON to select ON or OFF timer.
- Press or to select your desired time.
You can set , and desired shift temperature with timer.
- Press SET to confirm program 1. The selected day will be highlighted with .
After 2 seconds, the display will move to the next program.
7. Repeat steps 4 to 7 to set programs 2 to 6.
- During timer setup, if no button is pressed within 30 seconds, or if the button is pressed the setting at that moment is confirmed and timer setup is ended.
Add/Modify timer
Repeat the steps above.
Disable timer
Press, then press
Enable timer
Press, then press
Check timer
- Press
- Press or until your desired day is shown, press SELECT to confirm your selection.
- Press or to check the set programs.
Cancel timer
- Press TIMER
- Press or until your desired day is shown, press
- Press to enter program setting.
- Press or until your desired program is shown.
- Press to cancel the program.
SELECT to confirm your selection.
Notes:
- You can set the Timer for each day of the week (Monday to Sunday) with 6 programs per day.
- When the unit is switched on by the ON TIMER, it will use the previously set temperature to control the water outlet temperature.
- Same timer program cannot be set in the same day.
- You may also select collective days with same timer setting.
- Promotes energy saving by allowing you to set up to 6 programs in any given day.
MONO BLOC UNIT
MONO BLOC UNIT
In case of a power supply failure or pump operating failure, drain the system (as suggested in the figure below).
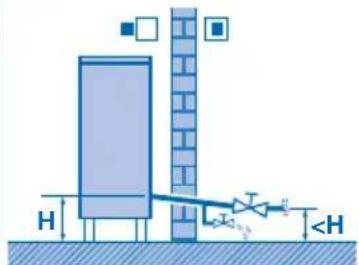
When water is idle inside the system, freezing up is very likely to happen which could damage the system.
- Do not obstruct the air inlet and air outlet vents, it may cause low performance or breakdown. Please remove obstacles to assure the ventilation.
During winter, please clean and remove the snow near mono bloc unit so that the snow does not cover the air inlet and air outlet vents.
EXTERNAL FILTER
- Please clean the external filter at least once a year. Fail to do so might cause filter clogged, consequent system breakdown. Please consult authorized dealer.
INSPECTION
In order to ensure optimal performance of the unit, seasonal inspections on the unit, external filter and field wiring have to be carried out at regular intervals. This maintenance should be carried out by authorized dealer.
- Clear any obstruction at the air inlet and air outlet vents of mono bloc unit.

FOR EXTENDED NON-USE
- Do not switch off the power supply. Switching off the power supply will stop the automatic water pump operation and cause the water pump jammed.
NON SERVICEABLE CRITERIAS
TURN OFF POWER SUPPLY then please consult authorized dealer under the following conditions:
Abnormal noise during operation.
Water/foreign particles have entered the remote control.
- Circuit breaker switches off frequently.
Power cord becomes unnaturally warm.
TROUBLESHOOTING
The following symptoms do not indicate malfunction.
| SYMPTOM SYMPTOM CAJ | CAUSE |
| Flowing sound during operation. | · Refrigerant flow inside the unit. |
| Operation is delayed a few minutes after restarting. | · The delay is a protection to the unit's compressor. |
| Mono bloc unit emits water/steam. ▷ · Condensation or evaporation occurs on pipes. | |
| Mono bloc unit emits steam during heating mode. | · This is due to defrost operation happens at the heat exchanger. |
| Mono bloc unit does not operate. ▷ · When the outdoor temperature is out of the operation condition range, the heatpump system enter protection control. | |
| (Mono bloc) Air-to-water Heatpump system operation will turn off. | ·The heatpump system enter protection control. Compressor stops by water inlet temperature lower than 18°C; and backup heater power turn on by water inlet temperature lower than 23°C. |
| System difficult to heat-up. | ·When heating is operated together with floor heating or panel heater simultaneously, there may be case where warm water temperature is getting lower and cause floor heating or panel heater heat-up is weaken. ·When outdoor air temperature is low, it may be diffi cult to get warm. ·Is the snow pile blocking the discharge outlet or intake inlet of mono bloc unit. ·When water outlet set temperature is low, it may be diffi cult to get warm. |
| System cannot get warm instantly. | ·Due to the nature of the heatpump system, it may take some time to heat-up the water if the unit is operated from cold-start. |
| Backup heater turn ON automatically when it is not enabled. | ·The turn ON of backup heater is a protection to the indoor unit's heat exchanger. |
| Operation starts automatically even without ON Timer. | ·The sterilization timer has been set. |
Check the following before calling for servicing.
| SYMPTOM | CHECK |
| Heating operation is not working efficiently. | • Set the temperature correctly. • Is the panel heater valve closed. • Clear any obstruction at the air inlet and air outlet vents of mono bloc unit. |
| Noisy during operation. | • Check if the unit has been installed at an incline or the cover is not closed properly. |
| The unit does not work. | • Check if the circuit breaker is tripped. |
| Operation LED is no lit or remote control display is blank. | • Is the power supply off or power failure. |
The operation LED blinks and error code appear on remote control display.
- Turn the unit off and reveal the error code to authorized dealer.
- Timer operation cancel when error code occur.
Force Heater Mode Button
FORCE

-
In case of a failure of the (Mono bloc) Air-to-Water Heatpump system, the backup heater can be used to heat up the heating water. Press FORCE to switch on the backup heater.
-
Press OFF/ON to stop the force heater operation.
- During Force Heater mode, all other operations are not allowed.
Auto to o nma poeioeioei
PnqnoTpo Tpaumatio.

Auto to o nma Tpoeiotoie IPOOXMA Tpaumatoo n cniia o e Tepiouia.
Oi obnyieC TIOI PPETEIA aKOLOUeNtouv KATNYOPIOIOUVTAI OuPwva ta TAPAKATW OUoBoLa:

AutoTo Evpeia Tou ANATOPEYETAI.


Auta ta 8nawovv evepyieC Tou eivai YINOxPEOTIKEs.

NPOEIAOONIOH2H
MONAAMONOBLOCK

H oukeun autn de Tpoopicietai yxon an ao atoua (oumtipiaabavovevuv twv taibow) me eiuwec quikcs, n vontikcs IKAVOTNTES, n xupic emteipia kai yywn, ektc av bpiokovtai uto Ettnpan n toupexovtai oynies oxetiká me t npan nsc oukeuns EIOYRIAE mteuvo yia tvn aopaleia touc. Ta piai piptei va ettnnpovtai yia va eaoapalotei ot dev taizov u n oukeun.
IapakaleioTE va ouboualeeite TOV eouoioobtnueo avntipooWIO n EIOKO yia va kaBapioTe ta eoTepika eapntmuata,va ETIOKEuaTe,va EykataoTneTe,va aapeoTe kai va TnaveykaataoTneTe tn ovoa. H Akatalnn EkyataoTaon kai o akatalanoc xepiOc Oa Tpokaleoudeltappno, nleKtpoiNjia n npkayia.
Kata tynETIOKEun nTo oepic Tou uuktiKou ouotnauoC, ETHIEBAIWOTe
ME eOouIOBDOTnEvo AVITIPOsWTO n EIDIKo Tn xPon Tou KAOpioEvou
TUTOU uukTIkOU. H xPon AALou uukTIkOU aTO Tov KAOpioEvO TUO
EVEXeai va TpokaeoBlaBn OTO TPOiov, TpaumatioK.

Mny EkyaIOTATE Tn Movadae TINVAE KEPKTKN H EUPLAKTN ATUOOPaipa.
EPOOV auto Dvivei, to aTOTeAeua MiTOpei va eivai atuxna
TIUPKAIAc.
Mny Eiayetye daxtuHa n aaaa avitkeiueva eoaa otynovova monoblock, ta Tepiotpefoeva np ttopeia vipokaleouv tpaumio.

Mny ayiyizete nvyovaba monoblock kata tn diapkeia tou wtiqou, mtopei va npokalaeoi nAekptopnIgia.
FIA NA ENEPRONOIHSETE (ON) TH NA ANENEPRONOIHSETE (OFF) TH ΣYΣKEYH
Otv n movada evai evepytoinuevntoLED aitoupyia eivai avampevo kai epaici t npexouo aepukpaa TgEodou Tou vpu kai ngwepikn oepukpaa Tpiipalauovtocnv oovn tou nlexeiipntiou.

TIA THN ENIANOH TOY TPONOY AEITOYPTIA

HEAT HEAT +TANK TANK
- TPOIOE AEITOYPTIAE OEPMANZH
Akupwate ToV xpoovdiokottn
Pantjote
- Patnote n yia va etiieeTe Tnv etiBunnt oac nhepa.
- Natnote yia va eIeBaeiwoTe. SELECT
- H evdeiEg "1" 0a avaoBnvei, Tnntote yia va puthetae To npoypma 1.
- Patnote yia va etiAeEte Tov xpvovdiakotttn oe tcn ON n OFF.
- Pataote yia va etiAeEte Tnv eHountn taac wpa.
Mtopeite va puBmuote Tov tpTo aeitoupyiae Kai Tnv Etnuunn aalayn
Eepokpiaic e To xpvodiaokotn.
- Pntote yia va eTBeBaiwTo To npoypauma 1.H eTleyeiognepaTaenq
Meta aio 2 deutepeoAeTTa, 0a atieKovIOtei to eTOevo TPOpypa. - EmavaaBata Ta hmuata 4 wcs 7 ia va puthetaiote ra npoypaumuata 2 w6 6.
KaTn diapkeia nC pOuHIOng XPOVoiAIOKOTn av dev nATnei kaveva KOUPTI e0 30
DeutepoAeTTa, n av nATnei to KOUPTI SET, n pOuHIOAN autnc tsN otivuNC EITIEBAWvETAI KA n
puOuHIOIN tou XPOVoiAIOKOTn Exei TEAEWOEi.
Emavaalabareaavotepwbnmuata.
TIMER CANCEL
TATnATE ,UOTepa TATnote SET
TATnATE ,UOTepa TATnote
- PatrnoTE
- Pnntote n EwC otou eepavioe i n tihuuntn oac npepa, Tnntote vi a vtebaiaotet nTv etiayn oac.
-
Patnote yia va eayeTe Ta puOmuOevTa PPOpypmaata.
-
Patrnte
- nntne n eos otou eapovitei n etiouunn oac nepa, nntote yia va etiiebaiaoe Tnv enioyn oac.
- Pataote yia va EIaayete Tn puOuion Tou pOpypaMatoC
- Pntnate n EwCOTou EupavioTeI TO EITBunTo OaTIPoypaMa. CANCEL
- PatnoTe yia va acupuoteTo TpOpypaua.
Σηειώεις:
Mtopeite va puoioeTe To xpvodiaokontn ia kahe epa ta ts eboaadac (Eutepa EwCupiaek) 6 npoypamata nynnepa.
Otav n movabaevpyoioi aio tov ON TIMER, 0a xpoiaipoiioe i tv TEautaia puoiuevni eepokpaoia yia tov Eeyxo ts Oepukpaia c Eobou vpo.
To iio npoypa ma xpovoiaokomn dev mtoepi va puthetai te nvi ia pa.
Mtopeite etions va etiAeEge suykevtpwikia napec ie tv ia pbiion xpvodiaakottn.
PpOwEi Egoikovogon Evepyiae TITPTovrac oa va puOmuTe ews kai TPOpyapMaT OTOIAHNTOTe Dotheia a nppea.
MONAGA MONOBLOCK

MONADA MONOBLOCK
CINNOST ZÁLOZNIHO TOPENÍ
NASTAVENI TEPLOTNIHO POSUVU VODY
Information for Users on Collection and Disposal of Old Equipment
These symbols on the products, packaging, and/or accompanying documents mean that used electrical and electronic products should not be mixed with general household waste.
For proper treatment, recovery and recycling of old products, please take them to applicable collection points, in accordance with your national legislation and the Directives 2002/96/EC and 2006/66/EC.
By disposing of these products correctly, you will help to save valuable resources and prevent any potential negative effects on human health and the environment which could otherwise arise from inappropriate waste handling.
For more information about collection and recycling of old products, please contact your local municipality, your waste disposal service or the point of sale where you purchased the items.
Penalties may be applicable for incorrect disposal of this waste, in accordance with national legislation.
For business users in the European Union
If you wish to discard electrical and electronic equipment, please contact your dealer or supplier for further information.
[Information on Disposal in other Countries outside the European Union]
These symbols are only valid in the European Union. If you wish to discard these items, please contact your local authorities or dealer and ask for the correct method of disposal.
Authorized representative in EU
Panasonic Testing Centre
Panasonic Marketing Europe GmbH
Winsberging 15, 22525 Hamburg, Germany