
CQDVR909N - Car stereo PANASONIC - Free user manual and instructions
Find the device manual for free CQDVR909N PANASONIC in PDF.
Download the instructions for your Car stereo in PDF format for free! Find your manual CQDVR909N - PANASONIC and take your electronic device back in hand. On this page are published all the documents necessary for the use of your device. CQDVR909N by PANASONIC.
USER MANUAL CQDVR909N PANASONIC
PRODUCT. HOWEVER THIS PRODUCT USES A
OPERATE THIS PRODUCT CORRECTLY AS
USE OF CONTROLS OR ADJUSTMENTS OR
PERFORMANCE OF PROCEDURES OTHER
THAN THOSE SPECIFIED HEREIN MAY RESULT
OPERATION! This product incorporates copyright protection technology that is protected by method claims of certain U.S. patents and other intellectual property rights owned by Macrovision Corporation and other rights owners. Use of this copyright protection technology must be authorized by Macrovision Corporation, and is intended for home and other limited viewing uses only unless otherwise authorized by Macrovision Corporation. Reverse engineering or disassembly is prohibited.
NOT FOR USE WHERE VIDEO MONITOR IS VISIBLE TO DRIVER TO AVOID RISK OF SERIOUS INJURY OR POSSIBLE VIOLATION. ❐ Precautions Volume Level For your driving safety, keep the volume level low enough to be aware of road and traffic conditions. Car Washing To avoid electrical shorts which may cause fire, or other damage, do not expose this product (including the speakers and discs) to water or excessive moisture. Car Ventilation If your car is parked for several hours in direct sunlight, the temperature inside the car may become very high. It is advisable to drive the car and give the interior a chance to cool down before switching the unit on. Power Supply This product is designed to be used in a car having a 12-Volt negative ground battery system. Disc Mechanism Do not insert coins or any small objects. Keep screwdrivers and other metallic objects away from the disc mechanism and disc. Protect the DVD Software When you leave the car, be sure to eject the disc from this unit and bring it out. Service This product is made of precision parts. Do not attempt to disassemble or adjust any parts. For repair, please consult your nearest authorized Panasonic Service Center. Note: ≥ The preset memory is cleared to return to the original factory setting when the power connector or battery is disconnected.CQ DVR909N
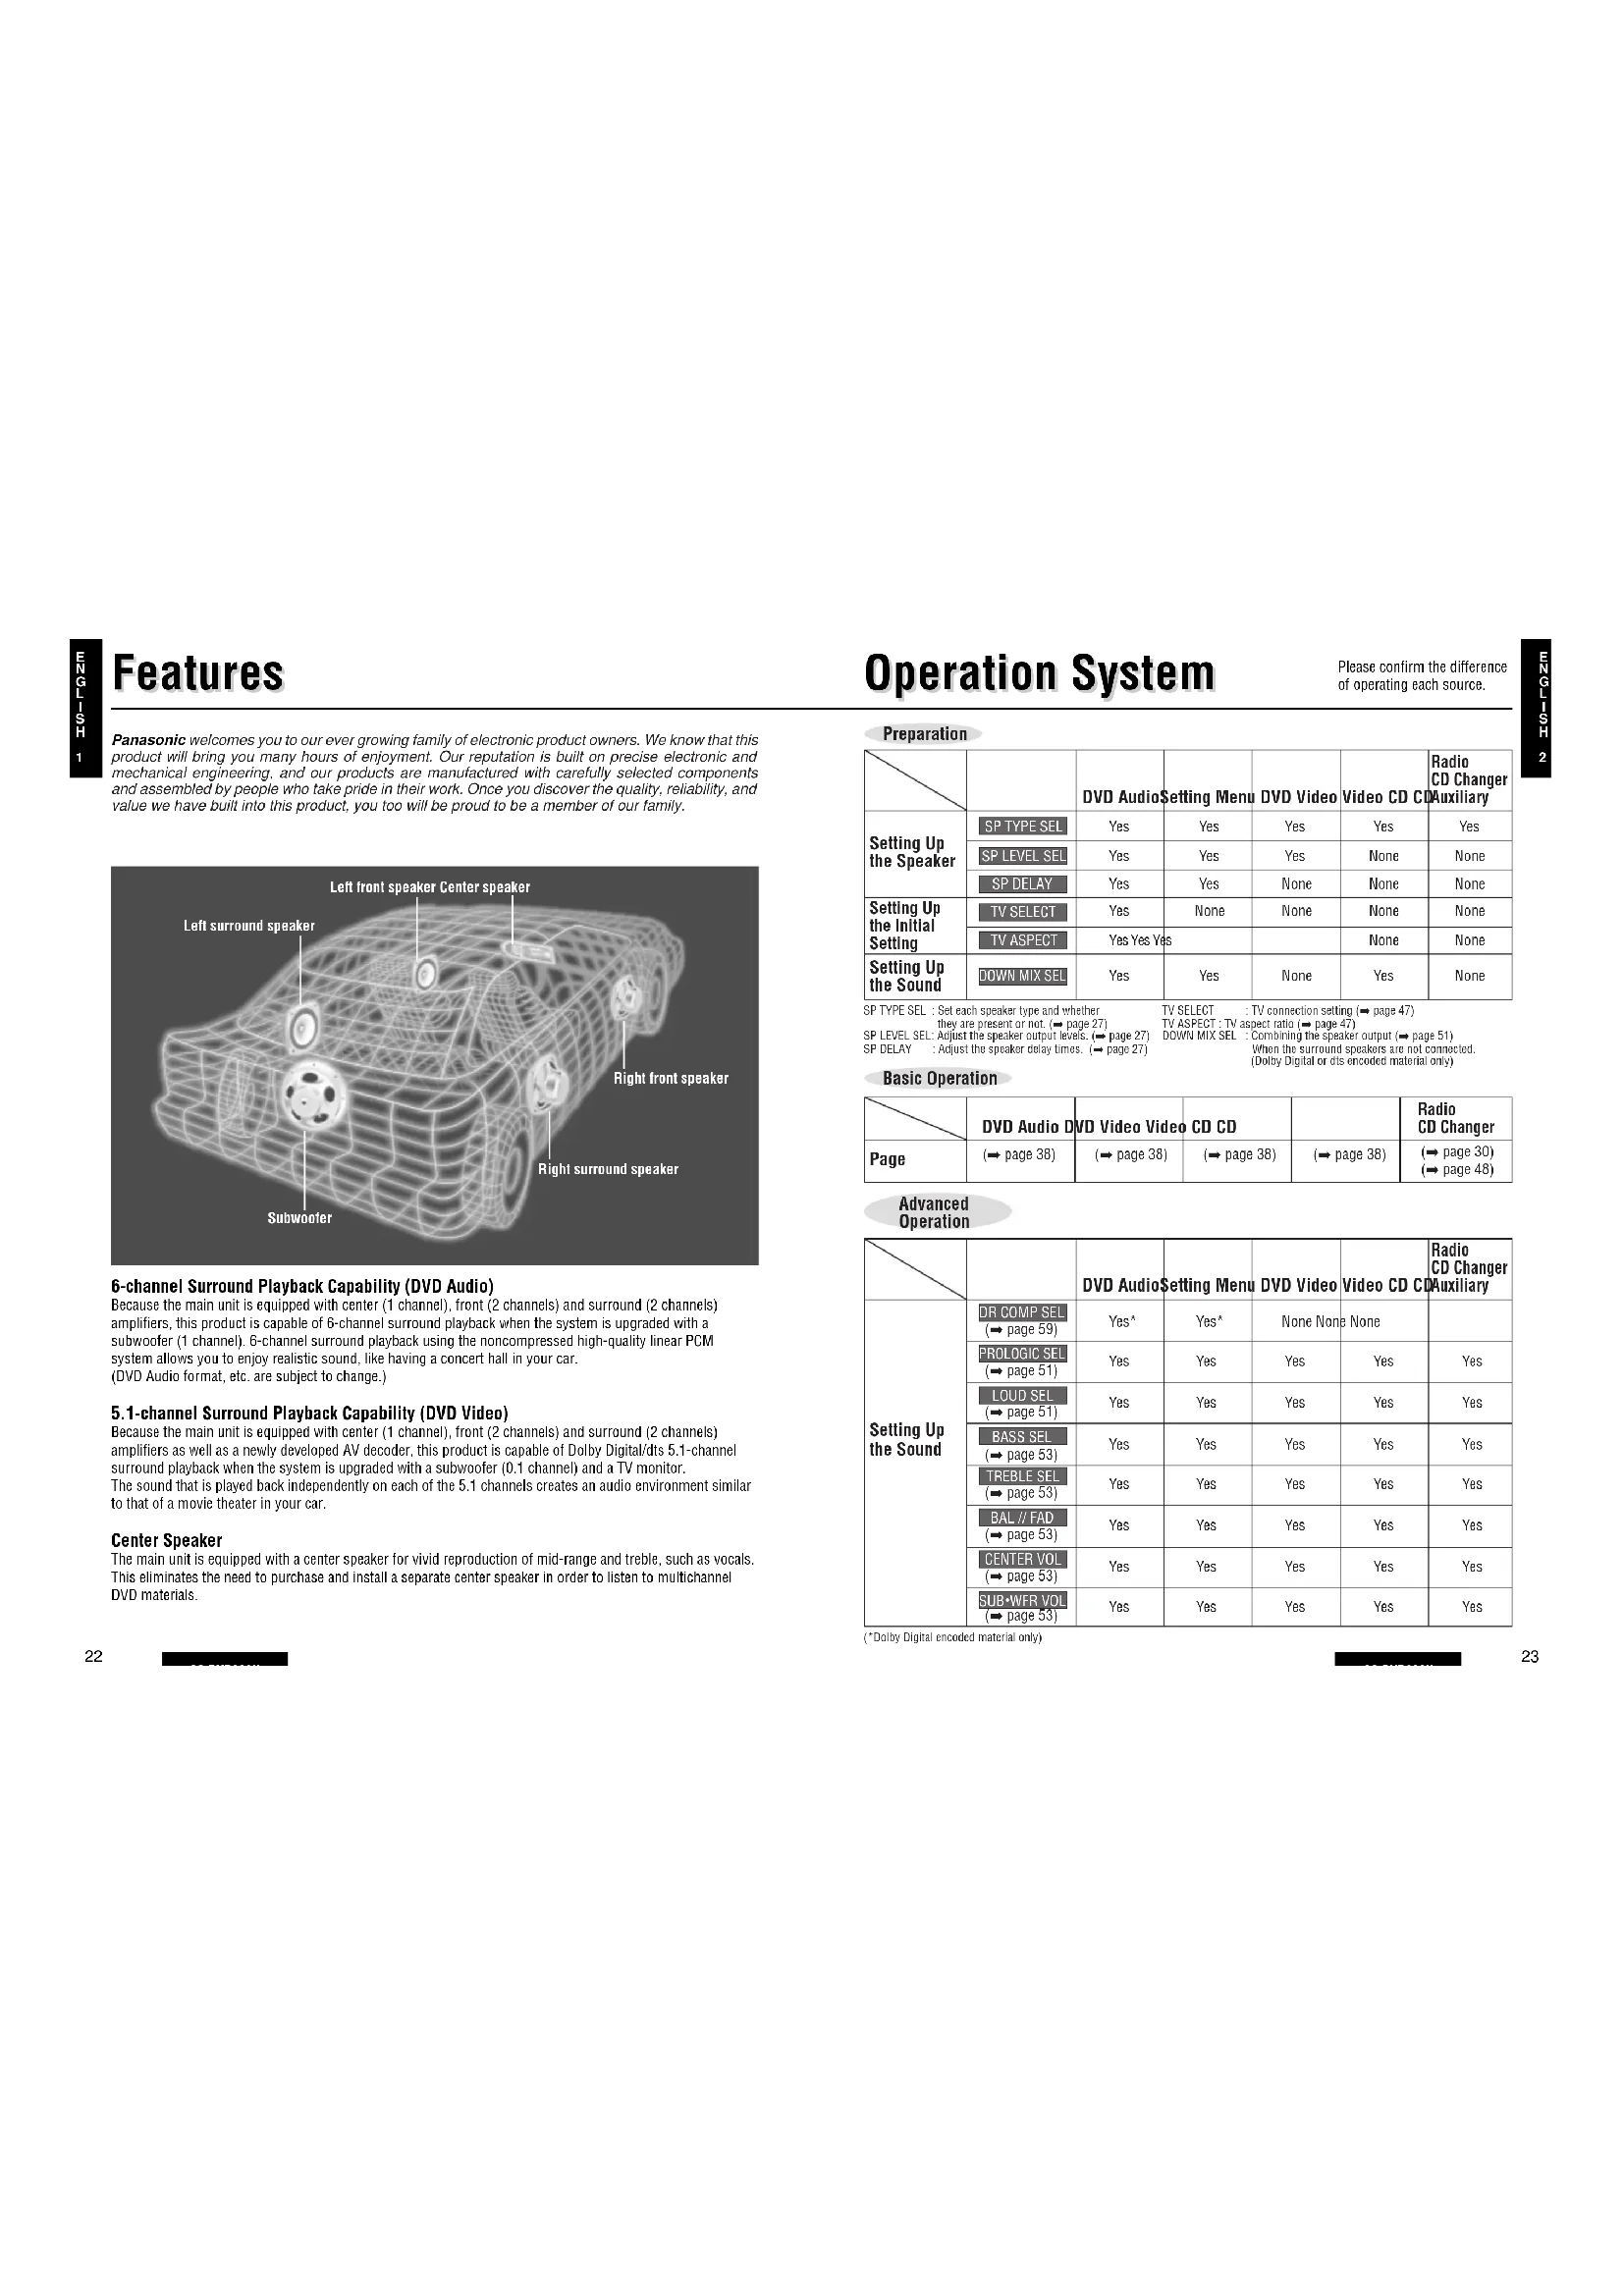
Features Features Operation System Operation System Panasonic welcomes you to our ever growing family of electronic product owners. We know that this product will bring you many hours of enjoyment. Our reputation is built on precise electronic and mechanical engineering, and our products are manufactured with carefully selected components and assembled by people who take pride in their work. Once you discover the quality, reliability, and value we have built into this product, you too will be proud to be a member of our family. Left surround speakerLeft front speaker Center speakerRight front speakerRight surround speakerSubwoofer 6-channel Surround Playback Capability (DVD Audio) Because the main unit is equipped with center (1 channel), front (2 channels) and surround (2 channels)amplifiers, this product is capable of 6-channel surround playback when the system is upgraded with asubwoofer (1 channel). 6-channel surround playback using the noncompressed high-quality linear PCMsystem allows you to enjoy realistic sound, like having a concert hall in your car.(DVD Audio format, etc. are subject to change.) 5.1-channel Surround Playback Capability (DVD Video) Because the main unit is equipped with center (1 channel), front (2 channels) and surround (2 channels)amplifiers as well as a newly developed AV decoder, this product is capable of Dolby Digital/dts 5.1-channelsurround playback when the system is upgraded with a subwoofer (0.1 channel) and a TV monitor. The sound that is played back independently on each of the 5.1 channels creates an audio environment similarto that of a movie theater in your car. Center Speaker The main unit is equipped with a center speaker for vivid reproduction of mid-range and treble, such as vocals.This eliminates the need to purchase and install a separate center speaker in order to listen to multichannelDVD materials.Please confirm the differenceof operating each source. Yes Yes Yes Yes Yes Yes Yes Yes Yes* Yes Yes Yes Yes Yes Yes Yes Yes* Yes Yes Yes Yes Yes Yes Yes Yes Yes Yes Yes Yes Yes Yes Yes Yes Yes Yes Yes Yes Yes Yes Yes Yes Yes Yes Yes Yes Yes Yes Yes Yes Yes Yes Yes None None None None Yes None None None None None None None None None None None None Yes Radio CD Changer Auxiliary DVD AudioSetting Menu DVD Video Video CD CD Radio CD Changer Auxiliary DVD AudioSetting Menu DVD Video Video CD CD Radio CD Changer DVD Audio DVD Video Video CD CD Setting Up the Speaker (➡ page 30)(➡ page 48) Setting Up the Initial Setting Setting Up the Sound Page Setting Up the Sound SP TYPE SELSP LEVEL SELSP DELAYTV SELECTTV ASPECTDOWN MIX SEL Preparation Basic Operation Advanced Operation SP TYPE SEL : Set each speaker type and whether they are present or not. (➡ page 27)SP LEVEL SEL: Adjust the speaker output levels. (➡ page 27)SP DELAY : Adjust the speaker delay times. (➡ page 27)TV SELECT : TV connection setting (➡ page 47)TV ASPECT : TV aspect ratio (➡ page 47)DOWN MIX SEL : Combining the speaker output (➡ page 51)When the surround speakers are not connected. (Dolby Digital or dts encoded material only) (➡ page 38) (➡ page 38) (➡ page 38) (➡ page 38) DR COMP SEL(➡ page 59)(*Dolby Digital encoded material only)PROLOGIC SEL(➡ page 51)LOUD SEL(➡ page 51)BASS SEL(➡ page 53)TREBLE SEL(➡ page 53)BAL // FAD(➡ page 53)CENTER VOL(➡ page 53) SUB
Setting Up the Speakers Setting Up the Speakers Discs that can be Played Back Discs that can be Played Back Inserting and Replacing the Batteries ≥ Type used: 2 AA dry cells (R6PU) ≥ Battery life: Approximately 5 months under normal use (when using manganese batteries at room temperature) Preparing the Remote Control Preparing the Remote Control Make sure the + and - terminalsare oriented correctly.
Region Management Information Region Management Information: This product is designed and manufactured to respond tothe Region Management Information that is recorded on a DVD disc. If the Region numberdescribed on the DVD disc does not correspond to the Region number of this product, thisproduct cannot play this disc.The Region number for this product is “2” and “ALL”.
Region numberVideo formatDisc sizeMark (logo)Disc ❐ The following discs can not be played back on this product. ≥ DVD-ROM ≥ DVD-R/DVD-RAM ≥ CD-ROM ≥ VSD ≥ CDV ≥ CD-G ≥ SACD ≥ photo CD ≥ CD-R* ≥ some dts CD discs ≥ CD-EXTRA (audio-only playback possible) ≥ DVDs with a region number other than “2” or “ALL”(*Because this product has its own reading device, CD-R discs can not be played back.) DVD Audio PAL/NTSC* 12 cm 8 cm PAL/NTSC* PAL/NTSC*
To reproduce the surround sound correctly, first set and adjust the speakers in the sequenceshown below.
Speakers that are Used Speaker Setup Display Speaker Setup Procedure Front speakers Use the type of speakers that are built into thedriver’s door and the passenger’s door. Center speaker We recommend you to use the speaker that isbuilt into this unit. When using a separatespeaker, install the speaker near the centerconsole of the car, or near the dashboard. Surround speakers Use the type of speaker that is used on the leftand right side of the rear of the passengercabin, or that is built into the rear deck. Subwoofer Because the positioning of the sound from thesubwoofer is not as dependent on theinstallation location as it is with otherspeakers, the subwoofer can be placedanywhere desired. (A separate subwooferamplifier is required.)
Set each speaker type and whether they are present or not. (➡ page 26)
Adjust the speaker delay times. (➡ page 26) After setting
, set the sound. (➡ page 50) Left surround speaker(L-SURROUND)Left front speaker(FRONT-L)Center speaker(CENTER)Right front speaker(FRONT-R)Right surround speaker(R-SURROUND)Subwoofer(SUB-WOOFER)Note: ≥ If this unit is going to be used without the installation of the surround speakers or subwoofer, set the speaker setting to suit the speaker system to be used. (➡ page 26)Move a cover with pressing down.*This product can play discs recorded in either PAL or NTSC format. However, the product must be connectedto a PAL TV which is capable of receiving PAL 525/60 system to play both PAL DVD (Video CD) and NTSCDVD (Video CD).E
Setting Up the Speakers Setting Up the Speakers (continued) (continued) Indicates pressing a button.Indicates pressing a button for an extended period of time.
Select the setting menu
Switch to setting mode.
Select the setting menu. Notes: Press [DISP] to complete the settingprocedure. (The unit returns to regular mode.)≥ The unit completes the setting procedure ifno buttons are pressed for 10 seconds.(The unit returns to regular mode.) (Whenadjusting the speaker output level, the unitwill wait 18 seconds.) Make settings
for all speakers.≥ The icon corresponding to the speakertype, which is currently being set, blinks.
Preparation: ≥ Turn on the power. (Main unit: ) ≥ Open the center speaker. (Main unit: ) When you adjust the speaker output levels, switch to the disc mode and operate while stopped. (➡ pages 38, 40) POWER SOURCE PressPress SOURCE POWER SPEAKER OPEN/CLOSE C.SP
Set Each Speaker Type and whether They are Present or NotLARGE : Large speaker. When bass playback is possible. (100 Hz or lower is the target.)SMALL : Small speaker. When bass playback is not possible.NONE : When not using a center speaker that was purchased separately.YES : When using a subwoofer.NO : When not using a subwoofer.Note:≥ If “SMALL” or “LARGE” is set for
C” (the optional center speaker), the attached centerspeaker of this unit is not operated. Otherwise, “NONE” should be set.SP TYPE SEL Adjust the Speaker Output LevelsUsing a test signal, adjust the audio output of each speaker so that the volume levelfrom every speaker sounds equal. (Adjustable range: 0 to 12 dB)Adjust the Speaker Delay TimesSet a delay for the output from center and surround speakers so that the sound from theother speakers reaches the listening position at the same time as the front speakers.(Adjustable ranges: Center speaker 0 to 4 ms Surround speaker 0 to 15 ms)SP LEVEL SEL SP DELAYThe test tone sounds for 2 seconds at each speaker in the following sequence:
To adjust the test signalvolume: VOLUME ["]: Increases level.[#]: Decreases level.12["]: Increases delay.[#]: Decreases delay.Note:≥ The test signal is not output from a speaker for which “ ¶” was set. (➡ page 53)Note: ≥ The center speaker can be adjusted only while playing back Dolby Digital encoded material. CENTER : 0 ms SUR : 0 ms SUB
C LARGEFRONT : SMALL(Center speaker, sold separately)FRONT : LARGE
(Front speaker) (Surround speaker) (Subwoofer)
(left front) (right surround) (left surround) (subwoofer) (center)(right front)