
Lumix DMWYAGHE - Camera PANASONIC - Free user manual and instructions
Find the device manual for free Lumix DMWYAGHE PANASONIC in PDF.

| Product type | Audio/video interface unit for Panasonic DMC-GH4 digital camera |
| Brand | Panasonic |
| Model | Lumix DMWYAGHE |
| Power supply | 12 V DC (11 V to 17 V), 1.4 A |
| Weight | 750 g (excluding protrusions and HDMI connection plug) |
| Video output | HDMI Type A, SDI (4 outputs, 1.5G/3G) |
| Video resolution | Cinema4K (4096×2160 24p), 4K (3840×2160 29.97p/25p/24p), Full HD |
| Bit depth | 8 bits/10 bits |
| Audio | 2-channel XLR input (LINE/MIC/+48V), 2-channel PCM HDMI output, SDI output with embedded 2-channel audio |
| Time code input | BNC TC IN (LTC) |
| Compatibility | Panasonic DMC-GH4 digital camera |
| Ventilation | Air intake and exhaust |
| Operating temperature | 0°C to 40°C |
| Operating humidity | 10% to 80% (no condensation) |
| Tripod mount | 1/4-20 UNC and 3/8-16 UNC holes |
| Safety | Do not expose to rain or moisture; use only with DMC-GH4; refer servicing to qualified personnel |
| Maintenance | Wipe with a soft dry cloth; do not use solvents |
| Included accessories | Connection plug caps, connector covers |
Frequently Asked Questions - Lumix DMWYAGHE PANASONIC
User questions about Lumix DMWYAGHE PANASONIC
0 question about this device. Answer the ones you know or ask your own.
Ask a new question about this device
Download the instructions for your Camera in PDF format for free! Find your manual Lumix DMWYAGHE - PANASONIC and take your electronic device back in hand. On this page are published all the documents necessary for the use of your device. Lumix DMWYAGHE by PANASONIC.
USER MANUAL Lumix DMWYAGHE PANASONIC
Operating Instructions
Bedienungsanleitung
Mode d'emploi
Please read these instructions carefully before using this product, and save this manual for future use.
- To reduce the risk of fire, do not expose this equipment to rain or moisture.
- To reduce the risk of fire, keep this equipment away from all liquids. Use and store only in locations which are not exposed to the risk of dripping or splashing liquids, and do not place any liquid containers on top of the equipment.
WARNING:
Always keep accessory (terminal cap) out of the reach of babies and small children.
CAUTION:
Do not remove panel covers by unscrewing.
No user serviceable parts inside.
Refer servicing to qualified service personnel.
CAUTION:
In order to maintain adequate ventilation, do not install or place this unit in a bookcase, built-in cabinet or any other confined space. To prevent risk of fire hazard due to overheating, ensure that curtains and any other materials do not obstruct the ventilation.
CAUTION:
To reduce the risk of fire and annoying interference, use the recommended accessories only.
CAUTION:
Do not leave the unit in direct contact with the skin for long periods of time when in use.
Low temperature burn injuries may be suffered if the high temperature parts of this unit are in direct contact with the skin for long periods of time.
When using the equipment for long periods of time, make use of the tripod.

indicates safety information.
CAUTION:
Do not lift the unit or the camera with a tripod attached.
The additional weight on the unit from the attached tripod may damage the connection between the unit and the camera, and may result in injuries.
When a tripod is attached, always carry the equipment by the tripod.
indicates safety information.
The rating plate is on the underside of the unit.
EEE Complies with Directive of Turkey.
ENGLISH
The unit is exclusively for Panasonic DMC-GH4 digital camera.
Mounting the unit to a digital camera allows you to output 4K, 3G-SDI, and HD-SDI compatible video from the SDI terminal and perform video production with higher-quality video.
Two-channel audio input (XLR) is supported with audio level meters available.
You can also input an external timecode to be used as a reference signal.
- When the unit is mounted on a digital camera, the electronic sound and electronic shutter sound of the digital camera are disabled.
Contents
Read this first! 2
Switching the Video Output 9
Accessories 5
Additional Menu 10
Names and Functions of Components 6
Specifications 12
Mounting to the Digital Camera 8
Handling the unit
- The unit is not splash proof or dust proof.
Be careful not to allow sand, dust, or water to adhere or enter into the terminal area, digital camera, or this unit when attaching or removing this unit.
- This unit is not waterproof, so it cannot be used underwater.
-
Do not subject the unit to strong shocks or vibration. Doing so may result in malfunction or damage.
-
When the unit is mounted on the digital camera, do not use the shoulder strap supplied with the digital camera. Always hold both the digital camera and the unit while carrying.
-
Keep the unit away from insecticide sprays and other volatile substances.
If the unit is exposed to these sprays or substances, its external case may deteriorate and/or its paint may come off.
-
Do not leave the unit in contact with any items made of rubber or PVC for prolonged periods of time.
-
Under no circumstances should the unit be used or stored in any of the following locations since doing so may cause trouble in operation or malfunctioning:
-
In direct sunlight or on a beach in summer
Near heaters, air conditioners or humidifiers - In locations with high temperatures and humidity
Where there is vibration
levels or where changes in temperature and humidity are acute - Inside a vehicle
Where there is fire -
Please also read the operating instructions of your digital camera.
-
Panasonic will not be liable for any direct or indirect damages or losses resulting from operation or malfunction of this product.
- The design and specifications found in this document are subject to change without notice and may differ from the actual product.
- If the unit's fan stops due to a malfunction or error and you continue to operate the unit, video output may not be performed properly.
Cleaning
When cleaning, wipe the unit with a dry soft cloth.
- When the unit is soiled badly, it can be cleaned by wiping the dirt off with a well-wrung wet cloth, and then with a dry cloth.
- Do not use solvents such as benzine, thinner, alcohol, kitchen detergents, etc., to clean the unit, since they may deteriorate the external case or the coating may come off.
- When using a chemical cloth, be sure to follow the accompanying instructions.
Accessories
- Be sure to dispose of the packaging materials in an appropriate manner after unpacking the unit.
The following supplied accessories come attached to the unit.
Names and Functions of Components
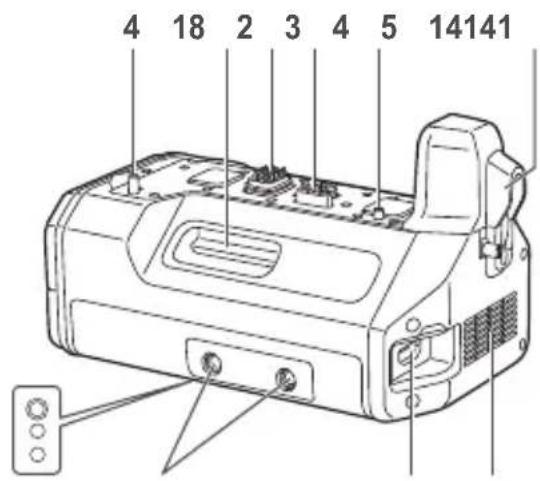
1 HDMI connection terminal
Connects to the digital camera's HDMI connector.
2 Electrical contacts
3 Interface contacts
4 Camera attachment pins
5 Attachment screw
6 Screw hole (1/4-20 UNC)
Attaches to PL lens compatibility adapters, etc.
7 HDMI terminal
HDMI Type A output terminal.
(VIERALinkisnotsupported.)
- Use a high-speed double-shielded 4K-compatible HDMI cable (up to 2m ) that is marked with the HDMI logo when connecting to this terminal.
8 DC IN terminal
Connects to the DC power supply (battery: 12 V DC).
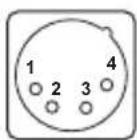
| Pin no. | Signal |
| 1 | GND |
| 2, 3 | — |
| 4 | 12 V |
| CASE | Frame GND |
Notes on DC power supply (battery)
- Verify that the output voltage matches the unit's voltage rating before connection.
- Use a rated output current that is equal to or higher than the unit's input current rating.
- Use a shielded cable that is less than 2m in length for the DC cable connecting the unit to the DC power supply (battery).
- An inrush current is generated when the digital camera is turned on. An insufficient power supply capacity when the power is turned on may result in malfunction. We recommend using a DC power supply (battery) that can provide at least twice the power consumption value of the unit.
Verify the pin positions of the output connector of the DC power supply (battery) and the unit's DC IN terminal, and be sure to connect with the correct polarities.
Connecting +12V power to the GND terminal may result in fire or malfunction.
Names and Functions of Components (continued)
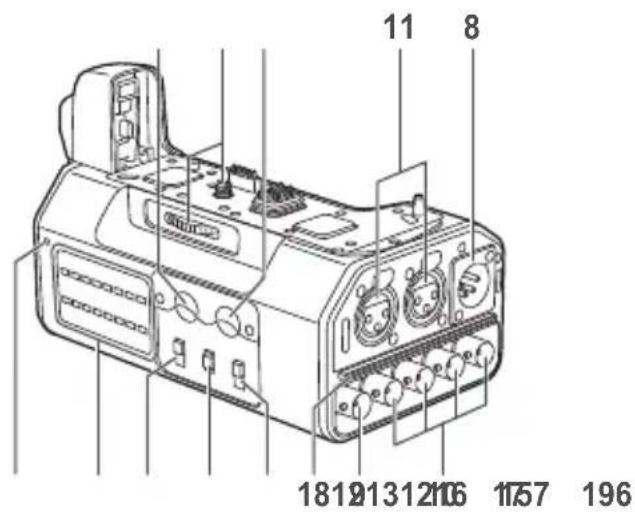
9 TC IN terminal (BNC)
Timecodes are input here.
Input a reference timecode to this terminal to synchronise the digital camera's timecode to that of external equipment.
- Use a 5C-FB equivalent double-shielded cable to connect to this terminal.
10 SDI OUT [1, 2, 3, 4] terminals (BNC)
Terminals reserved for SDI output.
| Resolution setting | Output terminal |
| C4K, 4K <1.5G-SDI Square Division> | 1 to 4 |
| FHD (1080/59.94p, 1080/50p) <3G-SDI> | 1, 2 (same signal) |
| FHD (Other than the above), HD <1.5G-SDI> | 1 to 4 (same signal) |
- Use a 5C-FB equivalent double-shielded cable to connect to this terminal.
- When outputting videos that do not include timecodes (e.g., when [Rec Format] is set to [MP4] on the digital camera), a timecode will not be output.
11 AUDIO IN [CH1, CH2] terminals (XLR, 3-pin)
Connects to audio equipment or microphones.
![PANASONIC Lumix DMWYAGHE - AUDIO IN [CH1, CH2] terminals (XLR, 3-pin) - 1](/content/2026/03/454410/images/53e3b18d5e348fb7513c86e05cb01fa15c663aa454613cb91d45678634b02dff.jpg)
| Pin no. Signal | |
| 1 GND | |
| 2 AUDIO IN (H) | |
| 3 AUDIO IN (C) | |
12 LINE / MIC / +48V switches
Switch these based on the audio equipment connected to the AUDIO IN CH1 or AUDIO IN CH2 terminal.
LINE:
When line input audio equipment is connected. (Input level: 0 dBu)
MIC:
When an external microphone is connected. (Input level: -50 dBu)
+48V:
When a phantom microphone (a microphone that requires a +48V power supply) is connected.
A power supply of +48V will be provided to the AUDIO IN CH1 and AUDIO IN CH2 terminals.
13 STEREO/MONO switch
Switches the audio that is input to the AUDIO IN CH1 and AUDIO IN CH2 terminals to stereo or monaural audio.
STEREO:
Two-channel stereo audio.
MONO:
Monaural audio.
The audio that is input to the AUDIO IN CH1 terminal will also be input to AUDIO IN CH2.
14 REC LEVEL dials
Adjust the audio inputs to the AUDIO IN CH1 and AUDIO IN CH2 terminals individually.
15 Level meters
Display individual indicators for the audio input levels of the AUDIO IN CH1 and AUDIO IN CH2 terminals.
The indicators light red when the audio levels exceed 0 dB.
Adjust the REC LEVEL dials (14) to prevent the audio levels from exceeding 0 dB.
16 Power indicator
Lights when the connected digital camera is turned on.
17 Tripod attachment holes
Compatible with 1/4-20 UNC and 3/8-16 UNC screws.
Use the appropriate hole according to the diameter of the tripod screw.
The holes have a depth of 5.5mm When attaching a tripod to the unit, do not tighten the screw with excessive force.
18 Intake vent
19 Exhaust vent
Mounting to the Digital Camera
- Make sure that a DC power supply is not connected to the unit's DC IN terminal and that the digital camera is turned off.
(Mounting or dismounting while the power is on may result in malfunction.)
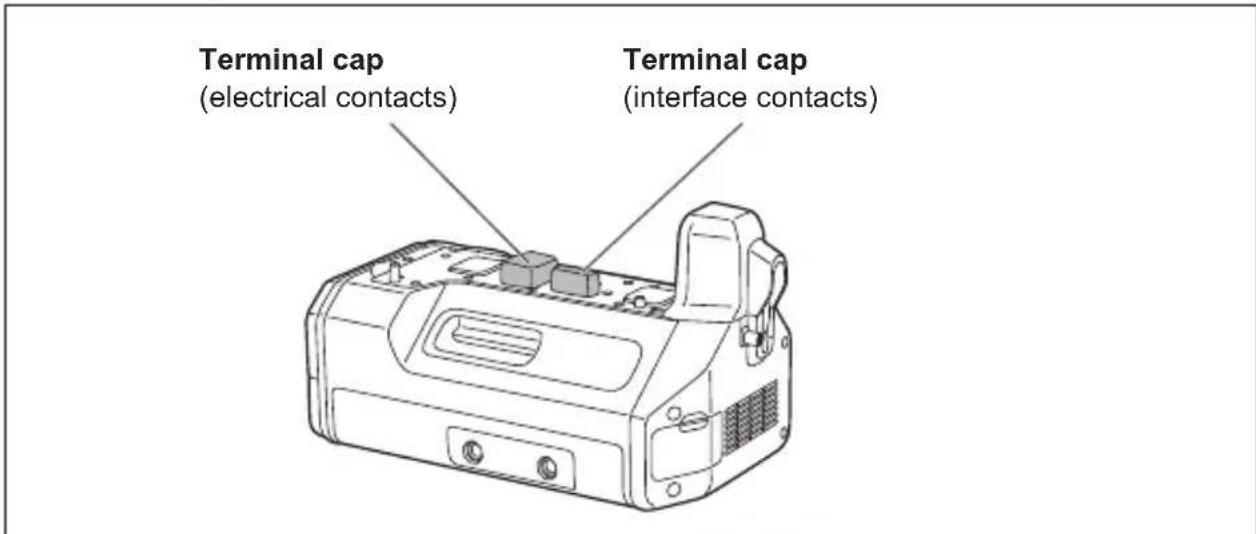
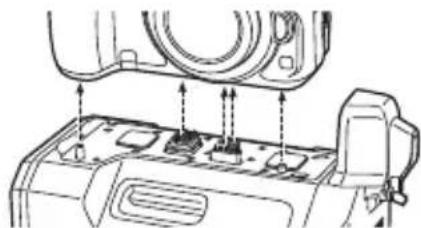
1 Remove the cover for the battery grip connector and cover for the interface unit connector on the digital camera, and remove the electrical contact and interface contact caps on the unit.
- Store the connector covers and contact caps safely to avoid loss.
- To protect the terminals, reattach the covers and caps after you finish using the unit.
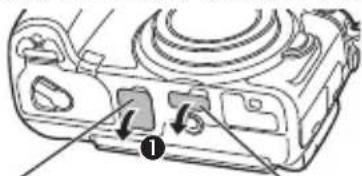
Cover for the battery grip connector
Cover for the interface unit connector
Terminal caps
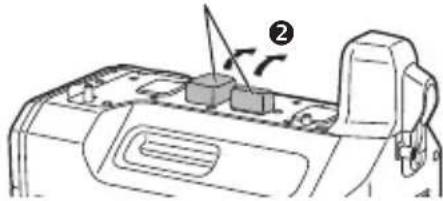
2 Loosen the HDMI connection terminal screw (A), and slide the HDMI connection terminal out to the side.
- Do not twist or pull the HDMI connection terminal with excessive force. Doing so may result in malfunction or damage.
3 Align the attachment screw, contacts, and camera attachment pins, and attach the digital camera.
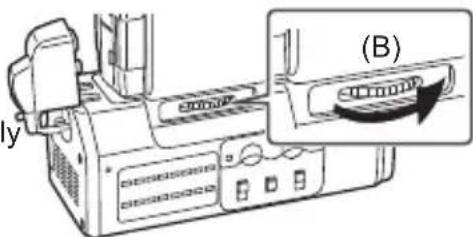
4 Rotate the attachment screw (B) in the direction of the arrow and tighten it securely.
- Verify that the attachment screw is tightened securely during use.
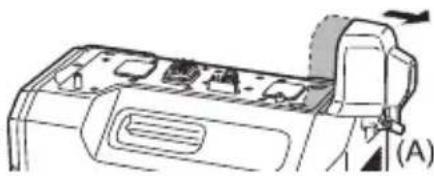
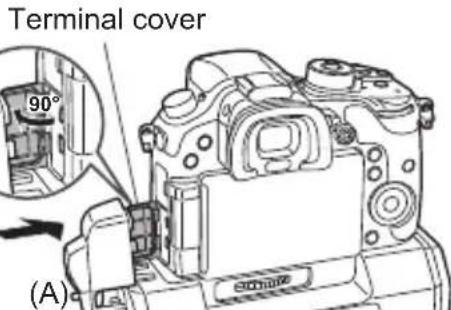
5 Open the terminal cover on the digital camera, slide the HDMI connection terminal on the unit inward (toward the camera) to connect it, and tighten the HDMI connection terminal screw (A) securely.
- Open the terminal cover on the digital camera 90 degrees, and store it in the HDMI connection terminal.
Dismounting from the digital camera
- Make sure that a DC power supply is not connected to the unit's DC IN terminal and that the digital camera is turned off, and then perform the mounting procedure in reverse order (disconnect the HDMI connection terminal before rotating the attachment screw (B)). Performing the procedure in the incorrect order may result in damage.
Switching the Video Output
When you mount the unit on a digital camera and set the camera to playback mode, videos and menus will not be displayed in the camera's monitor.
Press the [Fn3] button in such cases to switch the video output destination to the digital camera and display videos and menus in the camera's monitor.
Press the [Fn3] button again to switch the video output destination to the unit.

Additional Menus
When the unit is mounted on the digital camera, an additional menu will appear in the digital camera's display.
Be sure to read the digital camera's operating instructions together with this document.
- Menu settings are registered to the digital camera when you turn it off.

Motion Picture
| Interface Unit Settings | for the interface unit |
| Audio Input Select | Select the audio to input to the digital camera. •[BODY]: Input audio from the digital camera's internal microphone or from the external microphone connected to the digital camera. •[XLR]: Input audio from the equipment connected to this unit's AUDIO IN [CH1, CH2] terminals. When this is selected, the [Lens Noise Cut] setting will be fixed at [OFF]. |
| SDI Remote Recording | Select whether to output control information for recording start/stop to the external equipment connected to this unit's SDI OUT terminals. •[ON]: Enable the function. •[OFF]: Disable the function. |
| LED Brightness | Specify the brightness of the level meters. •[HIGH], [LOW] |
| 3G-SDI Type | Select the type of signal that will be used when outputting 3G-SDI signals. •[LEVEL A], [LEVEL B] |
| Low Battery Alert | Select the voltage at which to display the low battery (voltage decline) warning for the DC power battery. •[11V], [12.5V], [13.5V], [15V] The indicator will turn red and blink before the battery charge is empty. Replace the battery when the battery charge is low and "Interface Unit: Low Battery Alert" is displayed. |

Setup
Version Disp. Display the firmware version of the unit that is added.
In addition, some settings in the following menu items will be restricted when the unit is mounted on the digital camera.
| Setup Motion Picture | |
| TV Connection •HDMI Mode (Play): •When [AUTO] is selected, the output resolution is set automatically based on the recorded format (resolution). •When a setting other than [AUTO] is selected, timecodes are not superimposed on SDI outputs. •3D Playback: Fixed at [2D]. •VIERA Link: Fixed at [OFF]. | HDMI Rec Output •4K Down Convert: [AUTO] cannot be selected. |
Power source:
DC 12 V (11 V - 17 V), 1.4 A (DC 12 V) (including digital camera)

indicates safety information.
Operating temperature:
0^ C to 40^ C
Operating humidity:
10% to 80% (non-condensing)
Weight:
750g
Dimensions (W× H× D)
160mm× 64mm× 91mm
(excluding protrusions and HDMI connection terminal)

Digital video
Resolution:
Cinema4K:
4096× 2160 [24p]
4K (QFHD):
3840× 2160 [29.97p]
3840× 2160 [25p]
3840× 2160 [24p]
3840 × 2160 [23.98p]
FHD:
1920× 1080 [59.94p] (3G-SDI Level-A/B)
1920× 1080 [50p] (3G-SDI Level-A/B)
1920× 1080 [59.94i]
1920× 1080 [50i]
1920× 1080 [24PsF]
1920× 1080 [23.98PsF]
HD:
1280× 720 [59.94p]
1280× 720 [50p]
Sampling:
Y:Cb:Cr = 4:2:2
Bit depth:
8 bit / 10 bit

Digital audio
Sampling frequency:
48 kHz (video sync)
Quantization:
16 bit
Headroom:
12dB

Input / output
TC IN:
BNC×1, 1.0 V [p-p] to 4.0 V [p-p], 10 kΩ
AUDIO IN:
XLR (3-pin) × 2 high impedance,
Embedded audio: 2 channel
Timecode output: SDI OUT 1
Embedded LTC
HDMI:
HDMI Type A (VIERA Link not supported),
2-channel audio (linear PCM)
Information on Disposal for Users of Waste Electrical & Electronic Equipment (private households)

This symbol on the products and/or accompanying documents means that used electrical and electronic products should not be mixed with general household waste.
For proper treatment, recovery and recycling, please take these products to designated collection points, where they will be accepted on a free of charge basis. Alternatively, in some countries you may be able to return your products to your local retailer upon the purchase of
an equivalent new product.
Disposing of this product correctly will help to save valuable resources and prevent any potential negative effects on human health and the environment which could otherwise arise from inappropriate waste handling.
Please contact your local authority for further details of your nearest designated collection point.
Penalties may be applicable for incorrect disposal of this waste, in accordance with national legislation.
For business users in the European Union
If you wish to discard electrical and electronic equipment, please contact your dealer or supplier for further information.
Information on Disposal in other Countries outside the European Union
This symbol is only valid in the European Union.
If you wish to discard this product, please contact your local authorities or dealer and ask for the correct method of disposal.
WARNING:
10 SDI OUT-Buchse [1, 2, 3, 4] (BNC)
3840× 2160 [23,98p]
FHD:
1920× 1080 [59,94p] (3G-SDI Level-A/B)
1920× 1080 [50p] (3G-SDI Level-A/B)
1920× 1080 [59,94i]
1920× 1080 [50i]
1920× 1080 [24PsF]
1920× 1080 [23,98PsF]
HD:
1280× 720 [59,94p]
1280× 720 [50p]
Abtasten:
Y:Cb:Cr = 4:2:2
Bit-Tiefe:
8 Bit/10 Bit
Digitalaudio
Abtastfrequenz:
48 kHz (Video-Sync)
Quantisierung:
16 Bit
BNC×1, 1,0 V [p-p] bis 4,0 V [p-p], 10 kΩ
AUDIO IN:
XLR (3-polig) × 2 , hohe Impedanz,
BNC×4,0,8V[p-p],75Ω,
10 Prises SDI OUT [1, 2, 3, 4] (BNC)
11 Prises AUDIO IN [CH1, CH2] (XLR, 3 broches)
3840× 2160 [23,98p]
FHD:
1920× 1080 [59,94p] (3G-SDI nivea-A/B)
1 920×1 080 [50p] (3G-SDI niveau-A/B)
1920×1080[59,94i]
1920× 1080 [50i]
1920×1080[24PsF]
1920× 1080 [23,98PsF]
HD:
1280× 720 [59,94p]
1 280× 720 [50p]
Échantillonnage :
Y:Cb:Cr = 4:2:2
BNC×1, 1,0 V [p-p] à 4,0 V [p-p], 10 kΩ
AUDIO IN :
XLR (3 broches) × 2 , impedance elevée,
LINE/MIC/+48V (commutables)
LINE:0dBu
MIC: -50 dBu
+48V: +48 V fantôme pris en charge,
-50 dBu
SDI OUT :
BNC×4, 0,8 V [p-p], 75 Ω,
9 Terminal TC IN (BNC)
12VCC(11Va17V),1,4A(12VCC)
3840× 2160 [23,98p]
FHD:
1920× 1080 [59,94p] (3G-SDI Level-A/B)
1920× 1080 [50p] (3G-SDI Level-A/B)
1920× 1080 [59,94i]
1920× 1080 [50i]
1920× 1080 [24PsF]
1920× 1080 [23,98PsF]
HD:
1280× 720 [59,94p]
1280× 720 [50p]
Muestreo:
Y:Cb:Cr = 4:2:2
BNC×1, 1,0 V [p-p] a 4,0 V [p-p], 10 kΩ
AUDIO IN:
XLR (3 contactos) × 2 , alta impedancia,
LINE/MIC/+48V (conmutable)
LINE:0dBu
MIC: -50 dBu
+48V: admite fantasme de +48 V,-50 dBu
SDI OUT:
BNC×4,0,8V[p-p],75Ω,
Salida de audio: SDI OUT 1
Audio integrado: 2 canales
10 Terminali SDI OUT [1, 2, 3, 4] (BNC)
1920× 1080 [59,94i]
1920× 1080 [50i]
1920× 1080 [24PsF]
1920× 1080 [23,98PsF]
HD:
1280× 720 [59,94p]
1280× 720 [50p]
Campionamento:
Y:Cb:Cr = 4:2:2
Profondà di bit:
8 bit / 10 bit
Audio digitale
BNC×1, da 1,0 V [p-p] a 4,0 V [p-p], 10 kΩ
AUDIO IN:
XLR (3 pin) × 2 , impedenza elevata,
LINE/MIC/+48V (commutable)
LINE:0dBu
MIC: -50 dBu
+48V: +48 V phantom supportato,-50 dBu
SDI OUT:
BNC×4,0,8V[p-p],75Ω,
Uscita audio: SDI OUT 1
Uscita timecode: SDI OUT 1
LTC incorporo
HDMI:
Manufactured by: Panasonic Corporation
Kadoma, Osaka, Japan
Importer for Europe: Panasonic Marketing Europe GmbH
Panasonic Testing Centre
Winsberging 15, 22525 Hamburg, Germany
Panasonic Corporation
Web Site: http://panasonic.net
© Panasonic Corporation 2014