
Ultimate Series R9 XR1570 - Shaver REMINGTON - Free user manual and instructions
Find the device manual for free Ultimate Series R9 XR1570 REMINGTON in PDF.
| Product Type | Electric Shaver |
| Brand | Remington |
| Model | Ultimate Series R9 XR1570 |
| Usage | Cordless |
| Power supply | 100-240 V AC adapter |
| Charging time | 90 minutes for a full charge; 24 hours for the first charge |
| Runtime | Approximately 60 minutes |
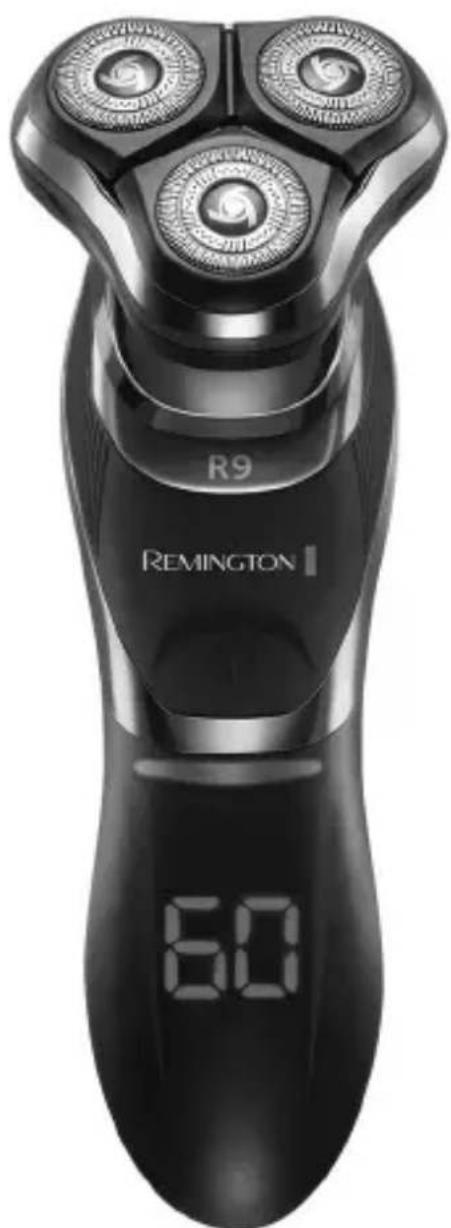
| Charge indicator | LED display: flashes during charging, shows 60 when fully charged |
| Main functions | Dry or wet shaving, retractable trimmer, Turbo mode, travel lock |
| Number of rotating heads | 4 heads (set of rotating heads and blades) |
| Integrated trimmer | Yes, retractable precision trimmer |
| Included accessories | Charging stand, beard trimming attachment, cutting guide, protective cap, cleaning brush, travel case |
| Wet shaving | Yes, can be used with shaving gel |
| Cleaning | Rinsable under running water; removable head for cleaning |
| Maintenance | Lubricate trimmer teeth every 6 months |
| Safety | Travel lock to prevent accidental start-up |
| Weight | Approximately 200 g (estimate) |
| Warranty | See manual for details |
Frequently Asked Questions - Ultimate Series R9 XR1570 REMINGTON
User questions about Ultimate Series R9 XR1570 REMINGTON
0 question about this device. Answer the ones you know or ask your own.
Ask a new question about this device
Download the instructions for your Shaver in PDF format for free! Find your manual Ultimate Series R9 XR1570 - REMINGTON and take your electronic device back in hand. On this page are published all the documents necessary for the use of your device. Ultimate Series R9 XR1570 by REMINGTON.
USER MANUAL Ultimate Series R9 XR1570 REMINGTON
Ultimate Series Rotary Shaver
R9
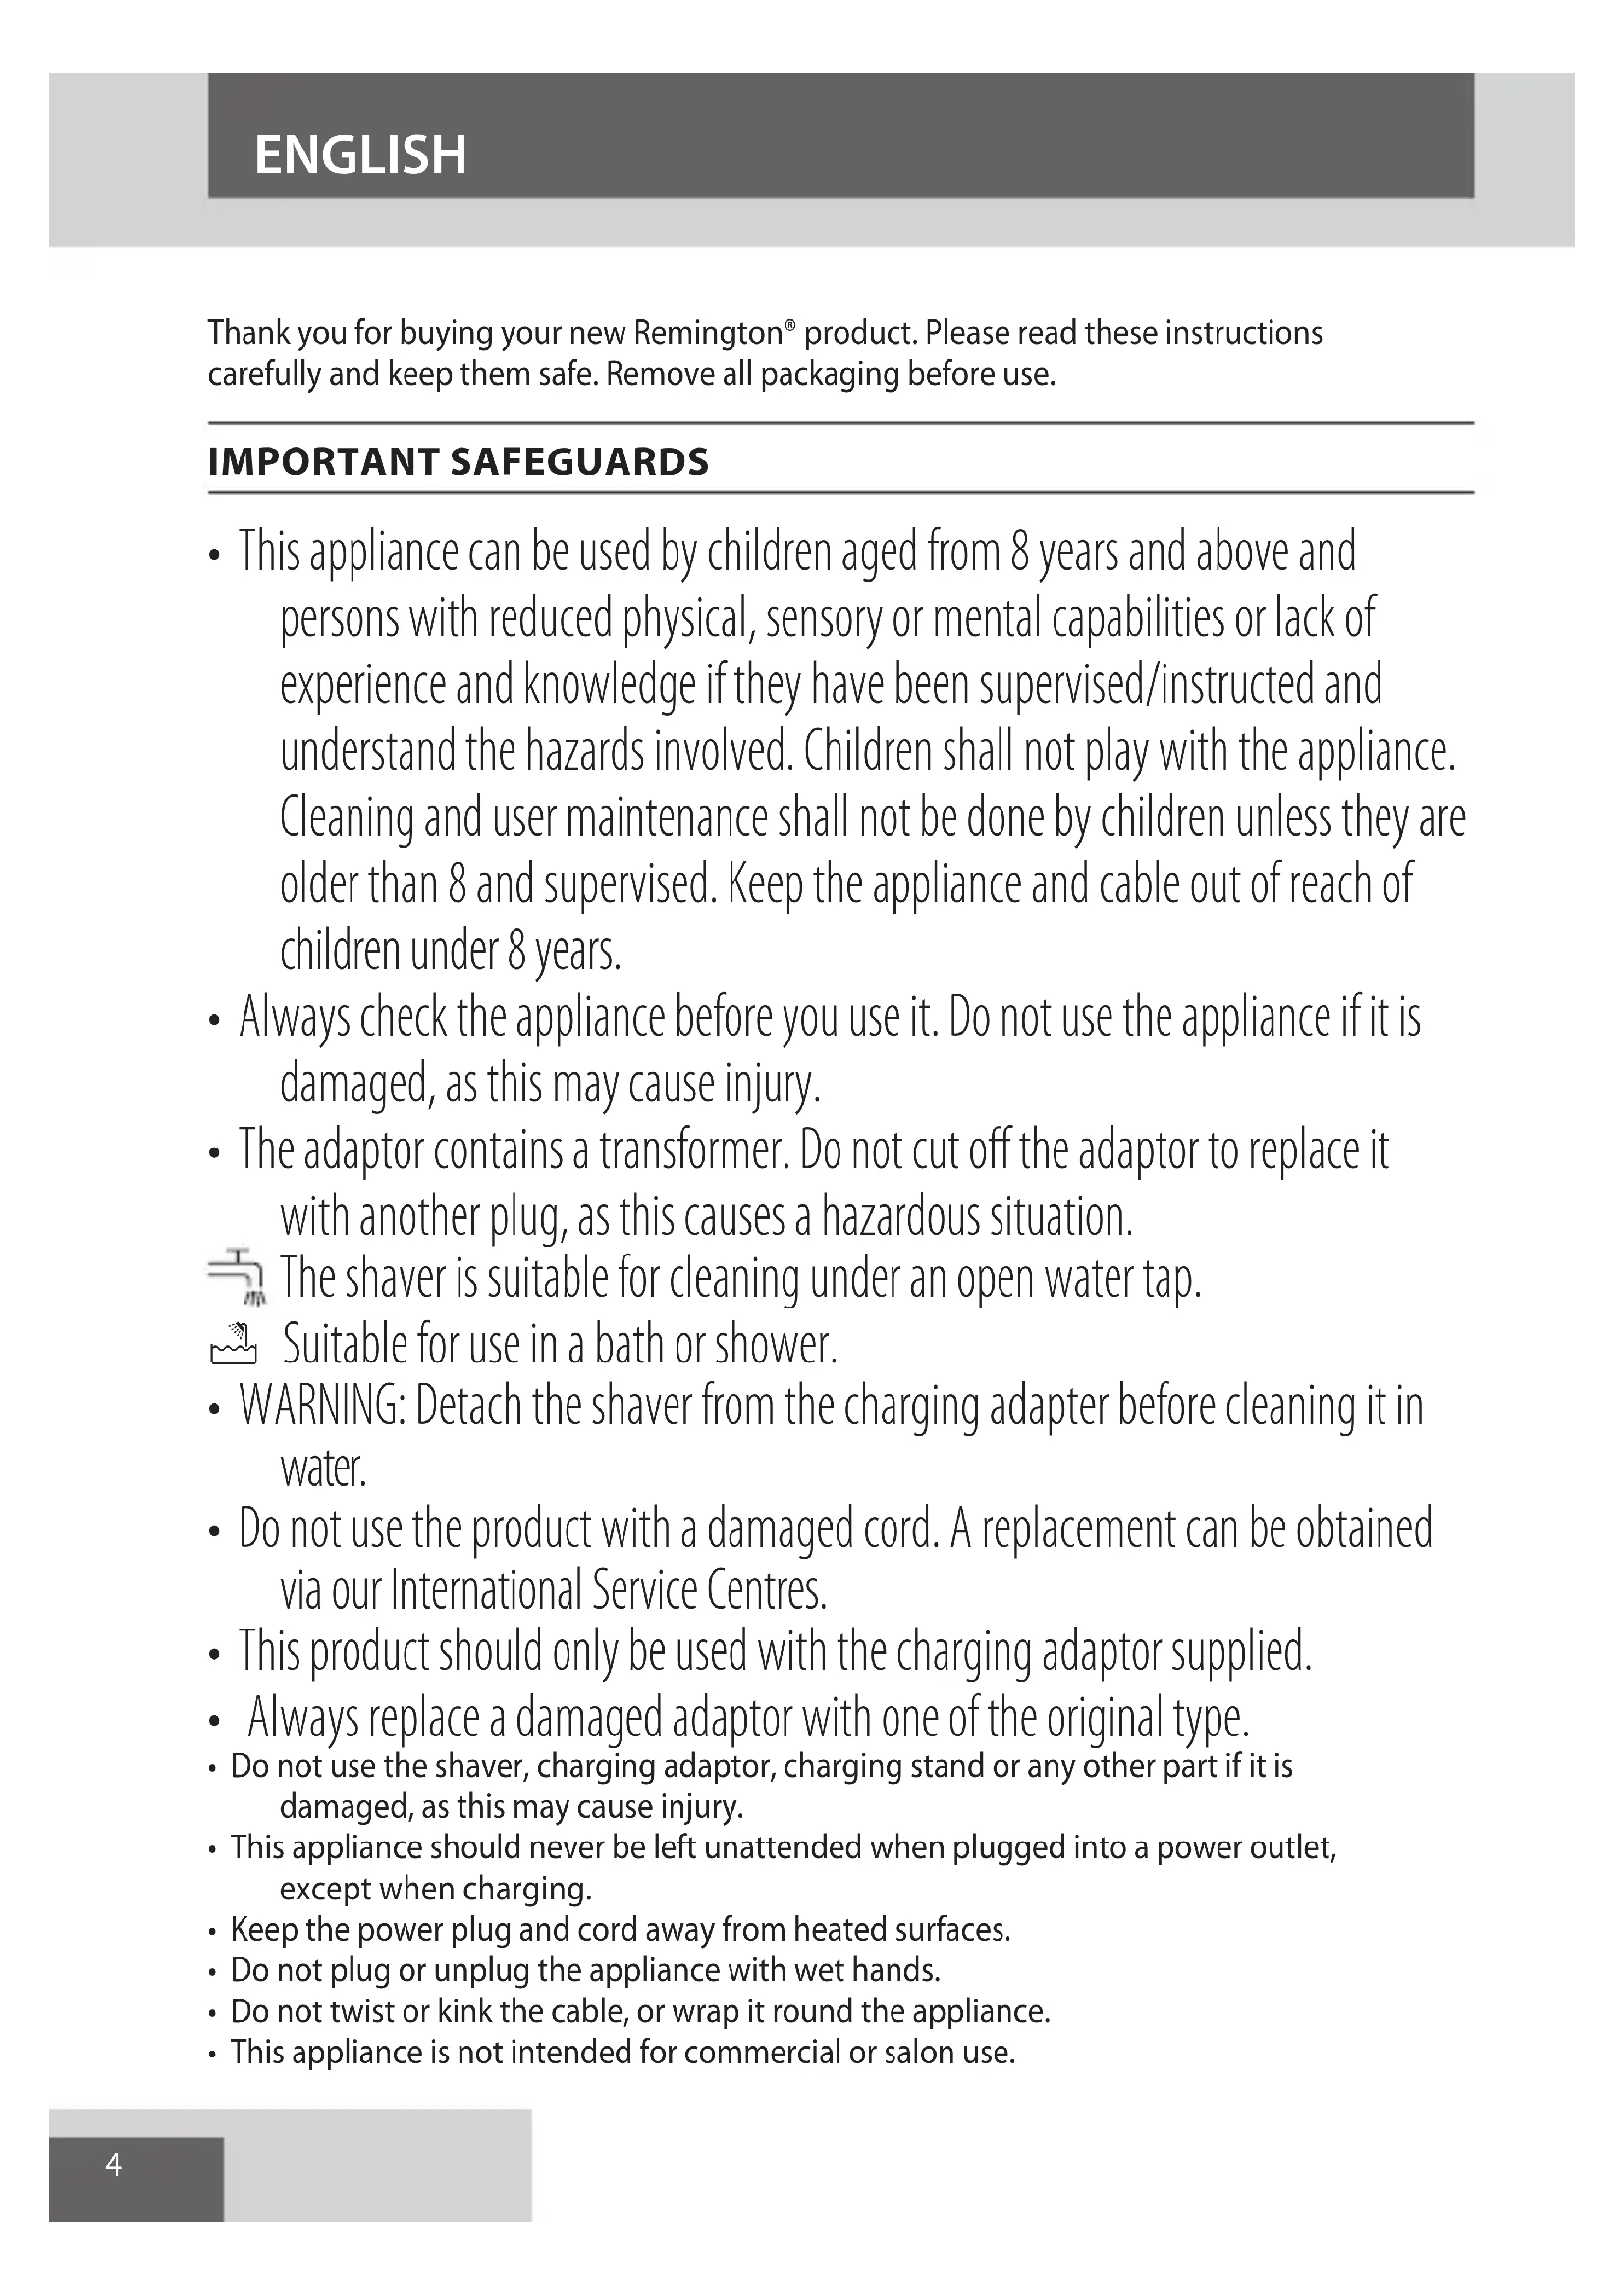
Thank you for buying your new Remington® product. Please read these instructions carefully and keep them safe. Remove all packaging before use.
IMPORTANT SAFEGUARDS
- This appliance can be used by children aged from 8 years and above and persons with reduced physical, sensory or mental capabilities or lack of experience and knowledge if they have been supervised/instructed and understand the hazards involved. Children shall not play with the appliance. Cleaning and user maintenance shall not be done by children unless they are older than 8 and supervised. Keep the appliance and cable out of reach of children under 8 years.
- Always check the appliance before you use it. Do not use the appliance if it is damaged, as this may cause injury.
- The adaptor contains a transformer. Do not cut off the adaptor to replace it with another plug, as this causes a hazardous situation.
The shaver is suitable for cleaning under an open water tap.
Suitable for use in a bath or shower.
- WARNING: Detach the shaver from the charging adapter before cleaning it in water.
- Do not use the product with a damaged cord. A replacement can be obtained via our International Service Centres.
- This product should only be used with the charging adaptor supplied.
- Always replace a damaged adaptor with one of the original type.
- Do not use the shaver, charging adaptor, charging stand or any other part if it is damaged, as this may cause injury.
- This appliance should never be left unattended when plugged into a power outlet, except when charging.
- Keep the power plug and cord away from heated surfaces.
- Do not plug or unplug the appliance with wet hands.
- Do not twist or kink the cable, or wrap it round the appliance.
- This appliance is not intended for commercial or salon use.
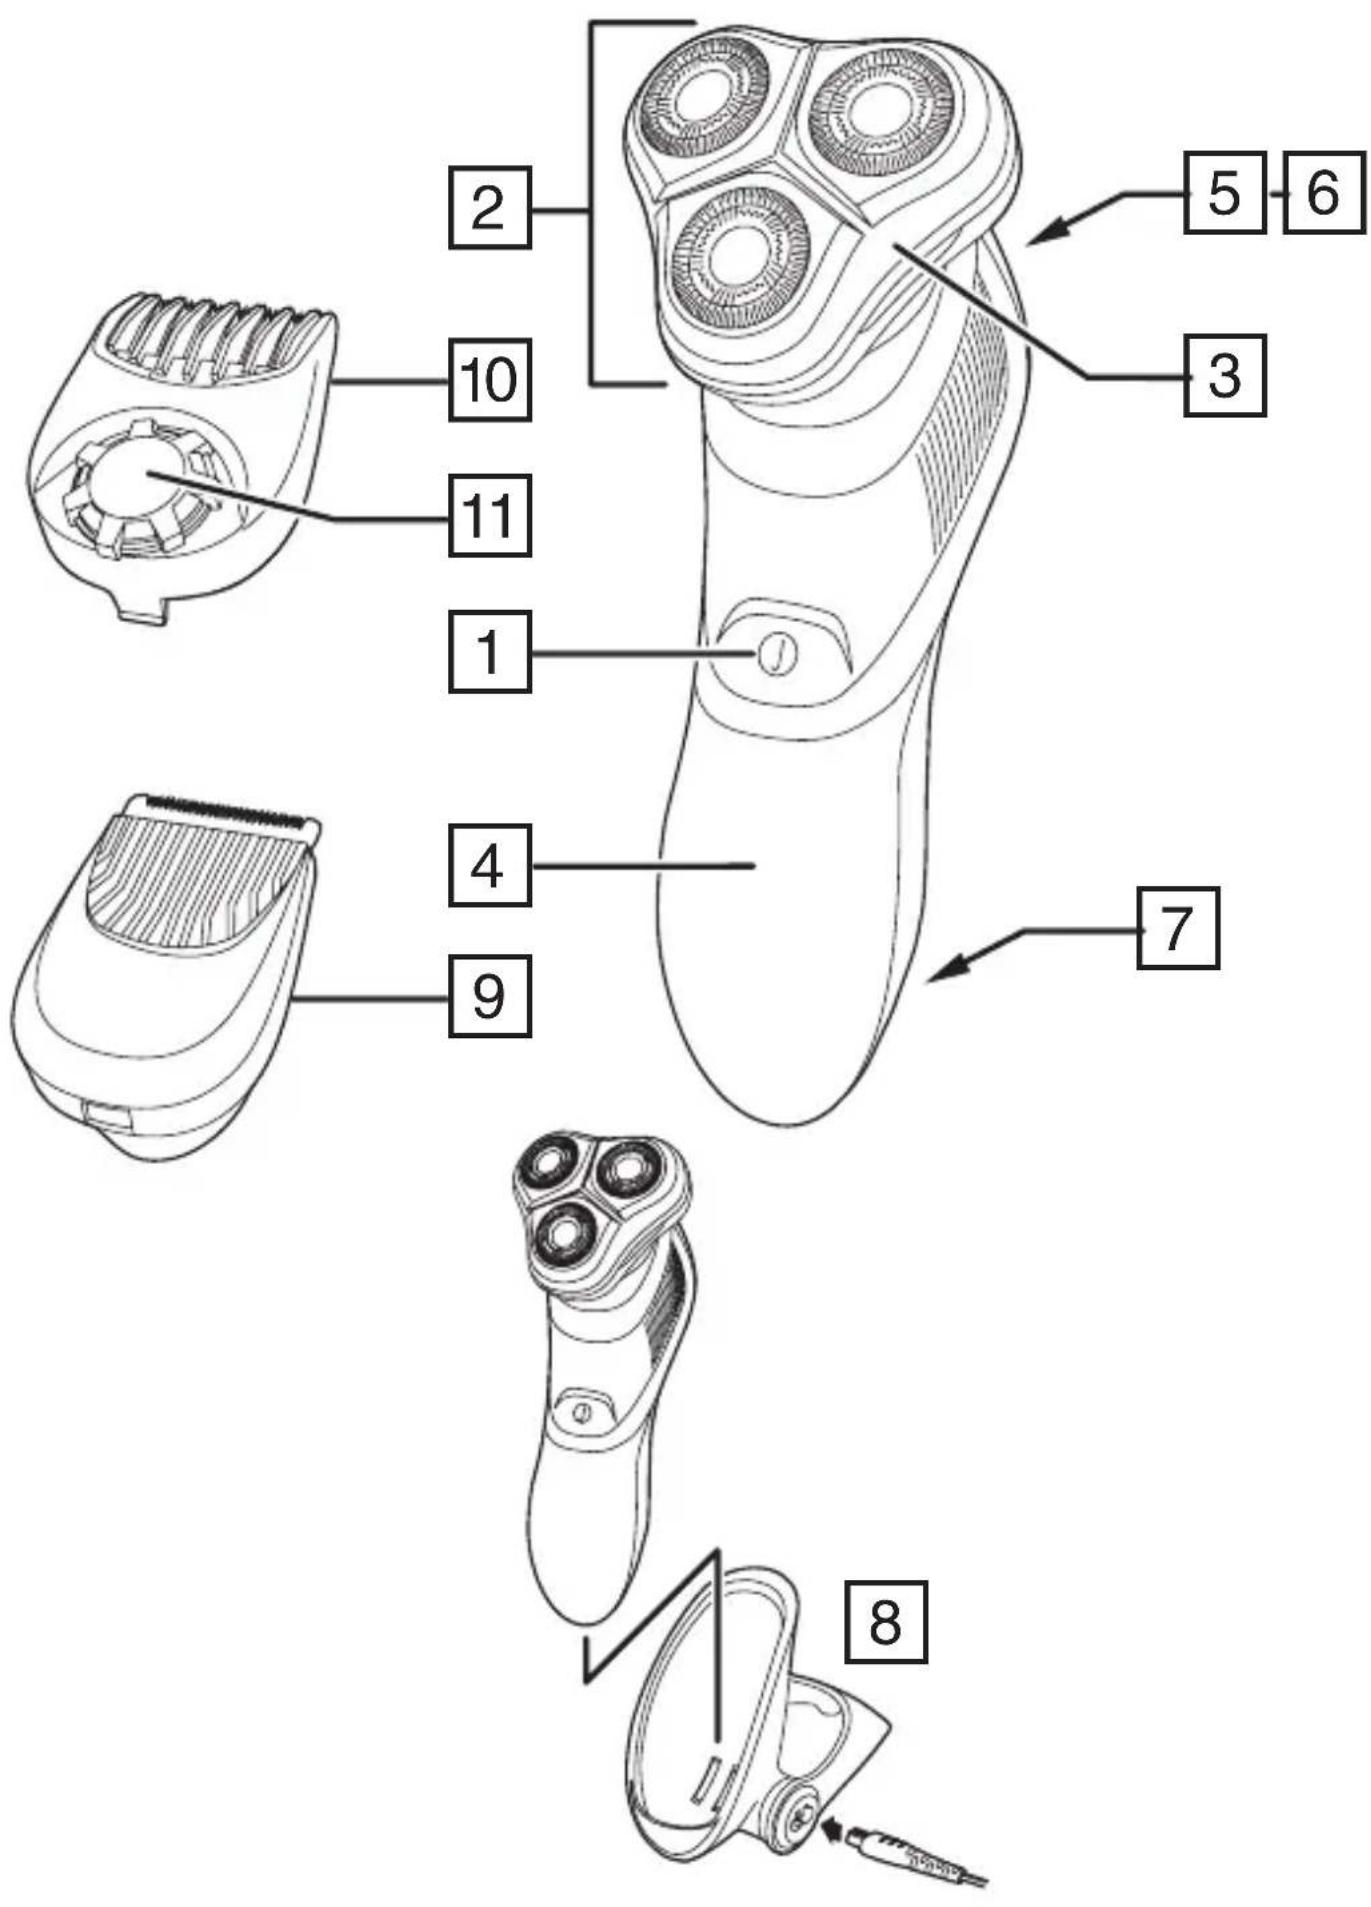
PARTS
- On/off switch
- Head and cutter assembly
- Hair pocket
- LED display
- Pop-up trimmer
- Trimmer release button
- Charging pins
-
Charging stand
-
Beard trimming attachment
-
Comb
- Comb adjustment dial
- Adaptor (not shown)
- Headguard (not shown)
- Cleaning brush (not shown)
- Storage case (not shown)
GETTING STARTED
CHARGE THE SHAYER:
Note: This shaver is for cordless use only.
- Ensure the appliance is turned off.
- Connect the charging stand to the adaptor and then to the mains.
- Place the shaver in the charging stand.
- Charge for at least 24 hours when using for the first time.
- Allow 90 minutes for a full charge.
- The LCD display will indicate when the shaver is fully charged.
- When charge is low 'Lo' will appear on the screen and will flash until the shaver is plugged in to charge. When charging, the LEDs blink in a clockwise rotation. When fully charged the indicator will flash 60 for 5 minutes and then the display will shut off.
- To preserve the life of your batteries, let them run out every 6 months then recharge for 24 hours.
- The appliance adapts automatically to a mains voltage between 100V and 240V.
INSTRUCTIONS FOR USE
It is recommended that you use your new shaver daily for up to four weeks to allow time for your beard and skin to become accustomed to the new shaving system.
SHAVING
- Switch the shaver on.
- Stretch the skin with your free hand so the hairs stand upright.
- Only apply light pressure on the shaving head while shaving (pressing too hard can damage the heads and make them vulnerable to breakage).
- Use short, circular strokes.
B
SHAVING WITH SHAVING GEL
- Follow the same instructions as dry shaving if using shaving gel.
- CAUTION After use with shaving gel, please rinse the head and cutters under warm water to clean away any excess gel and debris.
TRIMMING
- Push the trimmer button to release the detail trimmer.
- Hold the trimmer at right angles to your skin.
- Place the trimmer at desired trim line for a quick, easy, professional trim.
- To retract the trimmer, push down until it locks into position.
BEARD TRIMMER ATTACHMENT
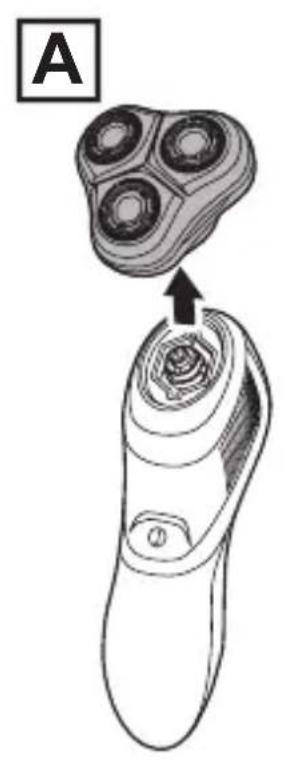
To fit the beard trimmer attachment:
- Switch off your shaver.
- Grasp the head and cutter assembly and pull it away from the body of your shaver (Fig A).
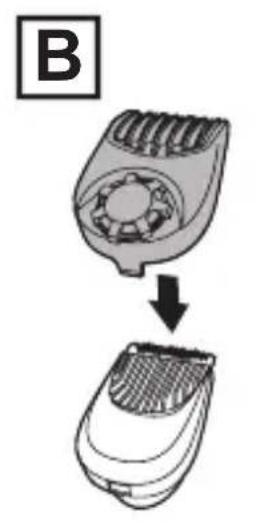
- If using, snap the comb to the beard trimming attachment (Fig B).
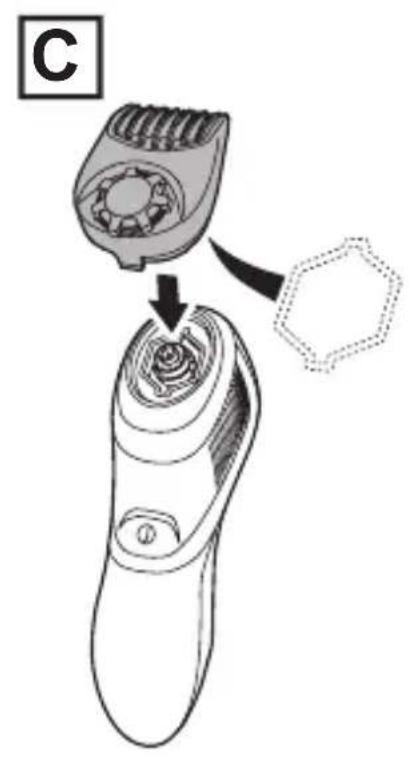
- Align the underside of the beard trimmer attachment with the hexagonal recess in the shaver body and click it into place (Fig C).
- Use the trimmer without the comb for trimming hair close to the skin. This will trim hair to 1mm , holding the blades perpendicular to the skin will trim hair to 0.4mm .
- Adjust the comb setting by rotating the adjustment dial on top of the comb clockwise to increase the cut length or anticlockwise to reduce the cut length. The selected setting is shown on the scale.
TRAVEL LOCK
The Travel Lock feature prevents the shaver from turning on and discharging accidentally while packed in luggage.
To set the travel lock:
- Press and hold the on switch for 3 seconds. The shaver will turn on, then will shut off after the 3 seconds. The LED display will flash five times to indicate the lock is set.
- While the travel lock is set, if the on switch is pressed, the LED display will flash three times to indicate the shaver is in travel lock mode.
To Unlock the Travel Lock:
- Press and hold the on switch for 3 seconds. The LED display will flash three times while the button is being held and then the shaver will turn on.
TURBO FEATURE
Use the Turbo feature to shave thick stubble. Press the on/off switch once to operate the shaver at normal speed. Press the on/off switch a second time to operate the shaver in Turbo mode. When the Turbo feature is activated the LED display will cycle around. To deactivate press the on off switch once to turn the shaver off.
TIPS FOR BEST RESULTS
- Use moderate to slow stroking movements. The use of short circular motions in stubborn areas may obtain a closer shave, especially along the neck and chin line.
- DO NOT press hard against the skin in order to avoid damage to the rotary heads.
To ensure long lasting performance clean after each use.
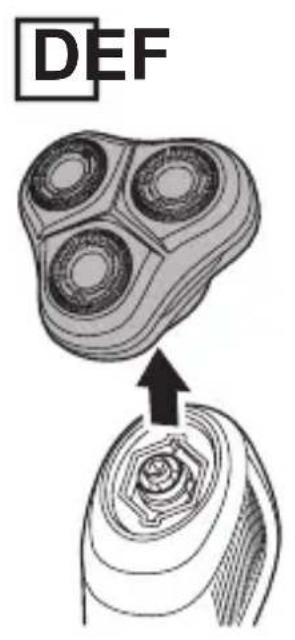
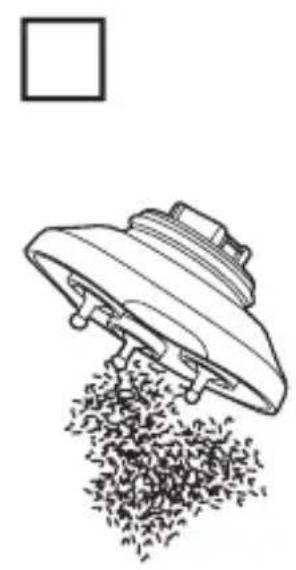
- Grasp the head and cutter assembly and pull it away from the body of your shaver (Fig D).
- Pull the face off the hair pocket (Fig E).
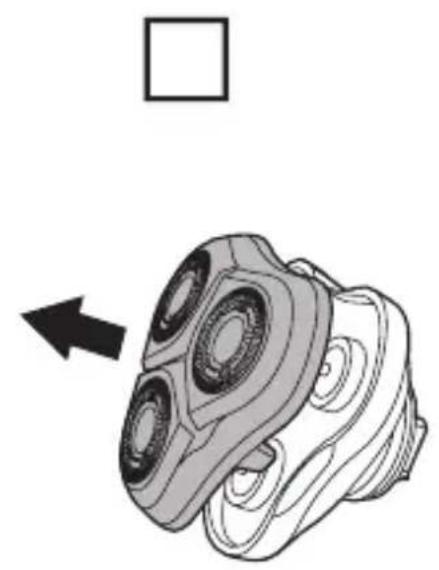
- Tap out excess hair shavings from the hair pocket (Fig F). Hair clippings can also be washed out of the hair pocket and or shave face by rinsing these under the tap.
- Once dry, snap the face back onto the hair pocket.
- The easiest and most hygienic way to clean the appliance is by rinsing the appliance head after use with warm water.
- Lubricate the teeth of the trimmer every six months with a drop of sewing machine oil.
REMOVING THE RECHARGEABLE BATTERY
We strongly recommend that a professional removes the rechargeable battery. Parts of the shaver case, and tools have sharp edges and may cause injury if not handled correctly.
- The rechargeable battery must be removed from the appliance before it is scrapped.
-
Disconnect the charging adapter before removing the battery.
-
Run the shaver until the motor stops.
- Remove the head from the shaver (pull the head up and off).
- Using a small screwdriver, pry the 'collar' off the top of the handle.
- Using a small screwdriver, pry the front cover from the body.
- Remove three screws located on front of shaver.
- Using a small screw driver, pry up the newly unsecured inner housing to expose the battery.
- Pry the battery free from the circuit board.
- Used batteries must be removed from the appliance and disposed of at an appropriate official recycling/collection point.
- Do not attempt to operate the shaver once you have opened it.
GB
RECYCLING
To avoid environmental and health problems due to hazardous substances, appliances and rechargeable and non-rechargeable batteries marked with one of these symbols must not be disposed of with unsorted municipal waste. Always dispose of electrical and electronic products and, where applicable, rechargeable and non-rechargeable batteries, at an appropriate official recycling/ collection point.
UW APPARAAT VERZORGEN
NAGRA GODA RÄD FÖR BÄSTA RESULTAT
RADY, JAK OSIAGNAC NAJLEPSZY WYNIK
Дя NOBbIeHnA ΝΦΦeKTHBHOCTn 6pNTbpeKOMeHdyETcN cNoJIb3OBaTb HOByIO 6pNTbBy exEiHeBHO Do YeTbIpeX HeJeIb, YTO6bl Baun 6OpOda N KOJa IMeJN BO3MOxHOCTb PnIBbIKHyTb K HOBOI 6pNTBeHHoN CnCTeme.
BPUTbE
- Bklnounte 6pntBy.
- Cbo6oHNo pyKoN haTARnBaIte Koxy, yTO6bI BOLOCKn paCNOJIOXnJIncb nepneHnkyIrpHo Koxe.
- Bo Bpem 6pntbHa CneJeT CnIbHO DaBnTb Ha 6pNTby (CnIbHoe DaBHeHne MoKet npNBecTu K NOBpeXeHIO rOLOBOK N CdeJaTb IX OCO6O yra3BmblM N K NOlOMKe).
- BbInonHnTe KOpOTKne KpyroBble DnJxKeHnI.
IOBTOPHAR INEPEPABOTKA
Bo n36eXaHne BO3dEiCTBnB BpeDhbl X BeIeCTB Ha OKpykaIOU cyPeDu n 3IOPOBBe np6Opbl N 6bTapeN Ondop3OBOrO nnMHOropa3OBOrO nCNOJb3OBAHn, NOMEeHHbIe ONDHM n3 3TNXCMBOLOB, Heo6xOIMo yTINl3INPOBaTb OTJeNbHO OTHeCOPtnpOBaHHbIX 6bITOBbIX OTXODOB. O6raTeJIbHO yTINl3InpyTe3JIeKTPnuCeKne i 3JIeKTPoHHbIe n3DeJIy, a TaKKe (ecNI 3TOnpImeHMo) 6bTapeN Ondop3OBOrO nnMHOropa3OBORO nCNOJb3OBAHn B COOTBeTCTByIOuNX OfNUaJIbHBIX PYNKTax NOBTOPHo nepepa6OTKn / c6opa OTXODOB.

EN IYI SONUÇLAR IÇIN IPUÇLARI
Tva toothe noeTe To KOTIKo EAptnma yia mouoi:
- Anevepyooinote Tnv Eupiotikn uynxavn.
- Iiaote to ouykpota kepaanc kai aeidac kai tpaBnEto yia va to aopaipoeet e ano to ouma tnC Eupiotiknc mynavnc (Eik.A).
- EFOOov Tn xPNOIOIeIe, OuvDcTe Tn XTeVa OTo KOnTIKO EApTma Yia Mouoi (Eik.B).
- Euθuyρaμiσε ην κατω πλευρα tou κοπικου εξαρτηματος για μούσι με ην εξάγωνη Σθόχή στο ωμα της ἐυριστικής μηχανής καί ασφαλίσετο θόη θέση tou (Eik. C).
XpnoiopoioTe Tnv KOnTikn mNxavn XwpiC Tn XTeva yia va KoPcTe TpiEc KovTa oTo a .Etai Oa KoPcTe TpiEc oTo 1 mm.Eav oi Ie iDc Bpikovtai KaOeTa npoc to a ,oi TpiEc Oa konouv oTa 0,4 mm.
PpOaPioTe Tn pUoHIOIg TNC XTEVAC PEPOTpeovTAC Tov ENILOyEA PUOIOnc OTN V KOpUfN TNC XTEVAC POC TA DEGIA YIA VA auENoTe TO uNKOC KOINc N, PPOC TA apIOTepa YIA VA TO MEIWOET. H EMIeYmuEvn PUsOIOH EmuaviEeTai NaW OTNV KIAIoka.
KAEIΔΩMA ΓI A TH METAΦOPA
H aospalia taIisiou eIIOdiEi Tnv TuXaia Evpyooinon Tnc EupiotiknC uXavnC otav p i o k t a I eo aNOOKeun.
Tia va kavete To kIeioa TaEiou:
KpatnoTne patnuevo tov diaokotn nevepyooinoc yia 3 deutepolenta. H upiotikn mynavn th a evpyoointhei kai t, apou nepaoovu ta 3 deutepolenta, th a anevpyoointhei. Hoovn LED th a avaoosnoe i nevt e opec yia va unodiei oti exyivto KkEiDomega.
Oo eivai evpyo to kIeIomega taIoiou, av nTne i o diaKoTnc evepyooinoc, n oovn LED 0a avaBooBnvei tpeic fopec yia va uno8eiEi ot i Eupiotikn mynavn Bpoketai oE IeIToupyia kIeIomegaatoc taIoiou.
ΔYNATOTHTA TURBO
Xpnoiouoiote nIeitoupyia Turbo yia va Eupioe neaxia yevia.
- PatnoTe to diakottn evpyooinoc/aevpyooinoc mia opa yia va leitoupynoe i n Eupiotikn mxavn oE kavovikn taxutnta. PatnoTe to diakottn evpyooinoc/ aeevyonoinoc yia deutepn oopa yia va leitoupynoe i n Eupiotikn mxavn oE λeitoupyia Turbo. Otav eivai evpyooinmuevn n duvatotnta Turbo, n evdeltaLED th avaBcI piodka.
Ia aevpyooinon natnoTe to diakottn evpyooinoc/aevvpeyooinoc mia opa yia va aevpyooinoe Tnv Eupiotikn uynxavn.
abla 4150 jjjbjj jss
a 1
.
Jg j 1
J 1
AE
a 1
y
J 100000000000000000000000000000000000000000000000000000000000000000000
.

Ref. No. XR1570
Remington® is a Registered Trade Mark of Spectrum Brands, Inc., or one of its subsidiaries
VARTA Consumer Batteries GmbH & Co. KGaA, Alfred-Krupp-Str. 9, 73479 Ellwangen, Germany www.remington-europe.com

- IMPORTANT SAFEGUARDS
- PARTS
- GETTING STARTED
- CHARGE THE SHAYER:
- INSTRUCTIONS FOR USE
- SHAVING
- SHAVING WITH SHAVING GEL
- TRIMMING
- BEARD TRIMMER ATTACHMENT
- TRAVEL LOCK
- TURBO FEATURE
- TIPS FOR BEST RESULTS
- REMOVING THE RECHARGEABLE BATTERY
- RECYCLING
- UW APPARAAT VERZORGEN
- NAGRA GODA RÄD FÖR BÄSTA RESULTAT
- RADY, JAK OSIAGNAC NAJLEPSZY WYNIK
- BPUTbE
- IOBTOPHAR INEPEPABOTKA
- EN IYI SONUÇLAR IÇIN IPUÇLARI
- KAEIΔΩMA ΓI A TH METAΦOPA
- ΔYNATOTHTA TURBO
- Ref. No. XR1570
Brand : REMINGTON
Model : Ultimate Series R9 XR1570
Category : Shaver