VCI21CS - Range hood THERMADOR - Free user manual and instructions
Find the device manual for free VCI21CS THERMADOR in PDF.

User questions about VCI21CS THERMADOR
0 question about this device. Answer the ones you know or ask your own.
Ask a new question about this device
Download the instructions for your Range hood in PDF format for free! Find your manual VCI21CS - THERMADOR and take your electronic device back in hand. On this page are published all the documents necessary for the use of your device. VCI21CS by THERMADOR.
USER MANUAL VCI21CS THERMADOR
VENTILATION USE AND CARE MANUAL
MODELS: VCI2

text_image
Thermometer LIGHT OFF LO MED HITable of Contents
About This Manual 1
How This Manual Is Organized 1
Safety 1
Important Safety Instructions 1
Operation 2
Before Using the Appliance for the First Time 2
Operation 3
Getting the Most out of Your Appliance 3
Tips (For Best Results) 3
Cleaning and Maintenance 3
Cleaning 3
Maintenance 5
Service 6
Before Calling Service 6
Warranty 7
Questions?
1-800-735-4328
www.thermador.com
5551 McFadden Ave.
Huntington Beach, CA 92649
We look forward to hearing from you!
About This Manual
How This Manual Is Organized
This manual contains several sections:
- The Overview section describes the features and functionality, including a description of how to set it up and operate the control panel.
- The Operation section describes how to operate and get the best performance out of each component.
- The Cleaning and Maintenance section describes how to clean and maintain your appliance.
• The Service section includes troubleshooting tips and your Warranty.
Before using your appliance, be sure to read this manual. Pay special attention to the Important Safety Instructions located at the beginning of the manual.
Safety
Important Safety Instructions
READ AND SAVE THESE INSTRUCTIONS
Important Safety Instructions
Fire Safety • Always have a working smoke detector near the kitchen.
- WARNING - TO REDUCE THE RISK OF A GREASE FIRE:
a) Never leave surface units unattended at high settings. Boilovers cause smoking and greasy spillovers that may ignite. Heat oils slowly on low or medium settings.
b) Always turn hood ON when cooking at high heat or when flambeing food (i.e. Crepes Suzette, Cherries Jubilee, Peppercorn Beef Flambe').
c) Clean ventilating fans frequently. Grease should not be allowed to accumulate on fan or filter.
d) Use proper pan size. Always use cookware appropriate for the size of the surface element.
- In the event that personal clothing or hair catches fire, drop and roll immediately to extinguish flames.
- Smother flames from food fires other than grease fires with baking soda. Never use water on cooking fires.
- WARNING - TO REDUCE THE RISK OF INJURY TO PERSONS IN THE EVENTOFARANGETOPGREASEFIRE,OBSERVETHEFOLLOWING:
a) SMOTHER FLAMES with a close-fitting lid, cookie sheet, or metal tray, then turn off theburner. BE CAREFUL TO PREVENT BURNS. If the flames do not go out immediately, EVACUATE AND CALL THE FIRE DEPARTMENT.
b) NEVER PICK UP A FLAMING PAN - You may be burned.
c) c) DO NOT USE WATER, including wet dishcloths or towels - a violent steam explosion will result.
d) Use an extinguisher ONLY if:
1) You know you have a Class ABC extinguisher, and you already know how to operate it.
2) The fire is small and contained in the area where it started.
3) The fire department is being called.
4) You can fight the fire with your back to an exit.
- Have an appropriate fire extinguisher available, nearby, highly visible and easily accessible near the oven.
- Whenever possible, do not operate the ventilation system during a cooktop fire. However, do not reach through fire to turn it off.
Child Safety
- When children become old enough to use the appliance, it is the legal responsibility of the parents or legal guardians to ensure that they are instructed in safe practices by qualified persons.
- Do not allow anyone to climb, stand, lean, sit, or hang on any part of an appliance, especially a door, warming drawer, or storage drawer. This can damage the appliance, and the unit may tip over, potentially causing severe injury.
- Do not allow children to use this appliance unless closely supervised by an adult. Children and pets should not be left alone or unattended in the area where the appliance is in use. They should never be allowed to play in its vicinity, whether or not the appliance is in use.
- CAUTION - Items of interest to children should not be stored in an appliance, in cabinets above an appliance or on the backsplash. Children climbing on an appliance to reach items could be seriously injured.
Proper Installation and Maintenance
- Have the installer show you the location of the circuit breaker or fuse. Mark it for easy reference.
- This appliance must be properly installed and grounded by a qualified technician. Connect only to properly grounded outlet. Refer to Installation Instructions for details.
- This appliance is intended for normal family household use only. It is not approved for outdoor use. See the Warranty. If you have any questions, contact the manufacturer.
- Do not store or use corrosive chemicals, vapors, flammables or nonfood products in or near this appliance. It is specifically designed for use when heating or cooking food. The use of corrosive chemicals in heating or cleaning will damage the appliance and could result in injury.
- Do not operate this appliance if it is not working properly, or if it has been damaged. Contact an authorized servicer.
- Do not repair or replace any part of the appliance unless specifically recommended in this manual. Refer all servicing to a factory authorized service center.
- CAUTION: Grease left on filters can remelt and move into the vent.
Operation
Before Using the Appliance for the First Time
A Note about Drafts: Drafts across the range or cooktop will reduce the effectiveness of the hood. Such drafts should be prevented when possible. The best job of
ventilation in the kitchen is done when the only air currents are those created by the blower itself
Operation
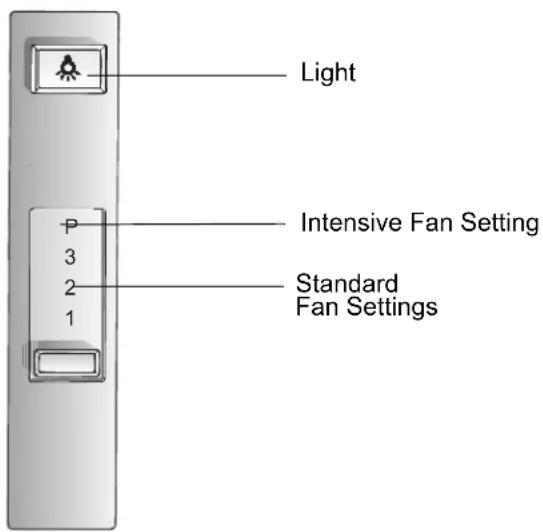
Control (Panel)
text_image
Light Intensive Fan Setting Standard Fan Settings 1 2 3 PFigure 1: Control
Getting the Most out of Your Appliance
Tips (For Best Results)
The blower should be turned on for about five minutes before cooking in order to establish air currents upward through the hood. Thus when heat, smoke, moisture, grease and cooking odors are produced, they will be carried outside instead of drifting into other rooms. Use the low speeds for normal use and the higher speeds for strong odors or fumes.
Cleaning and Maintenance
Cleaning
WARNING - Be sure the entire appliance (including the grease filters and light bulbs, if applicable) has cooled and grease has solidified before attempting to clean any part of the appliance.
Cleaning and Maintenance
Daily Cleaning Wipe with soapy water, rinse and dry.
Cleaning Guidelines
Avoid these cleaners DO NOT use the following!
- Abrasive Pads such as those made from steel wool SOS ®, Brillo® or plastic mesh.
- Abrasive cleaners such as Comet ®, Ajax® and Zud®.
- Flammable products such as gasoline or kerosene.
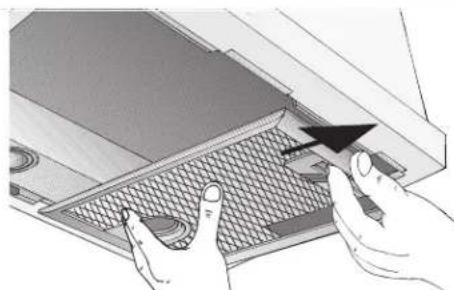
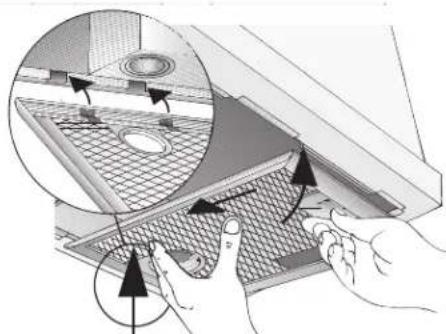
Filters

CAUTION: To avoid fire hazard, keep filters clean. Grease left on filters can remelt and migrate along the vent path.
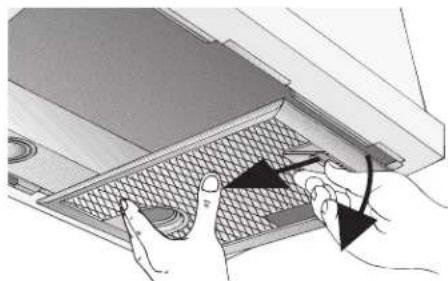
Aluminum Filter
Removable aluminum filters must be cleaned when they collects grease. When used over a wok or other high grease application, more frequent cleaning may be required. They can be cleaned with soap and water or in the dishwasher. When clean in the dishwasher, slight discoloration may occur.
natural_image
Illustration of hands inserting a component into a device with a mesh pattern (no text or symbols)Figure 2: Aluminum Filter Removal - Step 1
natural_image
Illustration of hands using a computer to press a grid device (no text or symbols visible)Figure 3: Aluminum Filter Removal - Step 2
natural_image
Illustration of hands interacting with a meshed air vent or filter structure, showing airflow direction (no text or symbols)Figure 4: Aluminum Filter Removal - Step 3
Cleaning Chart
Table 1: Cleaning Chart
| Part or Surface Suggested Technique Notes | ||
| Plastic (Buttons) Wipe with sudsy water or household cleaners such as Fantastic® or Formula 409®, rinse well and dry with a clean soft cloth to avoid water marks. | ||
| Stainless Steel | Wipe and dry stainless steel in the same direction as the grain. Avoid using too much pressure, which may mar the surface. To remove finger prints and give added shine, use cleaners such as Stainless Steel Magic®. | Do not allow any cleaning compounds to remain in contact with stainless steel for extended periods. |
| Glass Use warm soapy water | and/or a mild window cleaner. | |
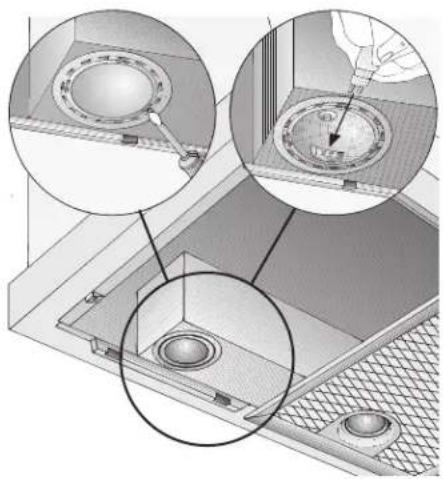
Maintenance
Lights CAUTION: Turn power off at breaker before removing a damaged bulb.

Do not touch the bulbs immediately after use. The bulbs will remain hot for several minutes.
- WARNING: Make sure the appliance and lights are cool and power to the appliance has been turned off before replacing the light bulb(s). Failure to do so could result in electrical shock or burns.
- The lenses (if equipped) must be in place when using the appliance.
- The lenses (if equipped) serve to protect the light bulb from breaking.
- The lenses (if equipped) are made of glass. Handle carefully to avoid breaking. Broken glass could cause an injury.
Light Bulb Replacement Use a 12V halogen bulb (max. 20Watt) with a two pin, G4 base.
Note: DO NOT touch a new halogen bulb with your fingertips. Grasp the bulb through a clean paper towel or facial tissue. The oils from your skin can reduce the longevity of the bulb.
Use a small flathead screwdriver (or your fingernail) to remove the lens.
natural_image
Technical diagram showing three views of a mechanical component with circular features and mounting holes (no text or symbols)Figure 5: Light Bulb Replacement
Pull damaged bulb straight out from the socket to remove. Press pins in bulb base straight into socket until fully seated. Snap lens back into place.
Do not use cooktop while hood is disassembled, to ensure adequate ventilation.
Service
Before Calling Service
Use the suggestions in the chart below before calling for service to avoid service charges.
Troubleshooting Chart
Table 2: Troubleshooting
| Problem Suggested Solution | |
| Noise during operation Some noise is normal do to vibration and air movement. Excessive noise could indicate one of the following: 1. Ductwork is too small / undersized 2. Ductwork is too large / oversized 3. Ductwork is loose 4. Transition is too small or is loose 5. Wood screws are not fully tightened 6. Loose screws in trim parts, etc. Check Installation Instructions to verify that ductwork is the proper size. Tighten screws. | |
| Noise when unit is off | Backflow flap on outside of duct wall cap moves with the wind. This is normal. |
Table 2: Troubleshooting
| Problem Suggested Solution | |
| Fan motor does not work | 1. Power supply is insufficient2. Electrical wiring is incorrectly connectedSee Installation Instructions for further information |
| Lights hum A slight hum is normal | |
| Hood trips breaker | 1. Electrical wiring is incorrectly connected2. Circuit is not sufficient.See Installation Instructions for further information |
How to Obtain Service or Parts
To reach a service representative, see the contact information at the front of the manual. Please be prepared with the information printed on your product data plate when calling.
Product Data Plate
The data plate shows the model and serial number. Refer to the data plate on the appliance when requesting service. It is located on the frame near the drawer. Open the drawer to view it.

text_image
Data Plate behind filterFigure 6: Data Plate Location
Warranty
What this Warranty Covers & Who it Applies to:
The limited warranty provided BSH Home Appliances ("Thermador") in this Statement of Limited Product Warranty applies only to the Thermador VCI Series Ventilation Custom Insert ("Product") sold to you, the first using purchaser, provided that the Product was purchased: (1) for your normal, household (non-commercial) use, and has in fact at all times only been used for normal household purposes; (2) new at retail (not a display, "as is", or previously returned model), and not for resale, or commercial use; and (3) within the United States or Canada, and has at all times remained within the country of original purchase. The warranties stated herein apply only to the first purchaser of the Product and are not transferable.
Please make sure to return your registration card; while not necessary to effectuate warranty coverage, it is the best way for Thermador to notify you in the unlikely event of a safety notice or product recall.
How Long the Warranty Lasts:
Thermador warrants that the Product is free from defects in materials and workmanship for a period of Three hundred sixty-five (365) days from the date of purchase. The foregoing timeline begins to run upon the date of purchase, and shall not be stalled, tolled, extended, or suspended, for any reason whatsoever.
Repair/Replace as Your Exclusive Remedy:
During this warranty period, Thermador or one of its authorized service providers will repair your Product without charge to you (subject to certain limitations stated herein) if your Product proves to have been manufactured with a defect in materi-
Service
als or workmanship. If reasonable attempts to repair the Product have been made without success, then Thermador will replace your Product (upgraded models may be available to you, in Thermador's sole discretion, for an additional charge). All removed parts and components shall become the property of Thermador] at its sole option. All replaced and/or repaired parts shall assume the identity of the original part for purposes of this warranty and this warranty shall not be extended with respect to such parts. Thermador's sole liability and responsibility hereunder is to repair manufacturer-defective Product only, using a Thermador-authorized service provider during normal business hours. For safety and property damage concerns, Thermador highly recommends that you do not attempt to repair the Product yourself, or use an un-authorized servicer; Thermador will have no responsibility or liability for repairs or work performed by a non-authorized servicer. If you choose to have someone other than an authorized service provider work on your Product, THIS WARRANTY WILL AUTOMATICALLY BECOME NULL AND VOID. Authorized service providers are those persons or companies that have been specially trained on Thermador products, and who possess, in Thermador's opinion, a superior reputation for customer service and technical ability (note that they are independent entities and are not agents, partners, affiliates or representatives of [Thermador]). Notwithstanding the foregoing, [Thermador] will not incur any liability, or have responsibility, for the Product if it is located in a remote area (more than 100 miles from an authorized service provider) or is reasonably inaccessible, hazardous, threatening, or treacherous locale, surroundings, or environment; in any such event, if you request, Thermador would still pay for labor and parts and ship the parts to the nearest authorized service provider, but you would still be fully liable and responsible for any travel time or other special charges by the service company, assuming they agree to make the service call.
Extended Limited Warranty: None
Out of Warranty Product:
Thermador is under no obligation, at law or otherwise, to provide you with any concessions, including repairs, pro-rates, or Product replacement, once this warranty has expired.
Warranty Exclusions:
The warranty coverage described herein excludes all defects or damage that are not the direct fault of Thermador, including without limitation, one or more of the following: (1) use of the Product in anything other than its normal, customary and intended manner (including without limitation, any form of commercial use, use or storage of an indoor product outdoors, use of the Product in conjunction with air or water-going vessels); (2) any party's willful misconduct, negligence, misuse, abuse, accidents, neglect, improper operation, failure to maintain, improper or negligent installation, tampering, failure to follow operating instructions, mishandling, unauthorized service (including self-performed "fixing" or exploration of the appliance's internal workings); (3) adjustment, alteration or modification of any kind; (4) a failure to comply with any applicable state, local, city, or county electrical, plumbing and/or building codes, regulations, or laws, including failure to install the product in strict conformity with local fire and building codes and regulations; (5) ordinary wear and tear, spills of food, liquid, grease accumulations, or other substances that accumulate on, in, or around the Product; and (6) any external, elemental and/or environmental forces and factors, including without limitation, rain, wind, sand, floods, fires, mud slides, freezing temperatures, excessive moisture or extended exposure to humidity, lightning, power surges, structural failures surrounding the appliance, and acts of God. In no event shall Thermador have any liability or responsibility whatsoever for damage to surrounding property, including cabinetry, floors, ceilings, and other structures or objects around the Product. Also excluded from this warranty are scratches, nicks, minor dents, and cosmetic damages on external surfaces and exposed parts; Products on which the serial numbers have been altered, defaced, or removed; service visits to teach you how to use the Product, or visits where there is nothing wrong with the Product; correction of installation problems (you are solely responsible for any struc-
ture and setting for the Product, including all electrical, plumbing or other connecting facilities, for proper foundation/flooring, and for any alterations including without limitation cabinetry, walls, floors, shelving, etc.); and resetting of breakers or fuses. TO THE EXTENT ALLOWED BY LAW, THIS WARRANTY SETS OUT YOUR EXCLUSIVE REMEDIES WITH RESPECT TO PRODUCT, WHETHER THE CLAIM ARISES IN CONTRACT OR TORT (INCLUDING STRICT LIABILITY, OR NEGLIGENCE) OR OTHERWISE. THIS WARRANTY IS IN LIEU OF ALL OTHER WARRANTIES, WHETHER EXPRESS OR IMPLIED. ANY WARRANTY IMPLIED BY LAW, WHETHER FOR MERCHANTABILITY OR FITNESS FOR A PARTICULAR PURPOSE, OR OTHERWISE, SHALL BE EFFECTIVE ONLY FOR THE PERIOD THAT THIS EXPRESS LIMITED WARRANTY IS EFFECTIVE. IN NO EVENT WILL THE MANUFACTURER BE LIABLE FOR CONSEQUENTIAL, SPECIAL, INCIDENTAL, INDIRECT, "BUSINESS LOSS", AND/OR PUNITIVE DAMAGES, LOSSES, OR EXPENSES, INCLUDING WITHOUT LIMITATION TIME AWAY FROM WORK, HOTELS AND/OR RESTAURANT MEALS, REMODELLING EXPENSES IN EXCESS OF DIRECT DAMAGES WHICH ARE DEFINITIVELY CAUSED EXCLUSIVELY BY THERMADOR, OR OTHERWISE. SOME STATES DO NOT ALLOW THE EXCLUSION OR LIMITATION OF INCIDENTAL OR CONSEQUENTIAL DAMAGES, AND SOME STATES DO NOT ALLOW LIMITATIONS ON HOW LONG AN IMPLIED WARRANTY LASTS, SO THE ABOVE LIMITATIONS MAY NOT APPLY TO YOU. THIS WARRANTY GIVES YOU SPECIFIC LEGAL RIGHTS, AND YOU MAY ALSO HAVE OTHER RIGHTS WHICH VARY FROM STATE TO STATE. No attempt to alter, modify or amend this warranty shall be effective unless authorized in writing by an officer of BSH.
How to Obtain Warranty Service:
To obtain warranty service for your Product, you should contact the nearest Thermador authorized service center.
BSH Home Appliances - 5551 McFadden Avenue, Huntington Beach, CA 92649 / 800-735-4328.
Table des matières
Huntington Beach, CA 92649
natural_image
Illustration of hands inserting a component into a laptop keyboard (no text or symbols visible)natural_image
Illustration of hands operating a laptop keyboard with a mouse pointer (no text or symbols)natural_image
Illustration of hands operating a device with a grid-patterned panel and directional arrows indicating motion (no text or symbols)natural_image
Technical diagram showing three views of a ceiling fixture with circular components and mounting holes (no text or labels)Huntington Beach, CA 92649
natural_image
Illustration of hands inserting a component into a device with a mesh grille (no text or symbols)natural_image
Illustration of hands operating a computer monitor with a mesh grille (no text or symbols visible)natural_image
Illustration of hands installing or adjusting a component inside a storage rack, showing internal structure and directional arrows (no text or symbols)natural_image
Technical illustration of a mechanical assembly with three circular insets showing internal components (no text or symbols)Figura 5: Cambio de focos