DVP1210 - Portable DVD Player LENCO - Free user manual and instructions
Find the device manual for free DVP1210 LENCO in PDF.



| Product type | Portable DVD player |
| Brand | Lenco |
| Model | DVP1210 |
| Power supply | AC 100-240 V, 50/60 Hz / DC 9-12 V |
| Power consumption | < 12 W |
| Video output | 1 V p-p (75 Ω) |
| Audio output | 1.2 V rms (1 kHz, 0 dB) |
| Laser system | Semiconductor, wavelength 650 nm |
| Signal system | NTSC / PAL |
| Frequency range | 20 Hz - 20 kHz (1 dB) |
| Signal-to-noise ratio | > 80 dB (ANALOG OUT connectors) |
| Dynamic range | > 85 dB (DVD/CD) |
| Battery | 7.4 V, charging time 3-4 hours |
| Playable formats | DVD, CD, VCD, MP3, JPEG |
| Main features | USB playback, SD card, TFT screen, remote control, zoom, subtitles, angles, programming |
| Care and cleaning | Use a soft, dry cloth. Do not use water or liquid. |
| Safety | Do not open the device. Do not expose to moisture. Do not block ventilation openings. |
| Spare parts and repairability | No user-serviceable parts. Contact authorized after-sales service. |
| Warranty | Complies with European legislation. Contact the retailer. |
Frequently Asked Questions - DVP1210 LENCO
User questions about DVP1210 LENCO
0 question about this device. Answer the ones you know or ask your own.
Ask a new question about this device
Download the instructions for your Portable DVD Player in PDF format for free! Find your manual DVP1210 - LENCO and take your electronic device back in hand. On this page are published all the documents necessary for the use of your device. DVP1210 by LENCO.
USER MANUAL DVP1210 LENCO
- Before using this product, read and follow all warnings and instrucons.
- This device is not intended for use by people (including children) with physical, sensory or mental disabilities, or a lack of experience and knowledge, unless they're under supervision or have received instrucons about the correct use of the device by the person who is responsible for their safety;
- This product is intended for household use only and not for commercial or industrial use.
- Do not expose to dripping or splashing.
- No naked ame sources, such as lighted candles, should be placed on or near the product.
- Venlaon should not be impeded by covering venlaon openings with items such as newspapers, table cloths, curtains and the like.
- Make sure the unit is adjusted to a stable posion. Damage caused by using this product in an unstable posion or by failure to follow any other warning or precaun contained within this user manual will not be covered by warranty.
- Do not place objects lled with liquids, such as vases on or near the product.
- Do not use or store this product in a place where it is subject to direct sunlight, heat, excessive dust or vibraon.
- Do not keep or store this product in wet conditions for a long period.
- Do not clean this product with water or other liquids.
- Do not block or cover the slots and holes in the product.
- Do not push foreign objects into the slots or holes in the product.
- Do not aempt to open this product yourself. There are no user serviceable parts inside.
- Do not allow children access to plasc bags.

Warning
- Never remove the casing of this device.
- Never place this device on other electrical equipment.
Noce
If at any me in the future you should need to dispose of this product please note that: All baeries and accumulators need to be removed from this product (Removal of Waste Baeries and Accumulators).
- Always bring your product to a professional to remove the built-in baery.
- This device is not intended for use by people (including children) with physical, sensory or mental disabilities, or a lack of experience and knowledge, unless they're under supervision or have received instrucons about the correct use of the device by the person who is responsible for their safety.
- This product is intended for household use only and not for commercial or industrial use.
- Make sure the unit is adjusted to a stable position. Damage caused by using this product in an unstable position or by failure to follow any other warning or precaution contained within this user manual will not be covered by warranty.
- Never remove the casing of this apparatus.
- Never place this apparatus on other electrical equipment.
-
Do not use or store this product in a place where it is subject to direct sunlight, heat, excessive dust or vibraon.
-
Do not clean this product with water or other liquids.
-
Do not block or cover the slots and holes in the product.
-
Do not push foreign objects into the slots or holes in the product.
-
Do not allow children access to plasc bags.
-
Please check that the voltage on the type plate of your appliance corresponds with your house electricity supply (type plate is located on the back of the unit).
-
Protect the power cord from being walked on or pinched, particularly at plugs, convenience receptacles, and the point where they exit from the apparatus.
-
Only use aachments/accessories specied by the manufacturer.
-
Refer all servicing to qualified service personnel. Servicing is required when the apparatus has been damaged in any way, such as the power supply cord or the plug, when liquid has been spilled or objects have fallen into the apparatus, when the apparatus has been exposed to rain or moisture, does not operate normally, or has been dropped.
-
Do not use a damaged power cord or plug or a loose outlet. Doing so may result in re or electric shock.
Power supply adaptor (For EU only)
Manufacturer: Mass Power Electronic Limited
Model number:EFF0900150E1BA
Power supply adaptor (For UK only)
Manufacturer: Mass Power Electronic Limited
Model number: EFF0900150G1BA
Only use the power supply listed in the user instrucons
WARNING
Do not ingest the baery, Chemical Burn Hazard (The remote control supplied with) This product contains a coin/buon cell baery.
If the coin/buon cell baery is swallowed, it can cause severe internal burns in just 2 hours and can lead to death.
Keep new and used baeries away from children.
If the baery compartment does not close securely, stop using the product and keep it away from children.
If you think baeries might have been swallowed or placed inside any part of the body, seek immediate medical aenon.

WARNING: Prolonged exposure to loud sounds from personal music players may lead to temporary permanent hearing loss.
To prevent possible hearing damage, do not listen at high volume levels for long periods.
2. Idencaon of Controls
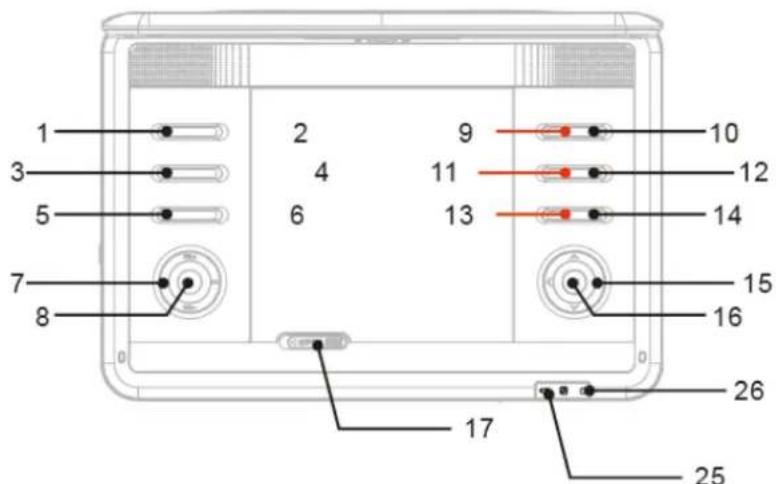
Main Unit
- ANGLE
- SOURCE
- BACKLIGHT
- DISPLAY
- MUTE
- REPEAT
- VOL+/VOL-//I
- MENU
- SETUP
10.ZOOM - AUDIO
- SUBTITLE
- SDP
-
/ / / / / / / / / / / / / / / / / / / / / / / / / / / / / / / / / / / (Le/right/up/down/Fast forward/Fast reverse)
-
OK
- OPEN
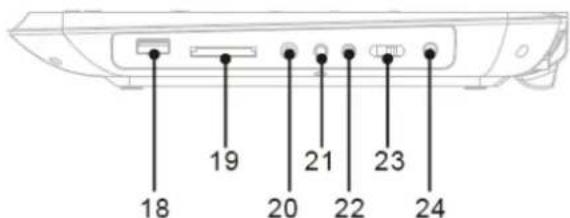
- USB
- CARD SLOT
- Earphone Socket
- AV OUT
- AVIN
- POWER ON/OFF
- DCIN 9-12V
- Baery Charging Indicator Illuminates green ashing when the baery is charging. Illuminates green when the baery is fully charged.
- Power Indicator Illuminates red when the unit is switched on.
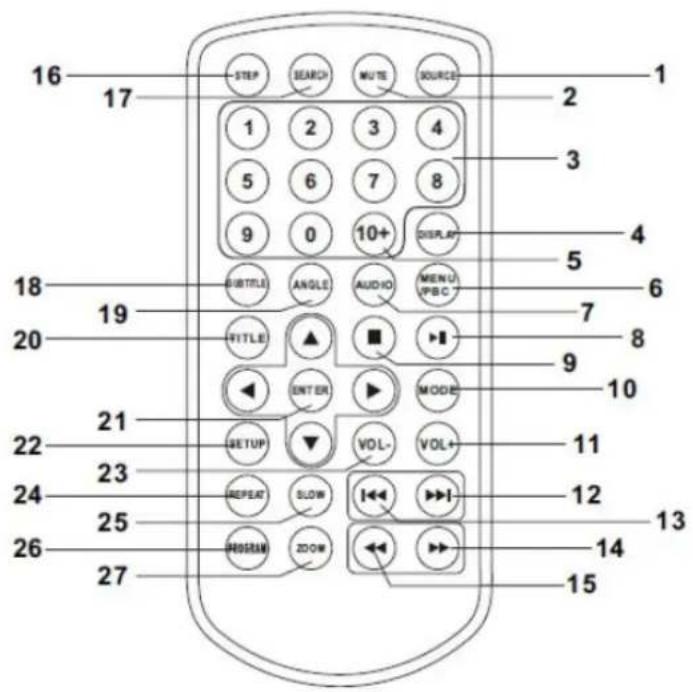
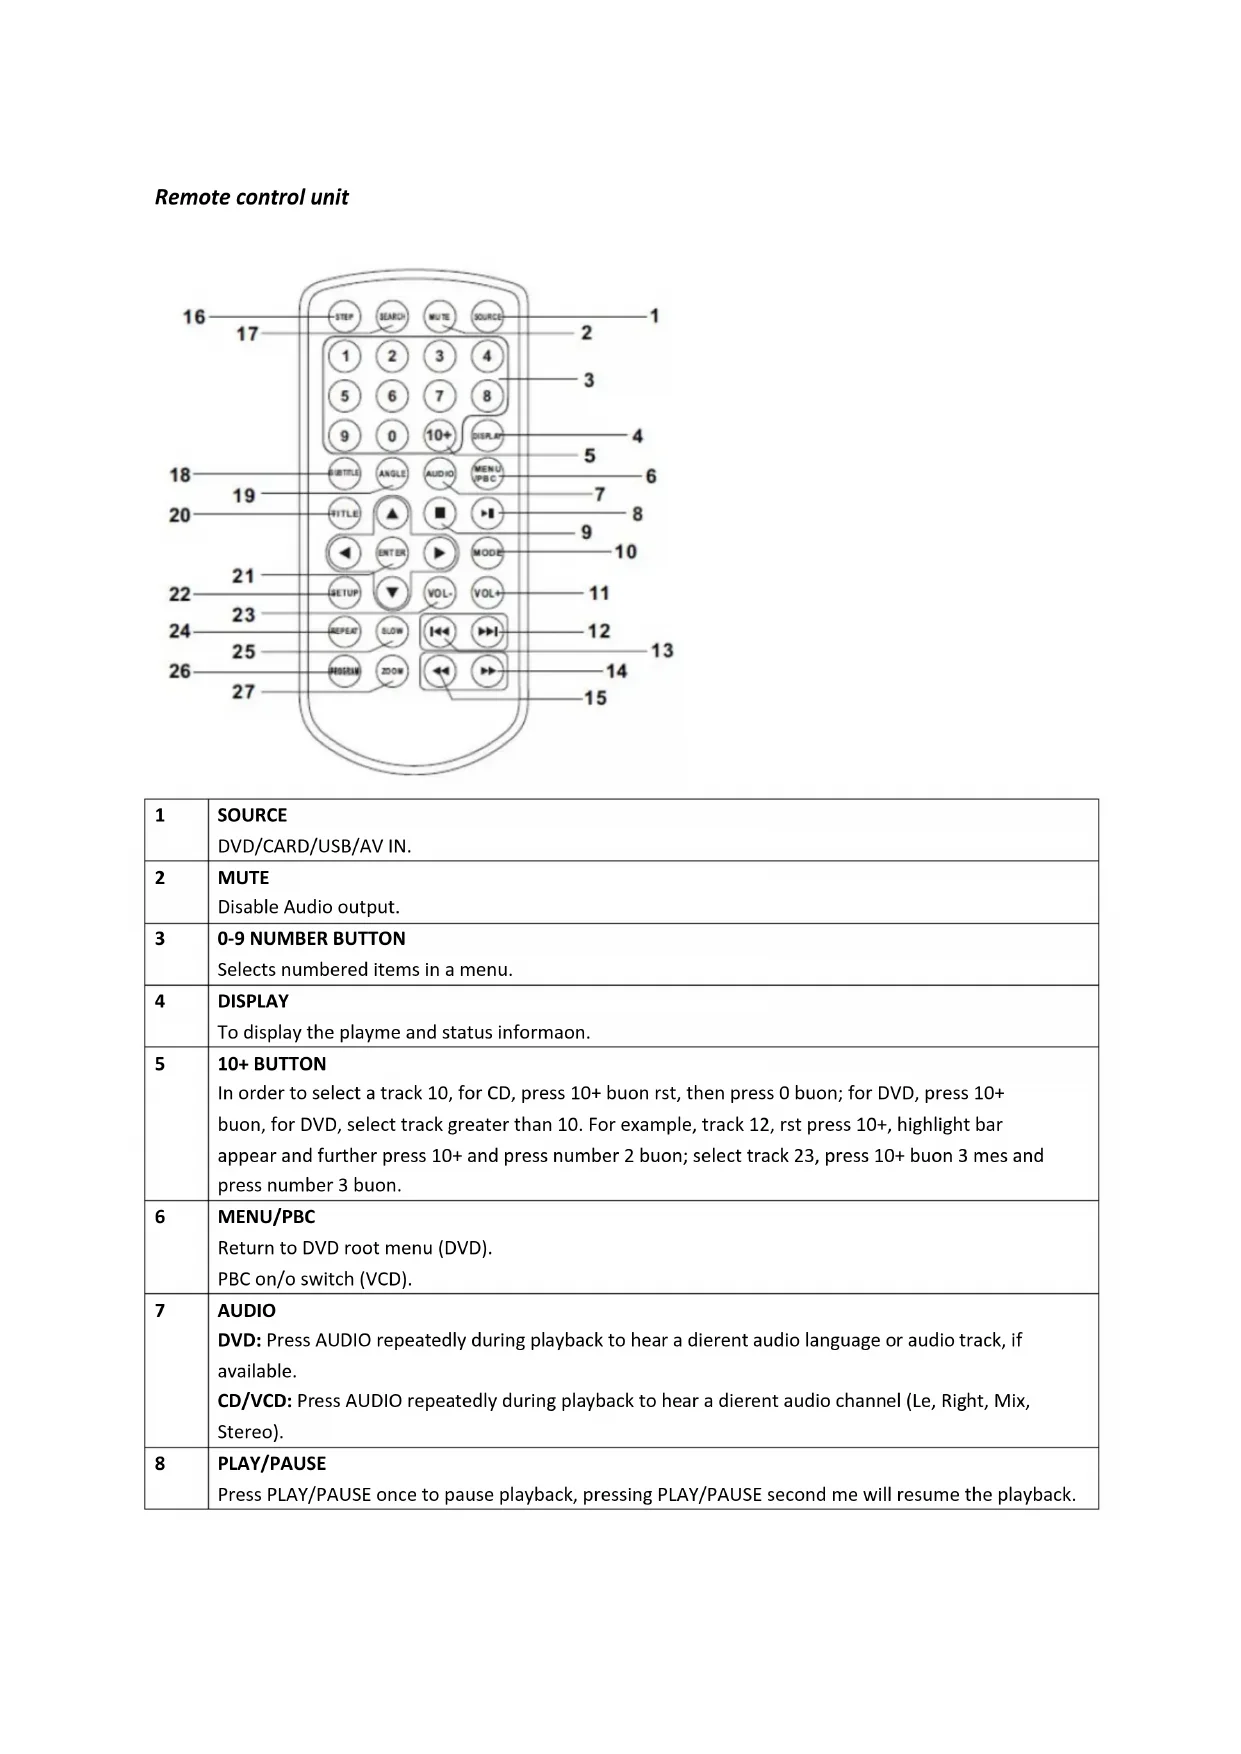
| 1 | SOURCE DVD/CARD/USB/AV IN. |
| 2 | MUTE Disable Audio output. |
| 3 | 0-9 NUMBER BUTTON Selects numbered items in a menu. |
| 4 | DISPLAY To display the playme and status informaon. |
| 5 | 10+ BUTTON In order to select a track 10, for CD, press 10+BUON rst, then press 0 buon; for DVD, press 10+ buon, for DVD, select track greater than 10. For example, track 12, rst press 10+, highlight bar appear and further press 10+ and press number 2 buon; select track 23, press 10+ buon 3 mes and press number 3 buon. |
| 6 | MENU/PBC Return to DVD root menu (DVD). PBC on/o switch (VCD). |
| 7 | AUDIO DVD: Press AUDIO repeatedly during playback to hear a dierent audio language or audio track, if available. CD/VCD: Press AUDIO repeatedly during playback to hear a dierent audio channel (Le, Right, Mix, Stereo). |
| 8 | PLAY/PAUSE Press PLAY/PAUSE once to pause playback, pressing PLAY/PAUSE second me will resume the playback. |
| 9 | STOP When this buoy is pressed once, the unit records the stopped point, from where playback will resume if PLAY ( ) is pressed aer wards. But if STOP buoy is pressed again instead of PLAY ( ) buoy, there will be no resume funcon. |
| 10 | MODE Set LCD parameter (adjust brightness, contrast, and saturaon). |
| 11 | VOL+ |
| 23 | VOL- Adjust volume. |
| 12 | Forward Skip Go to next chapter/track. For MP3, if want to go to desire track, need to press number buoy on R/C or ▲/▼ buoy to highlight the track and then press “ENTER” buoy to play the desire track. |
| 13 | Reverse Skip Go to previous chapter/track to the beginning. For MP3, if want to go to desire track, need to press number buoy on R/C or ▲/▼ buoy to highlight) the track and then press “ENTER” buoy to play the desire track. |
| 14 | → BUTTON Press → BUTTON allow skipping ahead at 5-level speed (X2->X4->X8->X16->X32->PLAY); press PLAY buoy return to normal playback. |
| 15 | ← BUTTON Press ← BUTTON allow skipping back at 5-level speed (X2->X4->X8->X16->X32->PLAY), press PLAY buoy return to normal playback. |
| 16 | STEP Step the moon in DVD mode. |
| 17 | SEARCH Go to me point, tie or chapter you want in DVD Mode. |
| 18 | SUBTITLE Press SUBTITLE repeatedly during playback to hear a dierent subtle languages. |
| 19 | ANGLE DVD: Press ANGLE will change the view angle, on DVDs that support this feature. |
| 20 | TITLE Return to DVD tle menu |
| 21 | ENTER Conrms menu selecon. |
| 22 | SETUP Accesses or removes setup menu. |
| 24 | REPEAT Press REPEAT during playback to select a desired repeat mode. DVD: you can play select repeat chapter/tle/o. CD/VCD: you can select repeat single/all/o. MP3: you can select repeat single/folder/o and random. |
| 25 | SLOW Press SLOW buoy repeatedly to enter slow playback, and cycle between dierent speeds. The speeds are 1/2, 1/4, 1/8, 1/16, and normal. |
| 26 | PROGRAM DVD/VCD: The program funcon enables you to store your favorite tracks from the disc. Press PROGRAM buoyon; then PROGRAM MENU will appear on screen, now you can use the number key to direct input the tles, chapters or tracks number and select PLAY opon. To resume normal playback, press PROGRAM and select clear program opon on the program menu, press PROGRAM again to exit program menu. MP3: Press PROGRAM buoyon, it will go back to the le list. Press PROGRAM buoyon again, it will go back to the MP3 folder. |
| 27 | ZOOM DVD/VCD: Use ZOOM to enlarge or shrink the video image. 1. Press ZOOM during playback or sll playback to acvate the Zoom funcon. The square frame appears briey in the right boom of the picture. 2. Each press of the ZOOM buoyon changes the TV screen in the following sequence: 2X size 3X size 4X size 1/2 size 1/3 size 1/4 size normal size JPEG: Use ZOOM to enlarge or shrink the picture. 1. Press 'ZOOM'. 2. Used to enlarge, or " " to shorten the picture. Use the ▲ ▼ ▲ buon to move through the zoomed picture. |
3. SETUP Menu Seng
General Setup Page
Press SETUP buon to get the setup menu. Use direcon buons to select the preferred item.
Aer nishing sengs, press SETUP again to normal display.
The following menu items can be changed:
GENERAL: selects the GENERAL PAGE menu.
AUDIO: selects the AUDIO PAGE menu.
VIDEO: selects the VIDEO PAGE menu.
PREFERENCE: selects the PREFERENCE PAGE menu.
General Setup Page
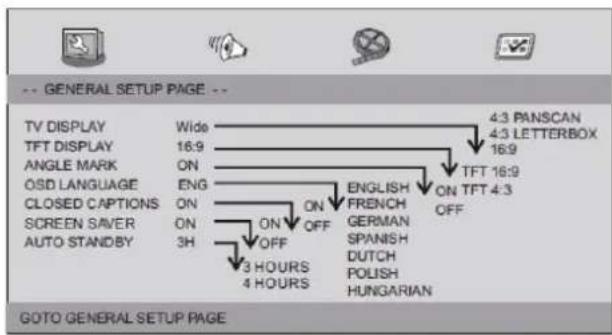
TV DISPLAY: selects the aspect rao of the playback picture.
4:3 PAN SCAN: if you have a normal TV and want both sides of the picture to be trimmed or formatted to t your TV screen.
4:3 LETTERBOX: if you have a normal TV. In this case, a wide picture with black bands on the upper and lower porons of the TV screen will be displayed.
16:9: wide screen display.
TFT DISPLAY: Select the TFT display to 16:9 or 4:3.
Angle Mark
Displays current angle seng informaon on the right hand corner of the TFT screen if available on the disc
OSD Language
You can select your own preferred language sengs.
Closed Capons
Closed capons are data that are hidden in the video signal of some discs. Before you select this funcon, please ensure that the disc contains closed capons informaon and your TV set also has this funcon.
Screen Saver
This funcon is used to turn the screen saver On or O.
Auto Standby
This funcon is used to select auto standby sengs aer 3 or 4 hours.
3 HOURS: the unit will turn to standby mode aer 3 hours if there is no interacon from user within this period of me.
4 HOURS: the unit will turn to standby mode aer4 hours if there is no interacon from user within this period of me.
OFF: the auto standby funcon is disabled, and unit will stay in "on" mode even if no interacon from user.
Audio Setup Page
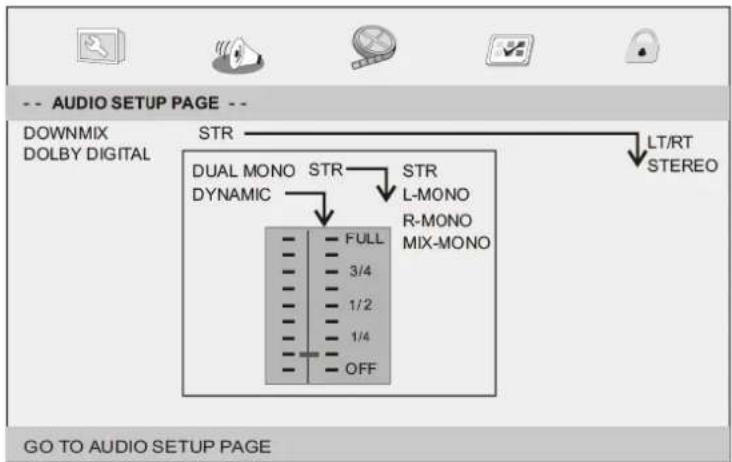
Audio Setup Page
Downmix
This opons allows you to set the stereo analog output of your DVD Player.
LT/RT: Select this opon if your DVD Player is connected to a Dolby Pro Logic decoder.
Stereo: Select this opon when output delivers sound from only the two front speakers.
Dolby digital
The opons included in Dolby Digital Setup are: 'Dual Mono' and 'Dynamic'.
Dual Mono
Stereo: Le mono sound will send output signals to Le speaker and Right mono sound will send output signals to Right speaker.
L-Mono: Le mono sound will send output signals to Le speaker and Right speaker.
R-Mono: Right mono sound will send output signals to Le speaker and Right speaker.
Mix-Mono: Le and Right mixed mono sound will send output signals to Le and Right speakers.
Dynamic
Dynamic range compression.
Video Setup Page
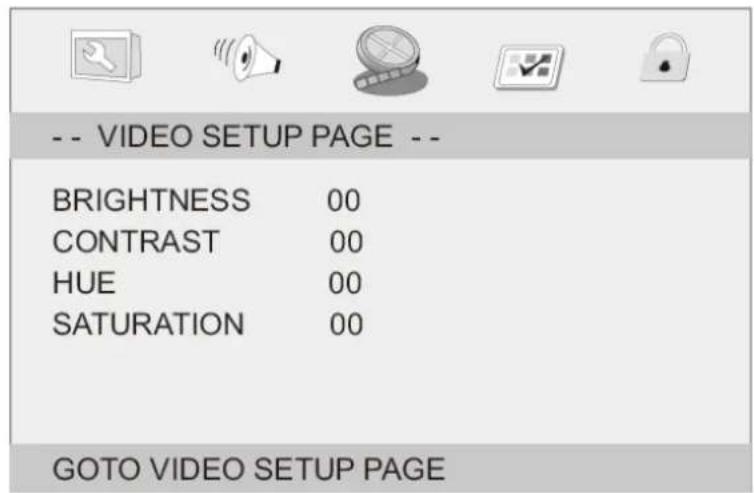
Brightness, Contrast, Hue, Saturaon: seng the video quality.
Preference Page
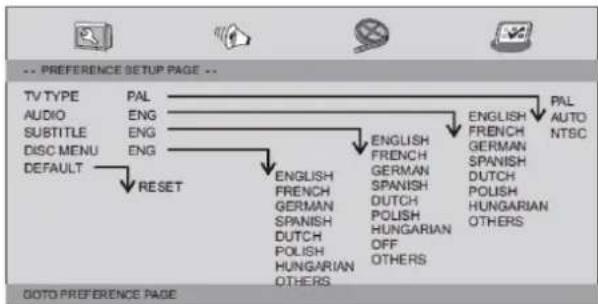
TV Type
Selecng the colour system that corresponds to your TV when AV outputs. This DVD Player is compatible with both NTSC and PAL.
PAL - Select this if the connected TV is PAL system. It will change the video signal of a NTSC disc and output in PAL format.
NTSC - Select this if the connected TV is NTSC system. It will change the video signal of a PAL disc and output in NTSC format.
Auto: Change the video signal output automac according to the playing disk format.
Audio: Selects a language for audio (if available).
Subtle: Selects a language for subtle (if available).
Disc Menu: Selects a language for disc menu (if available).
Default: Back to the factory seng.
4. Parameters and specicaons
Electronical parameters
| Item | Standard requirement | |
| Power requirements | : AC 1 00-240 V, 50/60 Hz/DC 9-12V | |
| Power consumpon | : <12W | |
| Operang humidity | : 5 % to 90 % | |
| Output | VIDEO OUT | : 1 Vp-p (75Ω) |
| AUDIO OUT | : 1.2 Vrms (1 KHz, 0dB) | |
System
| Laser | : Semiconductor laser, wavelength 650 nm |
| Signal system | : NTSC/PAL |
| Frequency response | : 20Hz to 20 kHz (1dB) |
| Signal-to-noise rao | : More than 80 dB (ANALOG OUT connectors only) |
| Dynamic range | : More than 85 dB (DVD/CD) |
Note: Design and specicaons are subject to change prior noce.
Baery Parameters
Baery Specicaons:
Output: 7.4V
Charge/Discharge Time:
Standard charge me: 3h 4h
Storage and work circumstances:
- Storage circumstances Temperature Humidity
6 months -20^ +45^ 65± 20%
1 week -20°C ~ +65°C 65 ± 20%
- Work circumstances Temperature Humidity
Standard charge 0^ +45^ 65± 20%
Standard discharge -20°C ~ +65°C 65 ± 20%
5. Guarantee
Lenco oers service and warranty in accordance with the European law, which means that in case of repairs (both during and aer the warranty period) you should contact your local dealer.
Important note: It is not possible to send products that need repairs to Lenco directly.
Important note: If this unit is opened or accessed by a non-social service center in any way, the warranty expires.
This device is not suitable for professional use. In case of professional use, all warranty obligaons of the manufacturer will be voided.
6. Disclaimer
Updates to Firmware and/or hardware components are made regularly. Therefore some of the instrucon, specicaons and pictures in this documentaon may differ slightly from your parcular situaon. All items described in this guide for illustraon purposes only and may not apply to parcular situaon. No legal right or entitlements may be obtained from the descripion made in this manual.
7. Disposal of the Old Device
This symbol indicates that the relevant electrical product or baery should not be disposed of as general household waste in Europe. To ensure the correct waste treatment of the product and baery, please dispose them in accordance to any applicable local laws of requirement for disposal of electrical equipment or baeries. In so doing, you will help to conserve natural resources and improve standards of environmental protecon in treatment and disposal of electrical waste (Waste Electrical and Electronic Equipment Directive).
8. CE Marking

Products with the CE marking comply with the EMC Directive (2014/30/EU) and the Low Voltage Directive (2014/35/EU) issued by the Commission of the European Community.
Hereby, Lenco Benelux BV; Thermiekstraat Ia, 6361 HB Nuth, The Netherlands, declares that this product is in compliance with the essenai requirements and other relevant provisions of Direcve 1999/5/EC. The declaraon of conformity may be consulted via techdoc@lenco.com
9. Service
For more informaon and helpdesk support, please visit www.lenco.com Lenco Benelux BV; Thermiekstraat la, 6361 HB, The Netherlands.
OSD Language (OSD Taal)
Ukuntuw eigen gewenste taalinstellingen selecteren.
Closed Capons (Ondertels)
Screen Saver (Schembeveiling)
Closed Capons (Subtulos)

- Warning
- Noce
- Idencaon of Controls
- SETUP Menu Seng
- General Setup Page
- Angle Mark
- OSD Language
- Closed Capons
- Screen Saver
- Auto Standby
- Audio Setup Page
- Downmix
- Dolby digital
- Dual Mono
- Dynamic
- Video Setup Page
- Preference Page
- TV Type
- Parameters and specicaons
- Baery Parameters
- Guarantee
- Disclaimer
- Disposal of the Old Device
- CE Marking
- Service
- OSD Language (OSD Taal)
- Closed Capons (Ondertels)
- Screen Saver (Schembeveiling)
- Closed Capons (Subtulos)
Brand : LENCO
Model : DVP1210
Category : Portable DVD Player