
HWR650 - Soundbar SAMSUNG - Free user manual and instructions
Find the device manual for free HWR650 SAMSUNG in PDF.
| Product Type | Soundbar with wireless subwoofer |
| Model | Samsung HW-R650 |
| Dimensions (W x H x D) | 1060.0 x 59.0 x 87.5 mm |
| Soundbar weight | 2.9 kg |
| Subwoofer dimensions (W x H x D) | 200.0 x 353.0 x 302.0 mm |
| Subwoofer weight | 6.0 kg |
| Power supply | AC/DC adapter, 24V DC; standby consumption 2.0W |
| Nominal output power | 30W x 6 (6 channels) |
| Subwoofer power | 160W |
| Supported audio formats | LPCM 2ch, Dolby Audio (Dolby Digital), DTS |
| Connectivity | HDMI (ARC), optical input, AUX, USB, Bluetooth |
| Sound modes | Standard, Surround Sound, Game, Smart |
| Special features | Bluetooth Power On, Auto Power Link, Anynet+ (HDMI-CEC), subwoofer volume adjustment, Samsung Audio Remote app |
| Maintenance and cleaning | Clean with a soft, dry cloth. Do not use chemical products. |
| Safety | Do not expose to rain or moisture. Plug into a grounded outlet. Disconnect during thunderstorms. |
| Spare parts and accessories | Wireless subwoofer, rear speaker kit (SWA-8500S), remote control, batteries, optical cable, power adapter |
| Repairability | Entrust any repairs to a qualified after-sales service. Do not open the device. |
Frequently Asked Questions - HWR650 SAMSUNG
User questions about HWR650 SAMSUNG
0 question about this device. Answer the ones you know or ask your own.
Ask a new question about this device
Download the instructions for your Soundbar in PDF format for free! Find your manual HWR650 - SAMSUNG and take your electronic device back in hand. On this page are published all the documents necessary for the use of your device. HWR650 by SAMSUNG.
USER MANUAL HWR650 SAMSUNG
Thank you for purchasing this Samsung product.
To receive more complete service, please register
your product at www.samsung.com/register
SAFETY INFORMATION
SAFETY WARNINGS
TO REDUCE THE RISK OF ELECTRIC SHOCK, DO NOT REMOVE THE COVER (OR BACK).
NO USER-SERVICEABLE PARTS ARE INSIDE.
REFER SERVICING TO QUALIFIED SERVICE PERSONNEL.
Refer to the table below for an explanation of symbols which may be on your Samsung product.
 | CAUTIONRISK OF ELECTRIC SHOCK.DO NOT OPEN. |  |
 | This symbol indicates that high voltage is present inside. It is dangerous to make any kind of contact with any internal part of this product. | |
 | This symbol indicates that this product has included important literature concerning operation and maintenance. | |
 | Class II product: This symbol indicates that it does not require a safety connection to electrical earth (ground). If this symbol is not present on a product with a power cord, the product MUST have a reliable connection to protective earth (ground). | |
 | AC voltage: This symbol indicates that the rated voltage marked with the symbol is AC voltage. | |
 | DC voltage: This symbol indicates that the rated voltage marked with the symbol is DC voltage. | |
 | Caution, Consult instructions for use: This symbol instructs the user to consult the user manual for further safety related information. | |
CAUTION
WARNING
- To reduce the risk of fire or electric shock, do not expose this appliance to rain or moisture.
CAUTION
- TO PREVENT ELECTRIC SHOCK, MATCH WIDE BLADE OF PLUG TO WIDE SLOT, FULLY INSERT.
- This apparatus shall always be connected to a AC outlet with a protective grounding connection.
- To disconnect the apparatus from the mains, the plug must be pulled out from the mains socket, therefore the mains plug shall be readily operable.
- Do not expose this apparatus to dripping or splashing. Do not put objects filled with liquids, such as vases on the apparatus.
- To turn this apparatus off completely, you must pull the power plug out of the wall socket. Consequently, the power plug must be easily and readily accessible at all times.
PRECAUTIONS
- Ensure that the AC power supply in your house complies with the power requirements listed on the identification sticker located on the bottom of your product. Install your product horizontally, on a suitable base (furniture), with enough space around it for ventilation (7\~10 cm). Make sure the ventilation slots are not covered. Do not place the unit on amplifiers or other equipment which may become hot. This unit is designed for continuous use. To fully turn off the unit, disconnect the AC plug from the wall outlet. Unplug the unit if you intend to leave it unused for a long period of time.
- During thunderstorms, disconnect the AC plug from the wall outlet. Voltage peaks due to lightning could damage the unit.
- Do not expose the unit to direct sunlight or other heat sources. This could lead to overheating and cause the unit to malfunction.
-
Protect the product from moisture (i.e. vases), and excess heat (e.g. a fireplace) or equipment creating strong magnetic or electric fields. Unplug the power cable from the AC wall socket if the unit malfunctions. Your product is not intended for industrial use. It is for personal use only. Condensation may occur if your product has been stored in cold temperatures. If transporting the unit during the winter, wait approximately 2 hours until the unit has reached room temperature before using.
-
The battery used with this product contains chemicals that are harmful to the environment. Do not dispose of the battery in the general household trash. Do not expose the battery to excess heat, direct sunlight, or fire. Do not short circuit, disassemble, or overheat the battery. Danger of explosion if the battery is replaced incorrectly. Replace only with the same or equivalent type.
ABOUT THIS MANUAL
The user manual has two parts: this simple paper USER MANUAL and a detailed FULL MANUAL you can download.

natural_image
Illustration of a person sitting on a sofa using a laptop (no text or symbols visible)USER MANUAL
See this manual for safety instructions, product installation, components, connections, and product specifications.

natural_image
Illustration of a person sitting on a couch next to a desk with a laptop (no text or symbols)
FULL MANUAL
You can access the FULL MANUAL on Samsung's on-line customer support centre by scanning the QR code. To see the manual on your PC or mobile device, download the manual in document format from Samsung's website. (http://www.samsung.com/support)
Design and specifications are subject to change without prior notice.
CONTENTS
01 Checking the Components 2
Inserting Batteries before using the Remote Control (AA batteries X 2) ____ 2
02 Product Overview 3
Front Panel / Right Side Panel of the Soundbar ____ 3
Bottom Panel of the Soundbar 4
03 Connecting the Soundbar 5
Connecting Electrical Power ____ 5
Connecting the Soundbar to the Subwoofer ____ 6
- Automatic connection between the Subwoofer and the Soundbar ____ 6
- Manually connecting the Subwoofer if automatic connection fails ____ 7
Connecting an SWA-8500S (Sold Separately) to your Soundbar 8
04 Connecting to your TV 10
Method 1. Connecting with a Cable ____ 10
- Connecting using an Optical Cable 10
- Connecting a TV using an HDMI Cable 11
Method 2. Connecting Wirelessly ____ 12
- Connecting a TV via Bluetooth 12
05 Connecting an External Device 14
Connecting using an Optical or Analogue Audio (AUX) Cable 14
Connecting using an HDMI Cable 15
06 Connecting a USB Storage Device 16
07 Connecting a Mobile Device 18
Connecting via Bluetooth ____ 18
Using the Samsung Audio Remote App ____ 21
- Installing the Samsung Audio Remote App ____ 21
- Launching the Samsung Audio Remote App 21
08 Using the Remote Control 22
How to Use the Remote Control ____ 22
Adjusting the Soundbar volume with a TV remote control ____ 25
Using the Hidden Buttons (Buttons with more than one function) ____ 26
Output specifications for the different sound effect modes ____ 26
09 Installing the Wall Mount 27
Installation Precautions 27
Wallmount Components 27
10 Software Update 29
Updating Procedure 30
If UPDATE is not displayed ____ 30
11 Troubleshooting 31
12 Licence 32
13 Open Source Licence Notice 32
14 Important Notes About Service 32
15 Specifications and Guide 33
Specifications 33
01 CHECKING THE COMPONENTS
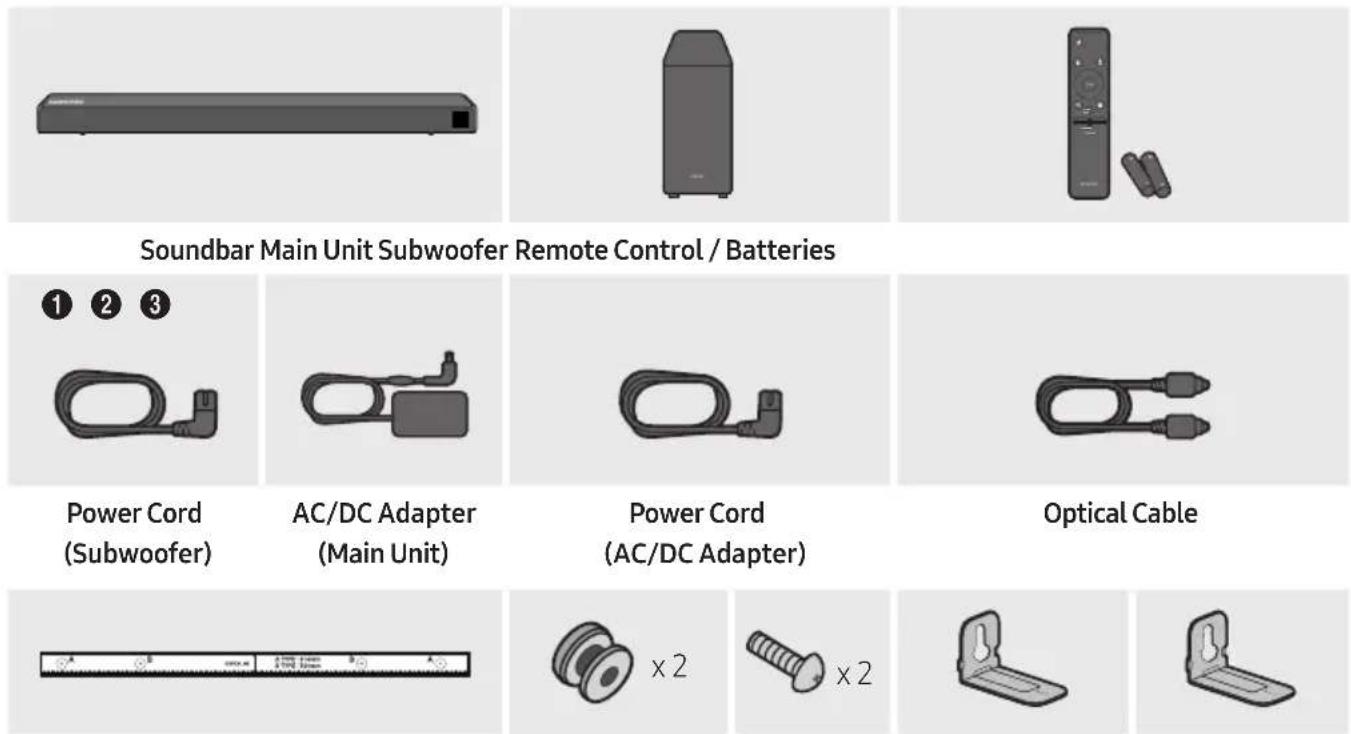
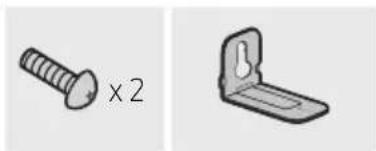
Wall Mount Guide Holder-Screw Screw Bracket-Wall
Mount L
Bracket-Wall Mount R
- For more information about the power supply and power consumption, refer to the label attached to the product. (Label: Bottom of the Soundbar Main Unit)
- The power components are labelled (1, 2, 3). For more information about power connections, see page 5.
- To purchase additional components or optional cables, contact a Samsung Service Centre or Samsung Customer Care.
- Depending on the region, the appearance of the AC plug may differ from the plug displayed above, or it may be supplied integrated with the AC/DC adapter.
- The appearance of the accessories may differ slightly from the illustrations above.
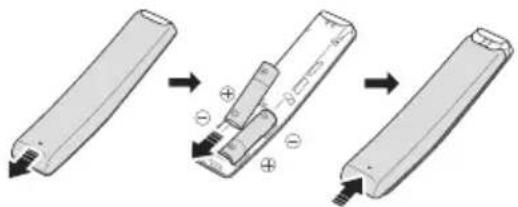
Inserting Batteries before using the Remote Control (AA batteries X 2)
Slide the battery cover in the direction of the arrow until it is completely removed. Insert 2 AA batteries (1.5V) oriented so that their polarity is correct. Slide the battery cover back into position.
text_image
Diagram illustrating battery internal structure changes with polarity labels02 PRODUCT OVERVIEW
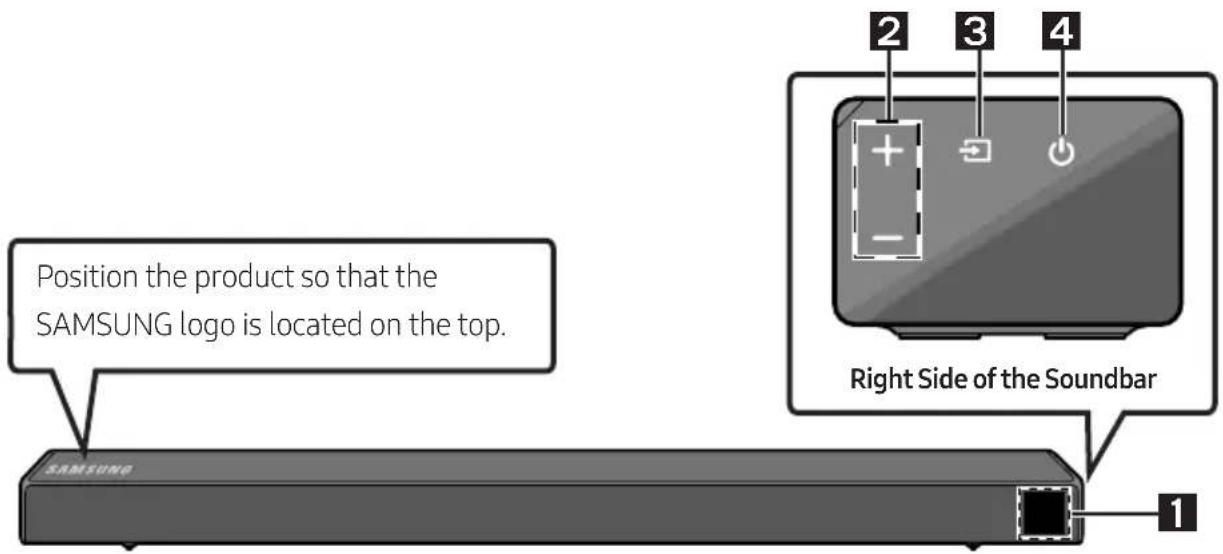
Front Panel / Right Side Panel of the Soundbar
text_image
Position the product so that the SAMSUNG logo is located on the top. SAMSUNG Right Side of the Soundbar 1 2 3 4| 1 | DisplayDisplays the product's status and current mode. | |
| 2 | +/- (Volume) ButtonAdjusts the volume.When adjusted, the volume level appears on the Soundbar's front display. | |
| 3 |  (Source) ButtonSelects the source input mode. (Source) ButtonSelects the source input mode. | |
| Input mode Display | ||
| Optical Digital input D.IN | ||
| ARC (HDMI OUT) input | D.IN → TV ARC (Auto conversion) | |
| AUX input AUX | ||
| HDMI input HDMI | ||
| BLUETOOTH mode BT | ||
| USB mode USB | ||
| To turn on "BT PAIRING" mode, change the source to "BT" mode, and then press and hold the(Source) button for more than 5 seconds. | ||
| 4 |  (Power) ButtonTurns the power on and off. (Power) ButtonTurns the power on and off. | |
- When you plug in the AC cord, the power button will begin working in 4 to 6 seconds.
- When you turn on this unit, there will be a 4 to 5 second delay before it produces sound.
- If you want to enjoy sound only from the Soundbar, you must turn off the TV's speakers in the Audio Setup menu of your TV. Refer to the owner's manual supplied with your TV.
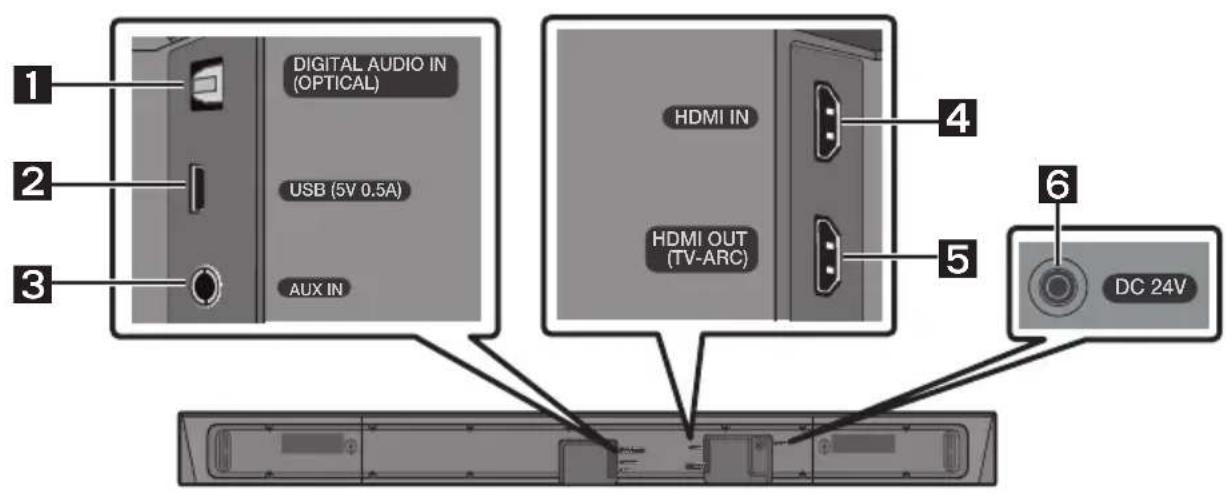
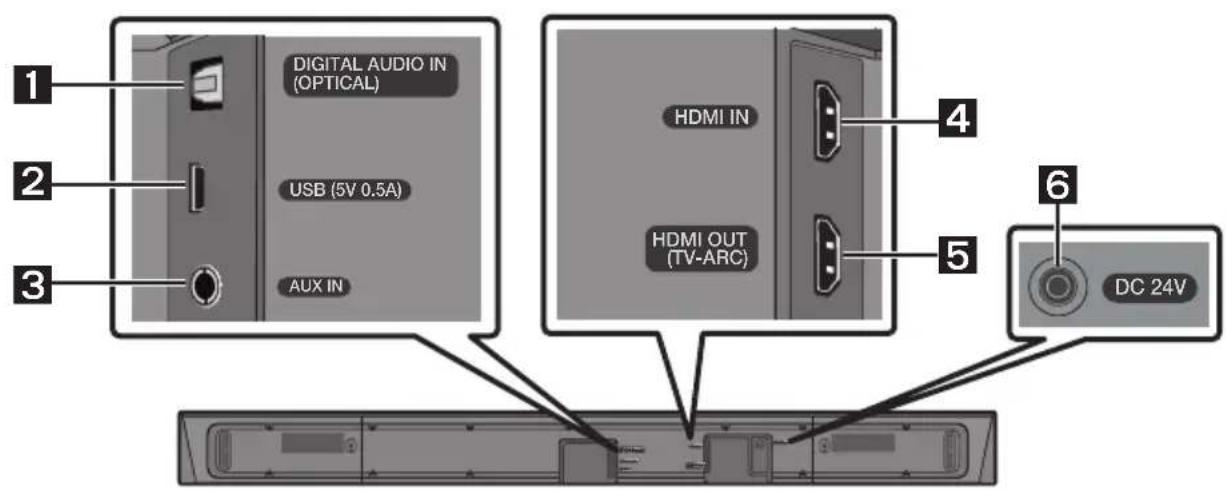
Bottom Panel of the Soundbar
text_image
1 2 3 DIGITAL AUDIO IN (OPTICAL) USB (5V 0.5A) AUX IN HDMI IN HDMI OUT (TV-ARC) 4 5 6 DC 24V| 1 | DIGITAL AUDIO IN (OPTICAL)Connect to the digital (optical) output of an external device. |
| 2 | USB (5V 0.5A)Connect a USB device here to play music files on the USB device through the Soundbar. |
| 3 | AUX INConnect to the Analogue output of an external device. |
| 4 | HDMI INInputs digital video and audio signals simultaneously using an HDMI cable.Connect to the HDMI output of an external device. |
| 5 | HDMI OUT (TV-ARC)Connect to the HDMI (ARC) jack on a TV. |
| 6 | DC 24V (Power Supply In)Connect the AC/DC power adapter. |
- When disconnecting the power cable of the AC/DC power adaptor from a wall outlet, pull the plug. Do not pull the cable.
- Do not connect this unit or other components to an AC outlet until all connections between components are complete.
03 CONNECTING THE SOUNDBAR
Connecting Electrical Power
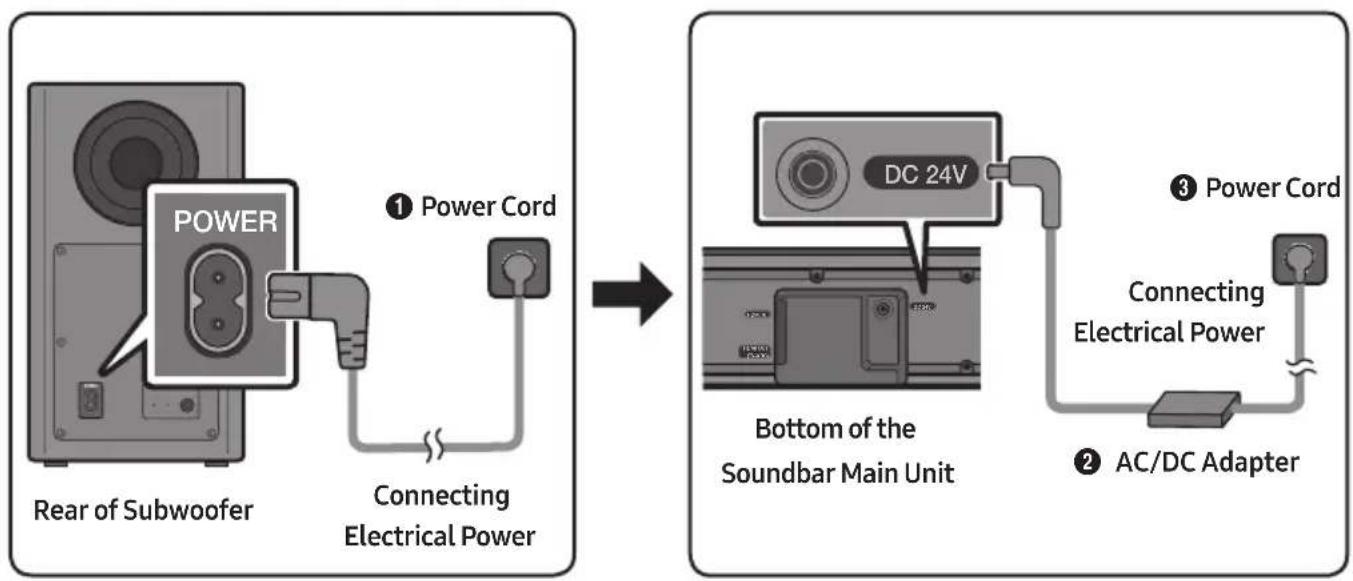
Use the power components (1, 2, 3) to connect the Subwoofer and Soundbar to an electrical outlet in the following order:
1 Connect the power cord to the Subwoofer.
② Connect the power output cable to the power adapter, and then to the Soundbar.
3 Connect the power cord to a wall socket.
See the illustrations below.
- For more information about the required electrical power and power consumption, refer to the label attached to the product. (Label: Bottom of the Soundbar Main Unit)
flowchart
graph LR
    A["Power Cord"] --> B["Connecting Electrical Power"]
    B --> C["Bottom of the Soundbar Main Unit"]
    C --> D["AC/DC Adapter"]
    D --> E["Connecting Electrical Power"]
    E --> F["DC 24V"]
    style A fill:#f9f,stroke:#333
    style C fill:#ccf,stroke:#333
    style D fill:#cfc,stroke:#333
- Make sure to rest the AC/DC Adapter flat on a table or the floor. If you place the AC/DC Adapter so that it is hanging with the AC cord input facing upwards, water or other foreign substances could enter the Adapter and cause the Adapter to malfunction.
Connecting the Soundbar to the Subwoofer
When the subwoofer is connected, you can enjoy rich bass sound.
Automatic connection between the Subwoofer and the Soundbar
When you turn the power on after connecting the power cables to the Soundbar and subwoofer, the subwoofer is automatically connected to the Soundbar.
- When auto pairing is complete, the blue indicators at the rear of the subwoofer turn on.
LED Indicator Lights on the Rear of Subwoofer
| LED Status Description Resolution | |||
| Blue | On | Successfully connected (normal operation) | - |
| Blinking Re | recovering the connection | Check if the power cable attached to the main Soundbar unit is connected properly or wait about 5 minutes. If blinking persists, try manually connecting the subwoofer. See page 7. | |
| Red On | Standby (with the Soundbar main unit turned off) | Check if the power cable attached to the main Soundbar unit is connected properly. | |
| Connection failed | Connect again. See the instructions for manual connection on page 7. | ||
| Red and blue | Blinking Malfunction | See the contact information for the Samsung Service Centre in this manual. | |
Manually connecting the Subwoofer if automatic connection fails
Before performing the manual connection procedure below:
-
Check whether the power cables for the Soundbar and subwoofer are connected properly.
• Make sure that the Soundbar is turned on. -
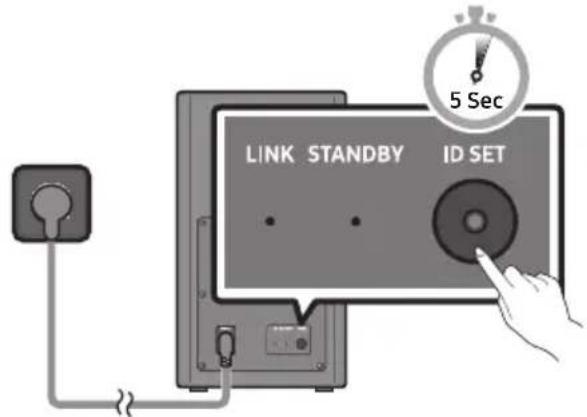
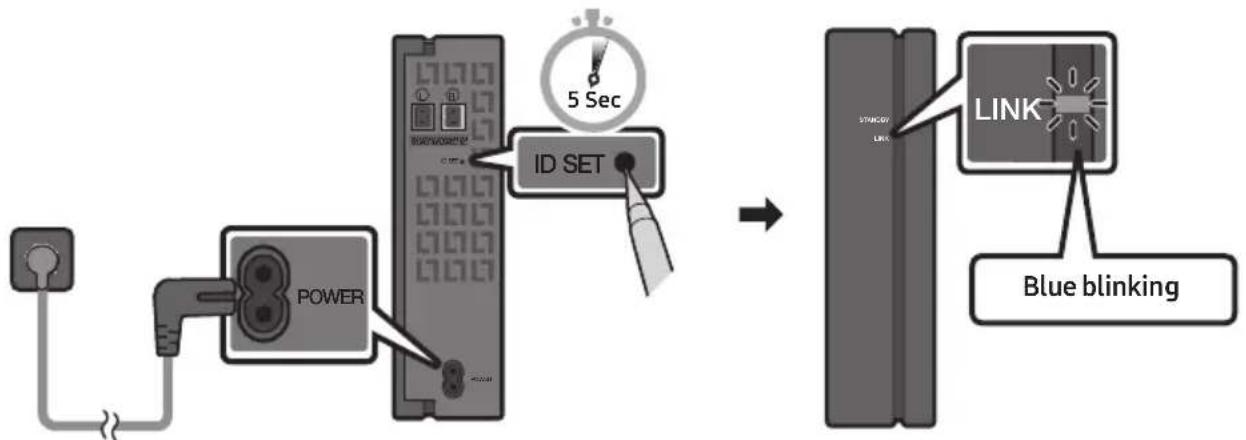
Press and hold ID SET on the rear of the subwoofer for at least 5 seconds.
- The red indicator on the rear of the subwoofer turns off and the blue indicator blinks.
text_image
LINK STANDBY ID SET 5 SecRear of Subwoofer
-
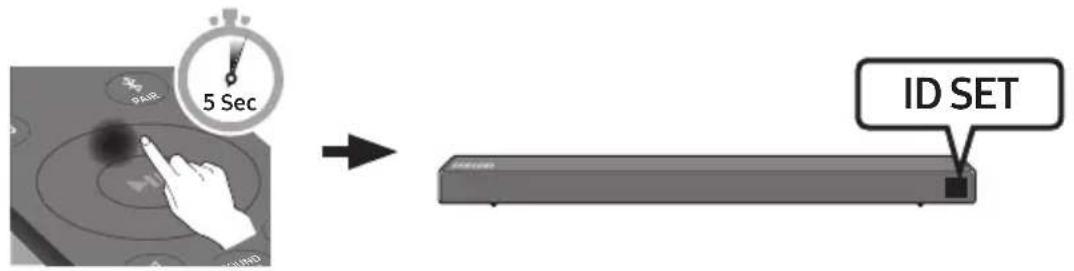
Press and hold the Up button on the remote control for at least 5 seconds.
-
The ID SET message appears on the display of the Soundbar for a moment, and then it disappears.
• The Soundbar will automatically power on when ID SET is complete.
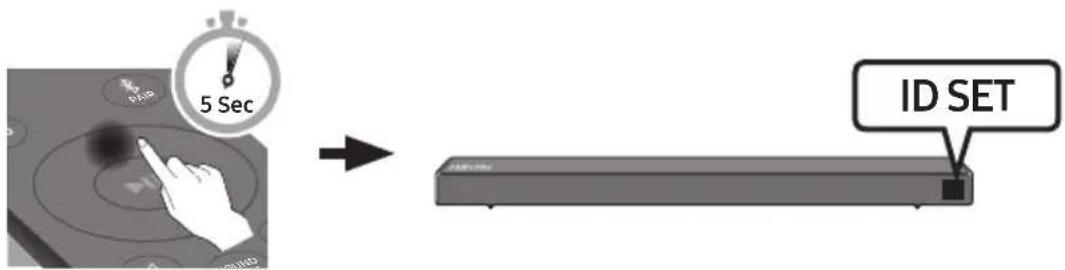
text_image
5 Sec ID SET- Check if the LINK LED is solid blue (connection complete).

text_image
LINK Blue is OnThe LINK LED indicator stops blinking and glows a solid blue when a connection is established between the Soundbar and the Wireless Subwoofer.
NOTES
- Do not connect the power cord of this product or your TV to a wall outlet until all connections between components are complete.
- Before moving or installing this product, be sure to turn off the power and disconnect the power cord.
- If the main unit is powered off, the wireless subwoofer will go into stand-by mode and the STANDBY LED on the rear of the sub-woofer will turn red after blinking in blue several times.
- If you use a device that uses the same frequency (5.8GHz) as the Soundbar near the Soundbar, interference may cause some sound interruption.
- The maximum transmission distance of the main unit's wireless signal is about 10 meters, but may vary depending on your operating environment. If a steel-concrete or metallic wall is between the main unit and the wireless subwoofer, the system may not operate at all because the wireless signal cannot penetrate metal.
PRECAUTIONS
- Wireless receiving antennas are built into the wireless subwoofer. Keep the unit away from water and moisture.
- For optimal listening performance, make sure that the area around the wireless subwoofer and the Wireless Receiver Module (sold separately) is clear of any obstructions.
Connecting an SWA-8500S (Sold Separately) to your Soundbar
Expand to true wireless surround sound by connecting the Samsung Wireless Rear Speaker Kit (SWA-8500S, sold separately) to your Soundbar.
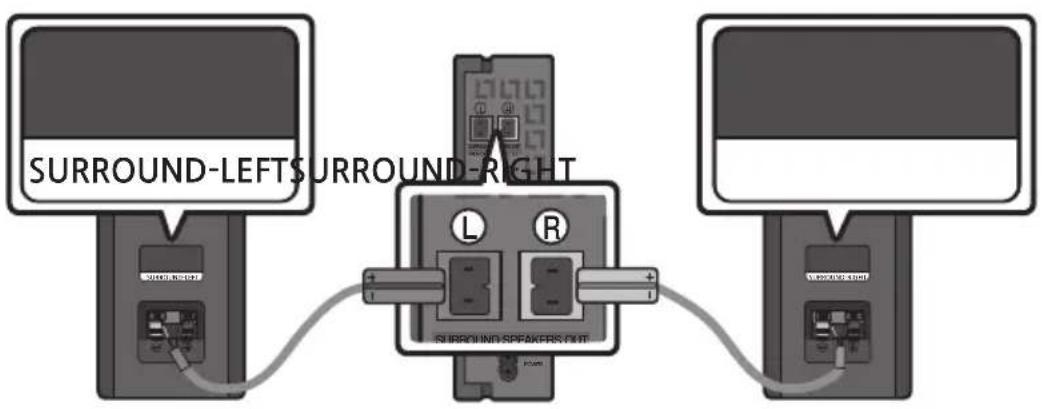
- Connect the Wireless Receiver Module to 2 Surround Speakers.
- The speaker cables are colour coded.
- Check the standby status of the Wireless Receiver Module after plugging it into an electrical outlet.
- The LINK LED indicator (blue LED) on the Wireless Receiver Module blinks. If the LED does not blink, press the ID SET button on the back of the Wireless Receiver Module with a pen tip for 5\~6 seconds until the LINK LED indicator blinks (in Blue). For more about the LED, please refer to the SWA-8500S user manual.
flowchart
graph LR
    A["Power"] --> B["Induction Switch"]
    B --> C["ID SET"]
    C --> D["Blue blinking"]
    D --> E["LINK"]
-
Press and hold the Up button on the remote control for at least 5 seconds.
-
The IDSET message appears on the display of the Soundbar for a moment, and then it disappears.
- The Soundbar will automatically power on when ID SET is complete.
text_image
5 Sec ID SET
CAUTION
- If your Soundbar was playing music when it connects to the SWA-8500S, you may hear some stuttering from the woofer as the connection finalises.
- Check if the LINK LED is solid blue (connection complete)
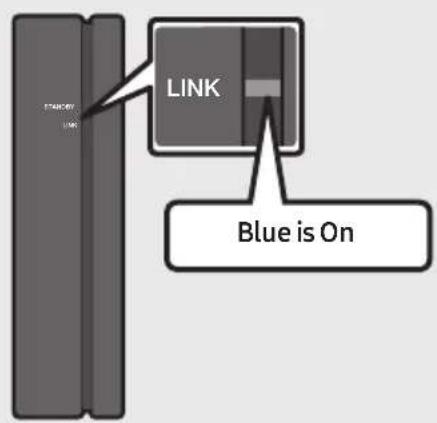
text_image
STANDARD LINE LINK Blue is OnThe LINK LED indicator stops blinking and glows a solid blue when a connection is established between the Soundbar and the Wireless Receiver Module.
- If the SWA-8500S is not connected, repeat the procedure from Step 2.
04 CONNECTING TO YOUR TV
Hear TV sound from your Soundbar through wired or wireless connections.
- When the Soundbar is connected to selected Samsung TVs, the Soundbar can be controlled using the TV's remote control.
- This feature is supported by 2017 and later Samsung Smart TVs that support Bluetooth when you connect the Soundbar to the TV using an optical cable.
- This function also allows you to use the TV menu to adjust the sound field and various settings as well as the volume and mute.
Method 1. Connecting with a Cable
When the audio in a broadcast is encoded in Dolby Digital and the "Digital Output Audio Format" on your TV is set to PCM, we recommend that you change the setting to Dolby Digital. When the setting on the TV is changed, you will experience better sound quality. (The TV menu may use different words for Dolby Digital and PCM depending on the TV manufacturer.)
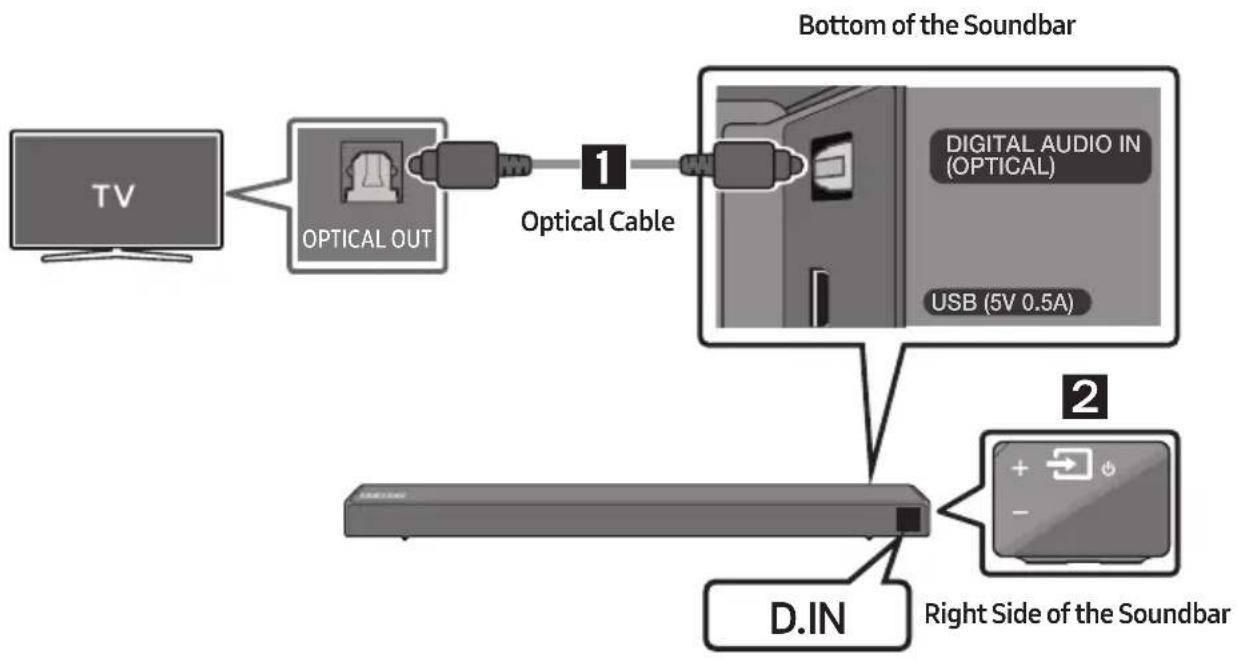
Connecting using an Optical Cable
flowchart
graph TD
    A["TV"] --> B["OPTICAL OUT"]
    B --> C["Optical Cable 1"]
    C --> D["D.IN"]
    D --> E["Right Side of the Soundbar 2"]
    E --> F["Digital Audio IN (OPTICAL) USB (5V 0.5A)"]
    style A fill:#f9f,stroke:#333
    style B fill:#ccf,stroke:#333
    style C fill:#cfc,stroke:#333
    style D fill:#fcc,stroke:#333
    style E fill:#cff,stroke:#333
-
Connect the DIGITAL AUDIO IN (OPTICAL) jack on the Soundbar to the OPTICAL OUT jack of the TV with a digital optical cable.
-
Press the → (Source) button on the right side panel or remote control, and then select the "D.IN" mode.
Auto Power Link
Auto Power Link automatically turns on the Soundbar when the TV is turned on.
- Connect the Soundbar and a TV with a digital optical cable.
- Press the Left button on the remote control for 5 seconds to turn Auto Power Link on or off.
• Auto Power Link is set to ON by default.
(To turn off this function, hold the Left button on the remote for 5 seconds.)
- Depending on the connected device, Auto Power Link may not function.
- This function is only available in the "D.IN" mode.

natural_image
Circular play button icon with double arrow symbol (no text or numbers)Connecting a TV using an HDMI Cable
flowchart
graph TD
    A["TV"] --> B["HDMI IN (ARC)"]
    B --> C["Connect to the HDMI IN (ARC) port of your TV."]
    C --> D["HDMI Cable (not supplied)"]
    D --> E["Bottom of the Soundbar"]
    E --> F["HDMI OUT (TV-ARC)"]
    F --> G["Connect to the HDMI OUT (TV-ARC) port of the Soundbar main unit."]
    G --> H["Right Side of the Soundbar"]
    H --> I["TV ARC"]
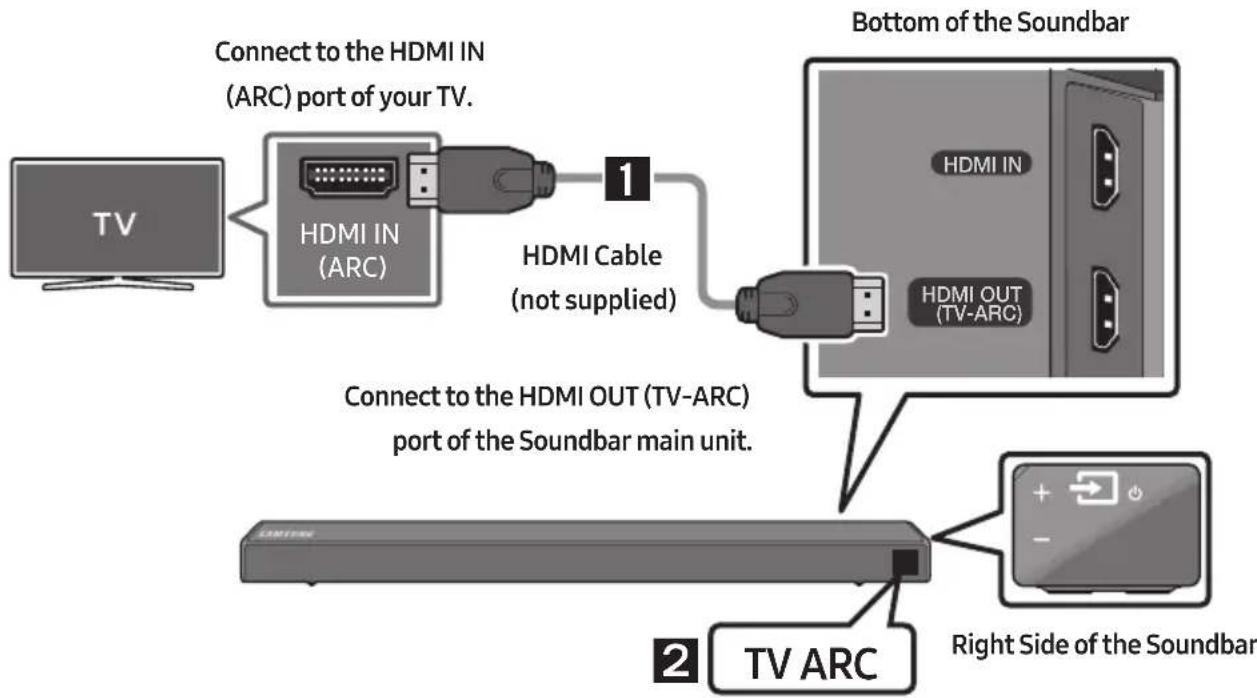
- With the Soundbar and TV turned on, connect the HDMI cable (not supplied) as shown in the figure.
-
"TV ARC" appears in the display window of the Soundbar main unit and the Soundbar plays TV sound.
-
If TV sound is inaudible, press the → (Source) button on the remote control or on the right side of the Soundbar to switch to "D.IN" mode. The screen displays "D.IN" and "TV ARC" in sequence, and TV sound is played.
- If "TV ARC" does not appear in the display window of the Soundbar main unit, confirm that the HDMI cable (not supplied) is connected to the correct port.
- Use the volume buttons on the TV's remote control to change the volume on the Soundbar.
NOTES
- HDMI is an interface that enables the digital transmission of video and audio data with just a single connector.
- If the TV provides an ARC port, connect the HDMI cable to the HDMI IN (ARC) port.
- We recommend you use a coreless HDMI cable if possible. If you use a cored HDMI cable, use one whose diameter is less than 14 mm.
- Anynet+ must be turned on.
• This function is not available if the HDMI cable does not support ARC.
Method 2. Connecting Wirelessly
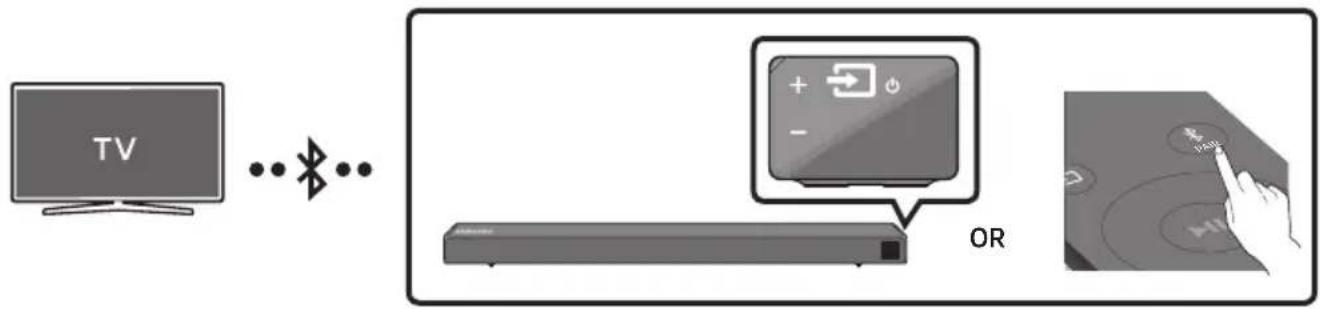
Connecting a TV via Bluetooth
When a TV is connected using Bluetooth, you can hear stereo sound without the hassle of cabling.
- Only one TV can be connected at a time.
flowchart
graph LR
    A["TV"] --> B["WiFi"]
    B --> C["OR"]
    C --> D["Control knob with +/- icon"]
    D --> E["Hand pointing at button labeled 'OK' with 'OK' icon"]
The initial connection
- Press the ✗PAIR button on the remote control to enter the "BT PAIRING" mode.
(OR) a. Press the → (Source) button on the right side panel and then select "BT".
"BT" changes to "BT READY" in a few seconds automatically if there is no Bluetooth device connected to the Soundbar.
b. When "BT READY" appears, press and hold the → (Source) button on the right side panel of the Soundbar for more than 5 seconds to display "BT PAIRING".
-
Select Bluetooth mode on the TV. (For more information, see the TV's manual.)
-
Select "[AV] Samsung Soundbar R6-Series" from the list on TV's screen.
An available Soundbar is indicated with "Need Pairing" or "Paired" on the TV's Bluetooth device list. To connect the TV to the Soundbar, select the message, and then establish a connection.
- When the TV is connected, [TV Name] "BT" appears on the Soundbar's front display.
- You can now hear TV sound from the Soundbar.
If the device fails to connect
- If a previously connected Soundbar listing (e.g. "[AV] Samsung Soundbar R6-Series") appears in the list, delete it.
- Then repeat steps 1 through 3.
NOTE
- After you have connected the Soundbar to your TV the first time, use the "BT READY" mode to reconnect.
Disconnecting the Soundbar from the TV
Press the → (Source) button on the right side panel or on the remote control and switch to any mode but "BT".
- Disconnecting takes time because the TV must receive a response from the Soundbar.
(The time required may differ, depending on the TV model.) - To cancel the automatic Bluetooth connection between the Soundbar and TV, press the
▶II (Play/Pause) button on the remote control for 5 seconds with the Soundbar in "BT READY" status. (Toggle On → Off)
What is the difference between BT READY and BT PAIRING?
- BT READY : In this mode, you can search for previously connected TVs or connect a previously connected mobile device to the Soundbar.
- BT PAIRING : In this mode, you can connect a new device to the Soundbar. (Press the ✗ PAIR button on the remote control or press and hold the ➞ (Source) button on the right side of the Soundbar for more than 5 seconds while the Soundbar is in "BT" mode.)
NOTES
- If asked for a PIN code when connecting a Bluetooth device, enter <0000>.
- In Bluetooth connection mode, the Bluetooth connection will be lost if the distance between the Soundbar and the Bluetooth device exceeds 10 meters.
- The Soundbar automatically turns off after 20 minutes in the Ready state.
-
The Soundbar may not perform Bluetooth search or connection correctly under the following circumstances:
-
If there is a strong electrical field around the Soundbar.
- If several Bluetooth devices are simultaneously paired with the Soundbar.
- If the Bluetooth device is turned off, not in place, or malfunctions.
- Electronic devices may cause radio interference. Devices that generate electromagnetic waves must be kept away from the Soundbar main unit - e.g., microwaves, wireless LAN devices, etc.
05 CONNECTING AN EXTERNAL DEVICE
Connect to an external device via a wired or wireless network to play the external device's sound through the Soundbar.
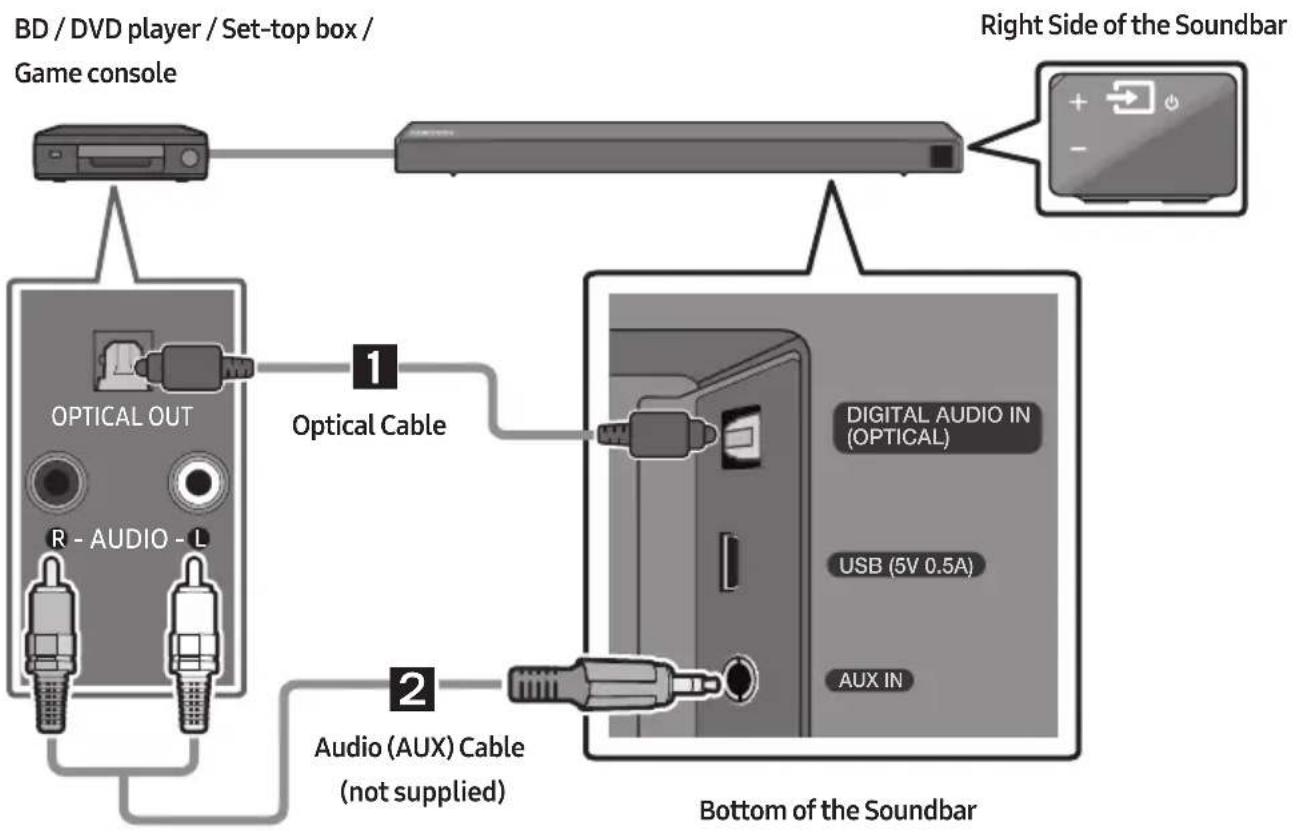
Connecting using an Optical or Analogue Audio (AUX) Cable
flowchart
graph TD
    A["Game console"] --> B["BD / DVD player / Set-top box /"]
    B --> C["Right Side of the Soundbar"]
    D["Optical OUT"] --> E["1 Optical Cable"]
    F["R - AUDIO - L"] --> G["2 Audio (AUX) Cable (not supplied)"]
    H["Digital Audio IN (OPTICAL)"] --> I["3 Digital Audio In (OPTICAL)"]
    I --> J["USB (5V 0.5A)"]
    I --> K["AUX IN"]
1 Optical Cable
1 Connect DIGITAL AUDIO IN (OPTICAL) on the main unit to the OPTICAL OUT jack of the Source Device using a digital optical cable.
② Select "D.IN" mode by pressing the → (Source) button on the right side panel or on the remote control.
2 Audio (AUX) Cable
1 Connect AUX IN (Audio) on the main unit to the AUDIO OUT jack of the Source Device using an audio cable.
② Select "AUX" mode by pressing the → (Source) button on the right side panel or on the remote control.
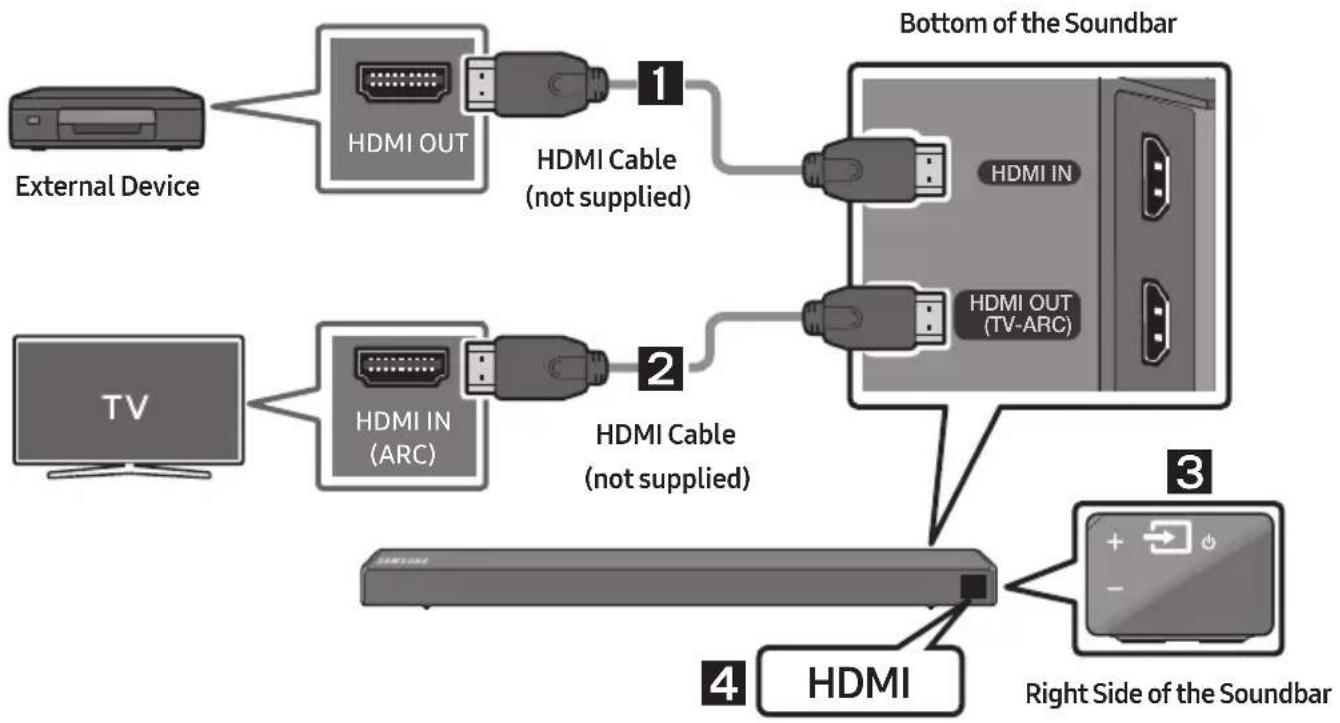
Connecting using an HDMI Cable
flowchart
graph TD
    A["External Device"] --> B["HDMI OUT"]
    B --> C["1 HDMI Cable (not supplied)"]
    D["TV"] --> E["HDMI IN (ARC)"]
    E --> F["2 HDMI Cable (not supplied)"]
    G["Bottom of the Soundbar"] --> H["HDMI IN"]
    H --> I["3 HDMI"]
    I --> J["Right Side of the Soundbar"]
- Connect an HDMI cable (not supplied) from the HDMI IN jack on the back of the product to the HDMI OUT jack on your digital device.
- Connect an HDMI cable (not supplied) from the HDMI OUT (TV-ARC) jack on the back of the product to the HDMI IN jack on your TV.
- Press the → (Source) button on the right side panel or on the remote control, and then select "HDMI".
- "HDMI" mode is displayed on the Soundbar display panel and sound plays.
06 CONNECTING A USB STORAGE DEVICE
You can play music files located on USB storage devices through the Soundbar.
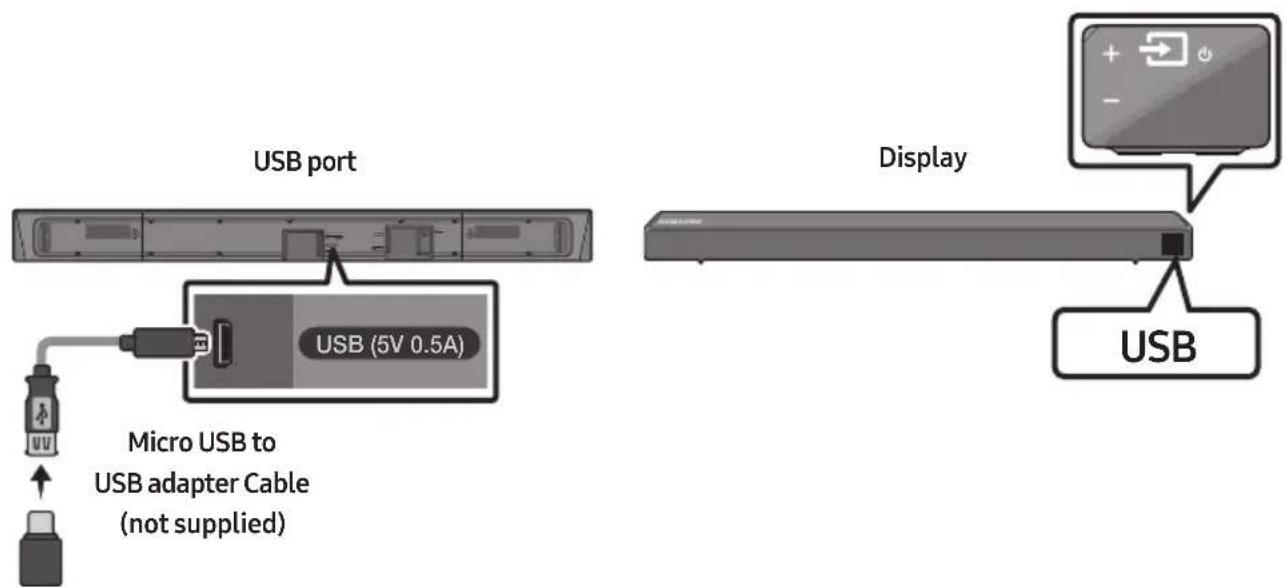
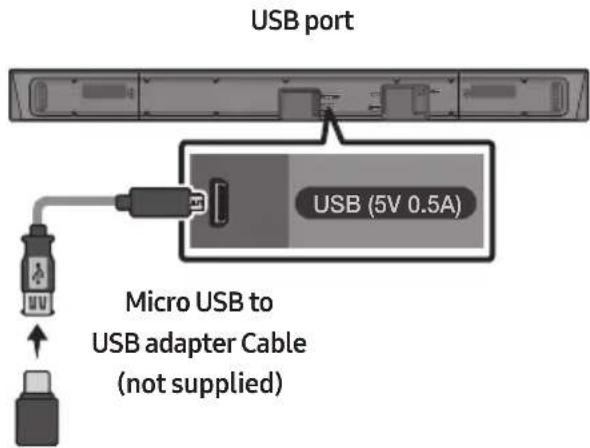
text_image
USB port USB (5V 0.5A) Micro USB to USB adapter Cable (not supplied) Display USB- Connect a Micro USB to USB adapter cable with a male USB 2.0 Micro USB plug (Type B) on one end and a standard female 2.0 USB jack (Type A) on the other end to the micro USB jack on your Soundbar.
- The Micro USB to USB adapter cable is sold separately. To purchase, contact a Samsung Service Centre or Samsung Customer Care.
-
Connect your USB device to the female end of the adapter cable.
-
Press the → (Source) button on the right side panel or on the remote control, and then select "USB".
-
"USB" appears in the display screen.
-
Play music files from the USB storage device through the Soundbar.
- The Soundbar automatically turns off (Auto Power Down) if no USB device has been connected for more than 20 minutes.
File Format Type Compatibility list
| Extension Codec Sampling Rate Bitrate | |||
| *.mp3 MPEG 1 Layer2 16kHz ~ 48kHz 80kbps~320kbps | |||
| MPEG 1 Layer3 16kHz ~ 48kHz | 80kbps~320kbps | ||
| MPEG 2 Layer3 16kHz ~ 48kHz | 80kbps~320kbps | ||
| MPEG 2.5 Layer3 16kHz ~ 48kHz | 80kbps~320kbps | ||
| *.wma | Wave_Format_MSAudio1 | 16kHz ~ 48kHz | 56kbps~128kbps |
| Wave_Format_MSAudio2 16kHz ~ 48kHz | 56kbps~128kbps | ||
| *.aac | AAC | 16kHz ~ 96kHz | 48kbps~320kbps |
| AAC-LC | 16kHz ~ 96kHz | 128kbps~192kbps5.1ch 320kbps | |
| HE-AAC | 24kHz ~ 96kHz | 48kbps~64kbps5.1ch 160kbps | |
| *.wav | - | 16kHz ~ 48kHz | up to 3000kbps |
| *.ogg | OGG 1.1.0 | 16kHz ~ 48kHz | 50kbps~500kbps |
- If there are too many folders and files stored on the USB device, it may take the Soundbar some time to access and play files.
07 CONNECTING A MOBILE DEVICE
Connecting via Bluetooth
When a mobile device is connected using Bluetooth, you can hear stereo sound without the hassle of cabling.
- You cannot connect more than one Bluetooth device at a time.
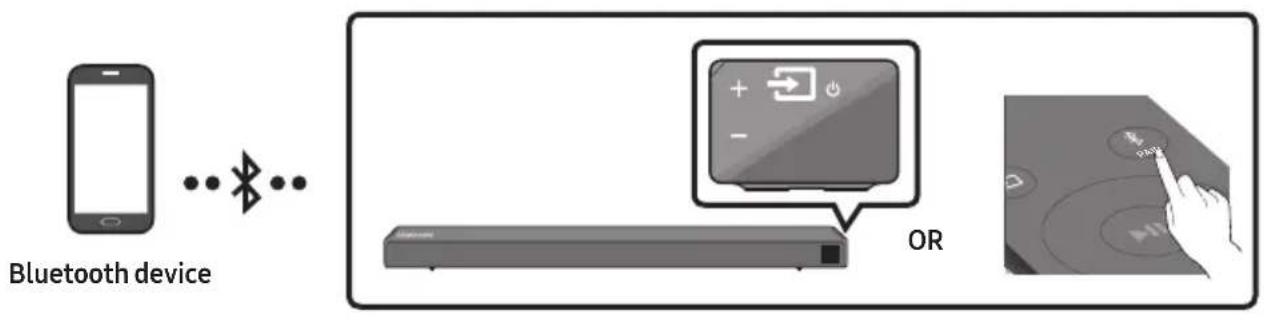
text_image
Bluetooth device ORThe initial connection
- Press the ✗PAIR button on the remote control to enter the "BT PAIRING" mode.
(OR) a. Press the → (Source) button on the right side panel and then select "BT". "BT" changes to "BT READY" in a few seconds automatically if there is no Bluetooth device connected to the Soundbar. b. When "BT READY" appears, press and hold the → (Source) button on the right side panel of the Soundbar for more than 5 seconds to display "BT PAIRING".
- On your device, select "[AV] Samsung Soundbar R6-Series" from the list that appears.
- When the Soundbar is connected to the Bluetooth device, [Bluetooth Device Name] → "BT" appears in the front display.
- Play music files from the device connected via Bluetooth through the Soundbar.
If the device fails to connect
- If a previously connected Soundbar listing (e.g. "[AV] Samsung Soundbar R6-Series") appears in the list, delete it.
- Then repeat steps 1 and 2.
NOTE
- After you have connected the Soundbar to your mobile device the first time, use the "BT READY" mode to reconnect.
What is the difference between BT READY and BT PAIRING?
- BT READY : In this mode, you can search for previously connected TVs or connect a previously connected mobile device to the Soundbar.
- BT PAIRING : In this mode, you can connect a new device to the Soundbar. (Press the ✗ PAIR button on the remote control or press and hold the ➞ (Source) button on the right side of the Soundbar for more than 5 seconds while the Soundbar is in "BT" mode.)
NOTES
- If asked for a PIN code when connecting a Bluetooth device, enter <0000>.
- In Bluetooth connection mode, the Bluetooth connection will be lost if the distance between the Soundbar and the Bluetooth device exceeds 10 meters.
- The Soundbar automatically turns off after 20 minutes in the Ready state.
-
The Soundbar may not perform Bluetooth search or connection correctly under the following circumstances:
-
If there is a strong electrical field around the Soundbar.
- If several Bluetooth devices are simultaneously paired with the Soundbar.
- If the Bluetooth device is turned off, not in place, or malfunctions.
- Electronic devices may cause radio interference. Devices that generate electromagnetic waves must be kept away from the Soundbar main unit - e.g., microwaves, wireless LAN devices, etc.
• The Soundbar supports SBC data (44.1kHz, 48kHz).
- Connect only to a Bluetooth device that supports the A2DP (AV) function.
- You cannot connect the Soundbar to a Bluetooth device that supports only the HF (Hands Free) function.
- Once you have paired the Soundbar to a Bluetooth device, selecting “[AV] Samsung Soundbar R6-Series” from the device’s scanned devices list will automatically change the Soundbar to “BT” mode.
- Available only if the Soundbar is listed among the Bluetooth device's paired devices.
(The Bluetooth device and the Soundbar must have been previously paired at least once.)
- The Soundbar will appear in the Bluetooth device's searched devices list only when the Soundbar is displaying "BT READY".
- The Soundbar cannot be paired to another Bluetooth device if already in Bluetooth mode and paired to a Bluetooth device.
Bluetooth Power On (SOUND MODE)
If a previously paired Bluetooth device tries to pair with the Soundbar when the Bluetooth Power On function is on and the Soundbar is turned off, the Soundbar turns on automatically.
-
Press and hold the SOUND MODE button for more than 5 seconds on the remote while the Soundbar is turned on.
-
"ON-BLUETOOTH POWER" appears on the Soundbar's display.
Disconnecting the Bluetooth device from a Soundbar
You can disconnect a Bluetooth device from the Soundbar. For instructions, see the Bluetooth device's user manual.
• The Soundbar will be disconnected.
- When the Soundbar is disconnected from the Bluetooth device, the Soundbar will display "BT DISCONNECTED" on the front display.
Disconnecting the Soundbar from the Bluetooth device
Press the → (Source) button on the right side panel or on the remote control, and then change to any mode except "BT".
- Disconnecting takes time because the Bluetooth device must receive a response from the Soundbar. (Disconnection time may differ, depending on the Bluetooth device)
- When the Soundbar is disconnected from the Bluetooth device, the Soundbar will display "BT DISCONNECTED" on the front display.
NOTES
- In Bluetooth connection mode, the Bluetooth connection will be lost if the distance between the Soundbar and the Bluetooth device exceeds 10 meters.
- The Soundbar automatically turns off after 20 minutes in the Ready state.
More About Bluetooth
Bluetooth is a technology that enables Bluetooth-compliant devices to interconnect easily with each other using a short wireless connection.
- A Bluetooth device may cause noise or malfunction, depending on usage, if:
- A part of your body is in contact with the receiving/transmitting system of the Bluetooth device or the Soundbar.
- It is subject to electrical variation from obstructions caused by a wall, corner, or office partition.
- It is exposed to electrical interference from same frequency-band devices including medical equipment, microwave ovens, and wireless LANs.
- Pair the Soundbar with the Bluetooth device while they are close together.
- The further the distance between the Soundbar and Bluetooth device, the worse the quality is. If the distance exceeds the Bluetooth operational range, the connection is lost.
- In poor reception areas, the Bluetooth connection may not work properly.
- The Bluetooth connection only works when it is close to the unit. The connection will be automatically cut off if the Bluetooth device is out of range. Even within range, the sound quality may be degraded by obstacles such as walls or doors.
- This wireless device may cause electric interference during its operation.
Using the Samsung Audio Remote App
Installing the Samsung Audio Remote App
To control the Soundbar with your smart device and the Samsung Audio Remote app, download the Samsung Audio Remote app from the Google Play store.
Market search : Samsung Audio Remote

Launching the Samsung Audio Remote App
To launch and use the Samsung Audio Remote app, touch the Audio Remote icon on your smart device, and then follow the directions on the screen.
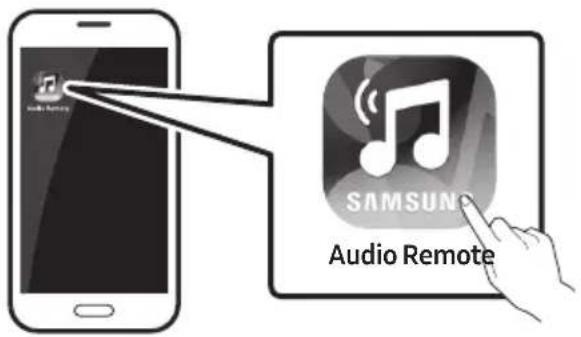
text_image
Audio Remote SAMSUNG Audio Remote- The Samsung Audio Remote app is only compatible with Android mobile phones and mobile devices running Android OS 3.0 or later.
08 USING THE REMOTE CONTROL
How to Use the Remote Control
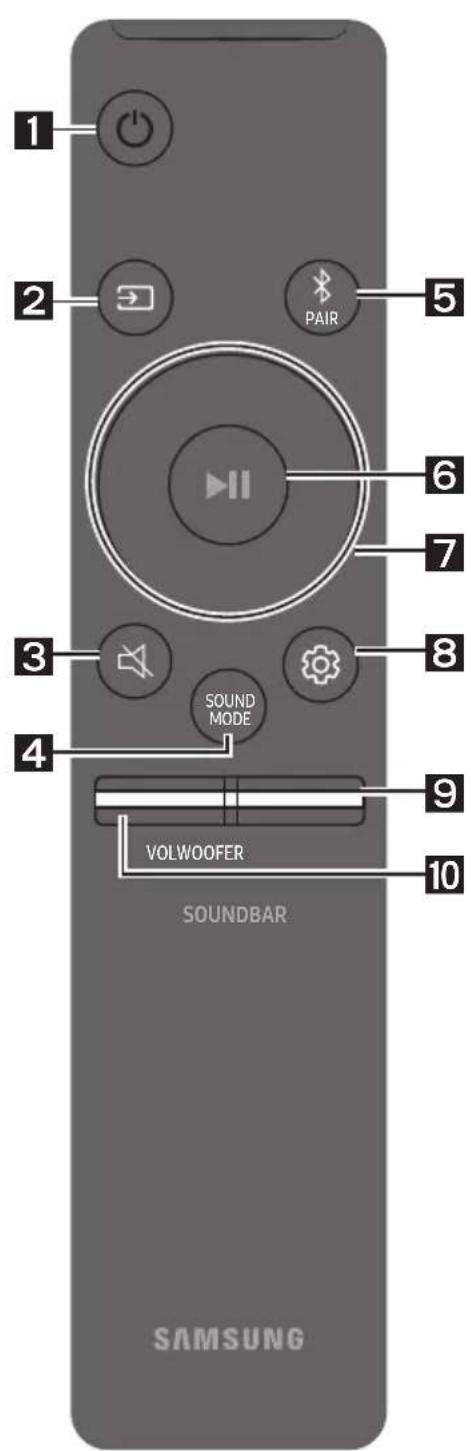
text_image
1 2 PAIR 5 6 7 3 SOUND MODE 8 4 9 VOLWOOFER 10 SOUNDBAR SAMSUNG| 1 |  Power Power | Turns the Soundbar on and off. |
| 2 |  Source Source | Press to select a source connected to the Soundbar.BT PAIRING modeTo turn on “BT PAIRING” mode, change the source to “BT” mode, and then press and hold the → (Source) button for more than 5 seconds. |
| 3 |  Mute Mute | Press the → (Mute) button to mute the sound. Press it again to unmute the sound. |
| 4 |  SOUND MODE SOUND MODE | You can select the desired sound effect by choosing STANDARD, SURROUND SOUND, GAME, or SMART.Select the “STANDARD” mode if you want to enjoy the original sound.DRC (Dynamic Range Control)Lets you apply dynamic range control to Dolby Digital tracks. Press and hold the SOUND MODE button while the Soundbar is powered off to turn DRC (Dynamic Range Control) on or off. With the DRC turned on, loud sound is reduced. (The sound may be distorted.)Bluetooth PowerThis feature automatically turns the Soundbar on when it receives a connection request from a previously connected TV or Bluetooth device. The setting is On by default.-Press and hold the SOUND MODEbutton for more than 5 seconds to turn off the Bluetooth Power function. |
| 5 |  BluetoothPAIR BluetoothPAIR | Press the ✦PAIRbutton. “BT PAIRING” appears in the Soundbar’s display.You can connect the Soundbar to a new Bluetooth device in this mode by selecting the Soundbar from the Bluetooth device’s search list. | |
| 6 |  Play / Pause Play / Pause | Press the ▶IIbutton to pause a music file temporarily.When you press the button again, the music file plays.• Auto Power Down FunctionThe unit turns off automatically in the following situations:- In D.IN / HDMI / BT / USB Mode : If there is no audio signal for 20 minutes.- In AUX Mode :- If the Audio (AUX) Cable is disconnected for 20 minutes.- If there is no KEY input for 8 hours when the Audio (AUX) Cable is connected.(The Auto Power Down function can be turned off only when the unit is in “AUX” mode.)- To turn off Auto Power Down function while the unit is in “AUX” mode, press and hold the ▶IIbutton for 5 seconds. “ON-AUTO POWER DOWN” / “OFF-AUTO POWER DOWN” appears on the display. | |
| 7 |  Up/Down/Left/Right Up/Down/Left/Right |  Press the indicated areas to select Up/Down/Left/Right.Press Up/Down/Left/Right on the button to select or set functions.RepeatTo use the Repeat function in “USB” mode, press the Upbutton.Music SkipPress the Rightbutton to select the next music file. Press the Leftbutton to select the previous music file.Anynet+ / Auto Power LinkYou can turn Anynet+ and Auto Power Link on or off.Anynet+ and Auto Power Link are turned on and turned off by the Rightand Leftbuttons respectively.- Anynet+ : If the Soundbar is connected to a Samsung TV through an HDMI cable, you can control your Soundbar with a Samsung TV remote control.Press and hold the Rightbutton for 5 seconds to toggle Anynet+ ON and OFF.- Auto Power Link : If the Soundbar is connected to your TV through a digital optical cable, the Soundbar can automatically turn on when you turn on your TV. Press and hold the Leftbutton for 5 seconds to toggle Auto Power Link ON and OFF.- Anynet+ / Auto Power Link are set to ON by default.ID SETPress and hold the Upbutton for 5 seconds to complete ID SET(when connecting to an accessory item). Press the indicated areas to select Up/Down/Left/Right.Press Up/Down/Left/Right on the button to select or set functions.RepeatTo use the Repeat function in “USB” mode, press the Upbutton.Music SkipPress the Rightbutton to select the next music file. Press the Leftbutton to select the previous music file.Anynet+ / Auto Power LinkYou can turn Anynet+ and Auto Power Link on or off.Anynet+ and Auto Power Link are turned on and turned off by the Rightand Leftbuttons respectively.- Anynet+ : If the Soundbar is connected to a Samsung TV through an HDMI cable, you can control your Soundbar with a Samsung TV remote control.Press and hold the Rightbutton for 5 seconds to toggle Anynet+ ON and OFF.- Auto Power Link : If the Soundbar is connected to your TV through a digital optical cable, the Soundbar can automatically turn on when you turn on your TV. Press and hold the Leftbutton for 5 seconds to toggle Auto Power Link ON and OFF.- Anynet+ / Auto Power Link are set to ON by default.ID SETPress and hold the Upbutton for 5 seconds to complete ID SET(when connecting to an accessory item). | |
| Volume Restriction functionTo protect your hearing, the Volume Restriction function restricts the volume to 20 if you turn on the Soundbar when the volume is set higher than 20.- The default value for the Volume Restriction function is Off. You must turn it on to activate it.- When turned on, the Volume Restriction function stays on even when the power is turned off.- To turn Volume Restriction on or off, press and hold theDownbutton on the remote control for 5 seconds. With Volume Restriction off, “V FREE” appears on the front display. With the function on, “V LOCK” appears. | |||
| 8 |  Sound Control Sound Control | You can select TREBLE, BASS, or AUDIO SYNC.To control the volume of the treble or bass sound, select TREBLE or BASS in Sound Settings, and then adjust the volume between -6~+6 by using theUp/Downbuttons.Press and hold the(Sound Control)button for about 5 seconds to adjust the sound for each frequency band. 150Hz, 300Hz, 600Hz, 1.2kHz, 2.5kHz, 5kHz, and 10kHz are selectable using theLeft/Rightbuttons and each can be adjusted to a setting between -6 to +6 using theUp/Downbuttons.If the video on the TV and audio from the Soundbar are not synchronised, selectAUDIO SYNCin Sound Settings, and then set the audio delay between 0~300 milliseconds by using theUp/Downbuttons. (Not available in “USB” mode.)AUDIO SYNCis only supported for some functions. | |
| 9 |  WOOFER WOOFER | 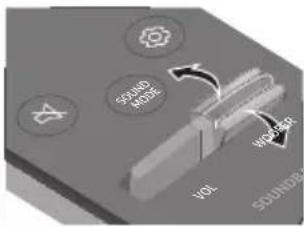  Push theWOOFERbutton up or down to adjust the volume of the subwoofer to -12 or between -6 to +6. To set the subwoofer volume level to 0, press the button. Push theWOOFERbutton up or down to adjust the volume of the subwoofer to -12 or between -6 to +6. To set the subwoofer volume level to 0, press the button. | |
| 10 |  VOL VOL |  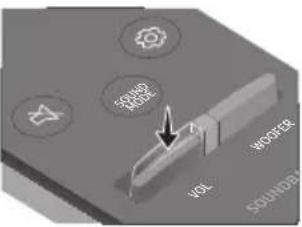 Push theVOLbutton up or down to adjust the volume.MutePress theVOLbutton to mute the sound. Press it again to unmute the sound. Push theVOLbutton up or down to adjust the volume.MutePress theVOLbutton to mute the sound. Press it again to unmute the sound. | |
Adjusting the Soundbar volume with a TV remote control
If you have a Samsung TV, you can adjust the Soundbar's volume using the IR remote control that came with your Samsung TV.
First use the TV menu to set the TV audio on your Samsung TV to external speakers, then use your Samsung remote to control the Soundbar's volume. For more information, see the TV's user manual. The default mode for this function is control by a Samsung TV remote. If your TV is not a Samsung TV, follow the directions below to change the settings of this function.
- Turn Off the Soundbar.
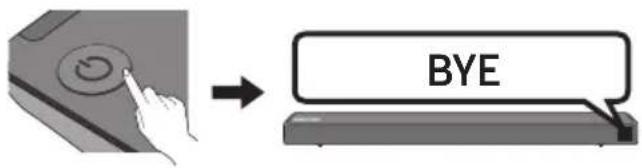
text_image
BYE- If you do not want to use this function, push up and hold the WOOFER button for 5 seconds repeatedly until "OFF-TV REMOTE" appears in the display.

text_image
5 Sec OFF-TV REMOTE- If you want to control the Soundbar with your TV's remote, push up and hold the WOOFER button for 5 seconds repeatedly until "ALL-TV REMOTE" appears in the display. Then, use your TV's menu to select external speakers.

text_image
5 Sec ALL-TV REMOTE- If you want to return the Soundbar to the default mode (control by a Samsung TV remote), push up and hold the WOOFER button for 5 seconds repeatedly until "SAMSUNG-TV REMOTE" appears in the display.

text_image
(Default mode) SAMSUNG-TV REMOTE- Each time you push the WOOFER button up and hold it for 5 seconds, the mode switches in the following order:
"SAMSUNG-TV REMOTE" (Default mode) → "OFF-TV REMOTE" →
"ALL-TV REMOTE".
- This function may not be available, depending on the remote control.
- Manufacturers supporting this function: VIZIO, LG, Sony, Sharp, PHILIPS, PANASONIC, TOSHIBA, GRUNDIG, Hisense, RCA
Using the Hidden Buttons (Buttons with more than one function)
| Hidden Button | Reference page | |
| Remote Control Button Function | ||
| WOOFER | TV remote control On/Off (Standby) | page 25 |
 (Source) (Source) | BT Pairing page 22 | |
| ▶II (Play / Pause) | Auto Power Down On/Off(AUX mode) | page 23 |
| Initialise (Standby) page 30 | ||
| BT Ready page 13 | ||
| Left | Auto Power Link ON/OFF | page 23 |
| Right Anynet+ ON/OFF page 23 | ||
| Up ID SET page 23 | ||
| Down | Volume restriction On/Off | page 24 |
 (Sound Control) (Sound Control) | 7 Band EQ page 24 | |
| SOUND MODE | DRC ON/OFF (Standby) | page 22 |
| Bluetooth Power | page 22 | |
Output specifications for the different sound effect modes
| Effect | Input | Output | ||
| Without Wireless Rear Speaker Kit | With Wireless Rear Speaker Kit | |||
 SOUND MODE SOUND MODE | STANDARD | 2.0 ch | 2.1 ch | 4.1 ch |
| 5.1 ch | 3.1 ch | 5.1 ch | ||
| SURROUND SOUND | 2.0 ch | 3.1 ch | 5.1 ch | |
| 5.1 ch | 3.1 ch | 5.1 ch | ||
| GAME | 2.0 ch | 3.1 ch | 5.1 ch | |
| 5.1 ch | 3.1 ch | 5.1 ch | ||
| SMART | 2.0 ch | 3.1 ch | 5.1 ch | |
| 5.1 ch | 3.1 ch | 5.1 ch | ||
- The Samsung Wireless Rear Speaker Kit can be purchased separately. To purchase a Kit, contact the vendor you purchased the Soundbar from.
09 INSTALLING THE WALL MOUNT
Installation Precautions
• Install on a vertical wall only.
- Do not install in a place with high temperature or humidity.
- Verify whether the wall is strong enough to support the product's weight. If not, reinforce the wall or choose another installation point.
• Purchase and use the fixing screws or anchors appropriate for the kind of wall you have (plaster board, iron board, wood, etc.). If possible, fix the support screws into wall studs.
• Purchase wall mounting screws according to the type and thickness of the wall you want to mount the Soundbar on.
- Diameter: M5
– Length: 35 mm or longer recommended.
- Connect cables from the unit to external devices before you install the Soundbar on the wall.
- Make sure the unit is turned off and unplugged before you install it. Otherwise, it may cause an electric shock.
Wallmount Components

text_image
A B A TYPE: 430mm B TYPE: 340mm B AWall Mount Guide

natural_image
Two 3D mechanical parts: a pulley and a screw, both scaled by ×2 (no text or symbols)Holder-Screw Screw

natural_image
Simple line drawing of a bracket with no text or symbolsBracket-Wall Mount
- Place the Wall Mount Guide against the wall surface.
• The Wall Mount Guide must be level.
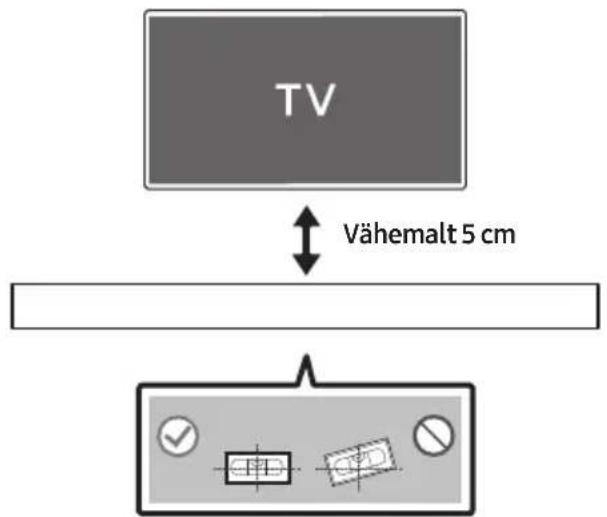
- If your TV is mounted on the wall, install the Soundbar at least 5 cm below the TV.

text_image
TV 5 cm or more- Align the Wall Mount Guide's Centre Line with the centre of your TV (if you are mounting the Soundbar below your TV), and then fix the Wall Mount Guide to the wall using tape.
- If you are not mounting below a TV, place the Centre Line in the centre of the installation area.
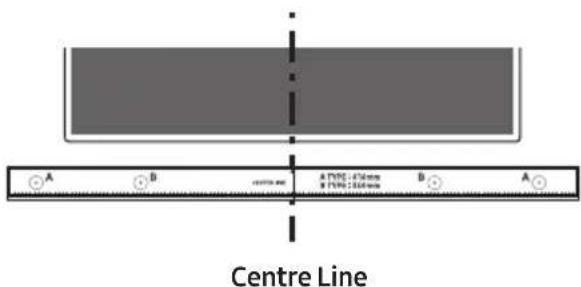
text_image
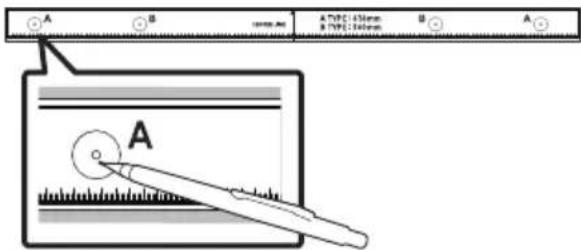
Centre Line A B TYPE: 4.5mm B TYPE: 2.6mm B A- Push a pen tip or sharpened pencil tip through the centre of the A-TYPE images on each end of the Guide to mark the holes for the supporting screws, and then remove the Wall Mount Guide.
text_image
A B A PBC 1.5mm B A A- Using an appropriately sized drill bit, drill a hole in the wall at each marking.
- If the markings do not correspond to the positions of studs, make sure you insert appropriate anchors or mollies into the holes before you insert the support screws. If you use anchors or mollies, make sure the holes you drill are large enough for the anchors or mollies you use.
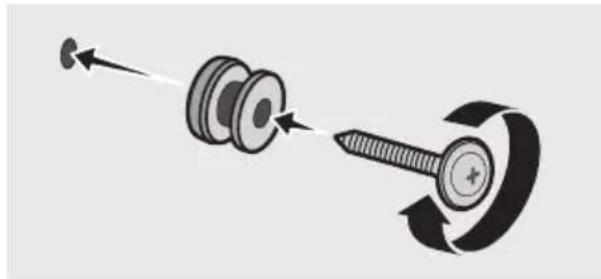
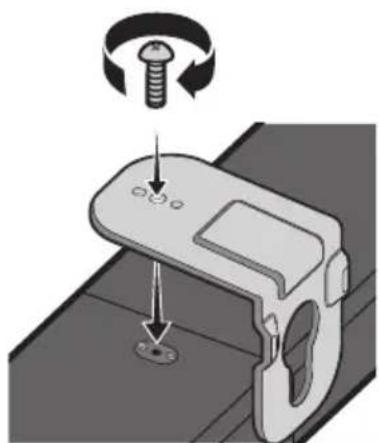
- Push a screw (not supplied) through each Holder-Screw, and then screw each screw firmly into a support screw hole.
natural_image
Diagram showing a screw being inserted into a nut, with motion arrows indicating direction (no text or symbols)- Install the 2 Bracket-Wall Mounts in the correct orientation on the bottom of the Soundbar using 2 Screws.
natural_image
Mechanical component diagram showing a screw being inserted into a housing with a bolt, no text or symbols present- When assembling, make sure the hanger part of the Bracket-Wall Mounts are located behind the rear of the Soundbar.
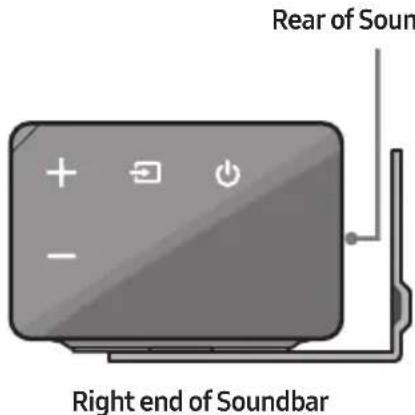
text_image
Rear of Soun Right end of Soundbar- Install the Soundbar with the attached Bracket-Wall Mounts by hanging the Bracket-Wall Mounts on the Holder-Screws on the wall.

natural_image
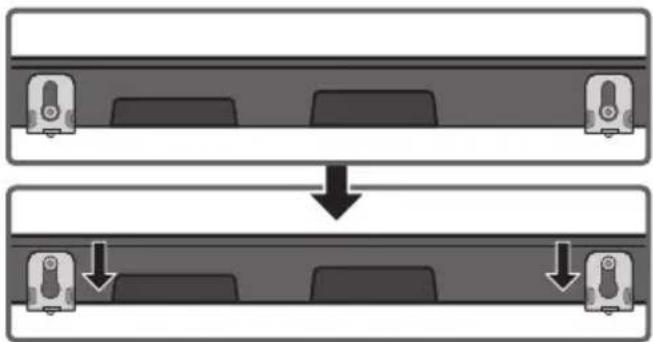
Diagram showing two mechanical components before and after assembly, with arrows indicating motion direction (no text or symbols)- Slide the Soundbar down as shown below so that the Bracket-Wall Mounts rest securely on the Holder-Screws.
- Insert the Holder-Screws into the wide (bottom) part of the Bracket-Wall Mounts, and then slide the Bracket-Wall Mounts down so that the Bracket-Wall Mounts rest securely on the Holder-Screws.
flowchart
graph TD
    A["Top Unit"] --> B["Down Arrow"]
    C["Bottom Unit"] --> D["Down Arrow"]
10 SOFTWARE UPDATE
Samsung may offer updates for the Soundbar's system firmware in the future.
text_image
USB port USB (5V 0.5A) Micro USB to USB adapter Cable (not supplied)If an update is offered, you can update the firmware by connecting a USB device with the firmware update stored on it to the USB port on your Soundbar. For more information about how to download update files, go to the Samsung Electronics website at www.samsung.com→Support.
Then, enter or select the model number of your Soundbar, select the Software & Apps option, and then Downloads. Note that the option names can vary. For updating instructions, see the next page.
Updating Procedure
Important: The updating function erases all user settings. We recommend you write down your settings so that you can easily reset them after the update. Note that updating the firmware resets the subwoofer connection too.
- Connect a Micro USB to USB adapter cable with a male USB 2.0 Micro USB plug (Type B) on one end and a standard female 2.0 USB jack (Type A) on the other end to the micro USB jack on your Soundbar.
- The Micro USB to USB adapter cable is sold separately. To purchase, contact a Samsung Service Centre or Samsung Customer Care.
-
Follow the steps below to download the product software: Go to the Samsung website at (samsung.com) → search for the model name - select the customer support option (the option name is subject to change)
-
Save the downloaded software to a USB stick and select "Extract Here" to unzip the folder.
-
Turn off the Soundbar and connect the USB stick containing the software update to the female port on a Micro USB adapter cable. Connect the cable to the USB port on the Soundbar.
-
Turn on the Soundbar. Within 3 minutes, "UPDATE" is displayed and updating begins.
-
When the update finishes, the Soundbar turns off. Press the ▶II button on the remote control for 5 seconds. "INIT" appears on the display and then the Soundbar turns off. The update is complete.
- This product has a DUAL BOOT function. If the firmware fails to update, you can update the firmware again.
- Reset your settings.
If UPDATE is not displayed
-
Turn off the Soundbar, disconnect and then reconnect the USB storage device that contains the update files to the Soundbar's USB port.
-
Disconnect the Soundbar's power cord, reconnect it, and then turn on the Soundbar.
NOTES
- The firmware update may not work properly if audio files supported by the Soundbar are stored in the USB storage device.
- Do not disconnect the power or remove the USB device while updates are being applied. The main unit will turn off automatically after completing the firmware update.
- After the update is completed, the user setup in the Soundbar is initialised so you can reset your settings. We recommend you write down your settings so that you can easily reset them after the update. Note that updating firmware resets the subwoofer connection too.
If the connection to the subwoofer is not re-established automatically after the update, refer to page 6.
If the software update fails, check if the USB stick is defective.
- Mac OS users should use MS-DOS (FAT) as the USB format.
- Updating via USB may not be available, depending on the USB storage device manufacturer.
11 TROUBLESHOOTING
Before seeking assistance, check the following.
| The unit will not turn on. |
| Is the power cord plugged into the outlet?→Connect the power plug to the outlet. |
| A function does not work when the button is pressed. |
| Is there static electricity in the air?→Disconnect the power plug and connect it again. |
| Sound dropouts occur in BT mode. |
| → See the Bluetooth connection sections on pages 12 and 18. |
| Sound is not produced. |
| Is the Mute function on?→Press the VOL button to cancel the function.Is the volume set to minimum?→Adjust the Volume. |
| The remote control does not work. |
| Are the batteries drained?→Replace with new batteries.Is the distance between the remote control and Soundbar main unit too far?→Move the remote control closer to the Soundbar main unit. |
| The red LED on the subwoofer blinks and the subwoofer is not producing sound. |
| This issue can occur if the subwoofer is not connected to the Soundbar main unit.→Try to connect your subwoofer again. (See page 6.) |
| The subwoofer drones and vibrates noticeably. |
| Try to adjust the vibration of your subwoofer.→Push the WOOFER button on your remote control up or down to adjust the subwoofer volume.(to -12, or between -6 ~ +6). |
12 LICENCE

DOLBY
AUDIO
Manufactured under license from Dolby Laboratories. Dolby, Dolby Audio, Pro Logic, and the double-D symbol are trademarks of Dolby Laboratories.


Digital Surround
For DTS patents, see http://patents.dts.com. Manufactured under license from DTS Licensing Limited. DTS, the Symbol, DTS in combination with the Symbol, and DTS Digital Surround are registered trademarks or trademarks of DTS, Inc. in the United States and/or other countries. © DTS, Inc. All Rights Reserved.

HIGH-DEFINITION MULTIMEDIA INTERFACE
The terms HDMI and HDMI High-Definition Multimedia Interface, and the HDMI Logo are trademarks or registered trademarks of HDMI Licensing LLC in the United States and other countries.
13 OPEN SOURCE LICENCE NOTICE
To send inquiries and requests regarding open sources, contact Samsung via Email (oss.request@samsung.com).
14 IMPORTANT NOTES ABOUT SERVICE
- Figures and illustrations in this User Manual are provided for reference only and may differ from actual product appearance.
- An administration fee may be charged if either
(a) an engineer is called out at your request and there is no defect with the product (i.e. where the user manual has not been read).
(b) you bring the unit to a repair centre and there is no defect with the product (i.e. where the user manual has not been read).
- You will be informed of the administration fee amount before a technician visits.
15 SPECIFICATIONS AND GUIDE
Specifications
| Model Name HW-R650 | |
| USB 5V/0.5A | |
| Weight 2.9 kg | |
| Dimensions (W x H x D) 1060.0 x 59.0 x 87.5 mm | |
| Operating Temperature Range +5°C to +35°C | |
| Operating Humidity Range 10 % ~ 75 % | |
| AMPLIFIERRated Output power 30W x 6 | |
| Supported play formats | LPCM 2ch, Dolby AudioTM(supporting Dolby® Digital), DTS |
| WIRELESS DEVICE OUTPUT POWERBT max transmitter powerSRD max transmitter power | 100mW at 2.4GHz – 2.4835GHz25mW at 5.725GHz – 5.825GHz |
| Subwoofer Name PS-WR65D | |
| Weight 6.0 kg | |
| Dimensions (W x H x D) 200.0 x 353.0 x 302.0 mm | |
| AMPLIFIERRated Output power 160W | |
| WIRELESS DEVICE OUTPUT POWERSRD max transmitter power | 25mW at 5.725GHz – 5.825GHz |
| Overall Standby Power Consumption (W) | 2.0W |
| BluetoothPort deactivation method | Press and hold the SOUND MODE button for more than 5 seconds to turn off Bluetooth Power function. |
NOTES
- Samsung Electronics Co., Ltd reserves the right to change the specifications without notice.
• Weight and dimensions are approximate.
- Hereby, Samsung Electronics, declares that this equipment is in compliance with Directive 2014/53/EU.
The full text of the EU declaration of conformity is available at the following internet address: http://www.samsung.com go to Support > Search Product Support and enter the model name.
This equipment may be operated in all EU countries.

[Correct disposal of batteries in this product]
(Applicable in countries with separate collection systems)
This marking on the battery, manual or packaging indicates that the batteries in this product should not be disposed of with other household waste at the end of their working life. Where marked, the chemical symbols Hg, Cd or Pb indicate that the battery contains mercury, cadmium or lead above the reference levels in EC Directive 2006/66.
If batteries are not properly disposed of, these substances can cause harm to human health or the environment.
To protect natural resources and to promote material reuse, please separate batteries from other types of waste and recycle them through your local, free battery return system.
Correct Disposal of This Product
(Waste Electrical & Electronic Equipment)
(Applicable in countries with separate collection systems)
This marking on the product, accessories or literature indicates that the product and its electronic accessories (e.g. charger, headset, USB cable) should not be disposed of with other household waste at the end of their working life. To prevent possible harm to the environment or human health from uncontrolled waste disposal, please separate these items from other types of waste and recycle them responsibly to promote the sustainable reuse of material resources.
Household users should contact either the retailer where they purchased this product, or their local government office, for details of where and how they can take these items for environmentally safe recycling.
Business users should contact their supplier and check the terms and conditions of the purchase contract. This product and its electronic accessories should not be mixed with other commercial wastes for disposal.
For information on Samsung's environmental commitments and product specific regulatory obligations e.g. REACH, WEEE, Batteries, visit:
http://www.samsung.com/uk/aboutsamsung/samsungelectronics/corporatecitizenship/data_corner.html
natural_image
Illustration of a person sitting on a sofa using a laptop (no text or symbols visible)РЪКОВОДСТВО НА ПОТРЕБИТЕЛЯ
natural_image
Illustration of a person sitting on a sofa next to a desk with a laptop (no text or symbols visible)
ПЪЛНО РЬКОВОДСТВО
text_image
Diagram illustrating the step-by-step assembly of a battery casing, showing internal components before and after disassembly.text_image
5 Sec ID SETtext_image
5 Sec ID SET
ВНИМАНИЕ
natural_image
Circular play button icon with two playback buttons (no text or symbols)natural_image
Two mechanical components: a pulley and a screw, both scaled by 2x (no text or symbols present)Държач-винт Винт

natural_image
Simple line drawing of a bracket-like object with no text or symbolsСкоба за монтаж на стена
text_image
Diagram showing a control panel with checkmark, input box, and output button symbolsnatural_image
Diagram showing a screw being inserted into a pulley and rotating around it, with no text or symbols present.natural_image
Mechanical assembly diagram showing a bolt and nut assembly with a rotating knob (no text or symbols)natural_image
Diagram showing two mechanical components with arrows indicating motion, no text or symbols presentflowchart
graph TD
    A["Top: Device icon"] --> B["Downward arrow"]
    B --> C["Bottom: Device icon with downward arrow"]
Manufactured under license from Dolby Laboratories. Dolby, Dolby Audio, Pro Logic, and the double-D symbol are trademarks of Dolby Laboratories.

dts
Digital Surround
For DTS patents, see http://patents.dts.com. Manufactured under license from DTS Licensing Limited. DTS, the Symbol, DTS in combination with the Symbol, and DTS Digital Surround are registered trademarks or trademarks of DTS, Inc. in the United States and/or other countries. © DTS, Inc. All Rights Reserved.

HIGH-DEFINITION MULTIMEDIA INTERFACE
The terms HDMI and HDMI High-Definition Multimedia Interface, and the HDMI Logo are trademarks or registered trademarks of HDMI Licensing LLC in the United States and other countries.
13 БЕЛЕЖКА ЗА ЛИЦЕНЗА ЗА ОТВОРЕН КОД
natural_image
Illustration of a person sitting on a sofa using a laptop (no text or symbols visible)KORISNIČKI PRIRUČNIK
Pogledajte ovaj priručnik za sigurnosne upute, instalaciju proizvoda, komponente, povezivanje i specifikacije proizvoda.
natural_image
Illustration of a person sitting on a sofa next to a desk with a laptop (no text or symbols visible)
POTPUNI PRIRUČNIK
POTPUNI PRIRUČNIK možete pristupiti putem web-centra službe za korisnike tvrtke Samsung skeniranjem QR koda. Za pregled priručnika na računalu ili mobilnom uređaju preuzmite priručnik u formatu dokumenta s web-stranice tvrtke Samsung. (http://www.samsung.com/support)
Dizajn i specifikacije mogu se promijeniti bez prethodne najave.
SADRŽAJ
01 Provjera Komponenti 2
Umetanje baterija prije upotrebe daljinskog upravljača (AA baterije X 2) ____ 2
02 Pregled Proizvoda 3
Prednja ploča / Ploča na desnoj strani uređaja Soundbar ____ 3
Donja ploča uređaja Soundbar 4
natural_image
Three grayscale product photos: a rectangular remote control unit, a cylindrical tower, and a remote control with three batteries (no text or symbols visible)Glavna jedinica Soundbar Subwoofer Daljinski upravljač / Baterije

text_image
① ② ③ ① ② ③Kabel za
napajanje
(Subwoofer)
AC/DC adapter (Glavna jedinica)
Kabel za napajanje (AC/DC adapter)
natural_image
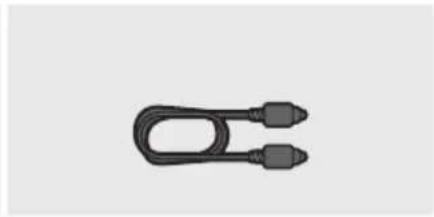
Simple black U-shaped connector with two connectors (no text or symbols)Optički kabel

natural_image
Four grayscale technical illustrations of mechanical parts: a rectangular bar, two threaded fasteners (x2), and two bracket-like structures (no text or symbols)text_image
Diagram illustrating the step-by-step assembly of a remote control panel, showing internal components and battery casing.02 PREGLED PROIZVODA
Prednja ploča / Ploča na desnoj strani uređaja Soundbar
| 1 | Zaslon Prikazuje status proizvoda i trenutni način. | |
| 2 | Gumb +/- (Glasnoća) Prilagođava glasnoću. • Prilikom prilagođavanja razine glasnoća se prikazuje na prednjem zaslonu uređaja Soundbar. | |
| 3 | Gumb (Izvor) Odabir načina unosa izvora. | |
| Način unosa Zaslon | ||
| Optički digitalni ulaz D.IN | ||
| Unos ARC (HDMI OUT) | D.IN → TV ARC (Automatska pretvorba) | |
| Unos AUX AUX | ||
| Unos HDMI HDMI | ||
| Način BLUETOOTH BT | ||
| Način USB USB | ||
| • Za uključivanje načina „BT PAIRING" promijenite izvor u način „BT", a zatim pritisnite i držite gumb (Izvor) duže od 5 sekundi. | ||
| 4 | Gumb (Iapajanje) Uključuje i isključuje napajanje. | |
- Kad priključite kabel napajanja, tipka napajanja radi još 4 do 6 sekundi.
- Kad uključite napajanje ove jedinice, početak reprodukcije zvuka kasnit će 4 do 5 sekundi.
- Ako želite uživati u zvuku koji se reproducira samo putem uređaja Soundbar, zvučnike televizora morate isključiti u izborniku Postavke zvuka televizora. Pogledajte priručnik TV-a koji je isporučen uz TV.
Donja ploča uređaja Soundbar
text_image
1 DIGITAL AUDIO IN (OPTICAL) 2 USB (5V 0.5A) 3 AUX IN HDMI IN HDMI OUT (TV-ARC) 4 5 6 DC 24V| 1 | DIGITAL AUDIO IN (OPTICAL)Povežite na digitalni (optički) izlaz vanjskog uređaja. |
| 2 | USB (5V 0.5A)Povežite USB uređaj kako biste reproducirali glazbu s uređaja USB pomoću uređaja Soundbar. |
| 3 | AUX INPovežite na analogni izlaz vanjskog uređaja. |
| 4 | HDMI INUnosi digitalne video i audio signale istovremeno pomoću kabela HDMI.Povežite na izlaz HDMI vanjskog uređaja. |
| 5 | HDMI OUT (TV-ARC)Povežite s priključkom HDMI (ARC) na televizoru. |
| 6 | DC 24V (Ulaz napajanja)Spojite AC/DC adapter. |
- Prilikom isključivanja iz zidne utičnice, kabel za napajanje adaptera izmjenične/istosmjerne struje držite za utikač. Ne povlačite kabel.
- Ne spajajte ovu jedinicu ili druge komponente na utičnicu za napajanje izmjeničnom strujom dok u potpunosti ne spojite sve komponente.
03 SPAJANJE UREĐAJA SOUNDBAR
text_image
5 Sec ID SET- Provjerite svijetli li indikator LINK LED postojano plavo (uspostavljanje veze dovršeno).
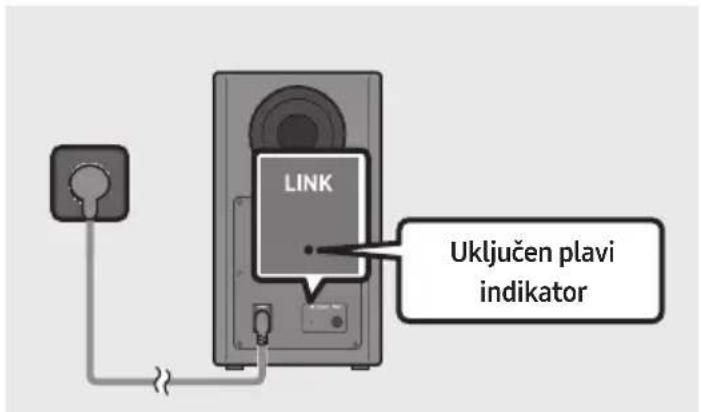
text_image
LINK Uključen plavi indikatorLINK LED prestat će treptati i počet će postojano svijetliti plavo nakon uspostavljanja veze između sustava Soundbar i bežičnog subwoofera.
NAPOMENE
text_image
5 Sec ID SET
OPREZ
natural_image
Circular play button icon with no text or symbolsPovezivanje televizora pomoću kabela HDMI
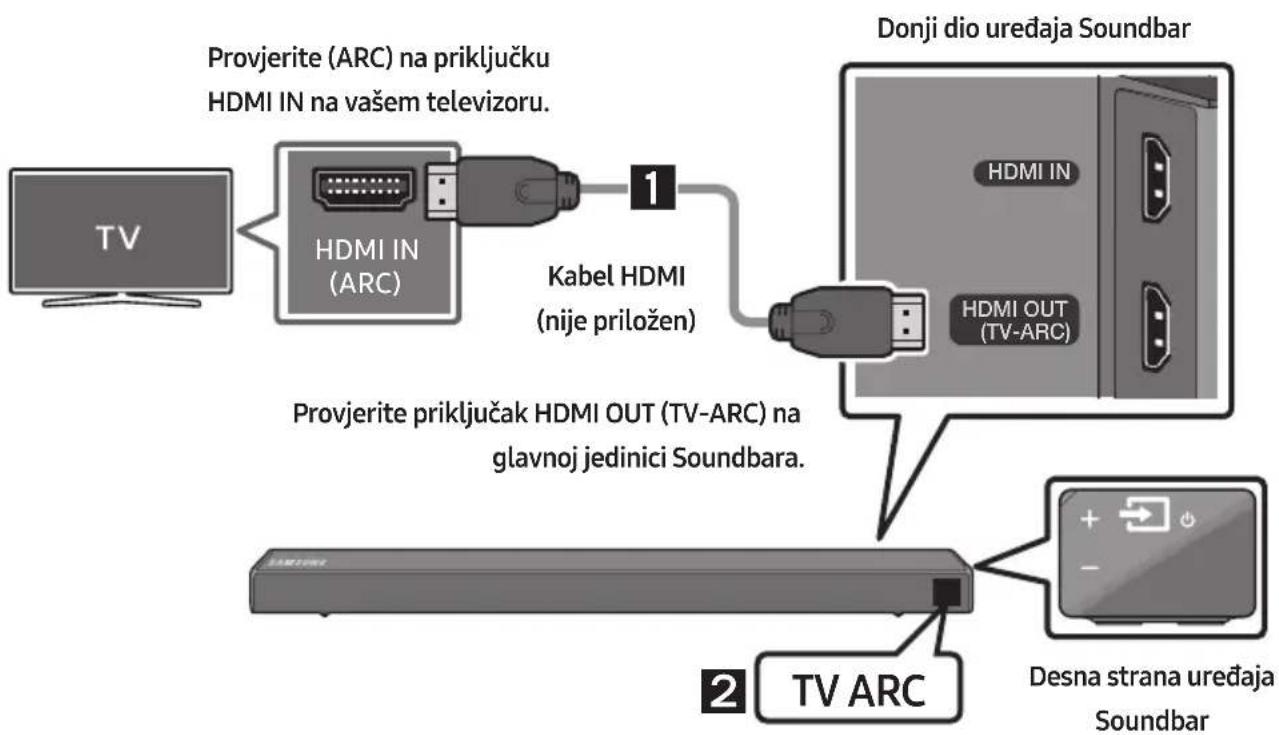
flowchart
graph TD
    A["TV"] --> B["HDMI IN (ARC)"]
    B --> C["Kabel HDMI (nije priložen)"]
    C --> D["Donji dio uređaja Soundbar"]
    D --> E["Provjere priključak HDMI OUT (TV-ARC) na glavnoj jedinici Soundbara."]
    E --> F["TV ARC"]
    F --> G["Desna strana uređaja Soundbar"]
- S uključenim Soundbarom i TV-om priključite kabel HDMI (nije priložen) kao što je prikazano na slici.
- „TV ARC” se prikazuje u prozoru zaslona glavne jedinice Soundbar i zvuk televizora se reproducira pomoću Soundbara.
- Ako se zvuk televizora ne čuje, pritisnite gumb 📄 (Izvor) na daljinskom upravljaču na desnoj strani Soundbara kako biste promijenili način u „D.IN”. Na zaslonu se prikazuju „D.IN” i „TV ARC” u nizu i zvuk s televizora se reproducira.
flowchart
graph LR
    A["Electric TV Control"] --> B["5 Sec"]
    B --> C["OFF-TV REMOTE"]
- Ako želite upravljati sustavom Soundbar putem daljinskog upravljača za televizor Samsung, uzastopno gurajte prema gore i držite gumb WOOFER 5 sekundi dok se na zaslonu ne prikaže poruka „ALL-TV REMOTE”. Zatim putem izbornika televizora odaberite vanjske zvučnike.

text_image
5 Sec ALL-TV REMOTE- Ako želite vratiti Soundbar u zadani način rada (upravljanje putem daljinskog upravljača za televizor Samsung), gurajte prema gore i zadržite gumb WOOFER 5 sekundi dok se na zaslonu ne prikaže poruka „SAMSUNG-TV REMOTE”.
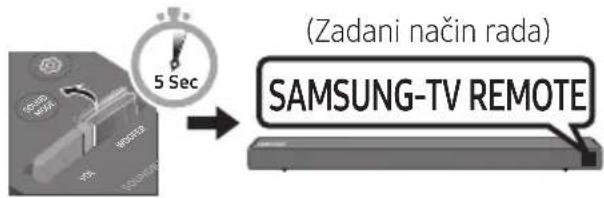
text_image
(Zadani način rada) SAMSUNG-TV REMOTE- Svaki put kada pritisnete gumb WOOFER prema gore i zadržite ga 5 sekundi, način rada prebacuje se sljedećim redoslijedom: „SAMSUNG-TV REMOTE” (Zadani način rada) → „OFF-TV REMOTE” → „ALL-TV REMOTE”.
- Ova mogućnost možda nije dostupna, ovisno o daljinskom upravljaču. - Proizvođači koji imaju podržanu ovu funkciju: VIZIO, LG, Sony, Sharp, PHILIPS, PANASONIC, TOSHIBA, GRUNDIG, Hisense, RCA
Uporaba skrivenih gumba (gumba s više funkcija)
| Skriveni gumb | Referentna stranica | |
| Gumb daljinskog upravljača Funkcija | ||
| WOOFER | Daljinskom upravljaču televizoraUključeno/Isključeno (Stanje čekanja) | Stranica 25 |
 (Izvor) (Izvor) | BT uparivanje Stranica 22 | |
| ▶II (Reproducija/Pauza) | Auto Power Down Uključeno/Isključeno(Način rada AUX) | Stranica 23 |
| Inicijalizacija (Stanje čekanja) Stranica 30 | ||
| Spremno za BT Stranica 13 | ||
| Lijevo | Auto Power Link ON/OFF | Stranica 23 |
| Desno | Anynet+ ON/OFF | Stranica 23 |
| Gore ID SET Stranica | 23 | |
| Dolje | Ograničenja glasnoće Uključeno/Isključeno | Stranica 24 |
| [EXCC] (Upravljanje zvukom) | 7 Pojas EQ Stranica 24 | |
| SOUND MODE | DRC ON/OFF (Stanje čekanja) | Stranica 22 |
| Bluetooth Power | Stranica 22 | |
Izlazne specifikacije za različite načine rada sa zvučnim efektima
natural_image
Two types of mechanical parts: a pulley and a screw, both scaled by 2 units (no text or symbols present)Vijak držača Vijak

natural_image
Simple line drawing of a bracket-like object with no text or symbolsZidni nosač
text_image
Diagram showing a control panel with checkmark, radio button, and two labeled buttons below containing text.- Poravnajte Središnja linija vodilice zidnog nosača sa sredinom televizora (ako montirate Soundbar ispod televizora), a zatim trakom pričvrstite Vodilica zidnog nosača na zid.
- Ako ne postavljate ispod televizora, postavite Središnju liniju u sredinu područja za postavljanje.
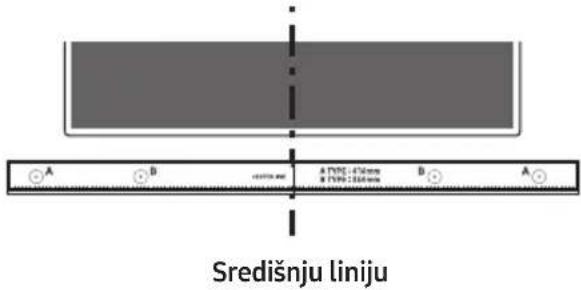
text_image
Središnju liniju- Gurnite vrh kemijske olovke ili naoštrene olovke kroz sredinu slika A-TYPE na svakoj strani vodilice da biste označili otvore za potporne vijke, a zatim uklonite Vodilica zidnog nosača.

text_image
A B TYPE 1.50mm TYPE 2.50mm A B Anatural_image
Diagram showing a screw being inserted into a pin, with motion arrows indicating direction (no text or symbols)natural_image
Mechanical assembly diagram showing a bolt and nut on a base with a rotating arrow indicating rotation (no text or symbols)natural_image
Diagram showing two mechanical components with arrows indicating motion or force direction (no text or symbols)flowchart
graph TD
    A["Top: Device icon"] --> B["Downward arrow"]
    B --> C["Bottom: Device icon with arrows indicating process flow"]
10 AŽURIRANJE SOFTVERA
Manufactured under license from Dolby Laboratories. Dolby, Dolby Audio, Pro Logic, and the double-D symbol are trademarks of Dolby Laboratories.

dts
Digital Surround
For DTS patents, see http://patents.dts.com. Manufactured under license from DTS Licensing Limited. DTS, the Symbol, DTS in combination with the Symbol, and DTS Digital Surround are registered trademarks or trademarks of DTS, Inc. in the United States and/or other countries. © DTS, Inc. All Rights Reserved.

HIGH-DEFINITION MULTIMEDIA INTERFACE
The terms HDMI and HDMI High-Definition Multimedia Interface, and the HDMI Logo are trademarks or registered trademarks of HDMI Licensing LLC in the United States and other countries.
13 OBAVIJEST O LICENCI ZA UPORABU SOFTVERA OTVORENOG KODA
Za slanje upita i zahtjeva u vezi otvorenih izvora obratite se tvrtki Samsung putem e-pošte (oss.request@samsung.com).
14 VAŽNA NAPOMENA VEZANA UZ SERVIS
- Slike u ovom korisničkom priručniku služe kao samo kao referenca i mogu se razlikovati od stvarnog izgleda proizvoda.
- Moguća je naplata administrativne pristojbe u slučaju
natural_image
Illustration of a person sitting on a sofa using a laptop (no text or symbols)UŽIVATELSKÁ PŘÍRUČKA
natural_image
Illustration of a person sitting on a couch next to a computer monitor (no text or symbols present)
KOMPLETNÍ PŘÍRUČKA
natural_image
Three grayscale product photos: a rectangular remote, a vertical tower, and a remote control with two small devices (no text or symbols visible)text_image
① ② ③ ① ② ③natural_image
Simple black U-shaped connector with two connectors (no text or symbols)Optický kabel

natural_image
Four technical illustrations of mechanical parts: a horizontal bar, a screw, a bracket, and a bracket (no text or symbols)text_image
Diagram illustrating the step-by-step assembly of a remote control device, showing internal components before and after disassembly.02 POPIS VÝROBKU
text_image
5 Sec ID SETtext_image
5 Sec ID SETVÝSTRAHA
natural_image
Circular play button icon with two vertical bars, no text or symbols presentnatural_image
Two mechanical components: a pulley and a screw, both scaled by 2x (no text or symbols present)Držák šroubu Šroub

natural_image
Simple line drawing of a bracket with no text or symbolstext_image
A B TYPE: 45mm TYPE: 36mm A B Anatural_image
Diagram showing a screw being inserted into a pulley and rotating around it, with no text or symbols present.natural_image
Mechanical component diagram showing a screw being inserted into a housing with a bolt, no text or symbols presentnatural_image
Diagram showing two mechanical components with arrows indicating motion, no text or symbols presentflowchart
graph TD
    A["Top: Device icon"] --> B["Downward arrow"]
    B --> C["Bottom: Device icon with arrows indicating process flow"]
10 AKTUALIZACE SOFTWARU
Manufactured under license from Dolby Laboratories. Dolby, Dolby Audio, Pro Logic, and the double-D symbol are trademarks of Dolby Laboratories.

dts
Digital Surround
For DTS patents, see http://patents.dts.com. Manufactured under license from DTS Licensing Limited. DTS, the Symbol, DTS in combination with the Symbol, and DTS Digital Surround are registered trademarks or trademarks of DTS, Inc. in the United States and/or other countries. © DTS, Inc. All Rights Reserved.

HIGH-DEFINITION MULTIMEDIA INTERFACE
The terms HDMI and HDMI High-Definition Multimedia Interface, and the HDMI Logo are trademarks or registered trademarks of HDMI Licensing LLC in the United States and other countries.
13 POZNÁMKA K LICENCI OTEVŘENÉHO SOFTWARU
natural_image
Illustration of a person sitting on a sofa using a laptop (no text or symbols visible)BENUTZERHANDBUCH
natural_image
Illustration of a person sitting on a couch next to a desk with a laptop (no text or symbols visible)
VOLLSTÄNDIGES HANDBUCH
natural_image
Three grayscale product photos: a rectangular remote unit, a tall tower, and a remote control with two batteries (no text or symbols visible)text_image
① ② ③ ① ② ③natural_image
Simple black outline of a U-shaped connector or clamp device (no text or symbols)Stromkabel (Netzadapter)
natural_image
Simple black U-shaped connector with two connectors (no text or symbols)Optisches Kabel

natural_image
Four technical illustrations of mechanical parts: a ruler, two screws, and two bracket brackets (no text or symbols)natural_image
Simple 3D illustration of a pulley or screw (no text or symbols)Aufhängungsschraube
natural_image
Two types of metal fasteners: a standard screw and a bracket (no text or symbols)text_image
Diagram illustrating battery internal structure changes with polarity labels02 PRODUKTÜBERSICHT
text_image
5 Sec ID SETtext_image
5 Sec ID SET
ACHTUNG
natural_image
Circular gray button with a play symbol and double arrow icon (no text or numbers)text_image
A B TYPE: 45mm TYPE: 340mm A TYPE: 45mm B TYPE: 340mm Anatural_image
Two mechanical components: a cylindrical screw and a threaded screw, both scaled by 2 units (no text or symbols present)natural_image
Simple line drawing of a bracket with no text or symbolsWandhalterung
text_image
A B 10000.00 A TDC: 45mm A TYPE: 45mm B A Anatural_image
Diagram showing a screw being inserted into a pinhole, with arrows indicating direction (no text or symbols)natural_image
Mechanical component diagram showing a screw being inserted into a housing with a bolt, no text or symbols presentnatural_image
Diagram showing a mechanical component before and after assembly, with arrows indicating motion direction (no text or symbols)Manufactured under license from Dolby Laboratories. Dolby, Dolby Audio, Pro Logic, and the double-D symbol are trademarks of Dolby Laboratories.

dts
Digital Surround
For DTS patents, see http://patents.dts.com. Manufactured under license from DTS Licensing Limited. DTS, the Symbol, DTS in combination with the Symbol, and DTS Digital Surround are registered trademarks or trademarks of DTS, Inc. in the United States and/or other countries. © DTS, Inc. All Rights Reserved.

HIGH-DEFINITION MULTIMEDIA INTERFACE
The terms HDMI and HDMI High-Definition Multimedia Interface, and the HDMI Logo are trademarks or registered trademarks of HDMI Licensing LLC in the United States and other countries.
13 BEKANNTMACHUNG ZU OPEN SOURCE LIZENZEN
natural_image
Illustration of a person sitting on a couch next to a desk with a laptop (no text or symbols visible)
TÄIELIKUST KASUTUSJUHENDIST
text_image
Diagram illustrating the step-by-step assembly of a remote control panel, showing disassembly and reassembly steps.02 TOOTE ÜLEVAADE
Soundbari esipaneel / parempoolne paneel
text_image
5 Sec ID SETtext_image
5 Sec ID SET
ETTEVAATUST!
natural_image
Circular gray button with a play symbol and double arrow icon (no text or numbers)text_image
Bluetooth-seade VõIflowchart
graph LR
    A["Monitor with 5 Sec"] --> B["OFF-TV REMOTE"]
natural_image
Two 3D mechanical parts: a pulley and a screw, both scaled by ×2 (no text or symbols)Hoidikkruvi Kruvi

natural_image
Simple line drawing of a bracket with no text or symbolsSeinakinnituskronsteini
- Asetage Seinakinnitusjuhik vastu seinapinda.
• Seinakinnitusjuhik peab olema loodis.
- Kui teler on seinale kinnitatud, paigaldage Soundbar vähemalt 5 cm telerist allapoole.
text_image
TV Vähemalt 5 cmtext_image
A B 100% 20% 30% A TYPE: 45mm TYPE: 30mm B A Anatural_image
Diagram showing a screw being inserted into a pin, with motion arrows indicating direction (no text or symbols)natural_image
Mechanical component diagram showing a screw being inserted into a housing with a circular base (no text or symbols)- Kokkupanekul veenduge, et Seinakinnituskronstein riputusosad jääksid Soundbari taha.
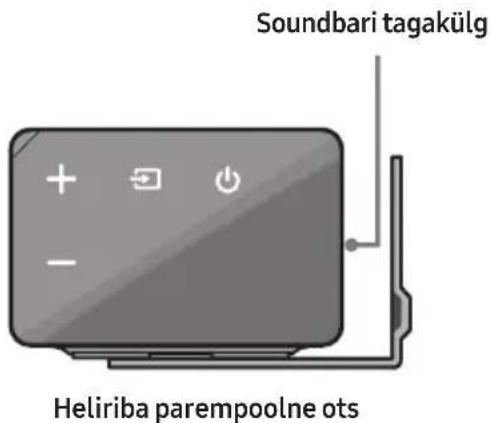
text_image
Soundbari tagakülg Heliriba parempoolne ots- Paigaldage Soundbar koos selle külge kinnitatud Seinakinnituskronstein, riputades Seinakinnituskronstein seinal olevatele Hoidikkruvi.

natural_image
Diagram showing two mechanical components before and after assembly, with arrows indicating motion direction (no text or symbols)- Libistage Soundbari alla, nagu on allpool näidatud, nii et Seinakinnituskronstein toetuksid Kruvihoidikutele.
- Sisestage Kruvihoidikutele Seinakinnituskronstein laia (alumisse) ossa ja seejärel libistage Seinakinnituskronstein allapoole, nii et Seinakinnituskronstein toetuksid kindlalt Kruvihoidikutele.
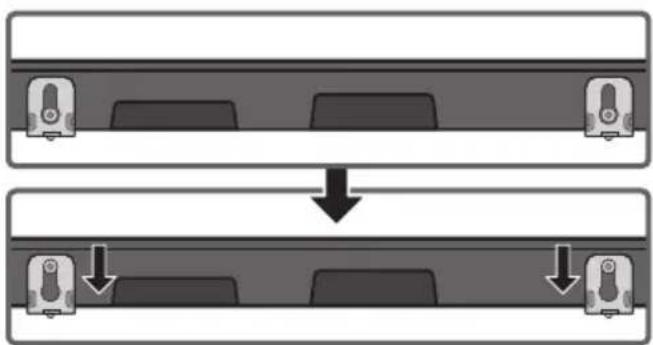
flowchart
graph TD
    A["Top: Device icon"] --> B["Downward arrow"]
    B --> C["Bottom: Device icon with arrows pointing to bottom panel"]
10 TARKVARA- VÄRSKENDUS
Manufactured under license from Dolby Laboratories. Dolby, Dolby Audio, Pro Logic, and the double-D symbol are trademarks of Dolby Laboratories.

dts
Digital Surround
For DTS patents, see http://patents.dts.com. Manufactured under license from DTS Licensing Limited. DTS, the Symbol, DTS in combination with the Symbol, and DTS Digital Surround are registered trademarks or trademarks of DTS, Inc. in the United States and/or other countries. © DTS, Inc. All Rights Reserved.

HIGH-DEFINITION MULTIMEDIA INTERFACE
The terms HDMI and HDMI High-Definition Multimedia Interface, and the HDMI Logo are trademarks or registered trademarks of HDMI Licensing LLC in the United States and other countries.
13 AVATUD LÄHTEKOODI LITSENTSI TEATIS
natural_image
Illustration of a person sitting on a couch watching a computer (no text or symbols visible)
MANUEL COMPLET
natural_image
Three grayscale product photos: a rectangular remote unit, a cylindrical device, and a remote control with two batteries (no text or symbols visible)text_image
① ② ③ ① ② ③natural_image
Four technical illustrations of mechanical parts: a rectangular bar, two circular holes with 'x2' labels, a screw, and a bracket (no text or symbols present)Guide de fixation murale
Vis de
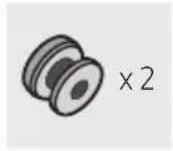
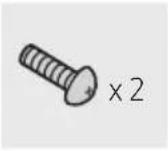
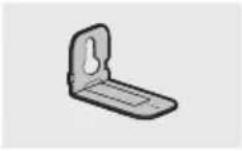
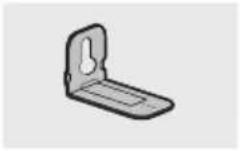
fixation
Vis Support de
fixation murale G
Support de fixation murale D
text_image
Diagram illustrating the step-by-step assembly of a battery pack, showing internal components and polarity indicators.02 PRÉSENTATION DU PRODUIT
text_image
5 Sec ID SETtext_image
5 Sec ID SET
ATTENTION
natural_image
Circular play button icon with two vertical bars, no text or symbols presentnatural_image
Two 3D-rendered mechanical parts: a pulley and a screw, both scaled by 'x2' (no text or symbols on the parts themselves)Vis de fixation Vis

natural_image
Simple line drawing of a bracket-like object with no text or symbolsSupport de fixation murale
text_image
TV 5 cm minimumtext_image
A B www.net A701.15mm A701.15mm B A Anatural_image
Diagram showing a screw being inserted into a pin, with motion arrows indicating direction (no text or symbols)natural_image
Mechanical component diagram showing a screw being inserted into a housing with a bolt, no text or symbols presentnatural_image
Diagram showing two mechanical components before and after assembly, with arrows indicating motion direction (no text or symbols)flowchart
graph TD
    A["Top: Device icon"] --> B["Downward arrow"]
    B --> C["Bottom: Device icon with downward arrows"]
10 MISE À JOUR DU LOGICIEL
Manufactured under license from Dolby Laboratories. Dolby, Dolby Audio, Pro Logic, and the double-D symbol are trademarks of Dolby Laboratories.

dts
Digital Surround
For DTS patents, see http://patents.dts.com. Manufactured under license from DTS Licensing Limited. DTS, the Symbol, DTS in combination with the Symbol, and DTS Digital Surround are registered trademarks or trademarks of DTS, Inc. in the United States and/or other countries. © DTS, Inc. All Rights Reserved.

HIGH-DEFINITION MULTIMEDIA INTERFACE
The terms HDMI and HDMI High-Definition Multimedia Interface, and the HDMI Logo are trademarks or registered trademarks of HDMI Licensing LLC in the United States and other countries.
13 AVIS DE LICENCE LIBRE
natural_image
Illustration of a person sitting on a sofa using a laptop (no text or symbols)ΕΓΧΕΙΡΙΔΙΟ ΧΡΗΣΗΣ
natural_image
Illustration of a person sitting on a sofa next to a desk with a laptop (no text or symbols visible)
ΠΛΗΡΕΣ ΕΓΧΕΙΡΙΔΙΟ
text_image
Diagram illustrating the step-by-step assembly of a battery pack, showing internal components and charge distribution.text_image
5 Sec ID SETtext_image
5 Sec ID SET⚠️ ΠΡΟΣΟΧΗ
natural_image
Circular gray button with a play symbol icon at center (no text or symbols)flowchart
graph LR
    A["TV"] --> B["Bluetooth"]
    B --> C["Device H"]
    C --> D["Hand interacting with screen"]
Αρχική σύνδεση
text_image
Audio Remote SAMSUN Audio Remotetext_image
A B TYPE: 45mm TYPE: 34mm A TYPE: 45mm B TYPE: 34mm Anatural_image
Two mechanical components: a cylindrical pin and a threaded screw, both scaled by 2 units (no text or symbols present)Βίδα στερέωσης Βίδα

natural_image
Simple line drawing of a bracket with no text or symbolstext_image
A B TYPE: 10mm TYPE: 30mm A B Anatural_image
Diagram showing mechanical components with arrows indicating motion, no text or symbols presentnatural_image
Mechanical component diagram showing a bolt and screw assembly with a rotating knob (no text or symbols)natural_image
Diagram showing a mechanical component before and after cutting, with arrows indicating motion direction (no text or symbols)flowchart
graph TD
    A["Top: Device icon"] --> B["Downward arrow"]
    B --> C["Bottom: Device icon with downward arrow"]
10 ENHMEPΩΣΗ ΛΟΓΙΣΜΙΚΟΥ
Manufactured under license from Dolby Laboratories. Dolby, Dolby Audio, Pro Logic, and the double-D symbol are trademarks of Dolby Laboratories.

dts
Digital Surround
For DTS patents, see http://patents.dts.com. Manufactured under license from DTS Licensing Limited. DTS, the Symbol, DTS in combination with the Symbol, and DTS Digital Surround are registered trademarks or trademarks of DTS, Inc. in the United States and/or other countries. © DTS, Inc. All Rights Reserved.

HIGH-DEFINITION MULTIMEDIA INTERFACE
The terms HDMI and HDMI High-Definition Multimedia Interface, and the HDMI Logo are trademarks or registered trademarks of HDMI Licensing LLC in the United States and other countries.
natural_image
Illustration of a person sitting on a sofa using a laptop (no text or symbols visible)FELHASZNÁLÓI KÉZIKÖNYV
natural_image
Illustration of a person sitting on a couch next to a desk with a laptop (no text or symbols visible)
TELJES KÉZIKÖNYV
natural_image
Three grayscale product photos: a rectangular remote unit, a vertical tower, and a remote control with two batteries (no text or symbols visible)text_image
① ② ③ ① ② ③natural_image
Simple black U-shaped connector with two side connectors (no text or symbols)Optikai kábel

natural_image
Four technical illustrations of mechanical parts: a ruler, a screw, a bracket, and a bracket (no text or symbols present)Falikonzol sín
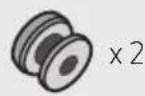
Tartócsavar
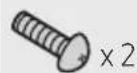
Csavar
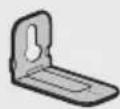
Fali Konzol B
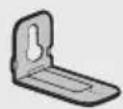
Fali konzol J
text_image
Diagram illustrating the step-by-step assembly of a battery pack, showing disassembly and reassembly steps with polarity indicators.02 A TERMÉK ÁTTEKINTÉSE
text_image
5 Sec ID SETtext_image
5 Sec ID SET
FIGYELEM
natural_image
Circular play button icon with two playback buttons, no text or symbols presentnatural_image
Two mechanical components: a pulley and a screw, both scaled by 2x (no text or symbols present)Tartócsavar Csavar

natural_image
Simple line drawing of a bracket with no text or symbolsFali Konzol
text_image
A B C A TYPE: 45mm B TYPE: 35mm A Anatural_image
Diagram showing a screw being inserted into a pinhole, with motion arrows indicating direction (no text or symbols)natural_image
Mechanical component diagram showing a screw being inserted into a housing with a bolt, no text or symbols presentnatural_image
Diagram showing two mechanical components with arrows indicating motion or force direction (no text or symbols)flowchart
graph TD
    A["Top: Device icon"] --> B["Downward arrow"]
    B --> C["Bottom: Device icon with downward arrow"]
10 SZOFTVERFRISSÍTÉS
Manufactured under license from Dolby Laboratories. Dolby, Dolby Audio, Pro Logic, and the double-D symbol are trademarks of Dolby Laboratories.

dts
Digital Surround
For DTS patents, see http://patents.dts.com. Manufactured under license from DTS Licensing Limited. DTS, the Symbol, DTS in combination with the Symbol, and DTS Digital Surround are registered trademarks or trademarks of DTS, Inc. in the United States and/or other countries. © DTS, Inc. All Rights Reserved.

HIGH-DEFINITION MULTIMEDIA INTERFACE
The terms HDMI and HDMI High-Definition Multimedia Interface, and the HDMI Logo are trademarks or registered trademarks of HDMI Licensing LLC in the United States and other countries.
13 NYÍLT FORRÁSKÓDÚ LICENC MEGJEGYZÉS
natural_image
Illustration of a person sitting on a sofa using a laptop (no text or symbols visible)MANUALE UTENTE
natural_image
Illustration of a person sitting on a couch next to a desk with a laptop (no text or symbols visible)
MANUALE COMPLETO
text_image
Diagram illustrating the step-by-step assembly of a battery pack, showing internal components and polarity indicators.02 PANORAMICA DEL PRODOTTO
text_image
5 Sec ID SETnatural_image
Circular gray button with a play symbol icon, no text or symbols presentflowchart
graph LR
    A["TV"] -->|Wireless Signal| B["OPPURE"]
    B --> C["Display with +/- icon"]
    C --> D["Hand pointing at screen with 'OK' button"]
text_image
OFF-TV REMOTEtext_image
A B TYPE: 45mm TYPE: 34mm A TYPE: 45mm B TYPE: 34mm Anatural_image
Two mechanical components: a pulley and a screw, both scaled by 2x (no text or symbols on the parts themselves)natural_image
Simple line drawing of a chair or bench with no text or symbolsnatural_image
Diagram showing a screw being inserted into a pin, with arrows indicating direction (no text or symbols)natural_image
Mechanical component with screw and mounting base, showing rotation arrow (no text or symbols)natural_image
Diagram showing a mechanical component before and after cutting, with arrows indicating motion direction (no text or symbols)flowchart
graph TD
    A["Top: Device icon"] --> B["Downward arrow"]
    B --> C["Bottom: Device icon with downward arrow"]
10 AGGIORNAMENTO DEL SOFTWARE
Manufactured under license from Dolby Laboratories. Dolby, Dolby Audio, Pro Logic, and the double-D symbol are trademarks of Dolby Laboratories.

dts
Digital Surround
For DTS patents, see http://patents.dts.com. Manufactured under license from DTS Licensing Limited. DTS, the Symbol, DTS in combination with the Symbol, and DTS Digital Surround are registered trademarks or trademarks of DTS, Inc. in the United States and/or other countries. © DTS, Inc. All Rights Reserved.

HIGH-DEFINITION MULTIMEDIA INTERFACE
The terms HDMI and HDMI High-Definition Multimedia Interface, and the HDMI Logo are trademarks or registered trademarks of HDMI Licensing LLC in the United States and other countries.
13 AVVISO DI LICENZA OPEN SOURCE
http://www.samsung.com/it/aboutsamsung/sustainability/environment/our-commitment/data/
DROŠĪBAS INFORMĀCIJA
DROŠĪBAS BRĪDINĀJUMI
LAI SAMAZINĀTU ELEKTRISKĀS STRĀVAS TRIECIENA RISKU, NENÖNEMIET PÄRSEGU (VAI KORPUSA AIZMUGURI).
IERÍCES IEKŠPUSĚ NEATRODAS NEVIENA DETAŁA, KURAS APKOPE BÛTU JÂVEIC LIETOTĀJAM. UZTICIET APKOPI KVALIFICĒTIEM APKOPES SPECIÄLISTIEM.
natural_image
Illustration of a person sitting on a sofa using a laptop (no text or symbols)LIETOTĀJA ROKASGRĀMATA
natural_image
Illustration of a person sitting on a couch next to a desk with a laptop (no text or symbols visible)
PILNĀ ROKASGRĀMATA
text_image
Diagram illustrating the step-by-step assembly of a battery pack, showing internal components and polarity indicators.02 IZSTRĀDĀJUMA PĀRSKATS
text_image
PAR 5 Sec ID SETtext_image
5 Sec ID SET
UZMANIBU
natural_image
Circular gray button with a white play symbol inside, no text or numbers present.text_image
Bluetooth ierice VAInatural_image
Two 3D mechanical parts: a pulley and a screw, both scaled by 'x2' (no text or symbols on the parts themselves)natural_image
Simple line drawing of a bracket with no text or symbolstext_image
A B TYPE: 100mm TYPE: 50mm A B Anatural_image
Diagram showing a screw being inserted into a pin, with motion arrows indicating direction (no text or symbols)natural_image
Mechanical component diagram showing a screw being inserted into a housing with a circular base (no text or symbols)natural_image
Diagram showing two views of a rectangular object with arrows indicating direction, no text or symbols presentflowchart
graph TD
    A["Top: Device icon"] --> B["Downward arrow"]
    B --> C["Bottom: Device icon with downward arrow"]
10 PROGRAMMATURAS ATJAUNINĀŠANA
11 PROBLÉMU NOVĚRŠANA
Manufactured under license from Dolby Laboratories. Dolby, Dolby Audio, Pro Logic, and the double-D symbol are trademarks of Dolby Laboratories.

dts
Digital Surround
For DTS patents, see http://patents.dts.com. Manufactured under license from DTS Licensing Limited. DTS, the Symbol, DTS in combination with the Symbol, and DTS Digital Surround are registered trademarks or trademarks of DTS, Inc. in the United States and/or other countries. © DTS, Inc. All Rights Reserved.

HIGH-DEFINITION MULTIMEDIA INTERFACE
The terms HDMI and HDMI High-Definition Multimedia Interface, and the HDMI Logo are trademarks or registered trademarks of HDMI Licensing LLC in the United States and other countries.
13 PAZIÑOJUMS PAR ATVÉRTÃ PIRMKODA LICENCI
natural_image
Illustration of a person sitting on a sofa using a laptop (no text or symbols visible)NAUDOTOJO VADOVAS
natural_image
Illustration of a person sitting on a couch next to a desk with a laptop (no text or symbols visible)
IŠSAMUS VADOVAS
text_image
Diagram illustrating the step-by-step assembly of a battery pack, showing disassembly and reassembly steps with polarity indicators.02 GAMINIO APŽVALGA
text_image
5 Sec ID SETtext_image
5 Sec ID SET
DÈMESIO
natural_image
Circular play button icon with two vertical bars, no text or symbols presenttext_image
A B TYPE: 45mm TYPE: 340mm B Anatural_image
Two types of mechanical components: a cylindrical pin and a threaded screw, both scaled by 2x (no text or symbols present)natural_image
Simple line drawing of a bracket with no text or symbolsSieninis laikiklis
natural_image
Diagram showing a screw being inserted into a pin, with motion arrows indicating direction (no text or symbols)natural_image
Mechanical component diagram showing a screw being inserted into a housing with a bolt, no text or symbols presentnatural_image
Diagram showing two states of a mechanical component before and after assembly, with arrows indicating motion direction (no text or symbols)flowchart
graph TD
    A["Top: Device icon"] --> B["Downward arrow"]
    B --> C["Bottom: Device icon with downward arrow"]
10 PROGRAMINĖS JRANGOS NAUJINIMAS
Manufactured under license from Dolby Laboratories. Dolby, Dolby Audio, Pro Logic, and the double-D symbol are trademarks of Dolby Laboratories.

dts
Digital Surround
For DTS patents, see http://patents.dts.com. Manufactured under license from DTS Licensing Limited. DTS, the Symbol, DTS in combination with the Symbol, and DTS Digital Surround are registered trademarks or trademarks of DTS, Inc. in the United States and/or other countries. © DTS, Inc. All Rights Reserved.

HIGH-DEFINITION MULTIMEDIA INTERFACE
The terms HDMI and HDMI High-Definition Multimedia Interface, and the HDMI Logo are trademarks or registered trademarks of HDMI Licensing LLC in the United States and other countries.
13 ATVIROSIOS PROGRAMINĖS JRANGOS LICENCIJOS PRANEŠIMAS
natural_image
Illustration of a person sitting on a couch next to a desk with a laptop (no text or symbols visible)
PEŁNY PODRĘCZNIK UŻYTKOWNIKA
text_image
Diagram illustrating battery internal structure change with polarity labels02 OPIS PRODUKTU
text_image
5 Sec ID SETtext_image
5 Sec ID SETPRZESTROGA
natural_image
Circular gray button with a play symbol icon, no text or symbols presentnatural_image
Two mechanical components: a pulley and a screw, both scaled by 2 units (no text or symbols present)natural_image
Simple line drawing of a bracket with no text or symbolsnatural_image
Diagram showing a screw being inserted into a pin, with motion arrows indicating direction (no text or symbols)natural_image
Mechanical component diagram showing a screw being inserted into a housing with a circular base (no text or symbols)natural_image
Diagram showing two stages of a mechanical or structural change, with arrows indicating motion direction (no text or symbols present)flowchart
graph TD
    A["Top: Device icon"] --> B["Downward arrow"]
    B --> C["Bottom: Device icon with downward arrow"]
10 AKTUALIZACJA OPROGRAMOWANIA
Manufactured under license from Dolby Laboratories. Dolby, Dolby Audio, Pro Logic, and the double-D symbol are trademarks of Dolby Laboratories.

dts
Digital Surround
For DTS patents, see http://patents.dts.com. Manufactured under license from DTS Licensing Limited. DTS, the Symbol, DTS in combination with the Symbol, and DTS Digital Surround are registered trademarks or trademarks of DTS, Inc. in the United States and/or other countries. © DTS, Inc. All Rights Reserved.

HIGH-DEFINITION MULTIMEDIA INTERFACE
The terms HDMI and HDMI High-Definition Multimedia Interface, and the HDMI Logo are trademarks or registered trademarks of HDMI Licensing LLC in the United States and other countries.
13 INFORMACJA O LICENCJI OPEN SOURCE
natural_image
Illustration of a person sitting on a sofa using a laptop (no text or symbols visible)MANUAL DE UTILIZARE
natural_image
Illustration of a person sitting on a sofa next to a laptop and desk (no text or symbols)
MANUAL COMPLET
natural_image
Three grayscale product photos: a rectangular remote, a cylindrical TV, and a remote control with three small devices (no text or symbols visible)text_image
① ② ③ ① ② ③Cablu de alimentare (Subwoofer)
Adaptor de c.a./c.c.
(Unitate principală)
Cablu de alimentare (Adaptor de c.a./c.c.)
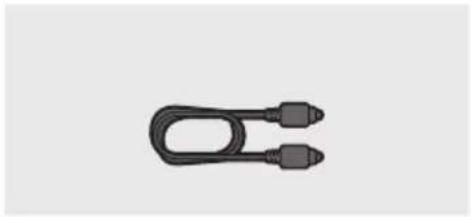
natural_image
Simple black U-shaped connector with two connectors (no text or symbols)Cablu optic

text_image
Technical diagram showing a toolbar with control buttons and four labeled mechanical parts: a screw, a bolt, a bracket, and a bracket.text_image
Diagram illustrating the step-by-step assembly of a battery casing, showing internal components and polarity indicators.02 DESCRIERI
text_image
5 Sec ID SETtext_image
PASS 5 Sec ID SET
ATENTIE
natural_image
Circular play button icon with two vertical bars, no text or symbols presentflowchart
graph LR
    A["Start"] --> B["5 Sec"]
    B --> C["ALL-TV REMOTE"]
text_image
A B TYPE: 45mm TYPE: 34mm A TYPE: 45mm B TYPE: 34mm Anatural_image
Two types of mechanical components: a cylindrical pin and a threaded screw, both scaled by 2 units (no text or symbols present)Şurub suport Şurub

natural_image
Simple line drawing of a bracket with no text or symbolsSuport de fixare pe perete
natural_image
Diagram showing a screw being inserted into a pin, with motion arrows indicating direction (no text or symbols)natural_image
Mechanical assembly diagram showing a screw being inserted into a housing component with a bolt, no text or symbols present.natural_image
Diagram showing two mechanical components with arrows indicating motion or force direction (no text or symbols)flowchart
graph TD
    A["Top: Device icon"] --> B["Downward arrow"]
    B --> C["Bottom: Device icon with arrows indicating process flow"]
10 ACTUALIZARE SOFTWARE
Manufactured under license from Dolby Laboratories. Dolby, Dolby Audio, Pro Logic, and the double-D symbol are trademarks of Dolby Laboratories.

dts
Digital Surround
For DTS patents, see http://patents.dts.com. Manufactured under license from DTS Licensing Limited. DTS, the Symbol, DTS in combination with the Symbol, and DTS Digital Surround are registered trademarks or trademarks of DTS, Inc. in the United States and/or other countries. © DTS, Inc. All Rights Reserved.

HIGH-DEFINITION MULTIMEDIA INTERFACE
The terms HDMI and HDMI High-Definition Multimedia Interface, and the HDMI Logo are trademarks or registered trademarks of HDMI Licensing LLC in the United States and other countries.
13 NOTIFICARE DE LICENȚĂ OPEN SOURCE
natural_image
Illustration of a person sitting on a sofa using a laptop (no text or symbols visible)KORISNIČKI PRIRUČNIK
Pogledajte ovaj priručnik za bezbednosna uputstva, postavljanje proizvoda, komponente, povezivanje i specifikacije proizvoda.
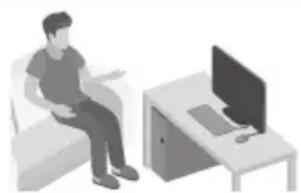
natural_image
Illustration of a person sitting on a sofa next to a desk with a laptop (no text or symbols visible)
KOMPLETAN PRIRUČNIK
Možete da pristupite KOMPLETAN PRIRUČNIK na internet centru za korisničku podršku kompanije Samsung skeniranjem QR koda. Da biste videli priručnik na vašem PC računaru ili mobilnom uređaju, preuzmite priručnik u formatu dokumenta sa internet stranice kompanije Samsung. (http://www.samsung.com/support)
natural_image
Three grayscale product photos: a rectangular remote unit, a cylindrical TV, and a remote control with two batteries (no text or symbols visible)Glavni uređaj Soundbar Sabvufer Daljinski upravljač/baterije

text_image
① ② ③ ① ② ③Kabl za napajanje (Sabvufer)
AC/DC adapter (Glavni uređaj)

natural_image
Simple black outline of a U-shaped connector or clamp (no text or symbols)Kabl za napajanje (AC/DC adapter)
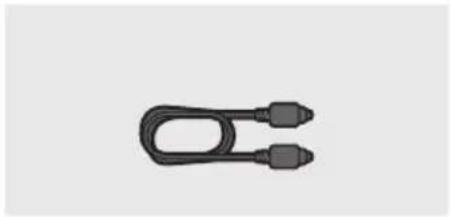
natural_image
Simple black cable with two connectors, no text or symbols visibleOptički kabl

natural_image
Four technical illustrations of mechanical parts: a ruler, two spools, one screw, and a bracket (no text or symbols present)Vodica za montažu na zid Zavrtanj držača Zavrtanj Nosač za
montažu
na zid L
Nosač za montažu na zid D
- Više informacija u vezi sa napajanjem i potrošnjom energije potražite na nalepnici na proizvodu. (Oznaka : Donji deo Glavnog Uređaja Soundbar)
- Koraci za povezivanje napajanja su označeni (1, 2, 3). Za više informacija o povezivanju napajanja, pogledajte str. 5.
- Za kupovinu dodatnih komponenti ili opcionih kablova možete se obratiti servisnom centru ili korisničkoj službi kompanije Samsung.
- U zavisnosti od regiona, AC utikač može imati drugačiji izgled, odnosno može da se isporuči zajedno sa AC/DC adapterom.
- Dodatna oprema se može malo razlikovati od one prikazane na gornjim slikama.
text_image
Diagram illustrating the step-by-step assembly of a battery pack, showing internal components and polarity changes.02 PREGLED PROIZVODA
Prednji panel/panel sa desne strane uređaja Soundbar
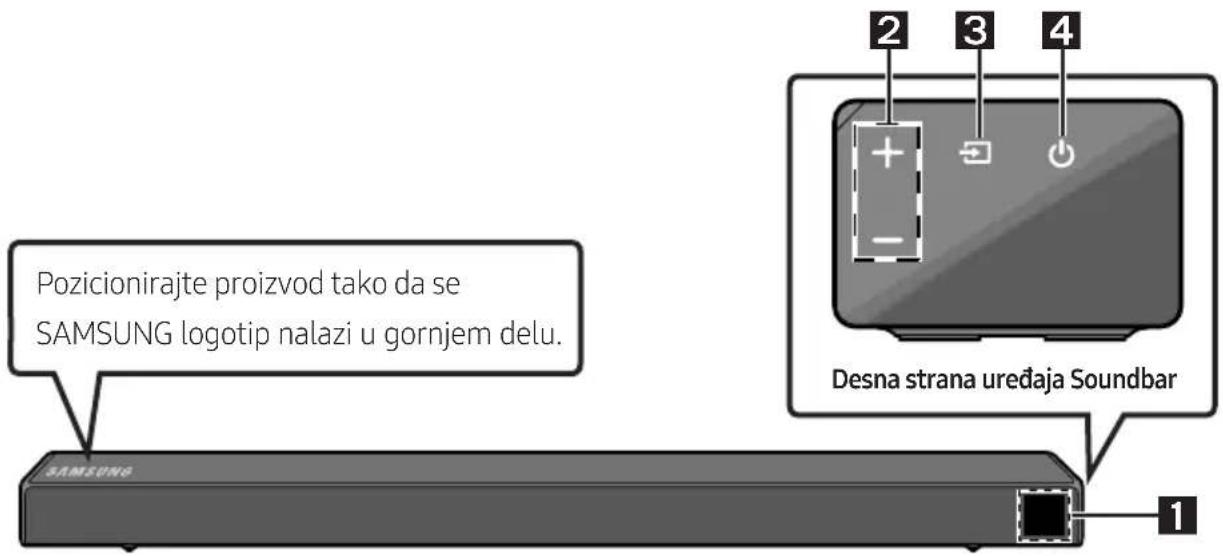
text_image
Pozicionirajte proizvod tako da se SAMSUNG logotip nalazi u gornjem delu. SAMSUNG Desna strana uređaja Soundbar 1 2 3 4| 1 | EkranPrikazuje status proizvoda i trenutni režim. | |
| 2 | Dugme +/- (Jačina zvuka)Podešava jačinu zvuka.Kada se podesi, nivo jačine zvuka se prikazuje na prednjem ekranu uređaja Soundbar. | |
| 3 | Dugme (Izvor)Bira režim ulaza izvora. | |
| Režim ulaza Ekran | ||
| Optički digitalni ulaz D.IN | ||
| ARC (HDMI OUT) ulaz | D.IN → TV ARC (automatska konverzija) | |
| AUX ulaz AUX | ||
| HDMI ulaz HDMI | ||
| BLUETOOTH režim BT | ||
| USB režim USB | ||
| Da biste uključili režim „BT PAIRING“, promenite izvor na režim „BT“, a zatim pritisnite i zadržite dugme → (Izvor) duže od 5 sekundi. | ||
| 4 | Dugme (Napajanje)Uključuje i isključuje napajanje. | |
text_image
5 Sec ID SET- Proverite da li LED lampica za vezu (LINK) svetli plavom bojom (povezivanje je završeno).
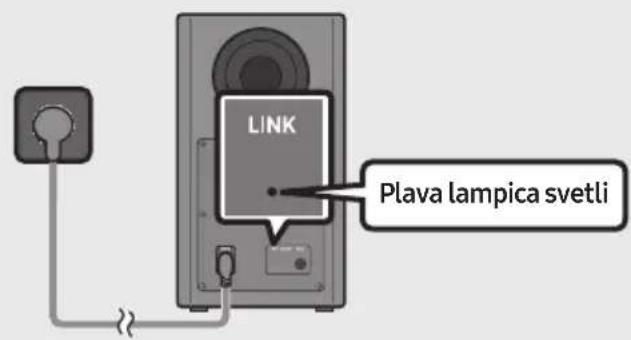
text_image
LINK Plava lampica svetliLED indikator za vezu (LINK) prestaje da treperi i počinje neprekidno da svetli plavom bojom kada se uspostavi veza između uređaja Soundbar i bežičnog sabvufera.
NAPOMENE
- Nemojte da priključni kabl ovog proizvoda ili vašeg televizora sa zidnom utičnicom sve dok sve veze između komponenti ne budu završene
- Pre pomeranja ili montiranja ovog proizvoda, uverite se da ste isključili napajanje i iskopčali priključni kabl.
- Ako je isključeno napajanje glavnog uređaja, bežični sabvufer će preći u režim mirovanja, a LED lampica za režim STANDBY na zadnjoj strani će postati crven nakon što trepne plavom bojom nekoliko puta.
- Ako koristite uređaj koji koristi istu frekvenciju (5,8GHz) kao Soundbar u blizini uređaja Soundbar, interferencija može dovesti do prekida zvuka.
- Maksimalno rastojanje prenosa bežičnog signala glavnog uređaja je oko 10 metara, ali može da se razlikuje u zavisnosti od radnog okruženja. Ako se zid od armiranog betona ili metalni zid nalazi između glavnog uređaja i bežičnog sabvufera, sistem možda neće raditi pošto bežični signal ne može da prođe kroz metal.
MERE PREDOSTROŽNOSTI
- Bežične prijemne antene su ugrađene u bežični sabvufer. Uređaj držite daleko od vode i vlage.
- Da biste ostvarili optimalne performanse slušanja, vodite računa da nema nikakvih prepreka u oblasti oko lokacije bežičnog sabvufera ili modula bežičnog prijemnika (prodaje se odvojeno).
Povezivanje SWA-8500S (prodaje se odvojeno) sa uređajem Soundbar
Stvorite pravi bežični surround zvuk povezivanjem kompleta bežičnih zadnjih Samsung zvučnika (SWA-8500S, prodaje se odvojeno) sa uređajem Soundbar.
- Povežite bežični modul prijemnika sa 2 zvučnika za prostorno ozvučenje (surround zvučnici). – Kablovi zvučnika su obeleženi različitim bojama.
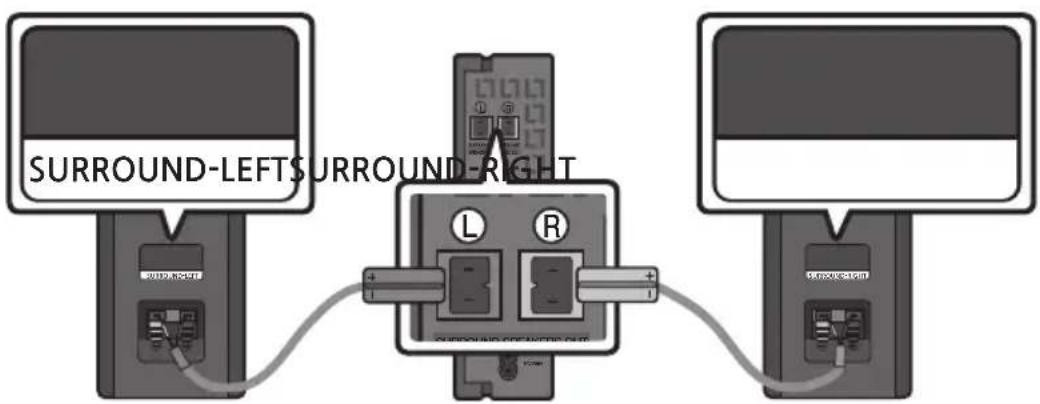
text_image
5 Sec ID SETOPREZ
- Ako se preko uređaja Soundbar puštala muzika dok ste ga povezivali sa SWA-8500S, čućete isprekidan zvuk iz vufera dok se veza uspostavlja.
- Proverite da li LED lampica za vezu (LINK) svetli plavom bojom (povezivanje je završeno).
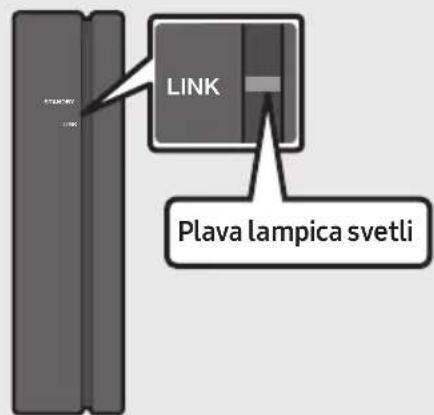
text_image
LINK Plava lampica svetliLED indikator za vezu (LINK) prestaje da treperi i počinje neprekidno da svetli plavom bojom kada se uspostavi veza između uređaja Soundbar i bežičnog modula prijemnika.
natural_image
Circular gray button with a play symbol and double arrow icon at center (no text or symbols)Povezivanje televizora pomoću HDMI kabla
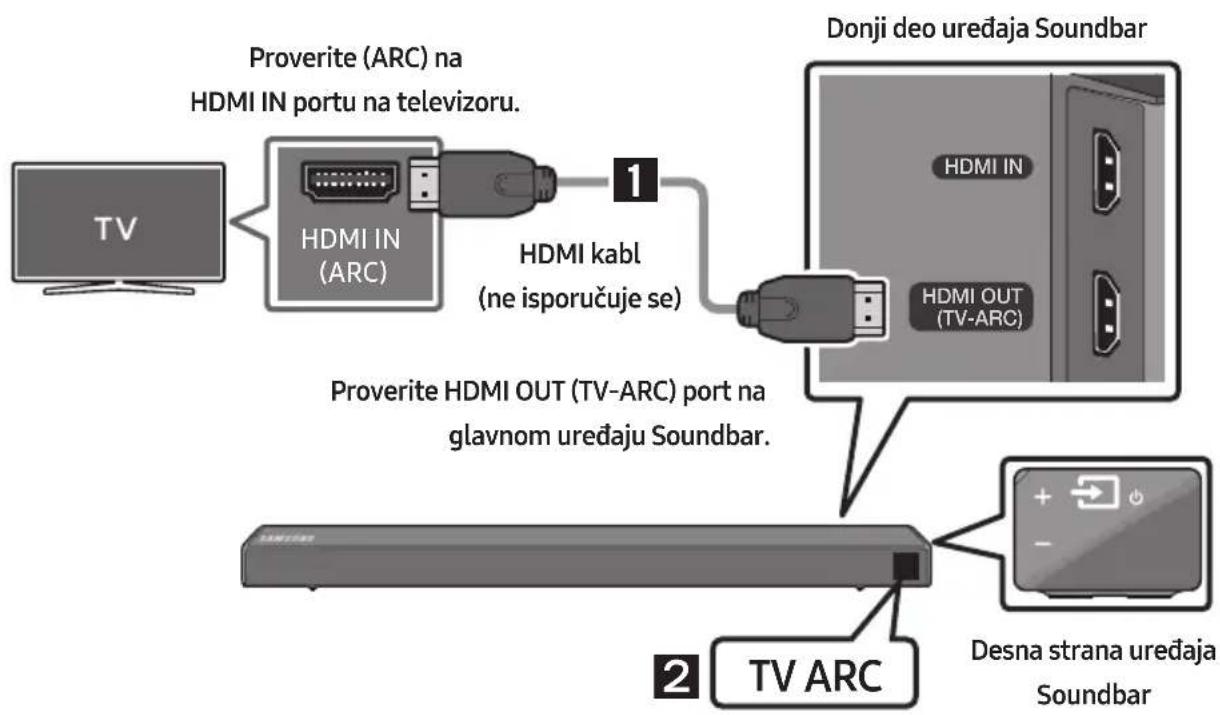
flowchart
graph TD
    A["TV"] --> B["Proverite (ARC) na HDMI IN portu na televizoru."]
    B --> C["HDMI IN (ARC)"]
    C --> D["1 HDMI kabl (ne isporučuje se)"]
    D --> E["Proverite HDMI OUT (TV-ARC) port na glavnom uređaju Soundbar."]
    E --> F["2 TV ARC"]
    F --> G["Desna strana uređaja Soundbar"]
    H["Donji deo uređaja Soundbar"] --> I["HDMI IN"]
    H --> J["HDMI OUT (TV-ARC)"]
- Kada su uređaj Soundbar i televizor uključeni, povežite HDMI kabl (ne isporučuje se) kao što je prikazano na slici.
-
„TV ARC“ će se pojaviti u prozoru ekrana glavnog uređaja Soundbar i uređaj Soundbar će reprodukovati zvuk sa televizora.
-
Ako se ne čuje zvuk sa televizora, pritisnite dugme ➞ (Izvor) na daljinskom upravljaču ili na desnoj strani uređaja Soundbar da biste prešli na režim „D.IN“. Na ekranu se redom prikazuje „D.IN“ i „TV ARC“, a zvuk sa televizora se reprodukuje.
- Ako se „TV ARC“ ne prikazuje u prozoru ekrana glavnog uređaja Soundbar, proverite da li je HDMI kabl (ne isporučuje se) povezan sa odgovarajućim portom.
- Koristite dugmad za jačinu zvuka na daljinskom upravljaču televizora da biste promenili jačinu zvuka uređaja Soundbar.
NAPOMENE
- HDMI je interfejs koji omogućava digitalni prenos video i audio podataka samo sa jednim priključkom.
- Ako televizor poseduje ARC priključak, povežite HDMI kabl sa HDMI IN (ARC) priključkom.
- Preporučujemo da koristite HDMI kabl bez jezgra ako je moguće. Ako koristite HDMI kabl sa jezgrom, koristite onaj čiji je prečnik manji od 14 mm.
• Anynet+ mora biti uključen. - Ova funkcija nije dostupna ako HDMI kabl ne podržava ARC.
natural_image
Two 3D mechanical parts: a pulley and a screw, both scaled by ×2 (no text or symbols on the parts themselves)natural_image
Simple line drawing of a bracket-like object with no text or symbolsNosača za montažu na zid
-
Postavite Vodicu za montažu na zid na zidnu površinu.
-
Vodicu za montažu na zid mora biti nivelisana.
- Postavite uređaj Soundbar najmanje 5 cm ispod televizora, ako je televizor montiran na zid.
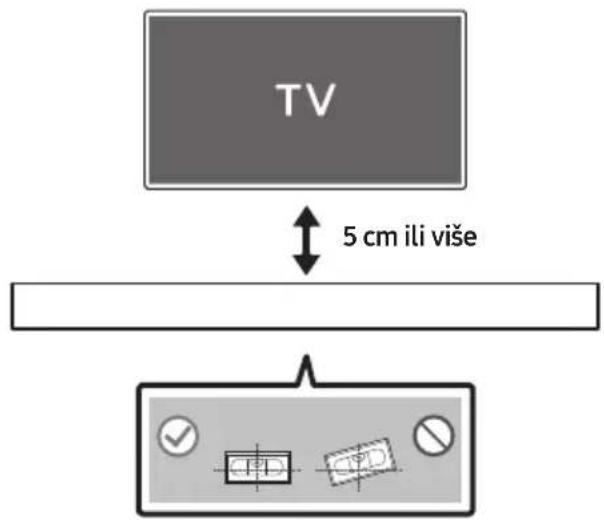
text_image
TV 5 cm ili više- Poravnajte Osu vodice za montažu na zid sa sredinom televizora (ako montirate uređaj Soundbar ispod televizora), a zatim pričvrstite Vodica za montažu na zid za zid koristeći traku.
- Ako ne montirate uređaj ispod televizora, postavite Osa na sredinu oblasti za montiranje.
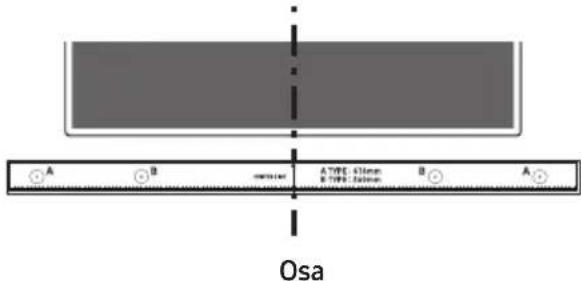
text_image
A B Osa A TYPE: 410mm B TYPE: 340mm B Anatural_image
Diagram showing a screw being inserted into a pin, with arrows indicating direction (no text or symbols)- Montirajte 2 Nosača za montažu na zid u odgovarajućoj orijentaciji na dnu uređaja Soundbar, pomoću 2 Zavrtnja.

natural_image
Mechanical component diagram showing a screw being inserted into a housing with a circular base (no text or symbols)- Prilikom sklapanja noseći delovi Nosač za montažu na zid treba da se nalaze sa zadnje strane uređaja Soundbar.
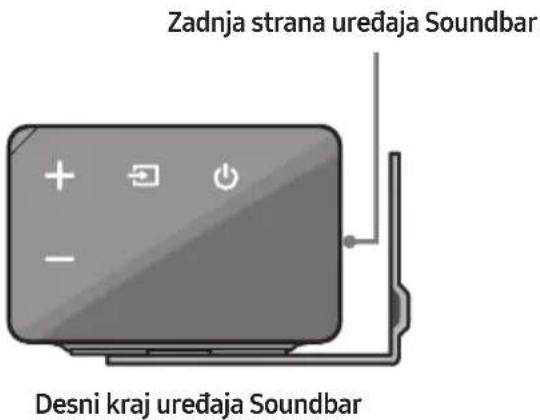
text_image
Zadnja strana uređaja Soundbar Desni kraj uređaja Soundbar- Postavite uređaj Soundbar sa pričvršćenim Nosač za montažu na zid tako što ćete okačiti Nosač za montažu na zid na Zavrtanj držača na zidu.
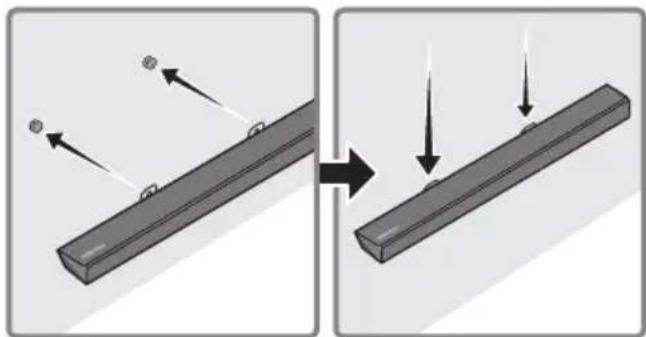
natural_image
Diagram showing two mechanical components before and after assembly, with arrows indicating motion direction (no text or symbols)Manufactured under license from Dolby Laboratories. Dolby, Dolby Audio, Pro Logic, and the double-D symbol are trademarks of Dolby Laboratories.

dts
Digital Surround
For DTS patents, see http://patents.dts.com. Manufactured under license from DTS Licensing Limited. DTS, the Symbol, DTS in combination with the Symbol, and DTS Digital Surround are registered trademarks or trademarks of DTS, Inc. in the United States and/or other countries. © DTS, Inc. All Rights Reserved.

HIGH-DEFINITION MULTIMEDIA INTERFACE
The terms HDMI and HDMI High-Definition Multimedia Interface, and the HDMI Logo are trademarks or registered trademarks of HDMI Licensing LLC in the United States and other countries.
13 OBAVEŠTENJE O LICENCI OTVORENOG IZVORNOG KODA
natural_image
Illustration of a person sitting on a sofa using a laptop (no text or symbols visible)POUŽÍVATELŠKÁ PRÍRUČKA
natural_image
Illustration of a person sitting on a sofa next to a desk with a laptop (no text or symbols visible)
ÚPLNÁ PRÍRUČKA
text_image
Diagram illustrating the step-by-step assembly of a remote control panel, showing internal components and battery connections.02 OPIS PRODUKTU
text_image
5 Sec ID SET- Overte, či LED dióda LINK svieti na modro (pripojenie dokončené).
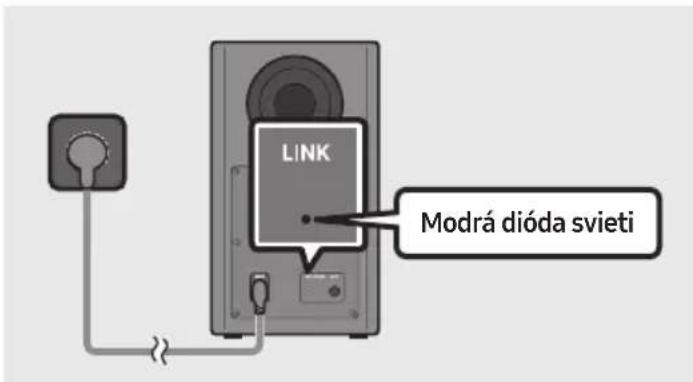
text_image
LINK Modrá dióda svietitext_image
5 Sec ID SET⚠️ UPOZORNENIE
natural_image
Circular play button icon with two vertical bars, no text or symbols presenttext_image
A B A TYPE: 436mm B TYPE: 348mm B Anatural_image
Two mechanical components: a cylindrical pin and a threaded screw, both scaled by 2 units (no text or symbols present)Skrutka držiaka Skrutka

natural_image
Simple line drawing of a bracket with a cutout and dimension label 'x2' (no text or symbols beyond the label)natural_image
Diagram showing mechanical components with arrows indicating motion, no text or symbols presentnatural_image
Mechanical component diagram showing a bolt and screw assembly with a circular arrow indicating rotation (no text or symbols)natural_image
Diagram showing two states of a mechanical component before and after assembly, with arrows indicating motion direction (no text or symbols)flowchart
graph TD
    A["Top: Device icon"] --> B["Downward arrow"]
    B --> C["Bottom: Device icon with downward arrow"]
10 AKTUALIZÁCIA SOFTVÉRU
Manufactured under license from Dolby Laboratories. Dolby, Dolby Audio, Pro Logic, and the double-D symbol are trademarks of Dolby Laboratories.

dts
Digital Surround
For DTS patents, see http://patents.dts.com. Manufactured under license from DTS Licensing Limited. DTS, the Symbol, DTS in combination with the Symbol, and DTS Digital Surround are registered trademarks or trademarks of DTS, Inc. in the United States and/or other countries. © DTS, Inc. All Rights Reserved.

HIGH-DEFINITION MULTIMEDIA INTERFACE
The terms HDMI and HDMI High-Definition Multimedia Interface, and the HDMI Logo are trademarks or registered trademarks of HDMI Licensing LLC in the United States and other countries.
13 POZNÁMKA K LICENCII S OTVORENÝM ZDROJOVÝM KÓDOM
natural_image
Illustration of a person sitting on a sofa using a laptop (no text or symbols visible)UPORABNIŠKI PRIROČNIK
natural_image
Illustration of a person sitting on a couch next to a desk with a laptop (no text or symbols)
POPOLNI PRIROČNIK
text_image
Diagram illustrating the step-by-step assembly of a battery pack, showing charge distribution and polarity changes.02 PREGLED IZDELKA
text_image
5 Sec ID SET- Preverite, ali kazalnik LINK LED sveti modro (povezava končana).
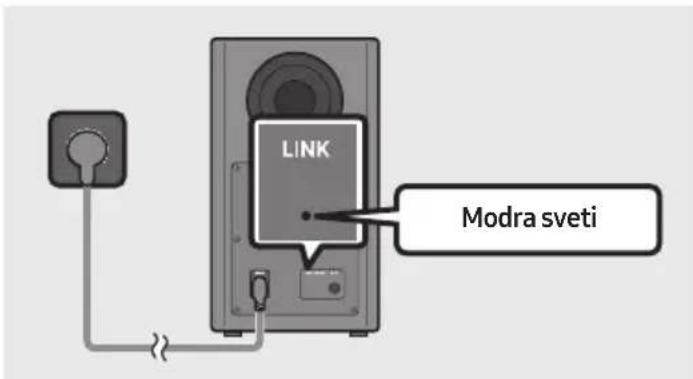
text_image
LINK Modra svetitext_image
5 Sec ID SET
POZOR
natural_image
Circular gray button with a play symbol icon at center (no text or symbols)- Odvisno od povezane naprave funkcija Auto Power Link morda ne bo delovala.
text_image
A B A TYPE: 436mm B TYPE: 348mm B Anatural_image
Two types of mechanical components: a pulley and a screw, both scaled by 2 units (no text or symbols present)Držalo vijaka Vijak

natural_image
Simple line drawing of a bracket with a cutout and label 'x2' (no other text or symbols)Stenskega nosilca
natural_image
Diagram showing a screw being inserted into a pin, with motion arrows indicating direction (no text or symbols)- Na spodnji del zvočnika Soundbar z dvema Vijakoma (2) pravilno namestite Dva stenska nosilca (2).
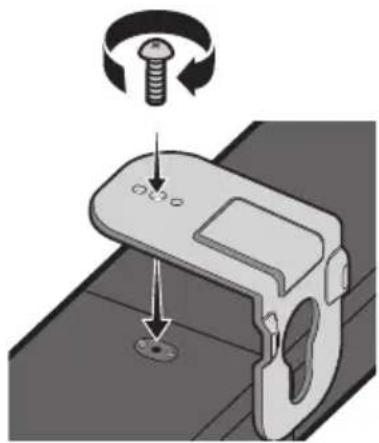
natural_image
Mechanical component diagram showing a screw being inserted into a housing with a bolt, no text or symbols presentnatural_image
Diagram showing two mechanical components with arrows indicating motion, no text or symbols present- Zvočnik Soundbar potisnite dol, kot je prikazano spodaj, tako da se Stenski nosilci varno zasidrajo na Vijake nosilca.
- Vijake nosilca vstavite v širok (spodnji) del Stenskih nosilcev, nato pa Stenske nosilce potisnite navzdol, da se Stenski nosilci varno zasidrajo na Vijake nosilca.
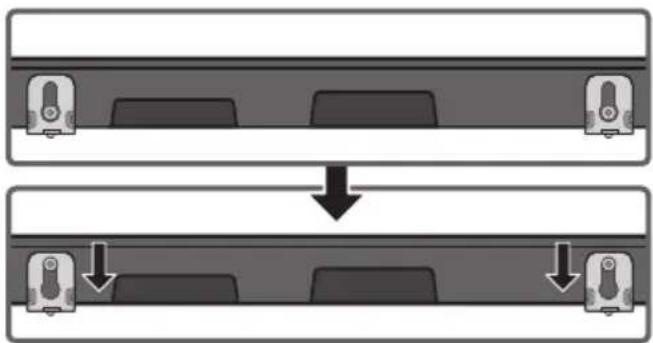
flowchart
graph TD
    A["Top: Device icon"] --> B["Downward arrow"]
    B --> C["Bottom: Device icon with downward arrows"]
10 POSODOBITEV PROGRAMSKE OPREME
Manufactured under license from Dolby Laboratories. Dolby, Dolby Audio, Pro Logic, and the double-D symbol are trademarks of Dolby Laboratories.

dts
Digital Surround
For DTS patents, see http://patents.dts.com. Manufactured under license from DTS Licensing Limited. DTS, the Symbol, DTS in combination with the Symbol, and DTS Digital Surround are registered trademarks or trademarks of DTS, Inc. in the United States and/or other countries. © DTS, Inc. All Rights Reserved.

HIGH-DEFINITION MULTIMEDIA INTERFACE
The terms HDMI and HDMI High-Definition Multimedia Interface, and the HDMI Logo are trademarks or registered trademarks of HDMI Licensing LLC in the United States and other countries.
13 OBVESTILO O ODPRTOKODNIH LICENCAH
© 2019 Samsung Electronics Co., Ltd. All rights reserved.
Contact SAMSUNG WORLD WIDE
If you have any questions or comments relating to Samsung products, please contact the SAMSUNG customer care Centre.
| Country | Contact Centre | Web Site |
| ▪Europe | ||
| UK 0330 SAMSUNG (7267864) | www.samsung.com/uk/support | |
| IRELAND (EIRE) 0818 717100 | www.samsung.com/ie/support | |
| GERMANY 06196 77 555 77 | www.samsung.com/de/support | |
| FRANCE 01 48 63 00 00 | www.samsung.com/fr/support | |
| ITALIA 800-SAMSUNG (800.7267864) | www.samsung.com/it/support | |
| SPAIN 0034902172678 | www.samsung.com/es/support | |
| PORTUGAL 808 207 267 | www.samsung.com/pt/support | |
| LUXEMBURG 261 03 710 | www.samsung.com/be_fr/support | |
| NETHERLANDS 088 90 90 100 | www.samsung.com/nl/support | |
| BELGIUM 02-201-24-18 | www.samsung.com/be/support (Dutch)www.samsung.com/be_fr/support (French) | |
| NORWAY 21629099 | www.samsung.com/no/support | |
| DENMARK 707 019 70 | www.samsung.com/dk/support | |
| FINLAND 030-6227 515 | www.samsung.com/fi/support | |
| SWEDEN | 0771 726 786 | www.samsung.com/se/support |
| POLAND | 801-172-678* lub +48 22 607-93-33** (oplata wedlug taryfy operatora) | http://www.samsung.com/pl/support/ |
| HUNGARY | 0680SAMSUNG (0680-726-7864) | www.samsung.com/hu/support |
| AUSTRIA 0800-SAMSUNG (0800-7267864) | www.samsung.com/at/support | |
| Country | Contact Centre | Web Site |
| SWITZERLAND | 0800 726 78 64 (0800-SAMSUNG) | www.samsung.com/ch/support (German)www.samsung.com/ch_fr/support (French) |
| CZECH | 800 - SAMSUNG (800-726786) | www.samsung.com/cz/support |
| SLOVAKIA | 0800 - SAMSUNG (0800-726 786) | www.samsung.com/sk/support |
| CROATIA | 072 726 786 | www.samsung.com/hr/support |
| BOSNIA | 055 233 999 | www.samsung.com/support |
| MONTENEGRO | 020 405 888 | |
| SLOVENIA | 080 697 267 (brezplačna številka) | www.samsung.com/si/support |
| SERBIA | 011 321 6899 | www.samsung.com/rs/support |
| ALBANIA 045 620 202 | www.samsung.com/al/support | |
| BULGARIA | *3000 Цена в мрежата0800 111 31, Безплатна телефонна линия | www.samsung.com/bg/support |
| ROMANIA | *8000 (apel in retea)08008-726-78-64 (08008-SAMSUNG)Apel GRATUIT | www.samsung.com/ro/support |
| CYPRUS | 8009 4000 only from landline, toll free | www.samsung.com/gr/support |
| GREECE | 80111-SAMSUNG (80111 726 7864) only from land line(+30) 210 6897691 from mobile and land line | |
| LITHUANIA 8-800-77777 | www.samsung.com/lt/support | |
| LATVIA | 8000-7267 | www.samsung.com/lv/support |
| ESTONIA | 800-7267 | www.samsung.com/ee/support |