
Mistfan FSM 40 - Fan QLIMA - Free user manual and instructions
Find the device manual for free Mistfan FSM 40 QLIMA in PDF.
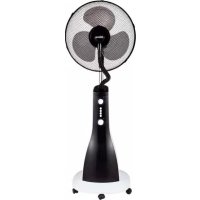


| Product type | Misting fan |
| Brand | Qlima |
| Model | Mistfan FSM 40 |
| Use | Indoor and outdoor |
| Power supply | 220-240 V, 50/60 Hz |
| Speeds | 3 speeds (low, medium, high) |
| Misting function | Yes, with water tank |
| Timer | Countdown adjustable in minutes |
| Tank capacity | Not specified (approx. 2-3 L) |
| Max water temperature | 40 °C |
| Material | Plastic and metal |
| Dimensions (approx.) | Height: approx. 130 cm, grill diameter: 40 cm |
| Weight (approx.) | 5.5 kg |
| Warranty | 2 years (manufacturing defects) |
| Cleaning | Unplug before cleaning; do not immerse; clean tank and basin with a soft cloth |
| Water replacement | Every 3-4 days |
| Safety | Protective grill, automatic shutdown, do not use with external timer |
| Spare parts | Not specified, contact Qlima customer service |
Frequently Asked Questions - Mistfan FSM 40 QLIMA
User questions about Mistfan FSM 40 QLIMA
0 question about this device. Answer the ones you know or ask your own.
Ask a new question about this device
Download the instructions for your Fan in PDF format for free! Find your manual Mistfan FSM 40 - QLIMA and take your electronic device back in hand. On this page are published all the documents necessary for the use of your device. Mistfan FSM 40 by QLIMA.
USER MANUAL Mistfan FSM 40 QLIMA
guarantee

YEARS
| D | BEDIENUNGSANLEITUNG | 2 |
| E | INSTRUCCIONES DE USO | 14 |
| F | MANUEL D'UTILISATION | 26 |
| GB | OPERATING MANUAL | 38 |
| I | ISTRUZIONI D'USO | 50 |
| NL | GEBRUIKSHANDLEIDING | 62 |
| SLO | NAVODILA ZA UPORABO | 74 |
IMPORTANT COMPONENTS
(Fig. 4)
OPERATION
(Fig. 5)
(Fig. 17)
WARRANTY CONDITIONS
IMPORTANT COMPONENTS
(Fig. 7)
WARRANTY CONDITIONS
MAIN COMPONENTS
(Fig. 4)
OPERATION
(Fig. 5)
(Fig.7)
WARRANTY CONDITIONS
Congratulations with the purchase of your mist fan. You have acquired a high quality product which will give you many years of pleasure, if you use it responsibly. Please read the user's manual first in order to ensure the optimum life span of your mist fan. On behalf of the manufacturer, we provide a two-year warranty on material- or manufacturing defects.
Enjoy your mist fan.
Yours sincerely,
PVG Holding B.V.
Customer Service Department
1 PLEASE READ THE USER'S MANUAL FIRST.
2 IF YOU HAVE ANY DOUBTS, CONSULT YOUR DEALER.
IMPORTANT COMPONENTS
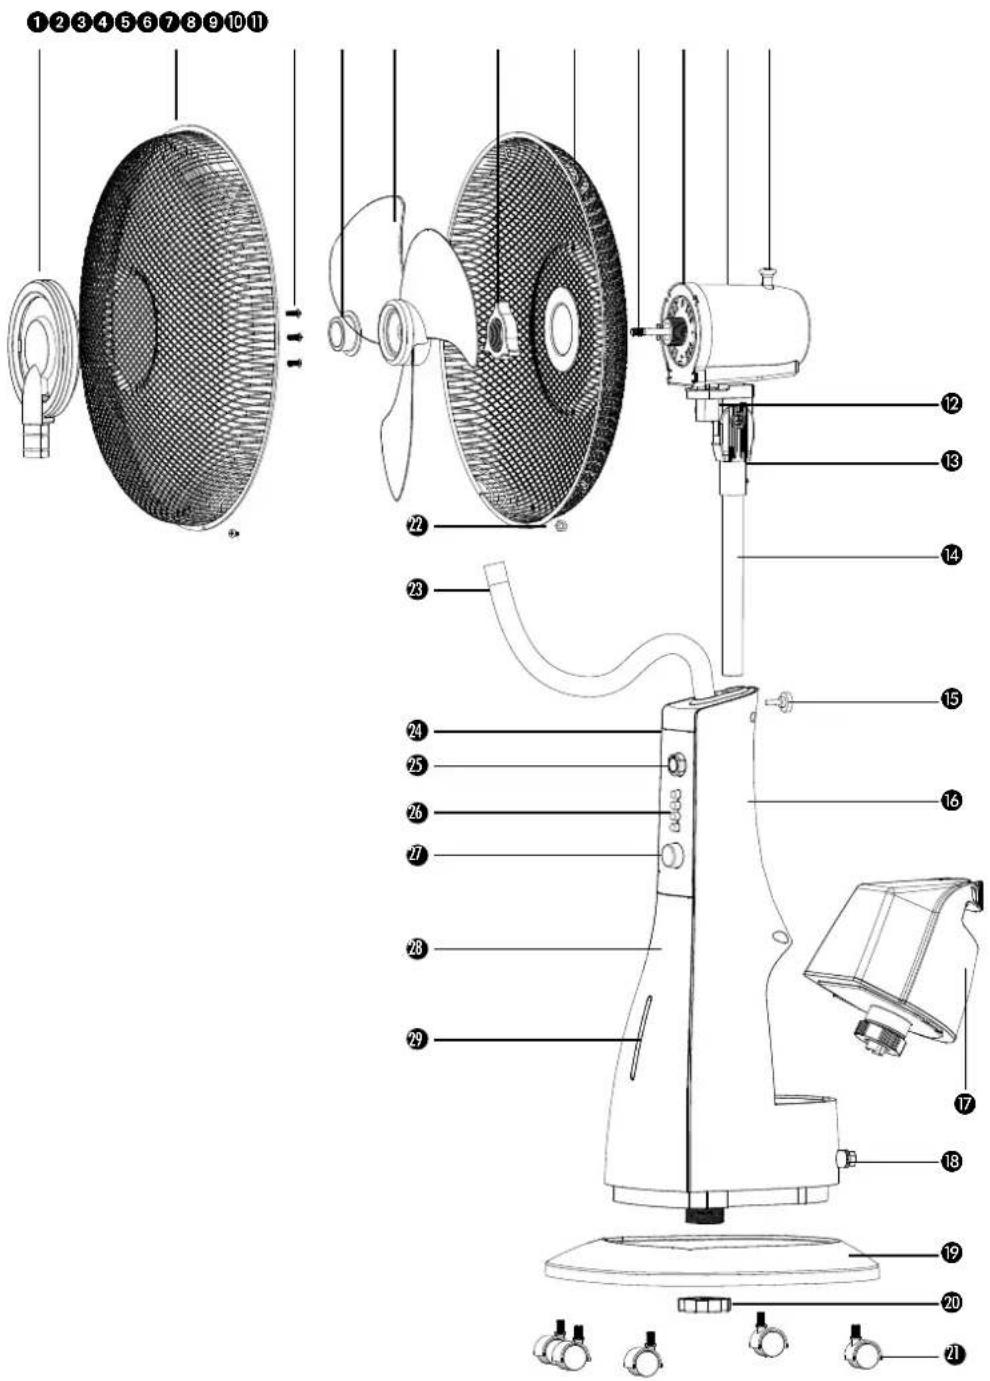
① Decoration ring ② Front guard 3 Screw 4 Blade lock 5 Leaf 6 Guard lock ⑦ Rear guard 8 Motor 9 Motor front cover 10 Motor rear cover ⑪ Pull pin 12 Connector 13 Connector bracket 14 Stanchion pole 15 Handle screw 16 Main body rear shell 17 Water tank 18 Water lock 19 Base 20 Base lock 21 Castor 22 Guard circle 23 Mist pole 24 Control panel 25 Timer knob 26 Speed button 27 Mist adjust knob 28 Main body front shell 29 Transparency window
DIRECTIONS FOR USE (GB)

- Read this user manual carefully before using the appliance and keep it for future reference. Install this device only when it complies with local/national legislation, ordinances and standards.
- The electric mist fan is designed for indoor and outdoor use.
- After unpacking, check the appliance for any damages. When in doubt, do not use the appliance, but contact customer service at your local dealer's. Keep the packaging materials (plastic bags, etc.) away from children, as they may cause hazardous situations to children.
- No modifications to the safety system are allowed.
- This product is constructed in conformity with relevant texts in the EN 60335 standard.

Warnings
- Read the Directions for Use before using the mist fan. The safety of this product is guaranteed only by its correct usage in accordance with these instructions, therefore it is recommended that they are retained for future reference.
- Only use the device for its intended purpose. Other usage may lead to short circuits, burns, electroshocks, lamp explosion, crash, etc.
• Install the product only if it complies with local regulations, laws and standards; - Make sure that the available voltage does not exceed the voltage stated in the specifications of this manual. - Check if the voltage indicated on the type plate corresponds to the local mains voltage before you connect the appliance. - The appliance is suitable for mains voltages ranging from 220-240V. - Always make sure that you actually see the appliance when you want to switch it on. Never use things like a timer, programmer or any other device (including Internet apps) that switches on the appliance automatically as this may cause fire! • Install the product according to the instructions as described in the installation section of the directions for use; - This product is manufactured according to CE safety standards. Nevertheless, as with any other device, care must be taken; - RISK OF FIRE Never use the product in places where inflammable and/or harmful Gases, products or fumes may be present (e.g. exhaust Gases, paint fumes, curtains, paper, clothes); - Do not use any extension cords or multi-socket adapters.
- This appliance is not intended for use by persons (including children) with reduced physical, sensory or mental capabilities, or lack of experience and knowledge, unless they have been given supervision or instruction concerning use of the appliance by a person responsible for their safety.
- If the supply cord is damaged, it shall be replaced by the manufacturer, its service agent or similarly qualified persons in order to avoid a hazard.
• Children should be supervised to ensure that they do not play with the appliance.
- The device must not be located immediately below a socket outlet.
- Do not use this product in the immediate surroundings of a bath, a shower or a swimming pool.
- The guard of this unit is intended to prevent direct access to moving parts and must be in place when the unit is in use.
- Disconnect the power plug before dismantling, assembling or before cleaning.
- Make sure the fan is on a dry and even surface.
- Do not insert objects into the openings of the device.
- The guard does not provide full protection for young children and infirm persons.
- This appliance can be used by children aged 8 years and above and by persons with reduced physical, sensory, or mental capabilities, or lack of experience and knowledge, if they have been given supervision or instruction concerning use of the appliance in a safe way and understand the hazards involved.
- Cleaning and user maintenance shall not be performed by children without supervision.
- Children under 3 years of age should be kept away unless continuously supervised.
- Children aged from 3 to 8 years shall only switch the appliance on/off provided that it has been placed or installed in its intended normal operating position and they have been given supervision or instruction concerning use of the appliance in a safe way and understand the hazards involved.
- Children aged from 3 to 8 years shall not plug in, regulate, or clean the appliance, nor perform user maintenance.
- Switch off the appliance when it is unattended.
- Do not cover or obstruct the product when in use.
- Disconnect from the mains during installation and cleaning.
- Do not use the unit if the ambient temperature is above 40°C.
- When using electrical appliances, always adhere to basic safety precautions to prevent the risk of fire, electric shocks, and physical injury. Even more attention and care is required when using electrical appliances that incorporate a container of water: should the water overflow, immediately unplug the adaptor from the outlet, check that the electrical parts of the unit are not wet, and if they are, dry them thoroughly and carefully. If in doubt, consult a qualified professional.
- Do not leave the appliance exposed to the weather (sun, rain, etc.).
- The water should be replaced every 3-4 days, even if it has not been used. If the fan has not been used for long periods, remove the water from the tank and the base of the humidifier.
- Care should be taken when using the appliance due to the emission of hot water vapour.
- Unplug the appliance during filling and cleaning.
If you fail to consult and/or follow the rules, instructions and explanation, the warranty will no longer be valid, and the manufacturer will no longer deal with any damage to the appliance and/or your environment under the warranty.
ASSEMBLING THE MIST FAN
The manufacturer is not responsible for any harm or damage if attention is not paid to the points described above.
The use of this product and the elements required for that purpose is entirely at the end user's own risk.
To assemble the safety grille and blade assembly, remove the spinner (by turning it clockwise), then the locking nut (by turning it anticlockwise) from the motor spindle. Place the back safety grille into position. Ensure the safety grille fits onto the locating lugs. If this is done correctly, the safety grille's carry handle will be at the top. Fix the safety grille into position by replacing the locking nut tightly by hand.
Do not force the locking nut.
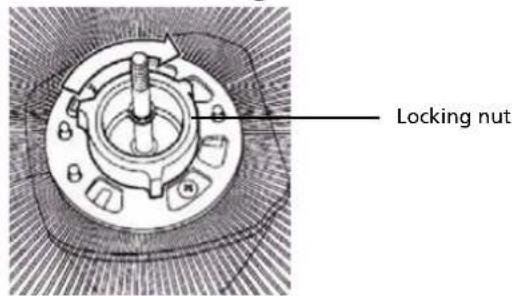
(Fig.1)
The groove in the centre of the fan blade aligns with a T-bar on the motor spindle to ensure correct positioning.
Fix the blade into place by gently hand tightening the spinner (Fig.2) anticlockwise onto the end of the motor spindle. The spinner is self-tightening; do not force it.
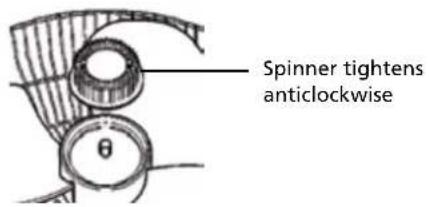
(Fig.2)
Lift out all locking clips on the front safety grille (Fig.3)
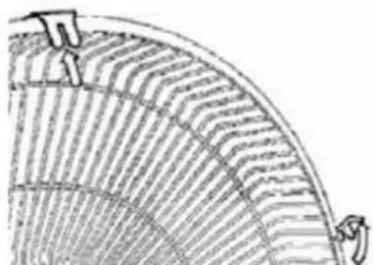
(Fig.3)
Water tank Assembly
Take out the water tank first, then remove the valve body cover from the water tank. After that, put the water in the tank and tighten the valve body cover. Place the tank on the atomizer main body. The temperature of the water should not exceed 40°C.
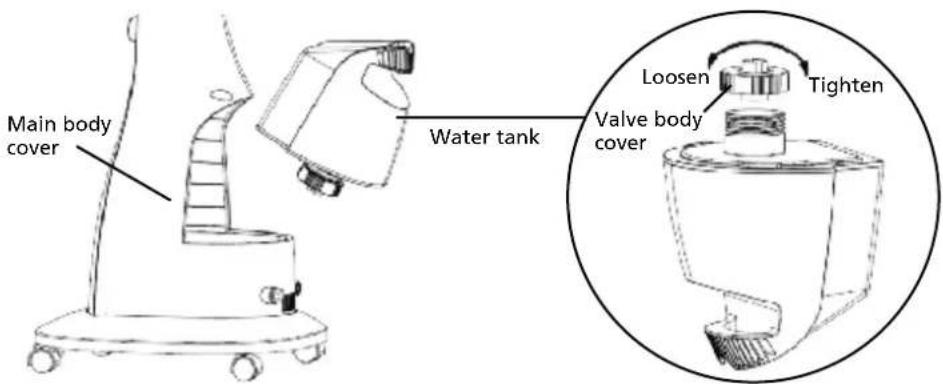
(Fig. 4)
OPERATION
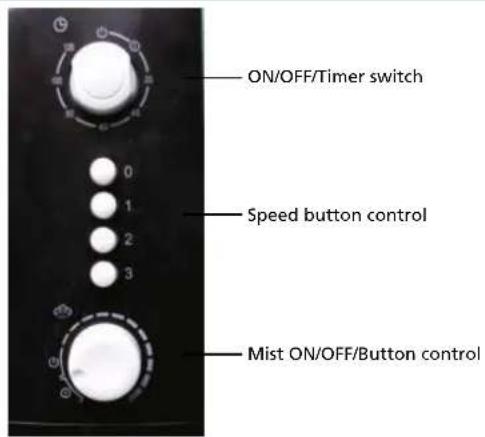
(Fig. 5)
- Always operate the product on a flat, level, steady, and stable surface to avoid it overturning.
- Plug the product into a standard electrical outlet.
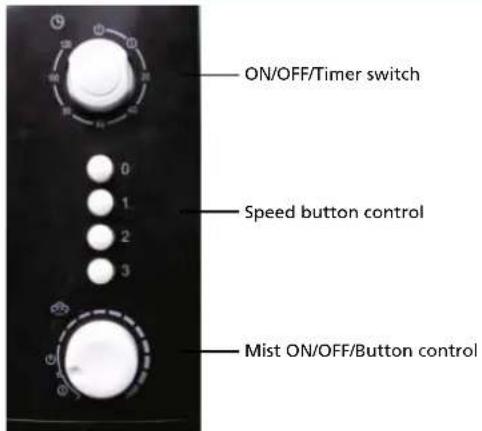
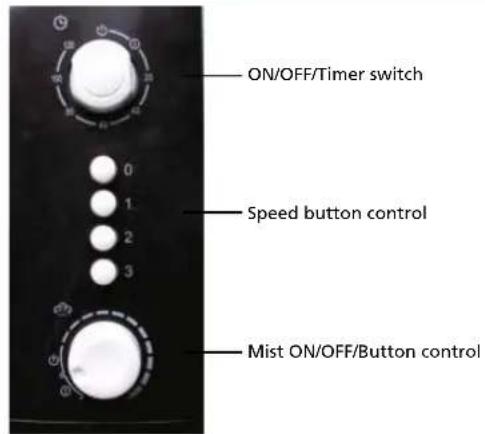
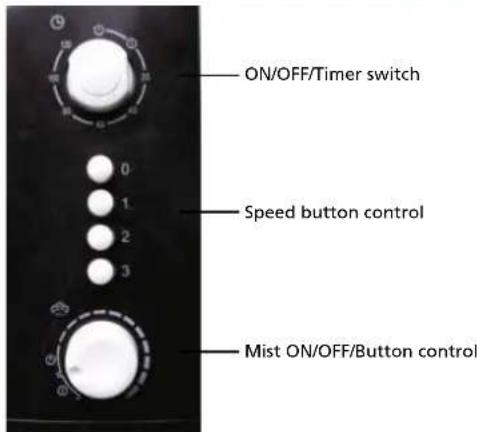
- To turn the fan on, rotate the ON/OFF/TIMER switch to the ON position and push the speed control push button (0-OFF, 1-LOW, 2-MEDIUM, 3-HIGH), as desired.
- To turn the fan off, rotate the ON/OFF/TIMER switch to the OFF position.
- To set the fan and mist timer, rotate the ON/OFF/TIMER switch to the desired countdown timer (in minutes). The fan and mist will turn off after the time on the timer has elapsed.
CAUTION: Press only one of the speed control push buttons at a time. Permanent damage to the switch housing may result if two or more of the buttons are pressed simultaneously.
Remove the cable tie and unravel the cordset before operation.
The fan and motor assembly are attached to a 2-position ratchet. Tilt up or down until the assembly clicks into the desired position (Fig.6).
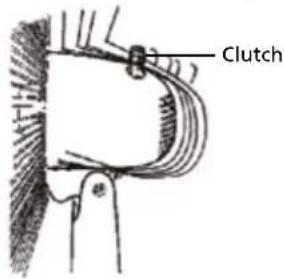
(Fig.6)
CARE AND CLEANING
• Always disconnect electrical appliances before cleaning them. - Never spray with liquids or submerge the mist fan in water or any other liquid. - Do not fill with water over 40 °C in tank and sink to avoid discoloration or deformation. - Pour out water from sink & tank when temperature below 0 °C to keep water away from freezing to avoid component damaged. - Do not fill water into handles directly. - Water Sink Cleaning: If sink with dusty or dirty material, put detergent onto soft cloth to clean the dirty place, then clean with water. - First cut power off, take out water tank then pull mist tube appropriately. Clean it if it's dirty. Use clean water to wash mist control box.
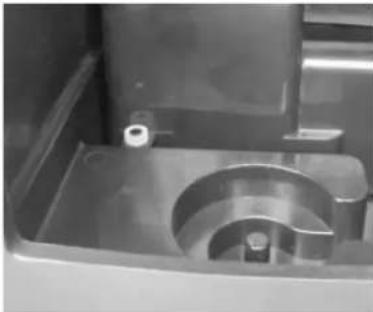
(Fig.7)
GUARANTEE CONDITIONS
The appliance is supplied with a 24-month guarantee, commencing on the date of purchase. All material and manufacturing defects will be repaired or replaced free of charge within this period. The following rules apply:
- We expressly refuse all further damage claims, including claims for collateral and/or consequential damage.
- Repairs to or replacement of components within the guarantee period will not result in an extension of the guarantee.
- The guarantee is invalidated if any modifications have been made, non-genuine parts are fitted or repairs are carried out by third parties.
- Components subject to normal wear, such as filters, batteries, lamps and heating elements are not covered by the guarantee.
- The guarantee is valid only when you present the original, dated purchase invoice and if no modifications have been made to it.
- The guarantee is invalid for damage caused by neglect and/or by actions that deviate from those in this instruction booklet.
- Transportation costs and the risks involved during the transportation of the appliance or components of the appliance shall always be for the account of the purchaser
- Damage caused by not using suitable spare parts is not covered by the guarantee.
To prevent unnecessary expense, we recommend that you always first carefully consult the instructions for use. Take the appliance to your dealer for repairs if these instructions do not provide a solution. www.qlima.com
ENVIRONMENTAL PROTECTION
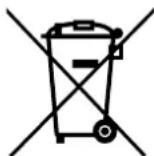

Never dispose of non-biodegradable products in the environment, but dispose of them in accordance with current national legislation.
Do not dispose of electrical appliances as unsorted municipal waste, use separate collection facilities.
Contact your local government for information regarding the collection systems available.
If electrical appliances are disposed of in landfills or dumps, hazardous substances can leak into the groundwater and get into the food chain, damaging your health and well-being. When replacing old appliances with new once, the retailer is legally obligated to take back your old appliance for disposal at least for free of charge.
Dear Sir or Madam,
IMPORTANT COMPONENTS
(Fig.7)
IMPORTANT COMPONENTS
Mounting the water tank
(Fig.4)
OPERATION
(Fig.5)
(Fig. 7)
WARRANTY CONDITIONS
SPARE PARTS
① Decorative ring ② Front part of the guard ③ Screw ④ Locking element ⑤ Plate ⑥ Locking element of the guard ⑦ Rear part of the guard ⑧ Motor ⑨ Front motor cover ⑩ Rear motor cover ⑪ Pull pin ⑫ Connecting element ⑬ Holder of connecting element ⑭ Support rod ⑮ Hand screw ⑯ Rear body cover ⑰ Water tank ⑱ Water locking element ⑲ Base ⑳ Base locking element ㉑ Casters ㉒ Guard ring ㉓ Mist rod ㉔ Control panel ㉕ Timer knob ㉖ Speed knob ㉗ Mist adjustment knob ㉘ Front body cover ㉙ Transparent window
INSTRUCTIONS FOR USE (SLO)

(Fig. 7)
WARRANTY TERMS
Distributed in Europe by PVG Holding B.V.
If you need more information or encounter any problems, please visit our website at www.qlima.com or contact our customer service (phone number available on www.qlima.com). For any additional information or if you have any issues with the device, please refer to www.qlima.com or your local customer center (phone numbers can be found at www.qlima.com). If you need information or have any problems, please visit our website www.qlima.com or contact our customer service (you will find the phone number on www.qlima.com). If you would like to obtain additional information or if you encounter a problem, please visit our website (www.qlima.com) or contact our customer service (you will find the address and phone number on www.qlima.com). If you need service assistance, more information, or if you have problems with the device, please visit our website at www.qlima.com or ask for advice from the PVG consumer service center (www.qlima.com). If you need information or if you have a problem, please visit our website (www.qlima.com) or contact our sales support (you will find its phone number on www.qlima.com). For information and in case of problems, visit our website www.qlima.com or contact our Customer Service Center (to find out the phone number, consult www.qlima.com). If you need information, or if you have a problem with the product, you can visit our website at www.qlima.com. Alternatively, you can contact PVG consumer service (phone number at www.qlima.com). If you need information or if you have a problem, please visit our website (www.qlima.com) or contact the sales support department (address and phone on www.qlima.com). If you need information or if you have problems, visit our website www.qlima.com or contact our Assistance Center (phone number at www.qlima.com). In case of problems and for detailed information, visit the Qlima website at www.qlima.com or contact the Qlima contact center (www.qlima.com). If you need service or information or have problems with the device, you can visit www.qlima.com or contact Qlima customer service (you will find the phone number at www.qlima.com). If you need additional information, visit our website at www.qlima.com or call the phone number (www.qlima.com). If you need more information or if you encounter a problem, visit the Qlima website at www.qlima.com or contact the Qlima customer center in your country (phone number: www.qlima.com).
- IMPORTANT COMPONENTS
- OPERATION
- WARRANTY CONDITIONS
- MAIN COMPONENTS
- DIRECTIONS FOR USE (GB)
- WARNINGS
- ASSEMBLING THE MIST FAN
- WATER TANK ASSEMBLY
- CARE AND CLEANING
- GUARANTEE CONDITIONS
- ENVIRONMENTAL PROTECTION
- MOUNTING THE WATER TANK
- SPARE PARTS
- INSTRUCTIONS FOR USE (SLO)
- WARRANTY TERMS
- DISTRIBUTED IN EUROPE BY PVG HOLDING B.V
Brand : QLIMA
Model : Mistfan FSM 40
Category : Fan