
SBCRU880-10C - Remote control PHILIPS - Free user manual and instructions
Find the device manual for free SBCRU880-10C PHILIPS in PDF.

| Product type | Universal remote control |
| Brand | PHILIPS |
| Model | SBCRU880-10C |
| Power supply | 3 x 1.5 V batteries type UM3 / LR6 / AA |
| Number of controllable devices | Up to 8 devices |
| Available modes | TV, VCR, SAT, DVD, CD, AUDIO 1, AUDIO 2, HOME |
| Display | LCD screen with green backlight |
| Code copying function | Yes, up to 200 codes from an original remote control |
| Automatic code search | Yes, hands-free search |
| Macro programming | Yes, up to 10 keys per macro, 8 macros total |
| Built-in timer | Yes, to turn devices on/off |
| Programmed shutdown (Sleep) | Yes, adjustable from 15 to 60 minutes |
| Home Theater mode | Yes, allows controlling multiple devices with one key |
| RF compatibility | Yes, with the Philips SBC LI510 extension unit |
| Remote switch control | Yes, for the Philips HomeControl system |
| Infrared range | Approximately 10 meters (estimate) |
| Display languages | French, English, German |
| Maintenance and cleaning | Replace batteries once a year; clean with a soft, dry cloth |
| Safety | Use only recommended batteries; do not expose to moisture |
Frequently Asked Questions - SBCRU880-10C PHILIPS
User questions about SBCRU880-10C PHILIPS
0 question about this device. Answer the ones you know or ask your own.
Ask a new question about this device
Download the instructions for your Remote control in PDF format for free! Find your manual SBCRU880-10C - PHILIPS and take your electronic device back in hand. On this page are published all the documents necessary for the use of your device. SBCRU880-10C by PHILIPS.
USER MANUAL SBCRU880-10C PHILIPS
Instructions for Use
Mode d'emploi
Bedienungsanleitung
Gebruiksaanwijzing
Let's make things better.
INDEX
English 4
Français 16
Deutsch .30
Nederlands .....43
Español .....57
Português .....70
Italiano .....84
'Ελληνικά .98
Svenska .....115
Dansk .....128
Norsk .....141
Suomi .....154
INTRODUCTION
You have made a great choice by buying this Philips universal remote control! It replaces up to eight separate remote controls and is pre-programmed to operate with almost any brand of TV, VCR, satellite tuner, cable decoder, CD-player, DVD-player, tuner and amplifier. The SBC RU880 can also control Philips Power Control System devices. It can even learn the codes of other remote control units that are not pre-programmed. Best of all, the SBC RU880 is quick to set up and easy to use, and with the green back-lighting it can even be used in dimly lit rooms! Here's how...
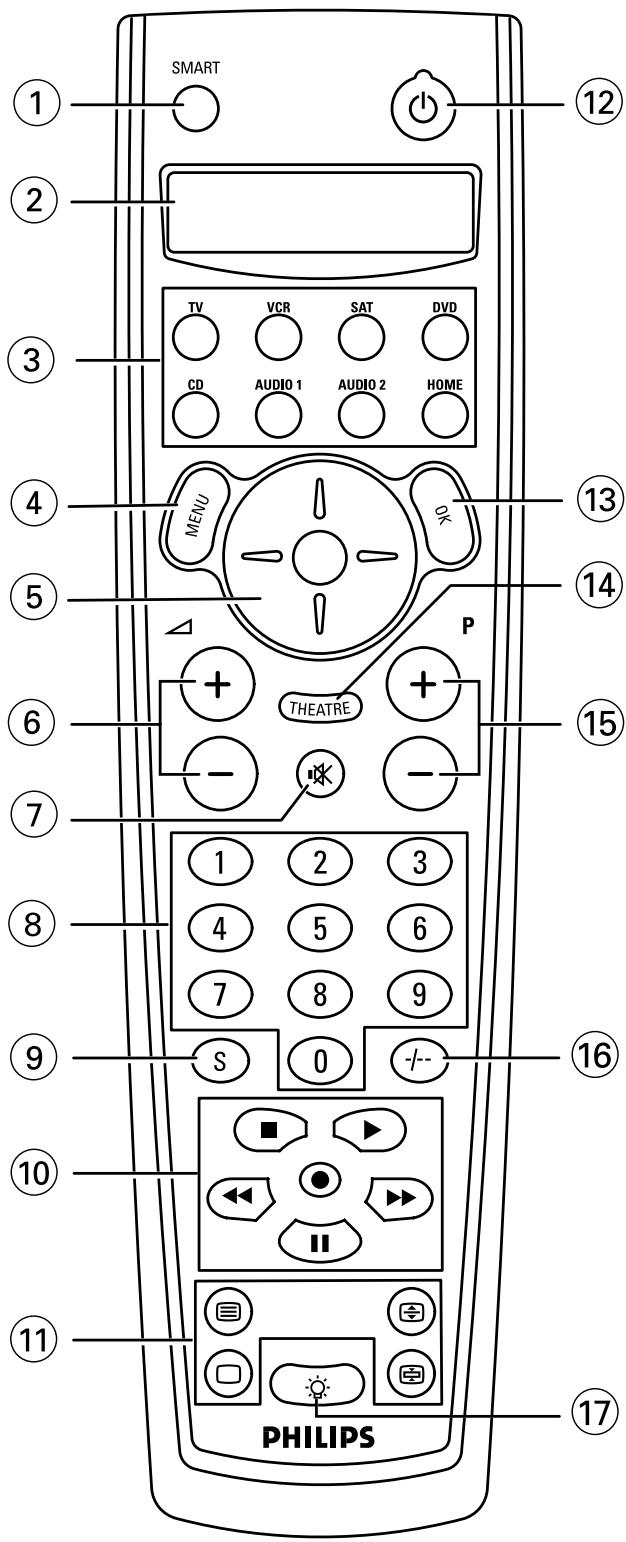
DON'T FORGET THE BATTERIES!
To operate the SBC RU880 you'll need three 1.5V batteries, type UM3, LR6 or AA only. Put them in like this....
natural_image
Diagram of a battery system with an open circuit and charge distribution (no text or labels)Remember to replace the batteries at least once a year. The RU880 has the unique feature of not losing the programmed or learned codes when the batteries are empty. You only have to set the clock again (see 'Setting up the Clock' section).
AT A GLANCE
Once you've installed the batteries, the SBC RU880 is ready to operate most Philips VCRs, satellite tuners, CD-players, tuners and amplifiers. Just press the button (as indicated below) for the Philips device you wish to operate. If you want to operate other equipment brands you need to set up the SBC RU880 first - see chapter 2. 'Installation'.
Select TV, VCR, SAT, DVD, CD, AUDIO 1, AUDIO 2 or HOME.
The remote has 8 operating modes: TV, VCR, satellite tuner (SAT/CBL), DVD-player, CD-player, AUDIO 1 & AUDIO 2 (for other equipment) and HOME (for operating the Philips Power Control System). The LCD display shows you which mode you have activated. To switch between modes simply press the button of the device you want to operate.
① SMART gives access to the set-up menu of the SBC RU880
② Display
③ Mode keys select the device you want to operate
④ MENU switches menu on (and off, if this is the case on your original remote)
⑤ Cursor up/down/ left/right scrolls through the menu
⑥ Volume Up/Volume Down turns volume up turns volume down
⑦ Mute switches sound on and off
⑧ Keypad for direct channel selection and other functions
⑨ S(hift) hold this key while pressing other keys to access additional functions (if available on your equipment).
For instance: TV:
S(hift) - - /-- Previous Program
S(hift) - Menu Menu Off
S(hift) - ☐ Teletext Mix
S(hift) - □ Teletext Cancel
Try these and other combinations on your equipment to discover which functions are available.
⑩ for TV FastText for VCR
red ◀◀ Rewind
green ■ Stop
yellow ▶ Play
blue ▶▶ Forward
white II Pause
Record
⑪ □ switches Teletext off
switches Teletext on
enlarges the Teletext display
keeps the current Teletext page on screen
| 12 | switches your device off (and on, if this is the case on your original remote) | |
| 13 | OK | confirms selections in the menu |
| 14 | THEATRE | is used to activate the theatre function |
| 15 | Channel Up/ Channel Down | changes to next channel changes to previous channel |
| 16 | 1/2 Digits | switches between one and two-digit channel selection and display |
| 17 | Back-lighting switches the keypad back-lighting on and off; it stays on for four seconds after the last key press | |
Try it out! The easiest way to find out how your new remote control works is to try pressing the keys and see what happens - don't worry, you won't damage anything!
For example:
- Switch on your TV (manually) Using your SBC RU880:
- Press Vol. Up
- Press TXT on
- Press ⏻
If the SBC RU880 has been set up properly these functions should work. If they don't work, go to the section 1. GETTING STARTED.
Most of the keys work the same as on your original remote control. Of course, if your TV or VCR system remote control does not offer a specific function, pressing that key on the SBC RU880 has no effect.
1. GETTING STARTED
Language setup
① Press and hold the SMART key (for about three seconds) until the LCD displays TIMER. Release the SMART key.
② Press Cursor up or Cursor down until the LCD displays SPECIAL.
③ Press OK.
- The LCD displays THEATRE.
④ Press Cursor up or Cursor down until the LCD displays LANGUAGE.
⑤ Press OK. You can now define the language of the display by pressing Cursor up and Cursor down.
- The LCD displays ENGLISH, FRANCAIS or DEUTSCH.
⑥ Press OK to confirm the language you require and to go back to normal mode.
- The LCD now displays all messages in the language you have selected.
NOTE: The SBC RU880 does not react to any keys other than the keys described above. To leave this mode and go back to normal mode, just press the SMART key.
Setting up the clock
① Press and hold the SMART key (for about 3 seconds) until the LCD displays TIMER. Release the SMART key.
② Press Cursor up or Cursor down until the LCD displays SPECIAL.
③ Press OK.
- The LCD displays THEATRE.
④ Press Cursor up or Cursor down until the LCD displays TIME SETUP.
⑤ Press OK.
- The SBC RU880 is now ready for you to set the time up. The LCD displays 24HR CLOCK.
⑥ Press Cursor up or Cursor down to choose between a 24 HR and 12 HR clock.
⑦ Press OK.
- The LCD will display TIME : .
⑧ Use the 10-digit keypad to enter the desired time. Press Cursor left or Cursor right to change any digits you have entered.
⑨ Press OK.
- If you have chosen the AM/PM clock, the LCD displays AM.
⑩ Press Cursor up or Cursor down to choose between AM and PM.
⑪ Press OK.
- The LCD will display MON: to indicate a day of the week.
⑫ Press Cursor up or Cursor down to adjust the current day.
⑬ Press the OK key to go back to normal mode.
2. INSTALLATION
The SBC RU880 is ready to operate most Philips TVs, VCRs, satellite tuners, DVD-players, CD-players, tuners, amplifiers and Power Control Systems. For other brands of equipment, it first needs to be set up. This only takes a couple of seconds, thanks to Philips' 'Simple System Set-up'!!
2.1 SETTING UP THE SBC RU880 FOR YOUR AUDIO/VIDEO EQUIPMENT
Before you start, make sure the SBC RU880 is in the right mode (TV, VCR, SAT, DVD, CD, AUDIO 1 or AUDIO 2) on the LCD display for setting it up. Also, make sure the equipment is switched on, and that you are sitting right in front of it. If you know the brand name of your equipment (your TV for example) look at the code list at the back of this book to find the first 3-digit code for your TV. Then:
① Press and hold the SMART key (for about three seconds) until the LCD displays TIMER. Release the SMART key.
② Press Cursor up or Cursor down until the LCD displays SETUP.
③ Press OK.
- The LCD displays ENTER CODE. The SBC RU880 is now in set-up mode.
④ Press OK.
- The SBC RU880 is now in programming mode and the LCD displays the selected equipment (your TV in this case).
⑤ Press OK.
⑥ Enter the 3-digit code using the keypad.
- If the code is correct, the display indicates OK for one second and returns to normal operation.
That's it! Press a few keys on the SBC RU880 to check that the equipment (your TV in this case) responds correctly. If it doesn't, or if not all keys respond correctly, repeat the procedure again using the next code in the list. If none of the codes work properly, follow the instructions in the next section.
Tip: Make a note of the code inside the battery case and in the back of this booklet in case you ever need to set up again.
2.2 HANDS-FREE AUTOSEARCH
If you don't know the brand of your equipment or if you can not find it in the codelist, set-up still won't take long. Philips' patented Hands-free Autosearch tests all the codes one after another and finds the right one for you!
The search time averages about 90 seconds. (Maximum search time is 5 minutes for TV; 2 minutes for VCR; 4 minutes for SAT, 1 minute for CD and 1 minute for Tuners/Amplifiers.)
Before starting the Hands-free Autosearch make sure that the equipment (e.g. TV, VCR) is switched on. If it's a VCR, insert a tape and start play. Once the correct code has been found the equipment switches off, or the VCR stops playing.
2.2.1 To start Hands-free Autosearch
① Press and hold the SMART key (for about three seconds) until the LCD displays TIMER. Release the SMART key.
② Press Cursor up or Cursor down until the LCD displays SETUP.
③ Press OK.
- The LCD displays ENTER CODE. The SBC RU880 is now in set-up mode.
④ Press Cursor up or Cursor down until the LCD displays AUTOSEARCH.
⑤ Press OK.
- The SBC RU880 is now in programming mode and the LCD displays the selected equipment.
⑥ Press ⏻ to start the search.
- Each time a code is transmitted, the code is displayed on the LCD. There is a 1.5 second period between each transmission. When the right code is found, the equipment switches off (if it's a VCR, it stops playing). Immediately press ⏻ to stop the search. The LCD displays the selected equipment and its code.
If you missed the correct code because the search went too far, switch the equipment back on, then press (P-) to send the previous code again. Keep pressing (P-) down repeatedly until the equipment switches off again.
⑦ Once you've found the correct code, press OK to lock the code in the SBC RU880's memory. The SBC RU880 goes back to normal operation.
That's it! Now, switch the equipment on again manually, then press a few keys on the SBC RU880 to check that your equipment responds correctly. If it doesn't, try again from step 1 to find a better code. When the SBC RU880 has searched all codes, the LCD will display END for a few seconds before returning to normal operation.
If none of the codes works or if you are still missing certain functions of your original remote control, try our solution in chapter 2.4.1 'To copy codes from your original remote control', or call our free-phone help-line.
2.3 NOTE THAT CODE!
Make a note of the correct code inside the battery case and in the back of this booklet; it will save you time if you ever need to set up again. If you have forgotten to note the code you can still 'read out' the code from the SBC RU880. Here's how:
① Press and hold the SMART key (for about three seconds) until the LCD displays TIMER. Release the SMART key.
② Press Cursor up or Cursor down until the LCD displays SETUP.
- The SBC RU880 is now in set-up mode.
③ Press OK.
- The LCD displays ENTER CODE.
④ Press Cursor up or Cursor down until the LCD displays CODE NO.
⑤ Press OK.
– The LCD displays the selected equipment with its code.
⑥ By pressing the mode keys you can read out the programmed codes.
⑦ Press the SMART key to return the SBC RU880 to normal mode.
2.4 COPY CODES FROM YOUR ORIGINAL REMOTE CONTROL
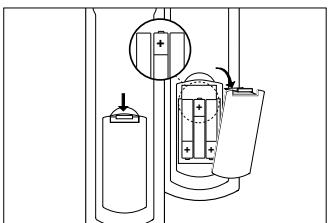
If your equipment is not included in the code list, or if specific codes on your remote control are missing, the SBC RU880 has the solution. It can copy and replicate up to 200 codes from your original remote control. Here's how...
Place your original remote control facing the infra-red sensor window of the SBC RU880. Place both remote controls on a flat surface, 3-8 centimetres apart. Make sure that both remote controls have new batteries.
natural_image
Diagram showing two connected devices with directional arrows indicating movement (no text or symbols)2.4.1 To copy codes from your original remote control
① Press and hold the SMART key (for about three seconds) until the LCD displays TIMER. Release the SMART key.
② Press Cursor up or Cursor down until the LCD displays SETUP.
③ Press OK.
- The LCD displays ENTER CODE. The SBC RU880 is now in set-up mode.
④ Press Cursor up or Cursor down until the LCD displays LEARN.
⑤ Press OK.
- The SBC RU880 is now in learning mode and the LCD displays the selected equipment.
⑥ Press OK.
- The LCD displays PRESS KEY.
⑦ Press a key on the SBC RU880 that you want to use as the function key.
- The LCD displays PRESS ORIG indicating that the SBC RU 880 is ready to receive a signal.
⑧ Press and hold the function key on the original remote control that you want to copy to the SBC RU880, until the SBC RU880's LCD displays OK for a second.
- The LCD displays PRESS KEY.
⑨ Release the key.
- The function for the selected key has now been copied.
That's it! You've now copied a function from your original remote control to one of the SBC RU880 keys. If you want to copy more functions from your original remote control, start again from step 7.
⑩ Return to normal mode by pressing the SMART key.
Tips: Choose keys that correspond with the keys on your original remote control, so that you can remember them easily.
Note: If the LCD displays MEN FULL you have reached the maximum of keys you can copy. Please delete some keys and copy only the important keys.
2.4.2 If the SBC RU880 displays ERROR
If the SBC RU880 displays ERROR for a second, followed by PRESS ORIG, the SBC RU880 did not receive the signal correctly. Then you should:
- vary the distance slightly between both remote controls and try again from step 7 (try this several times).
- This time you should press and immediately release the function key on your original remote control. The LCD should display OK, indicating that the RU 880 received the signal.
• make sure that both remote controls have new batteries. - try to copy your codes under different lighting conditions. Light from TL-tubes may influence the signal you are copying.
The SBC RU880 is designed and tested extensively and is ready to copy almost all infra-red remote control signals. In some rare instances manufacturers use infra-red signals that cannot be copied to any remote control. You should of course always try the Hands-free Autosearch to see if such a code is included in our pre-programmed library.
2.4.3 If you run out of keys on the SBC RU880
If you run out of keys on the SBC RU880 or if you want to copy less important functions you can do so under the SBC RU880's shift key.
Here's how:
① Make sure the SBC RU880 is in the right mode for the equipment you're setting up, and position both remote controls as indicated above. Then:
② Refer to section 2.4.1. 'To copy codes from your original remote control' and repeat the first six steps. Then:
③ Press and hold (S) and then press the key you have selected to activate the desired function from your original remote control.
- The LCD displays PRESS ORIG.
④ Release both keys.
⑤ Now repeat steps 8 and 9 from the same section.
That's it! The function for your selected key has now been copied.
NOTE: If you copy a function under a specific key on the SBC RU880, the previous signal will be erased.
2.5 SETTING UP AN EXTRA DEVICE ON THE SBC RU880
The SBC RU880 has eight operating modes for operating eight different devices. It can also be programmed for any combination of devices contained in its library. The following is an example. Other combinations are also possible.
The HOME mode on the SBC RU880 is factory pre-set to control the Philips Power Control System (see 5. 'Setting up the SBC RU880 for your Philips Power Control System'), but you can change it to control, for example, a second TV.
Before you start, make sure the SBC RU880 is in the HOME mode. Also, make sure the equipment is switched on, and that you're sitting right in front of it.
2.5.1 If you know the brand name
If you know the brand name of your second TV look at the code list at the back of this book to find the first 3-digit code for this TV. Then:
① Press and hold the SMART key (for about three seconds) until the LCD displays TIMER. Release the SMART key.
② Press Cursor up or Cursor down until the LCD displays SETUP.
③ Press OK.
- The LCD displays ENTER CODE. The SBC RU880 is now in set-up mode.
④ Press OK.
- The SBC RU880 is now in programming mode and the LCD displays the selected equipment.
⑤ Press Cursor up or Cursor down until the LCD displays TP.
⑥ Press OK.
⑦ Enter the 3-digit code using the keypad.
- If the code is correct, the display indicates OK for one second and returns to normal operation. The LCD then displays TV2. When you press the TV MODE key the LCD displays TV1.
That's it! Now press a few keys on the SBC RU880 to check that the equipment responds correctly. If it doesn't, try again from step 1 using the next code in the list. If none of the codes work properly, follow the instructions in the next section.
Tip: Make a note of the code inside the battery case and in the back of this booklet in case you ever need to set up again.
2.5.2 If you don't know the brand name
If you don't know the brand name of your equipment or if you cannot find it in the code list, set-up still won't take long. Philips' patented Hands-free
Autosearch tests all the codes one after another and finds the right one for you! Make sure the TV is switched on. You will know the correct code has been found when the equipment switches off. Then:
① Press the SMART key (for about three seconds) until the LCD displays TIMER. Release the SMART key.
② Press Cursor up or Cursor down until the LCD displays SETUP.
③ Press OK.
- The LCD displays ENTER CODE. The SBC RU880 is now in set-up mode.
④ Press Cursor up or Cursor down until the LCD displays AUTOSEARCH.
⑤ Press OK.
- The SBC RU880 is now in programming mode and the LCD displays the selected equipment.
⑥ Press Cursor up or Cursor down until the LCD displays TV.
⑦ Press ⏻ to start the search.
– Each time a code is transmitted it is displayed on the LCD. There is a 1.5 second period between each transmission. When the right code is found, the TV switches off.
⑧ Immediately press ⏻ to stop the search.
- The LCD displays the selected equipment and its code.
If you missed the correct code because the search went too far, switch the TV back on, then press (P-) to send the previous code again. Keep pressing (P-) down repeatedly until the equipment switches off again
⑨ When you've found the correct code, press OK to lock the code in the SBC RU880's memory. The LCD will then display TV2. When you press the TV mode key the LCD will display TV1.
That's it! Now switch the second TV on again manually, then press a few keys on the SBC RU880 to check that the TV responds correctly. If it doesn't, try again from step 1 to find a better code.
NOTE: When the SBC RU880 has searched all codes, the LCD displays END for a few seconds before returning to normal operation.
2.6 TO CONTROL THE SECOND TV'S VOLUME
If you have installed a second TV under the HOME mode, you can also control that TV's volume when you are in VCR mode. To do this:
① Press and hold the SMART key (for about three seconds) until the LCD displays TIMER. Release the SMART key.
② Press Cursor up or Cursor down until the LCD displays SPECIAL.
③ Press OK.
- The LCD displays THEATRE.
④ Press Cursor up or Cursor down until the LCD displays COPY VOL.
⑤ Press OK.
- The SBC RU880 is now ready to change the volume, and the LCD displays FROM.
⑥ Press the mode you want to copy the volume from (in this case HOME).
- TO appears on the LCD.
⑦ Press the mode you want to copy to (in this case VCR).
- The SBC RU880 goes back to normal mode.
NOTE: The SBC RU880 does not react to keys other than the keys described above. To go back to normal mode press the SMART key.
2.7 RESTORING DEFAULT KEY SETTINGS
2.7.1 If you want to restore the original function of a specific key
① Press and hold the SMART key (for about three seconds) until the LCD displays TIMER. Release the SMART key.
② Press Cursor up or Cursor down until the LCD displays SPECIAL.
③ Press OK.
- The LCD displays THEATRE .
④ Press Cursor up or Cursor down until the LCD displays RESET.
⑤ Press OK.
- The SBC RU880 is now in reset mode and the LCD displays RESET KEY.
⑥ Press OK.
- The LCD displays PRESS KEY.
⑦ Press the key that you want to restore. - The LCD displays OK for a second and then returns to normal operation.
That's it! The key now operates under its original function.
2.7.2 If you want to restore all keys in a certain device
① Press and hold the SMART key (for about three seconds) until the LCD displays TIMER. Release the SMART key.
② Press Cursor up or Cursor down until the LCD displays SPECIAL.
③ Press OK.
- The LCD displays THEATRE .
④ Press Cursor up or Cursor down until the LCD displays RESET.
⑤ Press OK.
- The SBC RU880 is now in reset mode and the LCD displays RESET KEY.
⑥ Press Cursor up or Cursor down until the LCD displays RESET MODE.
⑦ Press OK.
- The LCD displays PRESS MODE.
⑧ Press the device key that you want to restore.
- The LCD displays OK for a second and then returns to normal operation.
That's it! You have now restored all keys in this mode to their original functions.
2.7.3. If you want to reset the RU880 completely
NOTE: All programming will be erased, you the RU880 will return to its default set-up.
① Press and hold the SMART key (for about three seconds) until the LCD displays TIMER. Release the SMART key.
② Press Cursor up or Cursor down until the LCD displays SPECIAL.
③ Press OK.
- The LCD displays THEATRE.
④ Press Cursor up or Cursor down until the LCD displays RESET.
⑤ Press OK. - The SBC RU880 is now in reset mode and the LCD displays RESET KEY.
⑥ Press Cursor up or Cursor down until the LCD displays RESET ALL.
⑦ Press OK. - The LCD displays RESET.
⑧ Press OK to completely reset the RU880. - The LCD displays OK for a second and then returns to normal operation.
3. KEYS AND MACRO'S
3.1 COPYING THE FUNCTIONS OF KEYS
① Press and hold the SMART key (for about three seconds) until the LCD displays TIMER. Release the SMART key.
② Press Cursor up or Cursor down until the LCD displays SPECIAL.
③ Press OK.
- The LCD displays THEATRE.
④ Press Cursor up or Cursor down until the LCD displays COPY KEY.
⑤ Press OK.
- The SBC RU880 is now ready to move keys and the LCD displays FROM.
⑥ Press the device key of the device you want to copy from, followed by the key you want to copy from.
- The LCD displays TO.
⑦ Press the device key of the device you want to copy to, followed by the key you want to copy to.
- After you've pressed this key, the LCD displays OK for a second and the SBC RU880 goes back to normal operation.
3.2 PROGRAMMING MACRO'S
A macro is a short-cut to performing a series of functions. To programme a macro:
① Press the SMART key (for about three seconds) until the LCD displays TIMER. Release the SMART key.
② Press Cursor up or Cursor down until the LCD displays SPECIAL.
③ Press OK.
- The LCD displays THEATRE.
④ Press Cursor up or Cursor down until the LCD displays KEY MACRO.
⑤ Press OK.
- The LCD displays SELECT KEY. You can now define the key that you want to transmit the macro.
⑥ Press the defined key.
- The LCD displays ENTER KEYS. You can now enter all the keys (up to 10) that you want the SBC RU880 to transmit.
⑦ Press the SMART key to indicate the end of the string.
- The LCD displays OK for a second and then returns to normal operation.
NOTES:
- Press the keys in the sequence that you want your equipment to respond.
- The THEATRE key, SMART key and back-lighting key cannot be programmed as macro keys.
4. EXTRA FUNCTIONS
4.1 TIMER
The SBC RU880 has a built-in timer that can be used to organise time blocks to switch on or off your TV or to set up your VCR for recording. This timer can also be used to operate a Philips Power Control system.
If you want to set up the timer for example to record your favourite programme every Monday at 7.p.m., just:
① Press the SMART key (for about three seconds) until the LCD displays TIMER.
② Press OK.
- The LCD displays ADD TIMER, and the SBC RU880 is now in timer set-up mode.
③ Press OK.
- The LCD displays ONCE.
④ Press Cursor up or Cursor down to choose between ONCE, DAILY and WEEKLY (Select WEEKLY in this case).
⑤ Press OK.
- The LCD displays START : .
⑥ Key in the time using four digits (choose 19:00 in this case). Press Cursor left or Cursor right to go back and forth to correct.
⑦ Press OK.
– If you have chosen Once or Weekly, the LCD displays MON.
⑧ Press Cursor up or Cursor down to choose one of the week-days (Monday in this case).
⑨ Press OK.
- The LCD displays ENTER KEYS. You can now enter the sequence of keys you want to transmit at a certain point in time e.g. VCR, ⏻, Digit (2), REC.
⑩ Press the SMART key to indicate the end of this macro.
- The LCD displays OK for a second and then returns to normal operation. The timer symbol should light up.
That's it! You have now programmed your VCR to record your favourite Channel 2 programme at 7.p.m. every Monday night.
NOTES:
- If you have chosen the AM/PM clock, the LCD displays PM.
- Press Cursor up or Cursor down to choose between AM and PM.
- Press the SMART key to leave this mode and go back to normal mode.
- As soon as the last timer-block is transmitted, the timer-symbol should go off.
- Total number of timers and macro's should not exceed 8. Maximum number of keys per macro should be 10.
4.2 DELETE TIMER
To delete the timer function:
① Press the SMART key (for about three seconds) until the LCD displays TIMER.
② Press OK.
- The LCD displays ADD TIMER and the SBC RU880 is now in timer set-up mode.
③ Press Cursor up or Cursor down until the LCD displays DEL TIMER.
④ Press OK.
- The LCD displays (DAY) (Once/Weekly) (TIME) or (DAILY) (TIME). (This means day and time of the first programmed timer-block).
⑤ Press Cursor up or Cursor down to select between the several programmed timer-blocks.
- The day and time of those timer-blocks will then be displayed.
⑥ Press OK to delete the chosen timer-block.
- The SBC RU880 returns to normal operating mode.
NOTE: When the last programmed timer-block is deleted the timer-symbol goes off.
4.3 SLEEP-TIMER
Some televisions and satellite boxes have a sleep-timer function built-in. This enables these devices to be programmed for switching off at a pre-set time. You can check whether your equipment (TV, VCR etc.) has a built-in sleep-timer by aiming the SBC RU880 at it and pressing and holding the Shift key and ⏻ key. If there's a sleep-timer function built in, the equipment will respond. If the selected equipment does not have a sleep-timer function built in, the SBC RU880's internal sleep-timer can be activated. Here's how:
① Press and hold the SMART key (for about three seconds) until the LCD displays TIMER. Release the SMART key.
② Press Cursor up or Cursor down until the LCD displays SPECIAL.
③ Press OK.
- The LCD displays THEATRE.
④ Press Cursor up or Cursor down until the LCD displays SLEEP.
⑤ Press OK.
- The LCD displays DISABLE.
⑥ Press Cursor up or Cursor down to switch between DISABLE and ENABLE.
- If you select ENABLE the internal sleep-timer is set.
⑦ Press OK.
- The RU880 returns to normal mode.
4.3.1 Activating the SBC RU880's sleep-timer
The SBC RU880's sleep-timer function can be used to switch off equipment after a pre-determined time. First, select the equipment you want switched off, point your SBC RU880 at it, then:
① Press and hold the SBC RU880's Shift key and then press the ⏻ key. Release both keys.
- The LCD displays SLEEP IS by default.
② Press Cursor up or Cursor down to choose between the sleep-timer in 15, 30, 45, 60 minute sequences or OFF.
③ If you want the SBC RU880 to turn off your equipment after 15 minutes, press Cursor up until the LCD displays SLEEP 15.
④ Press OK to confirm your selection.
- The LCD displays 5LEEP 15 and commences count-down.
After 15 minutes the SBC RU880 turns off the selected equipment and returns to normal operation.
NOTE: Always point the SBC RU880 directly at your equipment to ensure a response to your key command.
4.3.2 To erase the sleep-timer
① Select the equipment that you want to be turned off.
② Press and hold the SBC RU880's Shift key and ⏻ key until the LCD displays SLEEP 15.
③ Press Cursor up until the LCD displays SLEEP OFF.
④ Press OK.
- The sleep-timer function is erased and your equipment stays on.
4.3.3 Turning off both your equipment and sleep-timer
① Select the equipment that you set to be turned off.
② Press the ⏻ key on the SBC RU880.
- The equipment turns off and the SBC RU880 erases the sleep-timer function.
4.4 PREPARING THE SBC RU880 FOR HOME THEATRE CONTROL
NOTE: You should only programme the SBC RU880's THEATRE key after you have programmed all the rest of your devices.
Home Theatre is an integrated A/V system that offers the best in sound and vision entertainment. If you have a Home Theatre system, you can use the SBC RU880 to operate the most important functions of each device (TV, VCR, amplifier etc.) without changing devices all the time.
The SBC RU880 is already factory preset to operate TVs, VCRs and amplifiers under THEATRE. All you have to do is programme the THEATRE key. Just:
① Press and hold the SMART key (for about three seconds) until the LCD displays TIMER. Release the SMART key.
② Press Cursor up or Cursor down until the LCD displays SPECIAL.
③ Press OK.
- The LCD displays THEATRE.
④ Press OK.
- The SBC RU880 is in THEATRE set-up mode and the LCD displays ENTER KEYS.
⑤ Now press a device key and then the function keys you want to operate that device with.
For example:
- Press TV
- Press P+, P-, and all of the digit keys
- Press VCR
- Press ■, ▶, ◀◀, ▶▶
That's it! You have programmed the SBC RU880 to operate both the television and the VCR in your Home Theatre system. You can programme the SBC RU880 to operate the rest of your Home Theatre devices in the same way, first by first pressing the device button, and then pressing the function key(s) you want to operate that device with.
① When you have finished programming the SBC RU880 in THEATRE mode, press the SMART key.
- The LCD displays PRESS OK.
② Press OK to leave THEATRE mode.
4.5 SETTING UP THE SBC RU880 TO TRANSMIT RF CONTROLLED SIGNALS
Philips' Remote Control Extender (SBC LI510) is an innovative wireless extension system that lets you operate Infra-Red (IR)-driven equipment from anywhere in your house. The SBC LI510 uses RF technology to convert IR into Radio-Frequency (RF) signals and back again so they can be used to control your VCR, satellite receiver or Hi-Fi set regardless of obstacles in between. You can use the SBC RU880 in combination with a Philips Remote Control Extender set to control your own devices. And because the SBC RU880 can be set up to transmit Rf signals, you don't even need the Transmitter section of the LI510 system!
To do this:
① Press and hold the SMART key (for about three seconds) until the LCD displays TIMER. Release the SMART key.
② Press Cursor up or Cursor down until the LCD displays SPECIAL.
③ Press OK.
- The LCD displays THEATRE.
④ Press Cursor up or Cursor down until the LCD displays RF.
⑤ Press OK. - The LCD displays RF OFF.
⑥ Press Cursor up. - The LCD displays RF ON.
⑦ Press OK. - The SBC RU880 returns to normal operation and can transmit both infra-red and RF signals.
5. SETTING UP THE SBC RU880 FOR YOUR PHILIPS POWER CONTROL SYSTEM
5.1 USING THE SBC RU 880 TOGETHER WITH YOUR PHILIPS POWER CONTROL SYSTEM
The SBC RU880 is ready for controlling a Philips Power Control System. This innovative system (comprising a range of switches and remote controls) allows you to control electrical appliances in and around your home using radio-frequency (RF) operated remote controls. Each Power Control system has its own house code to prevent interference with a neighbour's system.
Quick Reference
Caution: Before connecting any appliance to a Power switch check the appliances' power consumption. These Power switches can control appliances with a maximum power rating of 1000 Watts!
NOTE: The house code's default setting is A.
① Connect the Power switches to mains power outlets.
② Select the appliances, e.g. lamps, you want to control and plug them into the Power switches.
If the appliance has its own ON/OFF switch, make sure it is switched on.
Use the SBC RU880 to operate the appliances as follows:
① Select the HOME mode key.
- The last selected appliance is displayed (for example, UNIT I).
② Select your module using the 10-digit keypad.
- The LCD displays UNIT X (for example, UNIT 3).
NOTE: Although the unit code on the Power switch can be set from 1 to 16, the remote control can only operate Power switches with unit code set from 1 to 10.
① Press Cursor up to switch on the selected appliance.
② Press Cursor down to switch off the selected appliance.
③ Press P+ to switch all appliances on.
- The SBC RU880 displays ALL ON during key-press and then displays the last selected appliance.
④ Press P- to switch all appliances off.
- The SBC RU880 displays ALL OFF during key-press and then displays the last selected appliance.
5.2 SETTING UP THE SBC RU880 FOR DIFFERENT HOUSE CODES.
The Power Control system's house code prevents interference with a similar system in your neighbour's house. Power Control Systems only respond to signals with the correct house code. The house code's default setting is A.
To change the house code:
Verify that the house code already is installed. Look at the house code selection wheel at the rear of the switches (A-P). If you want to change the house code turn this wheel with a screwdriver.
NOTE: Ensure that the house code you have selected for the remote control and all Power switches is the same!
Look at the code list at the back of this book under Power Control to find the first three-digit code for your house code.
① Press the HOME mode key.
② Press and hold the SMART key (for about three seconds until the LCD displays TIMER. Release the SMART key.
③ Press Cursor up or Cursor down until the LCD displays SETUP.
④ Press OK.
- The LCD displays ENTER CODE. The SBC RU880 is now in set-up mode.
⑤ Press OK.
- The SBC RU880 is now in programming mode and the LCD displays HOME.
⑥ Press OK.
⑦ Enter the three-digit code using the keypad.
- If the code is correct the display indicates OK for a second and the SBC RU880 returns to normal operation.
NOTE: It's not possible to search/copy Power Control System codes, since these codes are not infra-red.
6. NEED HELP?
If you have questions about your remote or if you are missing certain functions on your remote, call our free-phone helpline! Before you call, please read the manual carefully. Most questions will be answered here.
However, if you don't find an answer to your questions, make a note of your equipment in the table below. This makes it easier for the operators to help you quickly. Look for model numbers in the equipment instruction manual, or on the back of the equipment. Be in front of the equipment, this way our operators can help you to see if your remote is working properly.
In the UK call 0800 968 118/In Ireland 1 800 553 136
The model number of your Philips universal remote control is: SBC RU880
Date of purchase: __/__/__/__ Day/month/year
| Equipment | Brand | Model number | Model number of original remote | Code |
| TV | ||||
| VCR | ||||
| SAT | ||||
| DVD | ||||
| CD | ||||
| AUDIO 1 | ||||
| AUDIO 2 | ||||
| HOME |
INTRODUCTION
N'OUBLIEZ PAS LES PILES!
natural_image
Diagram of a battery cell setup with an arrow indicating charge direction (no text or labels)natural_image
Diagram showing two connected devices with a directional arrow indicating movement (no text or symbols present)natural_image
Diagram of a battery cell setup with an external circuit board and internal components (no text or labels)natural_image
Diagram showing two mobile phone terminals with one pointing to a keypad (no text or symbols present)2.4.1 CODES VON IHRER ORIGINALFERNBEDIENUNG KOPIEREN
natural_image
Diagram of a battery cell setup with anode, battery, and internal components (no text or labels)Kies TV, VCR, SAT, DVD, CD, AUDIO1, AUDIO2 of HOME.
natural_image
Diagram showing two connected devices with circular buttons and a directional arrow (no text or symbols)3. TOETSEN EN MACRO'S
3.1 KOPIËREN VAN DE FUNCTIE VAN EEN TOETS
natural_image
Diagram of a battery cell setup with an open circuit board and a circular component, no text or symbols present.natural_image
Diagram showing two connected devices with a directional arrow pointing to one (no text or symbols present)natural_image
Diagram of a battery cell setup with an electrolytic cell and its internal components (no text or labels)2.2 AUTOBUSCA MÃOS LIVRES
natural_image
Diagram showing two mobile phone terminals with one pointing to a screen (no text or symbols present)natural_image
Diagram of a battery cell setup with an inset showing charge distribution (no text or labels)natural_image
Diagram showing two connected devices with a directional arrow pointing from one to the other (no text or symbols present)natural_image
Diagram of a battery cell setup with an inset showing charge distribution (no text or labels)natural_image
Diagram showing two connected devices with a directional arrow pointing to one (no text or symbols present)natural_image
Diagram of a battery cell setup with an external cylinder and internal charge distribution (no text or labels)natural_image
Diagram showing two connected devices with a directional arrow (no text or symbols)natural_image
Diagram of a battery cell setup with an arrow indicating direction, showing internal charge distribution (no text or labels)natural_image
Diagram showing two mobile phones with one pointing at a screen (no text or symbols present)2.5 INDSTILLING AF ET EKSTRA APPARAT I SBC RU880
2.6 FOR AT REGULERE DET ANDET TV-APPARATS LYDSTYRKE
natural_image
Diagram of a battery cell setup with an arrow indicating direction, showing internal components and charge distribution (no text or labels)natural_image
Diagram showing two connected devices with a directional arrow, no text or symbols present– LCD-displayet viser RF OFF (RF av).
natural_image
Diagram showing two mobile phone modules with one pointing to a screen (no text or symbols present)Birgmingham Cable Communications 303
BskyB....004
J
Jerrold 030, 303
P
PVP Stereo Visual Matrix....030
S
Scientific Atlanta....035, 304
U
United Cable 030
SETUP CODES FOR CD PLAYERS
A
Arcam 000
C
Carver 206
D
Denon....030, 061
F
Fisher 075, 206
G
Grundig 000
J
JVC 099
K
Kenwood 064, 217
L
Linn....184
M
Marantz 000
Memorex....059
N
NAD 027
Naim....000
0
Onkyo 128, 129
P
Panasonic 330, 056
Philips....000
Pioneer 059,495
Proton....000
Q
Quad 000
R
Rotel....000
S
SAE 000
Sanyo 075, 206
Sansui 000
Sharp 064
Sony 027
T
Technics 330, 056
U
Universum 000
Y
Yamaha 214
SETUP CODES FOR CD-RECORDABLE
M
Marantz 001
P
Philips....001
SETUP CODES FOR DVD
P
Philips....000
T
Toshiba 000
SETUP CODES FOR HOME
House code A....101
House code B....102
House code C 103
House code D....104
House code E 105
House code F 106
House code G....107
House code H....108
House code I....109
House code J 110
House code K....111
House code L 112
House code M 113
House code N....114
House code 0....115
House code P 116
SETUP CODES FOR MISC AUDIO
J
JVC 100
S Sony 037, 186
SETUP CODES FOR RECEIVERS
B
Bush 416
C
Carver 069
D
Denon 031
F
Fisher 069
G
Grundig 000, 002
J
JVC 101
K Kenwood ....054, 341
M
Marantz....000, 002
0
Onkyo 127, 162
P
Panasonic....066, 336, 416
Philips....000, 001, 003, 004
Pioneer 107,316
S
Sansui....000, 002
Sanyo....069
Sony 185
T
Technics....066, 336, 416
Y
Yamaha 109,203
SETUP CODES FOR SATELLITE
A
AST....348
Alba....389, 448, 482, 640
Aldes....315
Allantide....360
Amstrad....107
Ankaro .....244, 247, 315, 396, 546
Anttron 210, 448
Arcon 395
Armstrong....270
Astra....135
Astro 200, 385, 547
Avalon....423
Axis....396, 557
B BT....695
Barcom....244
Beko 216
Best......244, 396
Blaupunkt....200
Boca 270,540
Brain Wave 359
Bush 094
C CNT....547
Channel Master 389
CityCom....421
Commlink 315
Connexions 423
Conrad 616
Crown....270
Cyrus....227
D D-box....750
DDC 389
DNT 000, 227, 423
Diskxpress....244
Drake 295
E
Echostar....423, 898
Emanon 448
Eurodec 551
F FTE 358
Ferguson....094, 210, 216, 738
Finlux 135, 174, 482
Fracarro 898
Freecom 362,448
Fuba 244, 324, 396, 423, 448
G G-Sat ....210
SatPartner.....359, 362, 448, 529, 547
Satcom....632
Satec 210, 355
Schwaiger....210, 421
Seemann 423, 557
Siemens....200
Skymaster 315, 546, 632, 655
Sony 731
Sunstar....540
T
Tantec....324, 482
Telefunken 448
Teleka 270,640
Telesat 632
Thomson....482
Thorens 613
Tonna....695
Triad....348, 360, 362
U
Unitor 244,359
Universum....174, 200, 598
V
Vector 360
Ventana....000, 227
Vortec 448
W
Wevasat 360
Winersat 359
Wisi200, 348, 399, 423, 433, 434, 482
Z
Zehnder 348, 358, 547
SETUP CODES FOR TELEVISION
A
Acura 036
Admiral 114, 190
Adyson....244
Akai 388
Akura....245, 291, 396
Alba .....001, 036, 064, 245, 398, 422, ....000
Allorgan 321
Amplivision....244
Amstrad....036, 389, 396, 398
Anitech 036
Arc En Ciel 595
Arcam 243, 244
Aristona....001, 002, 003, 004, ....005, 064, 114, 000
ASA....114, 131, 322
Asuka 245
Atlantic 233
Audiosonic 001, 064, 136, 000
Autovox......114, 233, 264, 322, 363
B
BPL....309
BSR....321
BTC 245
Baird....370
Bang & Olufsen......114, 592
Basic Line....036, 245
Baur .....001, 037, 064, 376, 388, 539, ....581, 000
Beko 397
Beon 001, 064, 000
Binatone 244
Blaupunkt ......354, 355, 581
Blue Sky 245
Blue Star 309
Bondstec 274
Boots 244
Brandt 136, 360, 362
Brandt Electronic 595
Brionvega 114
Britannia 243
Bruns 114
Bush.....001, 036, 064, 245, 309, 321, .....376, 390, 398, 401, 000
C
CGE 111, 274, 333
CS Electronics....243
CTC 274
Cascade 036
Cathay 001, 064, 000
Centurion 001, 064, 000
Century 114
Cimline....036
Clarivox....001, 064, 000
Clatronic 274, 397
Condor 347, 397
Contec 036, 243
Continental Edison ......360, 426, 595
Crosley....111, 114, 374
Crown .....001, 036, 064, 397, 445, 000
Crystal....458
Cybertron....245
D
Daewoo......001, 036, 064, 401, 000
Dainichi....245
Dansai 001, 064, 000
Dayton 036
De Graaf 390
Decca 001, 064, 099, 000
Dixi....001, 036, 064, 000
Dual....363, 379
Dual Tec 244
Dumont 097, 114, 322, 374
D-Vision....001, 064, 000
E
Elbe 286
Elin 001, 064, 000
Elite 245,347
Elta....036
Emerson 114, 388
Erres 001, 039, 064, 000
Expert 233
F
Ferguson .....001, 064, 100, 136, 265, ....314, 362, 370, 000
Fidelity 243, 388, 390
Finlandia....373, 386, 390
Finlux ...001, 064, 097, 099, 114, 131, ....132, 322, 373, 374, 000
Firstline .036, 243, 244, 274, 321, 348
Fisher....131, 244, 330, 397, 582
Flint 482
Formenti 001, 064, 114, 347, 374, 000
Frontech......190, 274, 291, 390, 458
Fujitsu 099, 233
Funai 291, 321, 330
G
GEC....001, 064, 099, 244, 000
GPM 245
Geloso 036, 374
Genexxa 190, 245
GoldStar .....001, 064, 136, 244, 317, .....390, 000
Goodmans.....001, 064, 099, 244, 344, .....370, 398, 401, 000
Gorenje 397
Graetz....190, 374, 388
Granada....001, 064, 099, 244, 366, ....386, 390, 000
Grandin 309
Grundig 097, 264, 514, 581
H
HCM....036, 309
Hanseatic .....001, 064, 347, 388, 000
Hantarex....036
Hifivox 595
Hinari ......001, 036, 064, 245, 000
Hisawa....309, 482
Hitachi....071, 132, 136, 190, 244, ....333, 374, 376, 390
Huanyu 243, 401
Hypson......001, 064, 291, 309, 000
|
ICE 244, 291, 398
ICeS....245
ITS....398
ITT....190, 374, 388
Imperial....111, 274, 397, 445
Indesit 264
Indiana......001, 064, 000
Ingelen 190
Inno Hit 099
Interfunk.....001, 064, 190, 274, 388, .....539, 595, 000
Intervision....001, 064, 129, 244, 291, ....000
Isukai....245
J
JVC 080, 121, 398, 680
K
Kaisui 036, 243, 244, 245, 309
Kapsch....190, 233
Kathrein 000
Kendo....001, 064, 389, 000
Kingsley 243
Kneissel....286
Korpel....001, 064, 000
Korting....114
Koyoda....036
L
Leyco.....001, 064, 099, 291, 321, 000
Liesenk & Tter 001, 064, 000
Loewe 114,539
Luma 233, 390
Luxor .....221, 264, 376, 388, 390, 582
M
M Electronic..001, 036, 064, 131, 132, ....136, 190, 244, 314, 373, 401, 507, ....000
MTC 376,539
Magnadyne......114, 129, 274, 374
Magnafon 129
Manesth....244, 291, 347
Marantz....001, 064, 000
Marelli....114
Mark....001, 064, 000
Matsui ..001, 036, 038, 062, 064, 099, .....244, 321, 390, 398, 458, 514, 000
Mediator 001, 039, 064, 000
Memorex....036
Memphis....364
Metz....114, 302, 394
Minerva 097, 264, 514, 581
Minoka 396
Mitsubishi.....114, 135, 177, 264, 539
Mivar....243, 317, 318, 319
Multitech....036, 129, 243, 390
U
NEI 001, 064, 364, 458, 000
National 264
Neckermann ..001, 064, 114, 376, 390, ....581, 000
Nikkai ...001, 062, 064, 099, 243, 245, 291, 364, 000
Nobliko....129
Nogamatic 595
Nokia 388, 500, 507, 519
Nordmende......136, 314, 370, 595
0
Oceanic....190, 374, 388
Orion .....001, 064, 321, 347, 348, 000
Osaki....099, 244, 245, 291
Oso 245
Osume....099, 184
Otake 344
Otto Versand .001, 037, 064, 244, 347, ....370, 374, 376, 539, 581, 000
P
Palladium....390, 397, 445
Panama 244, 291
Panasonic .....153, 190, 253, 264, 277, ....374, 394, 677
Pathe Cinema....243, 265, 347
Pathe Marconi 360, 595
Pausa 036
Perdio 347
Philco....111, 114, 274
Philips ..001, 002, 003, 004, 005, 039, ....064, 114, 401, 581, 000
Phoenix....114
Phonola......001, 039, 064, 114, 000
Pioneer 136, 190, 314
Profex....036, 388, 390
Proline 348
Protech.001, 036, 064, 129, 244, 274, 291, 364, 445, 458, 000
Pye 039
Q
Quelle...001, 037, 038, 064, 097, 111, ....131, 279, 322, 333, 354, 355, 388, ....539, 581, 000
R
R-Line....001, 064, 000
RBM....097
RFT 114
Radiola....001, 039, 064, 000
Radiomarelli 114
Rediffusion 388
Revox 001, 064, 000
Rex 190, 233, 286, 291
Roadstar 036, 245, 291, 445
S
SBR....001, 039, 064, 000
SEG....244, 291
SEI 114, 129, 321
SEI-Sinudyne 374
Saba .....114, 136, 190, 314, 362, 370, ....374, 595
Saccs 265
Saisho 036, 038, 291, 458
Salora .....190, 221, 376, 386, 388, 390
Sambers 129
Samsung001, 036, 064, 117, 244, 291, 317, 397, 000
Sandra....243
Sanyo......038, 099, 131, 184, 366
Schaub Lorenz....374, 388
Schneider .....001, 064, 245, 274, 330, ....363, 379, 398, 421, 000
Sei-Sinudyne 037
Seleco 190, 233, 286, 389
Sentra 062
Sharp 120
Shorai 321
Siarem 114, 129, 374
Siemens 001, 064, 184, 354, 355, 374, 581, 000
Singer 114
Sinudyne....114, 129, 321
Solavox 190
Sonoko 001, 036, 064, 000
Sonolor 190
Sontec 001, 064, 000
White Westinghouse .....001, 064, 243, ....347, 000
Y
Yoko .....001, 064, 244, 291, 458, 000
Z
Zanussi 233, 390
SETUP CODES FOR VCR
A
Aiwa 027,334,375,379
Akai......068, 076, 080, 133, 342
Akiba 099
Alba .....047, 099, 236, 305, 342, 379
Ambassador 047
Amstrad 027, 305, 359
Anitech 099
Aristona .....001, 002, 003, 004, 005, .....108, 411, 430, 000
ASA.... 002, 064, 108, 000
Asuka 064
B
Baird....027, 068, 131, 134
Basic Line 047, 099, 305
Blaupunkt.....030, 033, 043, 061, 181, .....189, 222, 253, 254, 430, 000
Brandt....214, 347, 348, 520
Brandt Electronic 068
Bush 099, 236, 305, 379
C
CGE....027
Catron 047
Cimline....099
Clatronic....047
Combitech 379
Condor 047
Crown 047, 099, 305
D
Daewoo....047, 305
Dansai 099
De Graaf 069, 193
Decca 002, 027, 108, 000
Denon 069
Dual 068
Dumont .....002, 027, 108, 131, 000
E
ESC....267,305
Elcatech 099
F
Ferguson .....068, 111, 125, 134, 347, ....348, 520
Fidelity....027
Finlandia 002, 108, 131, 000
Finlux ....002, 027, 069, 108, 131, 000
Firstline......064, 070, 072, 099, 236
Fisher 073, 074, 081, 131
Frontech 047
Funai 027
G
GEC 002,108,000
General....047
GoldHand....099
GoldStar 064,252
Goodmans.....002, 027, 047, 064, 099, .....305, 430, 000
Graetz 032, 068, 131, 267
Granada......002, 073, 108, 131, 000
Grandin....027, 064, 099
Grundig .....002, 030, 033, 034, 043, .....099, 108, 222, 234, 253, 374, 376, .....430, 000
H
HCM....099
Hanseatic 064
Hinari....031, 099, 267, 379
Hitachi....027, 031, 068, 069, 193, .....262, 267
Hypson....099
|
ITT.032, 068, 073, 131, 133, 267, 411
ITV 064,305
Imperial 027
Ingersol....031
Interfunk 002, 108, 000
J
JVC.....035, 068, 094, 111, 233, 234, .....411, 513
K
Kaisui....099
Kendo 133,236
Kenwood 068
Korpel 099
L
Lenco 305
Leyco 099
Loewe....002, 031, 033, 064, 108, 000
Logik 031, 267
Luxor .....070, 073, 075, 131, 133, 027
M
Manesth 072, 099
Marantz......002, 030, 033, 108, 000
Matsui ...031, 063, 115, 236, 375, 379
Memorex....027, 064, 073, 131
Memphis....099
Metz .....030, 033, 189, 222, 254, 374
Minerva....033, 043, 222
Mitsubishi.....002, 070, 094, 108, 000
Multitech....027, 099
Murphy 027
N
NEC 065, 068, 094
Neckermann....002, 108, 000
Nesco....099
Nokia.....068, 073, 075, 131, 133, 267
Nordmende ...068, 324, 347, 348, 411, ....521
0
Oceanic....027, 068
Okano 342, 375
Orion .....031, 063, 115, 236, 375, 379
Osaki 027, 064, 099
Otto Versand......002, 108, 000
P
Palladium....033, 064, 068, 099
Panasonic....189, 253, 254
Pathe Cinema 063
Pathe Marconi 068
Pentax....069
Perdio 027
Philco 065
Philips ..001, 002, 003, 004, 005, 108, ....411, 430, 000
Phonola 002, 108, 000
Pioneer .....002, 094, 108, 262, 000
Portland 047
Profex 349
Profitronic 267
Proline 027
Pye 002,108,000
Q
Quartz 073
Quelle....002, 108, 000
R
Radiola 002, 108, 000
Rex....068, 411
RFT 430
S
SBR 002, 108, 001, 003, 000
SEG....267,349
SEI....002, 031, 108, 000
Saba .....068, 233, 234, 324, 347, 348, ....411, 521
Saisho 031, 063, 115, 236
Salora....070, 073, 133
Samsung 267,459
Sansui.... 068, 094
Sanyo 073, 131
Saville 379
Schaub Lorenz..... 027, 032, 068, 131
Schneider ..... 002, 027, 099, 108, 000
Seleco 068
Sentra 047
Sharp 075
Shintom 099, 131
Shorai 031
Siemens 002, 030, 033, 043, 064, 081, ....108, 131, 222, 000
Silva 064
Singer 072
Sinudyne....002, 031, 108, 000
Solavox 047
Sonolor 073
Sontec....064
Sony 038, 059, 060, 061
Sunkai 375
Sunstar....027
Suntronic....027
T
Tashiko....027
Tatung .....002, 027, 068, 108, 000
Tec 047
Technics 189, 253
Teleavia....068, 520
Telefunken....068, 214, 347, 348, 411, ....520, 521
Tenosal....099
Tensai 027,349
Thomson 068, 347, 411, 520, 521, 555
Thorn 063, 068, 111, 131
Toshiba.002, 068, 070, 072, 108, 411, 000
Towada....349
U
Uher 267
Ultravox 076
Universum ....002, 027, 033, 043, 064, ....076, 108, 133, 222, 267, 000
Y
Yamishi 099
Yokan....099
Yoko 047,267
Guarantee certificate
Certificat de garantie
Garantie
Identieficatiekaart
Dealer's name, address and signature
- INDEX
- INTRODUCTION
- DON'T FORGET THE BATTERIES!
- AT A GLANCE
- For instance: TV:
- ⑩ for TV FastText for VCR
- For example:
- GETTING STARTED
- Language setup
- Setting up the clock
- INSTALLATION
- SETTING UP THE SBC RU880 FOR YOUR AUDIO/VIDEO EQUIPMENT
- HANDS-FREE AUTOSEARCH
- To start Hands-free Autosearch
- NOTE THAT CODE!
- COPY CODES FROM YOUR ORIGINAL REMOTE CONTROL
- To copy codes from your original remote control
- If the SBC RU880 displays ERROR
- If you run out of keys on the SBC RU880
- SETTING UP AN EXTRA DEVICE ON THE SBC RU880
- If you know the brand name
- If you don't know the brand name
- TO CONTROL THE SECOND TV'S VOLUME
- RESTORING DEFAULT KEY SETTINGS
- If you want to restore the original function of a specific key
- If you want to restore all keys in a certain device
- If you want to reset the RU880 completely
- KEYS AND MACRO'S
- COPYING THE FUNCTIONS OF KEYS
- PROGRAMMING MACRO'S
- NOTES:
- EXTRA FUNCTIONS
- TIMER
- DELETE TIMER
- SLEEP-TIMER
- Activating the SBC RU880's sleep-timer
- To erase the sleep-timer
- Turning off both your equipment and sleep-timer
- PREPARING THE SBC RU880 FOR HOME THEATRE CONTROL
- SETTING UP THE SBC RU880 TO TRANSMIT RF CONTROLLED SIGNALS
- To do this:
- SETTING UP THE SBC RU880 FOR YOUR PHILIPS POWER CONTROL SYSTEM
- USING THE SBC RU 880 TOGETHER WITH YOUR PHILIPS POWER CONTROL SYSTEM
- Quick Reference
- SETTING UP THE SBC RU880 FOR DIFFERENT HOUSE CODES.
- To change the house code:
- NEED HELP?
- N'OUBLIEZ PAS LES PILES!
- CODES VON IHRER ORIGINALFERNBEDIENUNG KOPIEREN
- TOETSEN EN MACRO'S
- KOPIËREN VAN DE FUNCTIE VAN EEN TOETS
- AUTOBUSCA MÃOS LIVRES
- INDSTILLING AF ET EKSTRA APPARAT I SBC RU880
- FOR AT REGULERE DET ANDET TV-APPARATS LYDSTYRKE
- J
- P
- S
- U
- SETUP CODES FOR CD PLAYERS
- A
- C
- D
- F
- G
- K
- L
- M
- N
- 0
- Q
- R
- T
- Y
- SETUP CODES FOR CD-RECORDABLE
- SETUP CODES FOR DVD
- SETUP CODES FOR HOME
- SETUP CODES FOR MISC AUDIO
- SETUP CODES FOR RECEIVERS
- SETUP CODES FOR SATELLITE
- V
- W
- Z
- SETUP CODES FOR TELEVISION
- B
- E
- H
- |
- SETUP CODES FOR VCR
- Guarantee certificate
- Certificat de garantie
- Garantie
- Identieficatiekaart
Brand : PHILIPS
Model : SBCRU880-10C
Category : Remote control