Playon!DVR HD ACRPV76120 - Media player AC Ryan - Free user manual and instructions
Find the device manual for free Playon!DVR HD ACRPV76120 AC Ryan in PDF.
User questions about Playon!DVR HD ACRPV76120 AC Ryan
0 question about this device. Answer the ones you know or ask your own.
Ask a new question about this device
Download the instructions for your Media player in PDF format for free! Find your manual Playon!DVR HD ACRPV76120 - AC Ryan and take your electronic device back in hand. On this page are published all the documents necessary for the use of your device. Playon!DVR HD ACRPV76120 by AC Ryan.
USER MANUAL Playon!DVR HD ACRPV76120 AC Ryan
Thank you for purchasing our producT and welcome To The playon! communiTy!
This is a Quick insTallaTion guide To get you sTarTed wiTh your new playon!dVr
hd.
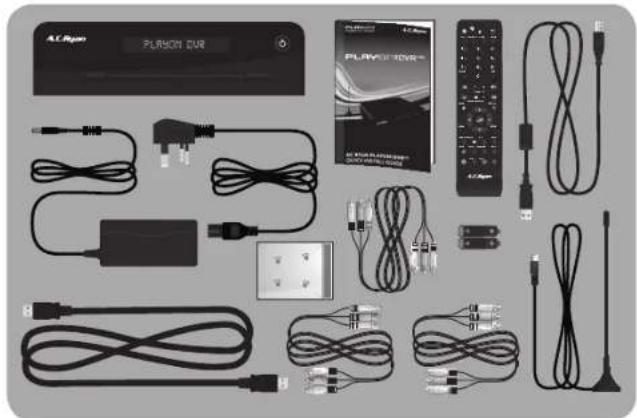
Included in this Playon!DVR ^HD box:
1 x Playon!DVR ^HD Digital Video Recorder and Full HD Network Media Player
1 x Quick install guide
1 x Remote control
2 x Batteries
1 x HDMI cable
1 x Pack of screws
2 x Composite cable (red/yellow/white)
1 x Component cable (red/blue/green)
1 x USB cable
1 x Power adapter
1 x Antenna
natural_image
Product display of a PLASON DVR controller with various cable and power connectors (no text or symbols visible)Getting started with the Playon!DVR ^HD
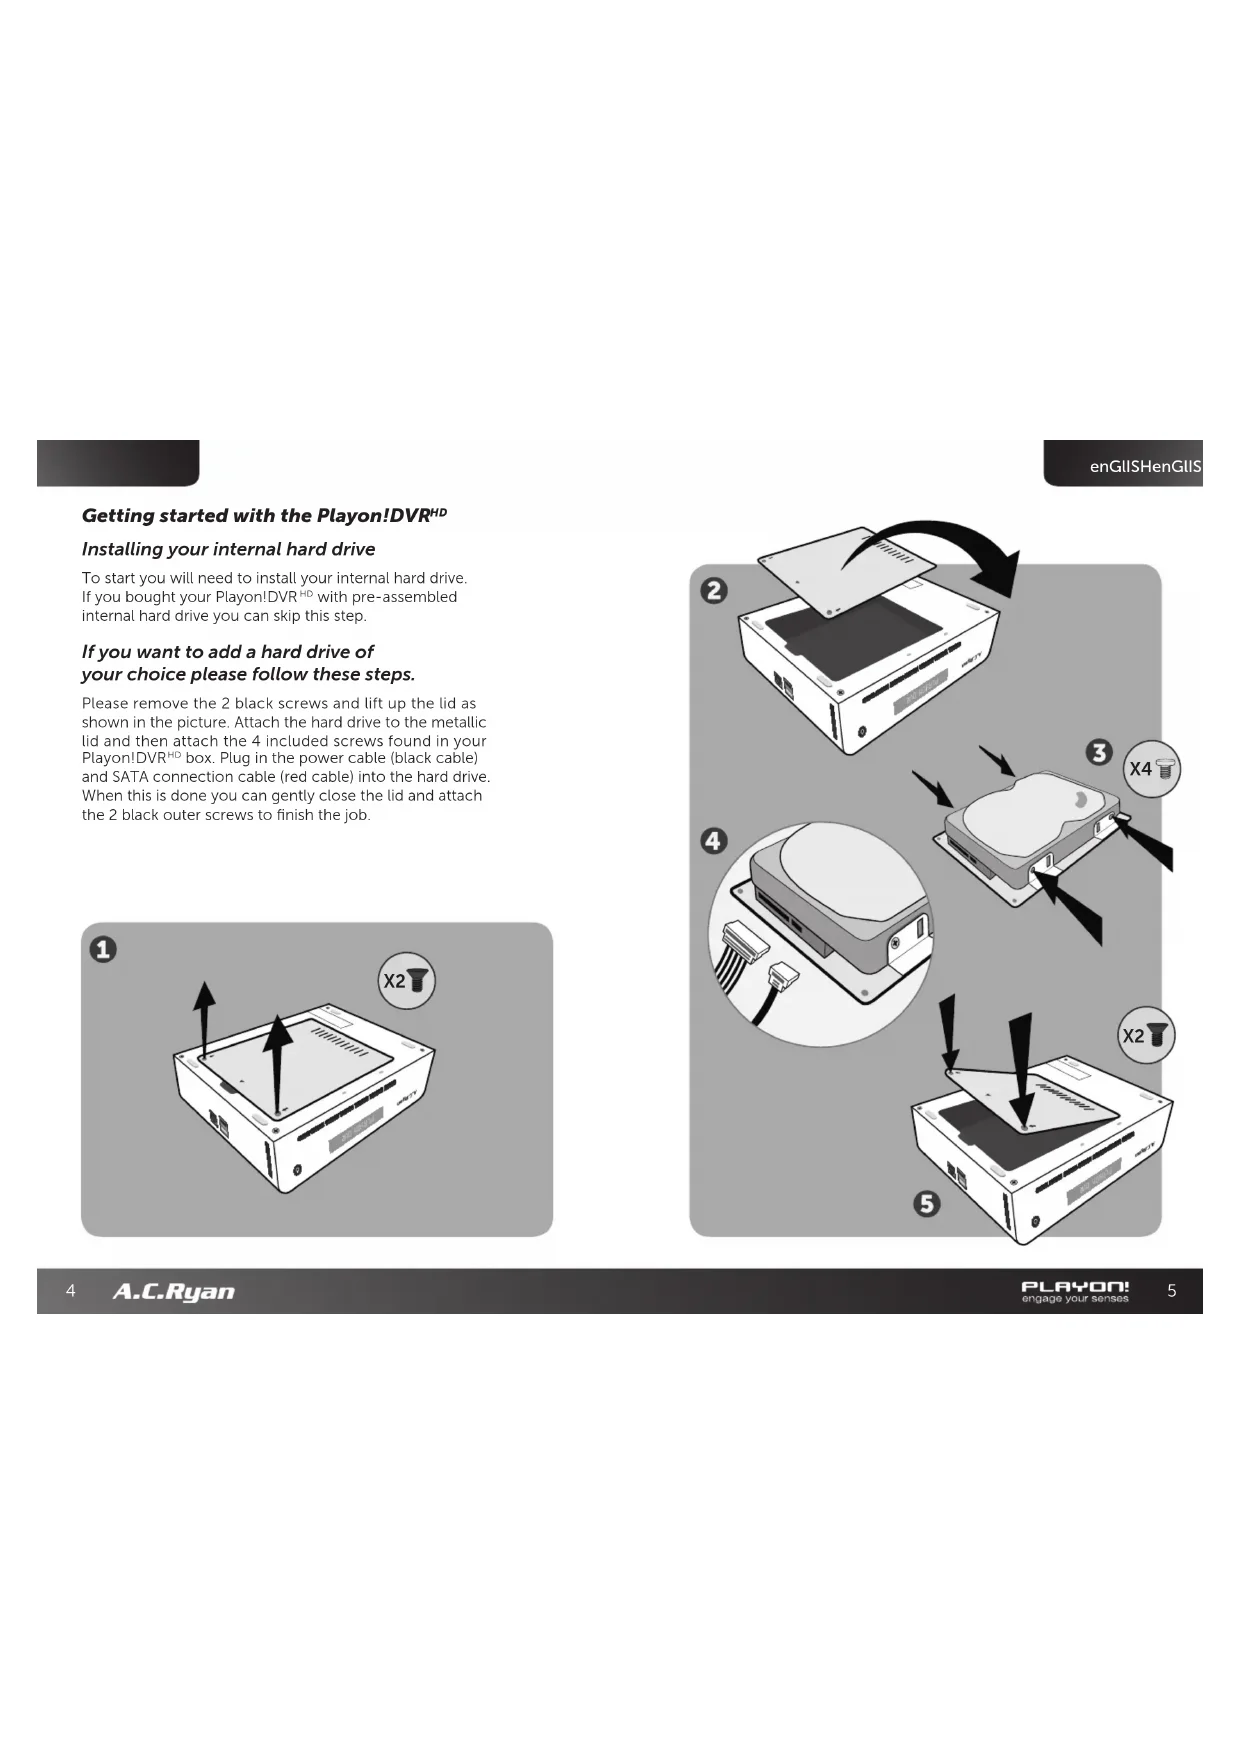
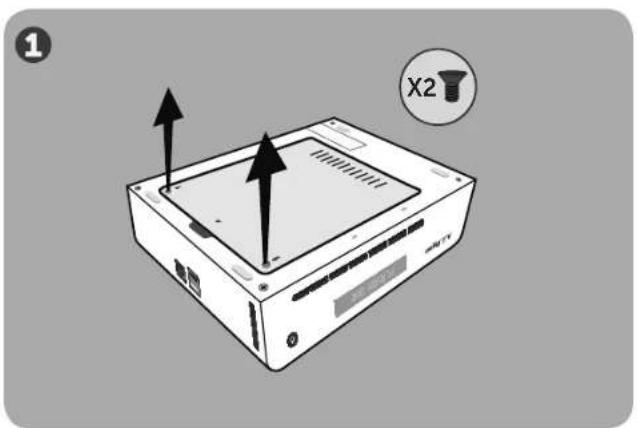
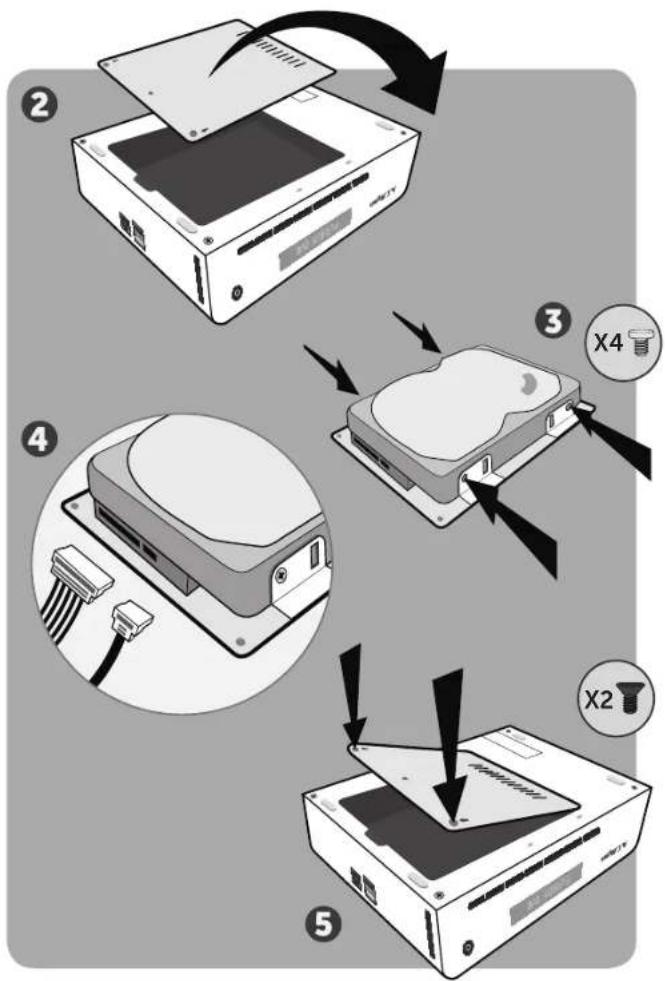
Installing your internal hard drive
To start you will need to install your internal hard drive. If you bought your Playon!DVR ^HD with pre-assembled internal hard drive you can skip this step.
If you want to add a hard drive of your choice please follow these steps.
Please remove the 2 black screws and lift up the lid as shown in the picture. Attach the hard drive to the metallic lid and then attach the 4 included screws found in your Playon!DVR ^HD box. Plug in the power cable (black cable) and SATA connection cable (red cable) into the hard drive. When this is done you can gently close the lid and attach the 2 black outer screws to finish the job.
text_image
X2enGIISHenGIIS
text_image
Diagram illustrating the process of inserting a hard disk into a device, showing steps from external to internal storage.Connecting the hardware to your TV
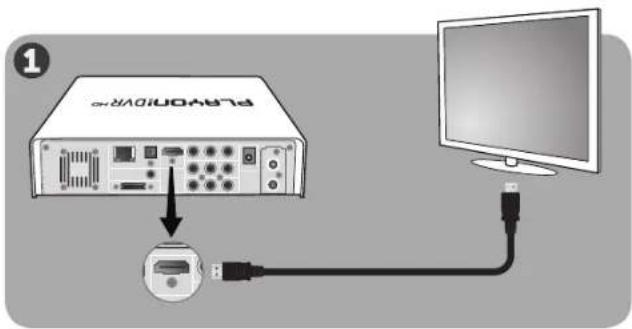
- Connect the included HDMI cable from the Playon!DVR ^HD to your TV for the highest quality video/audio.
- Connect one end of the included power adapter jack to your Playon!DVR ^HD and the other end to your wall power socket.
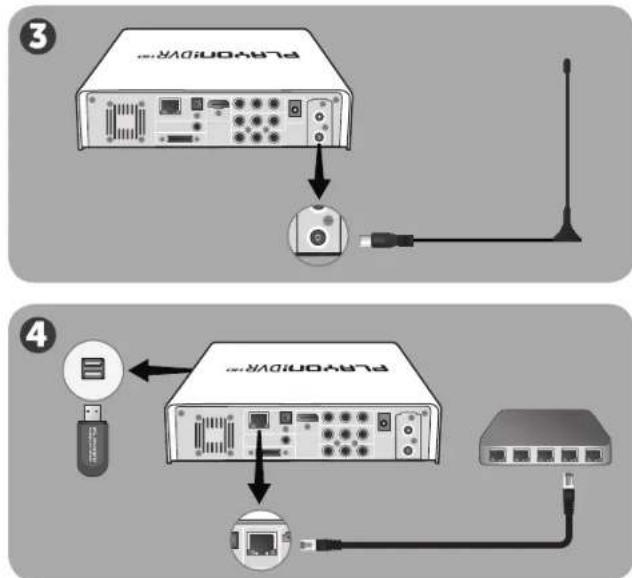
- Connect the included Antenna to the 'antenna in' connector on your Playon!DVR ^HD .
- To make the player part of your network you can connect your player to your network by using a normal network cable or optional Playon! Wireless dongle (both not included).
text_image
PLAVIDL0VR 1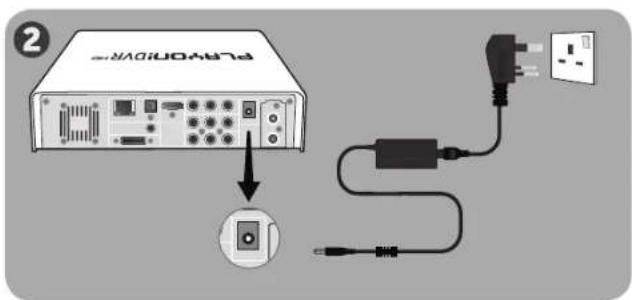
text_image
PLPROONICVR 2enGIISHenGIIS

text_image
PlayPod10VR 3
text_image
PLA010000 4Alternative options: If your TV does not have a HDMI input, you can use the included composite cable for both video and audio or the component cable (up to 1080i resolution) for video and the composite cable (red/white) for audio.
If you have an Audio/Video Receiver you can connect your audio/video signals through it to receive audio and video with a HDMI, Composite, Component, SPDIF Coaxial or SPDIF Optical TOSLINK cable.
***SPDIF Optical TOSLINK and SPDIF coaxial cables (not included) supports up to 5.1 surround sound. For rich HD Audio in 7.1 surround sound you need to use a HDMI cable.
enGLISH neDerl
Initial Setup
Choose your:
Menu language: Select the language you want to use.
Channel scan: Choose if you want to scan for DVB-T channels. You must have an antenna connected in order to scan.
Wired Setup: Choose automatic or fixed IP/DNS address if you have a network cable attached. Follow the instructions on the screen. If you don't have a network cable attached you can skip this step.
Time: Please set the current time to use the Electronic Program Guide (EPG). You can have this done automatically or set it manually.
If you have installed a new internal hard drive, or this is the first time you use the player, it is recommended to format the internal hard drive. The player will automatically detect this and ask you to format, follow the instructions on the screen to do so. If the player does not ask for a format by itself you can format the drive by going to Setup in the main menu, choose System and then select HDD Format. Your player will require a reboot after the format and then you are done with the basic setup of your Playon!DVR ^110 .
Note: When you insert a hard drive with data on it, formatting this hard drive will erase your data. Be sure to make a backup of your data first before formatting your hard drive inside the player. Copy your backup after the format back onto the hard drive inside the player.
Please take your time to go through the Setup menu and personalize the settings that you want to use, then you are ready to use your Playon!DVR ^HD . Playon! Engage your senses.
HARTELIJK DANK VOOR DE AANKOOP VAN ONS PRODUCT EN WELKOM BIJ DE PLAYON! COMMUNITY!
DIT IS EEN SNELLE INSTALLATIEGIDS OM U TE HELPEN SNEL VAN START TE GAAN MET UW NIEUWE PLAYON!DVR ^HD .
natural_image
Collection of electronic devices including PLCs, cables, and a remote control unit (no visible text or symbols)neDerlanDSneDerla
text_image
Diagram illustrating the process of inserting a hard disk into a device, showing steps from external to internal storage.neDerlanDSneDerla
natural_image
Product display of various electronic devices including a flash unit, controllers, and connectors (no visible text or labels)DeutScHDeutSc
text_image
Diagram illustrating the process of inserting a hard disk into a device, showing steps from external to internal storage.natural_image
Product display of a PLC expansion device with various cable and power connectors (no visible text or labels)text_image
Diagram illustrating the process of inserting a hard disk into a device, showing steps from external to internal storage.SvenSkaSvenSk
text_image
Diagram showing two connected devices: one with a PLC server and cable, the other with an RJ452 network connection to a power outlet.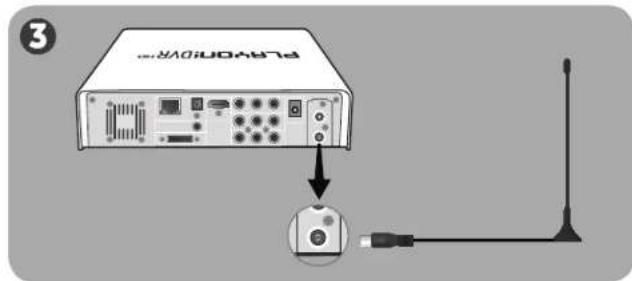
text_image
PLA0V00V8 3
flowchart
graph TD
    A["USB Device"] --> B["Network Switch"]
    B --> C["Router"]
    C --> D["Switch"]
    style A fill:#f9f,stroke:#333
    style B fill:#ccf,stroke:#333
    style C fill:#cfc,stroke:#333
    style D fill:#fcc,stroke:#333
natural_image
Product display of a PLC expansion device with various cable and power connectors (no visible text or labels)norSk
norSknorSk
text_image
Diagram illustrating the process of inserting a hard disk into a device, showing steps from external to internal storage.text_image
iPod100VIR 3
flowchart
graph TD
    A["USB Device"] --> B["Network Switch"]
    B --> C["Ethernet Port"]
    C --> D["USB Link"]
    style A fill:#f9f,stroke:#333
    style B fill:#ccf,stroke:#333
    style C fill:#cfc,stroke:#333
    style D fill:#fcc,stroke:#333
Alternativer: Hvis TV'en din ikke har en HDMI-inngang, kan du bruke den medfølgende komposittkabelen til både video og audio, eller en komponentkabel (opptil 1080i oppløsning) til video og komposittkabelen (rød/hvit) til audio.
Hvis du har en audio/video mottaker kan du få inn audio - og videosignalene gjennom HDMI-, RCA-, SPDIF Coaxial eller en SPDIF Optical Toslink-kabel.
***SPDIF Optical TOSLINK og SPDIF koaksialkabler (medfølger ikke) kan du oppnå 5.1 surround-lyd. For å få rik HD audio i 7.1 surroundlyd skal du bruke en HDMI-kabel.
Førstegangsoppsett
Velg ditt:
natural_image
Product display of various electronic devices including PLC/RSH, USB, and cable bundles (no visible text or labels)DanSk DanSk
text_image
Diagram illustrating the process of inserting a hard disk into a device, showing steps from external to internal storage.DanSkDanSk
text_image
iPod100VIR 3
flowchart
graph TD
    A["USB"] --> B["Network packet"]
    B --> C["Router"]
    C --> D["Switch"]
    style A fill:#f9f,stroke:#333
    style B fill:#ccf,stroke:#333
    style C fill:#cfc,stroke:#333
    style D fill:#fcc,stroke:#333
natural_image
Product display of a PLASON DVR controller with various cable and power connectors (no text or symbols visible)Suomi
Suoml
text_image
Diagram illustrating the process of inserting a hard disk into a device, showing steps from external to internal storage.Suoml
Suomi
text_image
iPod100VIR 3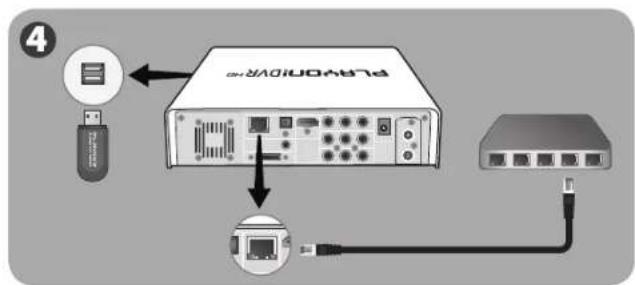
flowchart
graph TD
    A["USB"] --> B["Network packet"]
    B --> C["Router"]
    C --> D["Switch"]
    style A fill:#f9f,stroke:#333
    style B fill:#ccf,stroke:#333
    style C fill:#cfc,stroke:#333
    style D fill:#fcc,stroke:#333
natural_image
Product display of various electronic devices including a flash unit, controllers, and connectors (no visible text or labels)Français Françal
text_image
Diagram illustrating the process of inserting a hard disk into a device, showing steps from external to internal storage.Français Françal
text_image
PROVODIVAR 2
text_image
PLA0V0N0VR 3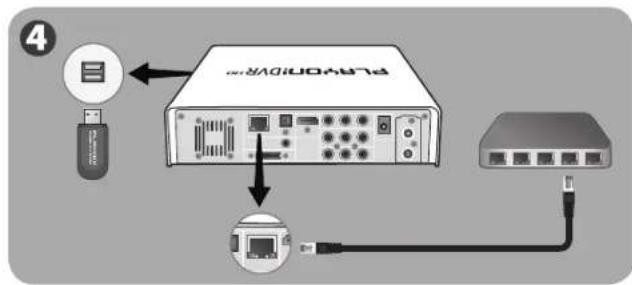
text_image
PLA010076 4natural_image
Product display of various electronic devices including a flash unit, controllers, and connectors (no visible text or labels)text_image
Diagram illustrating the process of inserting a hard disk into a device, showing steps from external to internal storage.text_image
Diagram showing two connected devices (PC-VRON10VR and PC-VRON10VR) with cable connections and power outlet, labeled in English.eSpañoleSpaño
flowchart
graph TD
    A["Network Interface"] --> B["Switch"]
    B --> C["USB Port"]
    C --> D["Internet"]
    D --> E["USB Port"]
    E --> F["USB Port"]
    F --> G["USB Port"]
    G --> H["USB Port"]
    H --> I["USB Port"]
    I --> J["USB Port"]
    J --> K["USB Port"]
    K --> L["USB Port"]
    L --> M["USB Port"]
    M --> N["USB Port"]
    N --> O["USB Port"]
    O --> P["USB Port"]
    P --> Q["USB Port"]
    Q --> R["USB Port"]
    R --> S["USB Port"]
    S --> T["USB Port"]
    T --> U["USB Port"]
    U --> V["USB Port"]
    V --> W["USB Port"]
    W --> X["USB Port"]
    X --> Y["USB Port"]
    Y --> Z["USB Port"]
natural_image
Product display of a PLASON DVR controller with various cable and power connectors (no text or symbols visible)ČeštlnaČeštlna
text_image
Diagram illustrating the process of inserting a hard disk into a device, showing steps from external to internal storage.ČeštlnaČeštlna
text_image
iPlayOnDevice 2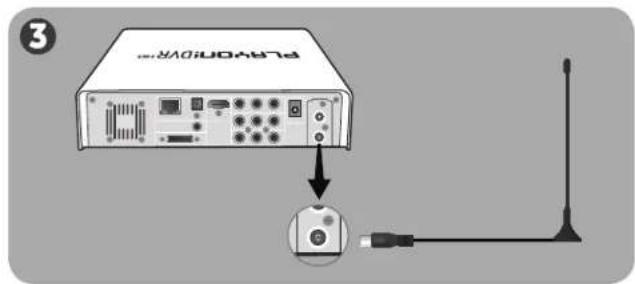
text_image
PlayPod10VR 3
text_image
PLA 4natural_image
Product display of a PLC power driver module with various cable and plug connectors (no visible text or labels)РУССКИЙРУСО
НАЧАЛО РАБОТЫ С МЕДИАПЛЕЕРОМ PLAYON!DVR HD
text_image
Diagram illustrating the process of inserting a hard disk into a device, showing steps from external to internal storage.
РУССКИЙРУСО
text_image
PlayIOV10VR 3
flowchart
graph TD
    A["USB"] --> B["Network Port"]
    B --> C["Server"]
    C --> D["USB"]
    style A fill:#f9f,stroke:#333
    style B fill:#ccf,stroke:#333
    style C fill:#cfc,stroke:#333
    style D fill:#fcc,stroke:#333
natural_image
Product display of a FL869 DUE controller with various cable and power connectors (no text or symbols visible)ΕΛΛΗΝΙΚΑΕΛΛΗ
text_image
Diagram illustrating the process of inserting a hard disk into a device, showing steps from external to internal storage.ΕΛΛΗΝΙΚΑΕΛΛΙ
text_image
iPlayOnDevice 2
text_image
PlayPod10VR 3
text_image
PLA 4natural_image
Product display of a PLASON DVR controller with various cable and power connectors (no text or symbols visible)text_image
Diagram illustrating the process of inserting a hard disk into a device, showing steps from external to internal storage.中文
中文
把硬件连接到电视机上:
text_image
PlayOnDevice
text_image
PlayPod10VR 3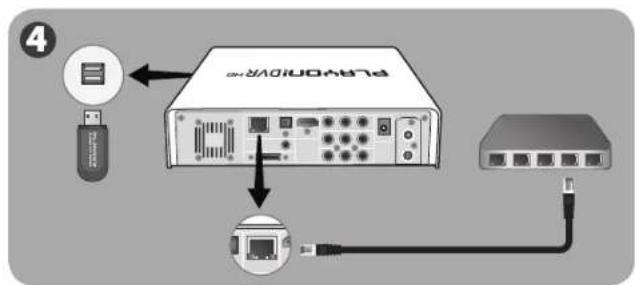
text_image
PLA 4natural_image
Product display of a PLC power driver module with various cable and plug connectors (no visible text or labels)תְבָרִי בְּרִי
Playon!DVR ^HD ob nisny nisnn
text_image
Diagram illustrating the process of inserting a hard disk into a device, showing steps from external to internal storage.תְבָרִי בְּרִי
natural_image
Product display of A.T. Rainer's PLR90TM DDR module with various cable and power connectors (no text or symbols visible)BaHaSa InDoneSlaBaHaSa
Mempersiapkan Playon!DVR ^HD Anda
Memasang hard disk internal Anda.
text_image
Diagram illustrating the process of inserting a hard disk into a device, showing steps from external to internal storage.BaHaSa InDoneSlaBaHaSa
Menghubungkan peranti keras ke TV Anda
You can have this done automatically or set it manually.
Playon! Engage your senses.