
RMP2.5 ALPHA - Media player Reloop - Free user manual and instructions
Find the device manual for free RMP2.5 ALPHA Reloop in PDF.
| Product Type | Professional cross-media player with CD player, USB ports and MIDI interface |
| Brand | Reloop |
| Model | RMP-2.5 Alpha |
| Dimensions (W × H × D) | 322 × 112.6 × 340.5 mm |
| Weight | 3.7 kg |
| Power Supply | AC 100-240 V, 50/60 Hz, 12 W |
| Supported Audio Formats | Audio CD, MP3 (MPEG1/2/2.5 Layer 3), WAV (PCM) |
| Playback Source | CD, USB flash drive, external hard drive (USB, FAT format) |
| Main Functions | Play, pause, cue, search, loop, sampler, scratch, pitch bend, key lock, BPM counter, touch jog wheel |
| Pitch Ranges | ±4 %, ±8 %, ±16 %, ±100 % |
| Connectivity | RCA audio outputs, 6.3 mm headphone output, USB MIDI port, USB multimedia port, Relay/Faderstart connector |
| MIDI | MIDI control on 4 channels, compatible with DJ software (e.g. Traktor Pro) |
| Shock Protection Memory | Approx. 10 seconds |
| Display | LCD screen with track info, BPM, time, mode, etc. |
| Max Number of Files/Folders | MP3 CD: 255 folders, 255 files; USB: 999 folders, 999 files |
| Maintenance and Cleaning | Clean with a dry, soft cloth. Avoid solvents and moisture. Check power cord regularly. |
| Safety | Class 1 laser. Do not open the casing. Keep away from liquids. Use indoors only. |
| Spare Parts and Repairability | Repair by qualified professional only. Use original packaging for transport. |
| General Information | Manual available in FR, DE, EN. Firmware updates at www.reloopdj.com. |
Frequently Asked Questions - RMP2.5 ALPHA Reloop
User questions about RMP2.5 ALPHA Reloop
0 question about this device. Answer the ones you know or ask your own.
Ask a new question about this device
Download the instructions for your Media player in PDF format for free! Find your manual RMP2.5 ALPHA - Reloop and take your electronic device back in hand. On this page are published all the documents necessary for the use of your device. RMP2.5 ALPHA by Reloop.
USER MANUAL RMP2.5 ALPHA Reloop
Professional Tabletop Cross Media Player with CD Drive and MIDI Function
For your own safety, please read this operation manual carefully before initial operation! All persons involved in the Installation, setting-up, operation, maintenance and service of this device must be appropriately qualified and observe this operation manual in detail. This product complies with the requirements of the applicable European and national regulations. Conformity has been proven. The respective statements and documents are deposited at the manufacturer.
Mode d'emploi
ATTENTION!
To prevent fire or avoid an electric shock do not expose the device to water or flu Never open the housing!
ATTENTION!
Keep Information for further reference!
| CC-ABSOLUTE (VR) Control Change messages are sent with status OxBn, where n is the channel, for the specified CC controller. Thus the controller MIDI ID is indicated with the channel along with the CC number. The value from Ox00 to Ox7F, directly related to the location of the controller. | ||||
| CC-RELATIVE (ENC) Control Change messages are status OxBn, where n is the channel, for the specified CC controller. Thus the controller MIDI ID is indicated with the channel along with the CC number. The value from Ox40 to indicate the change in the controller. This is an offset to Ox40 "one's complement" notation. A message with data Ox43 indicates a positive change of 3. A messages with data Ox31 indicates a negative change of 15. | ||||
| SWITCH ON/OFF (SW,CENTER,CW,CCW) These messages are used for switches. Control Change messages are sent with status Ox9n, SWITCH On and Off value are Ox7F and Ox00, where n is the channel. | ||||
| LED ON/OFF (LED) These messages are used for LED. Control Change messages are sent with status Ox9n, LED On and Off value are Ox7F and Ox00, where n is the channel. | ||||
| PITCHBEND Pitchbend messages are status OxEn, where n is the channel, for the specified controller. Thus the controller ID is indicated only by the channel. For accurate changes, the 14 bit data in a pitch bend message is reserved for absolute controllers which require more than 7 bits of data. | ||||
| MIDI MAP(HEX) | ||||
| SW name Type MIDI MIDI MID12(Hold shift) Remarks | ||||
| TRACK | SW/ENC 01/32 40/71 CC TYPE = RELATIVE | |||
| TRACK | VR/CENTER 32/ID 71/5 CC TYPE = ABSOLUTE | |||
| TRACK | CW/CCW 32/33 71/72 CC TYPE = NOTE | |||
| JOG SW/ENC 16/35 55/74(VR) CC TYPE = RELATIVE | ||||
| JOG CW/CCW 35/36 - CC TYPE = NOTE | ||||
| JOG CW SW 3B | -- | SCRATCH LED = ON & No Touch Inner Wheel | ||
| JOG CCW | SW | 3C | -- | SCRATCH LED = ON & No Touch Inner Wheel |
| Pitch Slider | (PITCHBEND or VR)/CENTER | PITCHBEND/17 | 31(VR)/56 | |
| << SEARCH >> | VR | 1E | 5D | |
| BANK P. | SW 09 | 48 | ||
| SGL/CTN | SW 02 | 41 | ||
| Time | SW 03 | 42 | ||
| FOLDER >> | SW 04 | 43 | ||
| FOLDER << | SW 05 | 44 | ||
| SHIFT SW 18 | ||||
| EJECT | SW 10 4F | |||
| RELOOP SW 0B | 4A | |||
| - | SW 15 54 | |||
| + | SW 14 53 | |||
| % | SW 11 | 50 | ||
| CUE SW/LED | 07/07 | 46/07 | ||
| II | SW/LED | 06/06 | 45/06 | |
| SCRATCH | SW/LED | 1C/1C | 5B/1C | |
| LOOP IN SW/LED | OC/OC | 4B/OC | ||
| LOOP OUT | SW/LED | 0D/0D | 4C/0D | |
| 1 | SW/LED | 1B/1B | 5A/1B | |
| 2 | SW/LED | 19/19 | 58/19 | |
| 3 | SW/LED | 1A/1A | 59/1A | |
| 4 | SW/LED | 0F/0F | 4E/0F | |
| SAVE TO | SW/LED | 0E/0E | 4D/0E | |
| SAMPLE | SW/LED | 0A/0A | 49/0A | |
| O | SW/LED | 13/13 | 52/13 | |
| PITCH | SW/LED | 12/12 | 51/12 | |
| 1(2) | LED | 1D | Traktor Note F1 | |
| 2(2) LED | 1E | ... | ||
| 3(2) | LED | 1F | ||
| 4(2) LED | 20 | |||
| 100 | LED | 21 | ||
| 16 | LED | 22 | ||
| 8 | LED | 23 | ||
| 4 | LED | 24 | ||
| PITCH O | LED | 25 | ||
8. Display Brightness
- Track (Track Encoder)
Möglich sind:
Relative
Absolute
Note
Jog (Jog Wheel)
Möglich sind:
Relative
Note
E. MIDI Channel
Reloop - Solutions for DJs
Global Distribution GmbH
Schuckertstraße 28
48153 Muenster, Germany
Fax +49.251.6099368
www.reloopdj.de
OPERATION MANUAL
CAUTION!

For your own safety, please read this operation manual carefully before initial operation! All persons involved in the installation, setting-up, operation, maintenance and service of this device have to be appropriately qualified and follow this operation manual in detail. This product complies with the requirements of the applicable European and national regulations. Conformity has been proven. The respective statements and documents are deposited at the manufacturer.
Congratulations on purchasing your Reloop RMP-2.5 cross media player. Thank you for placing your trust in our disc jockey technology. Before operating this equipment we ask you to carefully study and follow all instructions.
Please remove the RMP-2.5 Alpha from its packaging. Before initial operation make sure that the device did not suffer any visible damage during transport. If you detect any damage to the power cable or the casing, do not operate the device. Contact your specialised dealer.
SAFETY INSTRUCTIONS
CAUTION!

Please exercise particular caution when handling 100-240 V, 50/60 Hz power voltage. This voltage rating may lead to a critical electric shock! Any damage caused by the non-observance of this operation manual excludes any implied warranty claims. The manufacturer is not liable for any damage to property or for personal injury caused by improper handling or nonobservance of the safety instructions.
- This device left the works in perfect condition. To maintain this condition and to ensure a risk-free operation the user has to follow the safety instructions and warnings contained in this operation manual.
- For reasons of safety and certification (CE) the unauthorised conversion and/or modification of the device is prohibited. Please note that in the event of damage, caused by manual modification to this device, any implied warranty claims are excluded.
- The inside of the device does not contain any parts which require maintenance, with the exception of wear parts that can be exchanged from the outside. Qualified staff has to carry out maintenance, otherwise the implied warranty does not apply!
- Ensure that power is only supplied after the device has been fully set up. Always plug in the mains plug last. Ensure that the mains switch is in the "OFF" position when connecting the device to power.
- Only use cables that comply with regulations. Observe that all jacks and bushes are tightened and correctly hooked up. Refer to your dealer if you have any questions.
- When setting up the product make sure that the mains cable is not squashed or damaged by sharp edges.
- Prevent the mains cable from coming into contact with other cables! Exercise great care when handling mains cables and connections. Never touch these parts with wet hands!
- Connect the power cable exclusively to appropriate shock-proof outlets. The only supply point to be used is a supply outlet in accordance with specifications of the public supply network.
- Disconnect the device from the supply outlet when not in use and before cleaning! Be sure to hold the mains plug by the body. Never pull the mains cord!
- Position the device on a horizontal and stable low-flame base.
- Avoid any concussions or violent impacts when installing or operating the device.
- When selecting the location of installation, make sure that the device is not exposed to excessive heat, humidity, and dust. Be sure that no cables lie around openly. You will endanger your own safety and that of others!
- Do not place any containers filled with liquid that could easily spill on the device or in its immediate vicinity. If, however, fluids should access the inside of the device, immediately disconnect the mains plug. Have the device checked by a qualified service technician before re-use. Damage caused by fluids inside the device is excluded from the implied warranty.
- Do not operate the device under extremely hot (in excess of 35^ C) or extremely cold (below 5^ C) conditions. Keep the device away from direct exposure to the sun and heat sources such as radiators, ovens, etc. (even during transport in a closed vehicle).
-
The device must not be operated after being taken from a cold environment into a warm environment. The condensation caused hereby may destroy your device. Do not switch on or operate the device until it has reached ambient temperature!
-
Controls and switches should never be treated with spray-on cleaning agents and lubricants. This device should only be cleaned with a damp cloth. Never use solvents or cleaning fluids with a petroleum base for cleaning.
- When relocating, the device should be transported in its original packaging.
- When starting operation the crossfaders and volume controls of your amplifier have to be set to minimum level. Bring the loudspeaker switches into the „OFF“ position. Wait between 8 to 10 seconds before increasing the volume to avoid damage to loudspeakers and the diplexer.
- Always ensure that you place scratch-free, clean CDs into the player. When inserting the CD into the tray, your hands should also be clean.
- To keep the laser head clean, please often clean the discs.
Devices supplied by voltage should not be left in the hands of children. Please exercise particular care when in the presence of children. - At commercial facilities the regulations for the prevention of accidents as stipulated by the association of professional associations have to be followed.
- At schools, training facilities, hobby and self-help workshops the operation of the device has to be monitored with responsibility by trained staff.
- Keep this operation manual in a safe place for later reference in the event of questions or problems.
ATTENTION:
In the unlikely event of a return, please only use the original packaging to properly protect the equipment against any damage caused during transport. Damage caused during transport as a result of improper packaging could entail warranty expiration. The manufacturer does not accept liability for damage caused during transport as a result of improper packaging of a returned shipment to the seller. Such costs is for the account of the sender!
APPLICATION IN ACCORDANCE WITH REGULATIONS
- This device is a professional cross media player with CD drive and USB connections which can be used to play regular CDs and CDs in MP3 format, audio files in MP3 and WAV format from USB sticks and external drives. To do so the device has to be connected to a mixing console or amplifier.
- This product is authorised for connection to 100-240 V, 50/60 Hz and is designed exclusively for indoor application.
- If the device is used for any other purposes than those described in the operation manual, damage can be caused to the product, leading to the exclusion of implied warranty rights. Moreover, any other application that does not comply with the specified purpose harbours risks such as short circuit, fire, electric shock, etc.
- The serial number determined by the manufacturer must never be removed to uphold the implied warranty rights.
MAINTENANCE
- Check the technical safety of the device regularly for damage to the mains line or the casing, as well as for wear of wear parts such as rotary and sliding switches.
- If it is to be assumed that a safe operation is no longer feasible, the device has to be disconnected and secured against accidental use. Always disconnect the mains plug from the outlet!
- It must be assumed that a safe operation is no longer feasible if the device bears visible defects, if the device no longer functions, following longer storage under unfavourable conditions or after major transport stress.

CAUTION LASER RADIATION!
This device is equipped with two Class 1 laser diodes. To ensure a safe operation do not remove any covers or try to access the inside of the equipment. The inside of the device does not contain any parts which are subject to maintenance. Maintenance has to be carried out by qualified staff only.

INSTALLLION NOTES
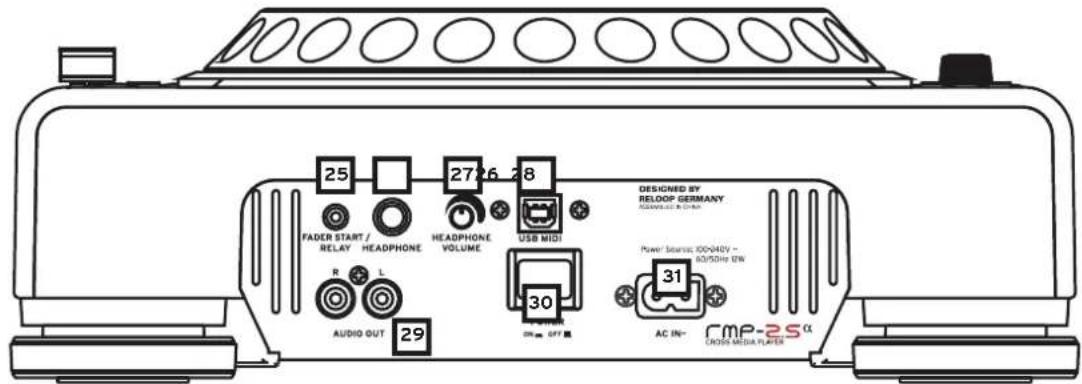
A) Connect the Outputs -29- to the inputs of your mixing console or amplifier. Optionally, connect the USB Port -28- to your computer, if you wish to operate a DJ software via MIDI.
B) Connect the mains cable to the mains connection -31- and your our outlet.
C) The Relay Play Connection -25- can be used for Relay Play as well as for Fader Start. >>For more details go to item -25-.
D) If desired, you can connect your headphones to the 6.3 mm Stereo Jack -26-. Use the Dial -27- to adjust the volume.
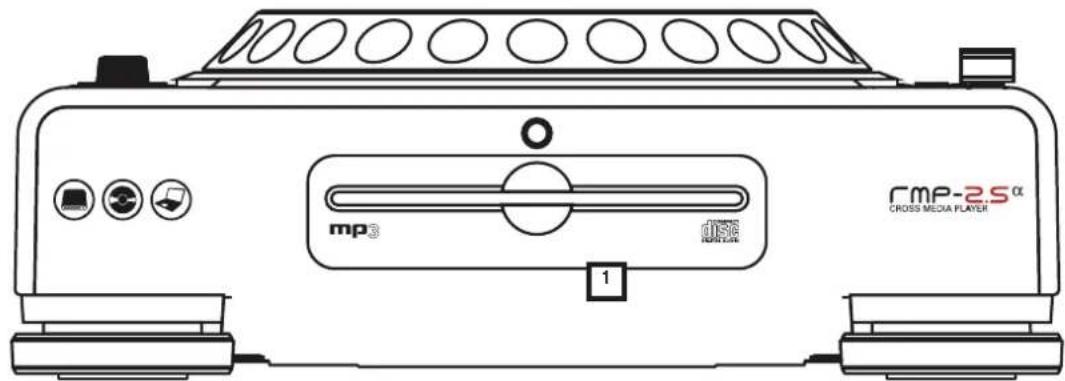
E) After all connections have been carried out, switch the device on by using the ON/OFF Button -30-. If no CD is in the drive, the Status LED above the drive -1- is continually illuminated.
F) Carefully insert a CD with the label facing upward into the slot -1-. The CD will be pulled in automatically. When playing a CD with a diameter of less than 12cm , make sure to use a conventional adapter. Press the Eject Button -19- while in pause/cue mode to eject the CD.
OPERATION
1. CD Drive
For information regarding the drive, please refer to the installation notes listed above. (>> see item F)
2. Play/Pause Button
Press the Play/Pause Button -2- to start playback. Press again to activate pause mode.

NOTE:
Your CD player goes into auto-cue mode after being switched on (>> also see item 8 or item 11/O). In this DJ friendly mode, a cue point is automatically set on the first signal of a music track.
3. Cue Button
A cue point is a self-defined starting point, usually at the beginning of a beat. When activating the Cue Button -3- the CD player interrupts playback and returns to the last set cue point. To set a cue point, follow either of the following two options:
I.) Search the desired cue point using the Jog Wheel -18- or the Search Wheel -5- while in pause mode. You will access frame search mode (fragmented repeats =1/75 minute) and you will be able to set your cue points in the most precise way. Then press the Play/Pause Button -2- to save the cue point. The player returns to play mode.
II.) While in play mode, press the Loop-In Button -12- at the desired point to save a cue point. The player remains in play mode. With a little practice, this is a faster way to set the desired cue point. Press the Cue Button -3- and the player returns to the cue point and goes into pause mode. By pressing and holding the Cue Button -3- you will return to play mode until you release the button again. The player will then return to the cue point and go into pause mode. Press the Play/Pause Button -2- to permanently return to play mode.

NOTE:
When pressing the Cue Button -3- while in play mode, when no cue point is set, the player returns to the beginning of the track and goes into pause mode (auto-cue). The player saves the cue point which can be prompted with the Cue Button -3- for a single track only. When changing to another track, the previous cue point will no longer be saved.
4. Track Encoder
Use the Track Encoder -4- to select tracks. Press and turn the Track Encoder-4- at the same time to move in steps of ten through the track selection.
5. Search Wheel
Turn the Search Wheel -5- to fast forward (clockwise) and rewind (counterclockwise) a track. The wheel features four different search speeds. The more the wheel is turned in either direction, the faster you will fast forward/rewind. When in pause mode, you can frame-search for track sections. The current frame (=1/75 minute) is constantly repeated.
6. Folder Search Buttons
If an MP3-CD is divided into folders, directly switch between folders by using the Folder Search Buttons -6-.
7. Time Button
Use the Time Button -7- to change between three time modes:
1) Elapsed time of a track (no separate indication on display)
II) Remaining time of a track (display shows „Remain“)
III) Remaining time of entire CD (display shows „Total Remain“)
NOTE:
Press the Time Button -7- and the Track Encoder -4- simultaneously to access the preset menu. Turn the Track Encoder -4- to select a desired menu item. Press to access the respective submenu. To exit the preset menu, press the Time Button -7- again.
The following menu items can be selected:
- Version: Firmware information (Controller, Servo, DSP)
- Playlist: Normal, Title, Artist, Album, Genre (for USB only)
- Sleep Time: Stand-by time adjustment from O - 120 minutes (O min. = inactive)
- Stop Time: Adjustment from 0.5 - 12 seconds that determines the time interval before the title runs through the display again.
- Run Time: Adjustment of title-display running time from 50 - 2000 milliseconds.
- Jog Sensitivity: Adjust the Jog Wheel's sensitivity from -20 + 20
- Pitch Bend Range: Pitch bend range adjustment from 1% - 100% .
- Display Brightness: Display brightness adjustment from 1 - 10.
- Repeat Mode: Repeat mode ON/OFF
A. Information Setup: Mode 1 / Mode 2
B. Bit Rate: Bit rate display ON/OFF (for USB mode)
C. MIDI Setup: JogOut, Edit, Device Name and I/O
D. MIDI CC Type: Jog, Track
E. MIDI CH: Adjustment for MIDI channel A-D = 1-4 etc.
F. MIDI Note Edit: MIDI note adjustment
G. MIDI LED Edit: MIDI feedback LED adjustment
H. Load Default: Enter Load = returns to default; Return = leaves the menu without returning to default
1. Exit & Save: Enter Save = saves set adjustments; Return = leaves the menu without saving set adjustments
8. Single/Continue Button
Use the Single/Continue Button -8- to select between two different play modes:
1) Single
The current title is played; then the player goes into pause mode.
II) Continue
The entire CD is played; then the player goes into pause mode.
NOTE:
Deactivate auto-cue mode by pressing and holding the Single/Continue Button -8- for two seconds. Press the same button slightly longer to reactivate it.
For more information regarding auto-cue mode go to item 2.
9. Bank Program Button
Use the Bank Program function -9- to play a sequence of loops saved on the sample banks -15-. If loops have been saved on the sample banks, activate the bank program function with the Bank Program Button -9-.


For details on how to save loops, see chapter „Sampling".
The display shows „BANKP.=1". By pressing the Cue/Sample Buttons 1 to 4 -15- in any sequence, an individualised sequence of up to 12 samples can be programmed.
NOTE:
There are two different play modes: Endless Mode and One Shot Mode. Endless Mode is activated by pressing the Sampler Button - 17 - once; the sampler LED is continually illuminated. In Endless Mode the programmed sequence is played endlessly. One Shot Mode is activated by pressing the Sampler Button - 17 - again. The sampler LED fl ashes. In One Shot Mode the programmed sequence is played only once. To play the just programmed sequence, press the Sampler Button -17- (once for Endless Mode / twice for One Shot Mode) and press the Bank Program Button -9- to start playback. To stop playback, press the Sampler Button -17- again until the LED goes out.
10. Scratch Effect
Select the scratch effect by pressing the Scratch Button -10-. In playback mode you can now scratch and stop the track via the inner part of the Jog Wheel -18-, similar to a vinyl record. The Jog Wheel -18- recognizes the touch of your fingers. Press the Scratch Button -10- again to deactivate scratch effect.

NOTE:
If you press the Scratch Button -10- longer than 2 seconds the Scratch-to-Cue function will be activated. If only the Jog Wheel -18- is being touched, the player returns to the cue point without going into pause or playback mode. This way it is possible to scratch a track from the desired cue point. If you press the Scratch Button -10- again, the scratch function will be deactivated. Individually adjust your preferred jog wheel sensitivity. To do so proceed as described under item 7, sub item 6.

NOTE:
If the Bank Program Button -9- is being pressed permanently, it is possible to manually tap the BPM value with the Scratch Effect Button -10-.
11. Display
The Display -11- indicates all the player's important functions:
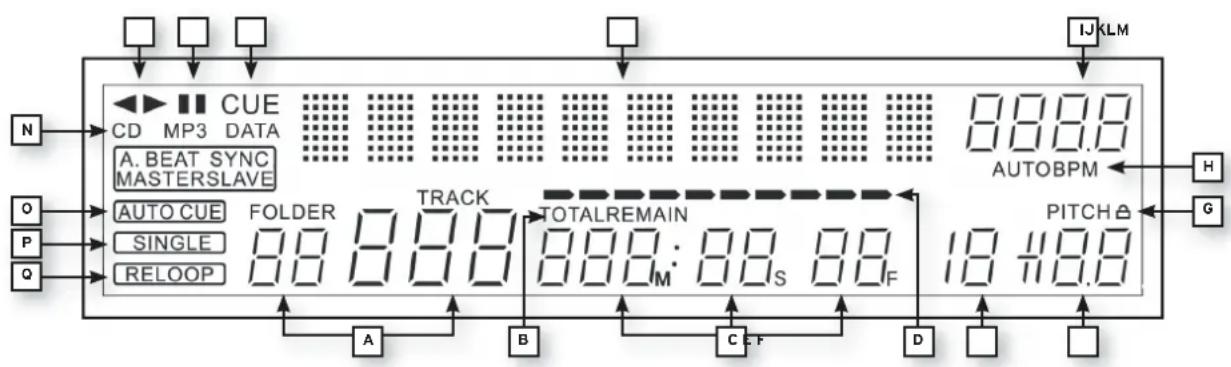
A) Track/Folder
Indicates the number of the current track or folder (folder of an MP3-CD).
B) Time Mode
Indicates if the player shows the elapsed time of a track (no indication on the display), the remaining time of a track (display shows „Remain“) or the remaining time of the entire CD (display shows „Total Remain“). Use the Time Button -7- to switch between these three modes.
C) Time
Indicates the time of the selected time mode in minutes, seconds and frames (1/75 min.).
D) Playing Address
Visualizes time display and increases or decreases, depending on the selected time mode. Shortly before a track ends, the entire bar fl ashes.
E) Anti-Shock Memory Display
Indicates how much music is saved in the anti-shock memory and if instant start function is available, 19'' is the maximum memory value and represents 10 seconds of the anti-shock memory.
F) Pitch Display
Indicates the set pitch value of a track in percent.
G) Key Lock
Indicates whether Key Lock has been activated (padlock symbol appears). If Key Lock is activated, the track's tone pitch remains the same while changing the tempo.
H) BPM Status
Indicates whether the Auto BPM Counter (display shows „Auto BPM") is activated.
1) BPM Display
Indicates the current BPM value of the track.
J) Dot Matrix Information Display
During playback of an MP3 CD featuring ID3 Tags, it shows the folder, artist and title. In order to switch between folder and artist/title of an MP3 CD, press the Track Encoder -4-. In the preset menu the required adjustments are made via the Dot Matix Information Display.
K) CUE
Indicates whether the player is in cue mode (display shows „Cue").
L) Pause
Indicates whether the player is in pause mode (display shows 山 山 ).
M) Running Direction
Indicates whether the player is in forward or reverse mode.
N) CD/MP3 Mode
Indicates whether an audio CD (display shows „CD“) or an MP3-CD (display shows „MP3“) is being played.
O) Auto-Cue Status
Indicates whether auto-cue is activated (display shows „Auto Cue"). To de-/activate auto-cue press and hold the Single/Continue Button -8- for two seconds.
P)Playback Mode
Indicates whether the player is in single mode (display shows „Single“) or in continue mode (display shows nothing).
Q) Reloop
Indicates whether the player has stored a loop which can be called up via the Reloop Button -14-(display shows „Reloop"). When „Reloop" flashes, the loop is active.
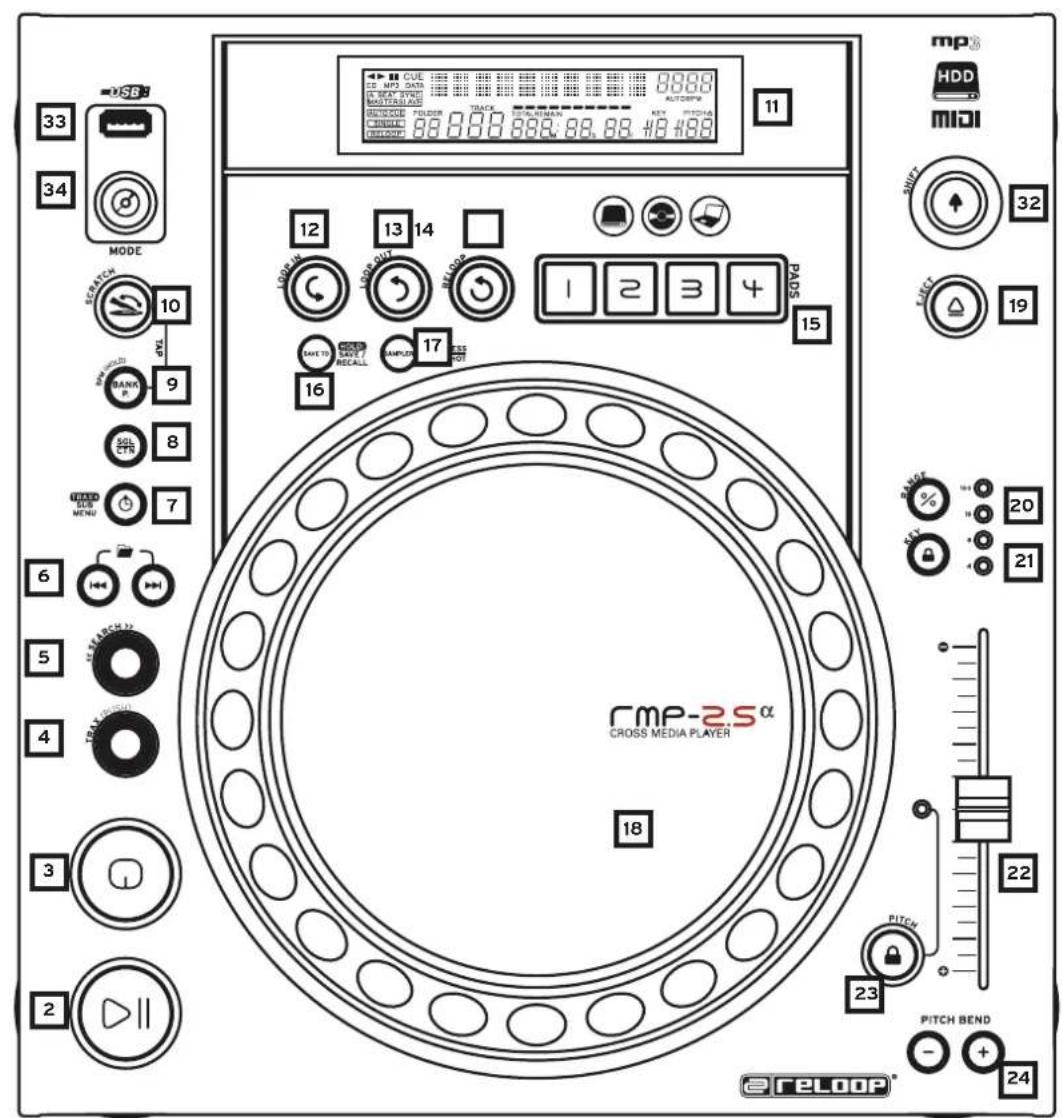
- Loop-In Button
By pressing the Loop-In Button -12- the starting point of a loop (endless loop) is set as well as a current cue point.
- Loop-Out Button
By pressing the Loop-Out Button -13- the ending point of a loop (endless loop) is set. If the Loop-In Button -12- has been previously used, the player goes into loop mode (seamless loop) - "Reloop" flashes on the display -11Q-. In order to leave the loop press the Loop-Out Button -13- once again. >>For more information about looping please see the chapter „Sampling".
Press the Reloop Button -14- for the player to return to the last played loop. To exit the loop, press the Loop-Out Button -13- again.
For more information about looping please see the chapter „Sampling".
15.CUE/Sample Banks 1-4
When in play mode, the Cue/Sample Banks 1 to 4 -15- can be used as hot cue buttons. Once sampler mode has been activated by using the Sampler Button -17- the player will play samples from the banks simultaneously to playback. For every bank, a 5-second sample can be saved and played back. Press one of the respective Bank Buttons 1 to 4 to trigger the previously stored cue points or samples.
For more information about looping please see the chapter „Sampling".
16. Memory Button
Use the Memory Button -16- to assign and store loops on the four sample banks. After creating a loop with the help of the Loop-In and Loop-Out Buttons -12, 13-, press the Memory Button -16-. The Memory LED goes on. Then select one of the four sample banks to store the loop on the very same. The respective sample bank goes on. The Memory LED goes out. Repeat this process to replace the respective sample or to record a new one. Via the memory function it is also possible to permanently save cue points and samples for up to 500 CDs. For further information please see the chapter "Sampling".
17. Sampler Button
To activate sample mode, press the Sampler Button -17.
NOTE:
There are two different sample play modes: Endless Mode and One-Shot Mode. Endless Mode is activated by pressing the Sampler Button - 17 - once; the sampler LED is continuously illuminated. In Endless Mode the sample is played endlessly in a loop. One-Shot Mode is activated by pressing the Sampler Button -17- a second time. The sampler LED flashes. In One-Shot Mode the sample is triggered only once. If sample mode has been activated, the loops previously stored on sample banks 1 - 4 -15- can be played simultaneously during CD playback.
18. Jog Wheel
The CD player features an extra large Jog Wheel -18- for authentic vinyl-like feeling while spinning. For scratch applications the Jog Wheel -18- has been divided into two sections. The middle section is touch-sensitive and responds similarly to a record on a turntable. The outer rubberized section is used for the pitch bend function - similar to the edge of a turntable. If the Scratch function -10- is deactivated, the whole Jog Wheel -18- can be used as search and pitch bend wheel. If you are in cue and pause mode you can search for a cue point via precise frame search (1/75 min.) by turning the Jog Wheel -18- clockwise or counterclockwise. In play mode the Jog Wheel -18- is used for the pitch bend function, similar to a turntable. This results in a quick increasing (Push Start) or decreasing (Stop) of the pitch value. The faster the Jog Wheel -18- is turned, the faster the pitch bend function will be. The same can be done via the Pitch Bend Buttons -24-.
19. Eject Button
To insert a CD, carefully slide the CD with the label facing upward into the slot -1-. The CD will be pulled in automatically. The Status LED above the drive flashes while loading the CD. As soon as the CD has been read and recognized, the Status LED goes out. When playing CDs with a diameter of less than 12cm , use a standard adapter. Press the Eject Button -19- to eject the CD.
20. Pitch Range Button
Press the Pitch Range Button -20- to select a pitch range of +/- 4% , +/- 8% , +/- 16% or +/- 100% .
21. Key Lock Button
When activating the Key Lock function via this button -21- the track's original tone pitch, regardless of the set pitch, will be maintained. Press the button a second time to deactivate the Key Lock function.
22.Pitch Fader
Use the Pitch Fader -22- to infinitely change the pitch of the track within the selected range. The difference from the original pitch is shown on the display -11F- in percent. In the pitch ranges +/- 4% and +/-8% a variation of 0.05% steps is carried out, in the pitch range +/-16% a variation of 0.02% steps is carried out and in the pitch range +/-100% steps of 0,1% will be carried out.
23. Pitch On/Off Button
De-/activate the Pitch Fader -22- by using the Pitch On/Off Button -23-.
24. Pitch Bend Buttons
Press and hold the Pitch Bend Buttons -24- to briefly change the pitch of the respective track by +4/8/16% (+ button), or by -4/8/16% (- button). Release the button for the player to return to the pitch previously set with the pitch fader.
Note!
The pitch bend range of +/-100% is only available for Audio CDs.
25. Relay/Fader Start Connecting Socket
If you connect your player to another Reloop CD player (which also disposes of a Relay/Fader Start Connector) via the Connecting Socket -25- by using the included 3.5 mm jack cable, relay play function will be available. To do so select single playback mode for both players via the Single/ Continue Buttons -8-. "Single" appears on both displays -11P-. Now activate playback mode on one of the players by using the Play/Pause Button -2-. The first track will be played. The player then switches to pause mode. Thereupon the first track of the other player will be played. The player then switches to pause mode. Thereupon the second track of the first player will be played, etc.
NOTE:
Moreover, your player supports the fader start function. To do so connect the included 3.5 mm jack cable to the Relay/Fader Start Connecting Socket -25- of a compatible mixer, for example the Reloop RMX-40 DSP. This way you can start and stop the playback of the CD player by simply moving one of the mixer's faders.
26. 6.3 mm Headphones Jack
For monitoring you can connect your headphones with 6.3mm jack to this output.
27. Volume Dial for Headphones
With this Dial -27- you can adjust your headphones' volume.
28. USB MIDI Port / USB Audio Link / MIDI Port Mode
You can connect the included USB cable to the USB MIDI Port and a computer. This port can also be used for MIDI data transfer. For example you can control DJ software such as Traktor. In operating systems the player will be recognized automatically without special drivers as „RMP-2.5" (compatible with Windows XP/Vista, Mac OS X).
29. RCA Output
Connect this Output -29- to the line-in connecting sockets of your mixer or amplifier.
30. On/Off Button
Via this button you can turn the device on and off respectively.
31. Mains Connecting Socket
Connect the mains cord to this Socket -31- and a shock proof outlet.
32. Shift Button
Press the Shift Button -32- repeatedly to the beat of the music to manually determine the speed of the track. The display currently reads the value in BPM (= beats per minute). Press the BPM Button to reactivate the automatic beat counter.
MIDI Shift Function:
In MIDI mode a second MIDI command can be carried out via the Shift Button -32-. Further details can be found in the paragraph "MIDI Mode".
33. USB Media Port
Here you can connect external USB storage devices such as USB sticks or external USB hard disks. MP3, PCM and WAVE are supported. The maximum file size is 466 minutes per track. 32, 44.1 and 48kHz encoding are supported. The storage device has to be formatted as FAT system. A maximum of 999 folders with 999 tracks each can be read.
34. Source Select Button
Via the Source Select Button -34- you can switch between the three media modes. After turning on the device your RMP-2.5 Alpha is automatically in USB mode. Press the Source Select Button -34- in pause mode to switch to CD mode. Hold the Source Select Button -34- for approximately 2 seconds to access MIDI mode. USB Mode = Source Select Button shines red
SAMPLING
This chapter details the possibilities and settings of the mighty on-board sampler of your device. A loop is the permanent repetition of a sequence between a selected loop starting point and ending point. Select a loop starting point by pressing the Loop-In Button -12-. Select the loop ending point by pressing the Loop-Out Button -13-. The player automatically goes into loop mode and the reloop display flashes -11Q-. The selected sequence will be repeated seamlessly until the Loop-Out Button - 13- is pressed a second time. The player seamlessly goes into play mode. In order to call up the last played loop again, press the Reloop Button -14-. The player automatically goes into loop mode.

NOTES:
- The player only saves this loop for the current track. When changing to a different track, no loop will be stored.
- The currently saved loop starting point (set with the Loop-In Button -12-) is also the current cue point. When saving a new cue point, after saving a loop and exiting loop mode, the current starting point will be overwritten. The reloop display goes out and no loop is stored.
Four sample banks are available, with 5 seconds each. To record a sample, set a loop as described above, using the Loop-In and Loop-Out Buttons -12, 13-. Then press the Memory Button -16- and then one of the four Sample Bank Buttons -15-. The set loop is now saved on the selected sample bank and the Memory Button -16- goes out. To play a sample, first press the Sampler Button -17-. Then press the desired Memory Button. The sampler plays the sample from the selected bank in an endless loop (Endless Mode). Press the Sampler Button -17- once again to play the sample only once (One Shot Mode). To stop playback of the sample, press the Sampler Button -17- again. The light goes out.

NOTES:
In sampler mode, playing a sample is activated independently from CD playback. In playback mode, both the current track and the sample are audible. In cue and pause mode only the sample is audible. The player saves these samples until they are overwritten by new ones or the device is turned off. When changing a track or CD the samples will remain stored. The button of an assigned sample bank -15- is lit red when the corresponding CD (=sample source CD) is inserted. If another (=non-sample) CD is inserted, the corresponding button is lit blue. Moreover, the button of the last assigned sample bank flashes in the respective colour. A sample bank will be overwritten when a new sample is recorded on it. The four sample banks also serve as hot cue memory. If you press one of the Sample Bank Buttons -15- without having previously activated the Memory or Sampler Button -17-, the player will return to the beginning of the respective sample in play mode as well as in pause mode. This function is only available for CDs (sample source) or for red blinking sample banks.

NOTES:
- If you wish to save the set cue points/samples permanently, press the Memory Button -16- for two seconds. The display shows „Saving". This means that the cue points/samples of the CD (sample source) will be maintained even after switching off the device. It is possible to permanently store four cue points/samples each for up to 500 CDs. To call up saved cue points/samples of a CD again, press the Memory Button -16- BEFORE inserting the CD. The display shows „Recall". Now insert the CD and the previously stored cue points/samples will be loaded automatically. The respective storage banks flash red and are then ready for play.
- To completely delete the cue point/sample bank memory, first switch off the device with the ON/OFF Button -30-. Then turn the Search Wheel -5- counterclockwise until the point of resistance and hold it in this position. Switch on the device via the ON/OFF Button. Release the Search Wheel again after the display shows „Clear all".
MIDI MODE
By pressing and holding the Bank Program Button -9- you will switch to MIDI mode. The Source Select Button -34- shines purple and the display shows "DeckA CHO1". DeckA CHO1 means that all elements send on MIDI channel 1. By pressing the Bank Program Button -9- you can switch from channel 1 (Deck A) up to channel 4 (Deck D). This way an easy handling of up to 4 virtual decks becomes possible. For further information please see the chapter "Submenu" and the TRAKTOR PRO mapping.

NOTE!
Regularly check our website www.reloopdj.de for possible firmware updates or new mappings.
Each of the player's elements sends MIDI data. Please also consider the MIDI map in this manual.
a) Bank Program Button
By pressing the Bank Program Button -9- you can switch comfortably between 4 MIDI channels. The display shows the current channel and, if applicable, the current deck. If, for example, you wish to control four virtual decks with the RMP-2.5 Alpha, you can switch between the virtual decks by pressing the Bank Program Button -9-. The channel presets can be adjusted in the submenu (see chapter "Submenu").
b) Shift Button
When pressing and hoding the Shift Button -32- a second function of an element can be called up. This way the number of control elements doubles. Please also consider the respective MIDl map in this manual.
c) Jog Wheel
The large, touch-sensitive Jog Wheel -18- can send MIDI data in two different modes:
Normal Mode
Sends data when turning/touching the Jog Wheel -18-
- Shift Mode
When simultaneously holding the Shift Button -32- the Jog Wheel -18- also sends other data.
TRAKTOR PRO MAPPING
In TRAKTO PRO a MIDI mapping for the Reloop RMP-2.5 can be imported and loaded. Current mappings as well as firmware updates can be found in our forum:
http://www.reloopdj.com/forum
The functions are assigned as follows:
| RMP-2.5A CONTROLS (TRAKTOR PRO) | ||
| Element Function (Traktor) Description | ||
| 2 | Play/Pause | Starting and pausing a loaded track in the selected deck. |
| 3 | Set Cue + Play Cue | • If no cue point is set, a new one will be set. • If a cue point is set the track will be started from this position when pressing the button. |
| 4 | Lists/Tree View Browsing/, Open Browser Mode | • Navigation through List View (> Normal Mode) • Shift + turning the Track Encoder: Tree View navigation (> Normal Mode) • Pressing the Track Encoder: Opens > Browse Mode |
| 5 | Search | Fast searching through a track (speed depends on how far the dial is being turn |
| 6 | Tree Navigation/Open Folder/Close | • Tree View navigation (> Normal Mode) • Open/close folder. |
| 7,8 | Loop Length | Loop length adjustment |
| 9 | Deck Switch | Switches the deck; the selected deck is shown on the RMP-2.5's display (11). |
| 10 | Scratch | Activates Scratch Mode. |
| 11 | Deck Indicator | The selected deck is shown on the RMP-2.5's display (11). |
| 12 | Loop IN | Sets the loop starting point for the selected deck. |
| 13 | Loop OUT | Sets the loop ending point for the selected deck; the determined section will be repeated in a loop. |
| 14 | Beat Loop | Automatically sets a loop, depending on the preset length. |
| 15 | Hot Cues/Effect Buttons | • Calls up stored Hot Cues (1-4) (> Normal Mode) • Shift + Hot Cues: Calls up stored Hot Cues (5-8) (> Normal Mode) • Activates effect buttons of the effect unit assigned to the selected deck.[A-e1, B-e2, C-e3, D-e4] (> Effect Mode) |
| 16 | Save Cue | Saves a Cue Point in the music database. |
| 17 | Cue/Play Mode | By pressing the Cue/Play Button you will return to playback mode (>Normal Mode); effects (> Effect Mode) and Scratch Mode will be deactivated. |
| 18 | Jog Wheel: Pitch Bend/Scratch/Effect Modulation/Browsing | • Pitch Bend (> Normal Mode) • Scratch Mode (if the Scratch Button has been pressed) • Effect modulation in > Effect Mode • Browsing in > Browser Mode |
| 19 | Load Track | Loads the track selected in list view. |
| 21 | Key Lock | (De-)activates Key Lock function |
| 22 | Pitch/volume Adjustment/Dry-Wet | • Pitch in > Normal Mode • Shift + moving the fader adjusts the selected deck's volume • Dry/Wet function of the corresponding effect unit in > Effect Mode |
| 23 | Jog Lock | • Locks the Jog Wheel against unintentional pitch bending/scratching/effect modulation/browsing functions |
| 24 | Pitch Bend/Automatic Crossfader | • Pitch Bend • Shift + Pitch Bend buttons: automatically moves the crossfader to the left/rig |
| 32 | Shift | • Facilitates a second function for certain elements |
| VARIOUS MODES (NORMAL/BROWSER/EFFECT) | ||
| Normal Mode | ||
| The Normal Mode is adjusted by default. In this mode, which is displayed by the Cue LED, it is possible to control all general deck features. | ||
| Jog (18) | When turning the Jog Wheel without an activated Jog Wheel function, the speed of the selected track will be changed temporarilyIf the Scratch Button has been pressed the Jog Wheel can be used for scat- ching. Please observe that this feature is only available when the Jog Wheel platter is being touched. | |
| PADs (15) | If a PAD Button (1-4, + Shift: 5-8) is pressed the track will jump to the saved Cue Point, if one is set. The track will Be re-played from the same position when the button is being pressed again. If no Cue Point has been set, pressing the Hot Cue Buttons has no effect. PAD button assignment: | |
| Track Drehrad (4) | By turning the Track Encoder it is possible to navigate through Track List View Shift + turning the Track Encoder allows Tree View navigation. Please consider the Folder Search Buttons (6) can be used for the same function in Normal Mod Search-Tasten (6) für dieGLEiche Funktion Im Normal Modus verwendet werden können If a larger Track/Tree View is desired, >Browser Mode should be activated. | |
| Browser Mode | ||
| By pressing the Track Encoder, Browser Mode can be maximized and minimized respectively. This allows a much more comfort table track navigation. | ||
| In this mode the Jog Wheel and a few other elements work differently. | ||
| Jog (18) | By turning the Jog Wheel it is possible to navigate through your music collectIf the Jog Wheel is in X Parameter Mode (25) it is possible to navigate through Tree View by moving the Jog WheelIf the Jog Wheel is in Y Parameter Mode (26), it is possible to quickly navigate through your music collection | |
| Track Rad (4) | Tree View navigation by turning the Track Encoder. | |
| Folder Search Tasten (6) | Selected folders can be opened and closed in Tree View by pressing the Folder Search Buttons (6). | |
| CC-ABSOLUTE (VR) Control Change messages are sent with status OxBn, where n is the channel, for the specified CC controller. Thus the controller MIDI ID is indicated with the channel along with the CC number. The value from Ox00 to Ox7F, directly related to the location of the controller. | ||||
| CC-RELATIVE (ENC) Control Change messages are status OxBn, where n is the channel, for the specified CC controller. Thus the controller MIDI ID is indicated with the channel along with the CC number. The value from Ox40 to indicate the change in the controller. This is an offset to Ox40 "one's complement" notation. A message with data Ox43 indicates a positive change of 3. A message with data Ox31 indicates a negative change of 15. | ||||
| SWITCH ON/OFF (SW,CENTER,CW,CCW) These messages are used for switches. Control Change messages are sent with status Ox9n, SWITCH On and Off value are Ox7F and Ox00, where n is the channel. | ||||
| LED ON/OFF (LED) These messages are used for LED. Control Change messages are sent with status Ox9n, LED On and Off value are Ox7F and Ox00, where n is the channel. | ||||
| PITCHBEND Pitchbend messages are status OxEn, where n is the channel, for the specified controller. Thus the controller ID is indicated only by the channel. For accurate changes, the 14 bit data in a pitch bend message is reserved for absolute controllers which require more than 7 bits of data. | ||||
| MIDI MAP(HEX) | ||||
| SW name Type MIDI MIDI MID12(Hold shift) Remarks | ||||
| TRACK | SW/ENC 01/32 40/71 CC | TYPE = RELATIVE | ||
| TRACK | VR/CENTER 32/ID 71/5 | CC TYPE = ABSOLUTE | ||
| TRACK | CW/CCW 32/33 71/72 CC | TYPE = NOTE | ||
| JOG SW/ENC 16/35 55/74(VR) CC TYPE = RELATIVE | ||||
| JOG CW/CCW 35/36 -- | CC TYPE = NOTE | |||
| JOG CW SW 3B -- | SCRATCH | LED = ON & | No Touch Inner Wheel | |
| JOG CCW | SW 3C -- | SCRATCH LED = ON & | No Touch Inner Wheel | |
| Pitch Slider | (PITCHBEND or VR)/CENTER | PITCHBEND/17 | 31(VR)/56 | |
| << SEARCH >> | VR | 1E 5D | ||
| BANK P. SW | 09 48 | |||
| SGL/CTN | SW 02 41 | |||
| Time SW 03 42 | ||||
| FOLDER >> | SW 04 | 43 | ||
| FOLDER << | SW 05 | 44 | ||
| SHIFT SW 18 | ||||
| EJECT | SW 10 4F | |||
| RELOOP SW 0B | 4A | |||
| - | SW 15 54 | |||
| + | SW 14 53 | |||
| % SW 11 | 50 | |||
| CUE SW/LED | 07/07 | 46/07 | ||
| II | SW/LED | 06/06 | 45/06 | |
| SCRATCH | SW/LED | 1C/1C | 5B/1C | |
| LOOP IN SW/LED | OC/OC | 4B/OC | ||
| LOOP OUT | SW/LED | 0D/0D | 4C/0D | |
| 1 | SW/LED | 1B/1B | 5A/1B | |
| 2 | SW/LED | 19/19 | 58/19 | |
| 3 | SW/LED | 1A/1A | 59/1A | |
| 4 | SW/LED | 0F/0F | 4E/0F | |
| SAVE TO | SW/LED | OE/OE | 4D/OE | |
| SAMPLE | SW/LED | OA/0A | 49/0A | |
| O | SW/LED | 13/13 | 52/13 | |
| PITCH | SW/LED | 12/12 | 51/12 | |
| 1(2) | LED | 1D | Traktor Note F1 | |
| 2(2) LED | 1E | ... | ||
| 3(2) | LED | 1F | ||
| 4(2) LED | 20 | |||
| 100 | LED | 21 | ||
| 16 LED | 22 | |||
| 8 | LED | 23 | ||
| 4 | LED | 24 | ||
| PITCH O | LED | 25 | ||
Linking Several RMP-2.5 Alpha Players
If you wish to link several RMP-2.5 Alpha players (for example to control a software), the following possibilities are recommended:
- Two RMP-2.5 Alpha for usage in TRAKTOR PRO
The RMP-2.5 Alpha mapping that is implemented in TRAKTOR PRO is laid-out for channels 1-4 (Channel 1 = Deck A, Channel 2 = Deck B, Channel 3 = Deck C, Channel 4 = Deck D). If two players are used you should assign player 1 to "DeckA CH1" and the second player should be assigned to "DeckB CH2" via the Bank Program Button.
This way the left player 1 controls Deck A and the right player 2 controls Deck B. It is recommended to assign a hardware ID to each player. This can be done in the submenu under item C > MIDI Set > Name. Please also consider the TRAKTOR assignment chart in this manual.
Combining several RMP-2.5 Alpha Players
When using several RMP-2.5 Alpha players to control a software you can proceed as follos:
a) Under C > MIDI Set > Name: assign a hardware ID to each player.
b) Under E > MIDI Channel: assign a channel preset to each player (altogether 4 presets, 4 channels each).
SUBMENU
By pressing the Time Button -7- and the Track Encoder -4- simultaneously, you will enter the sub-. menu. By pressing the Track Encoder you can enter the respective submenus.
1. Version
Shows the currently installed firmware version.
2. Playlist
If the Database Builder has been carried out for the USB drive, various criteria for track filtering can be adjusted.
Normal:
This is the default setting. Titles can be navigated according to the applied data structure.
Title:
If this criterion is selected, you can browse alphabetically through the title names by pressing the Folder Search Buttons -6-. By turning the Track Encoder -4- you can continuously and alphabetically browse the title structure.
Artist:
If this criterion is selected, you can browse alphabetically through the artist names by pressing the Folder Search Buttons -6-. By turning the Track Encoder -4- you can continuously and alphabetically browse the artist structure.
Album:
If this criterion is selected, you can browse alphabetically through the album names by pressing the Folder Search Buttons -6-. By turning the Track Encoder -4- you can continuously and alphabetically browse the album structure.
Genre:
If this criterion is selected, you can browse alphabetically through the genre names by pressing the Folder Search Buttons -6-. By turning the Track Encoder -4- you can continuously and alphabetically browse the genre structure.
Example:
You are looking for an artist whose name starts with the letter "G". Under playlist select the item "Artist". Via the Folder Search Buttons -6- you can navigate to the letter "G". All artists with the initial letter "G" will be displayed in sequence. With the Track Encoder -4- you can select the desired track.
3. Sleep Time
Adjustable stand-by time from 0 - 120 minutes.
4. Stop Time
Adjustable interval from 0.5 - 12 seconds between the ticker information display repetition.
5. Run Time
Adjustment of the ticker speed from 50 - 2.000 milliseconds.
6. Jog Sensitivity
Adjustable Jog Wheel's sensitivity from -20 + 20
7. Pitch Bend Range
Adjustable pitch bend range from +/-1% - +/-100% . Independently adjustable from master pitch range.
8. Display Brightness
Adjustable display brightness from 1 - 10.
9. Repeat Mode
If repeat mode is turned on, only tracks of the current folder will be played. If repeat is turned off, you can browse all folders with the Track Encoder -4-.
A. Information Setup
Mode 1: Folder name, ID3 TAG information is displayed in a continuous loop.
Mode 2: Folder name is displayed once, ID3 TAG information is shown repeatedly.
B. Bit Rate
Here you can determine whether the bit rate should be displayed or not.
C. MIDI Set
Jog Out:
Via the jog out function you can adjust the delay the jog wheel -18- should take in order to send MIDI data (Jog Wheel Data Delay) in milliseconds. The delay can be set from 0 - 30 milliseconds. To do so hold the Shift Button -32- and adjust the desired value via the Track Encoder -4-.

NOTE!
Some DJ softwares are only able to process a limited number of MIDI events per second. For these cases this adjustment is sensible. A value of 25 milliseconds corresponds to 40 events per second.
Edit:
Edit On/Off:
If Edit is turned on it is possible to edit MIDI parameters (MIDI Note, MIDI LED). If Edit is turned off, the RMP-2.5 Alpha sends the preset MIDI commands. Please also see the MIDI map in this manual.
Name:
With the name function it is possible to determine the player's hardware ID. The selected name will be recognized by the computer.
The following names are available:
RMP-25
RMP-25B
RMP-25C
RMP-25D
RMP-25E
RMP-25F
RMP-25G
RMP-25H
This is suggestive if you would like to link several RMP-2.5 Alpha players on one computer. This way each player will be displayed with an individual hardware ID. Please also see the chapter "Linking several RMP-2.5 Alpha Players".
I/O (Input/Output)
You can determine whether MIDI parameters should be displayed or not. To do so hold the Shift Button -32- and turn the Track Encoder -4- in order to switch between "Display" and "Hide".
D. MIDI CC Type
In the MIDI CC Type menu you can assign individual Control & Change parameters to the Tack Encoder -4-, Pitchfader -22- and Jog Wheel -18-.
In order to change the CC Type hold the Shift Button -32- and turn the Track Encoder -4- to the desired position.
- Track (Track Encoder)
The following is possible:
Relative
Absolute
Note
Jog (Jog Wheel)
The following is possible:
Relative
Note
E. MIDI Channel
With this option you can determine on which MIDI channels the RMP-2.5 Alpha should send data and which Traktor decks should be controlled.
The following presets are available:
A-D=1-4
In this preset you can seamlessly switch from "DeckA CHO1" to "DeckD CHO4" by pressing the Bank P. Button.
This preset is recommendable to either use an RMP-2.5 Alpha to control four Traktor decks or to link up four RMP-2.5 Alpha players.
A/C=1/3
With this preset you can switch back and forth between "DeckA CHO1" and "DeckC CHO3".
This preset is reasonable if you have two RMP-2.5 Alpha players and you would like to use one player for Deck A/C and the other one for Deck B/D.
B/D=2/4
With this preset you can switch back and forth between "DeckB CHO2" and "DeckD CHO4". This preset is reasonable if you have two RMP-2.5 Alpha players and you would like to use one player for Deck A/C and the other one for Deck B/D.
Please also see the paragraph „Linking several RMP-2.5 Alpha Players".
F. MIDI Note Edit
In this menu you can edit the single MIDI elements and parameters.
Please also refer to the MIDI map in this manual.
In order to change a parameter hold the Shift Button -32- and adjust the desired value via the Track Encoder -4-.
Example:
You would like to assign a different MIDI command to the Bank Program Button -09-. In the MIDI map you can see that Tap is assigned to MIDI command 09. In the MIDI Note Edit menu select position 09. Now hold the Shift Button -32- and set the desired new MIDI value by turning the Track Encoder -4-.
NOTE!
In menu item H "Load Defaults" you can load the default settings including the original MIDI values by pressing the Track Encoder -4-.
G. MIDI LED Edit
With the menu MIDI LED Edit you can edit the LEDs' illumination via MIDI parameters. Please see the MIDI map in this manual. Editing of the single parameters follows the same procedure as described under item F. Please refer to the example listed there.
H. Load Default
With this adjustment you can set the player back to default. All player settings will be set back. Confirm this setting by pressing the Track Encoder -4-.
1.Exit&Save
In order to save the adjusted parameters and leave the menu please confirm the item Exit & Save by pressing the Track Encoder -4-.

NOTE!
Alternatively you can also leave the menu by pressing the Time Button -7-.
USB AUDIO LINK
It is possible to link up two RMP-2.5 Alpha players in order to play tracks from a USB source. On the included CD you will find a special software called "Database Builder". This software analyzes the USB data carrier and creates special index files so the RMP-2.5 Alpha can access music files more easily and quickly. Moreover, it is possible to search interactively for certain criteria such as title or artist (also see chapter "Submenu", item 2. Playlist).

NOTE!
It is not mandatory to carry out the Database Builder in order to use it with two linked RMP-2.5 Alpha players but it is recommended (only available as PC version).
Minimum System Requirements:
Operating System: Microsoft Windows XP (SP3), Vista (SP2)
CPU: Intel Pentium 4, 1 GHz processor or better, Intel Centrino Mobile Technology 1.6 GHz
RAM:512MBRAM
Hard Disk: at least 100 MB free hard disk space required
Proceed as follows:
- RMP-2.5 Database Builder Software Installation
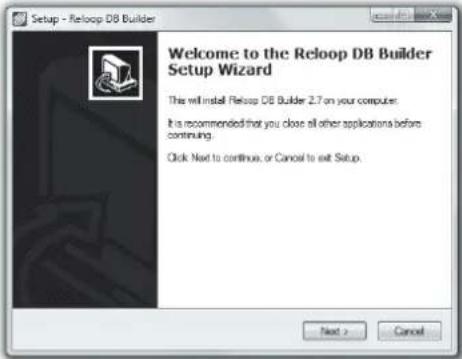
Carry out the software "Database Builder" from the included CD. As first step click "Next".
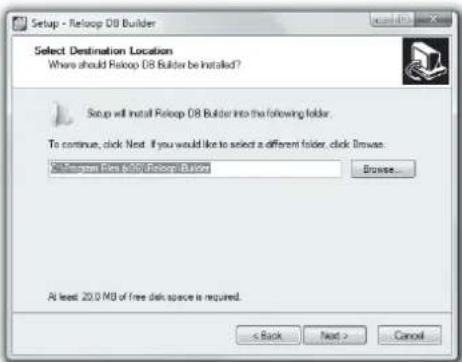
Select the folder where you want to save the Database Builder and confirm with "Next".
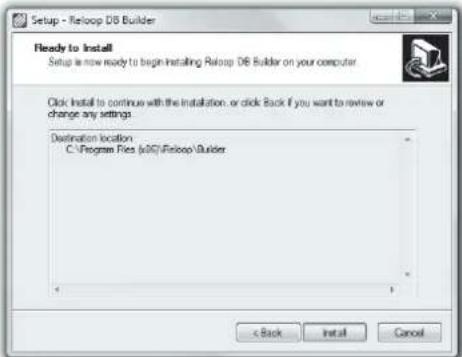
The software can now be installed. Click "Install".
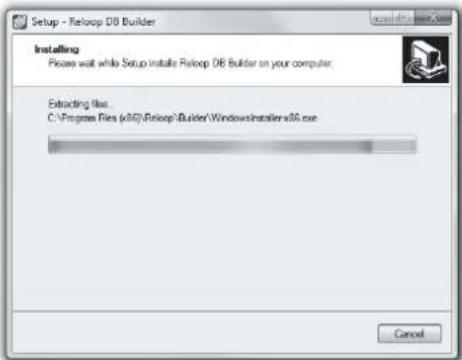
The software will now be installed.
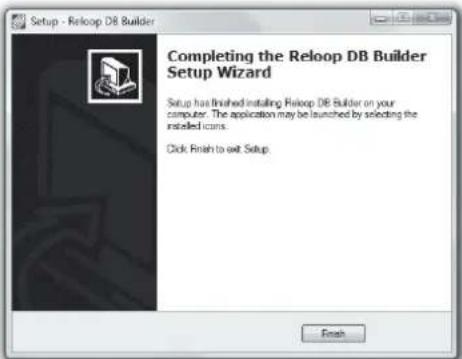
As last step click "Finish" in order to successfully complete the installation.
2. Using the Database Builder
In order to use the Database Builder and analyze your USB storage device proceed as follows:
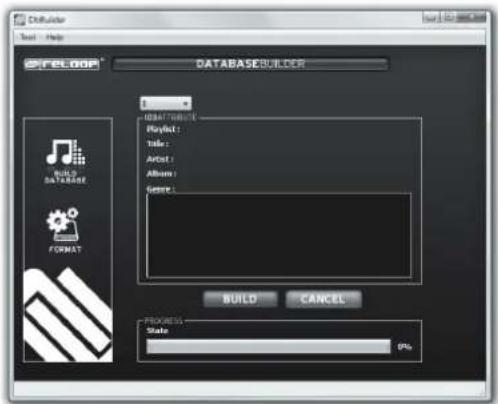
Start the installed software. As first step select the desired USB storage device and click on the "Build" button.
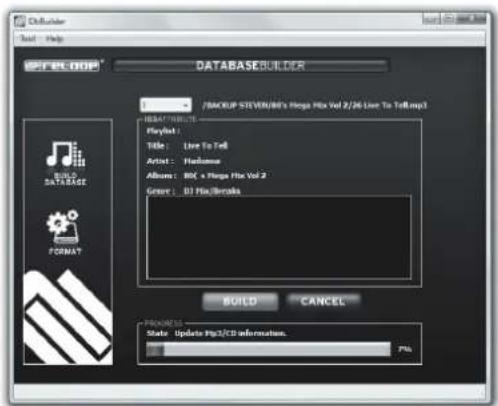
Your USB storage device will now be analyzed.
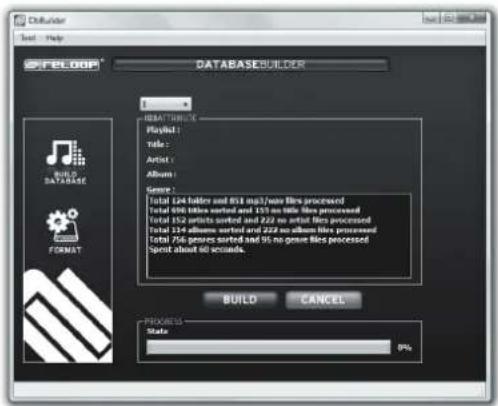
After successfully analyzing the USB storage device you can exit the software. Your USB storage device has now been successfully analyzed and is ready for use with your RMP-2.5 Alpha.
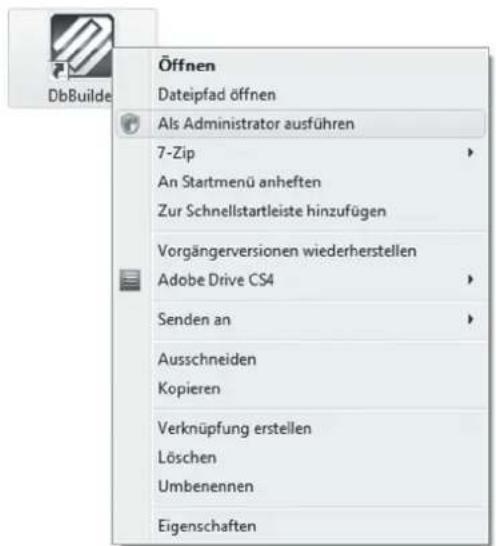
NOTE! When using Windows Vista the Database Builder may cause problems. Please refer to the following trouble shooting:
Under Windows Vista it is not possible to carry out the Database Builder. The cause for this could be restricted user rights.
Click the right mouse button and select the option "Run as administrator".
As next step click "Allow" in order to carry out the Database Builder.
3. Connecting two RMP-2.5 Alpha Players for Audio Link Mode
- Connect your USB storage device to the upper USB port -33-.
- Connect the rearmost USB Dataport -28- of the first player to the USB Media Port -33- of the second player.
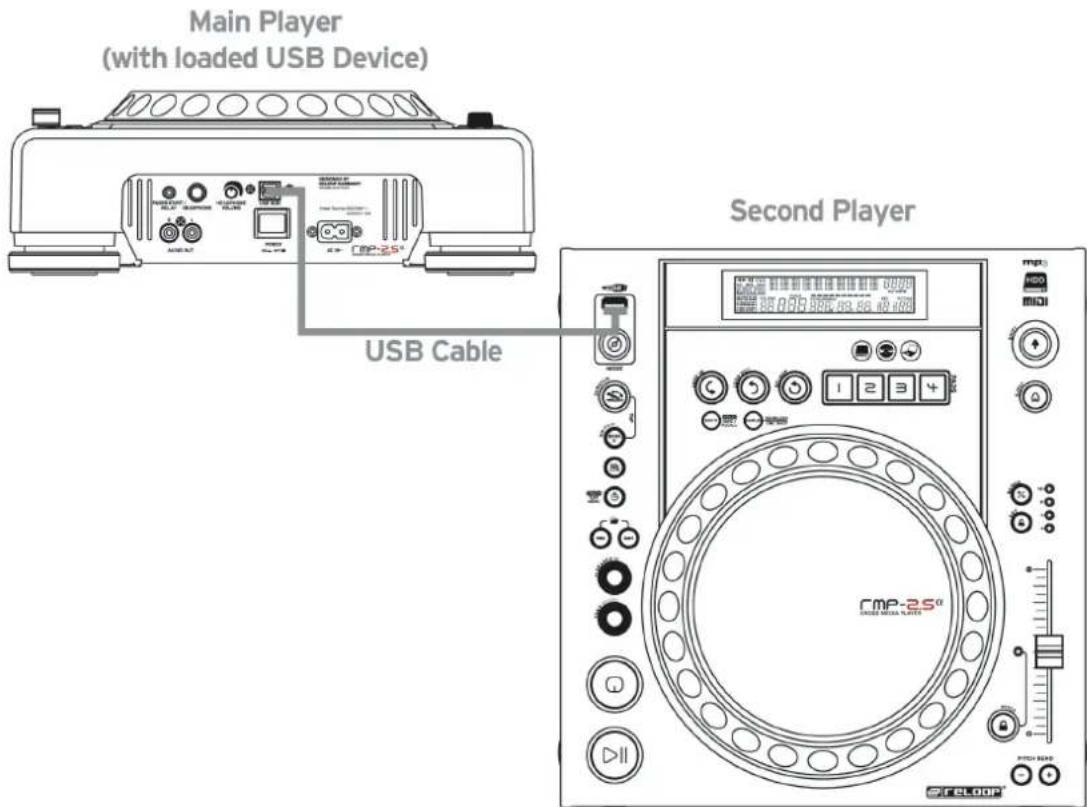
NOTE!
We recommend to use an USB cord with a maximum length of no more than 1 meter.
In USB mode you can now access the first player's USB drive (Master) via the second player (Slave).
NOTE!
Please also see the chapter "Submenu", item 2. Playlist, regarding sort and search functions.
End of Operation
Before turning off the device via the ON/OFF Button -30- make sure that no CD is in the player. If this is not the case, please turn on the device again and eject the CD via the corresponding button -19-.
TROUBLESHOOTING
If you should encounter any kind of trouble with the RMP-2.5 please check the following chart for corresponding symptoms and follow the instructions that are listed.
| Symptoms | Possible cause | Corrective Measures |
| There is no power when activating the ON/OFF button. | Poor mains plug connection. | Check the mains plug connection. |
| The CD does not start playback. | The CD has been inserted upside down or it is soiled. | Insert the CD with the label showing upward, clean the CD. |
| No sound. | Output cable is connected wrongly or not connected at all, wrong amplifier or mixing console operation. | Check the output cords' connections and the settings of your amplifier and mixer respectively. |
| CD is skipping. | The CD player is continuously exposed to vibrations and shocks for longer than 10 seconds. | Install your system in another location. |
| Humming noise. | Loose cable connections. Check all sound plugs. | |
TECHNICAL INFORMATION
Global Distribution GmbH did not check the following manufacturer's data for plausibility and accuracy:
Frequency response: CD 17 Hz - 20 kHz +/- 1dB / USB: 17 Hz - 16 kHz +/-1 dB
Channel separation: 83 dB
S/N ratio: 90 dB
D/A converter: 8-fold/1 Bit
MP3 Formats: MPEG 1 Layer 3 standard
MPEG 2 Layer 3 standard
MPEG 2.5 Layer 3 standard
Maximum MP3 folders: CD MP3 255/USB 999
Maximum MP3 files: CD MP3 255 / USB 999
Power Source: AC100 - 240V, 60/50 Hz, 12W
Dimensions: 322 × 112.6 × 340.5 ~mm
Weight: 3.7 kg
Subject to technical alterations!
Illustrations similar to original product!
Misprints excepted!
And now have fun with your Reloop!
Reloop - Solutions for DJs
Global Distribution GmbH
Schuckertstraße 28
48153 Muenster, Germany
Fax +49.251.6099368
www.reloopdj.com
MODE D'EMPLOI
ATTENTION!

23.Touche Pitch On/Off
Moreover, your player supports the fader start function. To do so connect the included 3.5 mm jack cable to the Relay/Fader Start Connecting Socket -25- of a compatible mixer, for example the Reloop RMX-40 DSP. This way you can start and stop the playback of the CD player by simply moving one of the mixer's faders.
| CC-ABSOLUTE (VR) Control Change messages are sent with status OxBn, where n is the channel, for the specified CC controller. Thus the controller MIDI ID is indicated with the channel along with the CC number. The value from Ox00 to Ox7F, directly related to the location of the controller. | ||||
| CC-RELATIVE (ENC) Control Change messages are status OxBn, where n is the channel, for the specified CC controller. Thus the controller MIDI ID is indicated with the channel along with the CC number. The value from Ox40 to indicate the change in the controller. This is an offset to Ox40 "one's complement" notation. A message with data Ox43 indicates a positive change of 3. A messages with data Ox31 indicates a negative change of 15. | ||||
| SWITCH ON/OFF (SW,CENTER,CW,CCW) These messages are used for switches. Control Change messages are sent with status Ox9n, SWITCH On and Off value are Ox7F and Ox00, where n is the channel. | ||||
| LED ON/OFF (LED) These messages are used for LED. Control Change messages are sent with status Ox9n, LED On and Off value are Ox7F and Ox00, where n is the channel. | ||||
| PITCHBEND Pitchbend messages are status OxEn, where n is the channel, for the specified controller. Thus the controller ID is indicated only by the channel. For accurate changes, the 14 bit data in a pitch bend message is reserved for absolute controllers which require more than 7 bits of data. | ||||
| MIDI MAP(HEX) | ||||
| SW name Type MIDI MIDI | 12(Hold shift) Remarks | |||
| TRACK | SW/ENC 01/32 40/71 CC | TYPE = RELATIVE | ||
| TRACK | VR/CENTER 32/ID 71/5 | CC TYPE = ABSOLUTE | ||
| TRACK | CW/CCW 32/33 71/72 CC | TYPE = NOTE | ||
| JOG SW/ENC 16/35 55/74(VR) CC TYPE = RELATIVE | ||||
| JOG CW/CCW 35/36 - CC TYPE = NOTE | ||||
| JOG CW SW 3B | -- | SCRATCH LED = ON & No Touch Inner Wheel | ||
| JOG CCW | SW | 3C | -- | SCRATCH LED = ON & No Touch Inner Wheel |
| Pitch Slider | (PITCHBEND or VR)/CENTER | PITCHBEND/17 | 31(VR)/56 | |
| << SEARCH >> | VR | 1E | 5D | |
| BANK P. SW | 09 | 48 | ||
| SGL/CTN | SW 02 | 41 | ||
| Time | SW 03 | 42 | ||
| FOLDER >> | SW 04 | 43 | ||
| FOLDER << | SW 05 | 44 | ||
| SHIFT SW 18 | ||||
| EJECT | SW 10 4F | |||
| RELOOP | SW 0B | 4A | ||
| - | SW 15 54 | |||
| + | SW 14 53 | |||
| % | SW 11 | 50 | ||
| CUE SW/LED | 07/07 | 46/07 | ||
| II | SW/LED | 06/06 | 45/06 | |
| SCRATCH | SW/LED | 1C/1C | 5B/1C | |
| LOOP IN | SW/LED | OC/OC | 4B/OC | |
| LOOP OUT | SW/LED | OD/OD | 4C/OD | |
| 1 | SW/LED | 1B/1B | 5A/1B | |
| 2 | SW/LED | 19/19 | 58/19 | |
| 3 | SW/LED | 1A/1A | 59/1A | |
| 4 | SW/LED | 0F/OF | 4E/OF | |
| SAVE TO | SW/LED | OE/OE | 4D/OE | |
| SAMPLE | SW/LED | OA/OA | 49/OA | |
| O | SW/LED | 13/13 | 52/13 | |
| PITCH | SW/LED | 12/12 | 51/12 | |
| 1(2) | LED | 1D | Traktor Note F1 | |
| 2(2) LED | 1E | ... | ||
| 3(2) | LED | 1F | ||
| 4(2) LED | 20 | |||
| 100 | LED | 21 | ||
| 16 | LED | 22 | ||
| 8 | LED | 23 | ||
| 4 | LED | 24 | ||
| PITCH O | LED | 25 | ||
Combiner pluseurs RMP-2.5 Alpha
8. Display Brightness
Edit On/Off (activer/désactiver la modification) :
Alternatively you can also leave the menu by pressing the Time Button -7-.

USB AUDIO LINK
[Data Base Builder SCREENSHOT 9]
And now have fun with your Reloop!
Reloop - Solutions for DJs
Global Distribution GmbH
Schuckertstraße 28
48153 Muenster, Germany
Fax +49.251.6099368
www.reloopdj.com