FRI2102E - Deep fryer BRANDT - Free user manual and instructions
Find the device manual for free FRI2102E BRANDT in PDF.
User questions about FRI2102E BRANDT
0 question about this device. Answer the ones you know or ask your own.
Ask a new question about this device
Download the instructions for your Deep fryer in PDF format for free! Find your manual FRI2102E - BRANDT and take your electronic device back in hand. On this page are published all the documents necessary for the use of your device. FRI2102E by BRANDT.
USER MANUAL FRI2102E BRANDT
natural_image
Black-and-white illustration of a butterfly-shaped food design, a sliced vegetable, and a pile of dried beans on a plate (no text or symbols)MANUEL D'INSTRUCTION FR
INSTRUCTION MANUAL EN
natural_image
Exterior view of a brand electric shaver with digital display (no visible text or symbols)FRI2102E
Chère Cliente, Cher Client,
text_image
Diagram of a food processor with labeled parts including a funnel, pan, and lidThank you for buying a BRANDT product and for your confidence in our company.
This product has been designed and manufactured for you considering your lifestyle and your requirements, so that it meets your expectations in the best way possible. We have invested it with our expertise, spirit of innovation and all the enthusiasm which has driven us for more than 60 years.
So that we are always able to satisfy your requirements as well as possible, our customer service is available, ready to listen and suggestions
You can also visit our website www.brandt.com where you will find our latest innovations as well as additional useful information.
BRANDT is happy to support you daily and hopes you will enjoy your purchase to the full.

Important: Before starting your machine, please read this guide for installation and use carefully in order to familiarise yourself with how it operates quickly.
CONTENTS
1) FOR THE USER'S ATTENTION....18
a) Safety Instructions....18
b) Technical Data....21
c) Environmental Protection....22
2) PREPARATION OF YOUR MACHINE ....22
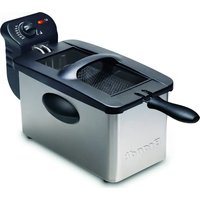
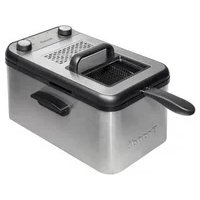
a) Description of the Deep Fryer 22
b) Before Using for the First Time 23
3) USING YOUR MACHINE....24
a) Use of the machine....24
b) Cooking Guide....25
c) Recommendations for Use....27
4) LOOKING AFTER AND CLEANING YOUR MACHINE....28
a) Dismantling the Deep Fryer before Cleaning it....28
b) Cleaning the Deep Fryer....28
c) Reassembling after Cleaning....28
d) Troubleshooting....29
1) FOR THE USER'S ATTENTION

Keep these instructions with your machine. I this machine to another person second-hand, make sure you give the new owner these instructions. Please I these instructions before installing and using your machine. They are written for your safety and that of others.
a) Safety Instructions
Installation and connection
- This machine is for frying food and for domestic use only. It may only be used in a covered, enclosed and heated environment such as a kitchen or any other room met the same specifications.
- Having taken your product out of its packaging, check that the machine is in perfect condition and, in particular, that the plug or the power cable is not damaged. If there is any doubt contact your dealer's after-sales service.
- Before connecting the machine make sure that the mains voltage corresponds with that indicated on the machine's rating plate.
- The use of adaptors and/or extension leads is not recommended. If these items prove to be indispensable, only use adaptors and extension leads compliant with the safety standards in force.
- This machine is not intended to be put into operation using an external timer or a separate remote control system.
-
Before using this machine place it on a smooth, dry, stable surface.
-
Keep the machine and its power cable ou children under the age of 8.
- Never let the fryer lead hang down from the worktop/table where it could be pulled by children or trip the user up.
• Children must not play with the machine.
During Use
- Place this machine on a stable surface so that hot liquid is not spilt.
- This machine is not designed to be used by children unless they are older than 8 and they are supervised or instructed in the use of the machine by someone who is responsible for their safety.
- This machine may be used by people with reduced physical, sensory or mental capacities, but only after having given them the necessary information concerning the use of the machine, so that they are aware of the dangers that may be incurred.
- The accessible parts of this machine may become hot when it is operating. Do not touch the parts of the machine when it is work children must be kept away or continually supervised.
- Never leave the deep fryer working if there is no surveillance.
- Never unplug the power cable when the machine is heating.
- Never pull the lead but disconnect the machine by holding the plug.
-
Do not touch the machine with wet hands.
-
Do not put anything above the deep fryer w/ operation.
- Do not allow the power supply lead to come into with hot surfaces and do not place machines in operation such as hobs, a hot oven, a microwave, etc.
- Ensure that the hot surfaces of the machir contact with easily flammable materials such as curtail tablecloths.
- Never use your deep fryer without oil or fat. The oil level in the deep fryer must always be between the "MIN" and "MAX" marks on the wall of the pot. For safety reasons never exceed the maximum level.
- Make sure the fryer basket is not overloaded.
• Make sure that cooking utensils or food that is too big is not put in the fryer. - Never add water to the oil.
- The use of accessories not recommended by the manufacturer may cause a fire, electric shocks or injuries.
Maintenance and cleaning
- Before cleaning ensure that the power cable for the machine is unplugged. Allow the machine to cool before cleaning.
-
The power cable cannot be replaced. If the cable is damaged the machine should be discarded. This product is guaranteed by your distributor. For more details please refer to the guarantee conditions provided by the distributor.
-
To protect yourself from the risk of electric shock, do not in any circumstances immerse the base of the machine in water or other liquids.
- Do not use chemical products, steel wool or abrasive cleaners to clean the outside of the machine. This risks damaging it.
- Cleaning and maintenance of the machine should not be carried out by children unless they are older than 8 and are supervised.
Non-compliant use
- Only use this machine for the purposes described in this manual.
- The manufacturer denies all responsibility in the event of non-compliant use.
- This machine is exclusively intended for do private dwellings. The use of this product in communal or professional premises such as rooms for breaks in offices or workshops, camping or hotel premises, does not represent compliant use as defined by the manufacturer.

Incorrect installation of the machine, inappropriate use or poor maintenance may cause serious burns.
b) Technical Data
| Model | FRI20102E |
| Power supply | 230 V 50/60 Hz |
| Consumption (W) | 2000 W |
| Oil capacity (L) | 3 |
| Dimensions (mm): | H160 x W410 x D210 |
| Net weight (kg) | 2.8 Kg |
c) Environmental Protection

At the end of its life this product must not be discarded with household wa must be taken to a recycling centre or to your dealer. This makes it possible to avoid consequences resulting from inappropriate disposal that are harmful to health and the environment, and to recycle materials to save energy and significant resources.
A logo appears on the product reminding you not to discard it with household waste. For further information, contact your council offices or the shop where you bought this product.
a) Description of the Deep Fryer

text_image
Diagram of a food processor with labeled parts including a handle, lid, and interior container- Control unit: It is made up of a control panel, a heating element and storage for the lead.
- Lid
- Removable frying basket: Enables food to be immersed in the fryer oil quickly and easily. The basket has a folding handle for easy storage.
- Removable frying tank: Fitted with an integral MIN and MAX indicator. It can be separated from the control unit and machine body for easy cleaning.
- Machine body with transport handles: Enables the removable tank and the control unit to be stored and the fryer to be kept stable on the worktop. The handles make moving the unit more convenient.
-
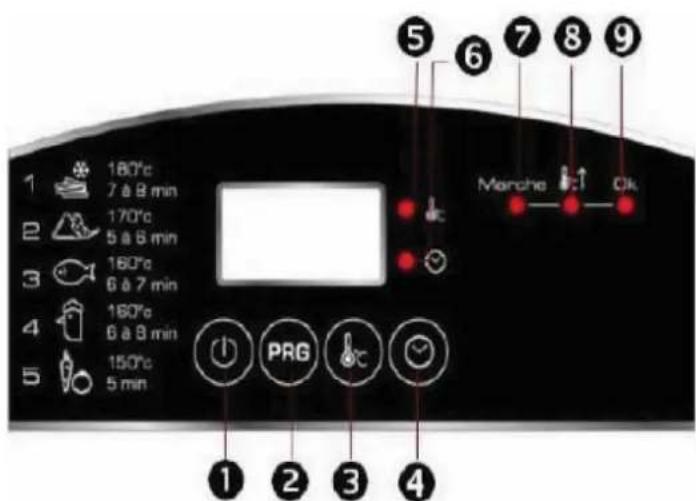
Button 1: On/Off button
-
Button 2: Programme selection button. Makes it possible to select a pre-entered programme.
-
Button 3: Temperature button. Makes it possible to set the oil temperature manually.
-
Button 4: Timer button. Makes it possible to set the timer manually.
-
Temperature activated mode: indicates that you can change the temperature
-
Timer activated mode: Indicates that you can change the timer
-
ON indicator light: Indicates that the machine is plugged into the mains.
-
Temperature rise indicator light: Indicates that the fryer is heating the oil.
-
OK indicator light: Lets you know the oil is hot. It comes on when the programmed temperature is reached.
b) Before Using for the First Time
- Unpack the machine and remove all the paper and plastic. Make sure no pieces of packaging remain inside or outside the machine.
• Then clean the cover, the frying basket and the tank with hot water and soap.
• Only wipe the machine, the control unit and the body with a damp tea towel.
• Always use your machine on a stable, safe, dry, horizontal surface. - Arrange sufficient space above and around all the sides for the circulation of air.
- Do not leave the machine in contact with flammable surfaces when in use (such as curtains and wallpaper).
- Be very vigilant when using the machine on surfaces which could be damaged by heat. The use of insulated protection is recommended.
Note: the numbers in brackets are references to the "Description of the Deep Fryer" section.
a) Use of the machine
1. Instructions for Use
• For frying only use good quality vegetable oil. Do not use butter, margarine or olive oil.
- Never add water or wet food to the oil. Food that is too wet may make the oil boil and possible overflow.
- Do not overload the basket. Please adhere to the safety limit quantities.
• Makes sure that food of similar size is placed in the basket so that it cooks evenly.
- Dry all the food well before frying it.
• The fryer may reach a high temperature when in use. Avoid touching the hot surfaces.
• In hot oil only use metal utensils with insulated handles.
2. Selection of the cooking mode
The "PRG" button (2) relates to the various cooking programmes on the machine
By pressing once on the button (2) -1- will appear on the screen. By pressing the same button you can scroll through the 5 cooking programmes as shown below.
Setting panel:
| Programme No. Food Cooking Temperature | |||
| 1 Chips 7-8 mm 180°C | |||
| 2 Doughnuts/prawns 5-6 mm 170°C | |||
| 3 Fish | 6-7 mm 160°C | ||
| 4 | Chicken | 6-8 mm 160°C | |
| 5 | Vegetables | 5 mm | 150°C |
3. Programming the temperature and cooking time manually
If you do not want to set your fryer using the pre-set cooking modes you can change the temperature and timer manually.
Setting the temperature
When the machine is turned on the default setting is activated for frozen chips
Press the button (3) to set the temperature. A light confirms that you are in temperature change mode (5).
The temperature will then scroll from 5 in intervals of 5^ C up to the maximum of 190^ C, and then go back to the minimum of 110^ C.
Setting the timer
The button (4) is for the timer. You can adjust the cooking time for your fryer. To do this press the button (4). A red light confirms that you are in timer change mode (6).
Each time you press button 3 the time will increase by one minute. To reduce the time increase the time to 99 minutes (maximum). Then press once again and the timer will return to the minimum (1 minute). To do this faster hold the key down and the time will be quickly.
4. Frying using the frying baskets
Note: the numbers in brackets are references to the "Description of the Deep Fryer" section.
- After selecting your cooking mode (or programming the temperature and timer manually), press the "On" button and the screen will show the actual temperature of the oil. Then the yellow temperature rise light will come on (8). Caution: do not put your food in the oil until it is hot.
- As the temperature is rising you can check the cooking mode by pressing the button (2). By pressing button (4) you can also check the timer. By pressing the button the timer will be displayed for 5 seconds.

To stop the fryer during operation press the "On" button. This will stop the cooking process. The fryer will then go back to the "PRG" menu.
- Once the fryer reaches the pre-selected temperature the fryer will stop heating the oil. A beep will then sound and the yellow temperature rise light (8) will go out. Conversely the red "OK" light (9) will light and show that you can fry your food.
- As soon as the oil reaches the pre-selected temperature the beep will sound for 1 minute. Then immerse your food in the oil before the beep stops. Press the "On/Off" button again to start the timer. The red indicator light (9) will turn on.
If you do not press the "On/Off" button the fryer will pause.
The use of dry food is recommended. If your food is wet there is a risk of splashing on contact with the oil.
- Once you have finished using the fryer unplug it (the two indicator lights will go out).
- Put the lid back on and leave the oil in the fryer to cool completely before cleaning the machine. Always use the handles to move the machine. Never try the deep fryer holding it by its lid or the pot.

We recommend removing the oil from the fryer once it has cooled completel cleaning the machine before putting it away.
b) Cooking Guide
The table below provides guidelines for cooking food that is normally fried. All the food is fried with the oil at MAX level.
The maximum capacity of the basket is 1000 g but for excellent results we recommend that you do not exceed the weight recommended in the table below.
| INGREDIENTS | Weight/Quantities | Temperatures | Approx. cooking time (minutes) | Comments |
| Frozen chips | 800 g 190°C | 8-10 | Move the basket from side once or twice during cooking to ensure cooking is optimal | |
| Frozen cod or battered haddock | 2-4 portions approx. 100 g each and 1.5 cm thick | 160°C 8-9 | Thick portions may take longer to cook in the middle. Turn the fish in the oil occasionally using tongs | |
| Breaded frozen scampi | 340 g packet 180°C 3-4 | The scampi will have a deep golden colour when cooked | ||
| Fresh and breaded prawns | 140g packet 180°C 1-2 | Follow the manufacturer's instructions | ||
| Cod fillet fingers | 10 fingers (300 g per packet) | 160°C 4-5 | Move the fillet in the oil occasionally for optimum cooking | |
| Frozen chicken - Breaded fillet | 2 portions approx. 100 g each | 160°C – 170°C 9-10 | The chicken is cooked when it is no longer pink in the centre. Ensure that the food is boiling hot throughout. | |
It is important to take into account which food you want to fry in order to determine the appropriate temperature. Use the guideline information in the table below, the advice of the manufacturer and your own decision to guide you.
Do not overload the basket. This will reduce the oil temperature and your food will be greasier and less crunchy.
In addition, if you fill the basket the food will not cook evenly because all the oil cannot reach all the food. It is therefore preferable to cook in batches. Make sure the food is cooked in the centre. If the oil temperature is too high the food at the extremities will brown quickly whilst the centre will not be cooked.
c) Recommendations for Use
1. Frying
- Small food items will cook faster than big items. It may be necessary to cook chicken and frozen food for longer and at a lower temperature to avoid the surfaces cooking before the inside.
- Delicate food like prawns, or indeed diced vegetables, requires cooking at a higher temperature for less time.
- Before using the fryer always fill it above the minimum level. Avoid filling the basket too full.
- Do not expose face or hands to steam or contact with boiling oil.
- For even cooking stir or turn the food with suitable utensils, or move the basket gently during cooking.
2. Checking that the food is hot.
Take a knife and insert it into the food. Hold it there for several seconds before taking it out. If the knife is hot when you touch it your dish is hot in the middle.
You can also use a food thermometer. The chicken is cooked when its juice runs clear and the meat is no longer pink in the middle.
3. Utensils
- Choose your kitchen utensils with care. Do not use utensils that might melt (e.g. plastic).
- Be careful not to damage your machine when you use metal utensils.
- Use suitable gloves or utensils with insulated handles.
- Suitable utensils are those in metal or heat-resistant plastic, skimmers and tongs.
- Unsuitable utensils are those in wood, plastic that is not resistant to heat, knives or other sharp tools.
4. Oil
Oils recommended for use in the fryer
Sunflower
Vegetable
Peanut
Rapeseed
Corn
Oils and fats that are not recommended
Very oily
Olive oil (all types)
Quantity of oil:
Always use the quantity of oil recommended for frying. Never exceed this volume and never use the fryer without oil. Always fill the fryer with oil above the MIN before using it.
4) LOOKING AFTER AND CLEANING YOUR MACHINE
a) Dismantling the Deep Fryer before Cleaning it
- Remove the fryer lid and basket.
- Carefully remove the control unit and the element in the body. To do this hold the control unit with one hand whilst holding the body firmly with the other. Just lift the control unit upwards until it detaches from the body.
- Remove the frying pot. Grip the edge of the bowl with two hands and remove it from the body.
b) Cleaning the Deep Fryer

Always unplug your fryer and leave the oil and your fryer to empty completely before cleaning it.
Never soak the control unit, the power supply lead or the plug in water or any ot liquid.
Never use abrasive cleaning products.
None of the fryer parts are dishwasher-proof. Always wash them by hand.
Cleaning the removable tank, frying basket and lid
Remove all the food residues from the tank and basket using kitchen towel. Wash the parts by hand in hot soapy water. Rub using a sponge. Dry the basket completely before putting it away.
Cleaning the control unit, the other parts and the body
Wipe the surplus oil off the element with kitchen towel (take care not to damage the electric wires connected to the heating element). Wipe the control unit and the body with a clean cloth, either very slightly damp or dry.
c) Reassembling after Cleaning
text_image
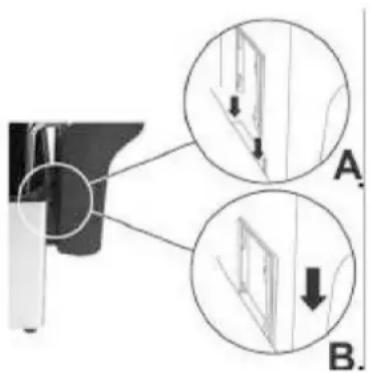
A B.- Place the machine body on a stable, safe, dry, horizontal surface.
- Hold the edge of the frying tank on both sides to lower it into the fryer.
- Reconnect the control unit to the body. The control unit has two rails into which the corresponding parts should be inserted in the body of the fryer.
- Slide the setting panel downwards into the rails (Figure B) until the elements are correctly assembled and inserted into the slits.
Note: The fryer will not work if the control unit is not attached to the body.
- If you use the fryer, lift the frying basket handle and then put it back in the locking position. Make sure the handle is firmly fixed on the body.
• To store the fryer, replace the basket, fold back the handle and close the lid.
d) Troubleshooting
This machine is manufactured in accordance with the highest safety standards. Follow these steps if the machine does not work:
- Check that you have followed the instructions in the manual properly.
- Check that the fuse has not tripped.
- Check that the wall socket is working properly.
text_image
Diagram of a food processor with labeled parts including handle, pan, and lidtext_image
Diagram showing two views (A and B) of a mechanical component with arrows indicating direction of movement or force, labeled A and B.text_image
Diagram of a food processor with labeled parts including a handle, lid, and interior containertext_image
Diagram showing two views (A and B) of a mechanical component with downward force arrows indicating compression or dislocation.● crescent moon bearing an equalment for all the world