
ACTV10001 - Camcorder HYUNDAI - Free user manual and instructions
Find the device manual for free ACTV10001 HYUNDAI in PDF.
| Product Type | Camcorder |
| Brand | Hyundai |
| Model | ACTV10001 |
| Sensor | 1.6 megapixel CMOS |
| Lens | F=2.4, f=1.70 mm |
| Focus Range | 1.5 m to infinity |
| Brightness | 100 - 16000 lux |
| Shutter Speed | 1/2 - 1/2000 s (electronic) |
| Video Resolutions | 1440x1080 @ 30 fps, 1280x720 @ 30 fps, 848x480 @ 60 fps |
| Memory | MicroSD (TF) card up to 16 GB (not included) |
| Display | LCD status display |
| Power Supply | Built-in lithium-ion battery, charges via USB |
| Interface | USB 2.0, HDMI |
| Video Formats | NTSC, PAL |
| Included Software | MAGIX Video easy SE |
| Operating Temperature | Not specified |
Frequently Asked Questions - ACTV10001 HYUNDAI
User questions about ACTV10001 HYUNDAI
0 question about this device. Answer the ones you know or ask your own.
Ask a new question about this device
Download the instructions for your Camcorder in PDF format for free! Find your manual ACTV10001 - HYUNDAI and take your electronic device back in hand. On this page are published all the documents necessary for the use of your device. ACTV10001 by HYUNDAI.
USER MANUAL ACTV10001 HYUNDAI
ThankyouforpurchasingtheHyundaiSpeedCam.Pleasereadthese operatinginstructionscarefullyinordertousethecamcordercorrectly. Keeptheinstructionsinasafeplaceafterreadingsothatyoucanreferto themlater.
Precautions
Before using the SpeedCam, please ensure that you read and understand the safety precautions described below. Always ensure that the camcorder is operated correctly.
DonotpointtheSpeedCam, directly intothesunorotherintenselight sourceswhichcoulddamageyoureyesight.
DonottrytoopenthecaseoftheSpeedCamorattempttomodifythis SpeedCaminanyway.Maintenanceandrepairssshouldbecarriedout onlybyauthorizedserviceproviders.
KeeptheSpeedCamanditsaccessoriesoutofthereachofchildrenand
HYUNDAI
animalstopreventaccidentsordamagetotheSpeedCam.
If you notices smokeorastrangeodorcomingfromtheSpeedCam, turn the power off immediately. Take the SpeedCam tothenearest authorized service center for repair. Never attempt to repair the SpeedCam on your own.
Useonlytherecommendedpoweraccessories.Useofpowersourcesnot expresslyrecommendedforthisequipmentmayleadtooverheating, distortionoftheequipment,fire,electricalshockorotherhazards.
Disclaimer
Weassumenoresponsibilityfordamagessufferedbytheuserorthird partiesasaresultofinappropriethandlingoftheproductorits accessories,orbytheiroperationalfailureandbytheiruse.Wereservethe righttomakechangestothisproductanditsaccessorieswithoutprior notice. Thephotosincludedinthisusermanualareonlyforreference.
Contents
PRECAUTIONS1
DISCLAIMER2
PREPARINGFORUSING5
PARTOFTHECAMCORDER5
PREPARINGBEFOREUSING6
CHARGINGTHERBATTERY6
BATTERYINDICATOR7
INSERTING THE MEMORY CARD 8
BASICOPERATION9
TURING POWER ON AND OFF 9
DISPLAY ON THE LCD SCREEN 10
RECORDING MOVIE CLIPS 10
SETTINGTHERESOLUTION 11
SETTINGTHEQUALITY12
HYUNDAI
SETTING THE TV TYPE 13
SETTINGTHEDATEANDTIME14
FORMATMEMORYCARD16
DEFAULTSETTING17
DOWNLOADFILESFROMTHECAMCORDERTOPC18
PLAYINGBACKMOVIECLIPS19
SPECIFICATION21
SOFTWAREINSTALLATION22
INSTALLINGTHESOFTWARE22
Preparingforusing
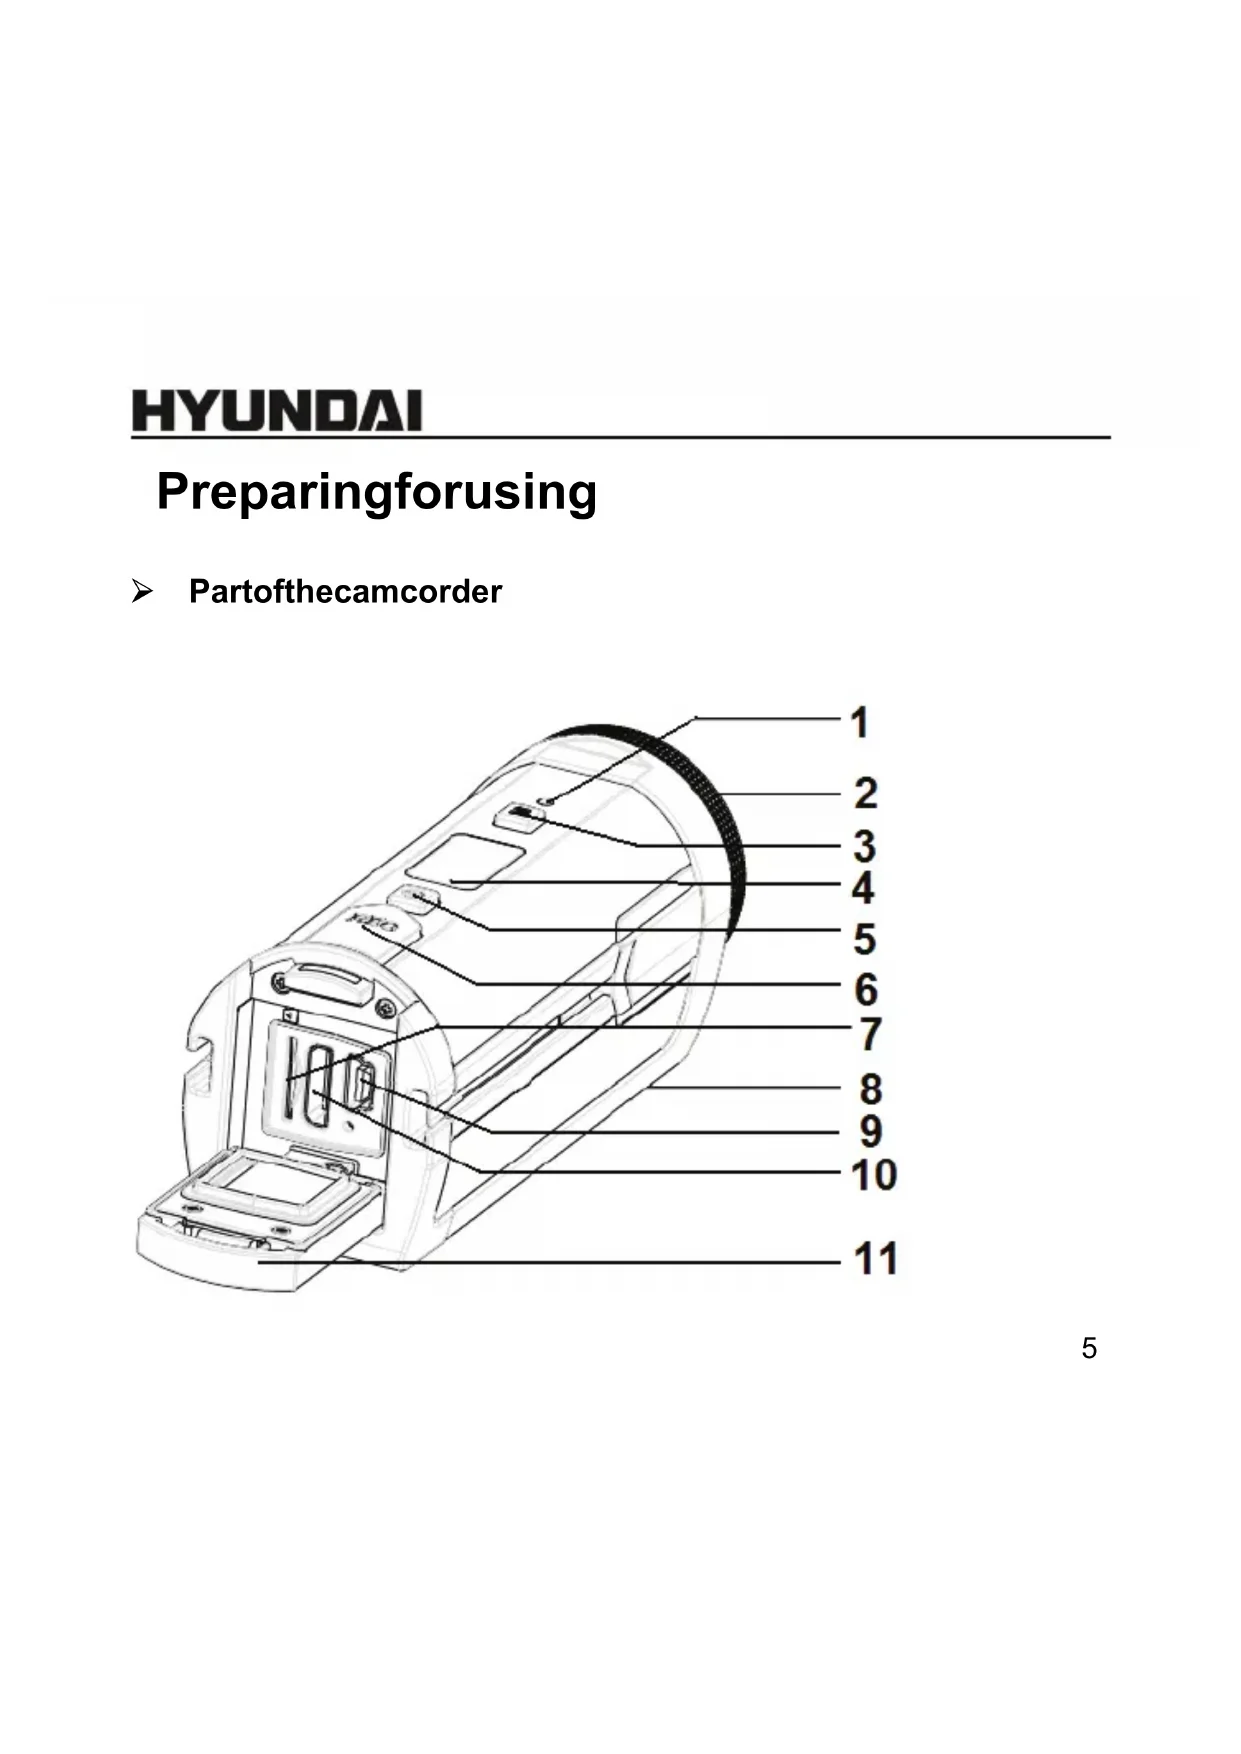
Partofthecamcorder
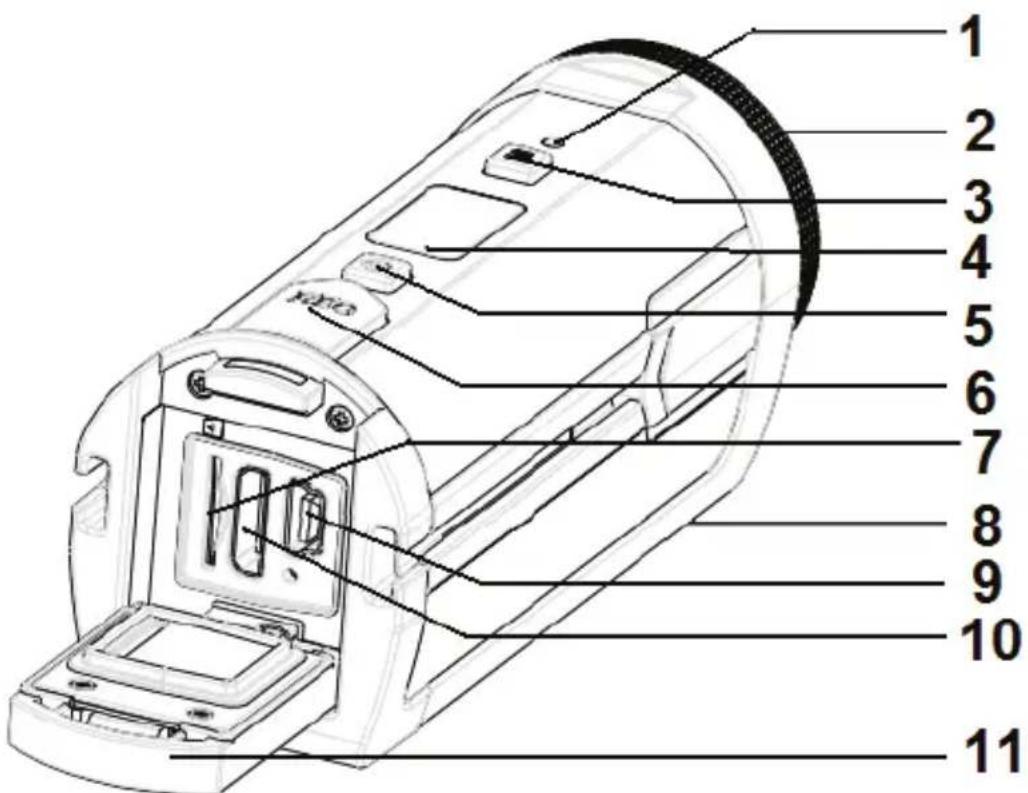
HYUNDAI
1:ChargingLED2:Lens
3:Menubutton4:LCDscreen
5:Powerbutton6:RECbutton
7:TFcardslot8:Microphone
9:USBjack10:HDMIjack
11.Cover
Preparingbeforeusing
Chargingthebattery
Thecamcorderhasabuild-inlithium-ionbattery,pleasechargethebattery atleast4hoursforfirsttimeuse.
1:Pushthecoverlockerdowntoopenthecover, and then find the USB jack.
2:ConnectthecamcordertoaPCviatheUSBcable.
HYUNDAI
3:Poweroffthecamcorder.
4:ChargingstartswhenchargingLEDturnsBLUE.Thechargeindicator lightturnsOFFwhenchargingiscompleted.
5:Disconnectthecamcorder.Pushthecoverlockerdowntoclosethe cover.
> Batteryindicator
| BatteryindicatorDescription | |
| Thebatterylevelisfull. | |
| Thebatterylevelishalf. | |
| Thebatterylevelislow,pleasepreparefor chargingthebattery. | |
InsertingtheMemoryCard
YoucanuseCFCardwiththiscamcorder.
1:Turnsoffthecamcorder.
2:Pushthecoverlockerdowntoopenthe cover, and then find the CFcardslot.
3:InserttheCFcardasshowinthefigure.
Ifthememorycardhassuccessfullyb
insertedyoucanhearaclearbuzzerandan
icon willdisplayontheLCDscreen.
e
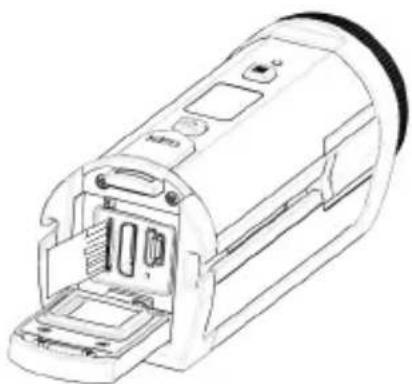
- Toremovethecard, gentlypressontheedgeofthecardandreleaseit. Pullthecardoutandclosethecover.
- Donottouchtheconnectionterminalsonthebacksideofthecard. Ifinsertorremovethecardwhilethecamcorderispoweron,itmaybe damagesthecardordata.
HYUNDAI
Aboutthememory
Thiscamcorderdoesnotequippedwithinternalmemory.AnSDcardormultimediacardmustbeinsertedforthisspotcamcordertooperate.lfacardhasnotbeeninsertedthisSpeedCamcannotrecord.
Basicoperation
> TurningPowerOnandOff
1:PressthePOWERbuttonoturnonthecamcorder.
2:PressthePOWERbuttonagaintoturnthepoweroff.
Thiscamcorderwillautomaticallyturnsoft180secondsafterthelastcontrolaccessed.PressthePOWERbuttonoturnnonthecamcorder
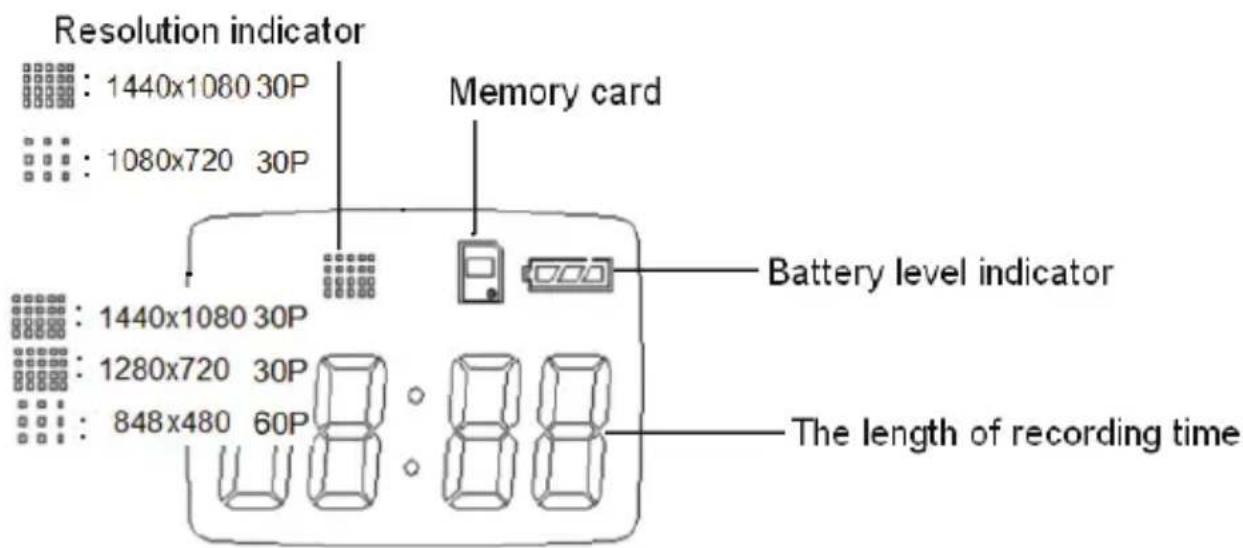
DisplayontheLCDscreen
WhentheSpeedCamispoweron, theseiconswilldisplayontheLCD screen.
RecordingMovieClips
1:Turnthepoweron.
TheLCDscreendisplay.

2:Startrecording.
PresstheRECbbuttonostartrecording.TheLCDmonitordisplays the recordedtime.
3:Finishrecording.
PresstheRECbuttonagaintostoprecording. Thecamcorderwillstop recordingautomaticallywhenthememorycapacityisfull.
Settingthesolution
1:TurnontheSpeedCam.
2:PresstheMENUbutton,theLCDscreendisplay

3:PresstheRECbuttontoenterthesubmenu.
4:PresstheMENUbuttontochangathereresolution.
EachtimetheMENUbuttonispressedtheiconontheLCDscreenis
HYUNDAI
changed.

:Thevideoclipsizes1440x1080.

:Thevideoclipsizeis1280x720.

:Thevideoclipsizeis848x480.
5:PresstheRECbuttontoconfirmthesetting.TheLCDscreendisplay

Settingthequality
1:TurnontheSpeedCam.
2:PresstheMENUbutton,theLCDscreendisplay

HYUNDAI
3:PresstheMENUbuttonagain,theLCDscreendisplay

4:PresstheRECbuttontoenterthesubmenu.
5:PresstheMENUbuttontochangethequality:
BF: S-Fine
FE:Fine
02:Normal
6:PresstheRECbuttontoconfirmthesetting.TheLCDscreendisplay
SettingtheTVtype
1:TurnontheSpeedCam.
HYUNDAI
2:PresstheMENUbutton,theLCDscreendisplay.

3:PresstheMENUButionagainuntiltheLCDscreendisplay.

4:PresstheRECbuttontoenterthesubmenu.
5:PresstheMENUbuttontochangetheTVtype:

NTSC:

PAL
6:PresstheRECbuttontoconfirmthesetting.TheLCDscreendisplay

Settingthedateandtime
1:TurnontheSpeedCam.
HYUNDAI
2:PresstheMENUbutton,theLCDscreendisplay.


3:PresstheMENUbuttonagainuntiltheLCDscreendisplay.
4:PresstheRECbutton,theLCDscreendisplaytheyear,presstheREC buttonagaintochangethevalue.
5:PresstheMENUbuttonagain,theLCDscreendisplaythemonth.Press theRECbuttontochangethevalue.
6:PresstheMENUbutton,theLCDscreendisplaythedate,pressthe RECbuttontochangethevalue.
7:PresstheMENUbutton,theLCDscreendisplaythehour,pressthe RECbuttontochangethevalue.
8:PresstheMENUButton,theLCDscreendisplaytheminite,pressthe RECbuttontochangethevalue.
9:PresstheMENUbuttonuntiltheLCDscreendisplay settinghasbesaved.
ldLE, the
Formatthememorycard
1:TurnontheSpeedcam.
2:PresstheMENUbutton,theLCDscreendisplay
3:PresstheMENUbuttonagainuntiltheLCDscreendisplay
4:PresstheRECbutton,theLCDscreendisplay.
5:PresstheMENUbuttontheLCDscreendisplay
6:PresstheRECbutton,theLCDscirendisplay.
7:PresstheMENUbuttontheLCDscreendisplay
8:PresstheRECbuttonofmatthememory,theLCDscreendisplay
HYUNDAI
FIRE
9:PresstheRECbuttonoclosethemenu.TheLCDscreendisplay
BDE.
Defaultsetting
1:TurnontheSpeedCam.
2:PresstheMENUbutton,theLCDscreendisplay


3:PresstheMENUbuttonagainuntiltheLCDscreendisplay

4:PresstheRECbutton,theLCDscreendisplay.
HYUNDAI
5:PresstheMENUbutton,theLCDscreendisplay.
6:PresstheRECbutton,theLCDscreendisplay
7:PresstheRECbuttonagain,theLCDscreendisplay


> DownloadfilesfromthecamcordertoPC
TherearetwowaystodownfilesfromthecamcordertoPC:byusing the cardreaderorbyconnectingthecamcordertoaPCwiththeUSBcable.
UsingtheCardReader
1:Ejectthememorycardfromthecamcorderandinsertitinacardreader thatisconnectedtoacomputer.
2:Open[MyComputer]or[WindowsExplorer]anddouble-clickthe removabledriveiconthatrepresentsthememorycard.
HYUNDAI
3:Copyimagesfromthecardintoadirectionofyourchoiceonthe computer'shardsdisk.
ConnectingtheCamcordertoaPCwiththeUSBCable
1:ConnectthecamcorderwithsuppliedUSBcabletothecomputer's USBport. Turnonthesortcamcorder, if the connection issuccessfulan
icon 一 willdisplayontheLCDscreen.
2:Open[MyComputer]or[WindowsExplorer].A"RemovableDisk" appearsinthedrivelist.Double-clickthe"RemovableDisk"icontoviewits contents Filesstoredoncamcorderarelocatedinthefoldernamed "DCIM".
> Playingbackmovieclips
YoucanonlyplaybackthemovieclipsbyaPCorHDTV.
HYUNDAI
PlayingbackmovieclipsbyaPC.
1:ConnectthecamcorderandthePCbytheattachedUSB cable.
2:Poweronthecamcorder.
3:Open[MyComputer]or[WindowsExplorer].A"RemovableDisk" appearsinthedrivelist.Double-clickthe"RemovableDisk"icontoviewits contents Filesstoredoncamcorderarelocatedinthefoldernamed "DCIM".
4:Youhavenstalltheplayermediafirstlyandthendouble-clickthefile youwanttoplay.
PlayingbackmovieclipsbyaTV.
1:UsethesuppliedHDMl cabletoconnectthecamcordertotheHDTVset. ThenturnonthecameraandtheHDTV.
2:SettheTVinputsignaltoHDMI. RefertothedocumentationincludedwithyourHDTVformoreinformation.
HYUNDAI
3:AllrecordfileswilldisplayontheTV.
4:PresstheMENUbuttontoselectafilewhichyouwanttoplayback.
5:PresstheRECbuttonostartplaying.
6:PresstheRECbuttonagaintohaveapauseifitisnecessary.Pressthe
RECbuttonthethirdtimetocontinueplaying.
7:PresstheMENUbuttontoendtheplaying.
Specification
Sensor:CMOSsensor,16megapixel,
Lens:F=2.8f=4.39mm
Focusrange:1.5Mtoinfinity
Illumination:100- 16000(lux)
Shutterspeed:Electronicshutter1/2- 1/2000s
Videorecordingresolution:
1440x1080@30fps/1280X720@30fps/848X480@60fps
Memory:External-SDandMMCardcompatible
HYUNDAI
StatusLCDscreen:
Battery:lithium-ionbattery
Interface:USB2.0,HDMI
SoftwareInstallation
InstallingtheSoftware
InserttheCDintoyourCD-ROMdrive. The autorunmenuappears:
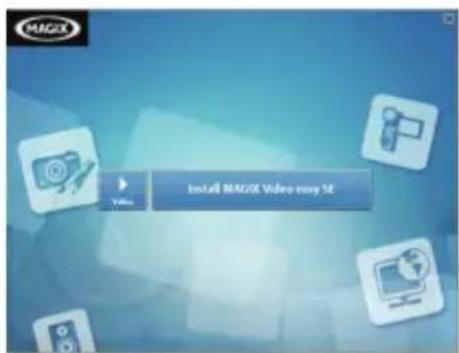
InstallIMAGIXVideoeasySE-Installssoftwareforedingvideooclips.
HYUNDAI
If the autorunmenudosnotappearautomatically, opentheCD-ROM [MyComputer]or[WindowsExplorer]anddouble-clickthefilenamed [start.exe]tostarttheprogram. You canalsoclick[Run]intheWindows Startupmenu, enter "D:\start.exe" (where DisyourCD-ROMdriveletter) in the textbox, and click [OK].
Notes:
- Open MAGIX VideoeaseySE, you havetorerthesoftwareatfirst, thenuseprogramwithoutanytimelimit.
2.Don'tforgettoinstalltheQuickTimePlayerduringinstallingtheMAGIX videoeaseasySE.
3.MAGIXVideoeasySEonlyincludesWindowsXPandWindowsVista, Windows7platforms.
SystemrequirementsforMagixVideoEasySE:
Intel®Pentium4orAMD®Athlon®1GHzandhigher
512MBRAM
400MBfreehardiskmemoryandaDVDdriveforprograminstallation
HYUNDAI
▶ Graphicscardwithascreenresolutionofatleast1024x768
Soundcard
Formoreinformationpleasevisitwww.my-hyundai.de
SpeedCam
1.Appuyezsu r latouchedeMISEENMARCHEPou r mettreleSpeed Camenservice.
2.Appuyezanouveausu r latouchedeMISEENMARCHEPou eteindrel'appareil.
LeSpeedCamsecondesaprèsladernièrereactivité.AppuyezsratouchedeMISEENMARCHEPourremetreleSpeedCamen service.
UF: S-Fin
FE:Fin
0L: Normal
6.AppuyezsurlatoucheRECpourconfirmerlesréglagesA
I'ecranLCDapparait

RéglagedelareproductionTV
1.MettezleSpeedCamenservice.

LecturedeclipsvideosuruneTV.
1:UtiliserLECâbleHDMIfournipourconnecterlacameraà laTVHD.AllumeralorslacaméraetlaTVHD.
2:Réglerlesignald'entréedelaTVsurHDMI.