EDGE13A - Slicer Centerline - Free user manual and instructions
Find the device manual for free EDGE13A Centerline in PDF.

| Product Type | Automatic Slicer |
| Brand | Centerline |
| Model | EDGE13A |
| Power Supply | 120 V, 60 Hz, 1 phase, 4.0 A |
| Motor | 1/2 HP (0.37 kW) |
| Maximum Cutting Thickness | 9/16 in (14.3 mm) |
| Slicing Speed | Automatic Single Speed |
| Blade Material | Chromium Forged Carbon Steel |
| Body Material | Anodized Cast Aluminum |
| Operating Modes | Automatic and Manual |
| Safety Devices | Blade guard, protection ring, pusher, immediate stop |
| Cleaning | Removable parts, wash with warm soapy water, disinfect, air dry |
| Maintenance | Blade sharpening (15 seconds), lubrication with mineral oil |
| Sharpener | Mounted on top, removable for cleaning, operated by handle |
| Electrical Plug | Three-prong grounded plug |
| Corrosion Protection | Anodized aluminum surface, corrosion resistant |
| Recommended Use | Food stores, professional kitchens |
| Warranty | Warranty subject to compliance with maintenance instructions (see manual) |
| Package Contents | Slicer, product carriage, pusher, sharpener, blade guard, slice deflector |
| Color | Aluminum gray (silver) |
Frequently Asked Questions - EDGE13A Centerline
User questions about EDGE13A Centerline
0 question about this device. Answer the ones you know or ask your own.
Ask a new question about this device
Download the instructions for your Slicer in PDF format for free! Find your manual EDGE13A - Centerline and take your electronic device back in hand. On this page are published all the documents necessary for the use of your device. EDGE13A by Centerline.
USER MANUAL EDGE13A Centerline
FORM 45259 Rev. C (November 2019)
TABLE OF CONTENTS
GENERAL 3
INSTALLATION 3
Unpacking. 3
Electrical 4
OPERATION 4
Safety 4
Slicing 4
CLEANING 5
Cleaning And Sanitizing 5
Cleaning Surface and Parts 5
Cleaning Meat Grip and Product Tray 5
Cleaning Knife and Slice Deflector 6
Cleaning Ring Guard 6
Cleaning Sharpening Stone 6
Gasket Inspection (Fig. 9) 7
MAINTENANCE 8
Knife Sharpening 8
Lubrication 8
TROUBLESHOOTING 8
Service 8
Installation, Operation and Care of CENTERLINE BY HOBART AUTOMATIC SLICER
SAVE THESE INSTRUCTIONS
GENERAL
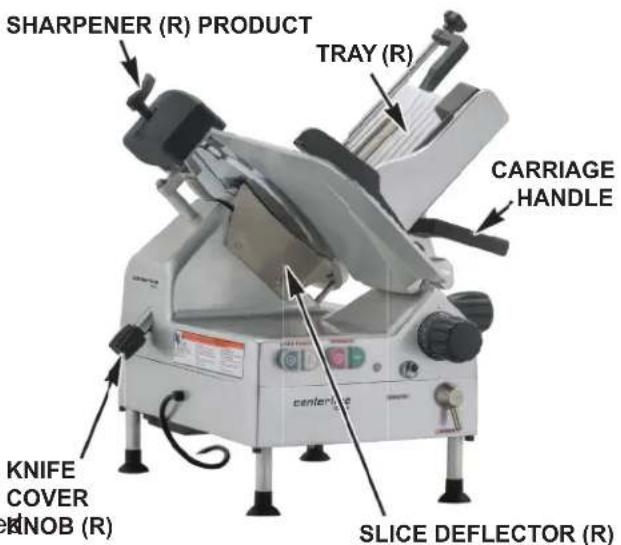
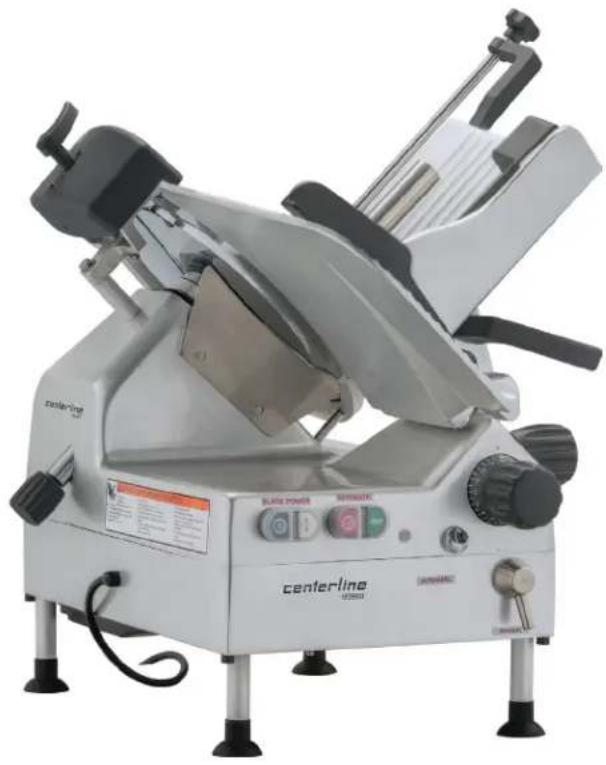
The Centerline by Hobart Automatic slicer is equipped with a 1/2 Hp. motor. The slicer Knife is chrome-plated forged carbon steel. The Slicer Base, Product Tray, Knife Cover, Ring Guard, and Gauge Plate are made of smooth finish anodized cast aluminum for easy cleaning. The rear-mounted Meat Grip is hinged on a rod with extension behind the Product Tray. The top-mounted knife Sharpener is removable for cleaning. A cord and plug is furnished as standard equipment.
The slicer must be thoroughly cleaned, rinsed and sanitized after installation and before being used. Refer to CLEANING on page 5.
INSTALLATION
UNPACKING
The slicer was inspected before leaving the factory. The carrier assumes full responsibility for safe delivery upon acceptance of the shipment. Check for possible shipping damage immediately after receipt.
If the slicer is found to be damaged, complete the following steps:
- Carrier must be notified within five business days of receipt.
- Carrier's local terminal must be notified immediately upon discovery (note the time, date, and who was spoken to), and follow up and confirm with written or electronic communication.
- All original packing materials must be kept for inspection purposes.
- The slicer cannot have been moved, installed, or modified.
- Notify Hobart customer care at (800) 333-7447.
Prior to installing the slicer, test the electrical service to make sure that it agrees with the specifications on the machine data plate. The data plate is located on the right side of the slicer base.
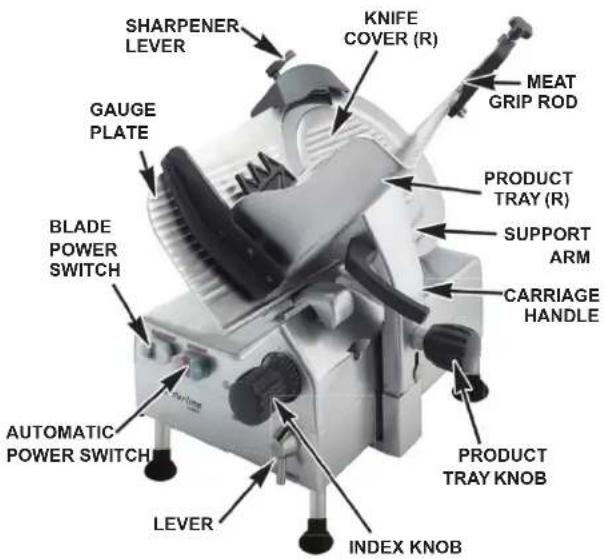
The Product Tray is secured to the slicer by turning the Knob (Fig. 2) below the Product Tray clockwise until snug.
Mount the Sharperener on top of the slicer (Fig. 1) by lowering it onto its post. The Sharperener can be removed for cleaning.
The Slice Deflector (Fig. 1) should already be mounteNBOB (R) below the knife.
(F)
ELECTRICAL
WARNING This machine comes with a three-prong grounding plug. The outlet to which this plug is connected must be properly grounded. If the receptacle is not the proper grounding type, contact an electrician.
ELECTRICAL DATA
| Model Volts / Hertz / Phase Machine Amps | Minimum Circuit Ampacity Maximum Protective Device AMPS | ||
| EDGE13A 120 / 60 / 1 4.0 15 | |||
Compiled in accordance with the National Electrical Code, NFPA 70, latest edition.
OPERATION
SAFETY
SAFETY DEVICES INCORPORATED IN THIS SLICER MUST BE IN THEIR CORRECT OPERATING POSITION ANY TIME THE SLICER IS IN USE.
The Slicer features one speed, one stroke automatic slicing.
The Knife Cover should already be secured in place with the Knife Cover Knob on the left side tightened clockwise (Fig. 1). The Ring Guard is not removable.
The Meat Grip (Fig. 4) helps secure product in position and must be used when slicing short ends to keep your hand(s) away from the knife.
When the slicer is not running, the Index Knob (Fig. 2) must be turned fully clockwise so the Gauge Plate covers the Knife edge.
Always UNPLUG the Power Cord before cleaning or moving the Slicer.
Fig. 2
(R) refers to removable part.
WARNING Rotating knife. Unplug machine power cord before cleaning, servicing or removing parts. Replace parts before use.
SLICING
With the Gauge Plate fully closed, pull the Product Tray forward until it stops. With the Meat Grip out of the way, place the product to be sliced on the Product Tray. Set the Meat Grip against the product. Turn the slicer on by pressing the Blade Power Switch ON (Fig. 2).
To operate slicer in automatic mode, change lever to automatic position at 9 o'clock. Turn the slicer on by pressing the Blade Power Switch ON (Fig. 2), then press the Automatic Power Button ON (Fig. 2).
If the Meat Grip is not needed, store it out of the way by lifting it to the top of the Meat Grip Rod and rotating it 270^ behind the Product Tray. Allow it to rest on the small notch of the upper Product Tray slot.
NOTE: The OFF button can be pressed to stop the slicer. The Product Tray will stop moving immediately.
Adjust the Gauge Plate to obtain the desired slice thickness by turning the Index Knob (Fig. 2) to vary the slice thickness from paper thin to 9/16 thick. Use the Carriage Handle (Fig. 2) to move the carriage back and forth to slice.
CLEANING
CLEANING AND SANITIZING
Thoroughly clean, rinse and sanitize the slicer after each day's use or after being idle for an extended time.
WARNING The slicer knife is very sharp. Exercise extreme caution when working near the knife.
WARNING Unplug the machine power cord and turn index knob fully clockwise to close the gauge plate before cleaning the slicer.
NOTE: Sanitizer concentration shall comply with Section 4-501.114, Manual and Mechanical Warewashing Equipment, Chemical Sanitation - Temperature, pH, Concentration, and Hardness of the FDA Food Code. If a chemical sanitizer other than chlorine, iodine, or quaternary ammonium is used, it shall be applied in accordance with the EPA-registered label use instructions.
Cleaning Surface and Parts
Frequency: The slicer shall be cleaned and sanitized at intervals to comply with national, state and/or local health codes.
Disassemble all removable slicer parts including Product Tray, Meat Grip, Meat Grip Rod, Slice Deflector, Knife Cover, Knife Cover Knob, and Sharpening Stone (See Fig. 1 and 2). Wash all surfaces of the machine with warm soapy water, a towel and mild detergent. Also, wash surfaces where food or liquid can accumulate or where there is frequent hand contact including handles, knobs and the control panel. Use generous amounts of soapy water on the sharpener hardware and knife hub. Clean all removable parts with water, a towel and mild detergent (refer to Page 7). Rinse with water and clean towel. Sanitize and let air dry.
- Excessive amounts of sanitizer and use of products not formulated for aluminum may void your Hobart warranty.
- DO NOT wash any slicer components in a dishwasher.
DO NOT hose down slicer or splash excessively with water. - Use ONLY products formulated to be safe on stainless steel or aluminum.
DO NOT exceed chemical manufacturer's recommended concentrations for detergent or sanitizer. - DO NOT clean any parts of the slicer with a steel pad.
Cleaning Meat Grip and Product Tray
Turn Index Knob fully clockwise until Gauge Plate is in closed position. Pull Product Tray to home position. Unscrew knob on Product Tray and lift to remove (Fig. 3). Unscrew Meat Grip Knob in order to extract Meat Grip Rod from the Product Tray (Fig. 4). Set aside rod and Meat Grip. Wash surface area, Product Tray, Meat Grip and Meat Grip Rod with water, a towel and mild detergent. Rinse, sanitize and let air dry. To replace the Product Tray, lower the tray onto the carriage and tighten the knob clockwise until snug. Thread Meat Grip Rod into Product Tray extension and then insert into Meat Grip. Tighten rod clockwise until snug.

Fig. 3 Fig. 4

Cleaning Knife and Slice Deflector
With Meat Grip and Product Tray removed, turn Index Knob fully closed. Unscrew the Knife Cover Knob (Fig. 5). Push the knob to remove Knife Cover. Remove both the Knife Cover and the Knife Cover Knob. Remove the Slice Deflector (Fig. 6) by sliding deflector downward to elongated slots. Wash, rinse and sanitize the Knife Cover Knob, Knife Cover, Slice Deflector and both sides of the Knife by wiping outward from the center. Allow to air dry.

Fig. 5 Fig. 6

Cleaning Ring Guard
Work a moistened paper towel between the Ring Guard and Knife. Insert the towel at the base of the Ring Guard (Fig. 7). Manually rotate the Knife to wipe Ring Guard and the edge of Guard Plate.
To replace the Knife Cover, insert the Knife Cover Knob into its hole (lower left side) and position the Knife Cover over the center hole so the guide pin fits the hole in the rim and the hub fits the center hole. Tighten the Knife Cover Knob (Fig. 5) so the threads at the end of the rod screw into the threaded hub underneath the Knife Cover.
Cleaning Sharpening Stone
Each time the Sharpener is used, the sharpening stones should be examined for cleanliness. Scrub stones with a stiff bristle brush. Rinse with clean water and sanitize.
Reassemble the Sharpener by lowering it onto the sharpener post (Fig. 8).
NOTE: Do not exceed chemical manufacturer's recommended concentrations for detergent or sanitizer. Do not exceed 200 parts per million concentration of available chlorine (1 tablespoon of 5.25% sodium hypochlorite bleach with 1 gallon of water). Concentrations greater than 200 ppm accelerate corrosion of metals. Maximum exposure to sanitizing solution varies with temperature and concentration. Rinse with clean water.
NOTE: Failure to follow use, care and maintenance instructions may void your Hobart warranty.
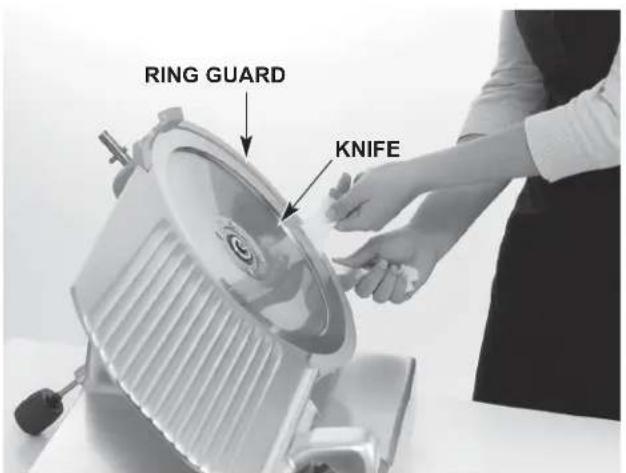
Fig. 7 Fig. 8

GASKET INSPECTION (FIG. 9)
The recommended interval between inspections shall not exceed six months for components that are detached for cleaning and sanitizing (all the gaskets in the images).
The inspections must be made by the manufacturer or its authorized service agent.
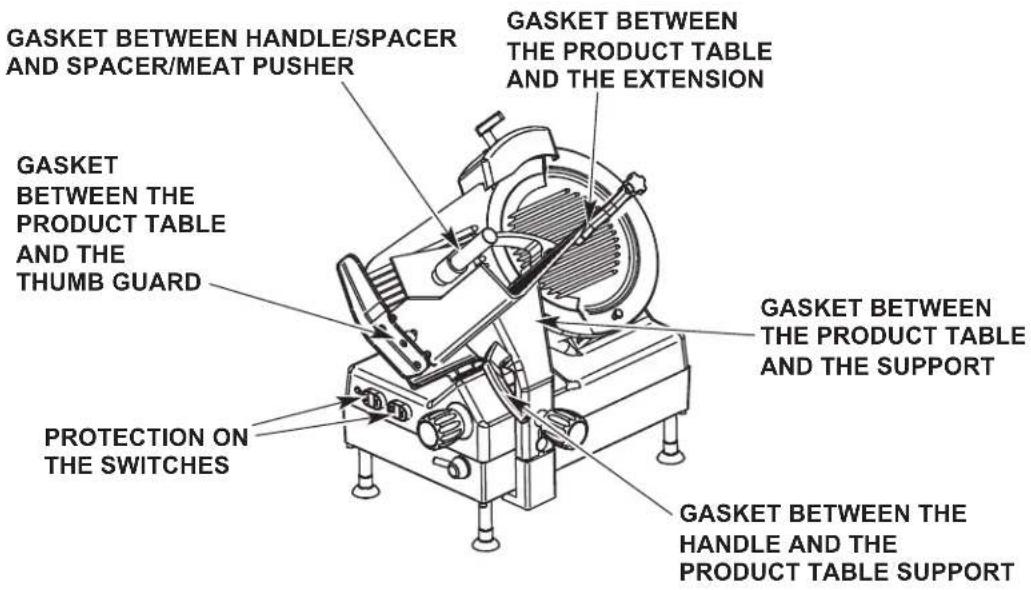
Fig. 9
WARNING The slicer must be removed from service until repaired by the manufacturer or its authorized service agent if any gasket or seal is found to be damaged, or missing.
MAINTENANCE
KNIFE SHARPENING
The Knife will provide long service in normal food store or kitchen use. However, in high volume applications where it is a practice to sharpen the Knife frequently or even daily, the Knife will be expended in a shorter time.
Sharpen only when necessary. Prolonged or sharpening too frequently results in unnecessary knife wear.
WARNING Unplug machine power cord.
Turn the Index Knob fully clockwise to close the Gauge Plate. Remove the Knife Cover by unscrewing the Knob and lifting it off the slicer.
Turn the slicer ON. Pull the Sharpener Handle (Fig. 10) forward for 15 seconds and release. Turn the slicer off. Unplug machine power cord. Clean and sanitize the slicer as outlined in the cleaning section after sharpening the Knife. Replace the Knife Cover.
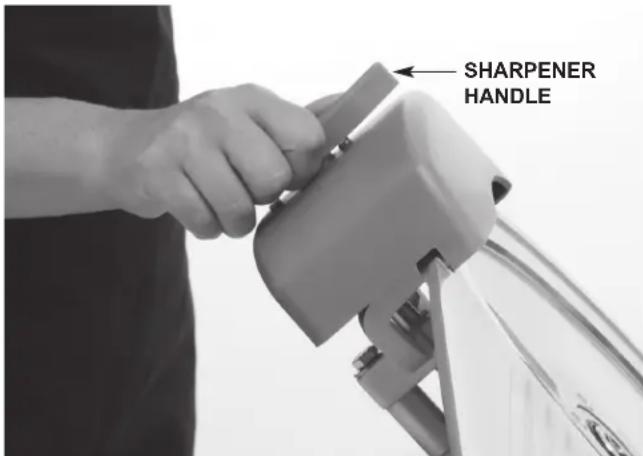
Fig. 10
LUBRICATION
Maintain smooth slicing by applying a few drops of mineral oil on the Carriage Slide Rod underneath the slicer base. Do not use vegetable oil.
TROUBLESHOOTING
Make sure that the circuit breaker has not tripped or the fuse blown.
SERVICE
Contact your local Hobart-authorized service office for any repairs or adjustments needed on this equipment.
INSTRUCTION MANUAL
MODELE
EDGE13A
ML-136348
701 S. RIDGE AVENUE
TROY, OHIO 45373
937-332-3000
www.hobartcorp.com
FORMULAIRE 45259 Rev. C (novembre 2019)
TABLE DES MATIÈRES
RENSEIGNEMENTS GENERAUX 3
INSTALLATION 3
Déballage 3
4
FONCTIONNEMENT 4
Inspection du joint (fig. 9) 7
ENTRETIEN 8
Affutage de la lame 8
Lubrification 8
DEPANNAGE 8
Service 8