
SRB 4 A1 - Face cleansing SILVERCREST - Free user manual and instructions
Find the device manual for free SRB 4 A1 SILVERCREST in PDF.
| Product Type | Rechargeable electric cleaning brush |
| Model | SRB 4 A1 |
| Brand | SilverCrest |
| Power Supply | Built-in rechargeable lithium-ion battery, charging via USB-C port (5 V, 2 A max) |
| Battery Life | Up to 60 minutes |
| Charging Time | Approximately 1.5 hours (with 2 A charger) |
| Charging Indicator | Red during charging, green when fully charged |
| Items Included | Cleaning brush, large brush attachment, narrow brush attachment, pad holder with hook-and-loop fasteners, 2 abrasive sponge attachments (coarse and fine grain), USB-A to USB-C charging cable, instruction manual |
| Attachments Available | Large brush (large flat surfaces), narrow brush (non-flat surfaces and crevices), coarse grain abrasive sponge (tough dirt), fine grain abrasive sponge (light dirt, delicate surfaces) |
| Intended Use | Cleaning indoor hard surfaces (floors, walls, sinks, stoves, etc.) in a domestic setting |
| Safety | Do not immerse the handle, do not use for body care or on animals, do not use with a damaged cable, keep away from children under 8 years old without supervision |
| Maintenance | Clean the handle with a damp cloth; attachments and pads with clean water and mild detergent; dry completely before storage |
| Storage | In a clean, dry place, protected from direct sunlight |
| Spare Parts | Available at www.kompernass.com (reference IAN 449364_2304) |
| Warranty | 3 years (France and Belgium), valid upon presentation of the receipt |
Frequently Asked Questions - SRB 4 A1 SILVERCREST
User questions about SRB 4 A1 SILVERCREST
0 question about this device. Answer the ones you know or ask your own.
Ask a new question about this device
Download the instructions for your Face cleansing in PDF format for free! Find your manual SRB 4 A1 - SILVERCREST and take your electronic device back in hand. On this page are published all the documents necessary for the use of your device. SRB 4 A1 by SILVERCREST.
USER MANUAL SRB 4 A1 SILVERCREST
natural_image
White and black hairdryer with bristles, labeled 'SILVERCREST' (no other text or symbols visible)ELECTRIC CLEANING BRUSH
Operating instructions and safety instructions
FR BE
BROSSE DE NETTOYAGE ÉLECTRIQUE
Before reading, unfold the page containing the illustrations and familiarise yourself with all functions of the device.
DE AT CH
GB / IE Operating instructions and safety instructions Page 1
Information about these operating instructions 2
Proper use 2
Safety information 2
Package contents and transport inspection 5
Appliance description 5
Before use 6
Charging the internal battery 6
Using the accessories 7
Handling and operation 8
Cleaning and maintenance 9
Storage 9
Technical details 10
Ordering replacement parts 10
Disposal....11
Disposal of the appliance 11
Disposal of the packaging 12
Kompernass Handels GmbH warranty 12
Service....14
Importer 14
Introduction
Information about these operating instructions
Congratulations on the purchase of your new appliance.
You have selected a high-quality product.

The operating instructions are part of this product. They contain important information about safety, usage and disposal. Before using
the product, please familiarise yourself with all operating and safety instructions.
Use the product only as described and for the range of applications specified.
Please also pass these operating instructions on to any future owner.
Proper use
The appliance is intended exclusively for removing dirt indoors in domestic households. Do not use the appliance for personal or animal care.
It is not intended for use in commercial or industrial areas.
Claims of any kind for damage resulting from misuse, incompetent repairs, unauthorised modification or the use of unauthorised replacement parts will not be accepted. The risk is borne solely by the user.
Safety information

WARNING! RISK OF INJURY!
▶ Check the appliance for visible external damage before use. Do not operate an appliance that has been damaged or dropped.
▶ Never use the appliance if the cable, plug or housing are damaged.
If the charging cable or the connections of the appliance are damaged, have them replaced by the manufacturer, its customer service or a similarly qualified person in order to avoid hazards.
▶ Use only accessories recommended by the manufacturer.

WARNING! RISK OF INJURY!
This appliance may be used by children aged 8 years and above and by persons with limited physical, sensory or mental capabilities, or lack of experience and knowledge, provided that they are under supervision or have been told how to use the appliance safely and are aware of the potential risks. Do not allow children to play with the appliance. Cleaning and user maintenance tasks may not be carried out by children unless they are supervised.
▶ Never immerse the appliance in water or other liquids.
▶ Never open the appliance. Have all repairs and replacement work done by the Service Centre or a qualified electrician.
- Keep hair, loose clothing and all other parts of the body away from moving parts of the appliance during operation.
▶ Use this appliance only as described in this instruction manual. Never use it for other purposes. There is a risk of injury if the appliance is misused.
- Switch off the appliance before cleaning it or switching accessories.
ATTENTION! PROPERTY DAMAGE!
- Ensure that the charging cable is not stretched tightly or kinked.
- Do not expose the appliance to direct sunlight or high temperatures. Otherwise, it can overheat and be irreparably damaged.
The appliance may heat up while it is charging. Place the appliance in a well-ventilated location during the charging process and do not cover it. - Switch the appliance off immediately and disconnect any connected cables from the appliance if you hear any unusual noises, smell fumes or notice any smoke. Have the appliance checked by a qualified specialist before using it again.
The product is equipped or supplied with a lithium-ion battery. Do not throw the rechargeable battery into a fire and do not subject it to high temperatures. There is a risk of an explosion!
▶ The battery in this appliance cannot be replaced.
Package contents and transport inspection
◆ Remove all parts of the appliance and the operating instructions from the packaging.
◆ Remove all packaging materials and any films and labels.
The package contents include the following components (see fold-out page for illustrations):
- Cleaning brush
- Brush attachment, broad
- Brush attachment, narrow
- Pad holder with Velcro
- Scouring pad attachments (two pads)
- USB charging cable (USB-A to USB-C)
- Operating instructions (not shown)
NOTE
▶ Check the package for completeness and signs of visible damage.
▶ If the delivery is incomplete or damage has occurred as a result of defective packaging or during transport, contact the customer service hotline (see section Service).
Appliance description
(See fold-out page for illustrations)
① Battery charge indicator
② On/Off switch
3 Hand element
4 USB-C port
⑤ Scouring pad attachment 1 (coarse pad)
6 Scouring pad attachment 2 (fine pad)
⑦ USB charging cable (USB-A to USB-C)
8 Pad holder with Velcro
9 Brush attachment, narrow
10 Brush attachment, broad
⑪ Attachment holder
Before use
Charging the internal battery
ATTENTION! PROPERTY DAMAGE!
▶ Due to the high current consumption, the appliance must be charged using a USB mains adapter (not supplied). Do not charge the appliance from the USB port of a PC or notebook.
For charging the appliance use only protection class II power supply approved for use with household products (output voltage/SELV output 5 V, max. 2 A).
▶ Use only the supplied USB charging cable ⑦ to charge the appliance.
▶ Disconnect the USB charging cable ⑦ when charging is complete.
NOTE
▶ The battery must be fully charged before using the appliance.
▶ Charging takes about 1.5 hours at a charging current of 2 A. When the battery is fully charged, the appliance can be operated for up to 60 minutes.
-
Make sure that the appliance is switched off. To switch off the appliance, press the On/Off switch ① ②.
-
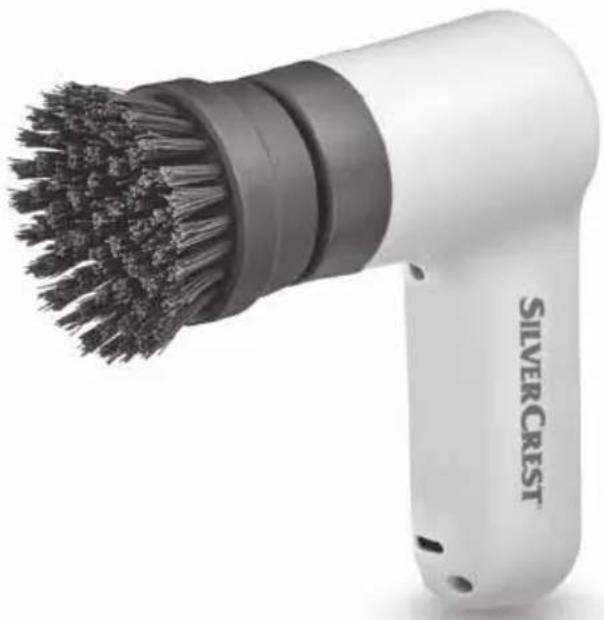
Connect the USB-A plug on the USB charging cable ⑦ to a USB power supply (see fig. 1). Insert the plug of the USB power supply into a mains power socket.
-
Connect the USB-C plug of the USB charging cable ⑦ to the USB-C socket ④ on the appliance (see fig. 1). The battery charge indicator ① lights up red and the charging process begins.
natural_image
Diagram of a hairdryer connected to an electrical outlet, showing cable and pin connections (no text or symbols)Fig. 1
-
The battery charge indicator ① lights up green as soon as the battery is charged.
-
Disconnect the USB charging cable ⑦ from the USB-C socket ④ on the appliance.
Using the accessories

WARNING! RISK OF INJURY!
▶ Make sure the appliance is switched off before changing the attachments ⑧/⑨/⑩ and the scouring pad attachments (coarse/fine pad) ⑤/⑥.
Two brush attachments 9/10 and two scouring pad attachments (coarse/fine pad) 5/6 (for the pad holder 8) are supplied with the appliance. Choose the most suitable brush attachment 9/10 or the most suitable scouring pad attachment 5/6 for the task:
Wide brush attachment
Use the wide brush attachment ⑩ for cleaning large flat areas, such as floors and walls.
Narrow brush attachment
Use the narrow brush attachment ⑨ to clean uneven surfaces, like washbasins, taps and hard-to-reach places such as crevices, corners and joints.
Scouring pad attachment 1 (coarse pad)
Use scouring pad attachment 1 (coarse pad) ⑤ to clean pots, pans or hobs with caked on, hard-to-remove dirt.
Scouring pad attachment 2 (fine pad)
Use scouring pad attachment 2 (fine pad) Ⓐ to clean pots, pans or hobs with easy-to-remove dirt or for cleaning surfaces such as glass and plastic.
Fitting/removing attachments
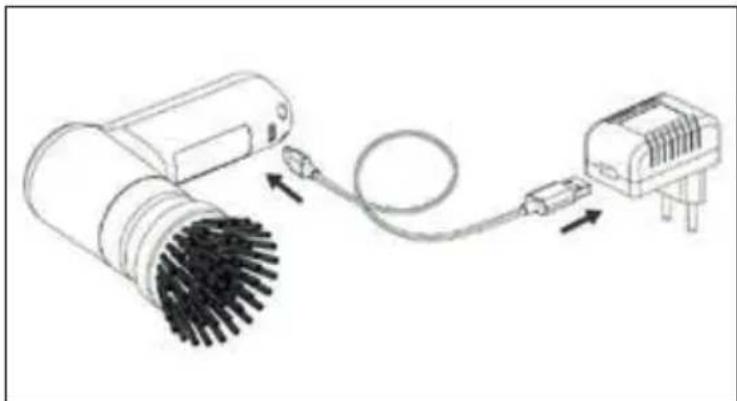
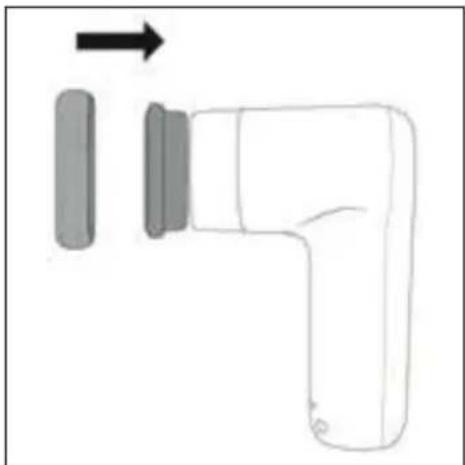
◆ Push the required attachment 8/9/10 onto the attachment holder 11 until it clicks into place (see fig. 2). Please make sure that the two catches on the attachment holder 11 slide into the appropriate recesses on the attachment 8/9/10.
To remove an attachment 8/9/10, pull it from the attachment holder 11 with a small amount of force (see fig. 3).
natural_image
Diagram showing a brush applying material to an electric shaver (no text or symbols present)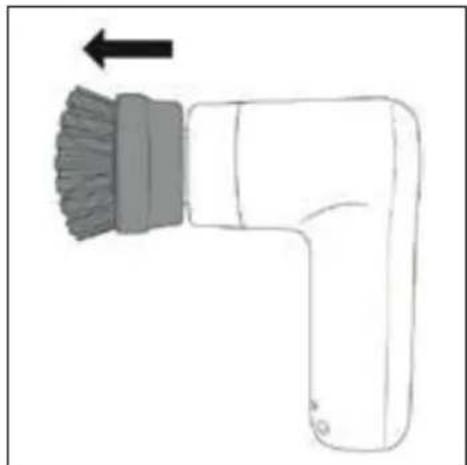
natural_image
Line drawing of a hairdryer with brush applying material, no text or symbols presentFig. 2 Fig. 3
Fitting/removing the scouring pad attachments
The scouring pad attachments (coarse/fine pad) ⑤/⑥ are attached to the pad holder ⑧. This is provided with Velcro to make fitting and removal of the scouring pad attachments ⑤/⑥ quick and easy.
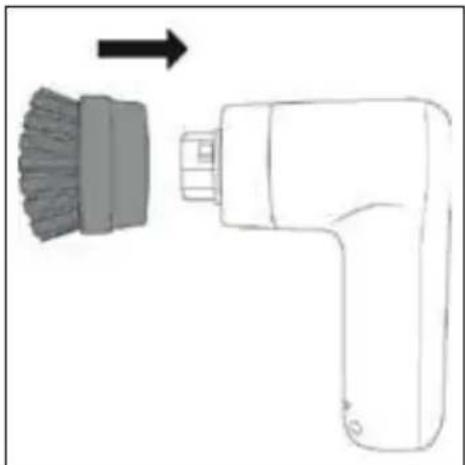
◆ Press the scouring pad attachment 5/6 firmly onto the pad holder 8. Make sure that the scouring pad attachment 5/6 is attached firmly and centrally on the pad holder 8 (see fig. 4).
To remove the scouring pad attachment 5/6, lift one side a little and then pull it off the pad holder 8 (see fig. 5).
◆ Clean the pad holder ^8 after use and before you attach another scouring pad attachment 5/6.
natural_image
Diagram of a handheld device with a right-hand rule and two gray rectangular buttons, no text or symbols present.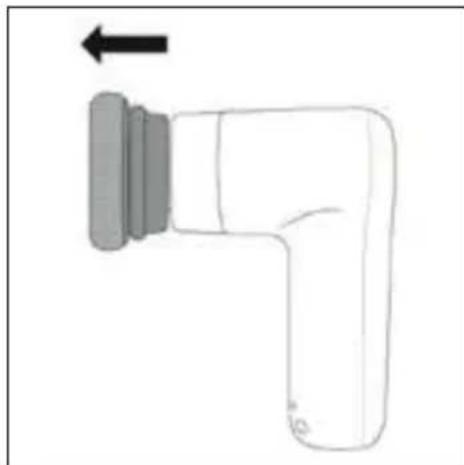
natural_image
Simple line drawing of a right-angle pipe fitting with a left-pointing arrow (no text or symbols)Fig. 4 Fig. 5
Handling and operation
ATTENTION! PROPERTY DAMAGE!
▶ Do not use abrasive cleaning agents. They could irreparably damage the surface you are cleaning.
The hard bristles of the brush attachment ^9 / ^10 and the coarse scouring pad attachment ^5 can scratch or damage sensitive surfaces such as glass, vehicle paintwork, stainless steel, copper, wood, etc. Test the brush attachments ^9 / ^10 and the coarse scouring pad attachment ^5 before use on an inconspicuous patch of the area you want to clean.
NOTE
▶ Use the appliance with water. For more difficult stains use a mild cleaning detergent. Apply the detergent directly onto the brush attachment ⑨/⑩ or the scouring pad attachment ⑤/⑥ and/or on the area you are cleaning before switching on the appliance.
▶ After every use, clean the appliance and the used attachments 5/6/8/9/10 as explained in the section Cleaning and maintenance.
◆ Hold the appliance tightly over the area to be cleaned.
Switch on the appliance by pressing the On/Off switch①②.
◆ Move the brush attachment⑨/⑩ or the scouring pad attachment ⑤/⑥ over the area you are cleaning while applying a light pressure. Apply more water and/or cleaning detergent, as needed, to the area to be cleaned.
Once you have finished using the appliance, press the On/Off switch① ② again to switch it off.
Cleaning and maintenance

WARNING! RISK OF ELECTRIC SHOCK!


Do not immerse the hand unit ③ in water in order to clean it.
ATTENTION! PROPERTY DAMAGE!
▶ Do not clean the appliance with solvents, alcohol or abrasive cleaning agents. These could damage the plastic surfaces of the appliance.
- Clean the hand unit③ with a moistened cloth. For stubborn dirt, add a little mild detergent to the cloth.
♦ Wash the attachments 5/6/8/9/10 under running water and with some mild detergent. Rinse off the attachments 5/6/8/9/10 afterwards with fresh water.
Allow the hand element 3 and the attachments 5/6/8/9/10 to dry completely before using them again or storing them.
Storage
◆ Store the appliance and the accessories in a clean, dry location out of direct sunlight.
Technical details
| Input voltage/current | 5 V = (DC), 2 A max.(via the USB-C port) |
| USB port USB-C | |
| Integrated battery (lithium ion) 4 V | == (DC), 2000 mAh |
| Protection class | III / ◇ (protection through low voltage) |
| Protection type | IPX5 (Protection against water jets from any direction) |
| Removable power supply | D-□-C |
| Operating time with full battery charge | Approx. 60 minutes |
| Charging time Approx. 1.5 hours |

Ordering replacement parts
You can order replacement parts for this product on the internet at www.kompernass.com.

Scan this QR code with your smartphone or tablet. You can use this QR code to navigate directly to our website www.kompernass.com where you can view and order the available spare parts for this appliance.
NOTE
▶ If you have problems with your online order, you can contact our customer service centre by phone or e-mail (see section Service).
▶ Please always quote the article number (e.g. 449364_2304) when ordering. You can find it on the title page of these operating instructions.
▶ Please note that online ordering of replacement parts is not possible for all countries.
Disposal
Applies only to France:

The product, its packaging and the operating instructions are recyclable. They are subject to an extended manufacturer responsibility and will be collected separately.
Disposal of the appliance
The adjacent symbol of a crossed-out dustbin means that this appliance is subject to Directive 2012/19/EU. This directive states that this appliance may not be disposed of in the normal household waste at the end of its useful life, but must be taken to specially set-up collection locations, recycling depots or disposal companies.
The disposal is free of charge for the user. Protect the environment and dispose of this appliance properly.
If your old appliance has stored any personal data, you are responsible for deleting it yourself before returning it.
If it is possible to do so without destroying the old appliance, remove the old batteries or rechargeable batteries before returning the appliance for disposal and take them to a separate collection point. In the case of permanently installed rechargeable batteries, you must indicate during disposal that the appliance contains a battery.
The integrated rechargeable battery in this appliance cannot be removed for disposal.

Your local community or municipal authorities can provide information on how to dispose of the worn-out product.
Disposal of the packaging
The packaging materials have been selected for their environmental friendliness and ease of disposal and are therefore recyclable. Dispose of packaging materials that are no longer needed in accordance with applicable local regulations.
Dispose of the packaging in an environmentally friendly manner. Note the labelling on the packaging and separate the packaging material components for disposal, if necessary. The packaging material is labelled with abbreviations (a) and numbers (b) with the following meanings: 1-7: plastics, 20-22: paper and cardboard, 80-98: composites.
This appliance has a 3-year warranty valid from the date of purchase. If this product has any faults, you, the buyer, have certain statutory rights. Your statutory rights are not restricted in any way by the warranty described below.
Warranty conditions
The warranty period starts on the date of purchase. Please keep your receipt in a safe place. This will be required as proof of purchase.
If any material or manufacturing fault occurs within three years of the date of purchase of the product, we will either repair or replace the product for you or refund the purchase price (at our discretion). This warranty service requires that you present the defective appliance and the proof of purchase (receipt) within the three-year warranty period, along with a brief written description of the fault and of when it occurred.
If the defect is covered by the warranty, your product will either be repaired or replaced by us. The repair or replacement of a product does not signify the beginning of a new warranty period.
Warranty period and statutory claims for defects
The warranty period is not prolonged by repairs effected under the warranty. This also applies to replaced and repaired components. Any damage and defects present at the time of purchase must be reported immediately after unpacking. Repairs carried out after expiry of the warranty period shall be subject to a fee.
Scope of the warranty
This appliance has been manufactured in accordance with strict quality guidelines and inspected meticulously prior to delivery.
The warranty covers material faults or production faults. The warranty does not extend to product parts subject to normal wear and tear or to fragile parts which could be considered as consumable parts such as switches, batteries or parts made of glass.
The warranty does not apply if the product has been damaged, improperly used or improperly maintained. The directions in the operating instructions for the product regarding proper use of the product are to be strictly followed. Uses and actions that are discouraged in the operating instructions or which are warned against must be avoided.
This product is intended solely for private use and not for commercial purposes. The warranty shall be deemed void in cases of misuse or improper handling, use of force and modifications / repairs which have not been carried out by one of our authorised Service centres.
Warranty claim procedure
To ensure quick processing of your case, please observe the following instructions:
■ Please have the till receipt and the item number (IAN) 449364_2304 available as proof of purchase.
■ You will find the item number on the type plate on the product, an engraving on the product, on the front page of the operating instructions (below left) or on the sticker on the rear or bottom of the product.
If functional or other defects occur, please contact the service department listed either by telephone or by e-mail.
■ You can return a defective product to us free of charge to the service address that will be provided to you. Ensure that you enclose the proof of purchase (till receipt) and information about what the defect is and when it occurred.
You can download these instructions along with many other manuals, product videos and installation software at www.lidl-service.com.
This QR code will take you directly to the Lidl service page (www.lidl-service.com) where you can open your operating instructions by entering the item number (IAN) 449364_2304.
Service
GB Service Great Britain
Tel.: 0800 404 7657
E-Mail: kompernass@lidl.co.uk
IE ServiceIreland
Tel.: 1800 101010
E-Mail: kompernass@lidl.ie
IAN 449364_2304
Importer
Please note that the following address is not the service address. Please use the service address provided in the operating instructions.
KOMPERNASS HANDELS GMBH
BURGSTRASSE 21
44867 BOCHUM
GERMANY
www.kompernass.com
Inhaltsverzeichnis
Einleitung 16
natural_image
Diagram of a hairdryer connected to an electrical outlet via cable (no text or symbols)Abb. 1
natural_image
Diagram showing a hairdryer with brush head removed from a plastic component, no text or symbols present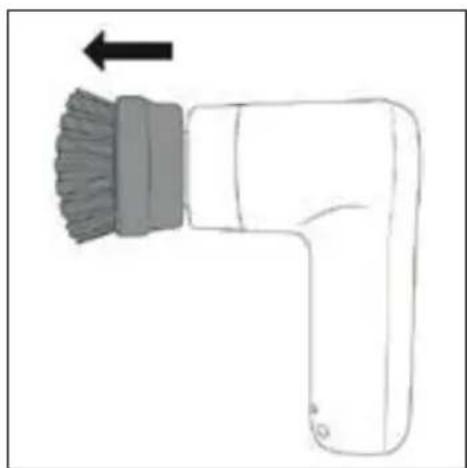
natural_image
Line drawing of a hairdryer tool with brush head and arrow indicating direction (no text or symbols)Abb. 2 Abb. 3
natural_image
Diagram of a handheld device with a right-hand rule and two gray buttons, no text or symbols present
natural_image
Simple line drawing of a right-angle pipe fitting with a black arrow indicating direction (no text or symbols)Abb. 4 Abb. 5
KOMPERNASS HANDELS GMBH
BURGSTRASSE 21
44867 BOCHUM
DEUTSCHLAND
www.kompernass.com
Sommaire
Introduction 30
natural_image
Diagram of a hairdryer connected to an electrical outlet, showing cable and pin connections (no text or symbols)Fig. 1
natural_image
Diagram showing a hairdryer with brush head removed from a plastic component, no text or symbols present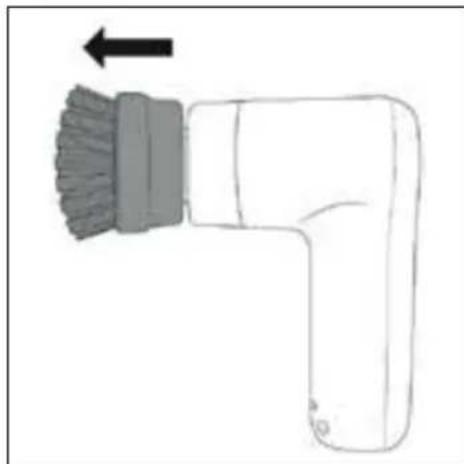
natural_image
Line drawing of a hairdryer with brush head and arrow indicating direction (no text or symbols)Fig. 2 Fig. 3
natural_image
Diagram of a right-hand rule tool with two gray buttons and an arrow indicating direction (no text or symbols)
natural_image
Simple line drawing of a right-angle pipe fitting with a left-pointing arrow (no text or symbols)Fig. 4 Fig. 5
KOMPERNASS HANDELS GMBH
BURGSTRASSE 21
44867 BOCHUM
ALLEMAGNE
www.kompernass.com
Inhoud
Inleiding....48
⚠ WAARSCHUWING! GEVAAR VOOR LETSEL!
WAARSCHUWING! GEVAAR VOOR LETSEL!
natural_image
Diagram of a hairdryer connected to an electrical outlet, showing cable and pin connections (no text or symbols)Afb. 1
⚠ WAARSCHUWING! GEVAAR VOOR LETSEL!
natural_image
Diagram showing a brush applying material to a handheld tool, with an arrow indicating direction (no text or symbols present)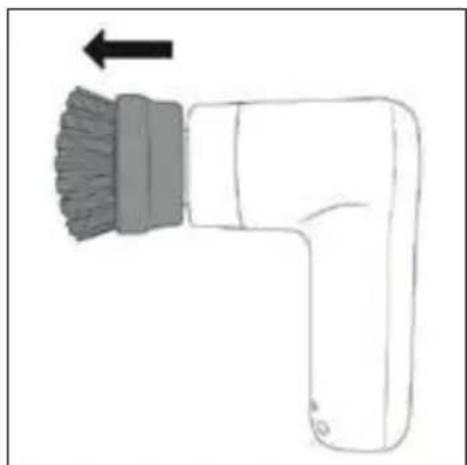
natural_image
Line drawing of a hairdryer with brush applying material, no text or symbols presentAfb. 2 Afb. 3
natural_image
Diagram of a handheld device with a right-hand rule and two gray rectangular buttons, no text or symbols present.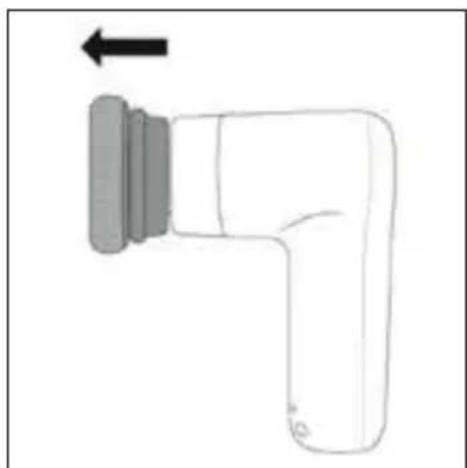
natural_image
Simple line drawing of a right-angle pipe fitting with a left-pointing arrow (no text or symbols)Afb. 4 Afb. 5
KOMPERNASS HANDELS GMBH
BURGSTRASSE 21
44867 BOCHUM
DUITSLAND
www.kompernass.com
Obsah
Úvod....62
POZOR! HMOTNÉ ŠKODY!
POZOR! HMOTNÉ ŠKODY!
natural_image
Diagram of a hairdryer connected to an electrical component via cable (no text or symbols)Obr. 1
natural_image
Diagram showing a brush applying material to a handheld electric shaver (no text or symbols present)
natural_image
Line drawing of a hairdryer with brush applying material, no text or symbols presentObr. 2 Obr. 3
natural_image
Diagram of a handheld device with a right-hand rule and two gray rectangular buttons, no text or symbols present.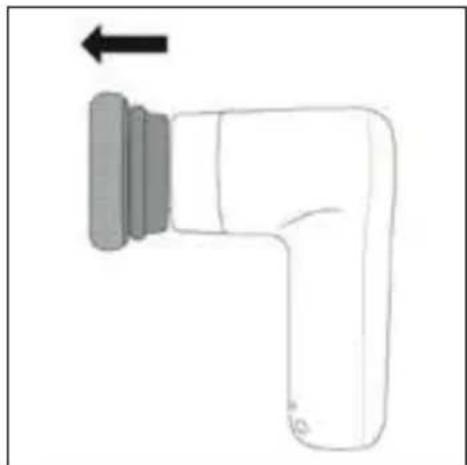
natural_image
Simple line drawing of a right-angle pipe fitting with a left-pointing arrow (no text or symbols)Obr. 4 Obr. 5
Obsluha a provoz
POZOR! HMOTNÉ ŠKODY!
POZOR! HMOTNÉ ŠKODY!
KOMPERNASS HANDELS GMBH
BURGSTRASSE 21
44867 BOCHUM
NĚMECKO
www.kompernass.com
Spis treści
W step....76
natural_image
Diagram of a hairdryer connected to an electrical outlet, showing cable and pin connections (no text or symbols)Rys. 1
natural_image
Diagram showing a brush applying material to a handheld electric shaver (no text or symbols present)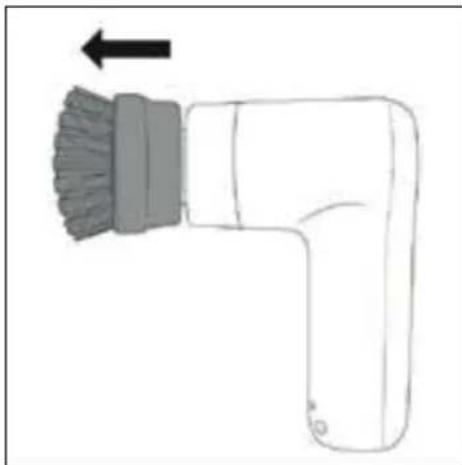
natural_image
Line drawing of a hairdryer with brush applying material, no text or symbols presentRys. 2 Rys. 3
natural_image
Simple line drawing of a right-handler tool with an arrow indicating direction (no text or symbols)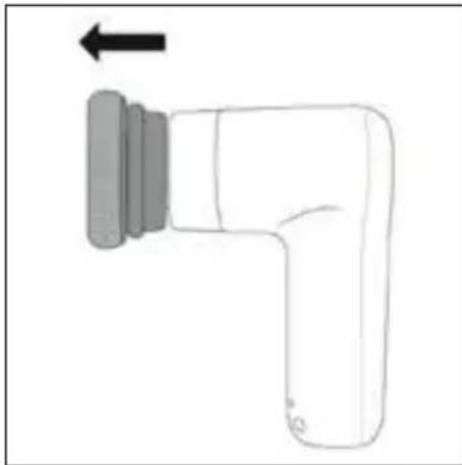
natural_image
Simple line drawing of a right-hand corner tool with an arrow indicating left motion (no text or symbols)Rys. 4 Rys. 5
KOMPERNASS HANDELS GMBH
BURGSTRASSE 21
44867 BOCHUM
NIEMCY
www.kompernass.com
Obsah
Úvod....90
natural_image
Diagram of a hairdryer connected to an electrical outlet via cable (no text or symbols)Obr. 1
natural_image
Diagram showing a brush applying material to a handheld electric shaver (no text or symbols present)
natural_image
Line drawing of a hairdryer with brush applying material, no text or symbols presentObr. 2 Obr. 3
natural_image
Diagram of a handheld device with a right-handled lever and two gray components, no text or symbols present.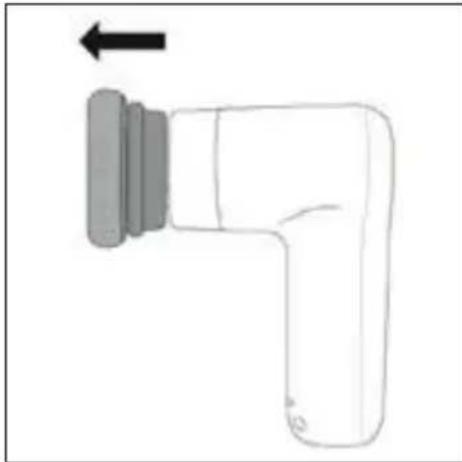
natural_image
Simple line drawing of a right-angle pipe fitting with a left-pointing arrow (no text or symbols)Obr. 4 Obr. 5
Obsluha a prevádzka
POZOR! VECNÉ ŠKODY!
KOMPERNASS HANDELS GMBH
BURGSTRASSE 21
44867 BOCHUM
NEMECKO
www.kompernass.com
Índice
Introducción....104
natural_image
Diagram of a hairdryer connected to an electrical outlet, showing cable and pin connections (no text or symbols)Fig. 1
natural_image
Diagram showing a brush applying material to a handheld electric shaver (no text or symbols present)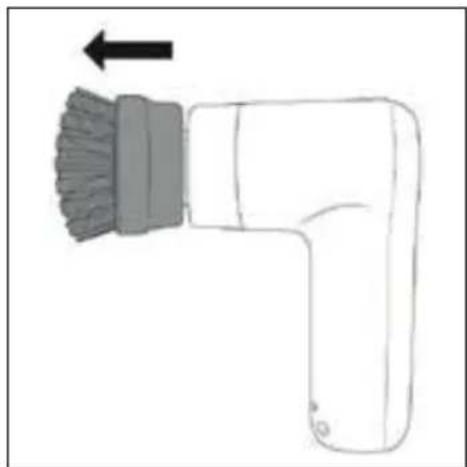
natural_image
Line drawing of a hairdryer tool with brush head and arrow indicating direction (no text or symbols)Fig. 2 Fig. 3
natural_image
Diagram of a handheld device with a right-handled arrow indicating direction (no text or symbols present)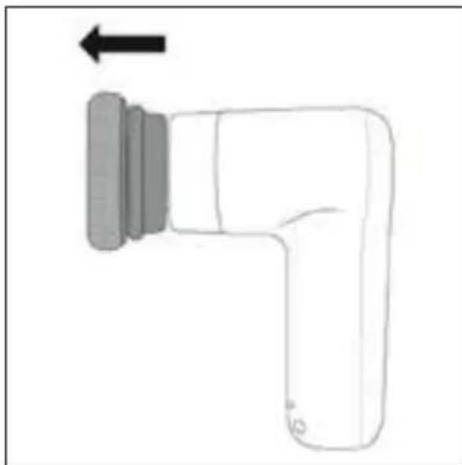
natural_image
Simple line drawing of a right-angle pipe fitting with a left-pointing arrow (no text or symbols)Fig. 4 Fig. 5
KOMPERNASS HANDELS GMBH
BURGSTRASSE 21
44867 BOCHUM
ALEMANIA
www.kompernass.com
Indholdsfortegnelse
Indledning....118
natural_image
Diagram of a hairdryer connected to an electrical outlet via cable (no text or symbols)Fig. 1
natural_image
Diagram showing a hairdryer with brush head removed from a plastic component, no text or symbols present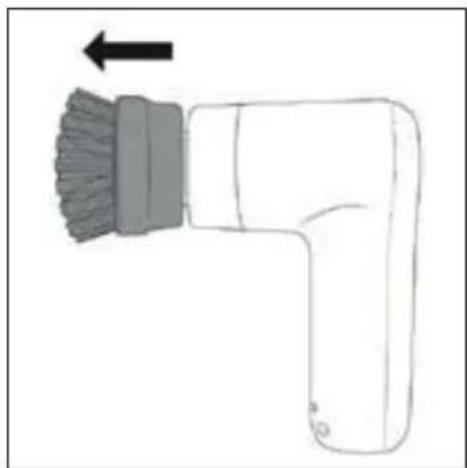
natural_image
Line drawing of a hairdryer tool with brush head and arrow indicating direction (no text or symbols)Fig. 2 Fig. 3
natural_image
Diagram of a right-hand rule tool with an arrow indicating direction (no text or symbols present)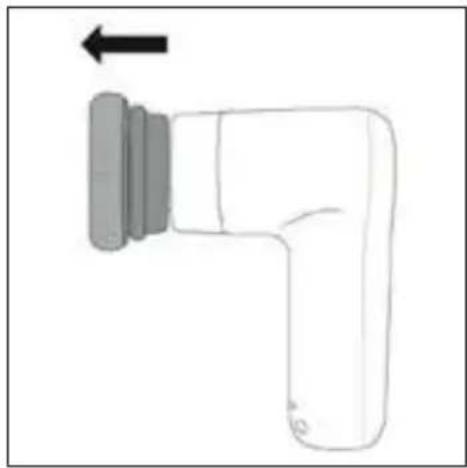
natural_image
Simple line drawing of a right-angle pipe fitting with a directional arrow (no text or symbols)Fig. 4 Fig. 5
KOMPERNASS HANDELS GMBH
BURGSTRASSE 21
44867 BOCHUM
TYSKLAND
www.kompernass.com
Indice
Introduzione....132
natural_image
Diagram of a hairdryer connected to an electrical outlet via cable (no text or symbols)Fig. 1
natural_image
Diagram showing a brush applying material to an electric shaver (no text or symbols present)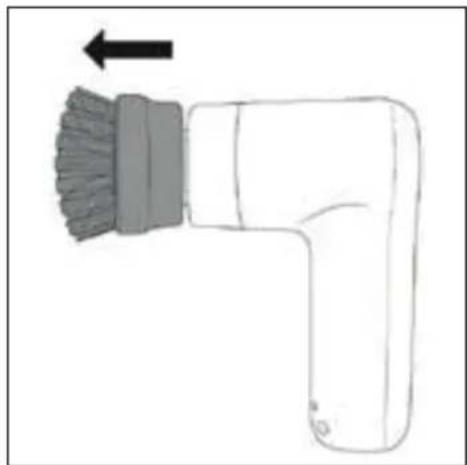
natural_image
Line drawing of a hairdryer with brush applying material, no text or symbols presentFig. 2 Fig. 3
natural_image
Diagram of a handheld device with a right-handled arrow indicating direction (no text or symbols)
natural_image
Simple line drawing of a right-angle pipe fitting with a directional arrow (no text or symbols)Fig. 4 Fig. 5
KOMPERNASS HANDELS GMBH
BURGSTRASSE 21
44867 BOCHUM
GERMANIA
www.kompernass.com
Tartalomjegyzék
Bevezető 146
natural_image
Diagram of a hairdryer connected to an electrical outlet via cable (no text or symbols)natural_image
Diagram showing a brush applying material to an electric shaver (no text or symbols present)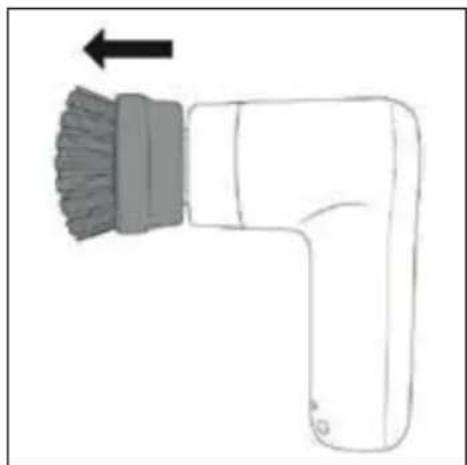
natural_image
Line drawing of a hairdryer with brush applying material, showing no text or symbols- ábra 3. ábra
natural_image
Diagram of a handheld device with a right-hand rule and two gray rectangular buttons, no text or symbols present.
natural_image
Simple line drawing of a right-angle pipe fitting with a left-pointing arrow (no text or symbols)- ábra 5. ábra
KOMPERNASS HANDELS GMBH
BURGSTRASSE 21
44867 BOCHUM
NÉMETORSZÁG
www.kompernass.com

KOMPERNASS HANDELS GMBH
BURGSTRASSE 21
44867 BOCHUM
GERMANY
www.kompernass.com
Last Information Update · Stand der Informationen · Version des informations


- ELECTRIC CLEANING BRUSH
- BROSSE DE NETTOYAGE ÉLECTRIQUE
- Safety information 2
- Package contents and transport inspection 5
- Appliance description 5
- Before use 6
- Handling and operation 8
- Cleaning and maintenance 9
- Storage 9
- Technical details 10
- Ordering replacement parts 10
- Disposal....11
- Kompernass Handels GmbH warranty 12
- Introduction
- Information about these operating instructions
- Proper use
- Safety information
- WARNING! RISK OF INJURY!
- ATTENTION! PROPERTY DAMAGE!
- Package contents and transport inspection
- NOTE
- Appliance description
- (See fold-out page for illustrations)
- Before use
- Charging the internal battery
- Using the accessories
- Wide brush attachment
- Narrow brush attachment
- Scouring pad attachment 1 (coarse pad)
- Scouring pad attachment 2 (fine pad)
- Fitting/removing attachments
- Fitting/removing the scouring pad attachments
- Handling and operation
- Cleaning and maintenance
- WARNING! RISK OF ELECTRIC SHOCK!
- Storage
- Technical details
- Ordering replacement parts
- Disposal
- Applies only to France:
- Disposal of the appliance
- The disposal is free of charge for the user. Protect the environment and dispose of this appliance properly.
- The integrated rechargeable battery in this appliance cannot be removed for disposal.
- Disposal of the packaging
- Warranty conditions
- Warranty period and statutory claims for defects
- Scope of the warranty
- Warranty claim procedure
- Service
- Importer
- Inhaltsverzeichnis
- Einleitung 16
- Sommaire
- Introduction 30
- Inhoud
- Inleiding....48
- ⚠ WAARSCHUWING! GEVAAR VOOR LETSEL!
- WAARSCHUWING! GEVAAR VOOR LETSEL!
- Obsah
- Úvod....62
- POZOR! HMOTNÉ ŠKODY!
- Obsluha a provoz
- Spis treści
- W step....76
- Úvod....90
- Obsluha a prevádzka
- POZOR! VECNÉ ŠKODY!
- Índice
- Indholdsfortegnelse
- Indice
- Introduzione....132
- Tartalomjegyzék
- Bevezető 146
- KOMPERNASS HANDELS GMBH
Brand : SILVERCREST
Model : SRB 4 A1
Category : Face cleansing