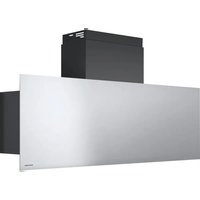
1KCYP9 - Basket BARAZZA - Free user manual and instructions
Find the device manual for free 1KCYP9 BARAZZA in PDF.
| Product type | Extractor hood |
| Brand | Barazza |
| Model | 1KCYP9 |
| Usage | Domestic use only |
| Operating modes | External extraction or internal recirculation (with optional activated carbon filter) |
| Minimum distance from hob | 65 cm for electric hobs, 75 cm for gas or mixed hobs |
| Air outlet diameter | 150 mm (recommended for anti-condensation function) |
| Grease filter | Metal, dishwasher safe or hand washable, clean at least once a month |
| Activated carbon filter | Replace every 2 months (only in recirculation mode) |
| Motor speeds | 4 speeds including a timed intensive (approx. 7 minutes) |
| Lighting | Yes, independent control (ON/OFF button) |
| Timer | Automatic shutdown after 15 minutes of operation |
| Anti-condensation function | Yes, with integrated low-voltage heating element in the glass panel |
| Control panel | Touch-sensitive with indicator lights |
| Power supply | Mains (voltage indicated on rating plate) |
| Safety instructions | Disconnect before maintenance, do not use without filters, do not cook with open flame, etc. |
| Maintenance | Clean exterior and interior with a damp cloth and mild detergent, avoid alcohol and abrasives |
| Spare parts | Filters, lamps, power cable (contact technical support) |
| Repairability | Repairs by qualified personnel, after-sales service available |
Frequently Asked Questions - 1KCYP9 BARAZZA
User questions about 1KCYP9 BARAZZA
0 question about this device. Answer the ones you know or ask your own.
Ask a new question about this device
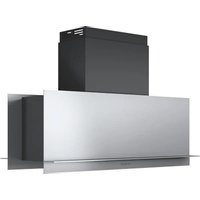
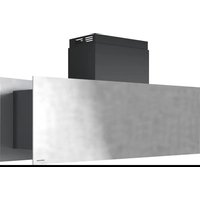
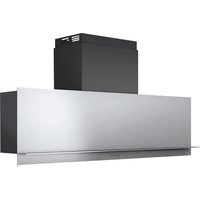
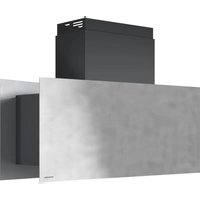
Download the instructions for your Basket in PDF format for free! Find your manual 1KCYP9 - BARAZZA and take your electronic device back in hand. On this page are published all the documents necessary for the use of your device. 1KCYP9 by BARAZZA.
USER MANUAL 1KCYP9 BARAZZA
Use and maintenance instructions
de DUNSTABZUGSHAUBE
natural_image
Isometric line drawing of a staircase with slatted base and roof, no text or symbols present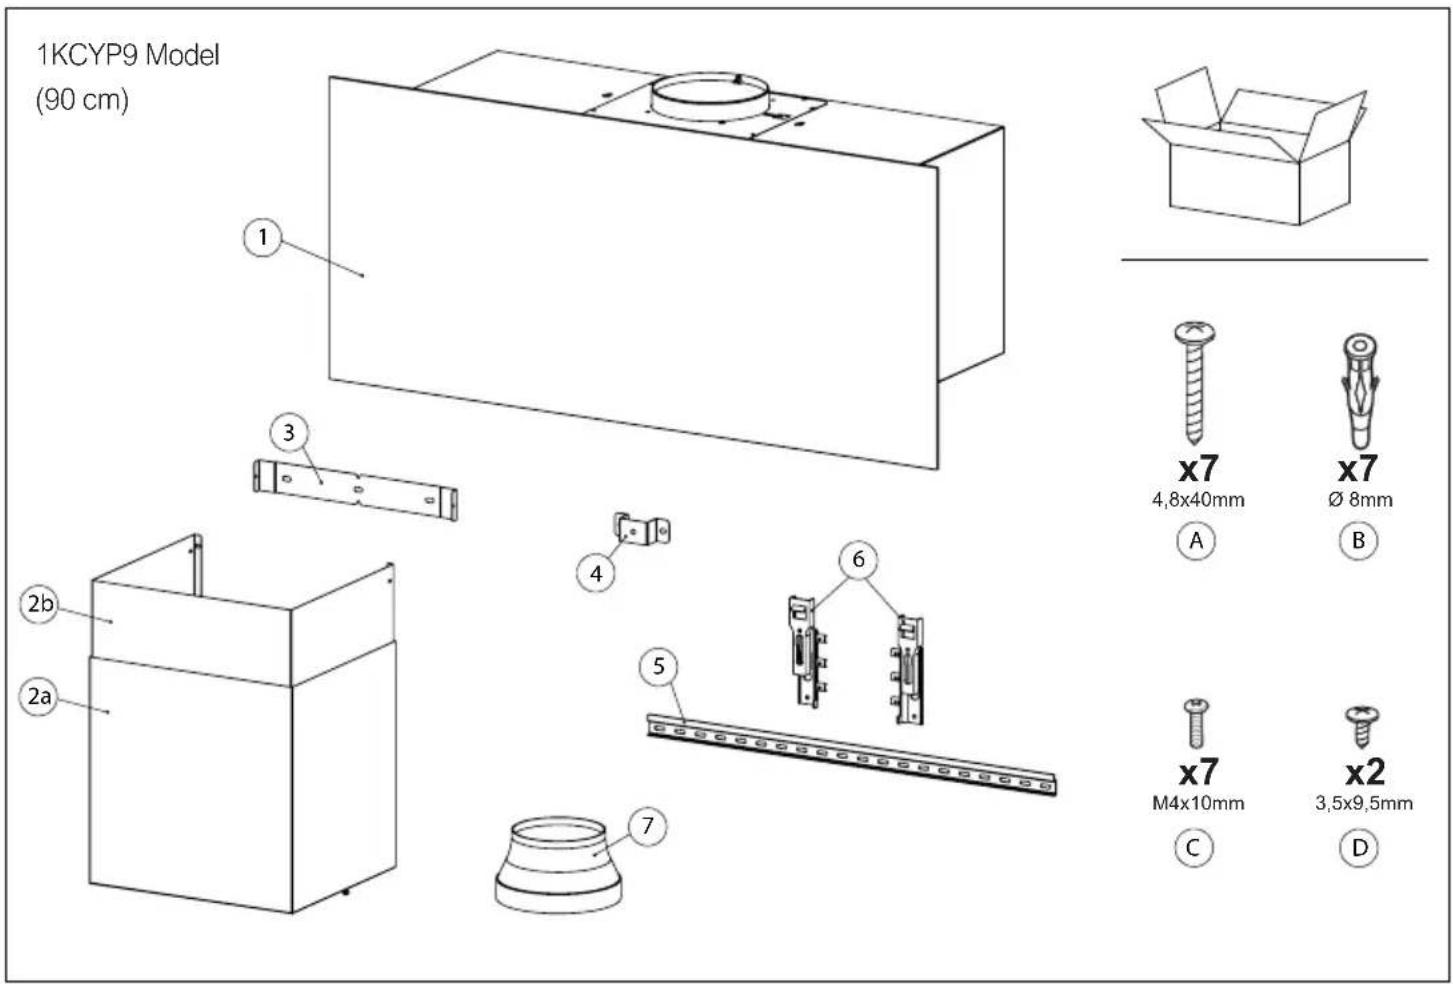
text_image
1KCYP9 Model (90 cm) ① ②b ②a ③ ④ ⑤ ⑥ ⑦ x7 4,8x40mm A x7 Ø 8mm B x7 M4x10mm C x2 3,5x9,5mm D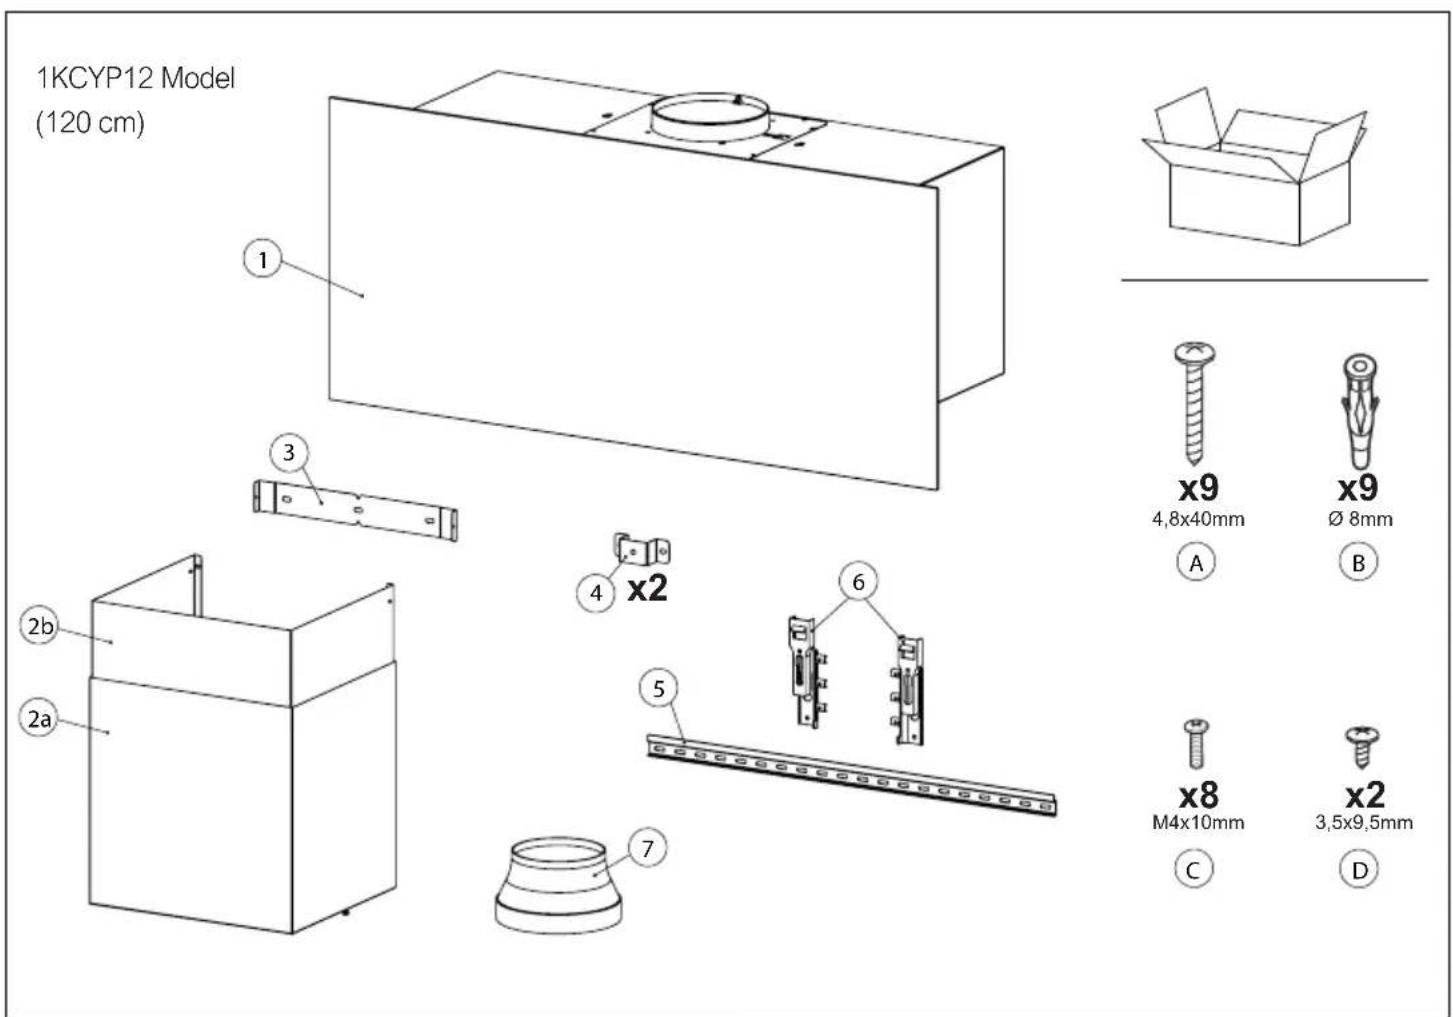
text_image
1KCYP12 Model (120 cm) ① ② b ③ ④ x2 ⑤ ⑥ ⑦ ⑧ x9 4,8x40mm A x9 Ø 8mm B x8 M4x10mm C x2 3,5x9,5mm D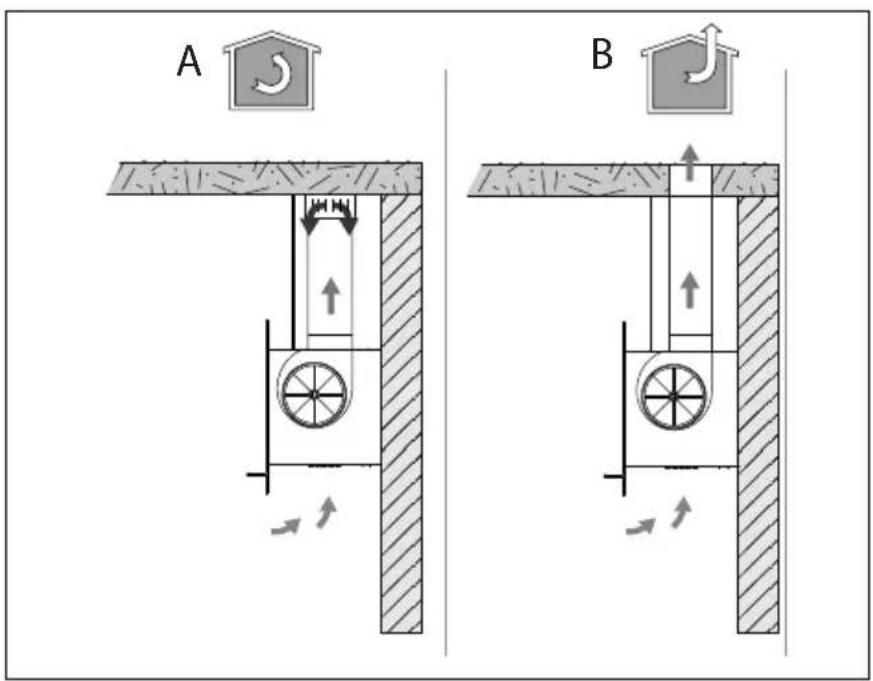
text_image
A B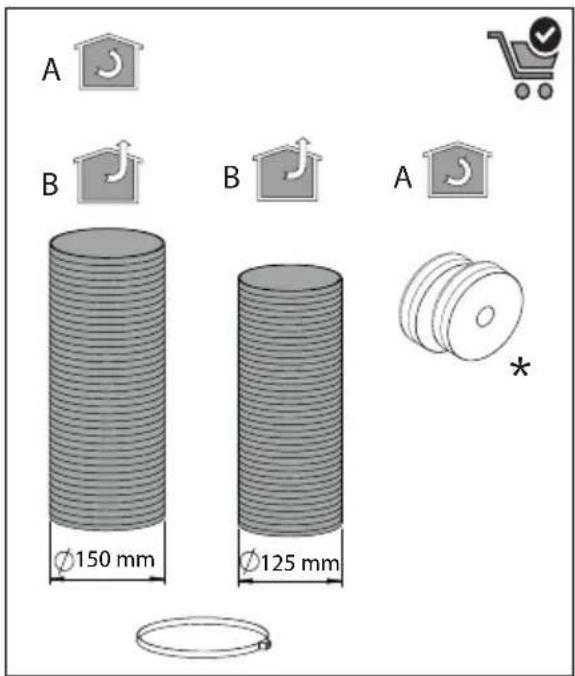
text_image
A B B A Ø150 mm Ø125 mm *
text_image
.1 .2 .1 .2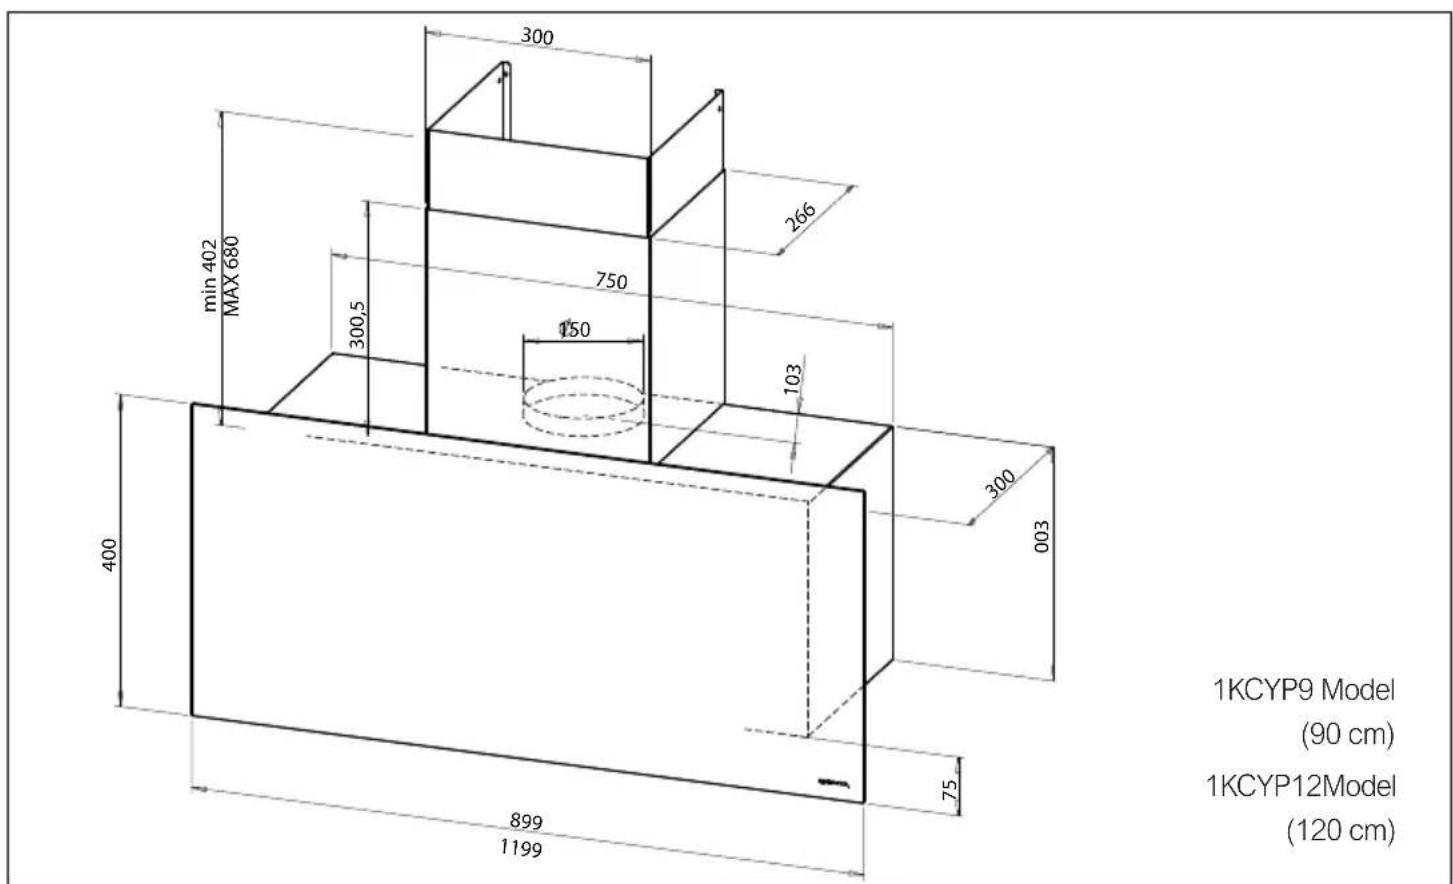
other
| Dimension | Value | | --------- | ----- | | 300 | 400 | | 266 | 300 | | 750 | 750 | | 150 | 150 | | 103 | 103 | | 300 | 300 | | 400 | 400 | | 75 | 75 | | 899 | 899 | | 1199 | 1199 |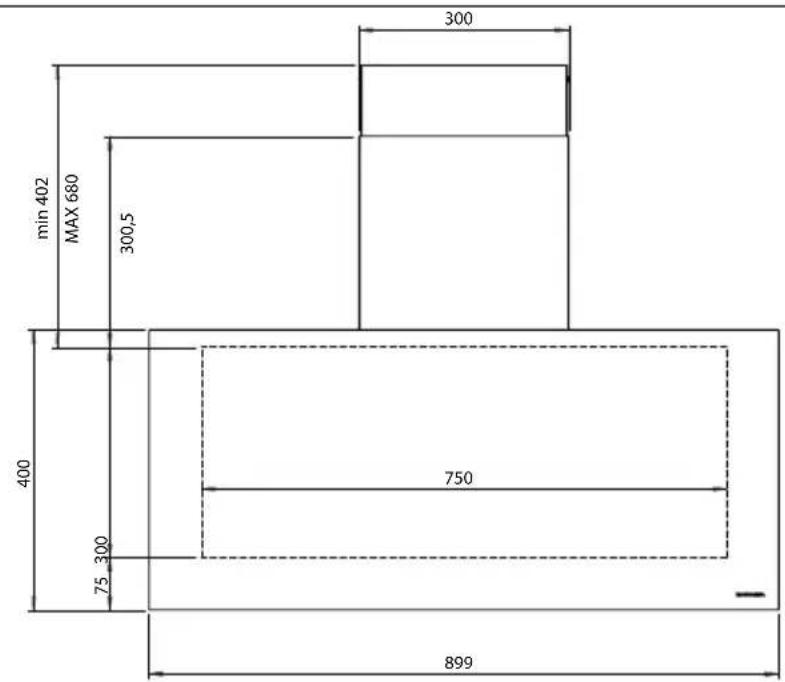
text_image
300 300 min 402 MAX 680 300,5 400 750 300 75 899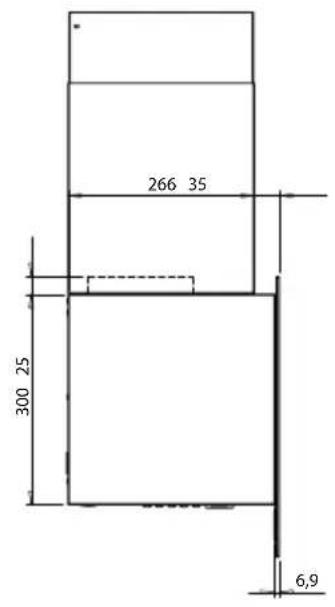
text_image
266 35 300 25 6,9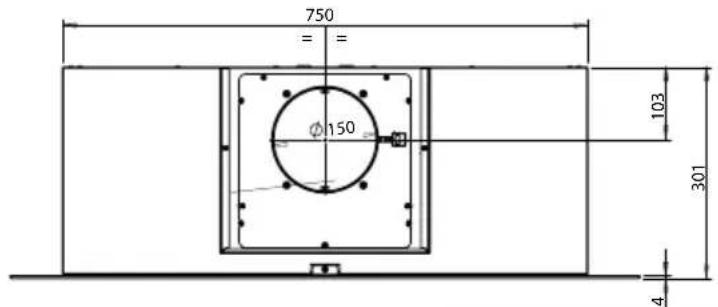
text_image
750 = = φ150 103 301 41KCYP9 Model (90 cm)
text_image
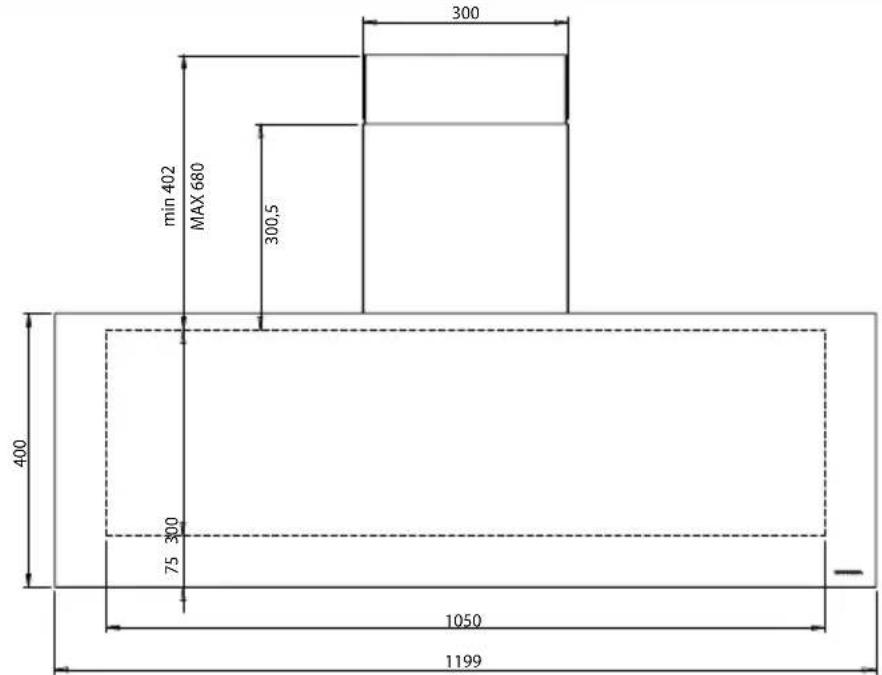
300 min 402 MAX 680 300,5 400 75 300 1050 1199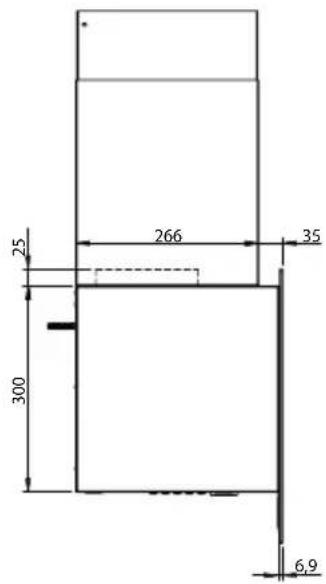
text_image
25 266 35 300 6.9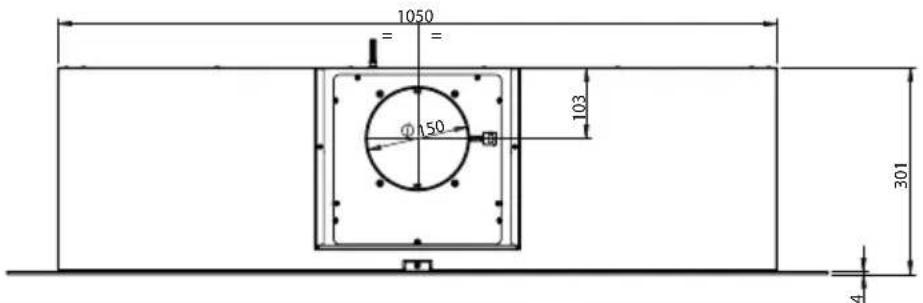
text_image
1050 = = Φ150 103 301 41KCYP12Model (120 cm)

text_image
Collection of safety and maintenance icons including warning symbol, person silhouette, hand gesture, tool, screwdriver, and tape measure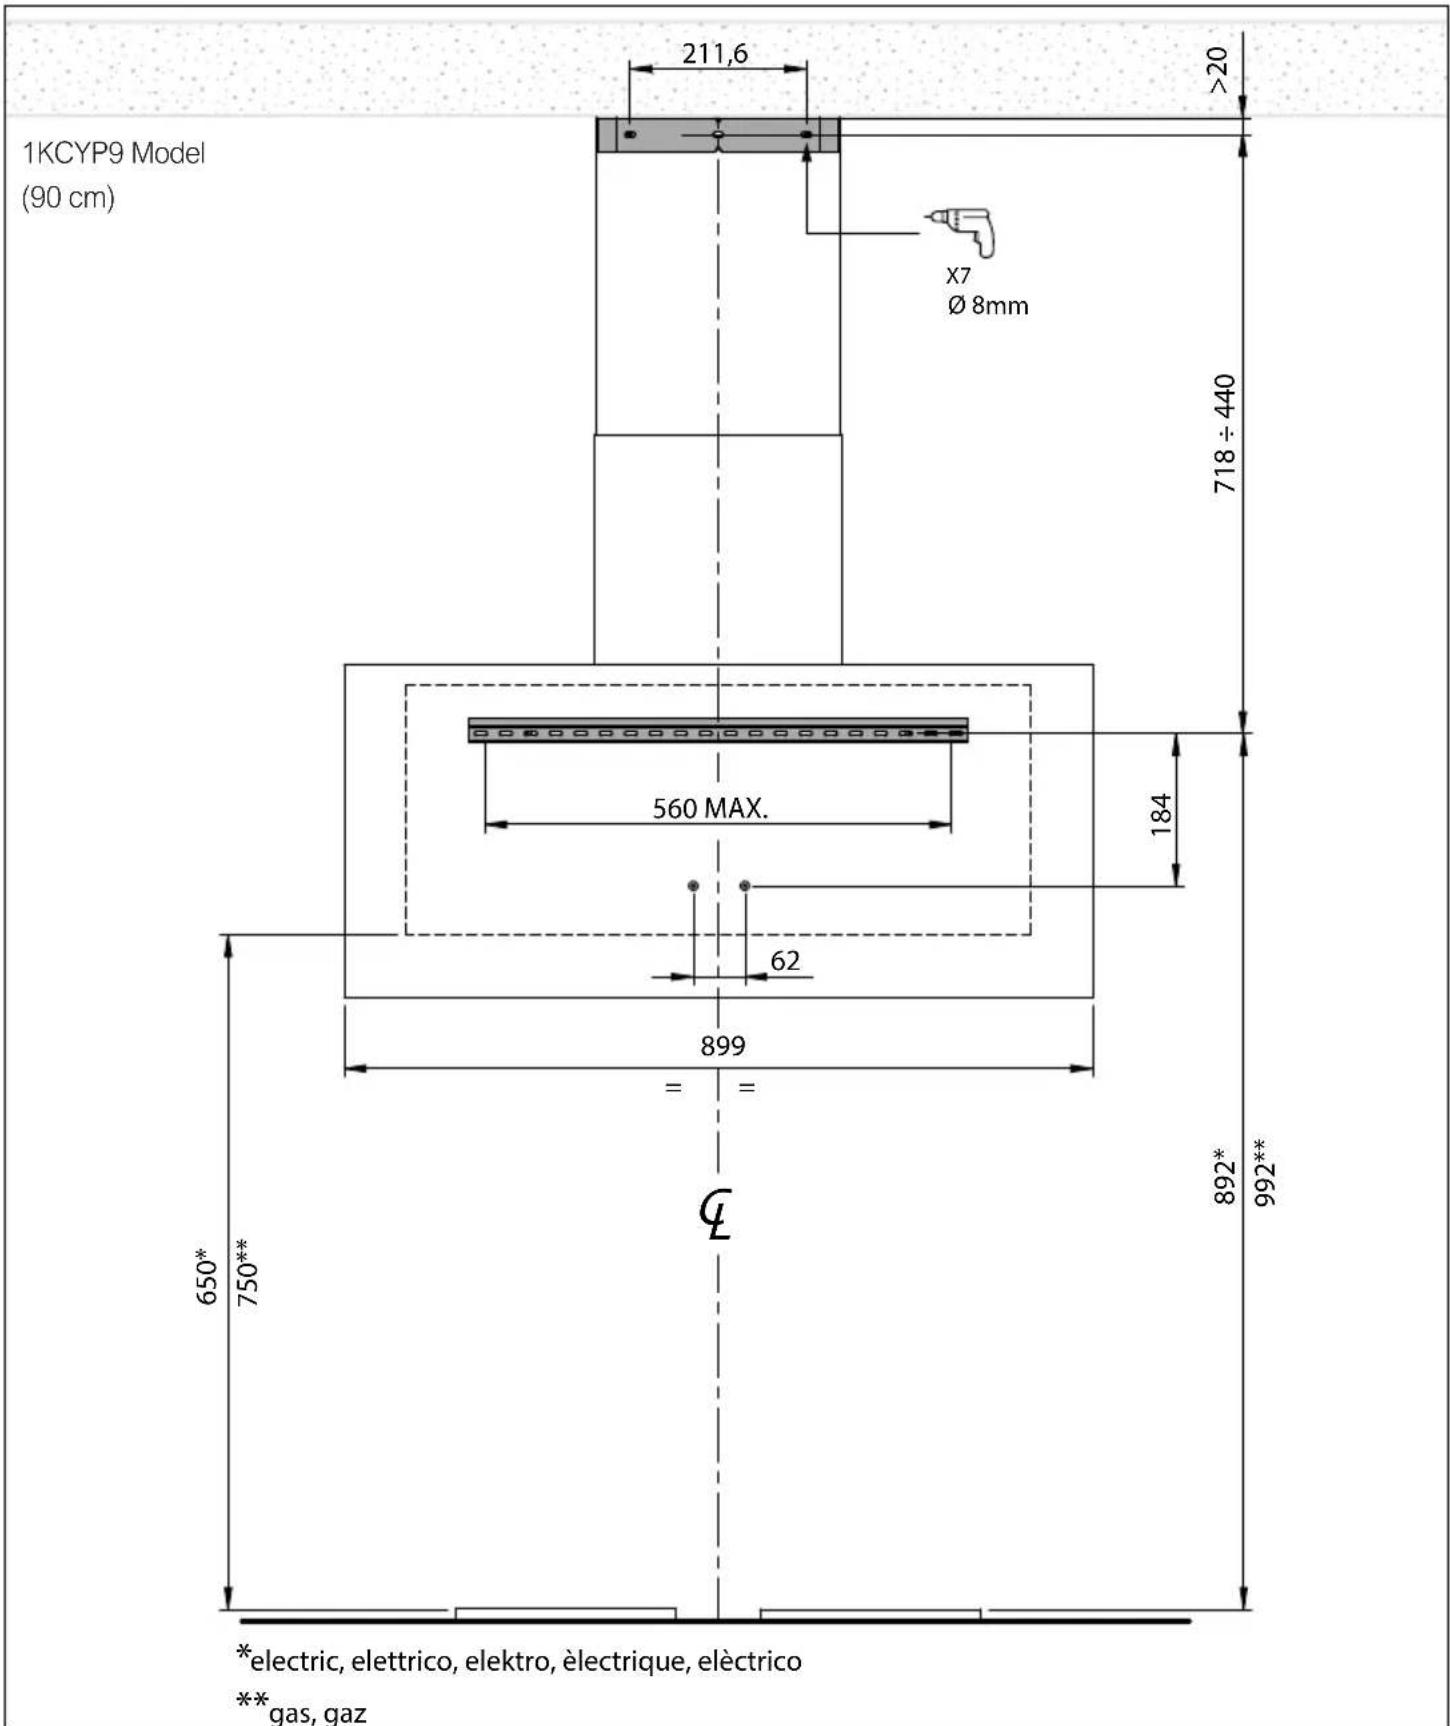
text_image
1KCYP9 Model (90 cm) 211,6 >20 X7 Ø 8mm 718 ÷ 440 560 MAX. 184 62 899 = = 650* 750** 892* 992** *electric, elettrico, elektro, èlectrique, electrico **gas, gaz
text_image
Warning symbol and related safety icons including warning sign, pictogram, safety goggles, gloves, screwdriver, and detector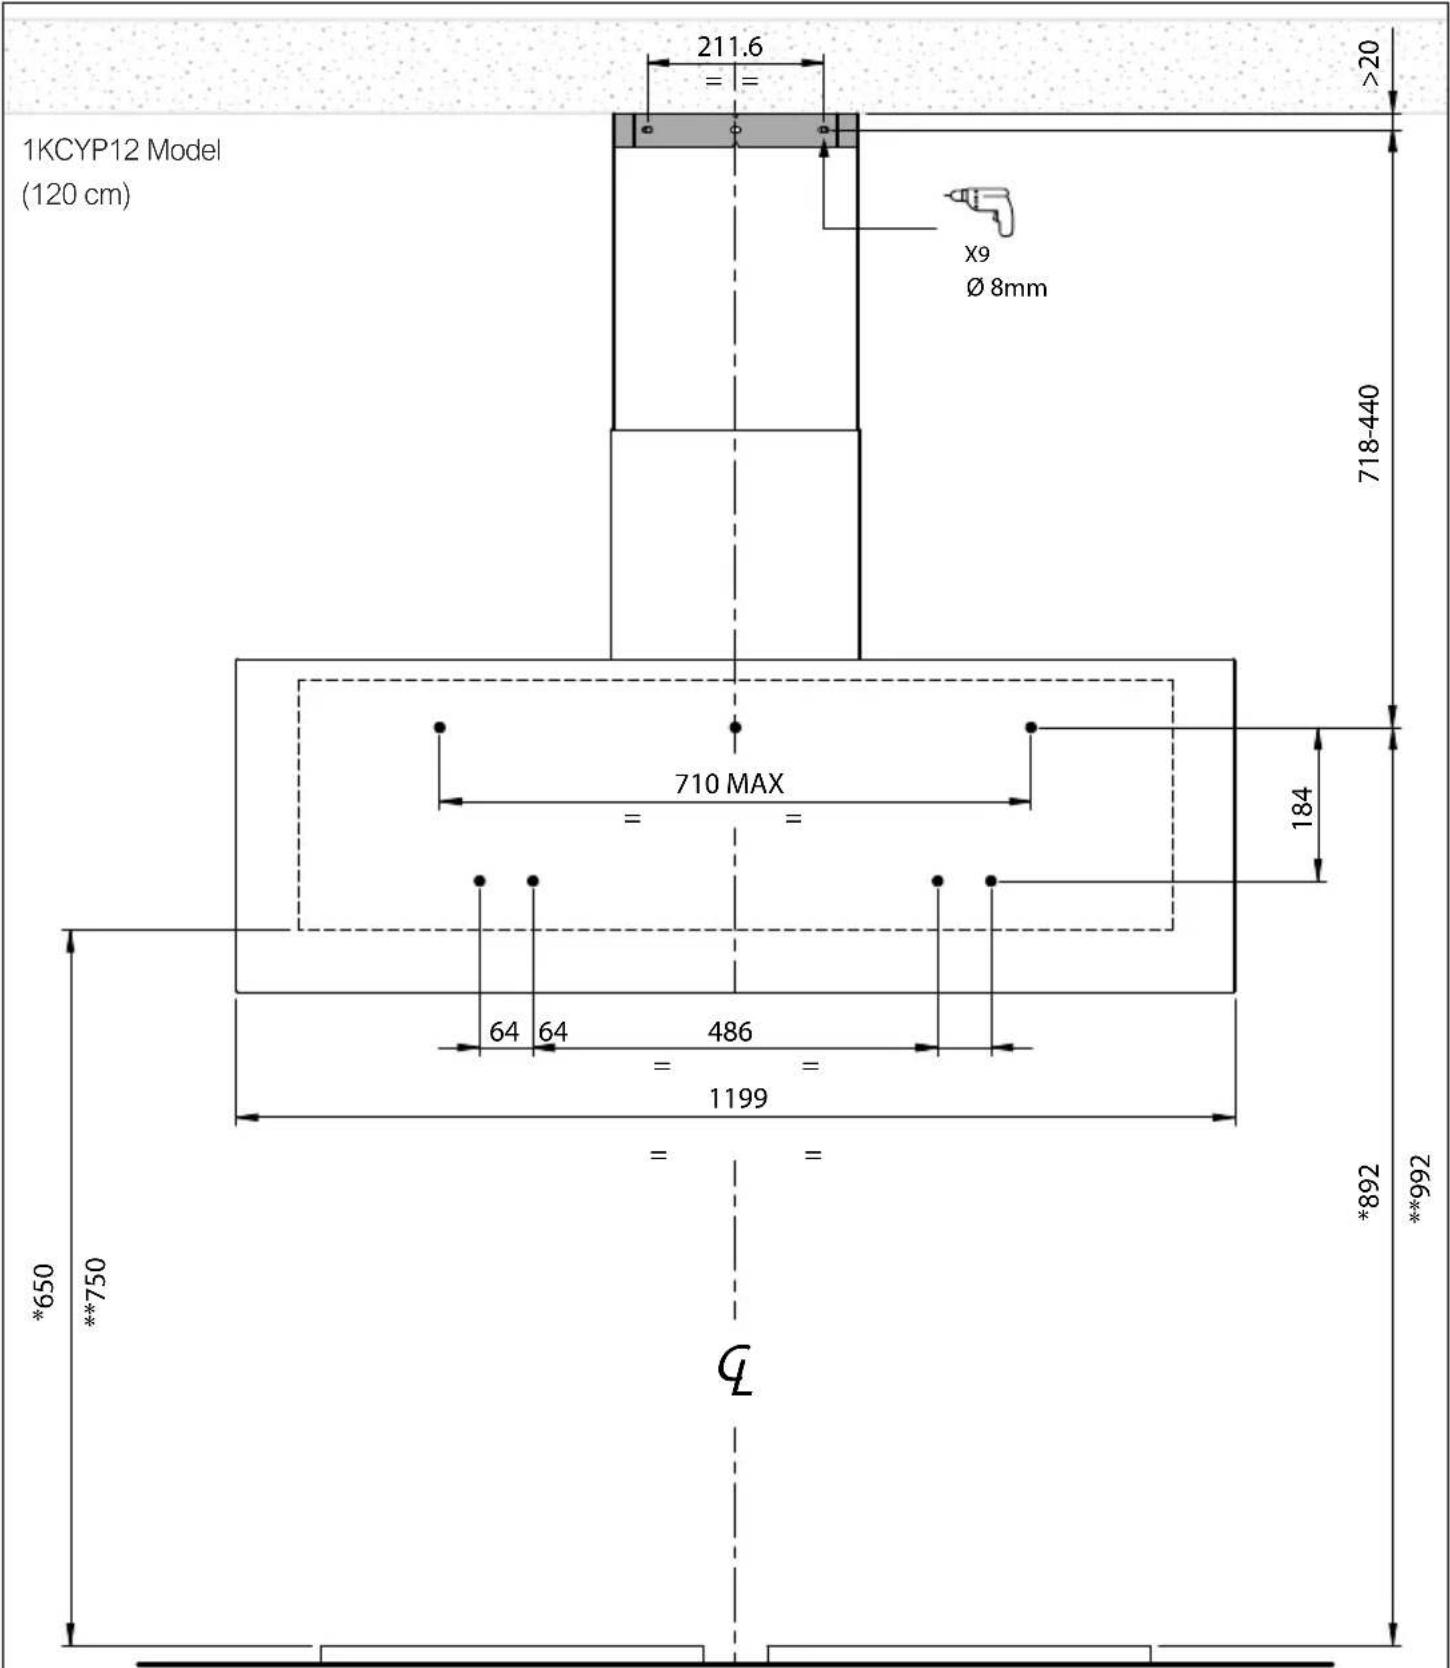
text_image
1KCYP12 Model (120 cm) 211.6 = = X9 Ø 8mm >20 718-440 710 MAX 184 64 64 486 1199 *650 **750 G *892 **992*electric, elettrico, elektro, èlectrique, elèctrico
**gas, gaz
text_image
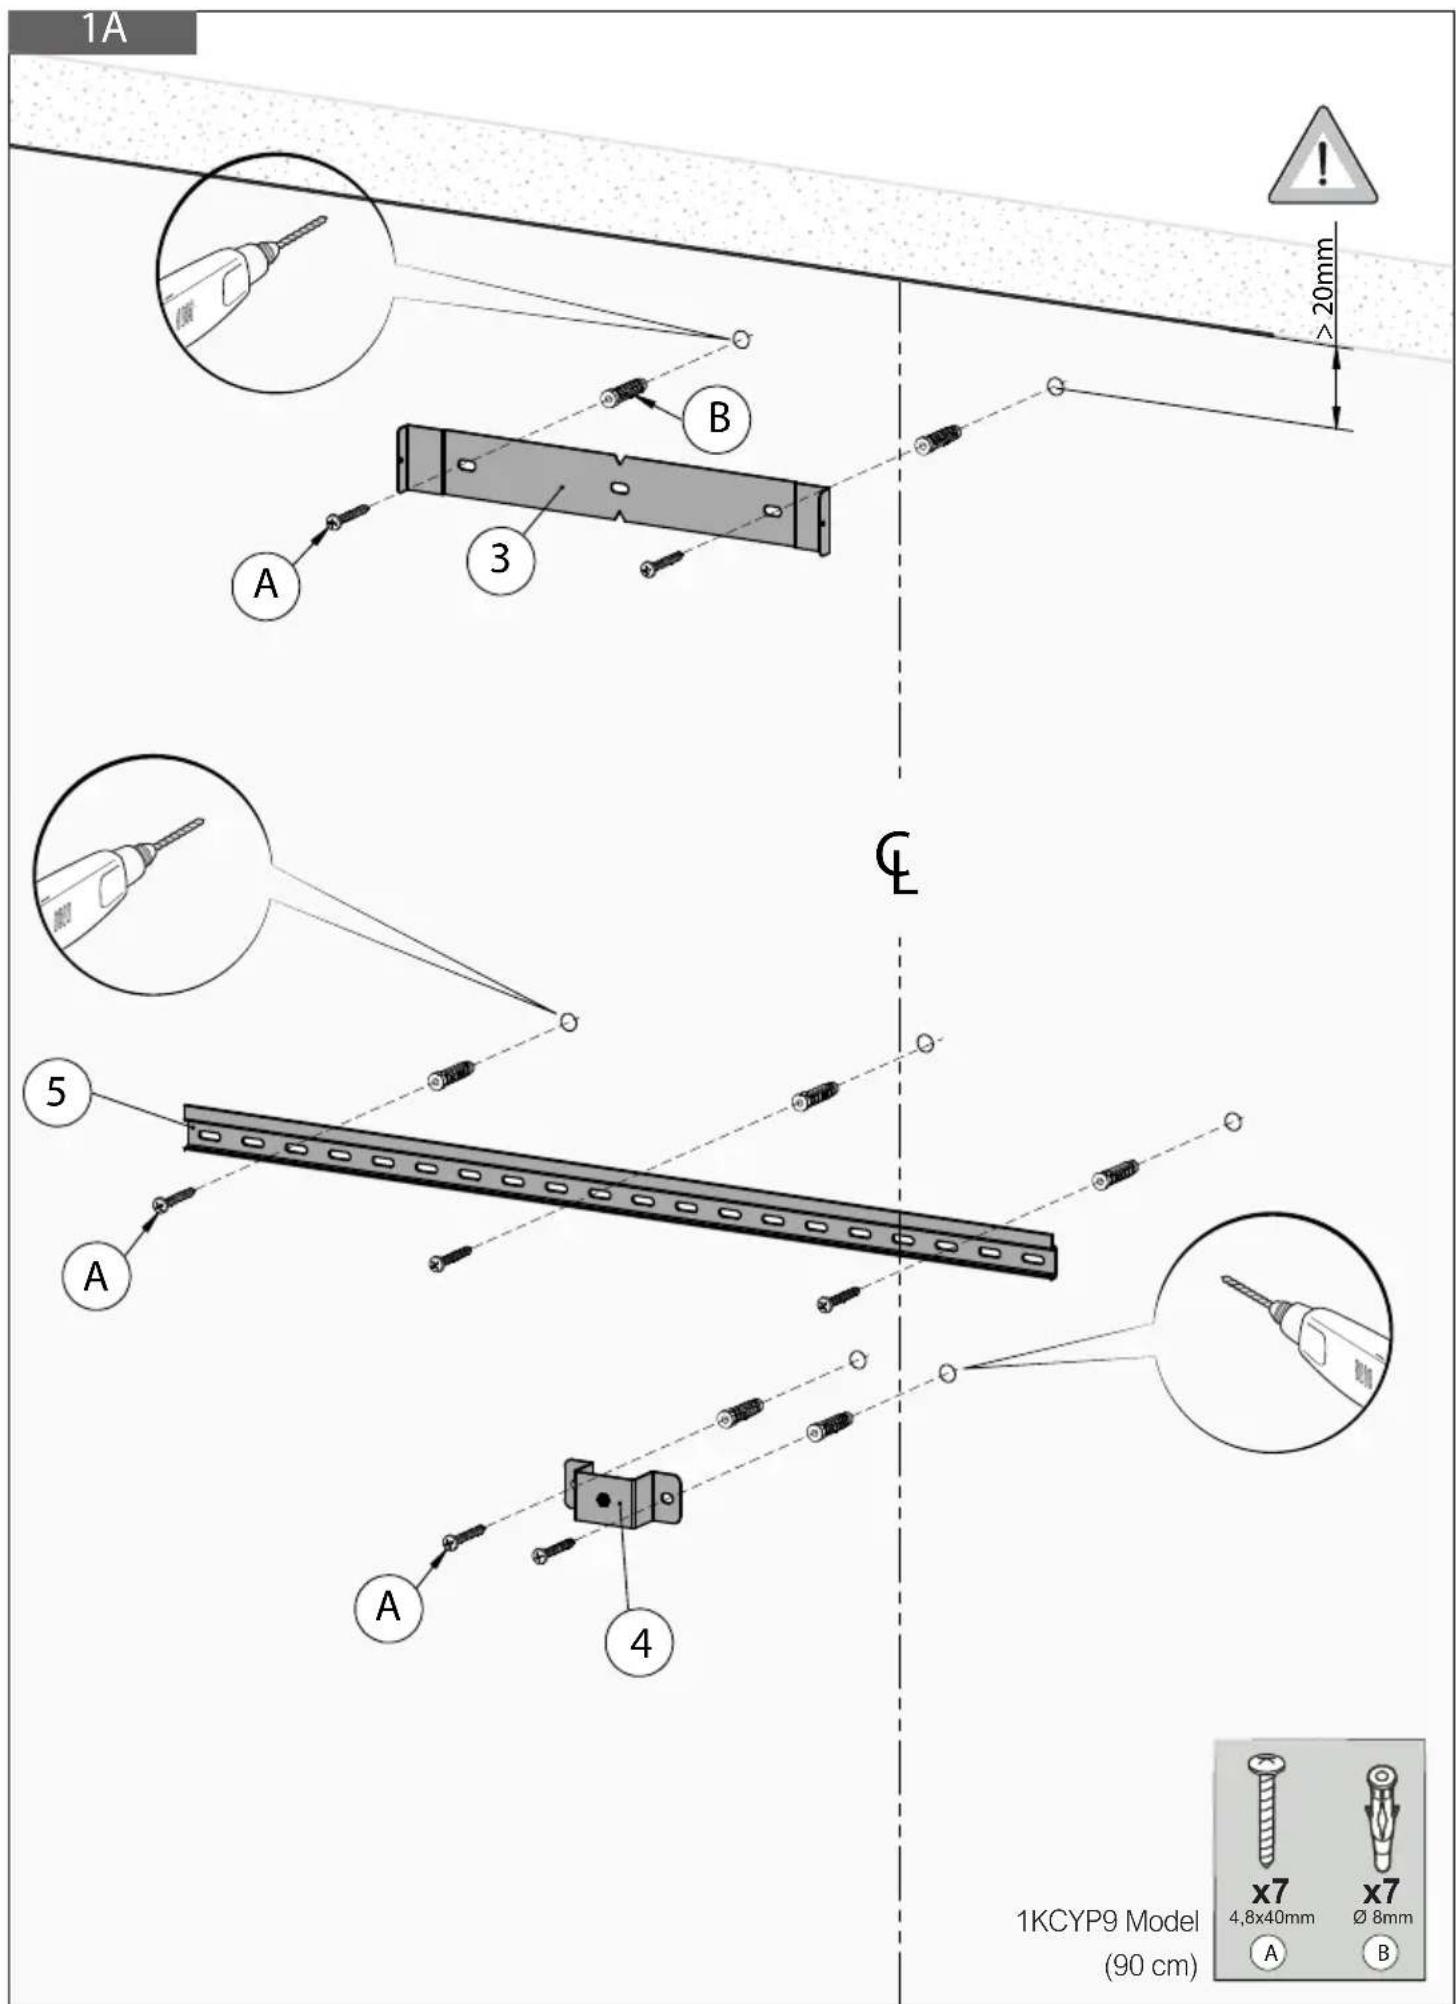
1A B 3 A 5 A 4 C 1KCYP9 Model (90 cm) x7 x7 4,8x40mm Ø 8mm A B >20mm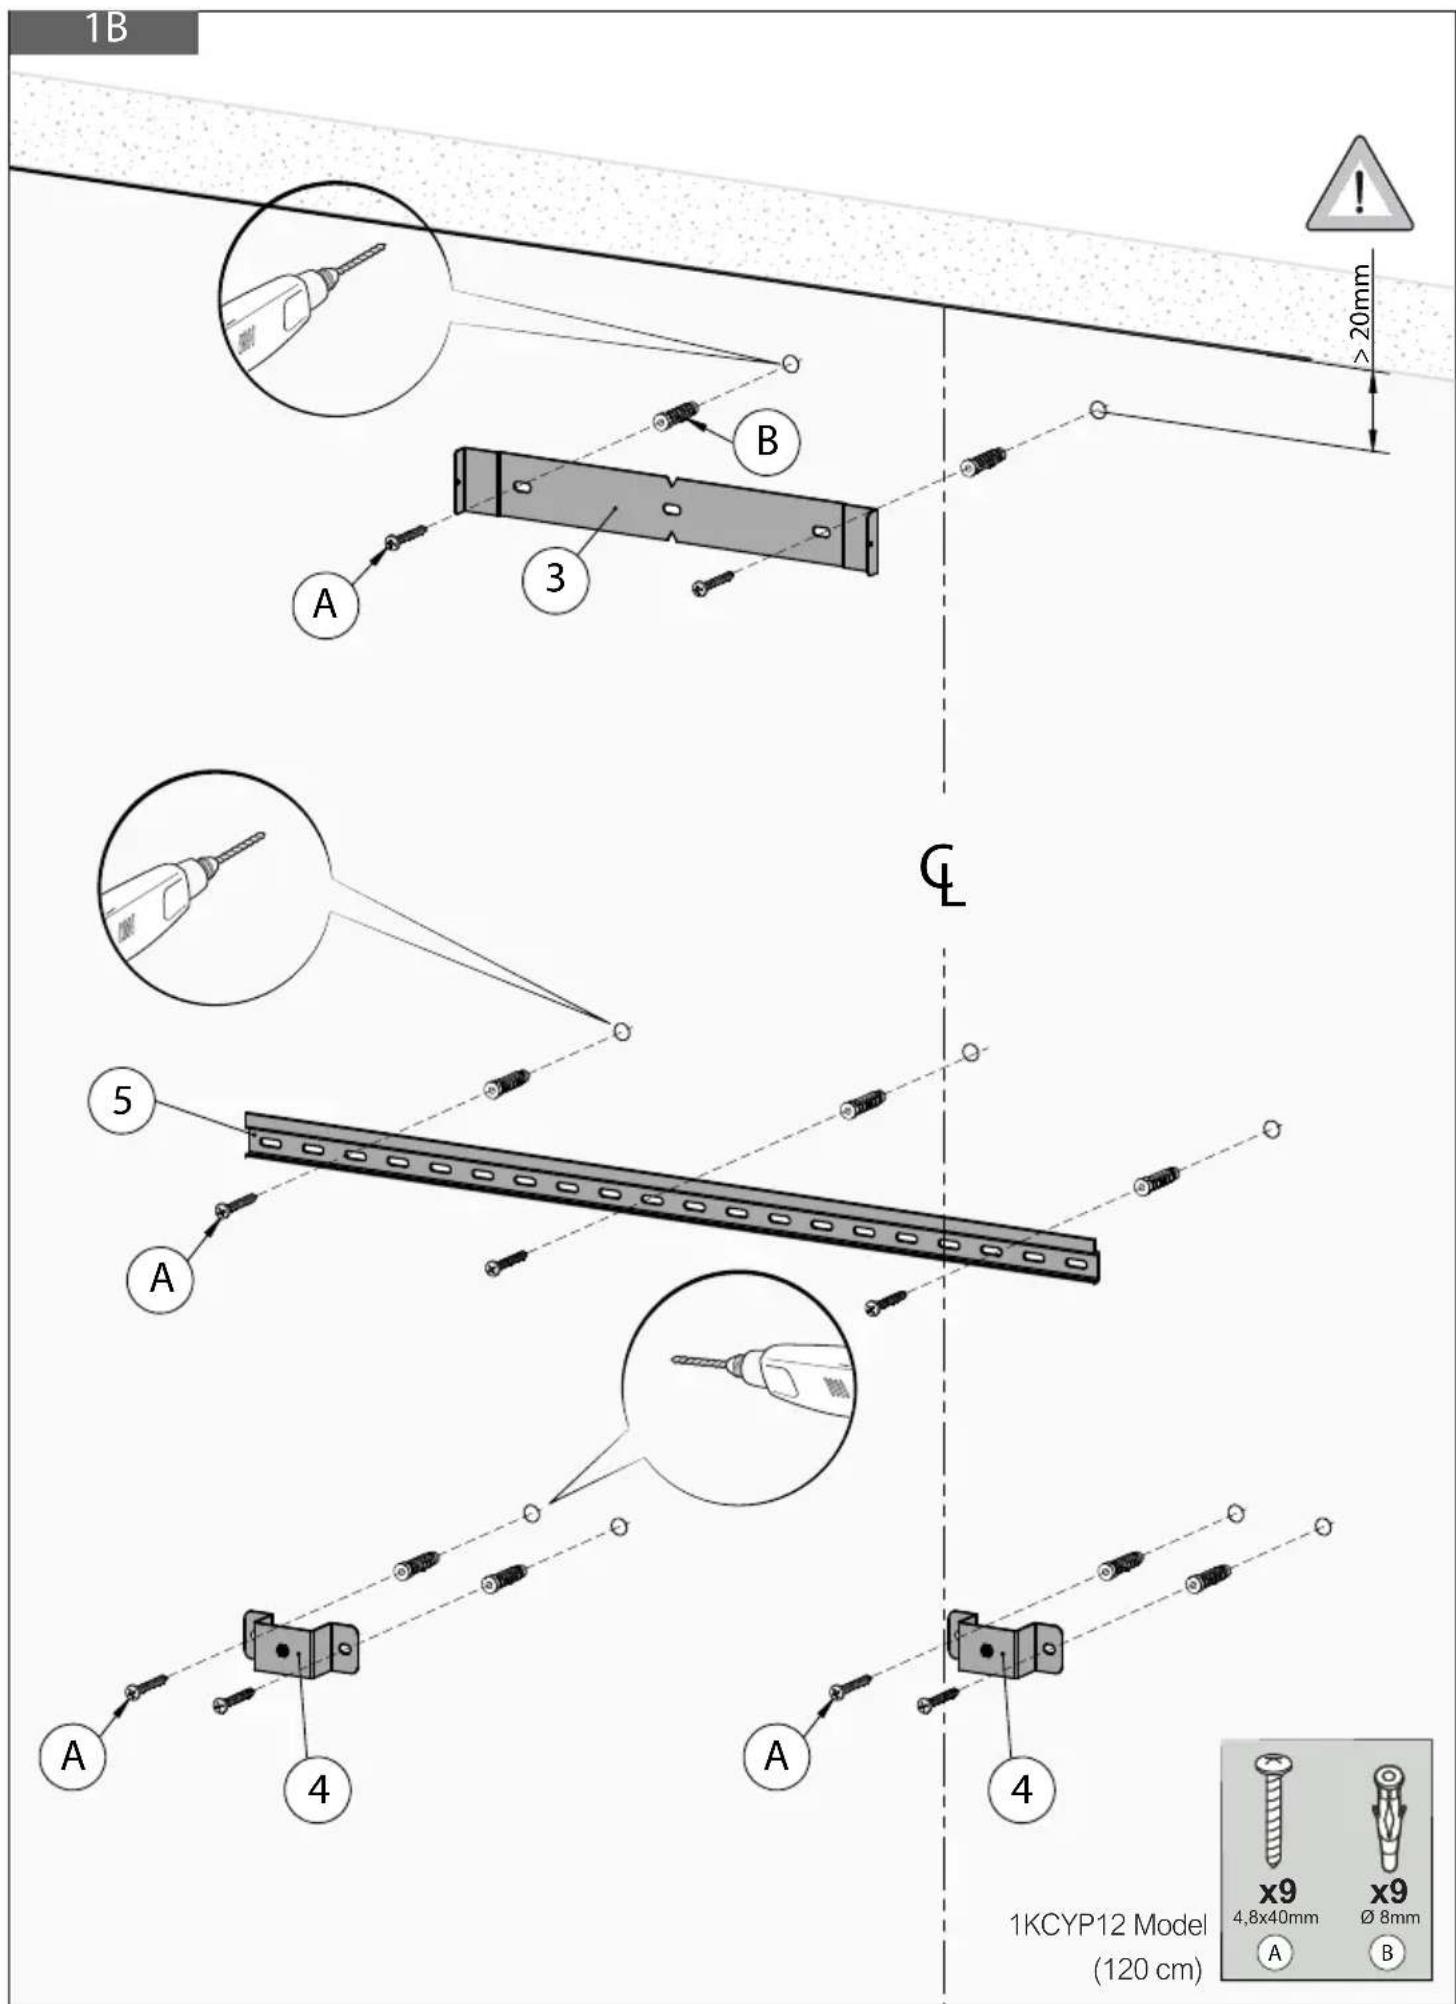
text_image
1B A B 3 >20mm G 5 A 4 A 4 1KCYP12 Model (120 cm) x9 4,8x40mm Ø 8mm A B x9 4,8x40mm Ø 8mm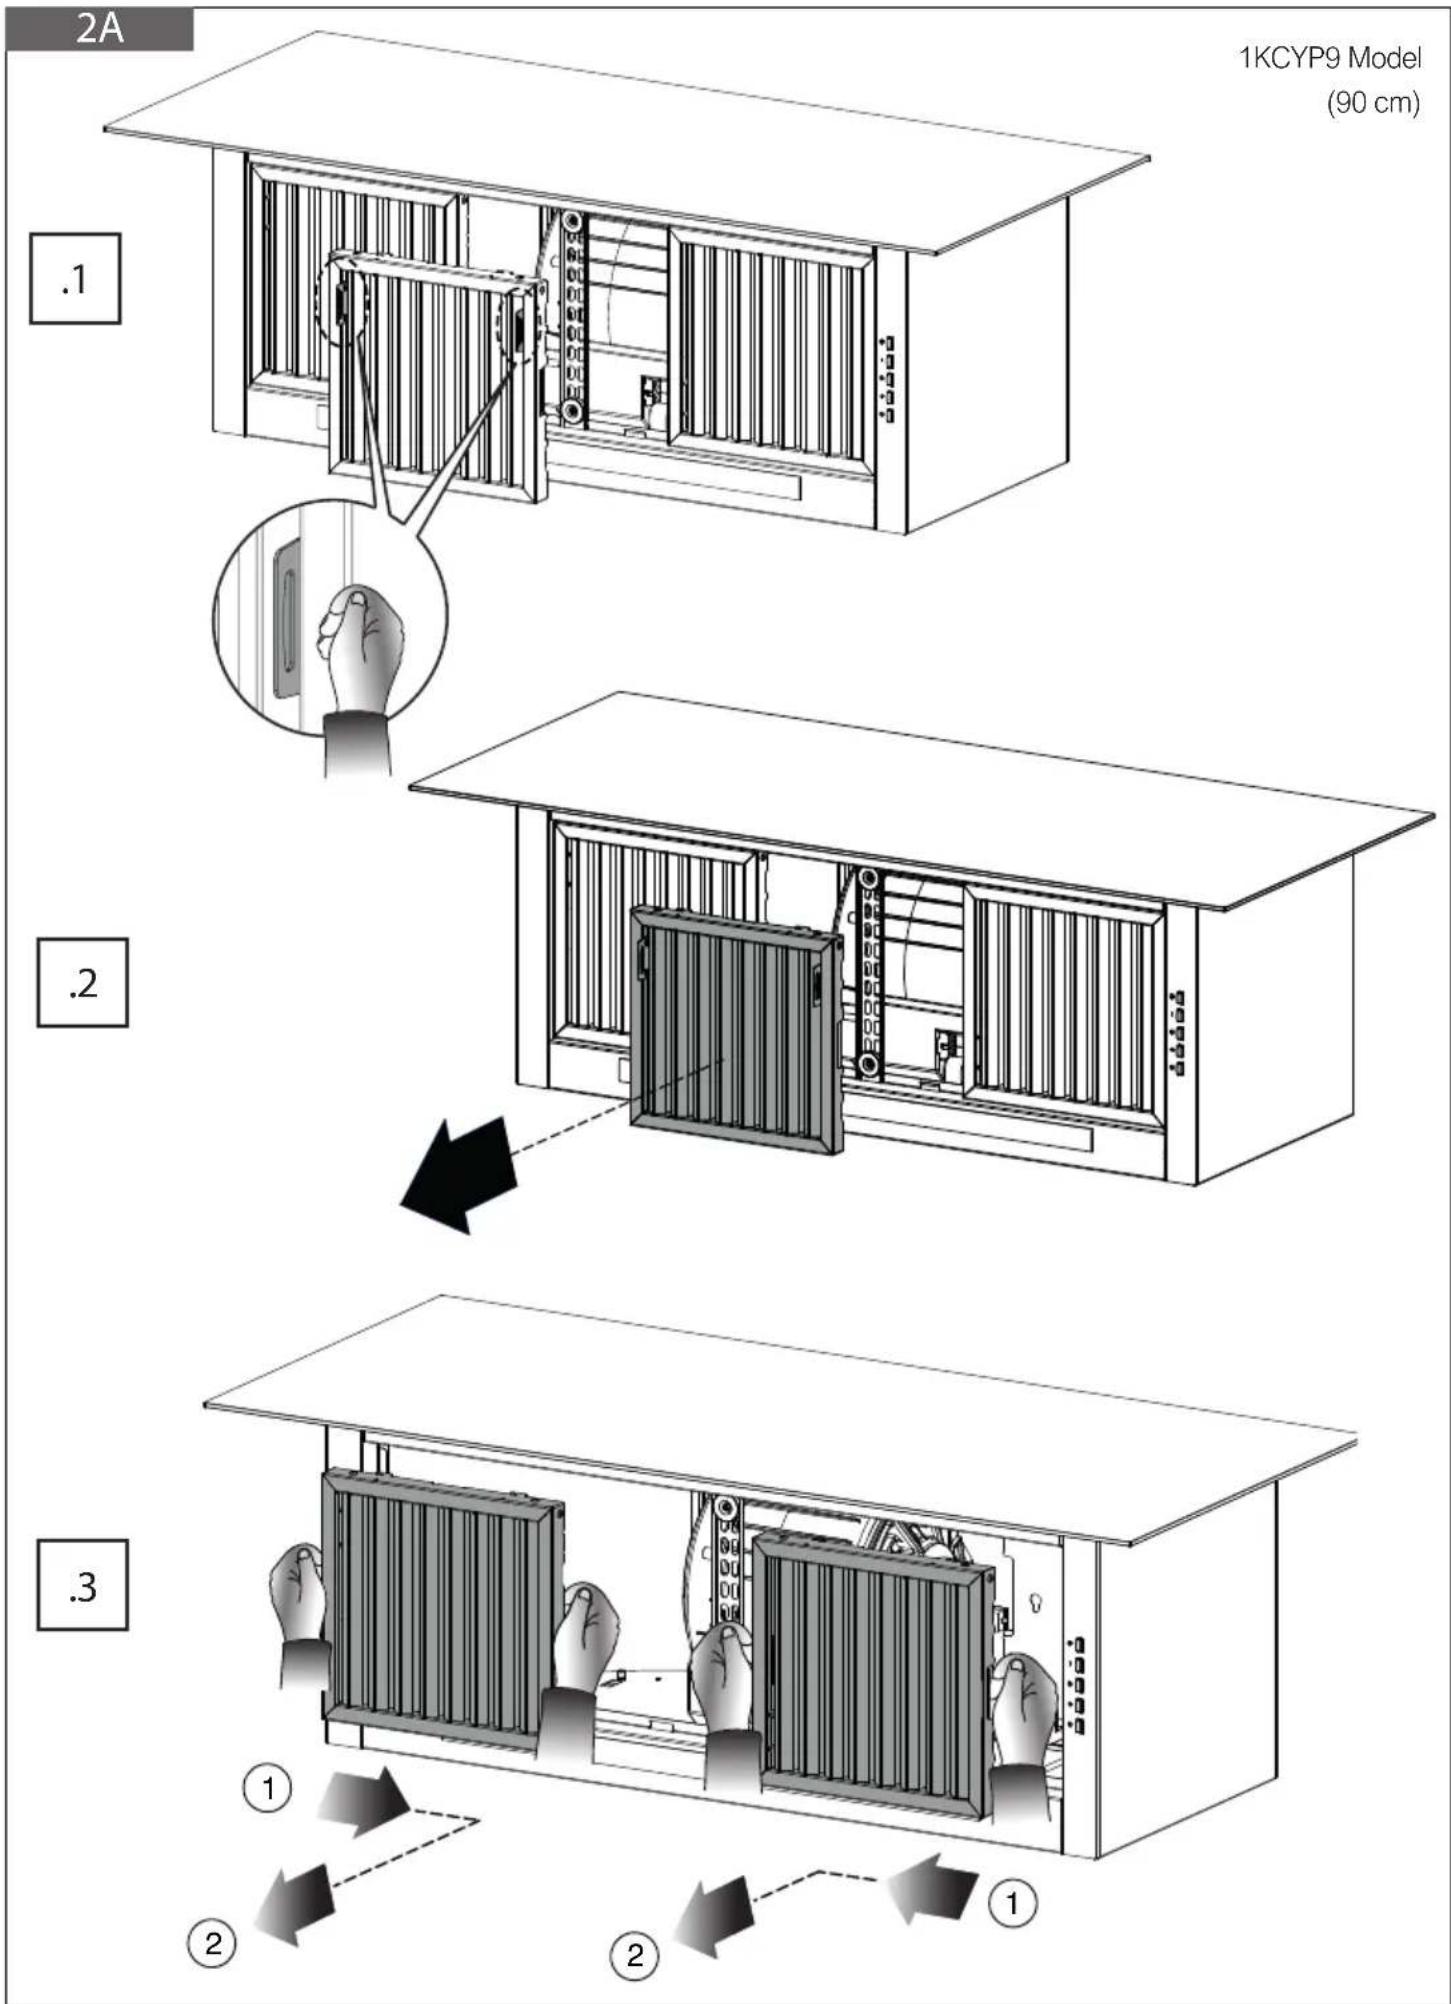
text_image
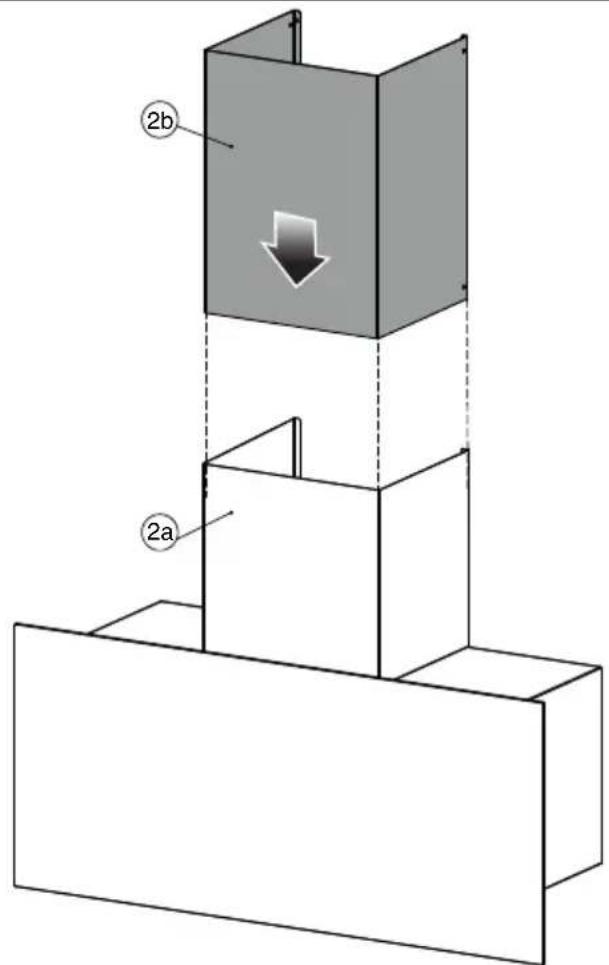
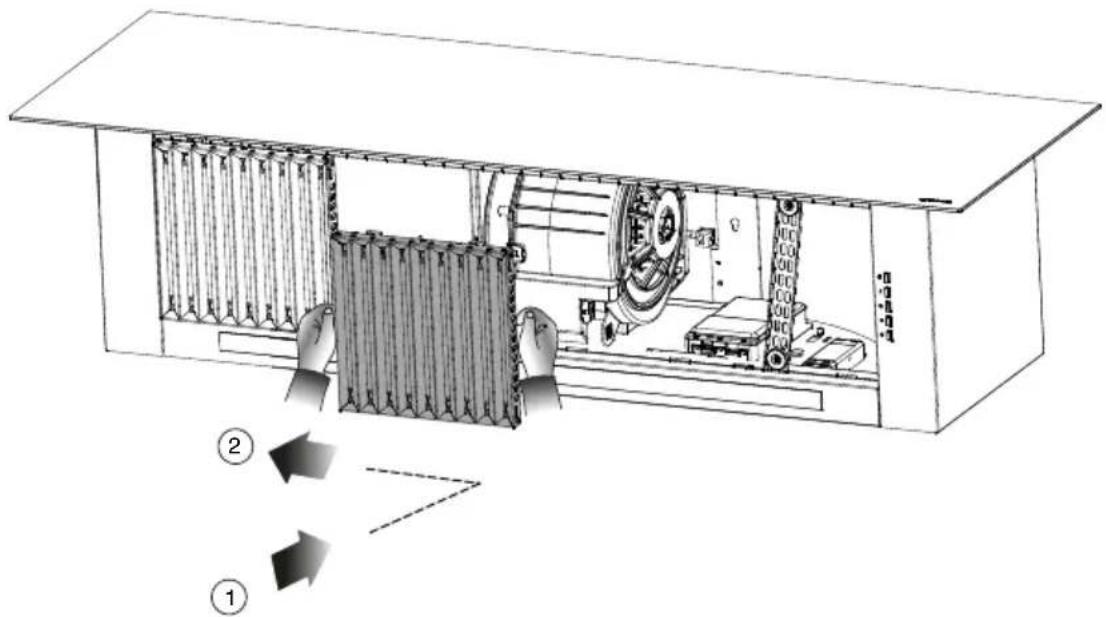
2A 1KCYP9 Model (90 cm) .1 .2 .3 ① ② ① ②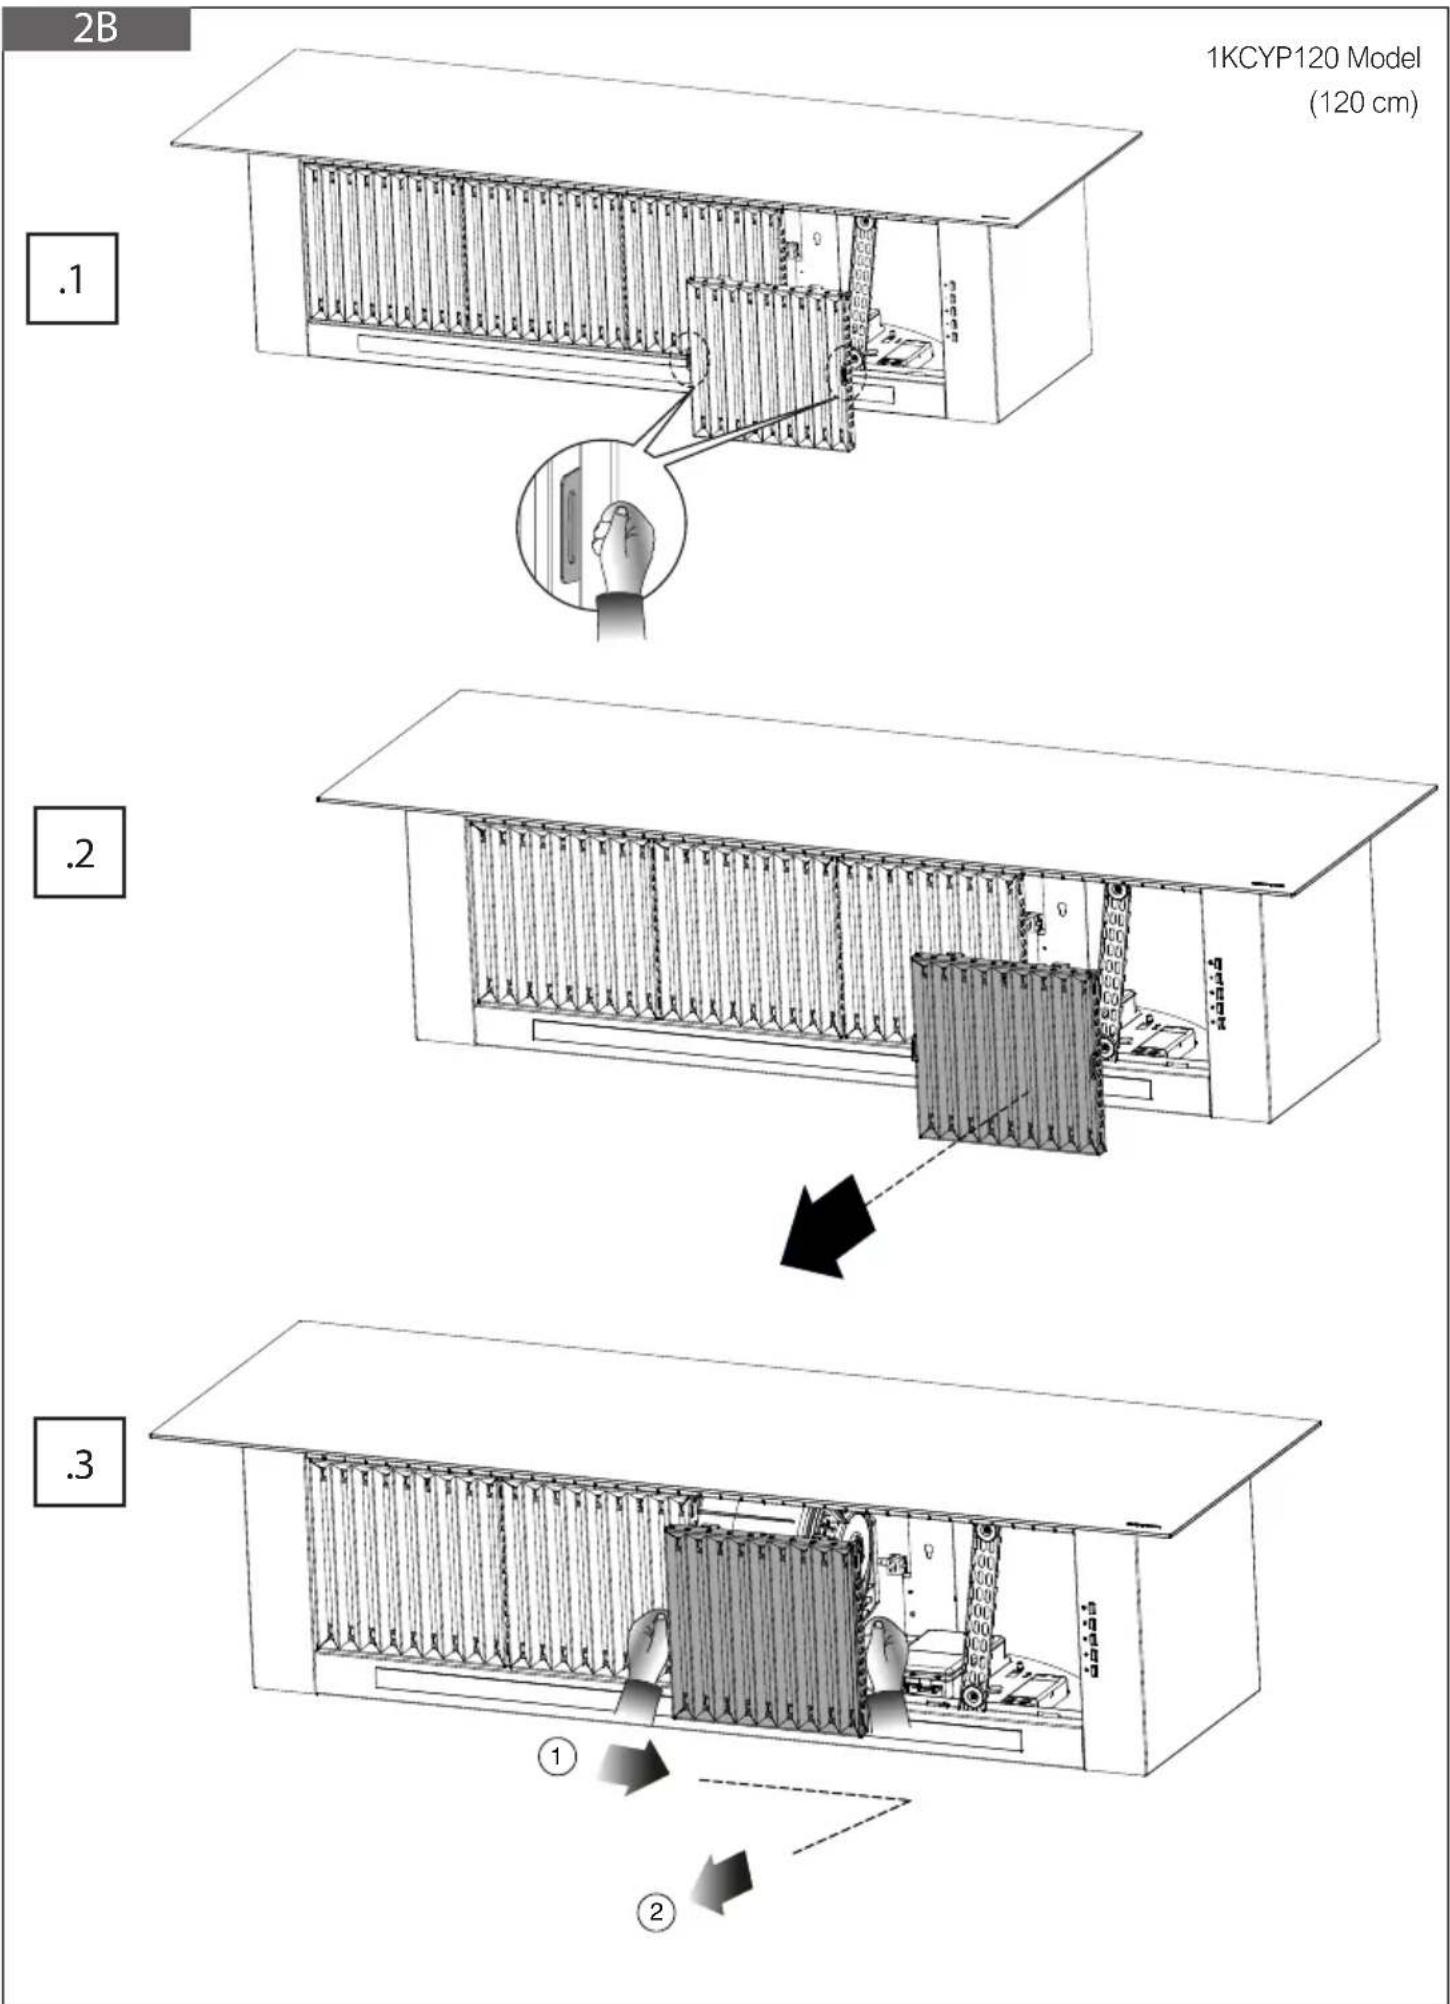
text_image
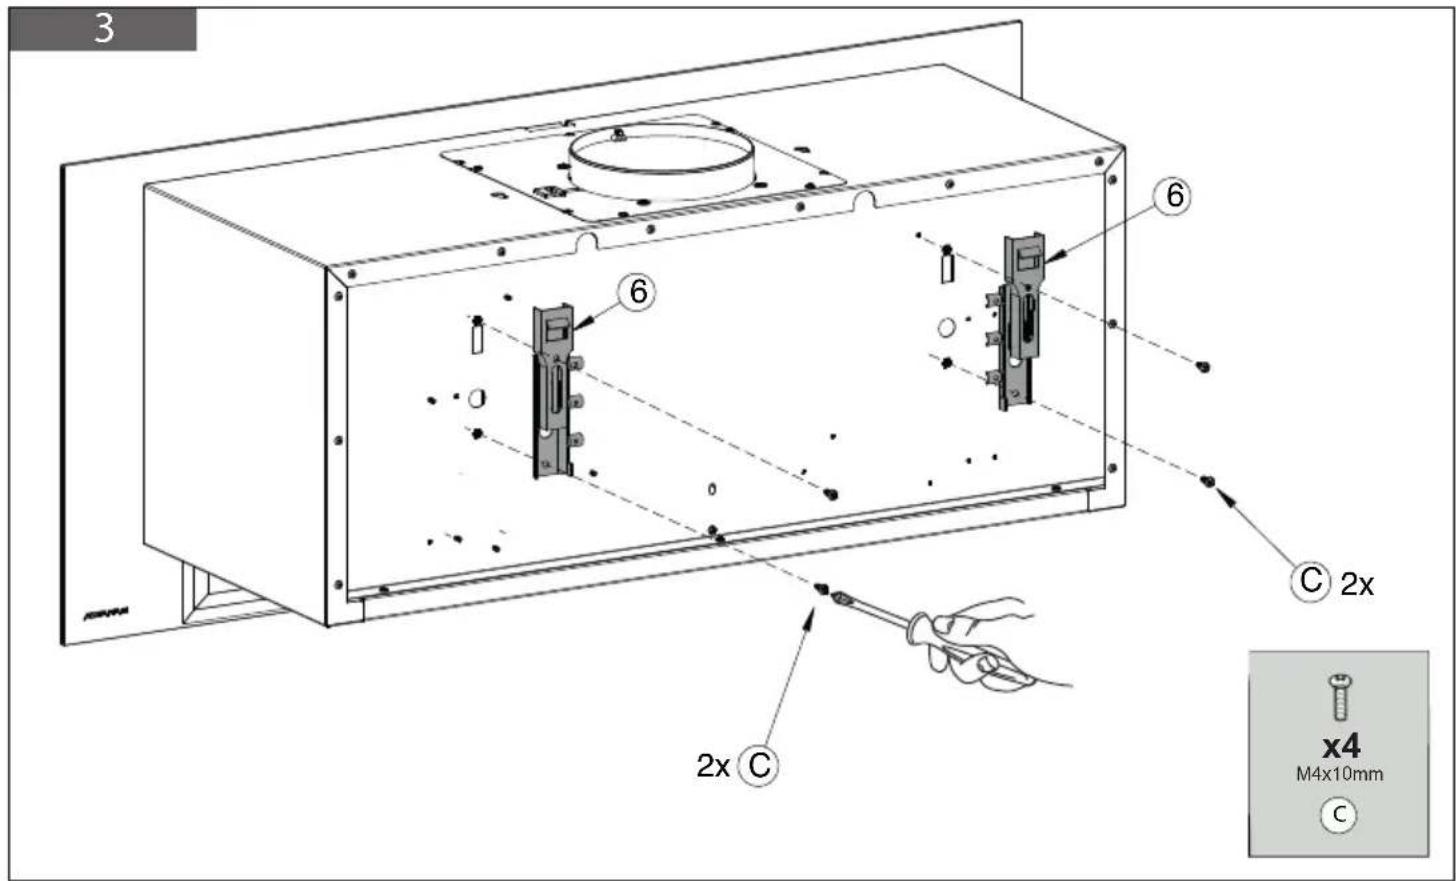
3 6 6 C 2x 2x C x4 M4x10mm C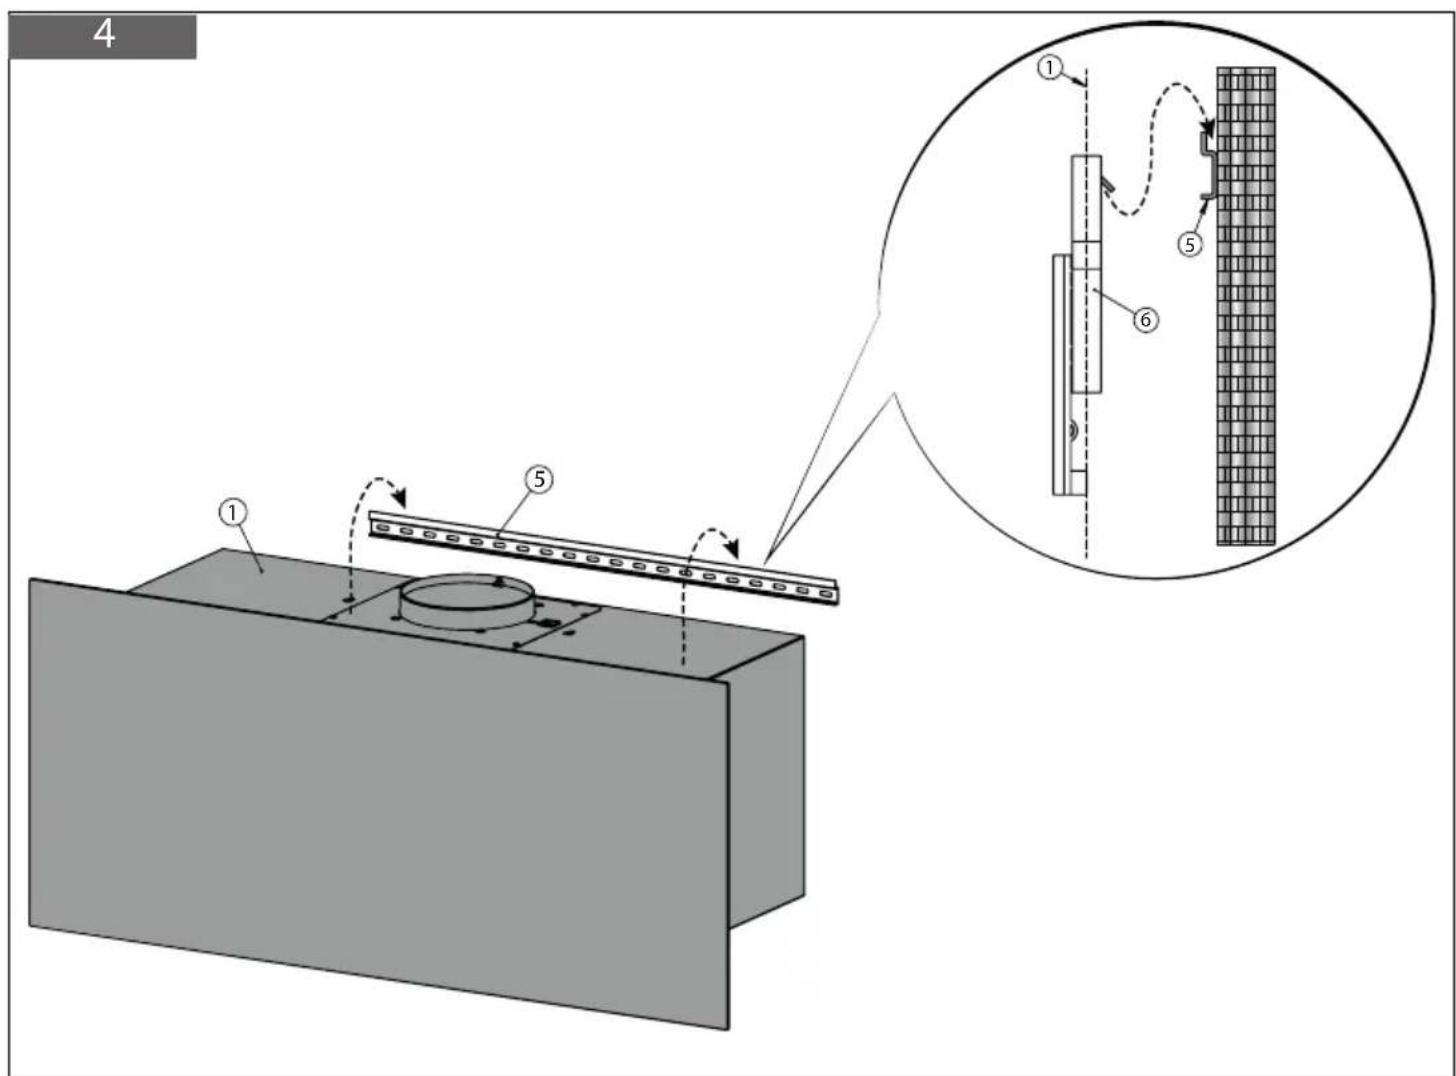
text_image
4 ① ⑤ ⑥5
6A
text_image
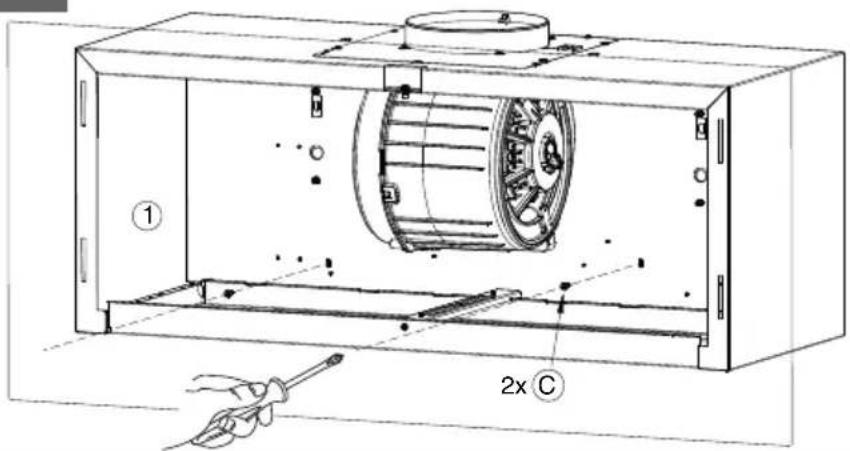
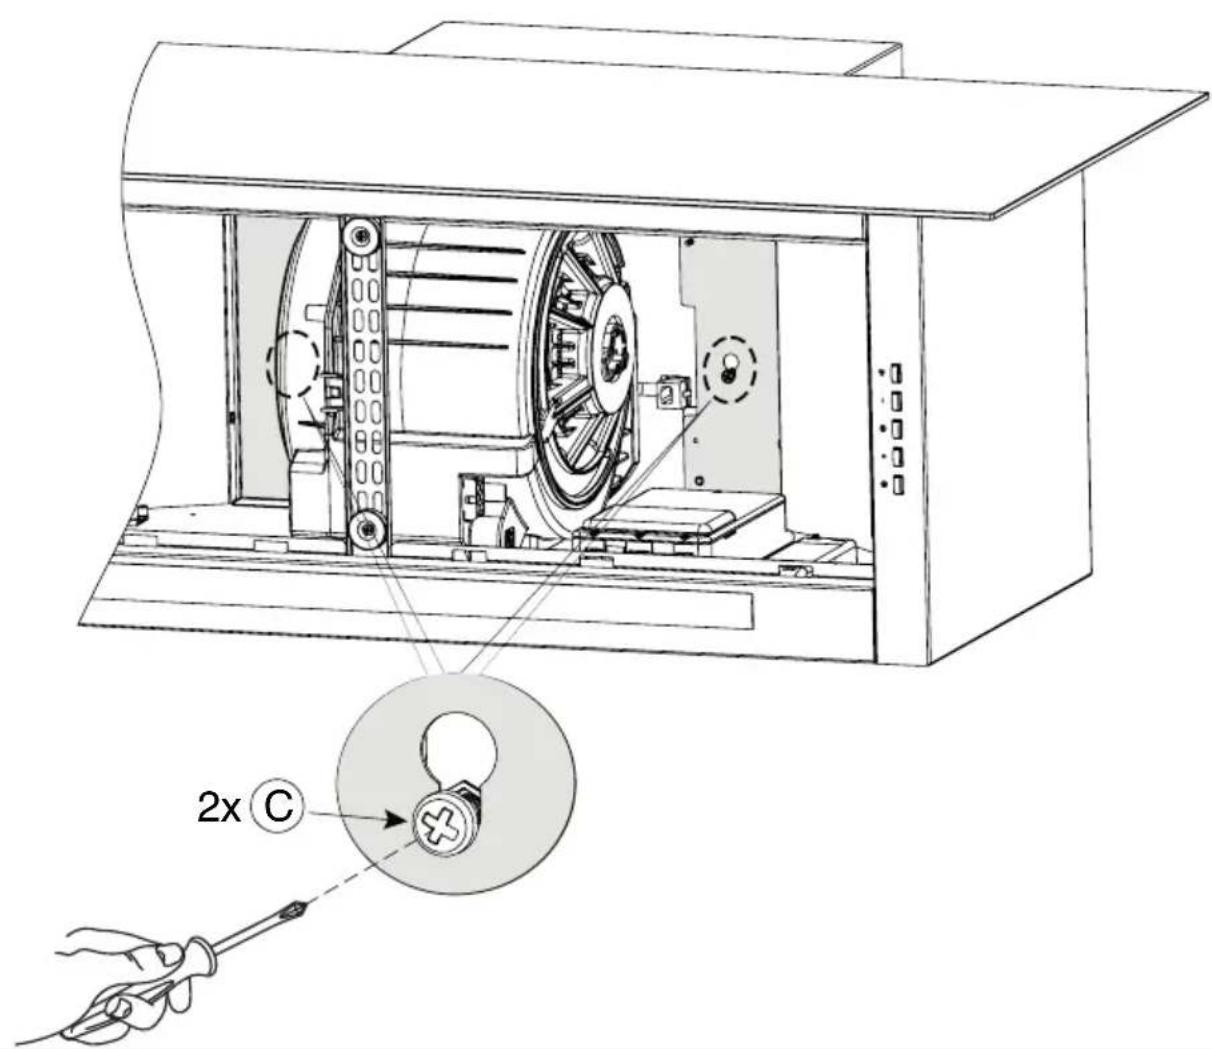
Technical diagram of an electrical enclosure with labeled components and a hand holding a tool1KCYP9 Model (90 cm)
text_image
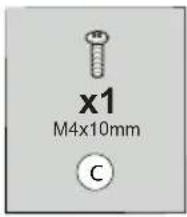
x1 M4x10mm C6B
text_image
① 2x C1KCYP12 Model (120 cm)
text_image
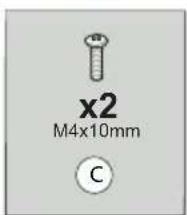
x2 M4x10mm C7
text_image
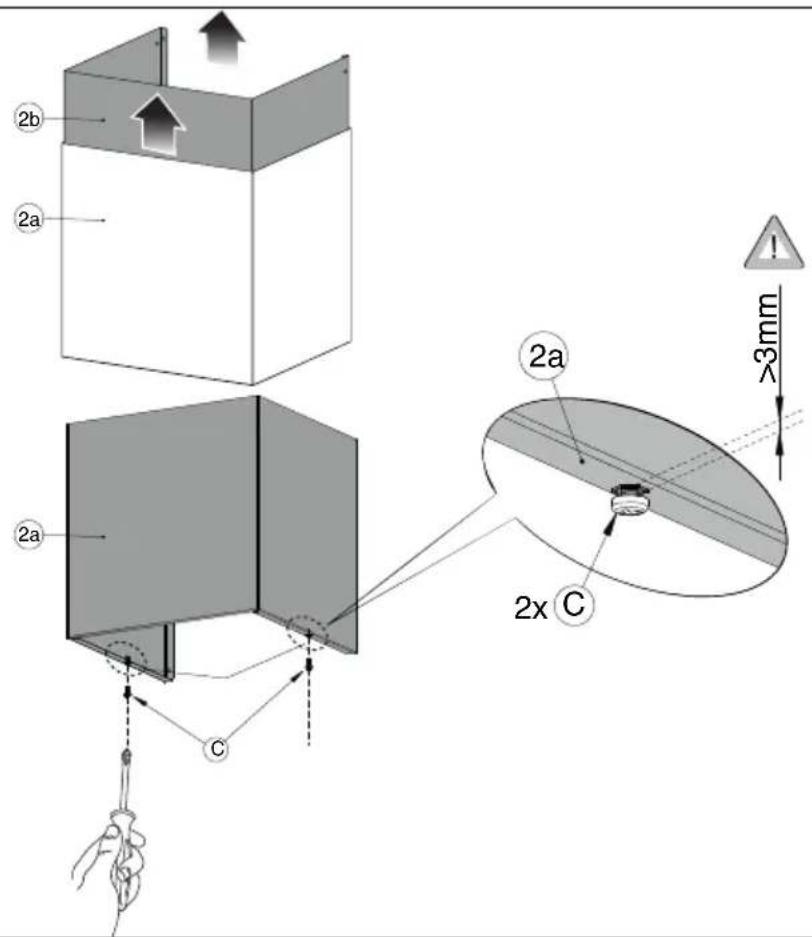
2b 2a 2a 2a C 2x C ×3mm !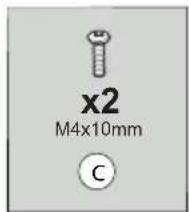
text_image
x2 M4x10mm C8
text_image
.1 1 2a 2a 1 2x C.2
text_image
2x C9

text_image
2b 2a
text_image
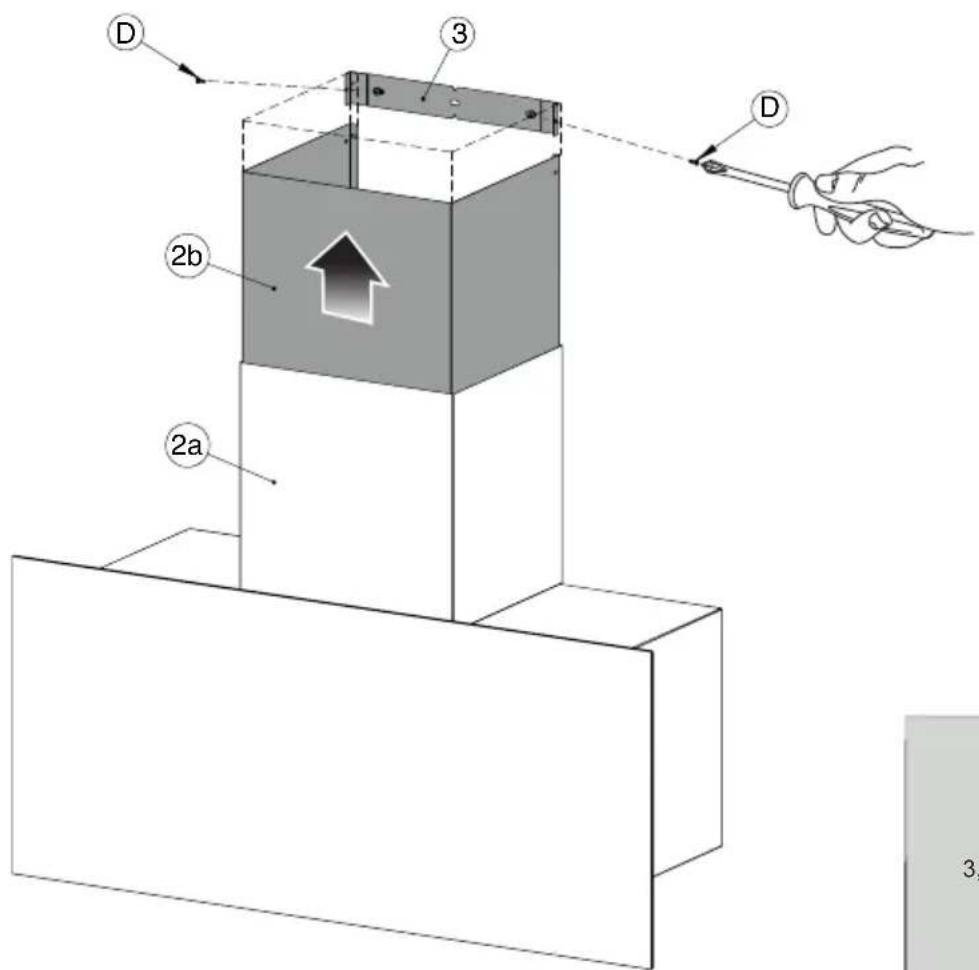
D 3 2b 2a D 3,

3,5×9,5mm

text_image
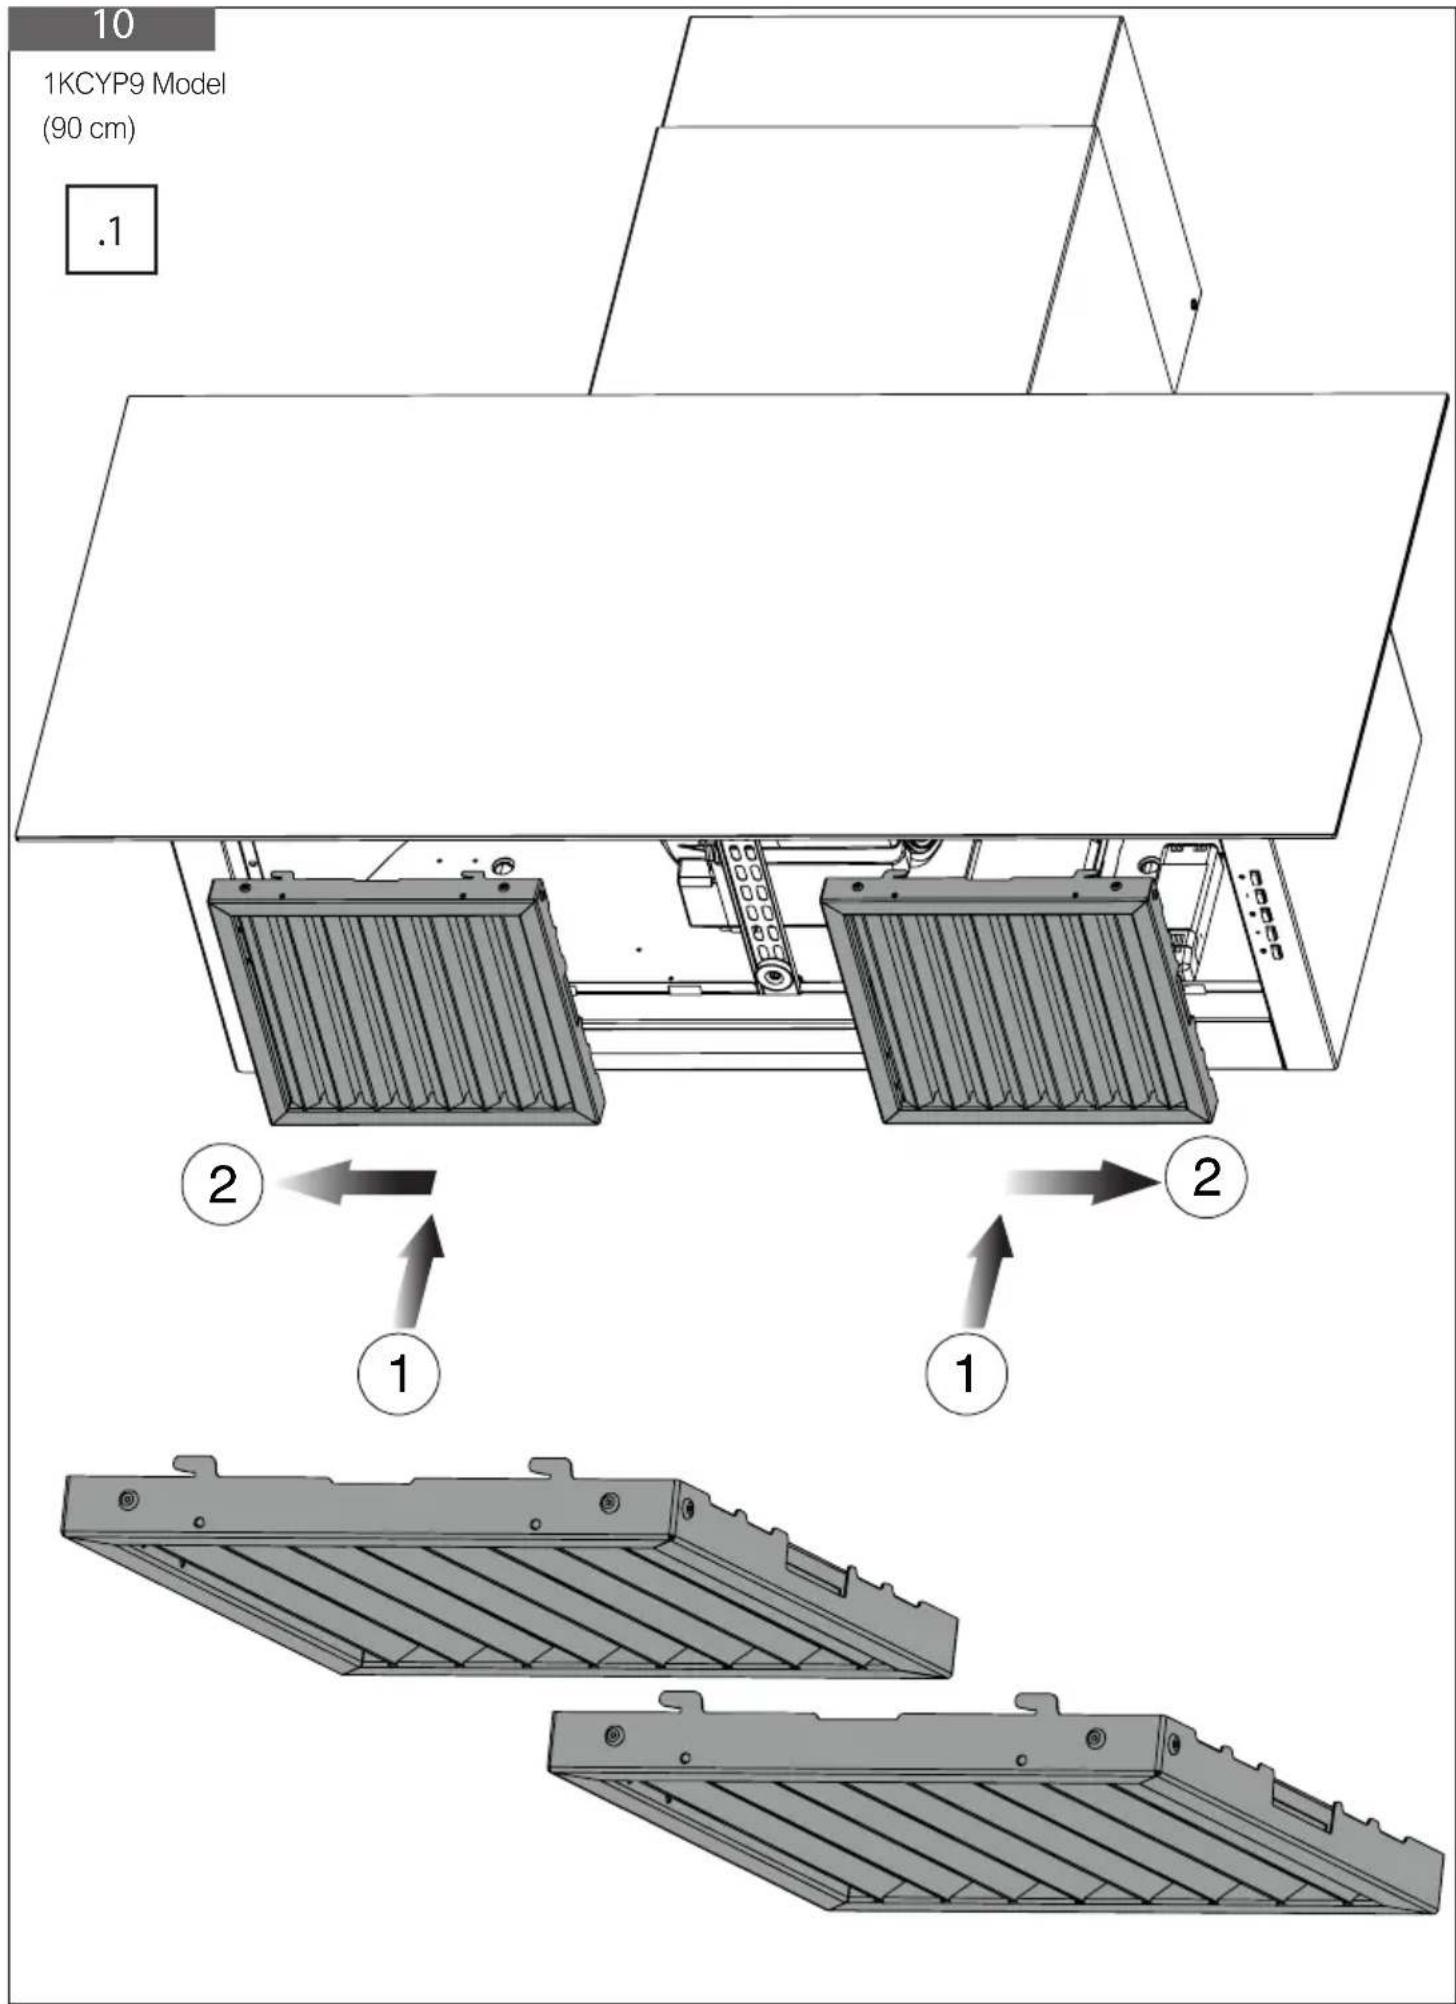
10 1KCYP9 Model (90 cm) .1 2 1 1 2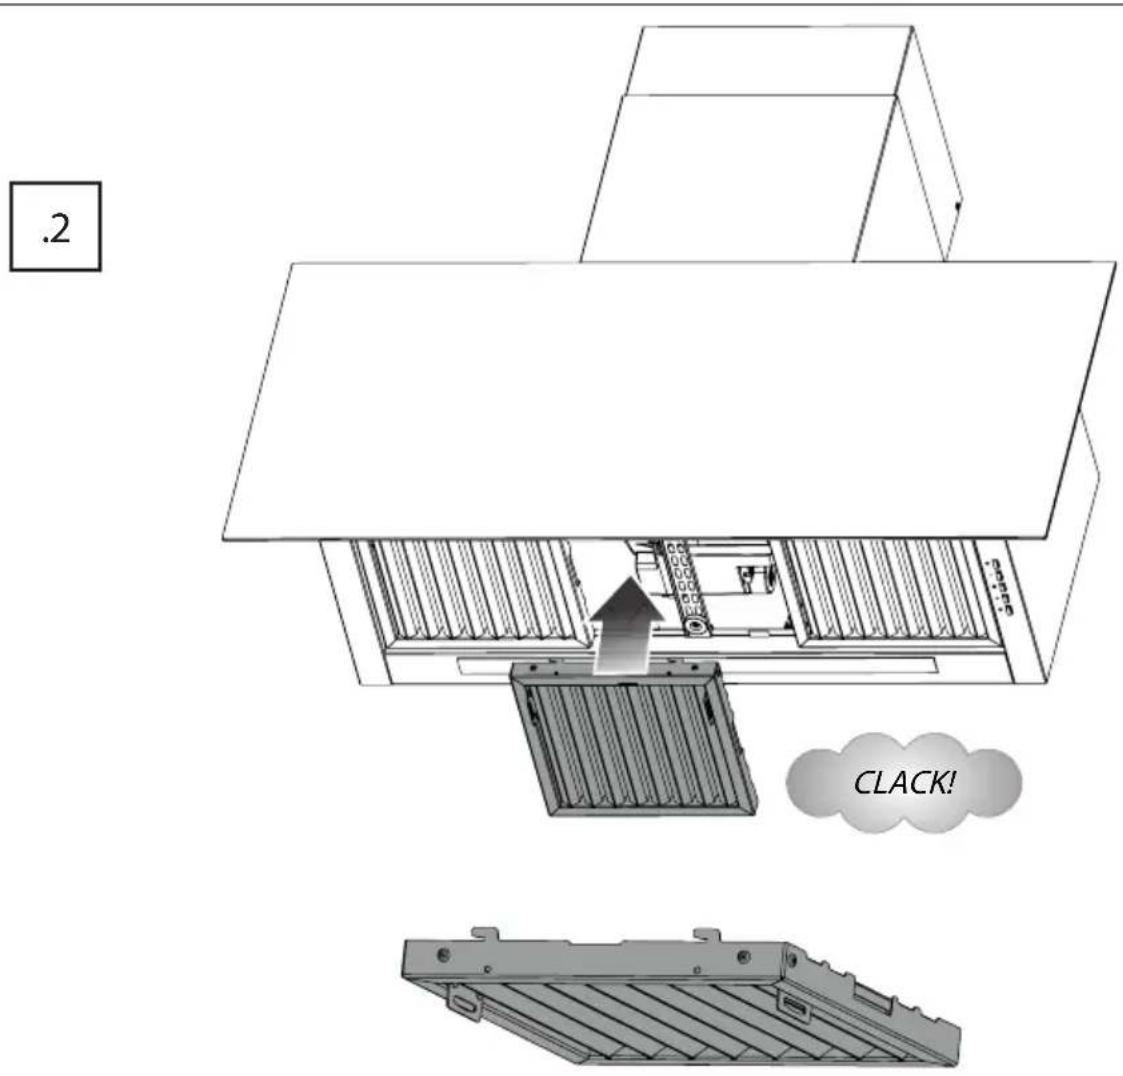
text_image
.2 CLACK!11
1KCYP12 Model
(120 cm)
text_image
Technical diagram of a mechanical assembly with labeled components and directional arrows indicating motion or flow.
text_image
Technical diagram of a mechanical assembly with labeled components and directional arrows indicating flow or movement.
text_image
Technical diagram showing a mechanical assembly with labeled components and directional arrows indicating flow or movement.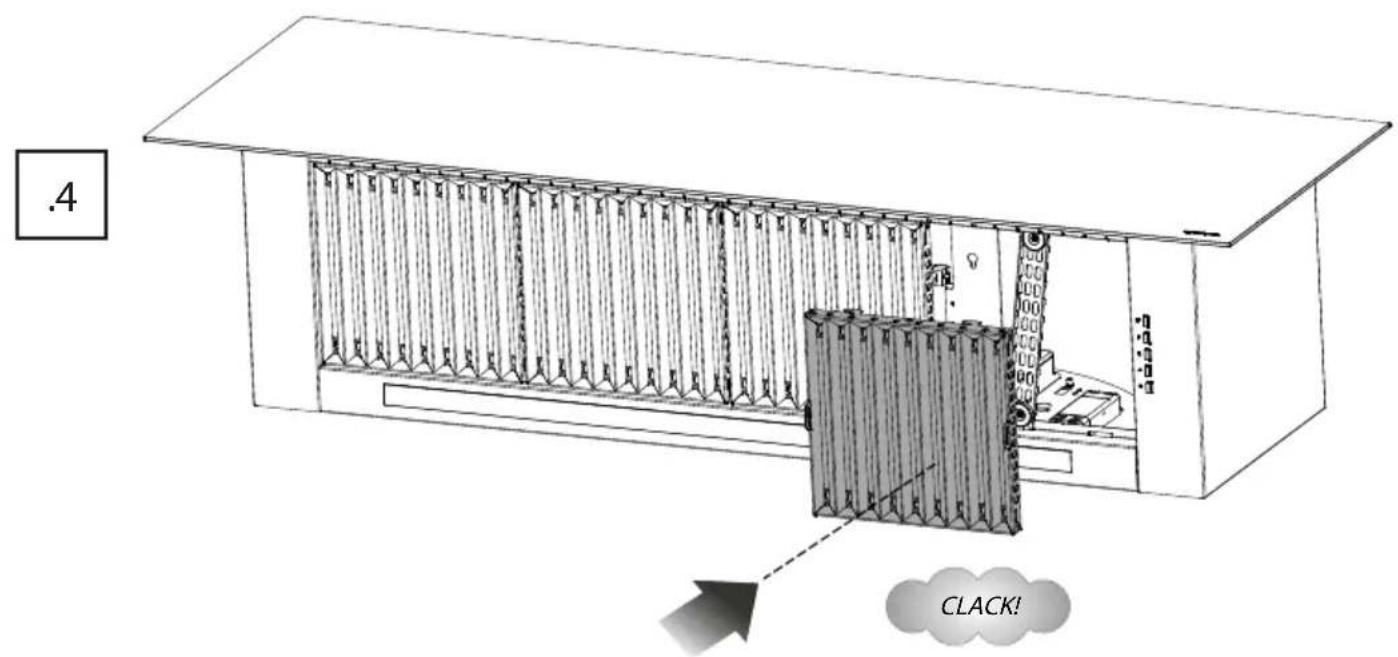
text_image
.4 CLACK!12
text_image
ON/OFF Light Speed decrease ON/OFF (1 Speed) Speed increase TimerAVVERTENZE GENERALI
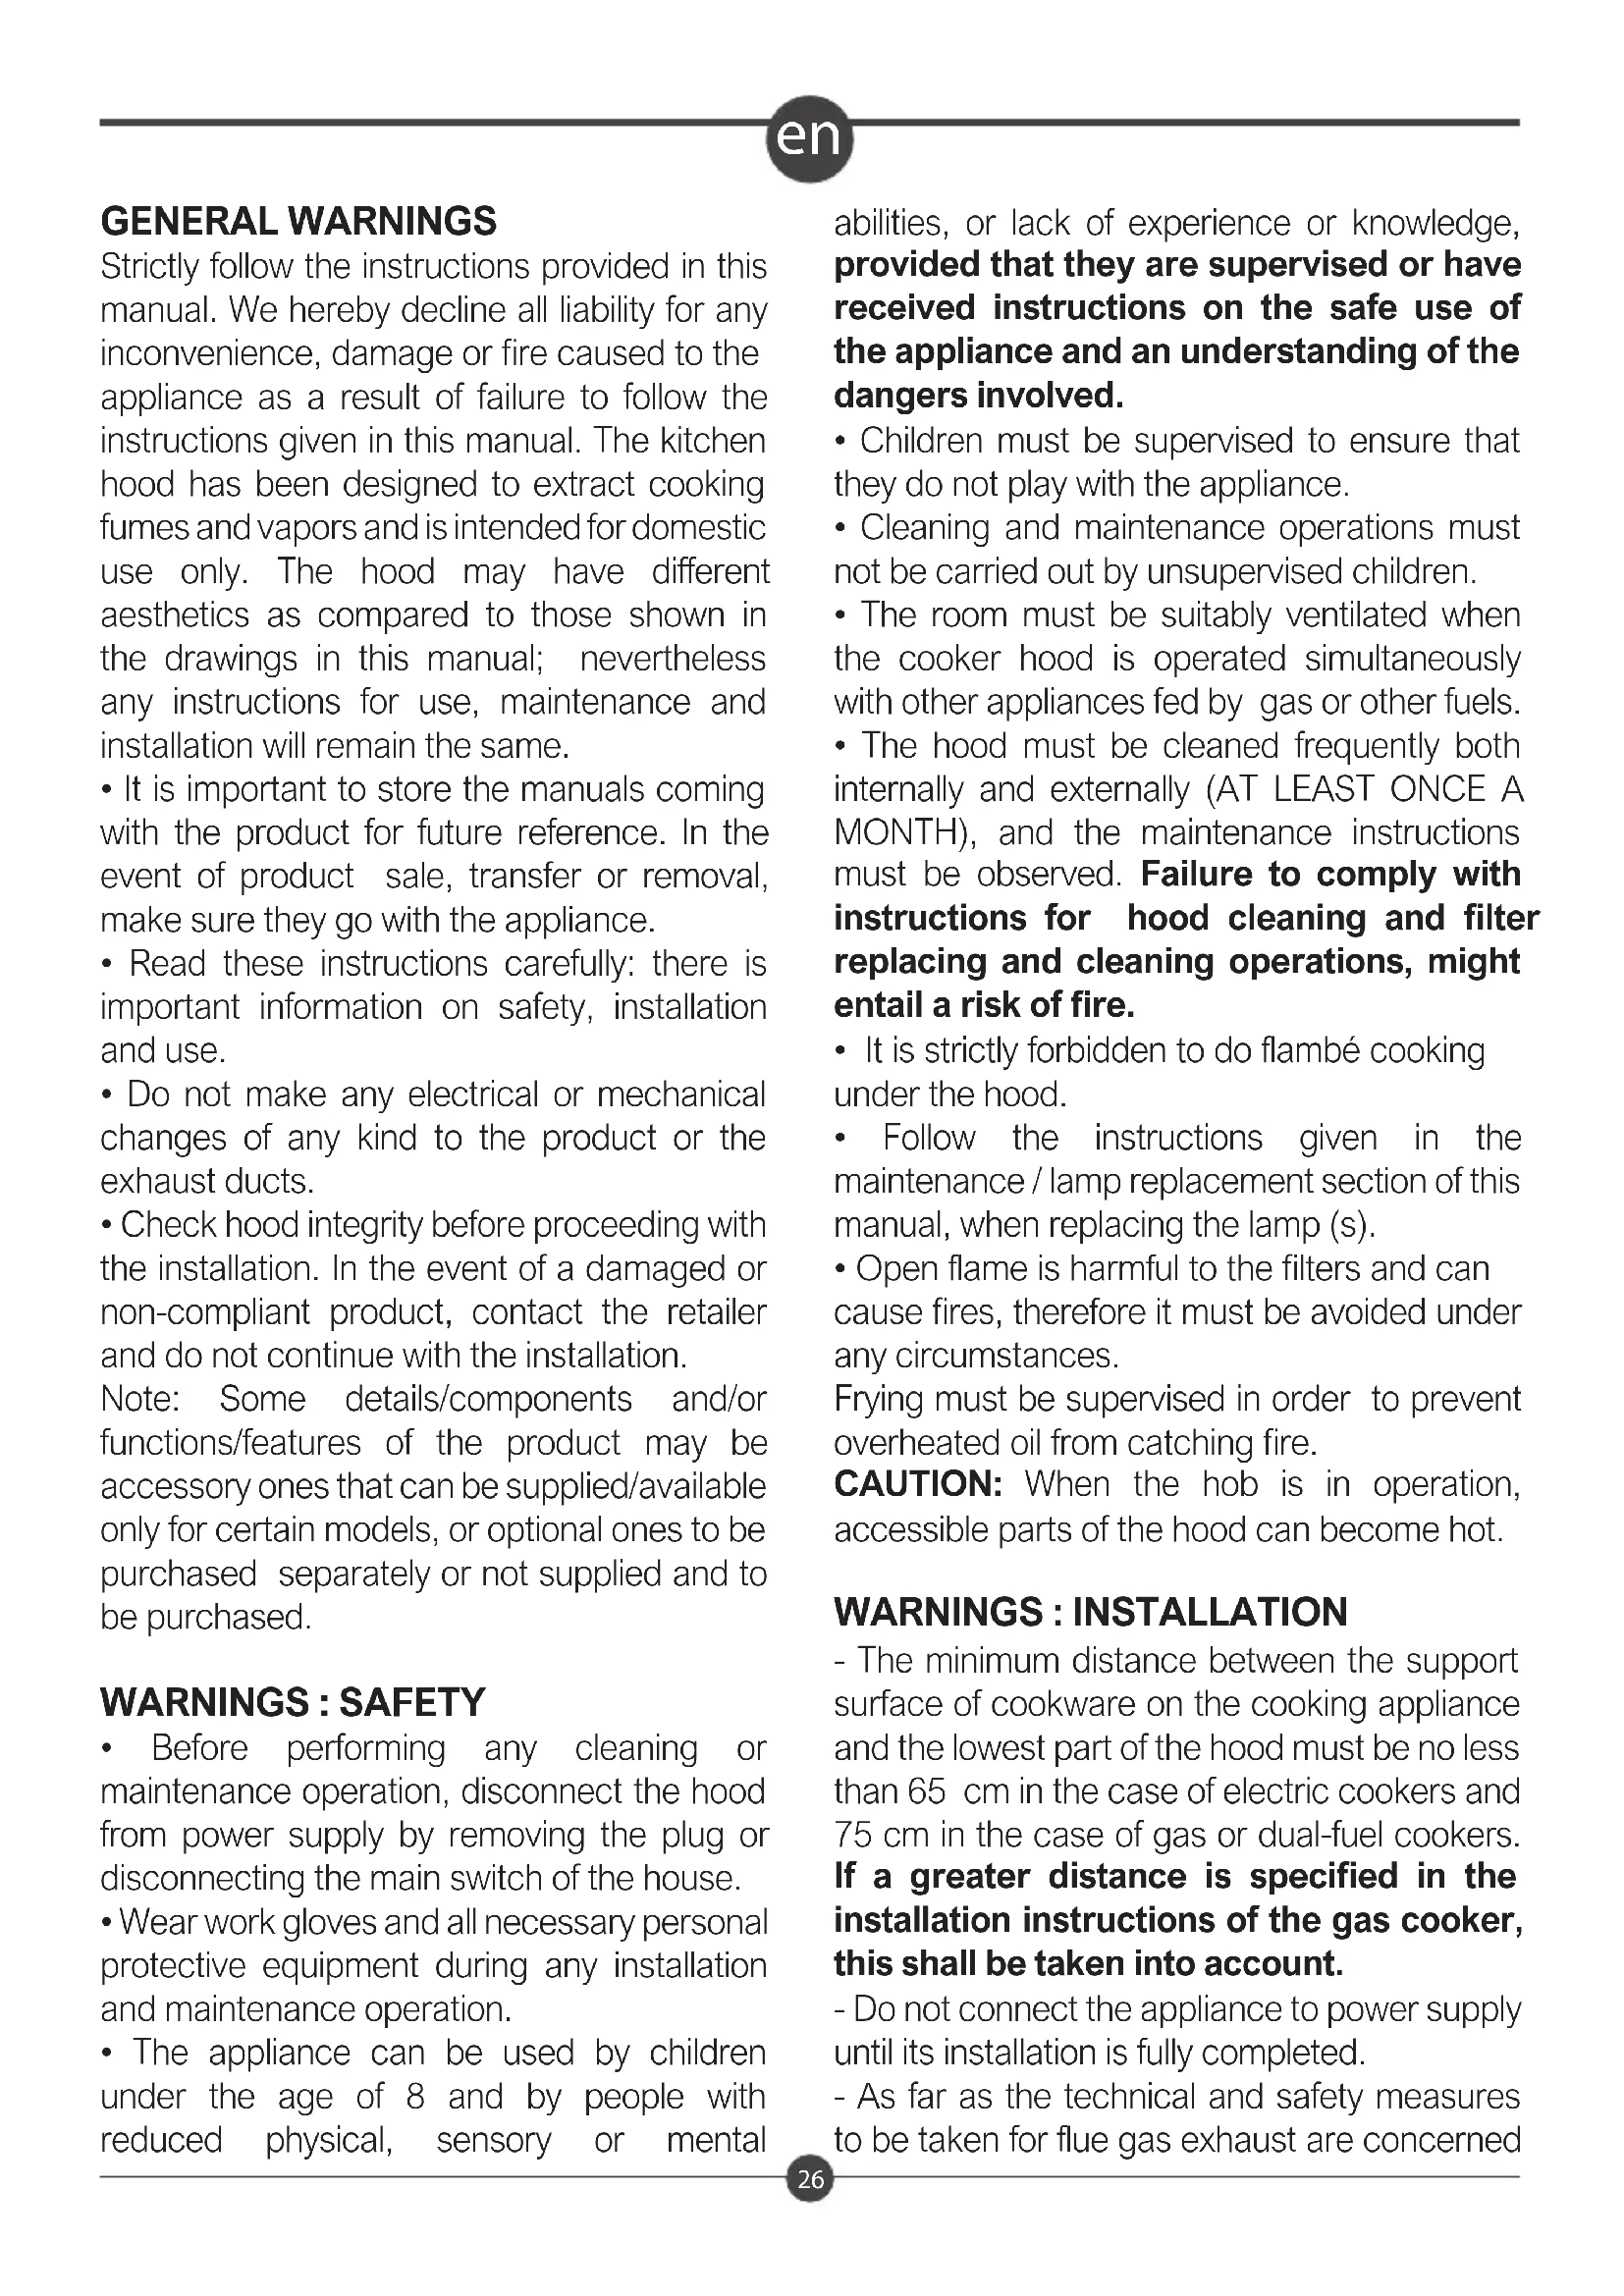
Strictly follow the instructions provided in this manual. We hereby decline all liability for any inconvenience, damage or fire caused to the appliance as a result of failure to follow the instructions given in this manual. The kitchen hood has been designed to extract cooking fumes and vapors and is intended for domestic use only. The hood may have different aesthetics as compared to those shown in the drawings in this manual; nevertheless any instructions for use, maintenance and installation will remain the same.
- It is important to store the manuals coming with the product for future reference. In the event of product sale, transfer or removal, make sure they go with the appliance.
- Read these instructions carefully: there is important information on safety, installation and use.
- Do not make any electrical or mechanical changes of any kind to the product or the exhaust ducts.
- Check hood integrity before proceeding with the installation. In the event of a damaged or non-compliant product, contact the retailer and do not continue with the installation.
Note: Some details/components and/or functions/features of the product may be accessory ones that can be supplied/available only for certain models, or optional ones to be purchased separately or not supplied and to be purchased.
WARNINGS : SAFETY
- Before performing any cleaning or maintenance operation, disconnect the hood from power supply by removing the plug or disconnecting the main switch of the house.
- Wear work gloves and all necessary personal protective equipment during any installation and maintenance operation.
- The appliance can be used by children under the age of 8 and by people with reduced physical, sensory or mental
abilities, or lack of experience or knowledge, provided that they are supervised or have received instructions on the safe use of the appliance and an understanding of the dangers involved.
- Children must be supervised to ensure that they do not play with the appliance.
- Cleaning and maintenance operations must not be carried out by unsupervised children.
- The room must be suitably ventilated when the cooker hood is operated simultaneously with other appliances fed by gas or other fuels.
-
The hood must be cleaned frequently both internally and externally (AT LEAST ONCE A MONTH), and the maintenance instructions must be observed. Failure to comply with instructions for hood cleaning and filter replacing and cleaning operations, might entail a risk of fire.
-
It is strictly forbidden to do flambé cooking under the hood.
- Follow the instructions given in the maintenance / lamp replacement section of this manual, when replacing the lamp (s).
- Open flame is harmful to the filters and can cause fires, therefore it must be avoided under any circumstances.
Frying must be supervised in order to prevent overheated oil from catching fire.
CAUTION: When the hob is in operation, accessible parts of the hood can become hot.
WARNINGS : INSTALLATION
- The minimum distance between the support surface of cookware on the cooking appliance and the lowest part of the hood must be no less than 65 cm in the case of electric cookers and 75 cm in the case of gas or dual-fuel cookers. If a greater distance is specified in the installation instructions of the gas cooker, this shall be taken into account.
- Do not connect the appliance to power supply until its installation is fully completed.
- As far as the technical and safety measures to be taken for flue gas exhaust are concerned
, strictly follow the regulations provided for by competent local authorities.
- Extracted air must not be conveyed into a duct used for the discharge of fumes produced by appliances burning gas or other fuels.
- Do not use or leave the hood without properly fitted lamps, as it might entail a possible risk of electric shock.
- NEVER use the hood without properly fitted grids/filters!
- The hood must NEVER be used as a support surface unless expressly indicated in the manual. The maximum total weight of any objects placed or hung on the hood (where applicable) must not exceed 1.5 kg.
- Use only the fixing screws supplied with the product for installation or, if not supplied, purchase the correct type of screws.
- Use proper length screws, as specified in the documentation.
- In case of any doubts, contact the authorized service center or similar qualified personnel.
- CAUTION! Failure to install screws and fasteners in accordance with these instructions may result in electrical hazards.
- Do not use the appliance with a programmer, timer, separate remote control or any other device that activates automatically.
WARNINGS: DISPOSAL
This equipment has been designed, tested and manufactured in accordance with current regulations.
This appliance has been marked in accordance with European Directive 2012/19/EC, Waste Electrical and Electronic Equipment (WEEE). By ensuring its proper disposal, you will help prevent potential negative consequences for the environment and health. The symbol on the product or on related documentation indicates that it should not be disposed of as household waste, yet it shall be handed over to a suitable collection point for the recycling of electrical and electronic
equipment. Disposal of this product shall be done in accordance with your local waste disposal regulations. For more information about disposal, recovery and recycling of this product, please contact your local Civic Office, your household waste disposal service or the shop where you purchased the product.
WARNINGS: USAGE
Tips for proper use in order to reduce environmental impact:
When start cooking, switch the hood on at minimum speed, leaving it on for a few minutes even after cooking is finished. Increase the speed only in the case of large amounts of fume and vapor, using the booster function only when strictly necessary. To keep the odor reduction system efficient, replace the charcoal filter (s) when necessary. To keep the grease filter efficient over time, clean it when needed.
To optimize efficiency and minimize noise, use a ducting system having the maximum diameter indicated in this manual.
The use of electric hobs equipped with induction technology ensures energy savings and cooking time reduction: for this purpose and in order to reduce the formation of condensation, it is recommended that the induction hob cooking zones are operated at an adequate power level to maintain necessary boiling throughout food preparation
The hood has been designed to be used in both extraction version, with external evacuation and recycling version, with internal air recirculation *.
Extraction version.
Vapors are discharged outside the room through an exhaust pipe fixed to the connecting flange.
- CAUTION! The exhaust pipe is not supplied with the appliance and must be purchased. If possible, the diameter of the exhaust pipe should be the same as the diameter of the
en
connection ring.
- CAUTION! For this type of installation, if the hood is equipped with charcoal filter/s, this / these must be removed.
- Connect the hood to pipes and wall exhaust holes having the same diameter as the air outlet (connection flange) one. The use of pipes and wall exhaust holes with a smaller diameter will result in a reduction in air flow performance and a drastic increase in noise levels. Thus, we hereby decline all liability in this regard.
- Use the shortest duct possible. In horizontal sections, the pipe must have a slight inclination (approx. 10% ) to better convey the air towards the outside of the room.
- Use a duct with as few bends as possible (maximum bend angle: 90^ ).
- Avoid abrupt changes in the duct cross-section.
Only for Germany: When the cooker hood and appliances powered by energy other than electricity are operated simultaneously, the negative pressure in the room must not exceed 4 Pa (4 x 10⁻⁵ bar).
Recycling version
(for some products / models it may be necessary to purchase an optional kit).
*CAUTION! It is recommended to use this installation version ONLY with a gas-powered hob.
*CAUTION! The anti-condensation function/feature may NOT give expected results in this operation mode.
Grease and odors will be removed from extracted air before returning it back into the room. To use the hood in this mode, you need to fit an additional charcoal filter-based filtering system, if not present.
ELECTRICAL CONNECTION
The main voltage must correspond to the voltage indicated on the rating label found inside the hood. If the hood is provided with a plug, connect the hood to a socket that complies with current regulations, which needs to be found in an area that is reachable even after installation. If the hood is not equipped with a plug (direct connection to the mains) or the plug is placed in an unreachable area, even after installation, fit a two-pole switch compliant with current regulations, which ensures complete disconnection from the mains under overvoltage category III conditions, in accordance with installation rules.
CAUTION! Before reconnecting the hood circuit to the power supply and verifying its proper operation, always check that the mains able has been fitted correctly. The hood is equipped with a special power cord; if the cord is damaged, contact the technical assistance service.
ASSEMBLY AND INSTALLATION
Before starting installation:
- Check that the purchased product is of a suitable size for the installation area selected.
- Remove the activated charcoal filter (s) if supplied (see also related paragraph). This/these must be refitted only if the hood is to be used in the recycling version.
- Check that there is no accompanying material (for transport purposes) inside the hood (for example, plastic bags with screws, guarantees, etc.), which may need to be removed and stored for use.
CAUTION! As the product is of excessive weight, handling and installation of the hood must be done by at least two or more persons.
CLEANING AND MAINTENANCE
ONLY use a cloth moistened with neutral liquid detergent for cleaning the hood. DO NOT USE TOOLS OR OTHER INSTRUMENTS FOR CLEANING operations! Avoid using products containing abrasives. DO NOT USE ALCOHOL!
en
Grease filter (Only for Filtering Version)
\*CAUTION! It is recommended to use the recycling version ONLY with a gas-powered hob.
Retains grease particles produced during cooking. Excess liquids shall be frequently removed from filters - or whenever cooking preparations involve the boiling of liquids- and filters must be cleaned once a month (or when the filter saturation indicator system - if your model is provided with it – signals it to be necessary), with non-aggressive detergents, either hand- washed or washed in the dishwasher at low temperatures and on a short cycle. When washed in the dishwasher the metal grease filter may fade, but it will not affect its filtering performance in any way.
Activated charcoal filter (Recycling version only)
Retains unpleasant odors produced during cooking. The charcoal filter must be replaced every two months (or when the filter saturation indicator system - if your model is provided with it- signals it to be necessary).
Lamp replacement
The hood is equipped with a LED technology-based lighting system, which ensures perfect lighting lasting up to 10 times longer than traditional lamps and allowing for considerable energy savings. For lamp replacement, please contact the technical assistance service.
Anti-condensation function/feature
This hood has been designed to minimize condensation of water vapor due to the cooking / boiling of liquids on an electric hob equipped with induction technology. CAUTION! To obtain the best results, we recommend to use the hood in the extraction mode (external discharge of cooking fumes) with a 150mm diameter exhaust pipe. and start operating it at least at the third speed. It is also recommended to operate the hood at first speed at least 10 minutes before starting cooking foods that involve boiling of liquids and leave it on at third speed at the end of your preparation, for at least 10 minutes. Exhaust pipes with smaller diameters, non-smooth internal walls, changes in duct section or elbow bends could reduce the anti-condensation function/feature effectiveness. A low voltage electrical resistance is coupled to the bottom of the glass panel; this results in a slight heating of the same in the related area. The resistance starts operation when the motor is operated.
CAUTION! Ambient temperatures below 20 °C, may reduce effectiveness of the anti-condensation function/feature.
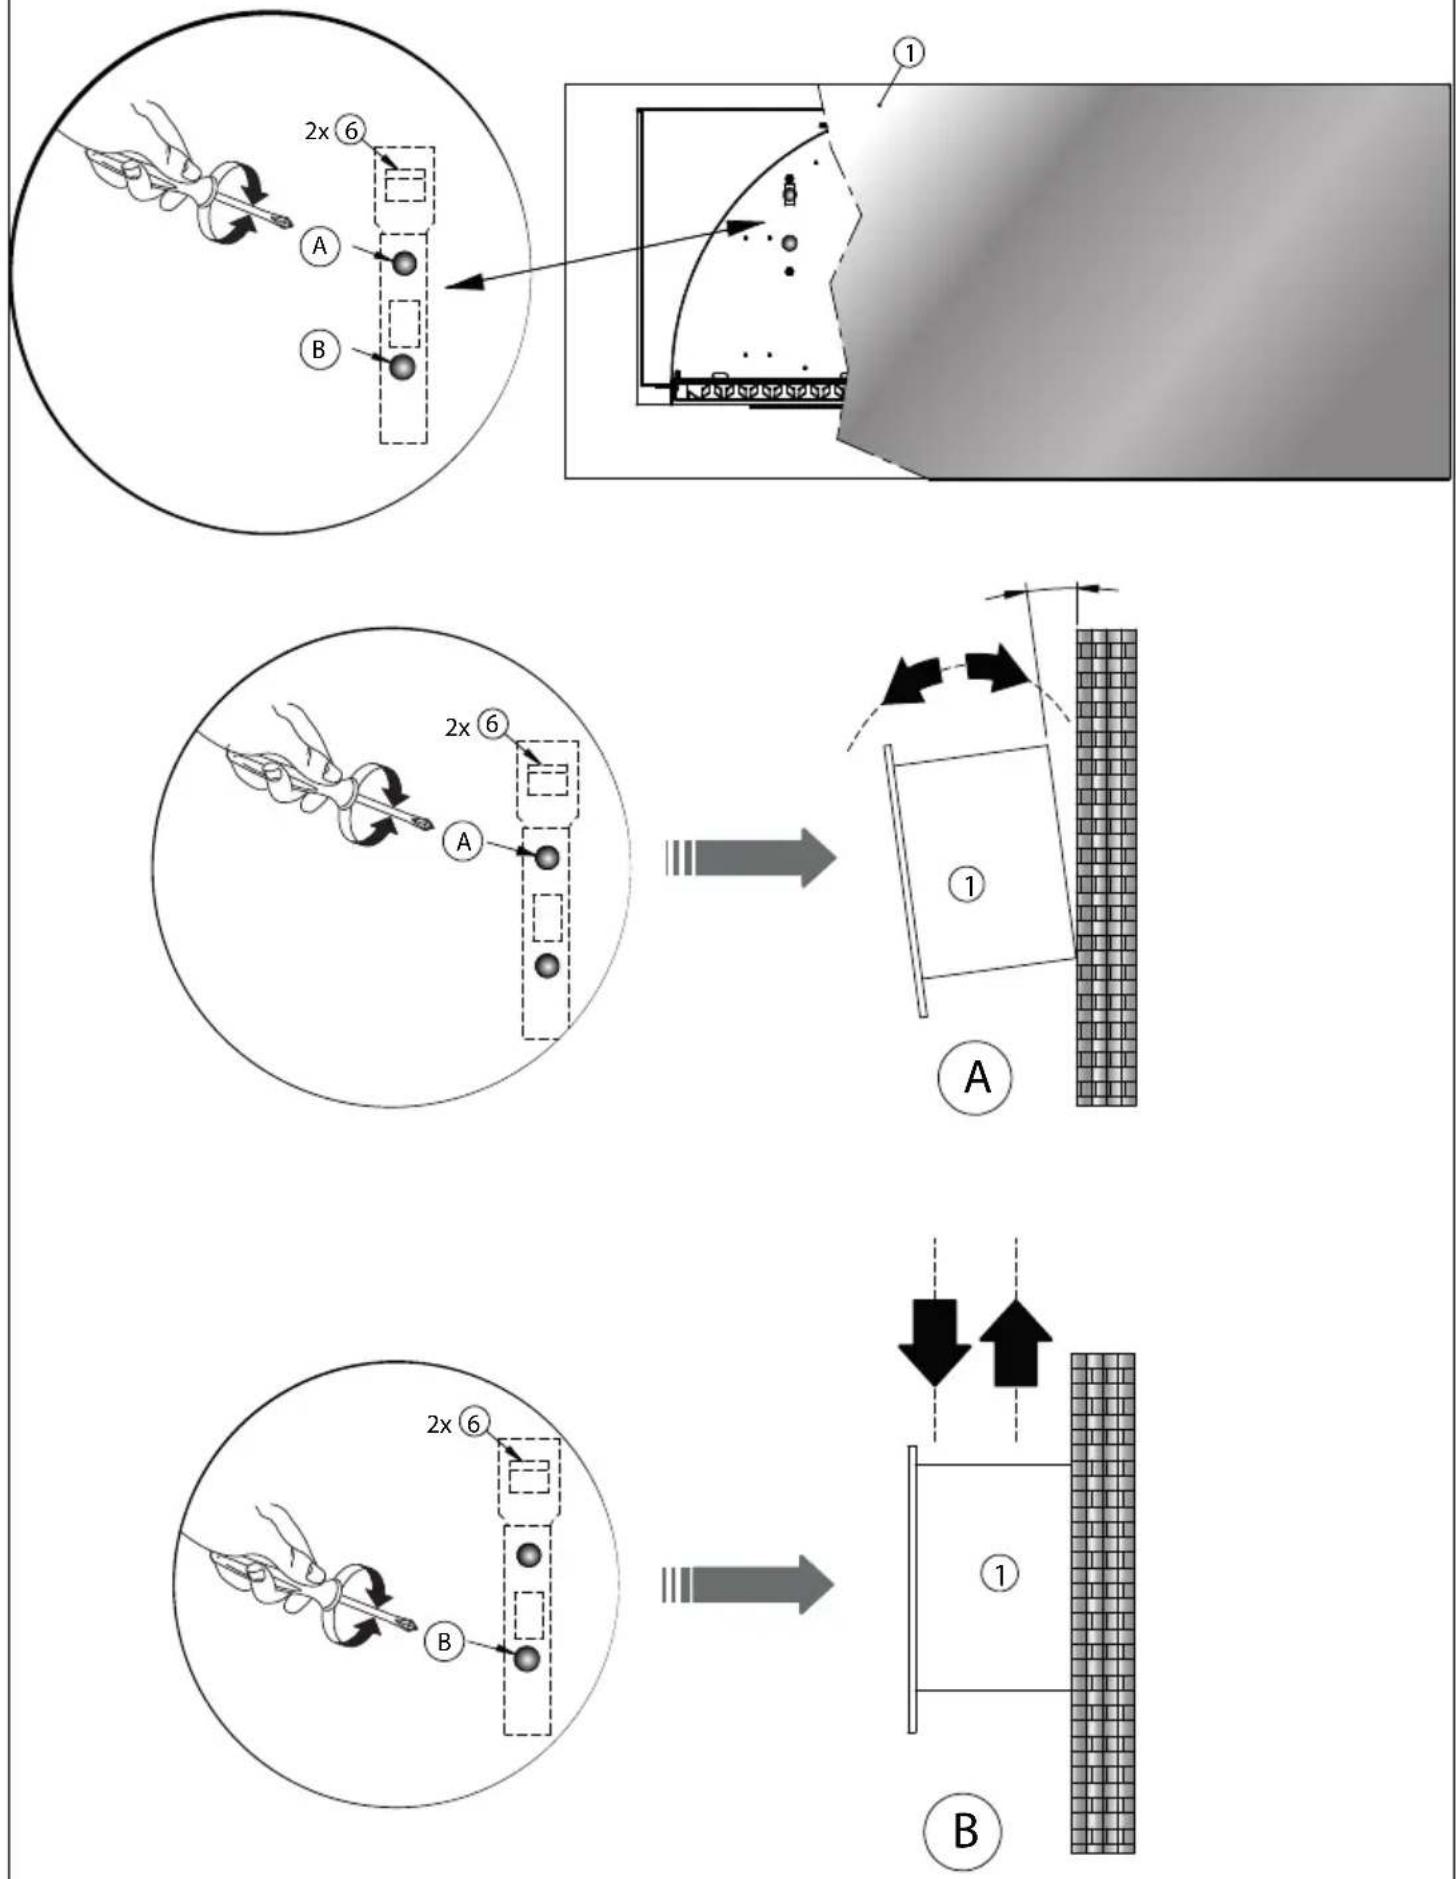
Hood installation
The hood must be installed by qualified personnel, by two or more people (excessive weight) and with all the personal protective equipment required by current regulations.
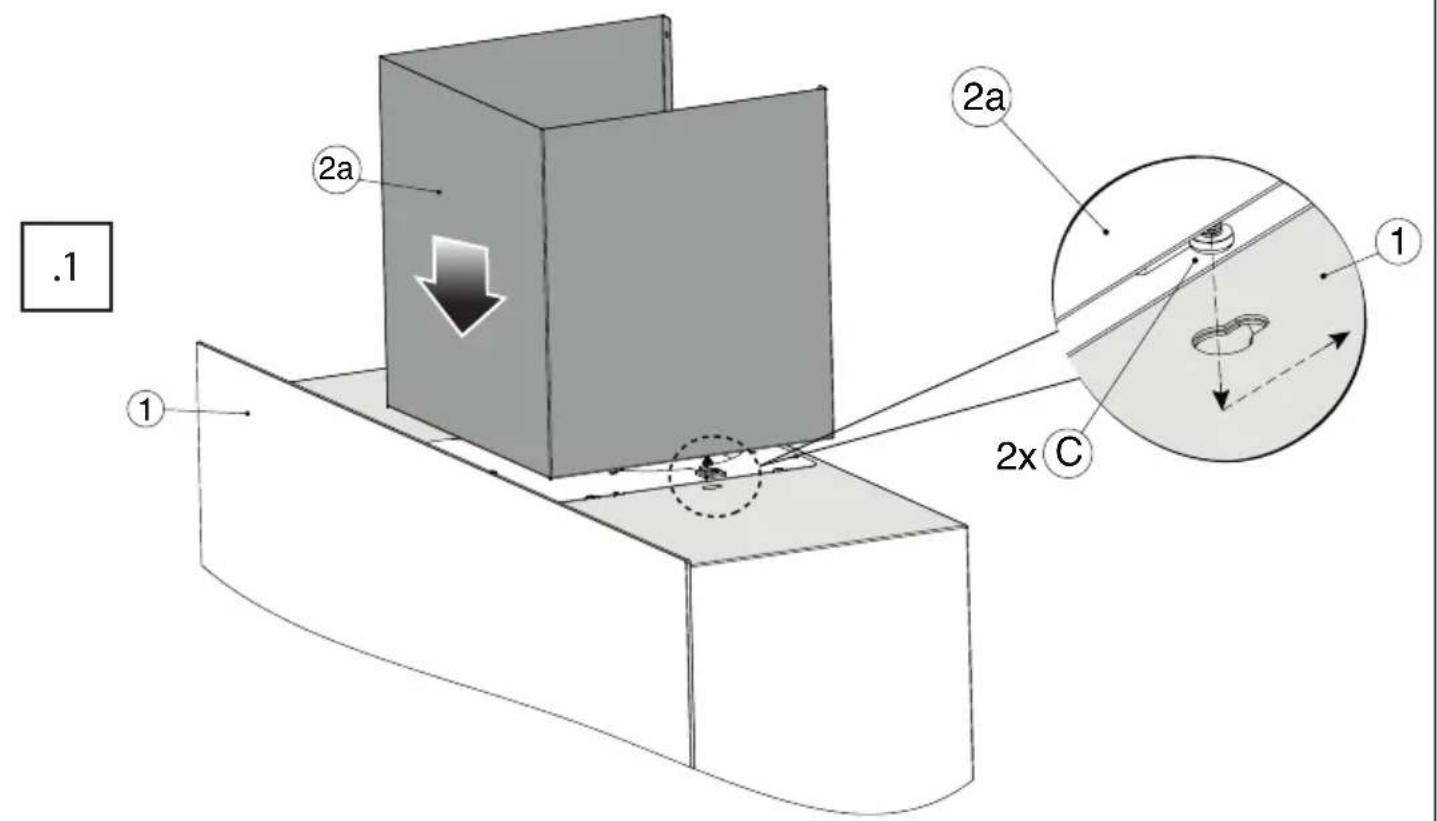
For the product installation sequences, follow the figures on page 5 on page 19.
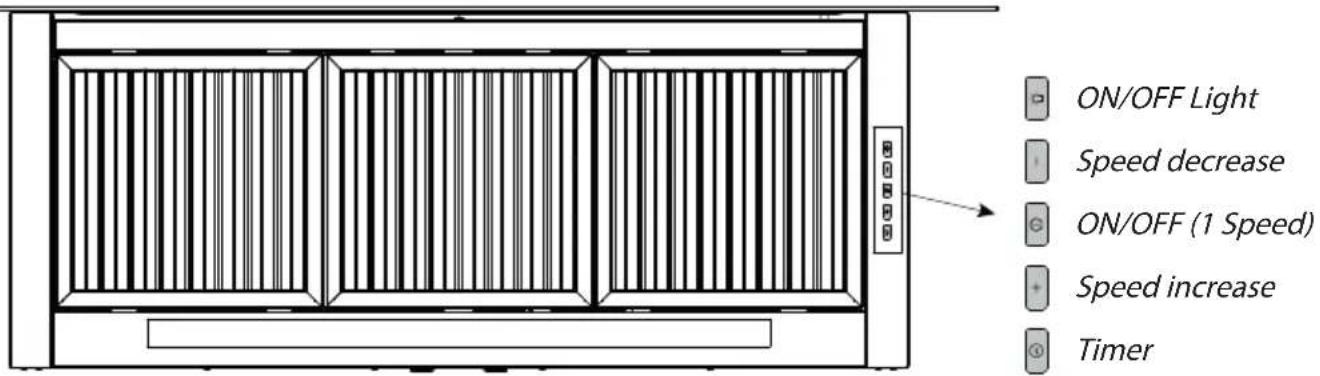
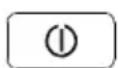
Operation of the controls
Use a higher speed (3rd-4th) to obtain better results in terms of anti-condensation or in case of high concentrations of cooking fumes and vapors. It is advisable to run the hood at least 5 minutes before starting to cook and to leave it on for at least 15 minutes from the end of cooking.
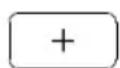
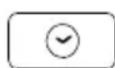
Control panel
A
B
C
D
E
A. Hood lighting ON / OFF button (independent of motor operation). When you press ON, the edge of the button lights up.
B. Motor speed decrease key. Each press decreases the engine speed by turning off the edges of the speed indicator keys.
C. Operation ON / OFF button. The motor starts in first speed and the anti-condensation resistor is powered. When pressed, the border of the - key lights up. When OFF is pressed, the motor and the anti-condensation resistance stop and all edges of the keys turn off except for Key A if the light is on in the ON position.
D. Speed increase button, set speed indicator. Each press increases the speed of the motor, illuminating the edges of the keys as follows: in second speed, the edge of the C key lights up; in third speed the edge of Button D lights up. The fourth speed (intensive) is ONLY timed and remains active for about 7 minutes with intermittent illumination of the edge of Button D, after which the motor automatically switches to third speed and the lighting of the edge of Button D returns to fixed.
E. Timer button. Once pressed, at the first, second and third speed it switches off the motor and the anti-condensation heater after about 15 minutes of operation at the set speed. Once you press the edge lighting of the set speed button, it will be intermittent.
CLEANING
The hood must be cleaned frequently externally and internally with a damp cloth and neutral non-abrasive detergents. The glass front panel can be treated with normal products specific for glass. ATTENTION! The anti-condensation resistance protected by a steel cover is housed in the lower rear part of the glass front panel: carefully clean the part using only a cloth moistened with water.
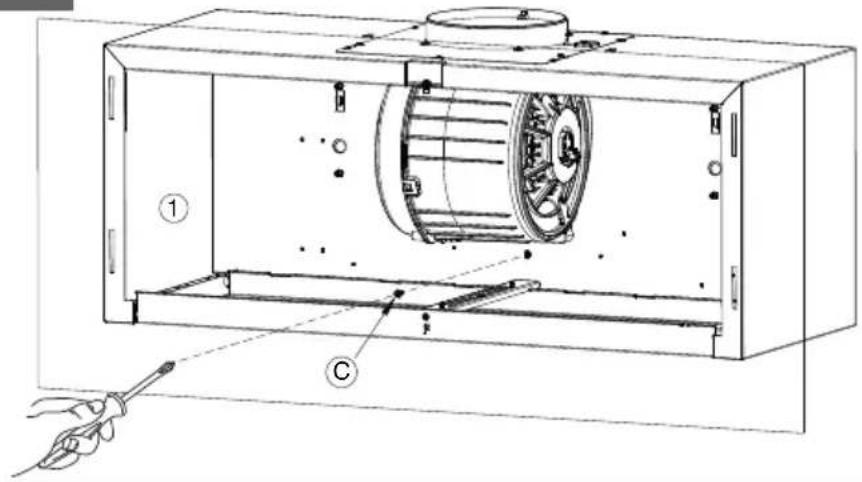
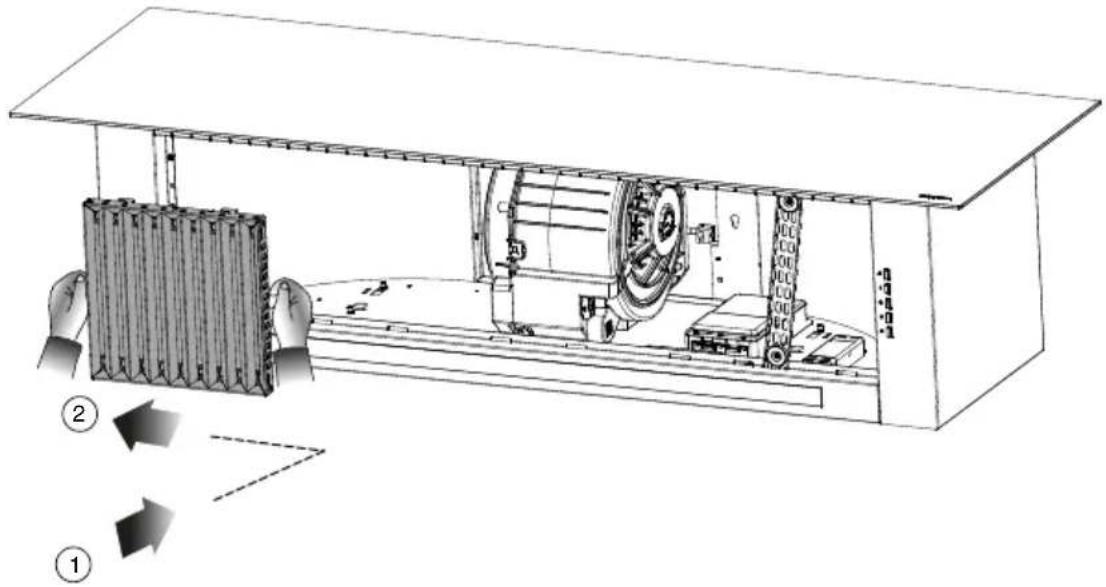
To keep the anti-condensation function efficient, it is advisable to keep the grease filters and the entire internal part of the hood thoroughly clean. When removing the grease filters following the sequence indicated in fig. 2A-2B, be careful to move them by keeping them in a horizontal position: this is to prevent excess liquids inside them from escaping and falling on the hob or on underlying elements.
For cleaning DO NOT use alcohol or products that contain it.
We decline all responsibility for any damage caused by non-observance of what is reported.