USER MANUAL Lisbon Marathon
Weather Station with Large
Colour Display
B4: Bouton ▲/▲ ALARM ON/OFF
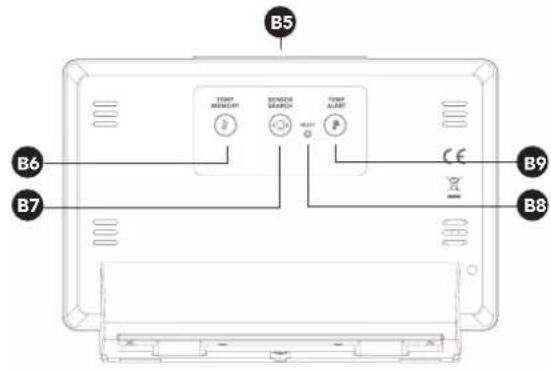
B8: Bouton RESET
B5: Bouton SNOOZE/DIMMER
B9: Bouton
text_image
B5
TEMP
HEIGHT
BEIJING
SEARCH
TEMP
ALABT
B6
B7
CE
B9
B8

text_image
MARATHON
-430 MHz
HIVERTHERM SENSOR
HIGH PREFERRED
C1
C2
C3
C4
natural_image
Simple line drawing of a sun and three clouds (no text or symbols)
REMARQUE: When outdoor temperature is lower than -20°C, or higher than +50°C, the outdoor sensor unit might not work properly
(4) Humidité
1 pression = 12/24 heures
2 pressions = fuseau horaire
3 pressions = heure
4 pressions = minute
5 pressions = seconde
6 pressions = langue
7 pressions = année
8 pressions = mois
9 pressions = jour
REMARQUE:
- Exploring the features
- What's in the box
- Getting started
- The weather forecast
- Setting your thermometer and hygrometer
- Setting the time and setting an alarm

Need a
replacement part?
Remote Temperature Sensor
(Part No. BA030017-RS)
Visit: www.MarathonWatch.com to order a replacement!
Exploring the features
EN

Weather Forecast
- There are totally 5 different weather status animations in the weather forecast. Sunny, Slightly Cloudy, Cloudy, Rainy and Snow

Time
- Radio Controlled Time
- Daily Alarm Function
Humidity
- Indoor humidity measurable range: 20 \~ 99%
- Outdoor humidity measurable range: 0\~99%
- Outdoor humidity record from Start-Up/Reset, and the corresponded time
- 24 Hours lowest & highest display for outdoor humidity

Temperature
- Indoor & Outdoor temperature display
- Measures °C / °F user selectable
- Outdoor Temperature Record from Start-Up/Reset, and the corresponded time
- 24 Hours lowest & highest display for outdoor temperature
Wireless Outdoor Sensor
- Low-battery indicator for Outdoor Sensor
- Wall Mount or Table Stand
- One Wireless outdoor sensor Included
- 433MHz RF transmitting frequency
- 70 meter transmission range in an open area
What's in the box
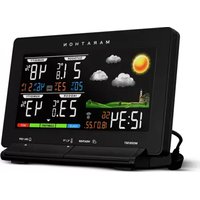
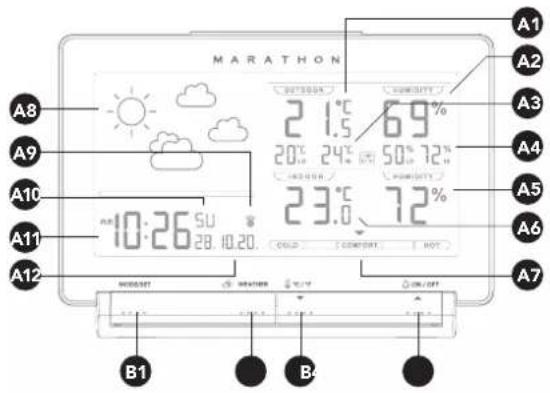
Weather Station Front LCD Screen
A1: Outdoor temperature
A2: Outdoor humidity
A3: Outdoor temperature memory record
A4: Outdoor humidity memory record
A5: Indoor humidity
A6: Indoor temperature
A7: Comfort indicator
A8: Weather forecast
A9: Radio control icon
A10: Day of week/Second
A11:Time
A12:Date
text_image
MARATHON
A8
A9
A10
A11
A12
21.5°C 69%
20°C 24°C 50% 72%
23.6°C 72%
A8:10:26 SU 28.10.20.
COLD COMBUT HOT
A7
B1
B4
Weather Station Backing
B1: MODE/SET button
B2: WEATHER button
B3: ▼/℃/°F button
B4: ▲/▲ALARM ON/OFF
button
B5: SNOOZE/DIMMER
button memory record
B6: MEMORY / button
text_image
MARATHON
-43.9 MHz
HOLD THERMAL SENSOR
HOLD PRECISION
C1
C2
C3
C4
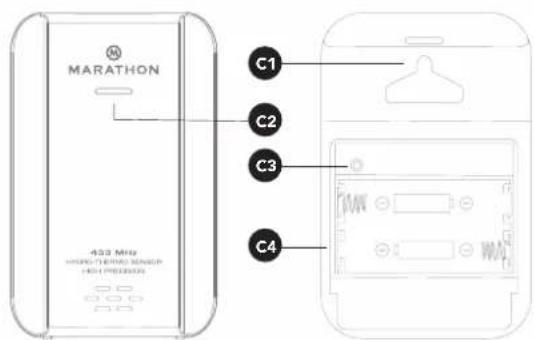
Outdoor Sensor/Transmitter
C1: Wall Mount Hole
C2: Transmission In
C3: RESET button
C4: Battery
Compartment
EN
Getting started
Powering up the weather station
Connect the power cord to the wall outlet or remove the battery compartment door and insert 2pcs AA size battery.
NOTE:
- Before connecting the unit to power, make sure your local voltage is the same as marked on the adaptor.
- If solely powered by battery, the backlight will be off. To turn the back light on for 5 seconds, press the SNOOZE/DIMMER button.
- When the power adaptor is connected, the weather station will automatically pull power from the external power supply.
Powering up the outdoor sensor
Open battery cover, and insert 2 x AA batteries observing polarity [ “+” and “-” marks]
Proper Installation
- Place the main unit on a flat surface.
- The remote sensor should be securely mounted vertically to a surface.
• Transmissions between receiver and transmitter can be reached up to 70m apart in open areas. Open areas refers to areas with no interfering obstacles such as buildings, trees, vehicles, high voltage lines, etc.
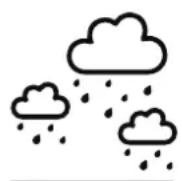
The weather forecast

natural_image
Simple line drawing of a sun and three clouds (no text or symbols)
Setting your current weather conditions
• After holding the WEATHER button for 3 seconds, the weather icon will flash on the LCD. Enter the current weather by pressing the ▼ or ▲ buttons. Press the WEATHER button to confirm the setting. The weather forecast may not be accurate if the weather entered does not match the current weather. The weather station will start the first forecast 6 hours after the current weather status has been entered.
- The current weather status should be entered again if the altitude of the main unit is changed. (The Barometric pressure is lower at higher altitude location. Therefore, altitude change will affect the weather forecast).
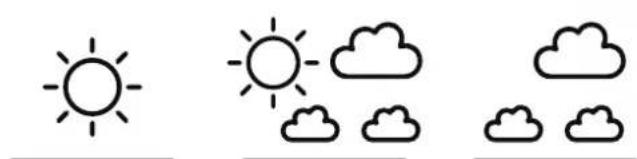
Weather Conditions
There are in total 5 different weather statuses in the weather forecast.
natural_image
Three weather icons: sun, cloudy cloud, and cloud (no text or symbols)
Sunny Slightly Cloudy Cloudy
text_image
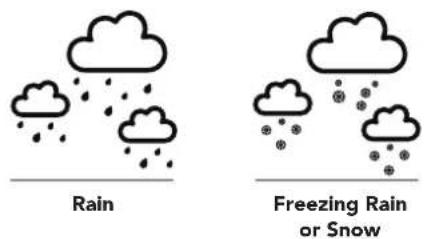
Rain
Freezing Rain
or Snow
NOTE:
- The "Freezing" or "Snow" symbol is shown if there is rain and the current outdoor temperature reads under 0 degrees celsius.
- The Frost Alert: 🌐 is shown if the outdoor temperature is between -2°C \~ +3 °C
- If there are inconsistencies between your Local Weather Station and this unit, please refer to your local weather station's forecast. The manufacturer does not take responsibility for incorrect forecasting from this unit.
Setting your thermometer and hygrometer
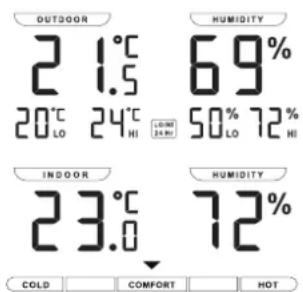
text_image
OUTDOOR
2 1.5
20°C 24°C
LO HI
LUMINI
20.00
69%
50% 72%
LO HI
INDOOR
23.0
HUMIDITY
72%
COLD COMFORT HOT
RF Transmission Procedure:
- The main unit will automatically start to receive the outdoor temperature & humidity conditions after the weather condition has been set.
- The outdoor sensor will automatically start to transmit temperature and humidity conditions to the weather station after batteries have been inserted.
- If the weather station is receiving transmissions from the outdoor sensor the RF icon will display on the LCD
- If the weather station has failed to receive transmissions from the outdoor sensor ("--." will display on the LCD). In this case press and hold the SEARCH / button for 3 seconds to reset transmission manually.
Temperature & Humidity
(1) Past 24 Hours Highest/Lowest outdoor temperature and humidity
- The weather station automatically shows the highest outdoor temperature and humidity record over the past 24 hours. For example: display of 30^ & 80% means past 24 hours recorded highest outdoor temperature is 30^ and highest outdoor humidity is 80%
- The weather station automatically shows the lowest outdoor temperature and humidity record over the past 24 hours. For example: display of means past 24 hours recorded lowest outdoor temperature is 8^ and lowest outdoor humidity is 20% .
(2) Recorded Maximum/Minimum Outdoor Temperature and Humidity from Powering on/Reset.
- Press the MEMORY / button to view the lowest and highest recorded temperature and humidity from point of powering on or reset. MEM will flash on the LCD.
- When viewing these saved records, hold the MEMORY / button for 3 seconds to clear the maximum and minimum record.
- When viewing these saved records, press the MEMORY / button again to check the corresponding time and date of records. The saved records and corresponding time and date will flash. Press MEMORY / button select to view:
- Time & date for lowest outdoor temperature memory record, Time and date for highest outdoor temperature memory record, Time & date for lowest outdoor humidity memory record, Time and date for highest outdoor humidity memory record.
- Press the °C/°F button to select Indoor/Outdoor temperature in Celsius or Fahrenheit.
- The measurable indoor temperature range is -10^ to +50^ . If the indoor temperature is out of the measurable range, LL.L(beyond the minimum temperature) or HH.H (beyond the maximum temperature) will be shown on the indoor temperature column of the LCD.
- The measurable outdoor temperature range is -20^ +50^ . If outdoor temperature out of the measurable range, LL.L (beyond the minimum temperature) or HH.H (beyond the maximum temperature) will be shown on the outdoor temperature column of the LCD.
NOTE: When outdoor temperature is lower than -20^ , or higher than +50^ , the outdoor sensor unit might not work properly
(4) Humidity
Indoor humidity measurable range is 20% \~ 99%. It will display 20% if indoor humidity is lower than 20%. Outdoor humidity measurable range is 0 \~ 99%.
(5) Outdoor Temperature Alert Function
- Press the 🔊 button to activate or deactivate the outdoor temperature alert function.
-
Press the 🔊 button to select:
-
The active outdoor upper temperature alert.
The icon will appear beside the outdoor perature digit.
- The active outdoor upper & lower temperature alert. The icon will appear beside the outdoor temperature digit.
-
The active outdoor lower temperature alert.
The icon will appear beside the outdoor temperature digit.
-
To deactivate the outdoor temperature alert. The alert icon will disappear.
-
Hold 🔊 button for 3 seconds to enter outdoor temperature alert setting. Icon ☑ beside outdoor temperature's digits flash. Press ▼ or ▲ button to adjust the setting value, press 🔊 button to confirm the setting. Setting Sequence as follow: Upper limit of temperature, Lower limit of Temperature.
- When it's alerting, icon ▶ or ▶ and temperature digit would flash on the LCD. Press any buttons to stop the alert sound, otherwise, it will sound for 2 minutes, and stop automatically.
(6) Comfort Indicator Bar:
Display of pleasant/unpleasant climate.
Setting the time and setting an alarm
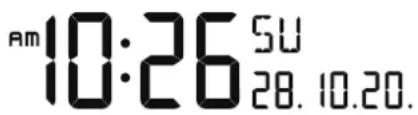
text_image
Am 10:26 5U
28. 10.20.
Radio Controlled Clock:
After the weather station has powered on and completed syncing temperature and humidity from the outdoor sensor, The DCF signal, radio controlled icon will automatically flash on the LCD, indicating the clock synchronizing the current time and date.

Icon Turns on
Indicates signal has been received
Icon Flashes
Indicates it is receiving DCF signal
Icon Disappears
Indicates signal has failed
NOTE:
- The clock will automatically synchronize with the radio wave signal at 3.00 a.m. every day to maintain accurate timing.
- If reception fails, scanning will stop and the ⏻will disappear from the LCD
- The clock can be set to synchronize manually by holding the button for 3 seconds.
(Synchronization can take several minutes.)
- You can stop the DCF synchronization by holding the 🔊 button for 3 seconds.
- If the weather station is in daylight savings mode a will show on the LCD.
Manual Time Setting:
- To enter the Clock/Calendar setting mode, press and hold the MODE/SET button for 3 seconds until the digits flash.
- Press ▼ or ▲ button to adjust the desired value and press the MODE/SET button to confirm and move on to the next setting.
- Hold down the ▼ or ▲ button to speed up setting.
- Press the MODE/SET button to confirm settings and exit from time setting mode or the time setting mode will automatically exit after 15 seconds if no button is pressed.
The setting sequence is as follow:
1 press = 12/24 Hour
2 presses = Time Zone
3 presses = Hour
4 presses = Minute
5 presses = Second
6 presses = Language
7 presses = Year
8 presses = Month
9 presses = Day
NOTE:
- The days of the week can be displayed in 8 different languages: German (GE), French (FR), Spanish (ES), Italian (IT), Dutch (NE), Danish (DA), Russian (RU), and English (EN).
- The language and their select abbreviations for each day of the week are shown in a table at the back of this manual.
• The Second setting is adjusted to zero only.
- Time Zone function: If your area can receive an RC-DCF frequency signal, the time zone function should be set to 0. The Time Zone function is used in areas where a DCF frequency signal can be received but the time zone is different from the German Time.
Daily Alarm Function:
- Press MODE/SET button to select to view the Time (Time & Day of Week) or Alarm Time ("AL" shown on the LCD)
- When viewing the alarm time, hold the MODE/SET button for 3 seconds to enter the alarm setting mode. Press the ▼ or ▲ button to adjust alarm time. Press the MODE/SET button to confirm the setting.
- Press the button to activate or deactivate the alarm. If the alarm is activated, the icon will appear on the screen.
- Press the SNOOZE button to silence the alarm and enter snooze mode, the alarm will sound again in 5 minutes. During snooze mode the neon will flash on the LCD.
- Press any button other than the SNOOZE button, to stop the alarm. Otherwise, the alarm sound will continue for 2 minutes before stopping.
NOTE:
The snooze function can be repeated up to 7 times.
Dimmer
Press the DIMMER button to adjust the LED brightness (off-med-high), when powered by the adaptor,
Low battery indication:
The low battery icon will display beside the
outdoor temperature digit indicating the outdoor sensor battery is low and batteries should be replaced.
Precautions
- Use a pin to press the reset button, if unit is not working properly.
- Avoid placing the clock near interference or metal frames such as computer and TVs.
- The clock will lose the time when the battery is removed.
- Do not expose to direct sunlight, heavy heat, cold, high humidity or wet areas
- The outdoor sensor must not be set up or installed under water and keep away from direct sunlight and rain
- Never clean the device using abrasive/corrosive materials or products as these may scratch the plastic and corrode electronics
- If there are inconsistencies between your Local Weather Station and this unit, please refer to your local weather station's forecast. The manufacturer will not take responsibility for incorrect forecasting from this unit.
Italiano
Sommario
text_image
B5
B6
B7
B9
B8
TORT M ENSCHY
R S C C N
C D
TORT A L E R T
CE
X
text_image
MARATHON
-433 MHz
HIPS-TEMPLE SENSOR
HIPS PREDUCATION
C1
C2
C3
C4
Struttura
natural_image
Simple line drawing of a sun and three clouds (no text or symbols)
natural_image
Simple line drawing of a sun and three clouds (no text or symbols)
natural_image
Three simple weather icons: sun, cloudy cloud, and cloud (no text or symbols)
text_image
MARATHON
A8
A9
A10
A11
A12
21.5 °C 6.9%
20°C 24°C 50% 72%
23.6 °C 72%
B1
B2
B3
B4
text_image
MARATHON
C1
C2
C3
C4
433 MHz
HENS TIN MACH SENSOR
HENS PROCESSOR
Sensor/Transmisor exterior
natural_image
Simple line drawing of a sun and three clouds (no text or symbols)
text_image
MARATHON
A8
A9
A10
A11
A12
21.5°C 69%
20°C 24°C 50% 72%
23.6°C 72%
B1
text_image
MARATHON
-430 MHz
HENS THERMAL SENSOR
HOLD PREDICTOR
C1
C2
C3
C4
Buitensensor/zender
natural_image
Simple line drawing of a sun and three clouds (no text or symbols)
natural_image
Three weather icons: sun, cloudy cloud, and three cloudy clouds (no text or symbols)
Zonnig Licht bewolkt Bewolkt
Regen
RF-transmissieprocedure:
(6) Comfort-indicatorbalk:
Marathon Watch Company Ltd.
Service Clients: / Customer Service: / Servisio clienti: /
Kundendienst / Servicio al cliente: / Klantenservice:
www.MarathonWatch.com
Conçu au Canada / Designed in Canada / Prodotto