06177 - Croque monsieur clip Gourmetmaxx - Free user manual and instructions
Find the device manual for free 06177 Gourmetmaxx in PDF.

| Technical Features | Gourmetmaxx 06177 Croque Monsieur Clamp |
|---|---|
| Material | Stainless steel and heat-resistant plastic |
| Dimensions | Not specified |
| Weight | Not specified |
| Usage | Ideal for preparing croque-monsieur, easy to handle |
| Care | Hand washable, do not immerse in water |
| Safety | Use with caution, avoid contact with hot surfaces |
| General Information | Compatible with most croque-monsieur devices |
Frequently Asked Questions - 06177 Gourmetmaxx
User questions about 06177 Gourmetmaxx
0 question about this device. Answer the ones you know or ask your own.
Ask a new question about this device
Download the instructions for your Croque monsieur clip in PDF format for free! Find your manual 06177 - Gourmetmaxx and take your electronic device back in hand. On this page are published all the documents necessary for the use of your device. 06177 by Gourmetmaxx.
USER MANUAL 06177 Gourmetmaxx
natural_image
Open black plastic kitchen grater with ventilation slots and handle (no text or symbols visible)06177
DE
Gebrauchsanleitung
ab Seite 3
EN
Instruction manual
starting on page 15
FR
Mode d'emploi
www.service-shopping.de
natural_image
Three grayscale product boxes with geometric patterns, arranged horizontally (no text or symbols visible)DE 8
Safety Instructions 16
Items Supplied 19
Device Overview 19
Before Initial Use 20
Setting Up the Device 20
Inserting and Changing Plates 20
Use 21
Tips 21
Recipes 22
Cleaning and Storage 25
Troubleshooting 25
Technical Data 26
Disposal 26
Explanation of the Symbols


Danger symbols: These symbols indicate risks of injury. Read through the associated safety instructions carefully and follow them.
Supplementary information
Suitable for food use.
Caution: hot surface!
Read instructions before use!
Explanation of the Signal Words
DANGER
warns of serious injuries and danger to life
warns of possible
WARNING
serious injuries and danger to life
CAUTION
warns of slight to moderate injuries
NOTICE
warns of material damage
EN 16
Dear Customer,
We are delighted that you have chosen this multifunction grill.
Before using the device for the first time, please read the instructions carefully and keep them for future reference. If the device is given to someone else, these instructions should also be handed over with it. They form an integral part of the device.
The manufacturer and importer do not accept any liability if the information in these instructions is not complied with.
If you have any questions about the device and about spare parts / accessories, contact the customer service department via our website:
www.service-shopping.de
Intended Use
- This device is intended to be used for grilling and frying meat, fish or vegetables, for making waffl es, doughnuts and omelettes, and for toasting sandwiches.
- The device is for personal domestic use only and is not suitable for commercial applications.
- Use the device only for the intended purpose and as described in the instructions. Any other use is deemed to be improper.
- The warranty does not cover faults caused by incorrect handling, damage or attempted repairs. The same applies to normal wear and tear.
Safety Instructions
This device may be used by children aged 8 and over and by people with reduced physical, sensory or mental abilities or a lack of experience and / or knowledge if they are supervised or have received instruction on how to use the device safely and have understood the dangers resulting from failure to comply with the relevant safety precautions.
■ Children must not play with the device.
- Cleaning and user maintenance may not be performed by children, unless they are older than 8 years of age and are supervised.
Children younger than 8 years of age and animals must be kept away from the device and the mains cable.
17 EN
CAUTION: Hot surface! The device will become very hot during use. It is essential to make sure that no heated parts are touched while using and after using the device. Only ever touch the handle while the device is in operation or immediately after it has been switched off. Only transport or store away the device when it has cooled down completely. Use suitable kitchen gloves.
- The device is not designed to be operated with an external timer or a separate remote control system.
- The device must always be disconnected from the mains power when left unattended, before replacing the plates and before cleaning it.
In the interest of your own safety, check the device, the mains cable and the mains plug for damage every time before use. Use the device only if it is in working order.
If the device or the connecting cable of the device are damaged, they must be replaced by the manufacturer, customer service department or a similarly qualified person (e.g. specialist workshop) in order to avoid any hazards.
It is essential to follow the cleaning instructions in the “Cleaning and Storage” chapter!

DANGER – Risk of Electric Shock
■ Use the device only in closed rooms.
- Do not use the device in rooms with high humidity.
- Never immerse the device, mains cable or mains plug in water or other liquids and ensure that these components cannot fall into water or become wet.
- Should the device fall into water, switch off the power supply immediately. Do not attempt to pull the device out of the water while it is still connected to the mains power!
- Never touch the device, mains cable or mains plug with wet hands when these components are connected to the mains power.

WARNING – Danger of Injury
■ Danger of suffocation! Keep children and animals away from the packaging material.
- Danger of scalding from heat and hot steam! Hot steam can escape from the device during operation. You should therefore keep your head and hands out of the danger zone.
EN 18
- Danger of burns! The plates of the device will become very hot. Be careful when inserting and removing the food! If necessary, use kitchen tongs made of plastic or wood.
■ The device must not be moved during operation. - Danger of tripping! Make sure that the connected mains cable does not present a trip hazard.

WARNING – Danger of Fire
- Do not use the device in rooms containing easily ignitable dust or poisonous and explosive fumes.
- Do not connect the device along with other devices (with a high wattage) to a multiple socket in order to prevent overloading and a possible short circuit (fire).
- Do not operate the device in the vicinity of combustible material. Do not place any combustible materials or materials that melt easily (e.g. cardboard, paper, wood, plastic) in or on the device.
Do not cover the device during operation in order to prevent it from catching fire. Ensure that there is sufficient ventilation while the device is in operation.
In the event of a fire: Do not extinguish with water! Smother the flames with a fireproof blanket or a suitable fire extinguisher.
NOTICE – Risk of Damage to Material and Property
■ The device may only be operated in a horizontal position, never on its side or tilted.
- Only connect the device to a socket with safety contacts that is properly installed and matches the “Technical Data” of the device. The socket must also be readily accessible after connection so that the connection to the mains can quickly be isolated.
- Do not use the device in conjunction with extension cables.
■ Position the mains cable in such a way that it does not become squashed or bent and does not come into contact with hot surfaces.
The mains cable must not hang down from the surface on which the device is placed in order to prevent the device from being pulled down.
- Only use heat-resistant utensils to place and remove the food. Keep metal objects or other sharp objects away from the device. These objects could damage the non-stick coating of the grill plates. We recommend the use of kitchen utensils made from wood or plastic.
- Never spray cold water onto the plates during or immediately after use of the device. This could damage the non-stick coating!
- Switch off the device and pull the mains plug out of the plug socket if an error occurs during operation, when there is a power cut or before a thunderstorm.
- Never pull or carry the device by the mains cable. When you pull it out of the socket, always pull on the mains plug and never the mains cable!
- Protect the device from other heat sources, naked flames, sub-zero temperatures, persistent moisture, wet conditions and impact.
■ Use only original spare parts from the manufacturer.
19 EN
Items Supplied
Check the items supplied for completeness and transport damage. If the device, the mains plug or the mains cable does have damage, do not (!) use the device, but contact our customer service department.
- Main device (1 x)
- Sandwich plate (2 x)
- Grill plate (2 x)
• Waffl e plate (2 x) - Instructions (1 x)
Device Overview
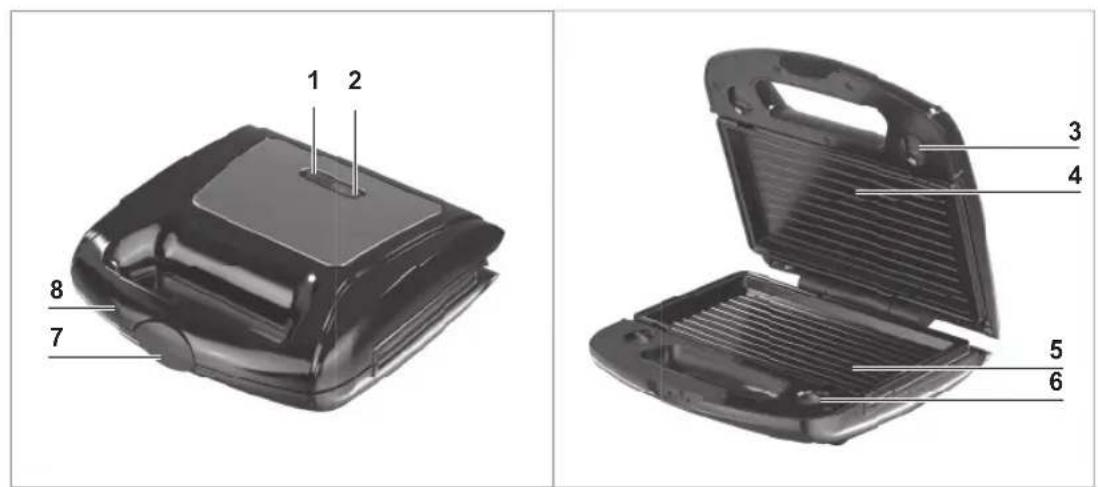
text_image
1 2 3 4 5 6 7 81 Operating lamp
2 Heating lamp
3 Release buttons at top
4 Top plate
5 Bottom plate
6 Release buttons at bottom
7 Locking catch
8 Handle
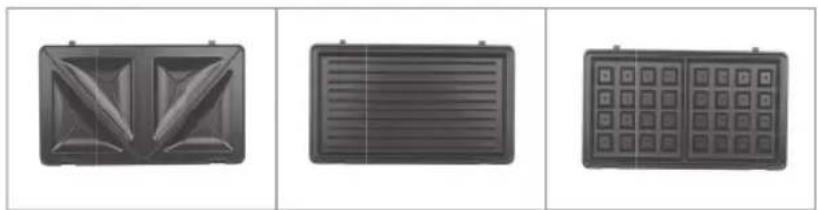
Accessories
Sandwich plates Grill plates Waffl e plates
natural_image
Three grayscale product boxes with geometric patterns, arranged horizontally (no text or symbols visible)EN 20
Before Initial Use

PLEASE NOTE!
■ Never remove the rating plate and any possible warnings.
- Remove all packaging materials and any possible protective films used for protection during transportation.
- There may still be some production residues on the device. To avoid harmful effects to your health, thoroughly clean the device before you use it for the first time:
-Wipe down the device with a clean, damp cloth.
- Wipe down the plates with a soft, damp cloth / sponge and a little detergent if necessary. Dry thoroughly.
- Before you first use it, we recommend that you allow the device to heat up once for a few minutes to remove any possible production residues from the plates. To do this, follow the instructions in the "Setting Up the Device" and "Use" chapters.

When the device is first used, production-related additives (e.g. grease) may cause a small amount of smoke and / or an odour to be produced. This is normal and not a device defect.
- Clean the device again (see the "Cleaning and Storage" chapter).
Setting Up the Device

PLEASE NOTE!
Do not place the device below kitchen wall units or similar cupboards. The rising steam could cause damage to them!
The surfaces of furniture may possibly contain elements which can attack and soften the adjustable feet of the device. If necessary, place a suitable pad below the adjustable feet.
Set up the device with a clear space at the sides (at least 20 cm) and clear space above it (at least 30 cm) on a flat, solid and heat-resistant surface.
Inserting and Changing Plates

PLEASE NOTE!
The device and the plates must be cooled down completely before they are removed from the device or replaced.
- Open the locking catch (7) and flip open the device.
- Pull the release buttons at the top (3) and take out the plate inserted at the top.
- Pull the release buttons at the bottom (5) and take out the plate inserted at the bottom.
21 EN
- Insert the plates you want at the top and bottom in such a way that the locking lugs on the plates are located in the corresponding recesses in the device.
- Pull the release buttons and insert the plate with a small amount of pressure. Let go of the release buttons again and check that the respective plate is securely fitted.
Use

PLEASE NOTE!
- Do not place food that is still wrapped in cling film or in plastic bags into or onto the device.
- Do not use any aluminium foil. This might result in the device overheating!
It should always be possible to close the device without too much effort. Do not open or close the device with force!

Although the plates have a non-stick coating, we still recommend that you lightly grease them before first use. Do not use any cooking spray as it can attack the non-stick coating!
- Completely unwind the mains cable and plug the mains plug into a properly installed plug socket that is easily accessible. Make sure that the mains cable is not trapped between the plates. Both the operating lamp (1) and the heating control lamp (2) light up.
- Open the locking catch (7) and flip open the device.
- Place the food that is to be prepared on the bottom plate.
- Flip the device shut and close it with the locking catch. It must click audibly into place.
- Keep the device closed for a few minutes.
Please Note: The heating control lamp goes out and lights up at regular intervals. This is not a malfunction. To maintain a constant temperature, the device heats up or the device stops the heating process at regular intervals. When the heating control lamp is lit up, the device is in a heating phase; if it goes out, the supply of heat is interrupted for a brief period.
-
Remove the food when it is as cooked and as brown as you want it to be. Use only a wooden or plastic utensil to remove the food.
-
After the device has been used, disconnect it from the mains power and allow it to cool before it is cleaned.
Tips

To prevent the food from sticking, place a drop of oil on the plates before you place the food on and spread it around slightly with a pastry brush.
Sandwich Plates
These plates can be used to create sandwiches with tasty fillings. You are free to choose any filling you want: from ham and cheese or pizza sauce and mozzarella to fillings with fruit, anything is possible. You can prepare two sandwiches at the same time.
EN 22
- Fill the bottom half with a filling of your choice. To do this, place the filling in the middle of the slice of toast. Do not use too much as the device will subsequently press on the toast slices and cut through them in the middle. Otherwise the filling will spill out of the sides of the sandwich.
- For a more flavoursome result, coat the subsequent outsides of the toast slices with a little butter or margarine.
- For sweet sandwiches, e. g. filled with fruit, you can scatter a little sugar on the outsides of the toast slices to create an extra crispy final result.
Grill Plates
These plates allow the device to be used like an electric table grill. The plates are suitable for preparing all kinds of meat, fi sh and vegetables.
- Place items of food such as burgers to make hamburgers, chicken fillets or grilled vegetables on the bottom grill plate.
- Food can be prepared with the device either open or closed. Be aware that the cooking time will be longer with the device open because more heat is lost using this method.
- If you are grilling larger items of food, only fold the device shut until the top plate rests gently on the food that is to be grilled. Do not close and lock the device with force!
- Only ever turn and remove the food using wooden or plastic kitchen utensils so that you do not damage the non-stick coating.
Waffl e Plates
These inserts can be used to make delicious waffles. You can prepare two waffles at the same time.
- Pour waffle mixture into the two moulds in the bottom waffle plate. Do not pour too much mixture into the moulds of the waffle plate so that the mixture is not pushed out at the sides when the device is closed.
- Open the device after approx. 3–4 minutes and check whether the waffles are as brown as you want them to be or need to be baked for a little longer.
Recipes
Oat Flake Waffles with Blueberries
Ingredients:
200 g fl our
200 g oat flakes (soft)
12 p. baking powder
12 tsp. salt
1 – 2 tsp. brown sugar
2 tbsp. neutral cooking oil
12 tsp. lemon juice
200 g. blueberries
approx. 12 I milk
1 egg
23 EN
Preparation:
- Insert the waffle plates into the device and allow the device to preheat.
- Mix together flour, oat flakes, baking powder, salt and sugar in a large bowl.
- Then add oil, lemon juice and the egg.
- Stir everything together and add enough milk to create a thick mixture.
- Finally, carefully fold the blueberries into the mixture.
- Pour the waffle mixture into the moulds in the bottom waffle plate.
- Close the device and secure it with the locking catch.
- Open the device after 3–4 minutes and check whether the waffles are as brown as you want them to be or need to be baked for a little longer.
- Remove the waffl es using wooden or plastic kitchen utensils.
Tuna Toasted Sandwich
Ingredients:
1 tin tuna, well drained
2 pita breads
2 carrots, grated
2 slices Gouda
To taste mayonnaise
To taste onion powder seasoning
To taste sweet relish (spice paste based on gherkins)
Preparation:
- Insert the grill plates into the device and allow the device to preheat.
- Mix together the tuna, carrots, mayonnaise, onion powder seasoning and sweet relish to make a salad.
- Fill the pita breads with the tuna salad and place a slice of Gouda into the pita breads.
- Place the pita breads on the grill plates.
- Close the device and secure it with the locking catch.
- Grill the pita breads for approx. 5 minutes.
- Remove the toasted sandwiches using wooden or plastic kitchen utensils.
Empanadas
Ingredients:
1 roll puff pastry
500 g minced beef
1 tsp. oregano
1 tsp. caraway
2 cloves garlic, chopped
1 onion, diced small
6 green olives
approx. 125 ml beef stock
approx. 200 ml tomato sauce
To taste salt and pepper
EN 24
Preparation:
- Insert the sandwich plates into the device and allow the device to preheat.
- Mix together the minced beef, oregano, caraway, salt and pepper in a large bowl.
- Fry off the onions and garlic for a short time.
- Add the minced beef mixture together with the beef stock and the tomato sauce.
- Mix all ingredients together thoroughly and allow everything to simmer on a low heat for 20 minutes.
- Add the olives and allow all ingredients to carry on cooking until all the liquid has boiled away.
- Divide off four puff pastry squares of equal size and roll them out.
- Place one puff pastry square onto each of the two moulds in the bottom sandwich plate.
- Pour some of the mince filling into the middle of each pastry square. Leave a sufficient amount of pastry free on all sides.
- Place the other two puff pastry squares onto the empanadas like a lid.
- Close the device and secure it with the locking catch.
- Bake the empanadas for approx. 5 minutes.
- Remove the empanadas with the aid of wooden or plastic kitchen utensils.
Mini-Burgers
Ingredients:
12 bag instant onion soup
500 g minced beef
100 g breadcrumbs
1 egg
1 tsp. ketchup
Preparation:
- Insert the grill plates into the device and allow the device to preheat.
- Mix together all ingredients in a large bowl and shape the mixture into four small burgers.
- Place two burgers on the bottom grill plate.
- Flip the device shut.
- Fry the burgers for approx. 8 – 10 minutes. Turn them from time to time if necessary.
- Remove the burgers with the aid of wooden or plastic kitchen utensils.
- Repeat steps 3 and 4 for the other burgers.
25 EN
Cleaning and Storage

PLEASE NOTE!
■ The device and the plates are not dishwasher-safe.
■ Never insert wet plates into the device!
- Do not use any corrosive or abrasive cleaning agents, cleaning sprays, rough sponges or knives to clean the device. These can damage the surface.
- Make sure that the device has completely cooled down and has been disconnected from the mains power!
- Carefully remove any crumbs and residues from the plates. Use a soft brush to do this if necessary.
- Remove the plates from the device (see the "Inserting and Changing Plates" chapter).
- Clean the plates with warm water and a little mild detergent.
- Wipe down the housing with a damp cloth. If necessary, use a little mild detergent to remove more intense soiling.
- Then dry off the housing with a soft cloth.
- Completely dry off the plates before they are inserted in the device and / or stored away.
- Check the mains cable regularly for any damage. Never wrap the mains cable tightly around the device (danger of the cable breaking).
- Store the device and accessories in a dry, clean, frost-free place that is protected from direct sunlight and cannot be accessed by children or animals
Troubleshooting
If the device does not work properly, check whether you are able to rectify the problem yourself. If the problem cannot be solved with the steps that are listed, contact the customer service department.

Do not attempt to repair a defective electrical device yourself!
| Problem Possible cause Fix | ||
| The device does not work. The operating lamp (1) does not light up. | Is the plug inserted in the socket correctly? | Insert the mains plug. |
| Is the socket defective? Try another socket. | ||
| No mains voltage is present. | Check the fuse of the mains connection. | |
| The fuse in the fuse box is triggered. | Too many devices connected to the same circuit. | Reduce the number of devices in the circuit. |
| No error can be identified. | Contact our customer service department. | |
EN 26
| Problem Possible cause Fix | ||
| The food is too dark. | The cooking time is too long. Reduce the cooking time. | |
| The food is not fully fried / baked. | The cooking time is too short. Increase the cooking time. | |
| During use, an unpleasant smell is detected. | During fi rst use. | A smell often develops when new devices are fi rst used.The smell should disappear once the device has been used several times. |
Technical Data
Article number: 06177
Model number: SW-088
Power supply: 220 - 240 V \~ 50 Hz
Power: 850 W
Protection class: I
Disposal

Dispose of the packaging material in an environmentally friendly manner so that it can be recycled.
This device is governed by the European Directive 2012/19/EU on waste electrical and electronic equipment (WEEE). Do not dispose of this device as normal domestic waste, but rather in an environmentally friendly manner via an officially approved waste disposal company.
Customer Service/ Importer:
DS Produkte GmbH
Am Heisterbusch 1, 19258 Gallin, Germany
Tel.: +49 38851 314650
(Calls to German landlines are subject to charges. The cost varies depending on the service provider.)
All rights reserved.
27 FR
Contenu
www.service-shopping.de
text_image
Labeled diagram of a portable food organizer with numbered parts for identificationwww.service-shopping.de