Plug&View OptiVision Pro - Surveillance Camera Digitus - Free user manual and instructions
Find the device manual for free Plug&View OptiVision Pro Digitus in PDF.
| Product type | Plug&View OptiVision Pro IP surveillance camera |
| Brand | Digitus |
| Model | Plug&View OptiVision Pro |
| Category | Surveillance camera |
| Use | Indoor (except specific outdoor models) |
| Power supply | Included power adapter; some models support PoE |
| Connectivity | Wi-Fi (2.4 GHz), Ethernet RJ45 |
| Local storage | microSD slot up to 32 GB |
| Main functions | Live video, motion detection, SD card recording, push notifications, two-way audio |
| Night vision | Yes (integrated infrared LED) |
| Audio | Built-in microphone and 3.5 mm audio output for external speaker |
| Configuration | Via Plug&View mobile app (iOS/Android) or PC web interface |
| Security | Strong password required (8 characters, uppercase/lowercase/numbers); encrypted connection |
| Operating conditions | Temperature 0 °C to 40 °C, dry indoor |
| Maintenance and cleaning | Clean with a soft, dry cloth; avoid any liquid |
| Spare parts and repairability | No user-replaceable parts; contact customer service for repairs |
| Box contents | 1 camera, 1 power adapter, 1 quick installation guide, 1 utility CD |
| General information | Trademark ASSMANN Electronic GmbH; compliant with directives 1999/5/EC and RoHS |
Frequently Asked Questions - Plug&View OptiVision Pro Digitus
User questions about Plug&View OptiVision Pro Digitus
0 question about this device. Answer the ones you know or ask your own.
Ask a new question about this device
Download the instructions for your Surveillance Camera in PDF format for free! Find your manual Plug&View OptiVision Pro - Digitus and take your electronic device back in hand. On this page are published all the documents necessary for the use of your device. Plug&View OptiVision Pro by Digitus.
USER MANUAL Plug&View OptiVision Pro Digitus
DIGITUS® Plug&View IP Cameras
Quick Installation Guide.
(QIG)
Safety Precautions
- Only use the Plug&View IP camera within the specified temperature range for this camera
- When not in use, store the product in a clean and dry place in temperatures between 0^ and 40^
- Do not cover the camera
- Do not let the camera come into contact with liquids (except outdoor cameras with IP66 protective cover)
- Plug&View IP cameras do not replace adult supervision. Safeguard the health of your children, family members or pets by regularly looking after them
- Ensure that the indoor IP cameras are only used inside. These cameras are not intended for outdoor use and can be damaged. In this case use the specified outdoor models
- Install the Plug&View IP cameras in close proximity to an easily accessible wall outlet. Ensure that the power cord is not under tension or stretched
-
Position the Plug&View IP cameras within the range of your Wi-Fi router and ensure that there are no obstacles between camera and router, which could interfere with the Wi-Fi signal
-
Protect the Plug&View IP cameras from electrical and other HF devices generating interferences (microwaves, mobile phones, etc.)
- Keep camera, network cable and power cord outside the reach of children, since these components can be dangerous
- Only use the supplied power adapter.
- Never try to repair Plug&View IP cameras yourself. Repair and maintenance work must be carried out by specialists.
- In case of problems contact our customer service.
- Observe all applicable laws regarding camera monitoring. The Plug&View IP cameras are intended for private use at home. Inform your family members, relatives and domestic helpers in your household with regard to video monitoring. Ensure that public areas and your neighbors' properties cannot be seen.
Personal Information
- Read and accept the privacy policy for using the DIGITUS Plug&View systems under http://plug-view.com/privacy-policy-for-platform-apps/.
- Select a password with a high degree of safety for your Plug&View account to protect it from unauthorized access.
- The password should contain at least 8 characters; we recommend case-sensitive letters and alphanumeric characters.
- Furthermore, the standard password of the camera should be changed to avoid unauthorized access here as well.
Live stream, push notification and further services are available via a cloud server. Despite backup solutions, system stability and bandwidth management the uninterrupted availability of the system cannot be guaranteed.
What's in the box
1 x Plug&View IP camera
1 x Power supply with cable
1 x Quick Installation Guide
1 x CD with utilities
Optional:
1 x Ethernet cable
1 x Ceiling/Wall mount
1 x Removable antenna*
*The following cameras are equipped with a removable antenna: DN-16029, DN-16039, DN-16043, DN-16048, DN-16049
Thank you for choosing a Plug&view IP-camera, which can be up- and-running quick and easy without complicated network settings.
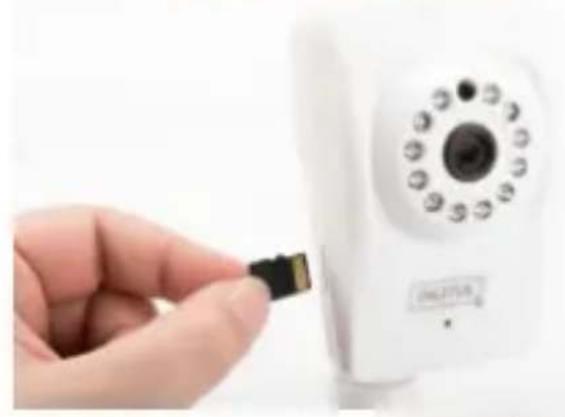
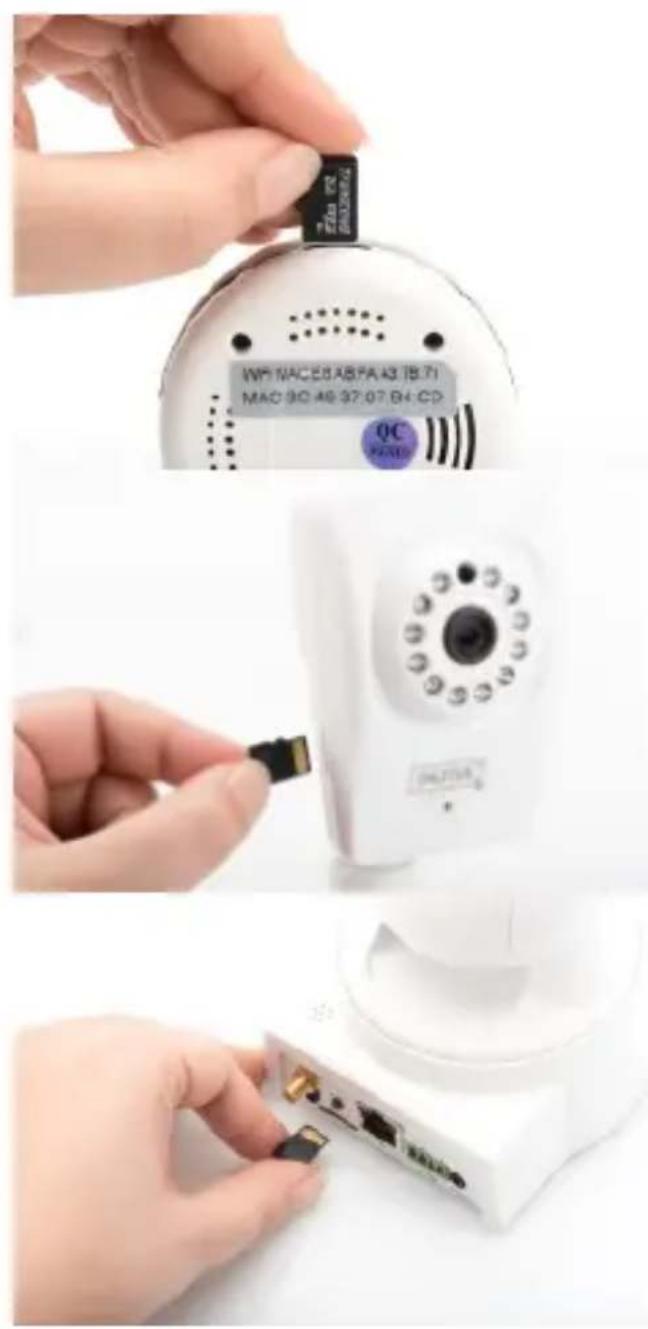
Install MicroSD Card
DIGITUS® indoor Plug&View cameras can be equipped with a microSD card for recording.
Check installation option by means of the installation illustration.
DN-16047
Install the SD card as illustrated, with the golden contacts towards the camera lens.
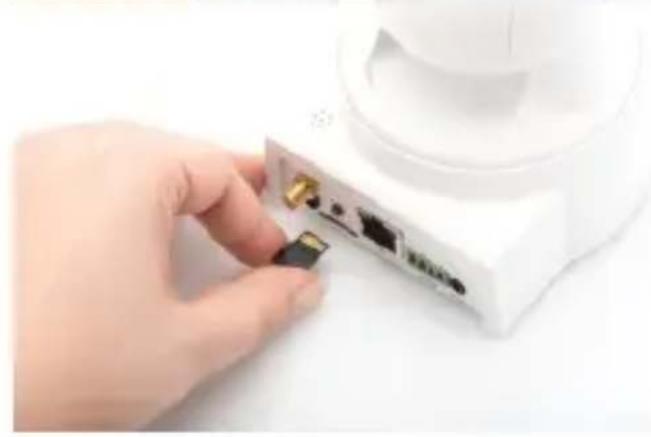
DN-16046
Install the SD card as illustrated, with the golden contacts towards the camera lens.
DN-16029
Install the SD card as illustrated, with the golden contacts up.

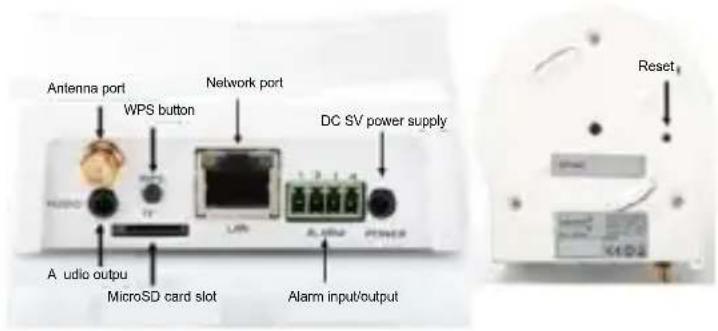
Camera Connections
LAN:
Connect the camera to the LAN port of your router.
Reset:
Press and hold the Reset button for 10 seconds after starting the camera to reset the camera to default settings.
Power:
Connect the supplied power cord to supply the camera with power.
MicroSD:
Insert a microSD card for local storage.
Mic: Microphone (Audio In).
Audio output:
Connect an external speaker via the 3.5mm audio cable.
WPS:
Press and hold the WPS button for 3 seconds after starting the camera to activate WPS mode.
Alarm:
Pin1: Alarm input
Pin2: Ground
Pin3: Not in use
Pin4: NO
Camera Connections
DIGITUS® outdoor Plug&View cameras are equipped with a special cable.
Check installation option by means of the installation illustration.
- Reset button:
Press and hold this button for 10 seconds after the camera is connected and ready-to-use. This resets the camera to default settings.
Network cable:
Connect the network cable to you router on the network to establish Internet connection.
DC 12V power
connection:
Connect the external power adapter to supply the camera with power.
- LED status indicator:
The blue LED status indicator shows if the camera is supplied with power.
For models DN-16039, DN-16043 and DN-16048 power can be supplied directly to the camera via the network cable in connection with a PoE injector or PoE switch.
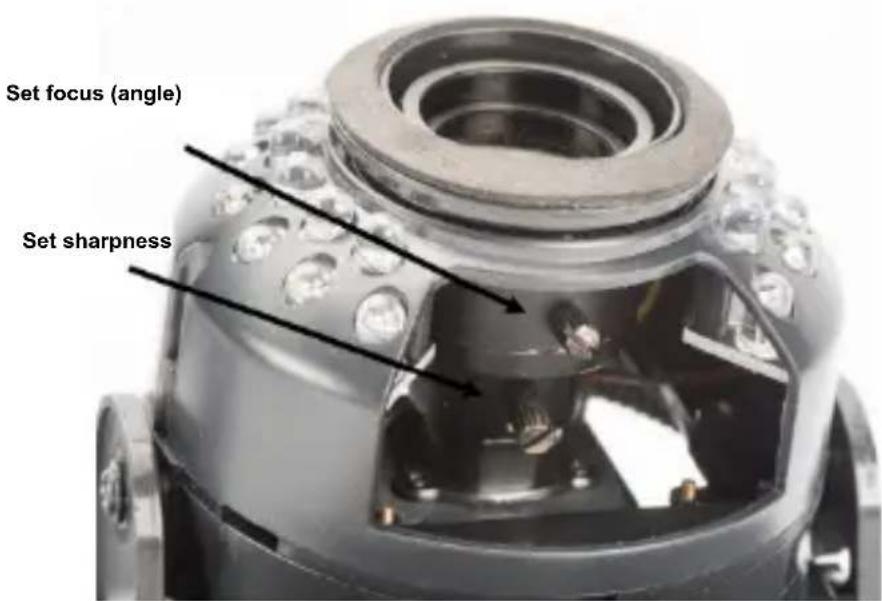
Lens Settings
DN-16039
DN-16043
You can adjust focus and sharpness via manual controls. Use the camera live image to adjust focus and sharpness as required.
1. Preparation
Before you can use your IP camera, some preparations must be taken care of.
Connect antenna
Plug the wireless antenna into the connector and tighten the mounting bolts.
Insert SD-card
The Plug&View IP cameras support MicroSD cards with up to 32 GB storage capacity, which you can buy at your resellers. Pictures or videos taken with your IP camera are then stored on this card.
If your camera has an external port and does not have existing internal memory, insert your MicroSD card into the corresponding slot until it firmly snaps into place.
Connect power supply
Plug the cable of the enclosed power supply into the "Power" connection of the camera.
Connect camera to router (e.g. AVM Fritz!Box, Telekom Speedport etc.)*
Connect one end of the supplied network cable to the LAN port of the camera. Connect the other end of the network cable to one of the connectors marked as 'LAN' on the back of your router. Some routers have only one LAN connection, others have multiple connections. Your router must have a working Internet connection.
*You can skip this point with the access point mode of the cameras. For DN-16047 this point must be skipped.
2. Setting up the Plug&View User Account
In order to use your Plug&View camera and to have a video image at any time and anywhere, you need to register your camera in a Plug&View user account. The setup and control can both be done from your Smartphone/tablet as well as from a PC.
2.1 Create a user account with your Smarthpone/tablet
If you have an Apple® iOS device, then you will find our "DIGITUS® Plug&View" App in the Apple App Store®. For Smartphones and tablets running on Google Android OS you can find our "DIGITUS® Plug&View"-App in the Google™ Play Store.
In the search field of the respective App Stores® enter "Digitus" or "DIGITUS Plug&View".
Apple App Store

GoogleTM
Play


In the Search results the "DIGITUS® Plug&View"-App will be marked with this symbol.
Then install the App on your mobile device.
Start the App on your tablet or on your Smartphone. You have 2 options to create your account:
- If you already have a Google account, you can use your Google account to use your plug&View App, or
- You directly create a new Plug&View account with an individual user name and password.
1. Sign in with Google account
Click on "Google account". Then you can use your Google Mail address and password to log in.
Or
2. Create new account with Plug&View
Click on "Create Account".
Terms of use agreement
Tie hnnnne nnnnne nnne nee nnnnne nnnnne nnnnne nnnnne nnnnne nnnnne nnnnne nnnnne nnnnne nnnnne nnnnne nnnnne nnnnne nnnnne nnnnne nnnnne nnnnne nnnnne nnnnne nnnnne nnnnne nnnnne nnnnne nnnnne nnnnne nnnnnee nnnnne nnnnne nnnnne nnnnne nnnnne nnnnne nnnnne nnnnne nnnnne nnnnne nnnnne nnnnne nnnnne nnnnne nannnne nannnne nannnne nannnne nannnne nannnne nannnne nannnne nannnne nannnne nannnne nannnne nannnne nannnne nannnne nannnne nannnne nannnne nannnne nannnne nannnne nannnne nannnne nannnne nannnne nennnee
Ordnang
n h btei tienaetne fngd aenrnnn nennn ennnn nnnn nnnn nnnn nnnn nnnn nnnn nnnn nnnn nnnn nnnn nnnn nnnn nnnn nnnn nnnn nnnn nnnn nnnn nnnn nnnn nnnn nnnn nnnn nnnn nnnn nnnn nnnn nnnn nnnn nnnn nnnn nnnn nnnn nann
Weymnne jedoch mae F, hme the Pughers Hg cnae phe rregean waeen
p
I
HouwewaeuotpaaatnntttheeetontbnercthePigWeyegcarrn
Accept the privacy policy for using the DIGITUS® Plug&View system.
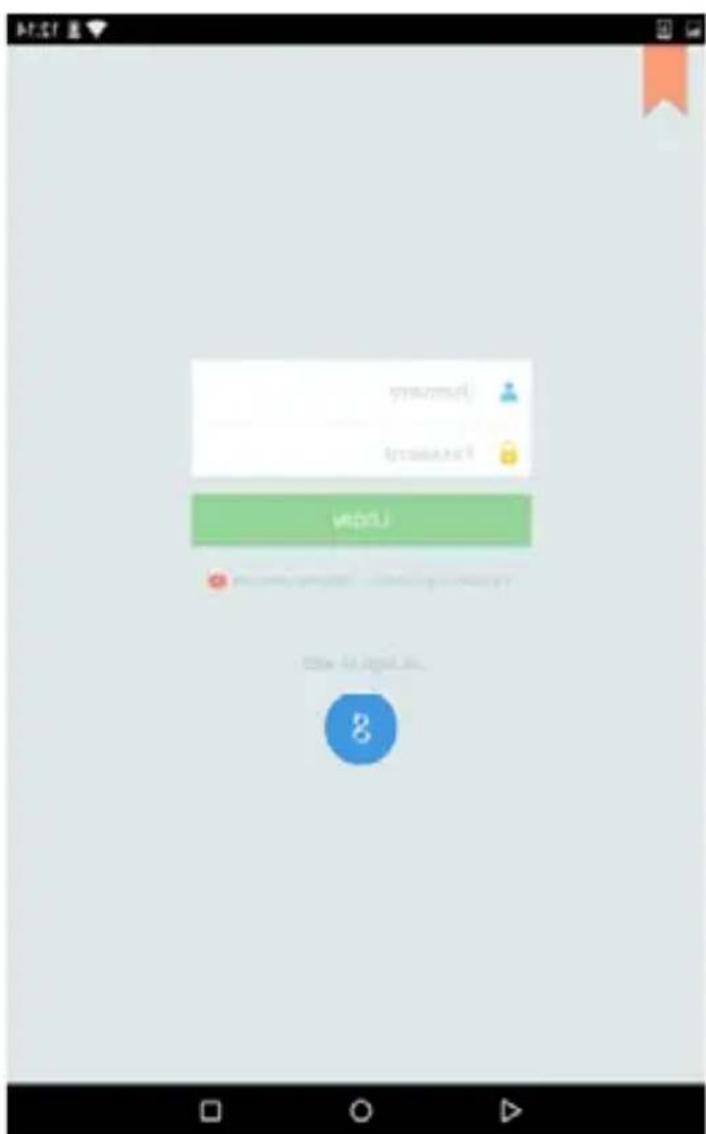
On the next page, please choose a user name, a password, and confirm your e-mail address.
Agree
A
O
Then tap on "Apply" to your Plug&View Account to create. Next you will receive an e-mail with instructions on how to unlock your account. Then log into the App with "Login" using your user name and password. Now you can add your camera to the account (proceed to item 3).
2.2 Create user account with your PC
For using the Plug&View system on a PC, Java add-on must be installed.
Install the current Java version if you do not have Java installed on your PC (http://www.java.com/de/).
Check if you have the latest version if you already have Java installed on your PC (www.java.com/de/download/installled8.jsp).
Please visit the website http://plug-view.com/. Then right click on "Login | My camera administration".

1. Sign in with Google account
Click on "Google Login". Then you can use your Google Mail address and password to log in.
Or
2. Create new account with Plug&View
Click on "Create Account". Please complete the information on the next page and confirm your entries with "Apply". Next you will receive an e-mail with instructions on how to unlock your account. On the login page you can then log in with your user data and add your camera.
Use this point if you want to connect the camera to your wireless network directly in access point mode.
For DN-16047 this point must be carried out.
Skip to step 4 if your camera is connected to your router via LAN cable.
3. Connect Plug&View IP Camera Via Wi-Fi
3.1 With Smartphone/tablet
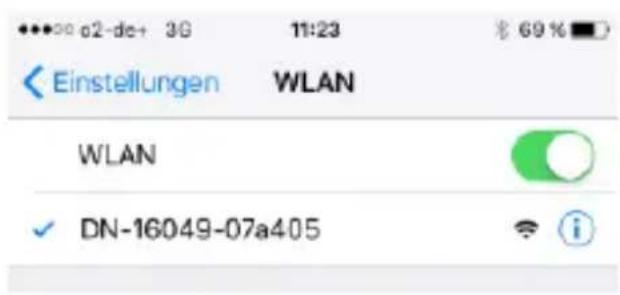
Open the Wi-Fi settings on your smartphone/tablet.
Search for available wireless networks in the immediate vicinity. The camera will be displayed as a wireless network with its model number and the last 6 characters of its MAC address.
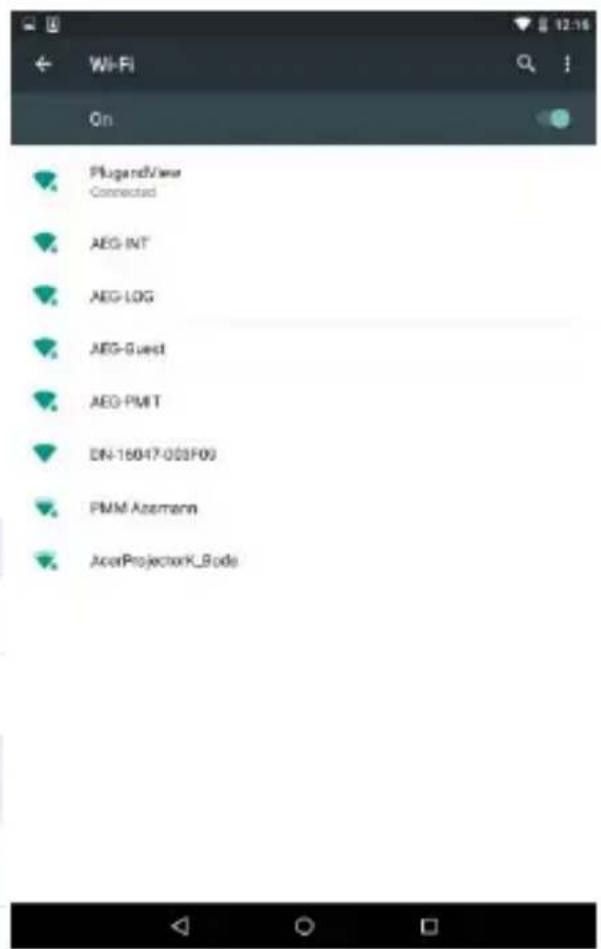
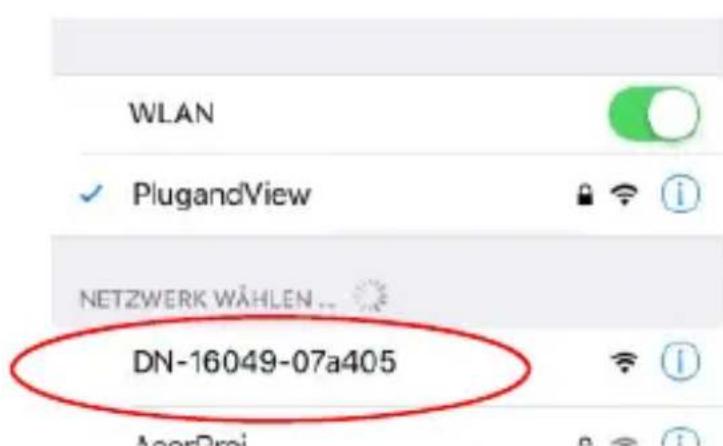
Connect your smartphone/tablet to the IP camera via the Wi-Fi connection.
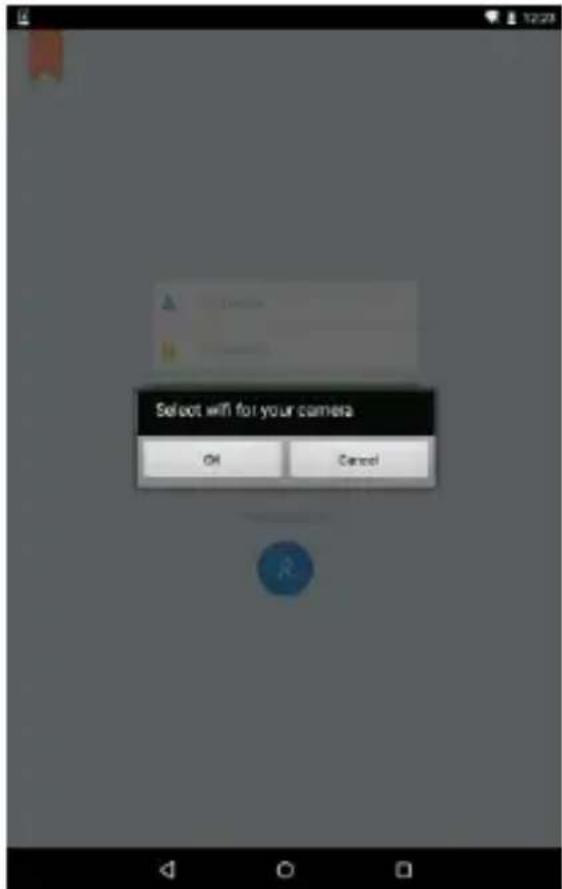
After smartphone/tablet are connected to the camera you can continue the Plug&View app installation. Open the Plug&View app.
The Plug&View app detects connection to a Plug&View camera operated in access point mode and prompts you to select the Wi-Fi network, to which the camera is to be connected.
Back
Choose your wireless network
bssid signal ssid
PlugandView
UPDipot
Available networks in the vicinity will be indicated. Please select here the network, with which the camera should be connected. If your network is not displayed, the camera may need to be repositioned.
ATTENTION: Hidden SSID's, meaning hidden Wi-Fi networks, are not supported by the camera. Please make your network visible, if you want to install your camera into one of these.
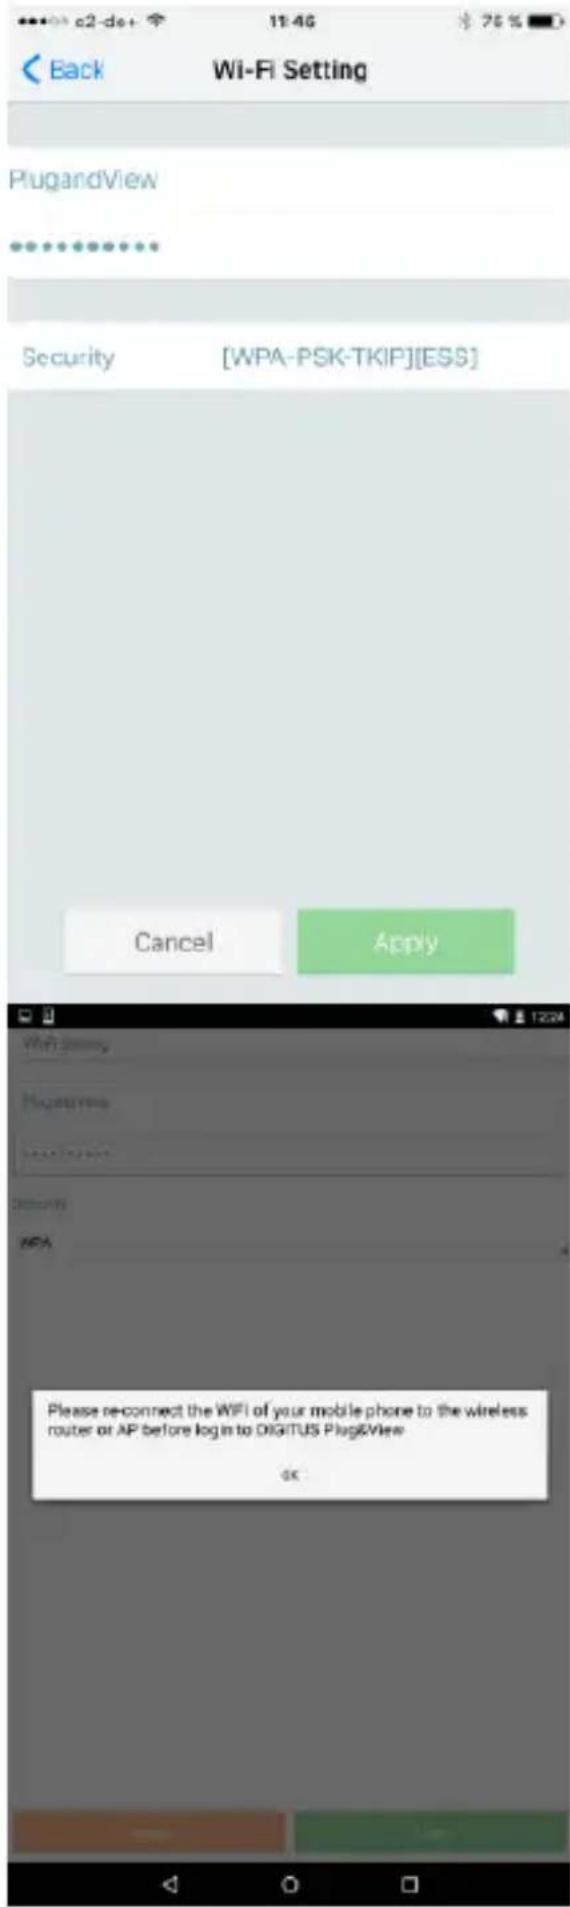
Enter the network password in the password field, with which your WiFi network is encrypted and confirm the input with OK.
Under Android operating systems you are prompted after successful connection to reconnect your Smartphone/Tablet to your Wi-Fi network again.
As a rule, this will happen automatically. Should this not be the case, please go to your Smartphone/Tablet Wi-Fi settings and connect to your Wi-Fi network there.
4.1 With Smartphone/tablet
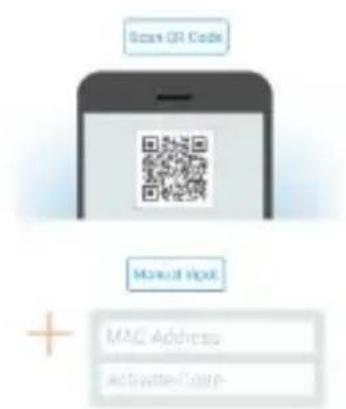
Press "+" to add a new camera during the first Plug&View camera installation.
Navigate to settings (cogwheel icon top right) and tap on "Add camera" if there are already cameras. This is easily done by scanning the QR-code with your Smartphone/tablet or through manual entry of the activation data.
The following devices are suitable for scanning the QR-code: Apple iPhone®, Apple iPad®, Android-Smartphone, Android-tablet (with integrated rear camera).
The MAC-address, the activation code, and the QR-code can be found on the last page of this guide.
Note: The Android version of the mobile device should be at least 2.3.5 or higher.
Adding the camera by scanning the QR-Codes

On the next page, select the option "Scan QR code". The QR code scan function of your mobile device is activated.

For scanning the QR code, you may have to move the device several times backwards and forwards, until the code is recognized.
Adding the camera though manual input of MAC-address and activation code
The MAC-address and the activation code are located on the last page of this guide. Navigate to "Manual input" after selecting "Add camera" in the Plug&View app.
Enter the alphanumeric combination, which you find under "MAC". Then enter your activation code and click "Apply".
MAC:
40D855070000
Act.Code:
wcdAcAcACAcAc

4.2 Add the camera to the PC via the Browser
After the first login into your camera administration on "http://wwwplug-view.com", you will be routed automatically to the registration page for the MAC-address and the activation code.

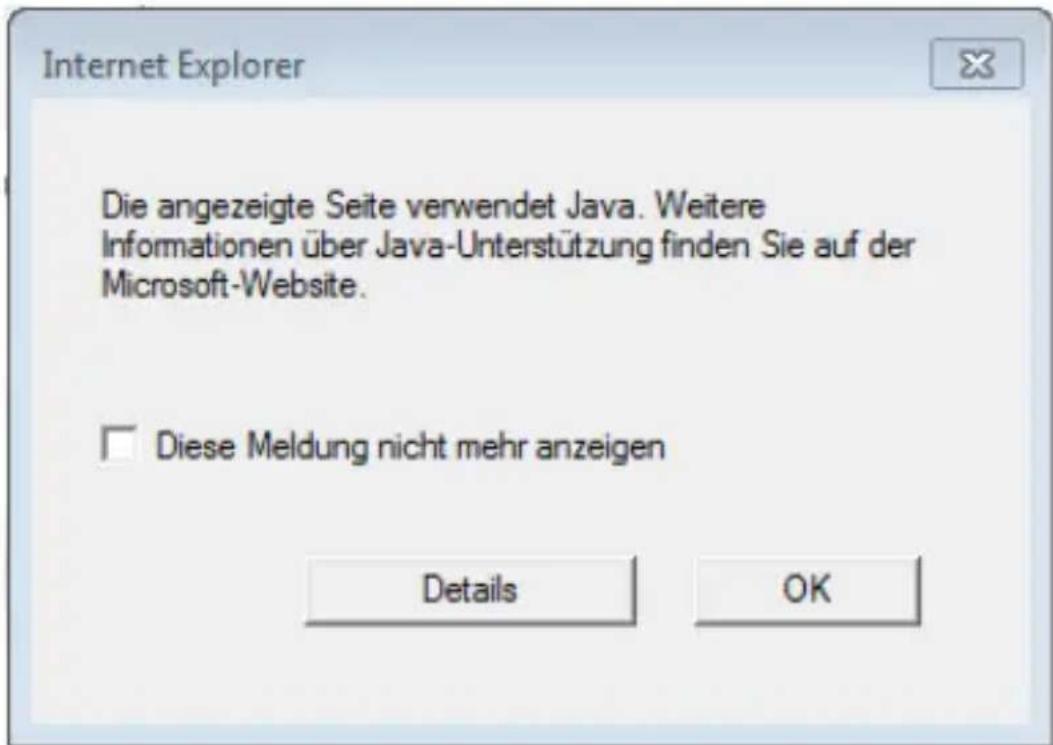
If you see a message telling you that the page uses Java, please click on "Details" and follow the instructions on the next screen to install Java on your computer. This is a precondition for using the video capabilities of the web site. After the successful installation of Java, reload the web page.
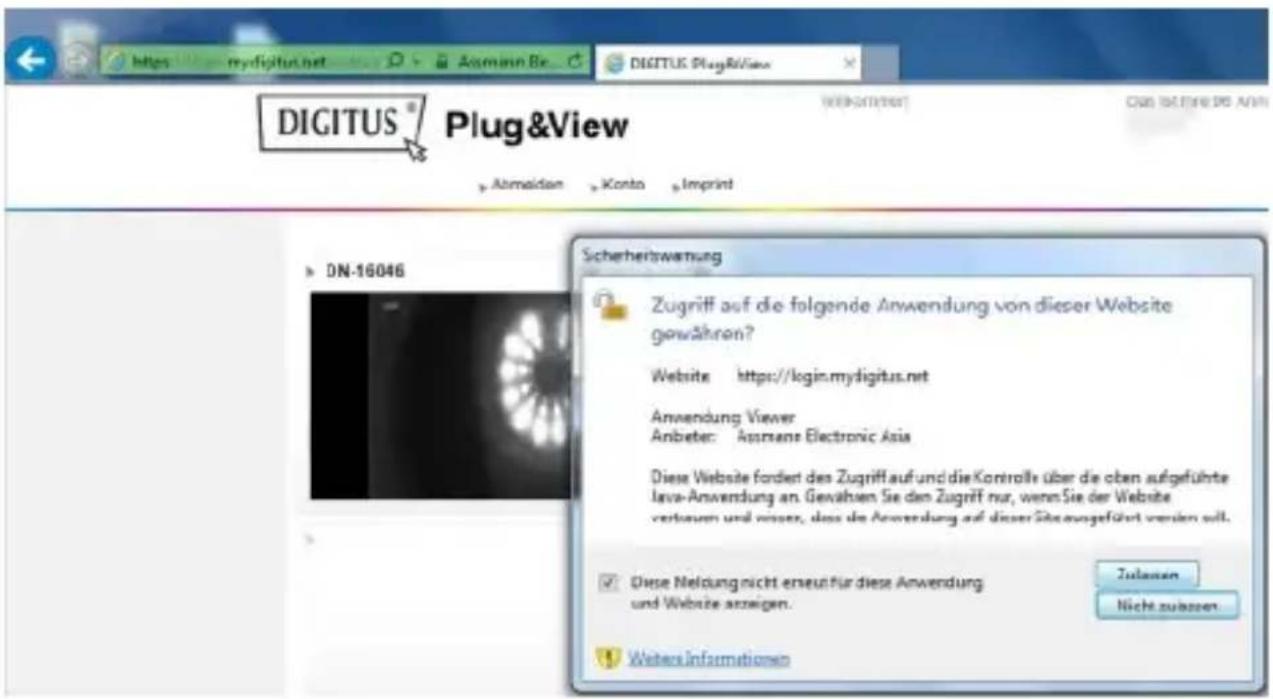
Should the security settings of your PC display a warning message after the Java installation, agree to run Java by clicking on OK.
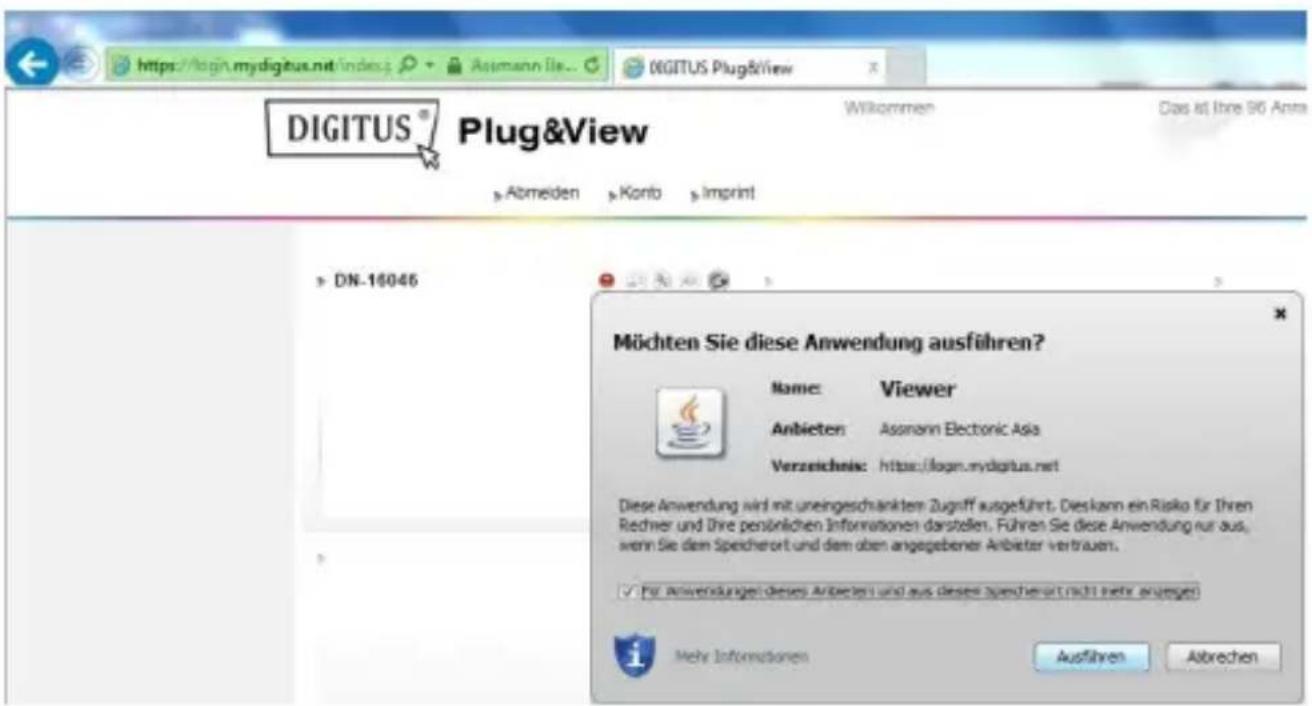
In the same way confirm in a possible message of the Windows Firewall, that Java is allowed to communicate with the Internet. In order to be able to use the multimedia and control functions, the OCX component must be installed in Internet Explorer and the VLC Mediaplayer in Firefox and Chrome. A download link will be displayed in the user interface if necessary.
The MAC-address and the activation code are located on the last page of this guide. Enter both in the appropriate fields and click on "Apply".
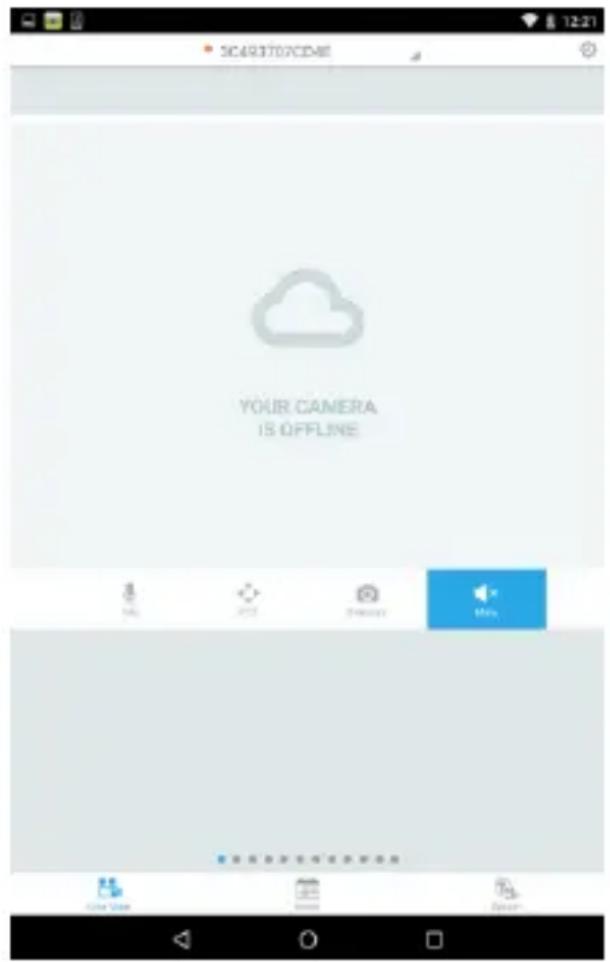
After successfully adding the camera to the camera list, please check whether your camera is displayed with a small preview image.
If you plan to continue using your Plug&View camera with a network cable, the setup is completed here.
If, however, you intend to use the wireless variant in the Wi-Fi for the greatest possible flexibility in the choice of location, please continue reading.
5. Setting up Wi-Fi
The setup of the wireless (Wi-Fi) connection between the IP camera and the Wi-Fi router/ Accesspoint is done on the PC via the browser
After the successful installation of your camera, log in to the web site "http://wwwplug-view.com". Please click on "Login | My camera administration".
Use your Plug&View user name or select the Google-Login. If you are not signed in to your Google account, you will be automatically redirected to the Google login page.
After entering your login details you can see the camera-overview page. Please check here if your camera is displayed with a small preview image.
To the right side, above the camera image, you will see some icons. Click on the "Settings" icon to be directed to the user interface of the camera.

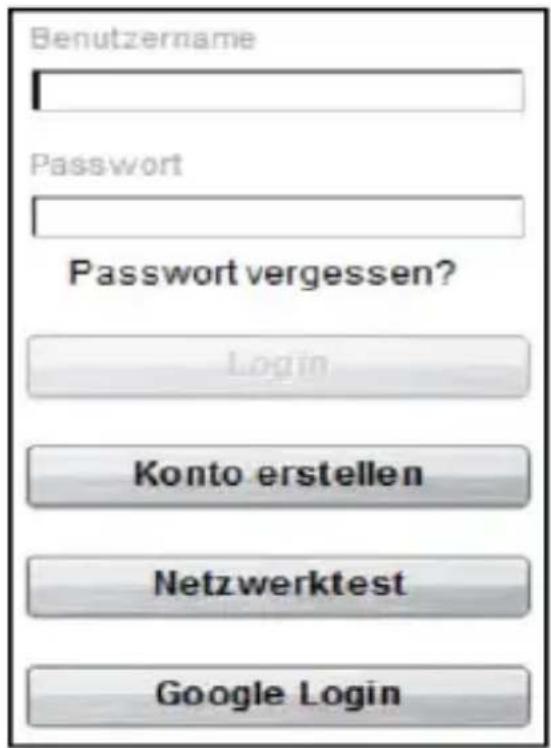
In the following window login with user name "admin" and password "admin". If you select the option "Autologin", you will be logged in automatically next time you access the configuration menu. Click on "Login".
In the user interface of the camera, click on Wi-Fi to carry out Wi-Fi settings.

A search window will appear, in which the available wireless networks in your environment will be displayed. Please select the identifier (SSID) of your network and confirm with "OK".

In the next window enter the Wi-Fi-key and confirm with "OK".

Please ensure that your router is functioning as a DHCP-server. This is the factory setting of almost all routers. Next, the connection to your wireless LAN is established. If the connection was successfully established, this will be displayed in a separate window.
You can now remove the network cable from the camera and close the browser window.
Congratulations. You have just completed your Plug&view IP camera set up. Now you can access your IP camera at any time from your Smartphone, tablet PC, or from a browser.
6. Set Motion Detection and Recording
The DIGITUS® Plug&View system offers the options motion detection and recording. To use this function, the SD card must be formatted in the camera and motion detection must be activated. For formatting the SD card, access the camera via the web portal.
To the right side, above the camera image, you will see some icons. Click on the "Settings" icon to be directed to the user interface of the camera.

In the following window login with user name "admin" and password "admin". If you select the option "Autologin", you will be logged in automatically next time you access the configuration menu. Click on "Login".
You access the SD card information via menu items System, Local storage.
Format the SD card via menu item "Format".
After formatting, motion detection can be activated. Navigate to Settings, Motion.
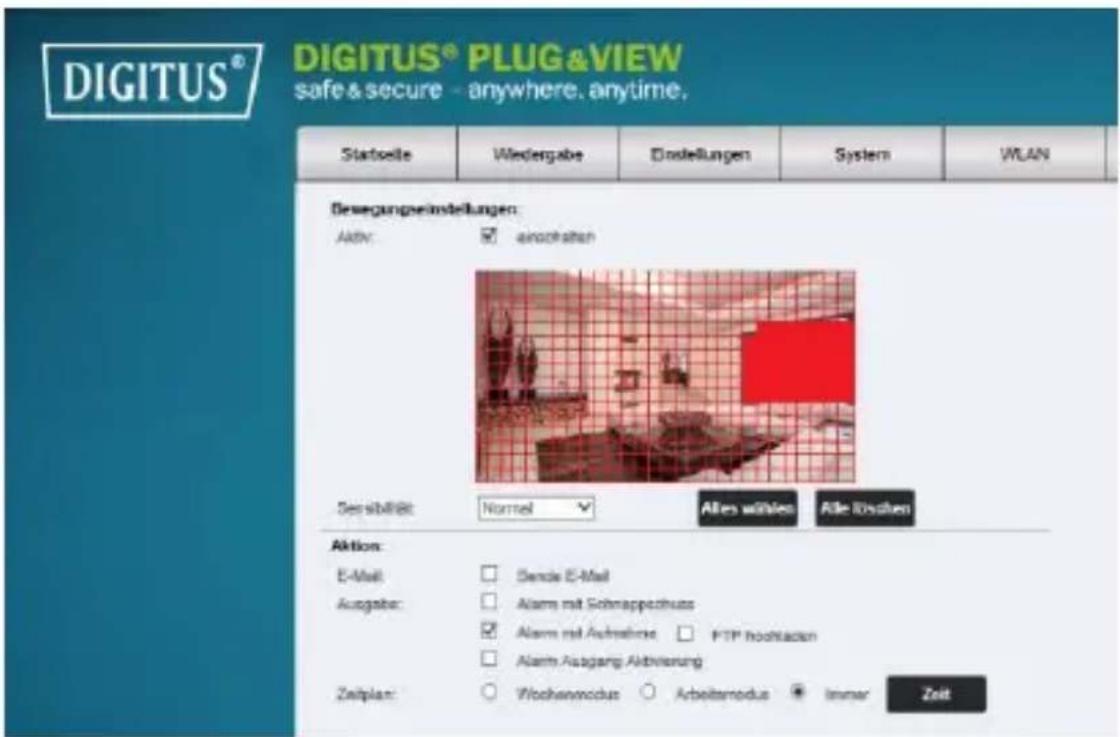
Activate motion detection by clicking on "ON". The colored area within the video image is the motion detection area, i.e. the area in which a movement triggers a picture or a video recording. In the original delivery condition, almost the entire screen is covered with red boxes. Click on the color markings to exclude certain areas from motion detection. By doing this, you delete the marker for that area. You can set the motion detection sensitivity in "Sensitivity". Select from the following four levels: "Very high", "High", "Normal" and "Low".
Activate "Alarm with recording" to save in case of detected motion to SD card.
Time setting is affected via the schedule for motion detection. You can record in Weekly, Workday or Full-time modes.
You can individually adjust the schedule.
Save the configuration with "Apply".
You have successfully set motion detection with recording.
For explanations regarding the camera's web interface see the camera manual supplied on CD.
With questions access the FAQ area on our Plug&View page (http://wwwplug-view.com/) or contact our Hotline (http://wwwplug-view.com/support-de/support/).
Trademarks
DIGITUS is a registered trademark ASSMANN Electronic GmbH. Apple, Apple App Store are registered trademarks of Apple Inc. Android, Google, Google play are registered trademarks of Google Inc. AVM Fritz!Box is a registered trademark of AVM Computersysteme Vertriebs GMBH.
Telekom Speedport is a registered trademark of Deutsche Telekom AG.
Note:
All other trademarks not listed here, are the property of their respective owners.
Trademarks or trade names mentioned in this manual are used to describe the operating steps and do not imply that they are freely available. In any case they are the property of the respective holder of the rights.
ASSMANN Electronic GmbH declares that the product complies with the requirements and provisions of directives 1999/5/EG and RoHS 2011/65/EG. You can request the complete Declaration of Conformity by mail at the manufacturer's address as stated below.
Please scan the QR Code below to enjoy
DIGITUS® PLUG&VIEW
safe & secure - anywhere. anytime.

Please scan this QR code using DIGITUS® Plug&View APP

DIGITUS® Plug&View IP K cameras
Quick Installation Guide
(QIG)
Sicherheitshinweise
Terms of use agreement
H
Hnnnnae
We rene ech p aep 1e 4n Aenrnnn nnnn
p#y#y#y#y#y#y#y#y#y#y#y#y#y#y#y#y#y#y#y#y#y#y#y#y#y#y#y#y#y#y#y#y#y#y#y#y#y#y#y#y#y#y#y#y#y#y#y#y#y#y#
Pnny pny
Theorem 2.1. Let be a field and let (x) be the set of all elements of . Then the Floer homology groups are isomorphic to the same groups.
Choose your wireless network
bssid signal ssid
PlugandView
LID:0102456789
Please scan the QR Code below to enjoy
DIGITUS® PLUG&VIEW
safe & secure - anywhere. anytime.

Please scan this QR code using DIGITUS® Plug&View APP

Caméra IP DIGITUS® Plug&View
safe & secure - anywhere. anytime.

DIGITUS® Plug&View IP camera's
Choose your wireless network
bssid signal ssid
PlugandView
UD0
safe & secure - anywhere. anytime.

Scan a.u.b. deutsche QR-code m.b.v. de DIGITUS® Plug&View APP

Telecamere IP DIGITUS® Plug&View
Choose your wireless network
bssid signal ssid
PlugandView
UD 4
safe & secure - anywhere. anytime.

Terms of use agreement
Bn 1000000000000000000000000000000000000000000000000000
自
t
Papkee paepepepepepepepepepepepepepepepepepepepepepepepepepepepepepepepepepepepepepepepepepepepepepepepepepepepepepepepepepepepepepepepepepepepepepepepepepepepepepepepepepepepepepepepe
F
Hnneaeenee e aiee eae ee eae eae eae eae eae eae eae eae eae eae eae eae eae eae eae eae eae eae eae eae eae eae eae eae eae eae eae eae eae eae eae eae eae eae eae eae eae eae eae eae eae eae eae eae eae eae eae eae eae eae eee
However, we will not discuss this in the event context. We will use the Plagio Viewpoint to interpret it by
Choose your wireless network
bssid signal ssid
PlugandView
UPrint#10
safe & secure - anywhere. anytime.

PykoBODCTBO NOIb3OBaTeJЯ.
(PN)
MepbI npeOcTOPOXHOCTN
- История IP Камеру Plug&View в Диапазоне Temперату, указандовдля данной Камеры
Korda kamepa He nCnoIb3yETcra, xpaHnTe eB Cyxom n YnCTOM MeCTe np TEmnepaType ot 0^ do 40^
He haKpbIbAaTe KaMepy - Избeraи Te KoHTaKta KaMepbI C XnДKOCTaMn (He OTHOCNTcK HapyXHbIM KaMepaM c 3aUHTbIM KOpnycom IP66)
- IP kamepbI Plug&View He YBJIaOTc3aMeHOJ POdnteJIbCKOMy KOHTpOJIIO. BepeITe 3dOpOBBe CBOIX DeTei, YJIeHOB CeMbI N DOMaUSHX XINBOTbIX IN peYJrPHO pINCMaTpNBaIte 3a HIMN
- Y6eIntecb, yTO domaunHe IP kamepbI nCnoJIb3yOTcT OJbKO BHyTpN IOMeueHn. DaHHbIe KaMepbI He npedHa3NaYeHbI dJIa NcNoJIb3OBaHnHa yIInCe n MOrY T BblTN n3 cTpoJ. NcNoJIb3yTe COOTBETCTByOUsne MoJeIN, npedHa3NaYeHHbIe dJIa yIInuHOro NcNoJIb3OBaHnA
- YctaHOBIne IP kaMepbI Plug&View B HeNOCpeICTBeHHoH 6n3OCTn K aJIeKTPnuecko p03eTKe. Y6eIITecb, yTO OTCyTCTByET HaTJXeHne Ka6eJra aJIeKTPoPnITaHnJ, n Ka6eJb ocJa6JIeH
-
Pa3mecntte IP kamepbI Plug&View B paDnucce DeiCtBna Wi-Fi pouTepa n y6eDnTeCb, uTo MeJdy kamepaMn i pouTepom HeT npEpanCTBn, KOTOpbIe MoIIN 6bl CO3dAbaTb NOMExn CnHaNy Wi-Fi
-
ObecneyuTe 3aunTy IP kamep Plug&View ot BO3deIcTBnA 3JIeKTPnuecknx IIN BbICOKOaCTOTHbIX yCTPOIcTB, CO3daIOuNX NOMEXN (MnKPOBONHOBbie neu, Mo6NJbHbIE TeJefoHbI n T.D.)
XpaHnte KaMepy, cTeBoi Ka6eIb I Ka6eIb 3JIeKTPoITaHnB HeIOCTUINOM dIgI DeTeI MeCTe, TaK KaK 3TN KOMNOHEHTbIMOryT npEcdTabIaTb ONaCHOCTb - Исторуши Толбко посторуши в КOMплкове заликов.
-
РИТАнь.
He nbItaTeCb noUHHb IP kamepbI Plug&View camocToTebHo. Pa6Otbl NO peMOHTy IN TexHnueCKomy o6CnyXnBaHNIO doJxHbI BblOJIHrTbCSneuJaNCTamN.
Bcnyae BO3HKnHOBeHnI npo6IeM CByXntEc b cHaSei cIyXboI pOndepKKn KJIneHTOB.
CobIouaTe npimehmoe 3aKoHOaTeJIbCTBO B OTHOseHn BIndeOHa6IIOHeHn. IP kamepbI Plug&View npedHa3NaYeHbI dJIy IInuHOrO DomaShero nCNoJb3OBaHn. PpOnHΦOpMnpyTe YJIeHOB cEMbN,POdCTBeHHNKOB IN NOMOUsHKnOB IO XO3YCTBY O HAnuHn BIndeOHa6IIODeHn B dOME. Y6eDNTecb, UTO Ha 3aINcax BIndeOHa6IIODeHn He BnHO oBSeCTBeHHbIe MeCTa IIIN CO6CTBeHHocTb BaUnx Cocedei. -
Празалту и римпу усювя полтуки Конфденильностд я спюльзовая систem DIGITUS® Plug&View, по сьлке http://plug-view.com/privacy-policy-for-platform-apps/.
- YctaHOBInTe napOJIb C BbICOKOI CTepeHbIO 3aUNTbI DnIyUyeTHoI 3aIncn Plug&View, UTO6bl 3aUNTbI eE OT HecaHKUHOHPOBaHHOrO DoCTyna.
- Паров должень соржать мнимум 8 3нakOB; Мbl pekomeндуем Испльбогаь 6укыр a3HOrO peRnCTpa n 6уКВеHHO-цфpoBbie CmBOЛы.
- Помимо зTORO, таЖе следует ИЗМЕнITь CTaHДapTHьй napОль Камерbl ДЯ пpeДOTВрашени HecaHKцINOHIPOBaHHORO DoCTyna.
YcTaHOBka KapTbI MicroSD
B KaMepbI DIGITUS Plug&View IJRA DOMaSHero NcNoJIb3OBAHnA MOryT yCTaHaBnBaTbcra KapTbI MicroSD IJRA 3aIncn BnDeo. O3HaKOMbTeCb CO cnoCo6amN yCTaHOBKn KapT nAmrTa Ha PnIBeDEHHbIX HnKe I3O6paXeHNx.
DN-16047
YcTaHOBInTe KaPty SD, KaK NOKa3aHo Ha pNcUHKe. KoHTaKTbI KaPTbI DOJXHbI paCNoJaRaTbcra B HAnpaBHeHn 06BeKTHBaKaMepbl.
DN-16046
YcTaHOBInTe KaPty SD, KaK Noka3aHo Ha pncyHke. KoHTaKTbI KaPTbI DOJIxHbI paCNoJaRaTbcra B HappaBHeHn 06BeKTnBa KamepbI.
DN-16029
YcTaHOBInTe KapTy SD KOHTaKTamN BBepx, KaK NOKa3aHo Ha pncyHke.
LAN:
CBeToIOnOHyBIM HndNKaTOP COCTOHNIA:
CnHn CBeToDnOdHbIn HndNKaTOp Noka3bIBAeT, YTO KaMepa NOkJIIOUyeHa K cETN 3JNeKTPoPNTaHnA.
Terms of use agreement
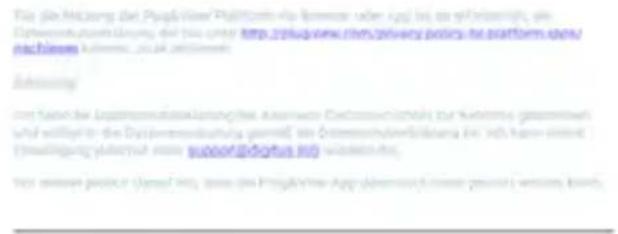
Tie hae aagrtae fagvVeyn thiirer n tae Appit eannenfich, die
tihnrtarntbrg, de sotu htp. ywnennnnnneanee ane rpltnen anp
mochien 4000000000000000
Dheng
I hauwanknowledgt the prniscr gory of Autonumus Electroric Derided wth hoery expenien to tthe datigereignment.
Tnssse,are tnsd pannat tht is the eanr cmmert be prnnd the Pngzerng mnn
3aɪdɪte Ha caɪt http://plug-view.com/.
Hajmte npaBoN KnaBnSeMbIShn Ha «Login | My camera administration».
1. Boudume, uclone3yra daHHbIe akkayHma Google
safe & secure - anywhere. anytime.

1 camera IP Plug&View
Terms of use agreement

safe & secure - anywhere. anytime.

Terms of use agreement
Tiehe hne nregee Fieae (n) 1000000000000000000000000000000000000000000000000000000000000000000000000
Dheng
Choose your wireless network
bssid signal ssid
PlugandView
LID:Deliv#
safe & secure - anywhere. anytime.

Terms of use agreement
Tie hnnnne nne nee nee nee nee nee nee nee nee nee nee nee nee nee nee nee nee nee nee nee nee nee nee nee nee nee nee nee nee nee nee nee nee nee nee nee nee nee nee nee nee nee nee nee nee nee nee nee nee nee nee ne eae
Ordnang
Pnepnnepepepepepepepepepepepepepepepepepepepepepepepepepepepepepepepepepepepepepepepepepepepepepepepepepepepepepepepepepepepepepepepepepepepepepepepepepepepepepepepepepepepepepepepepepepepepepe pe
I hauwanknowledgt the prniscr gory of Autonumus Electroric Dreded sthency expenien to tthe datigreerment aoeing to the prniscr gory. I wry reooy coontent doing tey forcontacting support info
f
DIGITUS® Plug&View systemd iliskin gizlilik politikasini kabul edin.
Choose your wireless network
bssid signal ssid
PlugandView
UPDSelect#10
Bu kılıvuzda bahsi®,®,®,®,®,®,®,®,®,®,®,®,®,®,®,®,®,®,®,®,®,®,®,®,®,®,®,®,®,®,®,®,®,®,®,®,®,®,®,®,®,®,®,®,®,®,®,®,®,®,®,®,®,®,®,®,®,®,®,®,®,®,®,®,®,®,®,®,®,®,®,®,®,®,®,®,®,®,®,®,®,®,®,®,®,®,®,®,®,®,®,®,®,®,®,®,®,®,®,®,®. - Bu kılıvuzda bahsi®,®,®,®,®,®,®,®,®,®,®,®,®. - Adımları®! - acıklamak,—çın kullanilmalık ve serbest)—çın kullanilmalık! - kullanilmabile"—çın anlamina gelmez. Üm durumlarda ilgili hak sahiplerinin)—mülkiyeti"—altindad)—lar.
safe & secure - anywhere. anytime.