
DV25B6900EX - Tumble drier SAMSUNG - Free user manual and instructions
Find the device manual for free DV25B6900EX SAMSUNG in PDF.
| Product Type | Front-loading Dryer |
| Brand | Samsung |
| Model | DV25B6900EX |
| Drum Capacity | 4.0 cu. ft. (113 L) |
| Net Weight | 88 lb (40 kg) |
| Height | 33.5 in (85 cm) |
| Width | 23.6 in (60 cm) |
| Depth | 25.8 in (65.5 cm) |
| Power Supply | 120/240 V AC, 60 Hz, 30 A (electric) |
| Heating Power | 2200 W (electric) |
| Total Consumption | 2500 W |
| Venting | Rigid metal duct 4 in (10.2 cm) to the outside |
| Drying Programs | Normal, Timed Dry, Large Capacity, Mix, Small Load, Delicate, Sanitize, Wrinkle Away, Towels, Sport, Jeans, Shirts, Wool, Wrinkle Free, Air Fluff |
| Drying Levels | 5 levels (High to Damp) |
| Options | Wrinkle Prevent, Damp Alert, My Cycles, Drum Light, Child Lock |
| Special Functions | Smart Control (Wi-Fi), AI Model, Air Block Test |
| Maintenance | Removable lint filter, clean after each cycle |
| Safety | Child Safety, Control Lock, Auto Shut-off, Secure Door |
| Repairability | Repair index not communicated; spare parts available from Samsung |
| Warranty | 1 year parts and labor (United States and Canada) |
Frequently Asked Questions - DV25B6900EX SAMSUNG
User questions about DV25B6900EX SAMSUNG
0 question about this device. Answer the ones you know or ask your own.
Ask a new question about this device
Download the instructions for your Tumble drier in PDF format for free! Find your manual DV25B6900EX - SAMSUNG and take your electronic device back in hand. On this page are published all the documents necessary for the use of your device. DV25B6900EX by SAMSUNG.
USER MANUAL DV25B6900EX SAMSUNG
What you need to know about the safety instructions 4
Important safety symbols 4
CALIFORNIA PROPOSITION 65 WARNING 8
Important safety precautions 9
Warnings 10
Cautions 10
Regulatory notice 12
FCC Notice 12
IC Notice 13
Open Source Announcement 14
Installation requirements 15
Key installation requirements 15
Location considerations 15
Ducting requirements (Not applicable to ventless (heat pump) models) 19
Exhausting requirements (Not applicable to ventless (heat pump) models) 20
Gas requirements (Not applicable to ventless (heat pump) models) 21
Electrical requirements 22
Installation 24
What's included 24
Step-by-step installation 26
Exhaust ducting guide (Not applicable to ventless (heat pump) models) 30
Changing the direction of the exhaust duct (optional) 31
35
Exhaust ducting guide 37
Switching the door position 37
Before you start 42
Initial setup 42
Sort and load 43
Functional prerequisite 43
English2

Operations 44
Control panel 44
Operating a cycle 46
Cycle overview 47
Options 48
Settings 51
Special features 53
Cycle chart 55
Drying guide 57
Maintenance 58
Cleaning 58
Troubleshooting 60
60 Checkpoints
Information codes 62
Specifications 63
Fabric care chart 63
Protecting the environment 64
Specification sheet 64
3English
Safety information
Congratulations on your new Samsung dryer. This manual contains important information on the installation, use and care of your appliance. Please take some time to read this manual to take full advantage of your dryer's many benefits and features.
What you need to know about the safety instructions
Please read this manual thoroughly to ensure that you know how to safely and efficiently operate the extensive features and functions of your new appliance. Please store the manual in a safe location close to the appliance for future reference. Use this appliance only for its intended purpose as described in this instruction manual.
Warnings and Important Safety Instructions in this manual do not cover all possible conditions and situations that may occur. It is your responsibility to use common sense, caution and care when installing, maintaining and operating your dryer.
Because the following operating instructions cover various models, the characteristics of your dryer may differ slightly from those described in this manual and not all warning signs may be applicable. If you have any questions or concerns, contact your nearest service center or find help and information online at www.samsung.com.
Important safety symbols
What the icons and signs in this user manual mean:

WARNING
Hazards or unsafe practices that may result in severe personal injury, death and/or property damage.

CAUTION
Hazards or unsafe practices that may result in personal injury and/or property damage.

NOTE
Indicates that a risk of personal injury or material damage exists.
These warning signs are here to prevent injury to yourself and others.
Please follow them explicitly.
After reading this manual, store it in a safe place for future reference.
Read all instructions before using the appliance.
As with any equipment that uses electricity and moving parts, potential hazards exist. To safely operate this appliance, familiarize yourself with its operation and exercise care when using it.
SAVE THESE INSTRUCTIONS
English4
WARNING - Risk of Fire
- Clothes dryer installation must be performed by a qualified installer.
- Install the clothes dryer according to the manufacturer's instructions and local codes.
- Do not install a clothes dryer with flexible plastic venting materials. If flexible metal (foil type) duct is installed, it must be of a specific type identified by the appliance manufacturer as suitable for use with clothes dryers. Flexible venting materials are known to collapse, be easily crushed, and trap lint. These conditions will obstruct clothes dryer airflow and increase the risk of fire.
- Do not install a booster fan in the exhaust duct.
Note: The booster fan warning does not apply to clothes dryers intended to be installed in a multiple clothes dryer system, with an engineered exhaust duct system that is installed per the clothes dryer manufacturer's guidelines.
- To reduce the risk of severe injury or death, follow all installation instructions.
- Save these instructions.
SAVE THESE INSTRUCTIONS
Safety information
WARNING - To reduce the risk of fire or explosion:
- Do not dry items that have been previously cleaned, washed, soaked, or spotted with gasoline, dry cleaning solvents, or other flammable or explosive substances. They emit vapors that could ignite or explode. Any material that has been in contact with a cleaning solvent or flammable liquids or solids should not be placed in the dryer until all traces of these flammable liquids or solids and their fumes have been removed. There are many highly flammable items used in homes, such as acetone, denatured alcohol, gasoline, kerosene, some liquid household cleaners, some spot removers, turpentine, waxes, and wax removers.
- Items containing foam rubber (which may be labeled latex foam) or similarly textured rubberlike materials must not be dried on a heat setting. Heated foam rubber materials can, under certain circumstances, ignite spontaneously.
SAVE THESE INSTRUCTIONS
English6
WARNING - Fire or explosion hazard
- Failure to follow safety warnings exactly could result in serious injury, death or property damage.
- Do not store or use gasoline or other flammable vapors and liquids near this or any other appliance.
- Installation and service must be performed by a qualified installer, service agency, or the gas supplier.
- Do not install a booster fan in the exhaust duct. Note: The booster fan warning does not apply to clothes dryers intended to be installed in a multiple clothes dryer system, with an engineered exhaust duct system that is installed per the clothes dryer manufacturer's guidelines.
WARNING - What to do if you smell gas:
- Do not try to light any appliance.
- Do not turn on the appliance.
- Do not touch any electrical switch.
- Do not use any phone in your building.
- Clear the room, building or area of all occupants.
- Immediately call your gas supplier from a neighbor's phone. Follow the gas supplier's instructions.
- If you cannot reach your gas supplier, call the fire department.
SAVE THESE INSTRUCTIONS
Safety information
CALIFORNIA PROPOSITION 65 WARNING

WARNING
Cancer and Reproductive Harm - www.P65Warnings.ca.gov.
SAVE THESE INSTRUCTIONS
English8
Important safety precautions

WARNING
To reduce the risk of fire, electric shock, or injury to persons when using your appliance, follow basic precautions, including the following:
- Read all instructions before using this appliance.
- Do not dry articles that have been previously cleaned in, washed in, soaked in, or spotted with gasoline, dry-cleaning solvents, or other flammable or explosive substances, as they give off vapors that could ignite or explode.
- Do not use the dryer to dry clothes which have traces of any flammable substance, such as vegetable oil, cooking oil, machine oil, flammable chemicals, paint thinner, etc., or anything containing wax or chemicals, such as mops and cleaning cloths. Flammable substances may cause the fabric to catch fire by itself.
- Do not store or use gasoline or other flammable vapors and liquids near this or any other appliance.
- Do not allow children to play on or in the appliance. Close supervision of children is necessary when the appliance is used near children.
- Before the appliance is removed from service or discarded, remove the door to the drying compartment.
- Do not reach into the appliance if the drum is moving.
- Do not install or store this appliance where it will be exposed to the weather.
- Do not tamper with internal controls.
- Do not repair or replace any part of the appliance or attempt any service unless specifically recommended in the user-maintenance instructions or in published user-repair instructions that you understand and have the skills to carry out.
- Do not use fabric softeners or products to eliminate static unless recommended by the manufacturer of the fabric softener or product.
- Clean the lint screen before or after each load.
- Do not use heat to dry articles containing foam rubber or similarly textured rubber-like materials.
- Keep area around the exhaust opening and adjacent surrounding areas free from the accumulation of lint, dust, and dirt.
- The interior of the appliance and exhaust duct should be cleaned periodically by qualified service personnel.
- Do not place items exposed to cooking oils in your dryer. Items contaminated with cooking oils may contribute to a chemical reaction that could cause a load to catch fire. To reduce the risk of fire due to contaminated loads, the final part of a tumble dryer cycle occurs without heat (cool down period). Avoid stopping a tumble dryer before the end of the drying cycle unless all items are quickly removed and spread out so that the heat is dissipated.
- This appliance must be grounded. See "Electrical requirements" and "Grounding" in "Installation" section.
SAVE THESE INSTRUCTIONS


Safety information
- Do not allow children to play on or in the appliance. Close supervision of children is necessary when the appliance is used near children.
- Do not insert your hand under the dryer. This may result in injury.
- Take care that children's fingers are not caught in the door when closing it.
- This may result in injury.
- The control board and inlet valve are intentionally not grounded and may present a risk of electric shock only during servicing.
- Do not contact these parts while the appliance is energized.
Warnings
WARNING
- Ensure pockets are free of small, irregularly shaped hard objects and foreign material, i.e. coins, knives, pins, etc. These objects could damage your dryer.
Gas leaks may occur in your system, resulting in a dangerous situation.
Cautions
CAUTION
- Do not allow children or pets to play on, in, or in front of the appliance. Close supervision is necessary when the appliance is used near children and pets.
- Before discarding or removing your dryer from service, remove the door to the drying compartment to prevent children or animals from becoming trapped inside.
- Do not reach into the appliance when the drum is moving.
- Do not install or store this appliance where it will be exposed to the weather.
- Do not tamper with the controls.
- Do not repair, replace, or attempt to service any part of the appliance unless specifically instructed to in the user-repair instructions and you have the understanding and skills to carry out the procedure.
- Do not use fabric softeners or products to eliminate static unless the softener or product is recommended for dryer use by the manufacturer of the fabric softener or product.
- Clean the lint screen before or after each load.
- Keep the area around the exhaust opening and surrounding areas free from lint, dust, and dirt.
- The interior of the dryer and exhaust duct should be cleaned periodically by qualified service personnel.
- This appliance must be properly grounded. Never plug the power cord into a receptacle that is not grounded adequately or not in accordance with local and national codes. See the installation instructions for information about grounding this appliance.
- Do not sit on top of the dryer.
- Do not dry clothing with large buckles, buttons, or other heavy metal or solid objects.
Gas leaks may not be detected by smell alone.
SAVE THESE INSTRUCTIONS
English10
Gas suppliers recommend you purchase and install a UL-approved gas detector.
- Install and use in accordance with the manufacturer's instructions.
- Do not place items in your dryer that have been spotted or soaked with vegetable oil or cooking oil. Even after being washed, these items may contain significant amounts of these oils.
- Residual oil on clothing can ignite spontaneously. The potential for spontaneous combustion increases when items containing vegetable oil or cooking oil are exposed to heat. Heat sources such as your dryer can warm these items, allowing an oxidation reaction in the oil to occur. Oxidation creates heat. If this heat cannot escape, the items can become hot enough to catch fire. Piling, stacking, or storing these kinds of items may prevent heat from escaping and can create a fire hazard.
- All washed and unwashed fabrics that contain vegetable oil or cooking oil can be dangerous. Washing these items in hot water with extra detergent will reduce, but not eliminate, the hazard. Always use the Cool Down cycle for these items to reduce their temperature. Never remove these items from the dryer hot or interrupt the drying cycle until the items have run through the Cool Down cycle. Never pile or stack these items when they are hot.
SAVE THESE INSTRUCTIONS
11English
Regulatory notice
FCC Notice
CAUTION
Any changes or modifications not expressly approved by the party responsible for compliance could void the user's authority to operate the equipment.
This device complies with Part 15 of FCC Rules. Operation is Subject to following two conditions:
- This device may not cause harmful interference, and
- This device must accept any interference received including interference that cause undesired operation.
For products sold in the US and Canadian markets, only channels 1-11 are available. You cannot select any other channels.
FCC STATEMENT:
This equipment has been tested and found to comply within the limits for a Class B digital device, pursuant to part 15 of the FCC Rules. These limits are designed to provide reasonable protection against harmful interference in a residential installation.
This equipment generates, uses, and can radiate radio frequency energy and, if not installed and used in accordance with the instructions, may cause harmful interference to radio communications. However, there is no guarantee that interference will not occur in a particular installation. If this equipment does cause harmful interference to radio or television reception, which can be determined by turning the equipment off and on, the user is encouraged to try to correct the interference by one or more of the following measures:
- Reorienting or relocating the receiving antenna
- Increasing the separation between the equipment and receiver
- Connecting the equipment to an outlet that is on a different circuit than the radio or TV.
- Consulting the dealer or an experienced radio/TV technician for help.
FCC RADIATION EXPOSURE STATEMENT:
This equipment complies with FCC radiation exposure limits set forth for an uncontrolled environment. This equipment should be installed and operated so there is at least 8 inches (20 cm) between the radiator and your body. This device and its antenna(s) must not be colocated or operated in conjunction with any other antenna or transmitter.
SAVE THESE INSTRUCTIONS
English12:
Unintentional emitter per FCC Part 15
Product type : Clothes Dryers
Model: DV25B6900E*
Responsible Party - U.S. Contact Information
Samsung Electronics America, Inc.
QA Lab America
19 Chapin Rd. Building D Pine Brook NJ 07058
Tel: 1-973-808-6375 Fax: 1-973-808-63
IC Notice
The term "IC" before the radio certification number only signifies that Industry Canada technical specifications were met. Operation is subject to the following two conditions:
- This device may not cause interference, and
- This device must accept any interference, including interference that may cause undesired operation of the device.
This Class B digital apparatus complies with Canadian ICES-003.
For products sold in the US and Canadian markets, only channels 1-11 are available. You cannot select any other channels.
IC RADIATION EXPOSURE STATEMENT:
This equipment complies with IC RSS-102 radiation exposure limits set forth for an uncontrolled environment. This equipment should be installed and operated so there is at least 8 inches (20 cm) between the radiator and your body. This device and its antenna(s) must not be colocated or operated in conjunction with any other antenna or transmitter.
SAVE THESE INSTRUCTIONS
13English
Regulatory notice
451663
Open Source Announcement
The software included in this product contains open source software. You may obtain the complete corresponding source code for a period of three years after the last shipment of this product by sending an email to mailto:oss.request@samsung.com.
It is also possible to obtain the complete corresponding source code in a physical medium such as a CD-ROM; a minimal charge will be required.
The following URL http://opensource.samsung.com/opensource/SMART_AT_051/seq/0 leads to the download page of the source code made available and open source license information as related to this product. This offer is valid to anyone in receipt of this information.


NOTE
Hereby, Samsung Electronics, declares that the radio equipment type appliance is in compliance with Directive 2014/53/EU. The full text of the EU declaration of conformity is available at the following internet address: The official Declaration of conformity may be found at http://www.samsung.com, go to Support > Search Product Support and enter the model name.
Wi-Fi max transmitter power : 20 dBm at 2.412 GHz - 2.472 GHz
SAVE THESE INSTRUCTIONS
English14
Installation requirements
Read through the following instructions before installing the dryer and keep this manual for future reference.
WARNING
Certain internal parts are intentionally not grounded and may present a risk of electric shock only during servicing.
Service Personnel - Do not contact the following parts while the appliance is energized: Control board and inlet valve.
Key installation requirements
- A grounded electrical outlet.
- A power cord for electric dryers (except in Canada).
Gas lines (for gas models) that must meet national and local regulations. - An exhaust system made of rigid metal or flexible stiff-walled metal exhaust ducting.
WARNING
Remove the door from all discarded appliances to prevent a child from suffocating.
Location considerations
The dryer should be located where there is enough space at the front for loading the dryer, and enough space behind for the exhaust system. This dryer is factory-ready for the rear exhaust option. To exhaust out the bottom, right or the left, use the accessory exhaust kit. Instructions are included with the kit. Make sure the room in which the dryer is located has enough fresh air. The dryer must be located where there are no air-flow obstructions. For gas dryers, adequate clearance must be maintained as noted on the data plate to ensure adequate air for combustion and the proper dryer operation.
The dryer must not be installed or stored in an area where it will be exposed to water and/or weather. The dryer area must be kept clear of combustible materials, gasoline, and other flammable vapors and liquids. A dryer produces combustible lint. The area around the dryer should be kept lint-free.
Installation requirements
451663
Dimensions
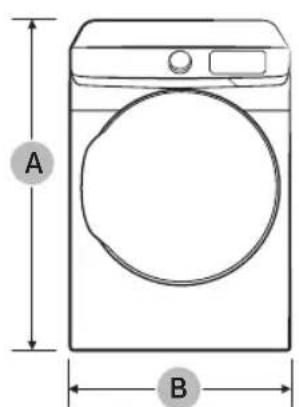
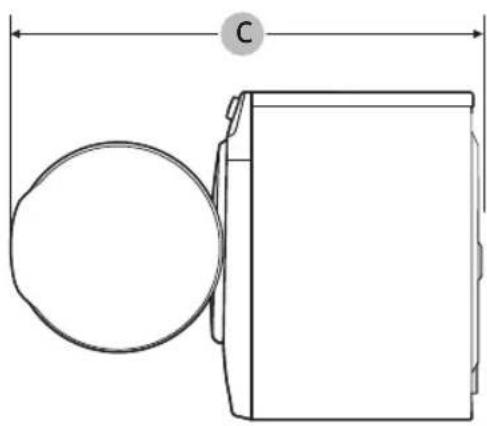
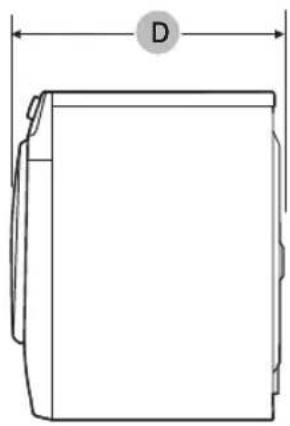
| Type Front loading dryer | ||
| Models DV25B6900E* | ||
| Dimensions (in. (mm)) | A. Overall height 33.5 (850) | |
| B. Width 23.6 (600) | ||
| C. Depth with door open 43.3 (1101) | ||
| D. Depth 25.8 (655) | ||
English16
Clearance requirement
This clearance requirement is applicable for dryers only.

NOTE
- For washer's clearance requirement, see the washer's user manual.
If the washer and dryer have different clearance requirements, use the one with the larger value.
Alcove or closet installations

WARNING
- The dryer must be exhausted to the outside to reduce the risk of fire when installed in an alcove or closet.
- No other fuel-burning appliance should be installed in the same closet as the dryer.
- Place the dryer at least 18 in. (460 mm) above the floor for garage installation.
Minimum clearance for stable operation:
| Sides Top Rear Front | |||
| 1 in. (25 mm) 1 in. (25 mm) | 3 in. (76 mm) 1 in. (25 mm) |
If both the washer and a dryer are installed in the same location, the front of the alcove or closet must have two unobstructed air openings for a combined minimum total area of 72 in. (465cm^2)
Undercounter installation
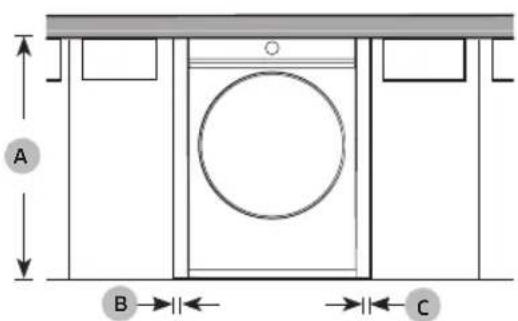
| A 34.4 in. (875 mm) |
| B 1 in. (25 mm) |
| C 1 in. (25 mm) |
Installation requirements
This clearance requirement is applicable for washer and dryer pair installation.
Side by side installation Stacked installation
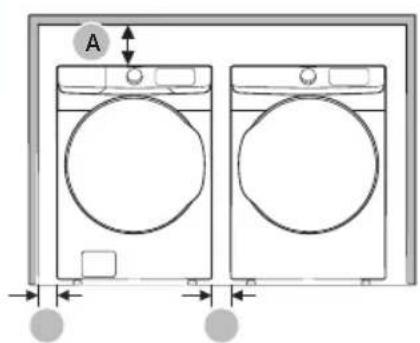
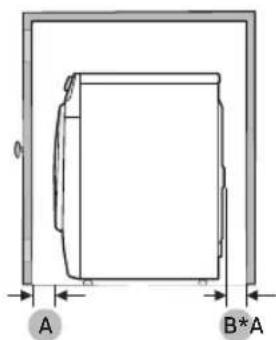
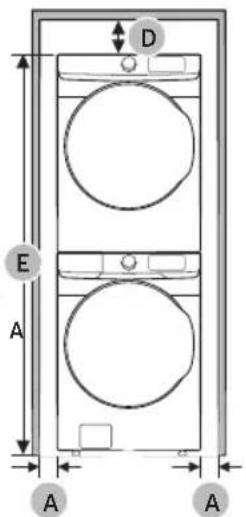
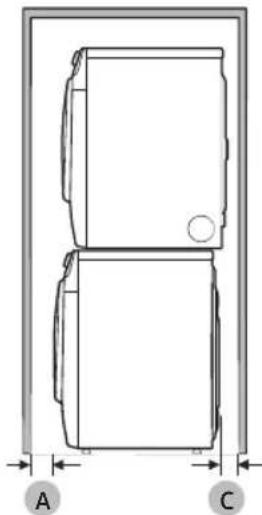
| A 1 in. (25 mm) |
| B* 3 in. (76 mm) |
| C 2 in. (50 mm) |
| D 6 in. (152 mm) |
| E 67 in. (1702 mm) |
(B*): This clearance requirement only applies to the dryer. For washer's clearance requirement, see the washer's user manual.
Minimum space (B^) of 3'' is required for best dryer performance. In case of insufficient space for duct installation, properly sized vent kit is needed.
NOTE
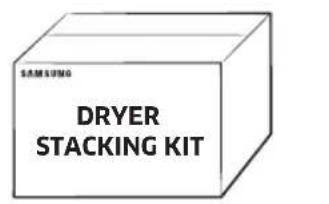
Stacking (SK-DH)
Many of Samsung's washers and dryers can be stacked to maximize usable space. You can purchase an optional stacking kit from your Samsung retailer. For details about stacking and compatible models, refer to the user manual included in the stacking kit you purchase.
English18
Ducting requirements (Not applicable to ventless (heat pump) models)
| Weather hood type | Recommended | Use only for short-run installation |
| 4" (10.2 cm) 2.5" (6.4 cm) | ||
| No. of 90° elbows Rigid Rigid | ||
| 0 80 ft. (24.2 m) 60 ft. (28.3 m) | ||
| 1 60 ft. (28.3 m) 45 ft. (13.7 m) | ||
| 2 45 ft. (13.7 m) 35 ft. (10.7 m) | ||
| 3 35 ft. (10.7 m) 25 ft. (7.0 m) | ||
NOTE
- Use a 4-inch (10.2 cm) diameter rigid aluminum or galvanized steel duct.
If you integrate the dryer's vent system with an existing exhaust system:
- Make sure the exhaust system meets all applicable local, state, and national regulations.
- Verify you are not using flexible plastic duct.
- Make sure to check for and remove all lint buildup from inside the existing ducts.
- Confirm the duct is not kinked or crushed.
- Make sure the exhaust hood damper opens and closes freely.
Manometer measurements
The static pressure in any exhaust system must not exceed 0.83 inches of water column or be less than 0. Note that these values are measured with the dryer running with a manometer presented to the exhaust duct that connects to the dryer. The dryer tumbler must be empty and lint filter clean.
19English
Installation requirements
Exhausting requirements (Not applicable to ventless (heat pump) models)
The dryer must not be exhausted into a chimney, a wall, a ceiling, an attic, a crawl space, or a concealed space of a building. Exhausting the dryer to the outside will prevent large amounts of lint and moisture from being blown into the room.
In the United States and Canada
- All dryers must be exhausted to the outside.
- The required exhaust duct is 4 inches (10.2 cm) in diameter.
- See "Ducting requirements (Not applicable to ventless (heat pump) models)" in the "Installation" section for the maximum duct length and number of bends that can be used.
The total length of flexible metal duct must not exceed 7^10^1 / 2 (2.4 m). - Do not assemble the duct with screws or other fasteners that extend into the duct and catch lint.
- Forthe United States only: Use only those foil-type flexible ducts, if any, specifically identified for use with the appliance by the manufacturer and that comply with the Outline for Clothes Dryer Transition Duct. Use Subject 2158A.
Outside the United States and Canada
Refer to the local codes.
WARNING
- You must exhaust the dryer to the outside to reduce the risk of fire when you install the dryer in an alcove or closet.
- Do not use a plastic or non-metal flexible duct.
- If your existing ductwork is plastic, non-metal, or combustible, replace it with metal.
- Use only a metal exhaust duct that is non-flammable to ensure containment of exhaust air, heat, and lint.
English20
Gas requirements (Not applicable to ventless (heat pump) models)
WARNING
- Use only natural or LP (liquid propane) gases.
- The installation must be conformed with local codes, or in the absence of local codes, with the national fuel gas code, ANSI Z223.1/NFPA 54, latest revision(for the UNITED STATES), or with the natural gas and propane installation code, CSA B149.1(for Canada).
- Gas dryers are equipped with a burner vent for use with natural gas. If you plan to use your dryer with LP (liquid propane) gas, it must be converted for safe and proper performance by a qualified service technician. (LNG models only)
You must check the burner of your model and use the proper LP Kit accordingly. To check the detail information of the burner, open the door and check the rating label location on the door frame. -20,000 BTU: LPKIT-4/XAA (DC98-04114A) -22,000 BTU: LPKIT-3/XAA (DC99-00792A)
- A 1/2'' (1.27 cm) gas supply line is recommended and must be reduced to connect to the 3/8'' (1 cm) gas line on your dryer. The National Fuel Gas Code requires that an accessible, approved manual gas shut-off valve be installed within 6" of your dryer.
Gas dryers installed in residential garages must be raised 18 inches (46 cm) above the floor. - Additionally, a 1/8 (0.3 cm) N.P.T. (National Pipe Thread) plugged tapping, accessible for test gauge connection, must be installed immediately upstream of your dryer's gas supply connection.
- Your dryer must be disconnected from the gas supply pipe system during any pressure testing of the system.
- Do not reuse old flexible metal gas lines. Flexible gas lines must be designed and certified by the standard for connectors for Gas Appliances, ANSI Z21.24 • CSA 6.10.
NOTE
- Your dryer uses an automatic ignition system to ignite the burner. There is no constant burning pilot.
- Any pipe joint compound used must be resistant to the action of any liquefied petroleum gas.
- As a courtesy, most local gas utilities will inspect a gas appliance installation.
Commonwealth of Massachusetts installation instructions
Your dryer must be installed by a licensed plumber or gas fitter. A "T" handle manual gas valve must be installed in the gas supply line to your dryer. If a flexible gas connector is used to install your dryer, the connector can be no longer than 3^ (36").
WARNING
Gas leaks may occur in your system, creating a dangerous situation.
Gas leaks may not be detected by smell alone.
Gas suppliers recommend you purchase and install a UL-approved gas detector.
Install and use in accordance with the manufacturer's instructions.
Installation requirements
Electrical requirements
The wiring diagram is located on the plate under the control panel or rear frame.
WARNING
- Improperly connecting the equipment grounding conductor can result in a risk of electric shock. Check with a qualified electrician or serviceman if you are in doubt as to whether your dryer is properly grounded. Do not modify the plug provided with your dryer – if it doesn't fit the outlet, have a proper outlet installed by a qualified electrician.
- To prevent unnecessary risk of fire, electrical shock, or personal injury, all wiring and grounding must be done in accordance with local codes, or in the absence of local codes, in accordance with the National Electrical Code, ANSI/NFPA No. 70-Latest Revision (for the U.S.) or the Canadian Electrical Code CSA C22.1 - Latest Revisions and local codes and ordinances. It is your responsibility to provide adequate electrical service for your dryer.
- All gas installations must be done in accordance with the national Fuel Code ANSI/Z2231 - Latest Revision (for the U.S.) or CAN/CGA - B149 Installation Codes - Latest Revision (for Canada) and local codes and ordinances.
Grounding
This dryer must be grounded. In the event of a malfunction or breakdown, the ground will reduce the risk of electrical shock by providing a path of least resistance for the electrical current.
Gas models
WARNING
- Your dryer has a cord with an equipment-grounding conductor and a grounding plug. The plug must be plugged into an appropriate outlet that is properly installed and grounded in accordance with all local codes and ordinances.
- Do not modify the plug provided with your dryer – if it doesn't fit the outlet, have a proper outlet installed by a qualified electrician.
- Do not connect the ground wire to plastic plumbing lines, gas lines, or hot water pipes.
Electric models
WARNING
- Your dryer has an optional cord with an equipment-grounding conductor and a grounding plug. This cord is sold separately.
- The plug must be plugged into an appropriate outlet that is properly installed and grounded in accordance with all local codes and ordinances.
- Do not modify the plug provided with your dryer – if it doesn't fit the outlet, have a proper outlet installed by a qualified electrician.
- If a power cord is not used and the electric dryer is to be permanently wired, the dryer must be connected to a permanently grounded metal wiring system, or an equipment grounding conductor must be run with the circuit conductors and connected to the equipment grounding terminal or lead on the dryer.
English22
Electrical connections
Before operating or testing, follow all grounding instructions in the "Grounding" section. An individual branch (or separate) circuit serving only your dryer is recommended.
Do not use an extension cord.
Gas models - U.S. and Canada
A 120 volt, 60Hz AC approved electrical service with a 15-ampere fuse or circuit breaker is required.
Electric models - U.S. only
Most U.S. dryers require a 120/240 volt, 60 Hz AC approved electrical service. Some require 120/208 volt, 60 Hz approved electrical service. The electric service requirements can be found on the data label located behind the door. A 30-ampere fuse or circuit breaker on both sides of the line is required.
- If a power cord is used, the cord should be plugged into a 30-ampere receptacle.
- The power cord is not provided with U.S. electric model dryers. This cord is sold separately.
Risk of Electric Shock
WARNING
- When local codes allow, you can connect the dryer's electrical supply with a new power supply cord kit, marked for use with a dryer, that is U.L. listed and rated at a minimum of 120/240 volts, 30-amperes with three No. 10 copper wire conductors terminated with closed loop terminals, open-end spade lugs with turned up ends, or with tinned leads.
- Do not reuse a power supply cord from an old dryer. The power cord electric supply wiring must be supported at the dryer cabinet by a suitable UL-listed strain relief.
- Grounding through the neutral conductor is prohibited for (1) new branch-circuit installations, (2) mobile homes, (3) recreational vehicles, and (4) areas where local codes prohibit grounding through the neutral conductor. (Use a 4-prong plug for a 4 wire receptacle, NEMA type 14-30R.)
Electric models - Canada Only
A 120 / 240 volt, 60 Hz AC approved electrical service fused through a 30-ampere fuse or circuit breaker on both sides of the line is required.
NOTE
All Canadian models are shipped with the power cord attached. The power cord should be plugged into a 30-ampere receptacle. In Canada, you may convert a dryer to 120/208 volts.
Installation
4s16e3
This dryer must be installed by a qualified technician. The installer is responsible for connecting the dryer to the main power while observing the relevant safety regulations of your area.
What's included
Make sure all the parts are included in the product package. If you have a problem with the dryer or the parts, contact a local Samsung customer center or the retailer.
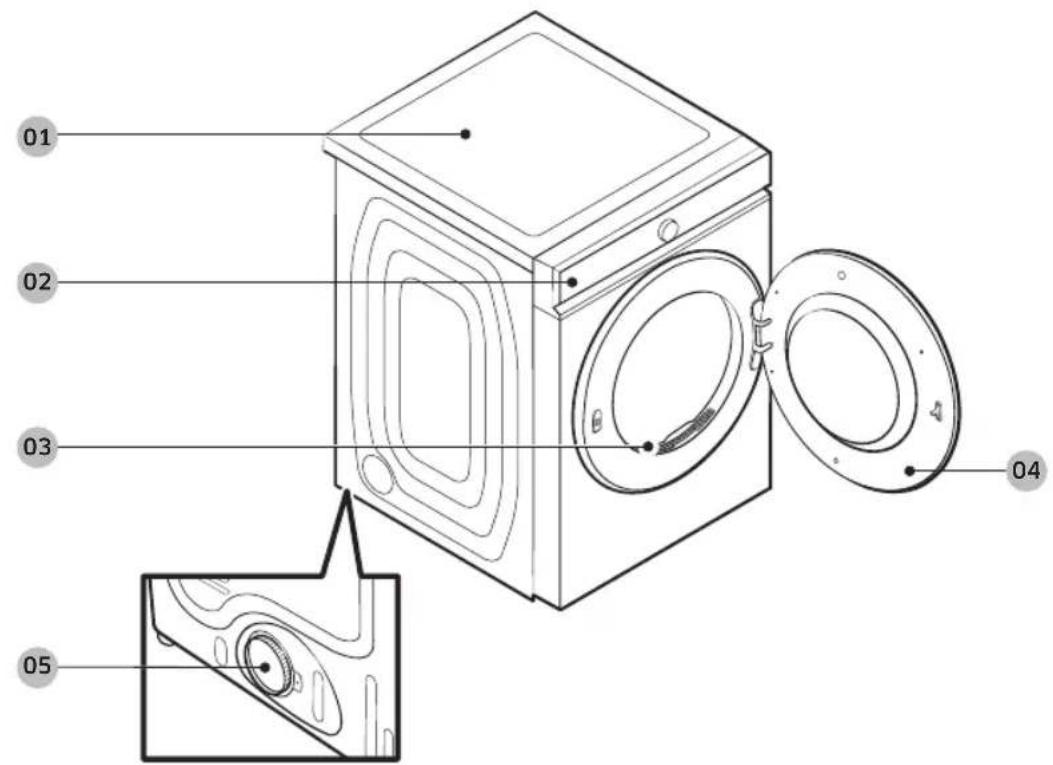
01 Worktop
02 Control panel
03Lint filter
04 Door 05 Exhaust duct
English24
Provided accessories
Stacking Kit (Canadian models only)
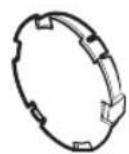
Cover Plate
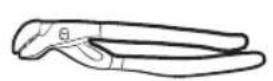
Tools needed for installation
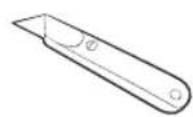
Pliers Cutting knife Pipe wrench
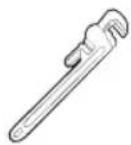
(gas models only)
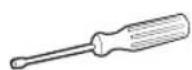
Nut screwdriver


Level Phillips screwdriver Duct tape Wrench
LPG-safe compound or Teflon Tape (for gas installation)
WARNING
Packing materials can be dangerous to children. Keep all packing materials (plastic bags, polystyrene, etc.) out of children's reach.
Installation
Step-by-step installation
Make sure you have a qualified technician install the dryer. Step by step installation instructions start below.
- Do not remove the protective film on the door before completing the product installation. If you remove the protective film before the installation is complete, the door may get scratched or damaged during installation.
- Make sure the installation location allows enough space for the dryer door to be fully open.
STEP 1 Install the exhaust system
- Select a location and move the dryer to the site. For easy access, we recommend you install the dryer in the same location as your washer.
- To change the door direction, see "Switching the door position" on page 37.
- Install the exhaust system as instructed in the "Exhaust ducting guide" section.
CAUTION
Before installing your dryer, remove the packing in the duct.
NOTE
- To move the dryer easily, lay two of the carton cushions from the packaging on the floor. Tip the dryer on its side so it lies across both cushion-tops. Push the dryer so that it is near its final location, and then set the dryer upright.
- Secure room around the dryer to facilitate ducting and wiring.
STEP 2 Connect the gas line (for gas models)
Before connecting the gas line, make sure you have read the "Gas requirements (Not applicable to ventless (heat pump) models)" section on page 21.
- Remove the protective cap from the gas pipe.
- Apply an LPG (Liquefied Petroleum Gas)-safe compound or 1.5 wraps of Teflon tape to all threaded connections.
- Connect the gas supply to the dryer. An additional fitting is required to connect the ^3/4 (1.9 cm) female thread end of a flexible connector to the ^3/8 (1 cm) male threaded end on the dryer. Tighten up the fitting over all threads.
- Turn on the gas supply, and check for any leaks using a soap solution. If a leak is found, tighten the connections and try again. Do not use an open flame to check for gas leaks.
English26
STEP 3 Connect the electrical wiring (for electric models)
Before connecting the electrical wiring, make sure you have read the "Electrical requirements" section on page 22.
3-wire system
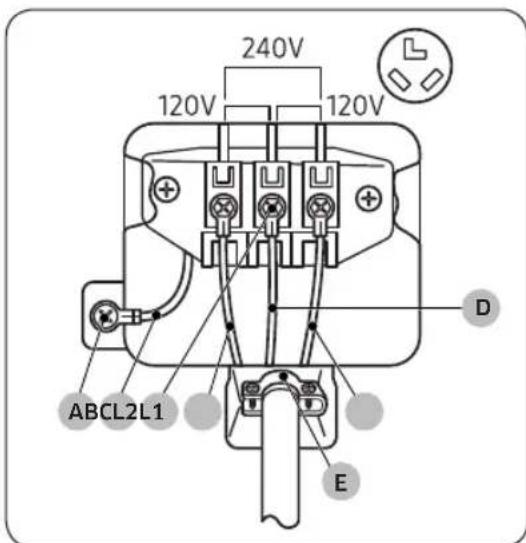
A. External ground connector
B. Neutral grounding wire (white)
C. Center silver-colored terminal block screw
D. Neutral wire (white or center wire)
E. 3 / 4'' (1.9 cm) UL-listed strain relief
- Loosen or remove the screws from the center terminal block.
- Connect the neutral wire (white or center wire) of the power cable to the center, silver-colored terminal screw of the terminal block. Tighten the screws.
- Connect the other wires to outer terminal block screws. Tighten the screws.
- Tighten the strain relief screws.
- Insert the terminal block cover into the rear panel of the dryer. Then, secure the cover with a hold-down screw.
CAUTION
- To convert from the 4-wire system to 3-wire system, connect the ground strap to the terminal block support to ground the dryer frame to the neutral conductor.
- Ring-type terminals are recommended. If using strap terminals, make sure they are tightened.
- Connect the power cord and check L1/L2/D (N) voltage. If the voltage is low, it may not heat properly. Review the "Electrical requirements" section on page 22 if needed.
Installation
4516u3
4-wire system
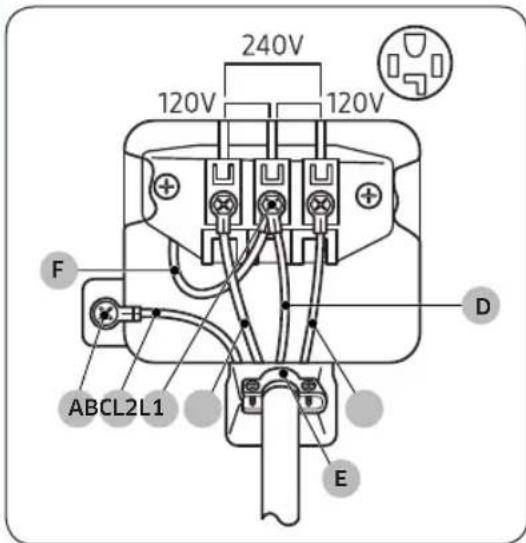
A. External ground connector
B. Neutral grounding wire (white)
C. Center silver-colored terminal block screw
D. Neutral wire (white or center wire)
E. 3 / 4'' (1.9 cm) UL-listed strain relief
F. Neutral wire (white or center wire)
- Remove the external ground connector's screw and connect the ground wire (green or unwrapped) of the power cable to the screw.

CAUTION
-To connect the ground wire to the neutral position without through contact A (cabinet ground), contact a technician. This is not user serviceable. Ring-type terminals are recommended. If using strap terminals, make sure they are tightened.
- Loosen or remove the screws from the center terminal block.
- Connect the neutral wire (white or center wire) and ground wire (white) to the center screw of the terminal block. Tighten the screw.
- Connect the other wires to the outer terminal block screws. Tighten the screws.
- Tighten the strain relief screws.
- Insert the tab of the terminal block cover into the rear slot of the dryer. Secure the cover with a hold-down screw.

CAUTION
Connect the power cord and check L1/L2/D (N) voltage. If the voltage is low, it may not heat properly. Review the "Electrical requirements" section on page 22 if needed.

WARNING
- All U.S. models are designed for a 3-wire system connection. The dryer frame is grounded to the neutral conductor at the terminal block. A 4-wire system connection is required for new or remodeled construction, mobile homes, or if local codes do not permit grounding through neutral. If you use the 4-wire system, you cannot ground the dryer frame to the neutral conductor at the terminal block.
- Remove the terminal block cover plate. Insert the power cord with a UL-listed strain relief through the hole provided in the cabinet near the terminal block.
- A strain relief must be used. Do not loosen the nuts already installed on the terminal block. Be sure they are tight. Use a ^3/_8 " (1 cm) deep well socket.
- Since january 1, 1996, the national electric code requires that new wiring (not existing) utilize a 4-wire connection to this dryer.
English28

STEP 4 Level the dryer
To ensure optimal performance, the dryer must be level.

Using a level (A), check if the dryer is level side to side and then front to back. If the dryer is not level, turn the leveling feet (B) clockwise to lower the dryer or counterclockwise to raise the dryer.
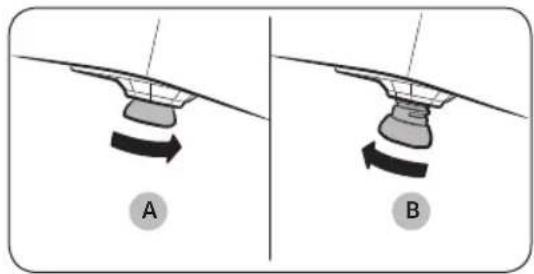
NOTE
- To set the dryer to the same height as your washer, fully retract (A) the leveling feet by turning them counterclockwise, then loosen (B) the feet by turning them clockwise. Once the dryer is the same height as the washer, follow the directions above to level the dryer.
- Adjust the leveling feet only as much as necessary to level the dryer. Extending the leveling feet more than necessary can cause the dryer to vibrate.
Installation
STEP 5 Power on (for gas models)
Make sure all gas connections, the exhaust line, and all wiring is connected correctly. Then, plug the power cord into a power source and check the dryer's installation and operation using the final checklist in Step 7 below.
STEP 6 Final Check
When installation is complete, confirm that:
- The dryer is plugged into an electrical outlet and grounded properly.
- The exhaust ductwork is connected, and the joints are taped.
- You have used rigid or stiff-walled flexible metal duct material, not plastic flexible duct.
- The dryer is level and is sitting firmly on the floor.
- The dryer starts, runs, heats, and shuts off properly.
- The gas is supplied properly with no leaks (For gas models only).
CAUTION
The burner may not ignite initially due to air in the gas line. Allowing your dryer to operate on a heat setting will purge the line. If the gas does not ignite within 5 minutes, turn your dryer off and wait 5 minutes. Be sure the gas supply to your dryer has been turned on. To confirm gas ignition, check the exhaust for heat.
Exhaust ducting guide (Not applicable to ventless (heat pump) models)
Ducting
- Make sure the dryer is installed properly so the air exhausts freely.
- Use 4-inch rigid metal ducts. Tape all joints including the dryer connection. Never use lint-trapping screws.
- To facilitate the exhaust, keep the ducts as straight as possible.
Cleaning
Clean all old ducts before installing the dryer, and make sure the vent flap opens and closes freely. We recommend that you to clean the exhaust system annually or on a regular basis.
WARNING
- To prevent fire, do not use plastic, thin-foil, or non-metal flexible ducts of any kind.
- Do not use a poor exhaust system because it slows down the dryer's performance.
- Do not use excessively long ducts that have multiple elbows.
- Do not use crushed or clogged venting or ducts.
English30
Changing the direction of the exhaust duct (optional)
WARNING
Before performing this exhaust installation, disconnect the dryer from its electrical supply. Wear gloves to protect your hands and arms from sharp edges when working inside the cabinet.
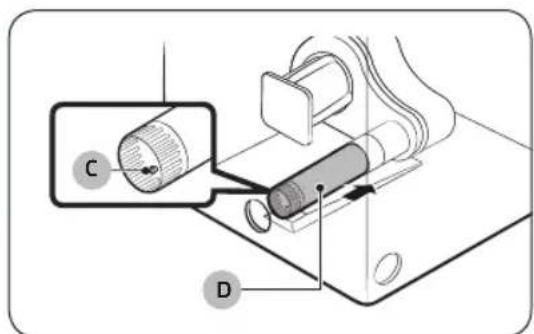
Side venting
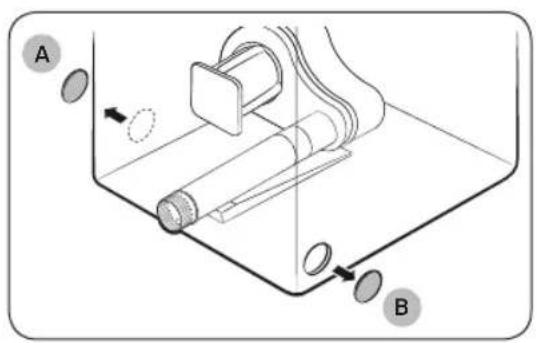
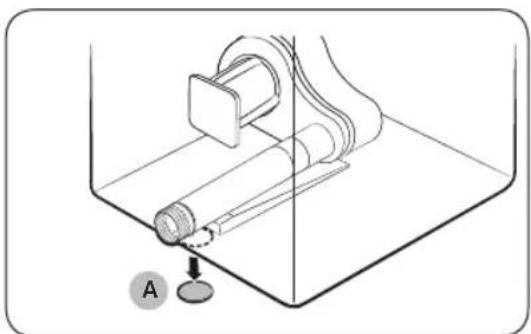
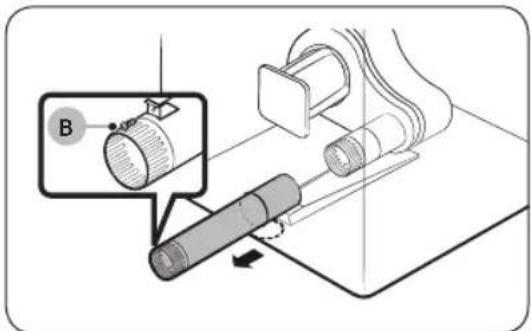
- Detach the right (A) or left (B) side knockout as desired.
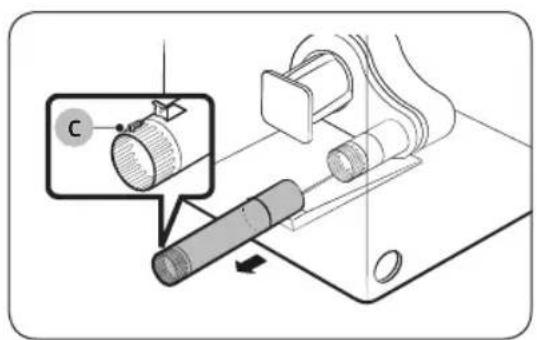
- Pull the duct out of the dryer, and then remove the screw(C) from the duct. Set screw(C) aside. You will need it in a later step.
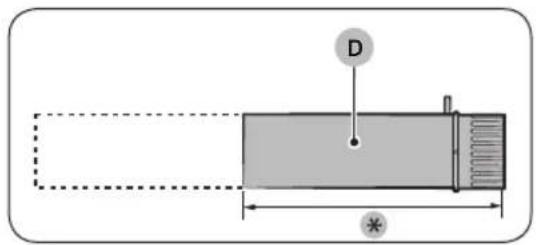
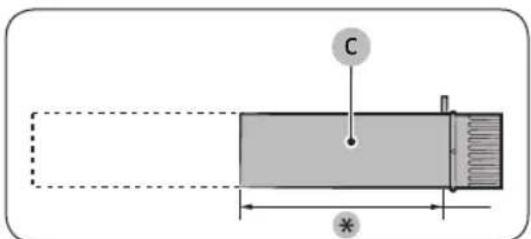
- Cut the duct as shown and keep the cut portion of the duct (D).
*: 4.9" (125 mm)
Installation
4516u3
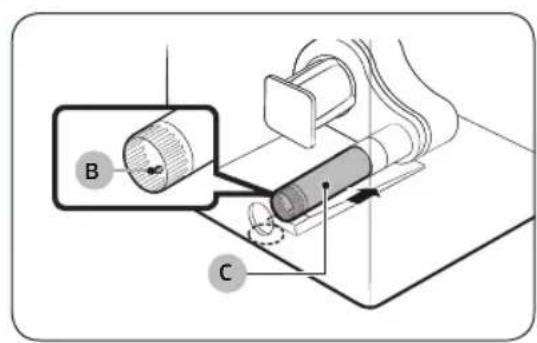
- Reconnect the cut portion of the duct (D), and then fasten it to the ramp on the appliance base with the screw (C) which you set aside in Step 2.

- Connect a duct to an elbow, and then tape the duct and the elbow together with duct tape.
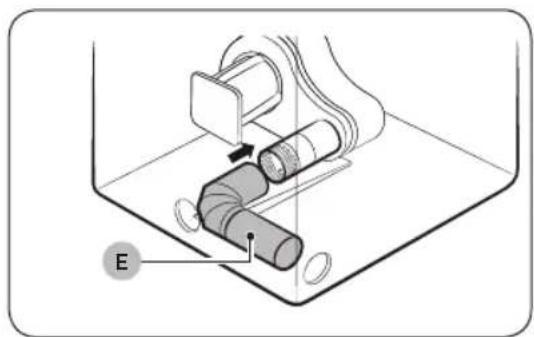
- Insert the duct with elbow (E) through the rear opening, and then connect it to the internal duct.
CAUTION
Wire components in the dryer may interfere slightly with the duct. Do not pull or damage the electrical wires inside the dryer when inserting the duct.
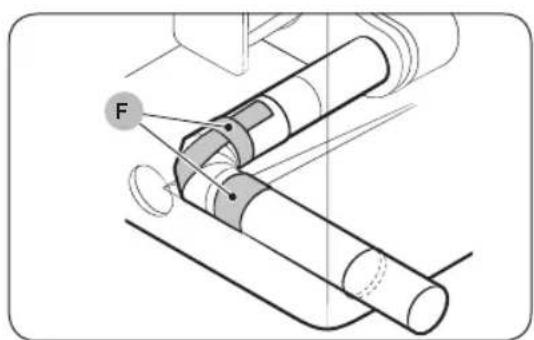
- Apply duct tape (F) on all joints as shown.
CAUTION
All joints must be secured with duct tape, otherwise, they may separate and cause a safety hazard.
English32
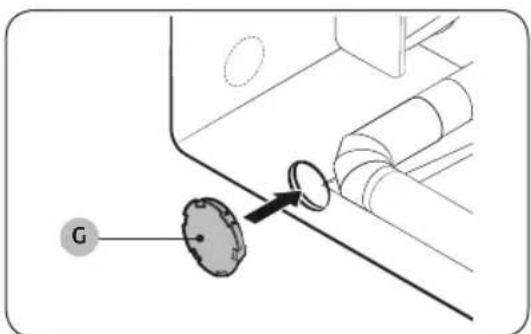
- Cover the back opening with a cover plate (G).
WARNING
Never leave the back opening uncovered. It must be covered with a cover plate.
Bottom venting
- Detach the bottom knockout (A).
- Pull the duct out of the dryer, and then remove the screw(B) from the duct. Set screw(B) aside. You will need it in a later step.
- Cut the duct as shown and keep the cut portion of the duct (C).
*: 4.9" (125 mm)
Installation
451663
- Reconnect the cut portion of the duct (C), and then fasten it to the ramp on the appliance base with the screw (B) which you set aside in Step 2.
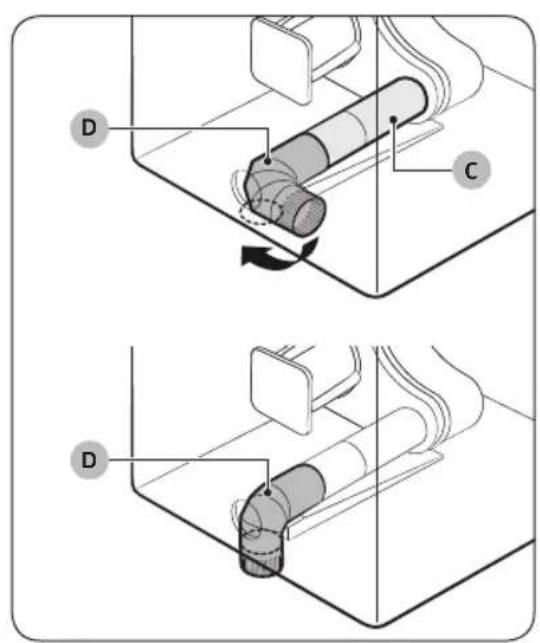
- Insert the elbow (D) through the rear hole and connect it to the duct (C).
- Rotate the elbow(D) through the bottom opening.
CAUTION
Do not to pull or damage the electrical wires inside the dryer when inserting the duct.
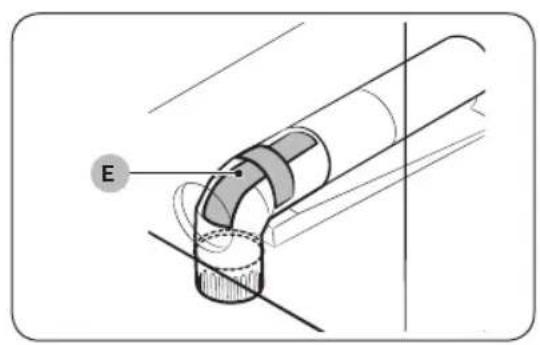
- Apply duct tape (E) on the joint as shown.
CAUTION
All joints must be secured with duct tape, otherwise, they may separate and cause a safety hazard.
English34
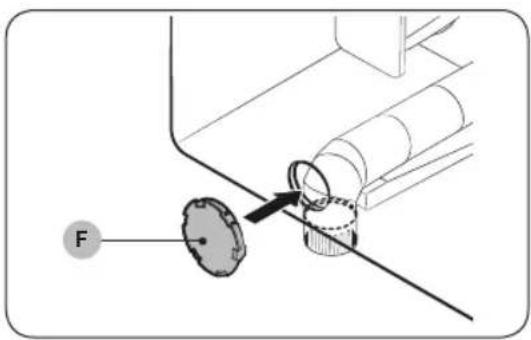
- Cover the back opening with a cover plate (F).
WARNING
Never leave the back opening uncovered. It must be covered with a cover plate.
Vent blockage test
After the dryer is installed, run the Vent Blockage Test function to check if the duct system is properly installed. Vent Blockage Test automatically detects the status of the ducts and reports any blockage or problems. Proper ducting can reduce drying time and save energy.
NOTE
The Vent Blockage Test function must run when the dryer is cool. If the dryer warms up after the installation check, run the Air Fluff cycle for several minutes to reduce its internal temperature.
Running the vent blockage test
- Make sure the drum is empty, and then close the door. (If there are any clothes or other items in the drum, the test will not give accurate results.)
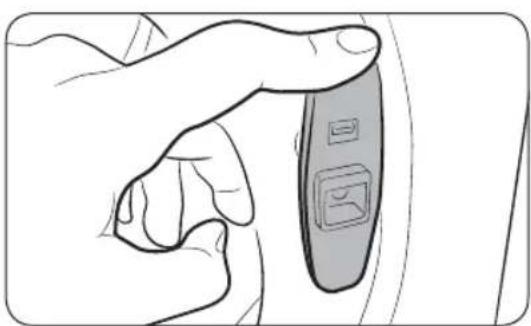
- Tap to turn the dryer on, then simultaneously tap and hold Options for 3 seconds.
- Turn the Navigation dial to select Vent Blockage Test, and then tap OK. Vent Blockage Test starts immediately.
The test takes about 2 minutes and "Testing..." is displayed during the test.
CAUTION
Do not open the door during the test.
NOTE
If you have started other procedures before running Vent Blockage Test, the dryer will not enter the Vent Blockage Test mode.
- After 2 minutes, when the test is complete, the results are displayed and the dryer sounds a tone. If status of the duct system is normal, an alarm triggers with the "No problems detected" message. If the duct system cannot exhaust properly, the check code appears, and the dryer sounds an alarm tone. For description about the code, see the "Installation check codes" section on page 36.
If there are any other problems, an information code appears in the display. For description about the code, see the "Information codes" section on page 62.
- To stop or cancel Vent Blockage Test, tap to turn off your dryer.
Installation
The results remain on the display for about 5 minutes and then automatically turn off. You can turn the results off immediately by tapping

NOTE
- During or after the test, the internal drum is hot. Use caution to prevent burns. The Vent Blockage Test function is used to check for problems in the current duct system when the dryer is installed for the first time.
- If the test result displays check code (the duct system is blocked), refer to the "Ducting requirements (Not applicable to ventless (heat pump) models)" section on page 19 and the "Exhaust ducting guide" section below, and then take proper measures to correct any problems. If the test is suspended, it could result in incorrect results. Follow the proper procedures when testing the dryer.
- Even if the test result is normal ("No problems detected"), the duct system could be blocked slightly. Properly install all duct work according to the installation instructions in this manual.
Installation check codes
| Check code Meaning Solution | ||
| No problems detected | Vent condition is good. | |
| Vent is nearly clogged | Over 80 % of the vent is clogged. (This may lead to poor drying performance or cause malfunction) | 1. Clean the lint filter. 2. Check your vent condition. (Refer to the “Ducting requirements (Not applicable toventless(heat pump) models)” section) * You must take measures (such as cleaning) through expert personnel. |
| Leave the dryer at room temperature | The internal temperature of the dryer is too low (below 32 °F (0 °C)) or too high (over 104 °F (40 °C)) and therefore vent blockage cannot be detected. | Leave the dryer at room temperature (41~95 °F (5~35 °C)) for an hour and check again. |
| Items detected in the drum | Unit is detecting items inside the drum or there is an error on the dry sensor. | Remove items from the drum and check again. If the problem continues, contact a service center. |

NOTE
For other information codes, see the "Troubleshooting" section on page 62.
English36
Exhaust ducting guide
Ducting
- Make sure the dryer is installed properly so the air exhausts freely.
- Use 4-inch rigid metal ducts. Tape all joints including the dryer connection. Never use lint-trapping screws.
- To facilitate the exhaust, keep the ducts as straight as possible.
Cleaning
Clean all old ducts before installing the dryer, and make sure the vent flap opens and closes freely. We recommend that you clean the exhaust system annually or on a regular basis.

WARNING
- To prevent fire, do not use plastic, thin-foil, or non-metal flexible ducts of any kind.
- Do not use a poor exhaust system because it slows down the dryer's performance.
- Do not use excessively long ducts that have multiple elbows.
- Do not use crushed or clogged venting or ducts.
Switching the door position
To reverse the direction of the door, we recommend that you contact a qualified technician.
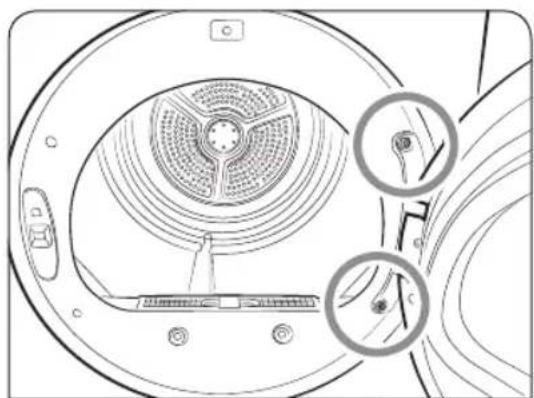
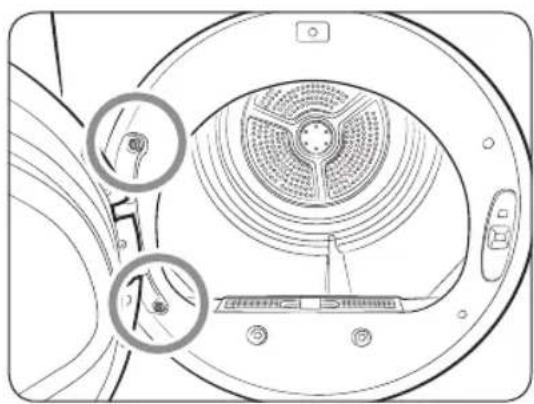
- Unplug the power cord of the dryer.
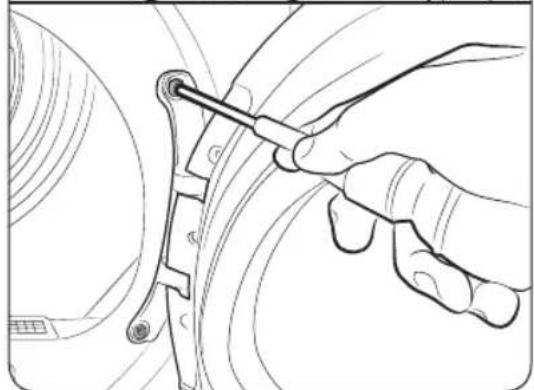
- Remove the two hinge screws from the door, and then remove the door by lifting it up slightly.
Installation
4516u3
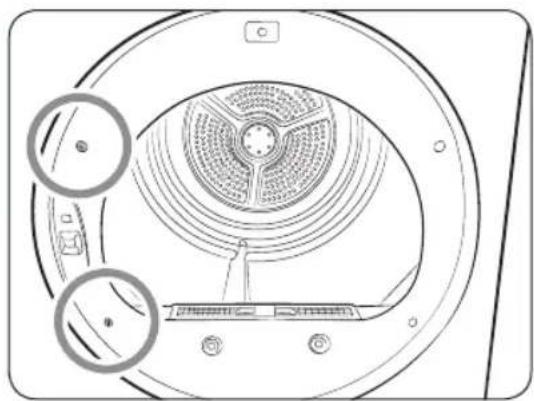
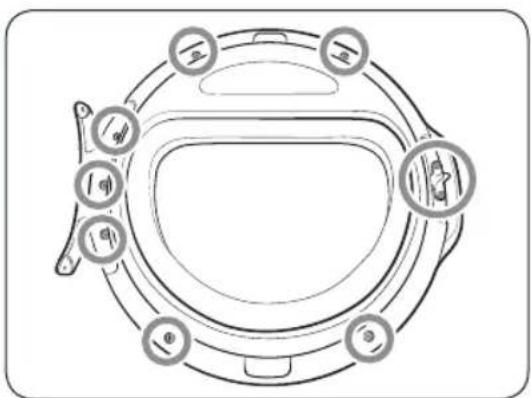
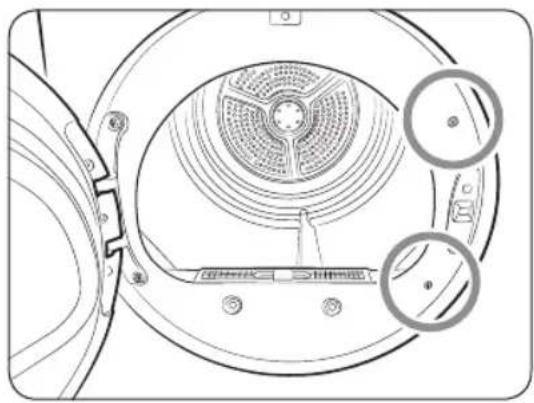
- Remove the two screws on the opposite side of the door hinge.
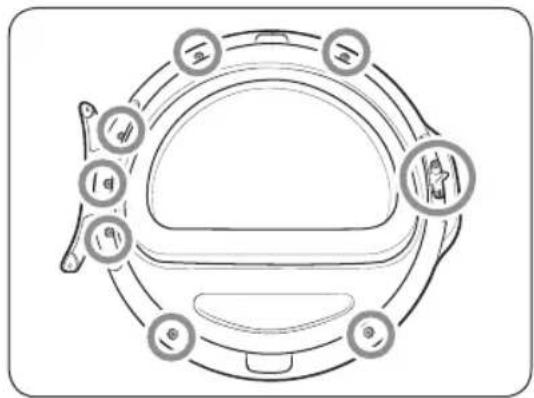
- Locate and remove the 9 screws from the door as shown.
- Remove the door lever.
English38

- Remove the door frame.
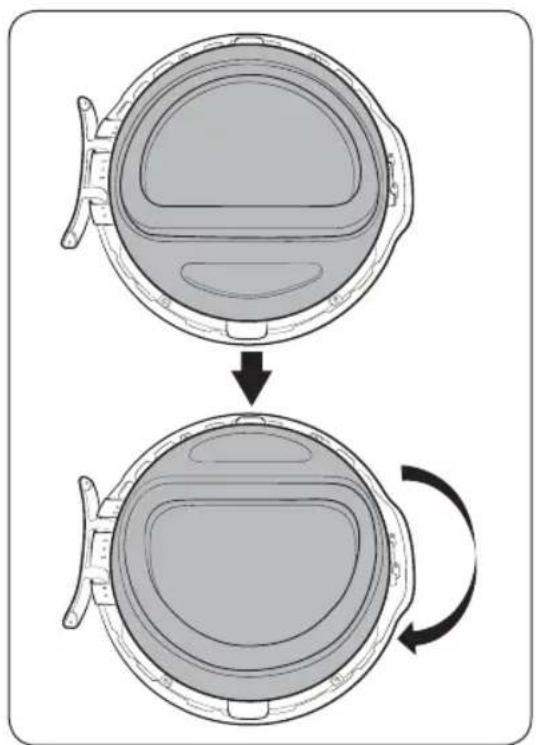
- Rotate the door glass 180^ .
Installation
4516u3
- Reassemble the door frame and the door lever.
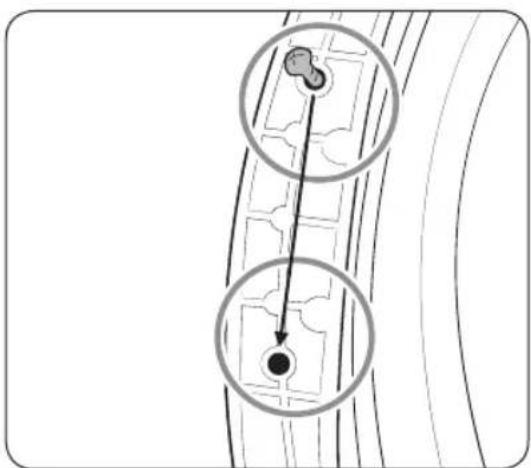
- Move the location of the screw, used to fix the door hinge, as shown.
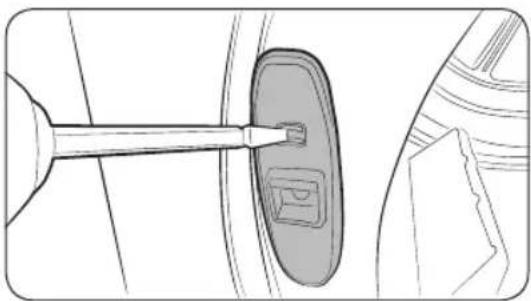
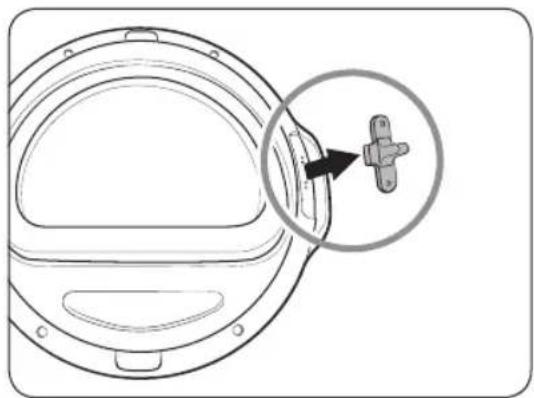
- Remove the lever cover by pressing the hook on it.
English40
- Put the lever holder on the other side as shown.
- Insert and tighten the two hinge screws.
- Insert and tighten the two screws on the opposite side of the door hinge.
Before you start
Here are a few things you should know before starting your dryer.
Initial setup
- When you turn on your dryer for the first time, the screen shows the initial setup process. Follow the on-screen instructions to complete it.
- If you complete the initial setup and operate a cycle for more than a minute, the initial setup will not appear again.
- The initial setup includes language selection and a brief tutorial.
- When tapping a button, tap exactly over the text.
- Operating the washing machine and dryer at the same time may result in a loss of power depending on where they are installed and your electrical power status.
| 01 Language selection 02 Welcome screen | |
| A® English(US) O Espanol Turn dial & Tap OK | Welcome! |
| 03 Tutorial | |
| Let's explore your new dryer! [Tap OK to skip] [Tap OK to skip] | Turn the dial to explore cycles |
| Now hold to start a cycle [Tap OK to skip] | Options Tap to see options [Tap OK to skip] |
| Try saving favorites in My Cycles | A dryer that knows you! All Done! |
English42
Sort and load
- Put one wash load in the dryer at a time.
- Do not mix heavy and lightweight items together.
- To improve drying efficiency for one or two items, add a dry towel to the load.
- For best results, untangle items before inserting them into the dryer. Tangled items may degrade the drying efficiency or cause the door to open.
- Overloading reduces the tumbling action, resulting in uneven drying and wrinkling.
- Unless recommended on the care label, do not dry woolens or fiberglass items.
- Avoid drying unwashed items.
- Do not dry items soiled with oil, alcohol, gasoline, etc.
Functional prerequisite
Lint filter
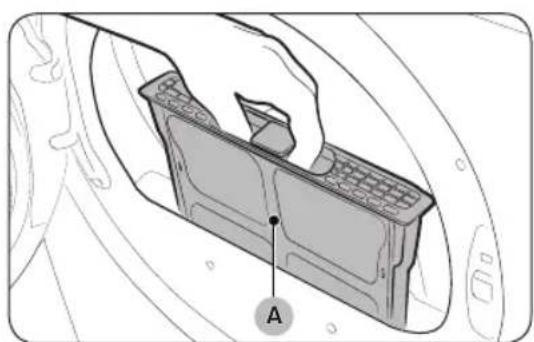
To prevent a risk of fire, make sure to clean the lint filter before or after every load.
- Turn off the dryer.
- Open the door and pull out the lint filter(A) from inside the drum.
- Open the lint filter by separating it at the top. Remove the lint, and then clean the lint filter.
- Close the lint filter, reinsert the lint filter into the dryer, and then close the dryer door.
CAUTION
- Do not operate the dryer without the lint filter in place.
- Do not use a damaged or broken lint filter. This may reduce performance and/or cause fire.
Operations
WARNING
To reduce the risk of fire, electric shock, or injury, read the "Safety information" before operating this appliance.
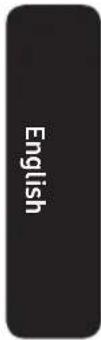
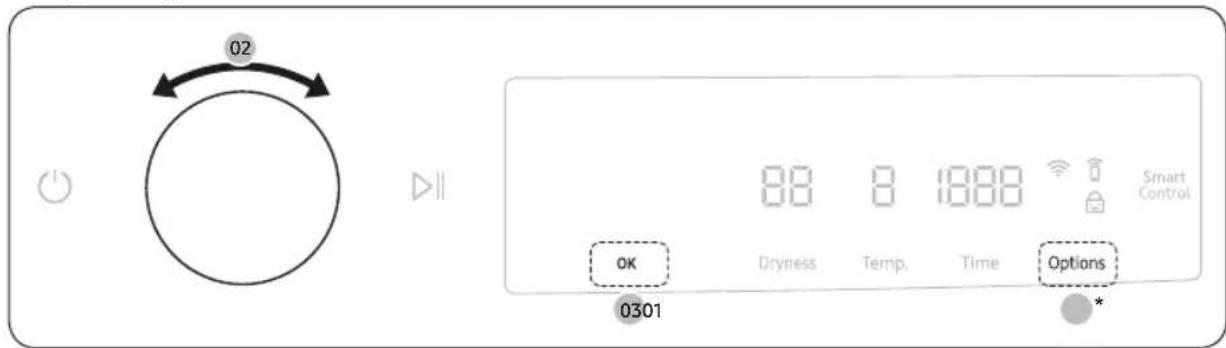
Control panel
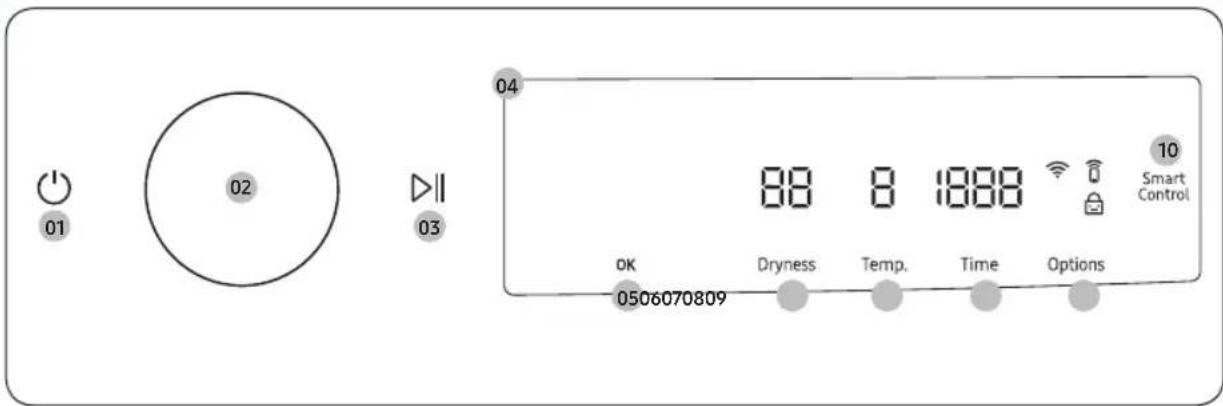
| 01 Power | Tap to turn the dryer on or off. ·If you do not manipulate the control panel for 10 minutes after the dryer is turned on, the dryer automatically turns off. ·The dryer automatically turns off when the drying completes. CAUTION Do not tap to turn the dryer off while the drying is in progress. Tap and hold to pause the cycle first, and then tap to turn the dryer off. |
| 02 Navigation dial | Turn the Navigation dial left or right to navigate through cycles and functions. When you turn the Navigation dial, the display shows your selection (such as cycle, additional features, and settings). |
| 03 Start/Pause | Tap and hold to start or pause an operation. |
| 04 Display | The display shows the current cycle, estimated time remaining, cycle options, and other useful or alert messages. |
| 05 OK Tap to confirm | your selection of function or setting. |
| 06 Dryness | Tap to change the dry level for the selected cycle. You can select from level 1 to 5, but available level depends on the selected cycle. ·4 or 5: Suitable for large and thick items. ·3: Standard drying level. ·2: The Damp dry level is designed to partially dry items. Use for items that lay flat or hang to dry. ·1: Gently dries items to protect fabric. Suitable for delicate items or items you want to naturally dry (by hanging or laying flat on drying rack) while they are damp. |
English44
| 07 Temp. | Temperature can only be adjusted in Time Dry cycle. Tap to change the temperature of the current cycle. |
| 08 Time | Tap to select the cycle time for Small Load, Time Dry, Air Fluff or Wrinkle Away. You can set the drying time between 10 minutes and 90 minutes. Available drying time depend on the selected cycle. |
| 09 Options | • Tap to enter the Options menu. • Tap and hold for 3 seconds to enter the Settings menu. |
| 10 Smart Control (Electric models only) | After connecting the Tumble Dryer to your home network using the SmartThings app, you can control or monitor the dryer remotely. When started, the Smart Control (Smart Monitor) indicator turns on. The dryer enters waiting mode and waits for remote commands. |
Icon description
| Wi-Fi This icon indicates that the dryer is connected to Wi-Fi. | |
| Smart Control | This icon indicates that Smart Control is on. For more information on “Smart Control”, see page 53. |
| Child Lock | This icon indicates that Child Lock is on. For more information on “Child Lock”, see page 50. |
45English
Operations
451663
Operating a cycle
- Tap turn on the dryer.
- Turn the Navigation dial to select the cycle you want. For more information on "Cycle overview", see page 47.
- Tap Dryness, Temp., or Time to change the default cycle settings.
- Tap Options, and then turn the Navigation dial to select additional function. For more information on "Options", see page 48.
- Tap OK to change the settings for selected additional function. Not all cycles have additional features available.
- Tap and hold to start operation. Once you set the cycle you want, the screen displays a brief cycle description, and cycle time. You can also check the cycle progress, remaining cycle time, and information codes.
English46
Cycle overview
NOTE
Other cycles can be used after adding them to your cycle list using the My Cycles function. For more information, see the "My Cycles" section on page 49.
| Cycle Description | |
| Normal For most fabrics | including cottons and linens. |
| Time Dry You can specify | a cycle time by a 10-minute unit. |
| Heavy Duty | For drying items made out of heavy fabrics, such as jeans, corduroys, or work clothes, with high temperature heat. |
| Mixed Load For mixed loads | consisting of cotton and synthetic fabrics. |
| Small Load | Timed cycle for small load items. The default cycle time is 30 minutes. However, you may manually change the cycle time if necessary. |
| Delicates For heat-sensitive | items at a low drying temperature. |
| Sanitize | Use to sanitize items by applying high-temperature heat to the fabric. This cycle can make items soft and reduce smells. |
| Wrinkle Release | The Wrinkle Release cycle will release wrinkles from items that are clean, dry, and only slightly wrinkled, such as clothes from a crowded closet, suitcase or items that have been in the dryer too long after the cycle has ended. Wrinkle Release can be used with any temperature selection. |
| Towels Use to dry loads | such as bath towels. |
| Activewear | For exercise wear and outdoor wear such as sports jackets, training pants, water-repellent jackets, and other performance clothing. Thick fabrics like a zipper or velcro closure of a jacket, or training socks may not be completely dried. |
| Denim | Use a stepped drying temperature for removing moisture of Jeans and denims. |
| Shirts Use to quickly dry | few items such as a shirt. |
| Wool | For machine washable and tumble dryable wool only. For best results, turn laundry inside out before drying. |
| Perm Press | Dry wrinkle-free cottons, synthetic fabrics, knits, and permanent press fabrics automatically. |
| Air Fluff Tumbles the load | in room temperature air. |
Operations
4516u3
Options
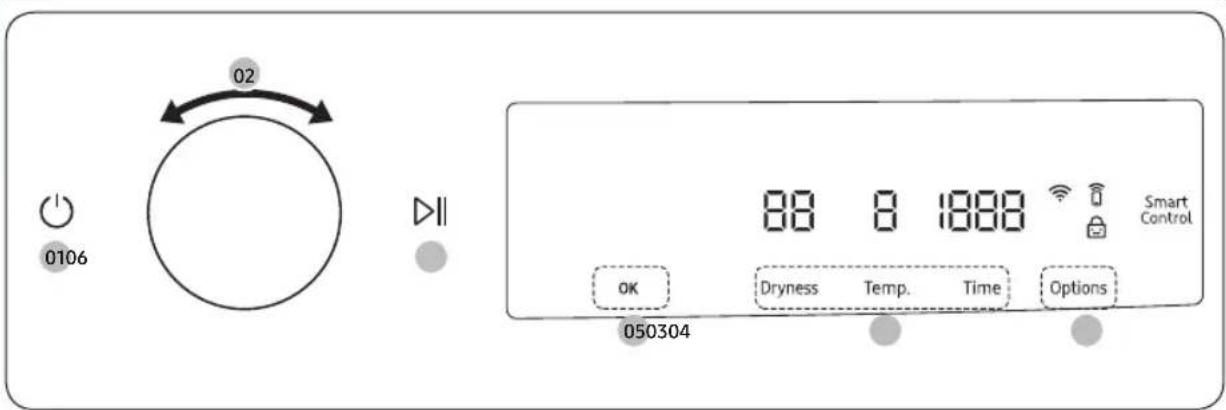
Using Options
- Tap Options.
- Turn the Navigation dial to select the desired additional function.
- Tap OK to change the selected function's settings or start the function.
NOTE
To return to the main screen, tap Options again or turn the Navigation dial to select Back and tap OK.
- If the selected function is not supported, the "Currently not supported" message is displayed, and the OK button is not activated.
- When you select an additional function, a brief help message appears for the first ten times of use.
- If you do not manipulate the control panel for 7 seconds after entering the Options menu, the display returns to the main screen.
Wrinkle Prevent
Reduces wrinkles by rotating the drum intermittently after completing the dry cycle. Wrinkle Prevent provides approximately 180 minutes. The load is dry and can be removed at any time during the Wrinkle Prevent cycle.
- Tap Options.
- Turn the Navigation dial to select Wrinkle Prevent, and then tap OK.
- Tap OK to select On or Off.
English48
Damp Alert
This function alerts you when shirts and other items that require ironing are dry enough to be suitable for ironing.
-
Select a cycle and change the cycle settings as necessary.
-
This function is available for Normal, Heavy Duty, Mixed Load, Delicates, Shirts, Perm Press, Towels and Denim with Dryness set to 2-5.
-
Tap Options.
- Turn the Navigation dial to select Damp Alert, and then tap OK.
- Tap OK to select On or Off.
Alarm during drying:
- Tap and hold pause the cycle.
- Open the door and take out the items you want to iron.
- Close the door, and then tap and hold dry the remaining items.
My Cycles
Add or remove cycles to create a personal cycle list.
- Tap Options.
-
Turn the Navigation dial to select My Cycles, and then tap OK.
-
You can only edit a cycle to create a personal cycle when the dryer is not operating.
-
Turn the Navigation dial to select a desired cycle.
- Tap OK to add or remove the selected cycle. -Addition and removal of a cycle is saved automatically.
- Tap Options or select Back to finish My Cycles setting.
NOTE
The Normal cycle cannot be removed from the cycles list.
Drum Light
You can turn the drum light on or off.
- Tap Options.
- Turn the Navigation dial to select Drum Light, and then tap OK.
- Tap OK to select On or Off.
The drum light turns on even when the dryer is off. (If the dryer is plugged into a power outlet.)
When the dryer door opens, the drum light automatically turns on and automatically turns off after 2 minutes.
Operations
Child Lock
To prevent children or infants from accidentally starting or setting the dryer, Child Lock locks all buttons except for and Options.
- Close the door.
- Tap Options.
- Turn the Navigation dial to select Child Lock, and then tap OK.
- Tap OK to select On or Off.
The Child Lock icon turns on when the function is on.
You cannot turn on Child Lock with the door open. If you get the "Door is open" message on the display while you try to turn on Child Lock, close the door and try again.
NOTE
- When Child Lock is on, all buttons are disabled except for and Options.
- It you tap a button with Child Lock on, an alarm triggers with the "Child Lock on" message.
If you open and close the door with Child Lock on, an alarm triggers with the "Open door & check inside" and "Child Lock on" message. - To dismiss a notification message, turn off Child Lock or the power.
English50
Settings
Using Settings
* Tap and hold 3 seconds.
- Tap and hold Options for 3 seconds.
- Turn the Navigation dial and select the desired setting, and then tap OK.
- Tap OK to change the selected function's settings or start the function.
NOTE
To return to the main screen, tap Options again or turn the Navigation dial to select Back and tap OK.
- If you do not manipulate the control panel for 7 seconds after entering the Settings menu, the display returns to the main screen.
AI Pattern
This function saves your frequently used cycles and settings.
- Tap and hold Options for 3 seconds.
- Turn the Navigation dial to select AI Pattern, and then tap OK.
- Tap OK to select On or Off.
The default setting is On. Set it to Off if you do not want to use this function.
- When you turn the function on, the dryer remembers frequently used cycles and their settings (Dry Level Dryness, Time Time) and save them in frequently used order.
- When you turn off the function, all the saved data resets.
Operations
Sound
You can turn on or off the sound from the dryer.
- Tap and hold Options for 3 seconds.
- Turn the Navigation dial to select Sound, and then tap OK.
- Tap OK to select On or Off. The default setting is On.
NOTE
The setting remains unchanged even if you restart the dryer.
Wi-Fi
You can turn the dryer's Wi-Fi on or off.
- Tap and hold Options for 3 seconds.
- Turn the Navigation dial to select Wi-Fi, and then tap OK.
- Tap OK to select On or Off.
The dryer's Wi-Fi is off as a factory default setting. However, the dryer's Wi-Fi turns on automatically when you turn on the dryer for the first time. Then, the final Wi-Fi setting maintains regardless of the dryer power status.
- Once you turn on the dryer's Wi-Fi and connect to a network, the dryer remains connected to the network even when you turn off the power.
The Wi-Fi indicates that the dryer is connected to the router through the Wi-Fi connection.
Language
You can change the system language.
- Tap and hold Options for 3 seconds.
- Turn the Navigation dial to select Language, and then tap OK.
- Turn the Navigation dial to select the desired language, and then tap OK.
Vent Blockage Test
Detects the status of the ducts and reports any blockage or problems.
- Tap and hold Options for 3 seconds.
- Turn the Navigation dial to select Vent Blockage Test, and then tap OK. -Vent Blockage Test starts immediately.
Factory Reset
You can reset your dryer.
- Tap and hold Options for 3 seconds.
- Turn the Navigation dial to select Factory Reset, and then tap OK. Your dryer resets to the factory setting.
English52
Special features
Smart Control
You can connect to the SmartThings app and control your dryer remotely.
(Smart Control for electric model, Smart Monitor for gas model)
Connecting your dryer
- Download and open the SmartThings app on your mobile device
- Tap to turn on the dryer.
- Tap and hold Smart Control / Smart Monitor on the dryer.
a. The dryer enters AP mode and connects to your mobile device.
b. Tap Smart Control / Smart Monitor to authenticate your dryer on your mobile device.
c. Once the authentication process is complete, your dryer is successfully connected to the app. Use various features available in the SmartThings app.
NOTE
- If your dryer fails to connect with the SmartThings app, try again.
- Check your router if you experience any Internet connection problem after connecting your dryer with the SmartThings app.
- If the Wi-Fi is off, tap and hold Options for 3 seconds to navigate to Settings, select Wi-Fi and tap OK to turn it on.
- Turning the dryer's Wi-Fi on allows you connect to the dryer via SmartThings app on your smartphone regardless of the power status of the dryer. However, the dryer appears offline on the SmartThings app if the dryer's Wi-Fi is off.
- Close the door before starting the Smart Control function.
- If you use the dryer 20 times without being connected to SmartThings, the next time you turn the dryer on, a pop-up about Smart Control connection will appear for 3 seconds.
- If the dryer's Wi-Fi is not connected to an AP (access point), the Wi-Fi will turn off when you turn off the power.
Stay Connect
Set up the Stay Connect function in your SmartThings app. Your dryer stays connected to the app so you can use the dryer when you are away from home.
- If you turn on the Stay Connect function on the SmartThings app, the dryer will stay in standby power saving mode after completing a cycle. The Stay Connect function will remain active for up to 24 hour if the door remains closed.
- When the Stay Connect function is active, the Smart Control and Wi-Fi turn on your dryer display.
- Conveniently control your dryer using the SmartThings app
NOTE
The dryer switches to standby power saving mode when operation is paused even if the machine is not connected to the SmartThings app.
Operations
SmartThings
Wi-Fi connection
On your smartphone, go to Settings and turn on the wireless connection and select an AP (Access Point).
- This appliance supports the Wi-Fi 2.4 GHz protocols.
Download
On an app market (Google Play Store, Apple App Store, Samsung Galaxy Apps), find the SmartThings app by searching for "SmartThings". Download and install the app on your device.
NOTE
The app is subject to change without notice for improved performance.
In addition, the further updates on app or the function in the app may stop due to usability and security reasons, even if updates are currently supported on your OS.
Log in
You must first log into SmartThings with your Samsung account. To create a new Samsung account, follow the instructions on the app. You don't need a separate app to create your account.
NOTE
If you have a Samsung account, use the account to log in. A registered Samsung smartphone user automatically logs in.
To register your appliance to SmartThings
- Make sure your smartphone is connected to a wireless network. If not, go to Settings and turn on the wireless connection and select an AP (Access Point).
- Open SmartThings on your smartphone.
- If you see the message "A new device is found," select Add.
- If no message appears, select + and select your appliance in a list of devices available. If your appliance is not listed, select Device Type > Specific Device Model, and then add your appliance manually.
- Register your appliance to the SmartThings app as follows.
a. Add your appliance to SmartThings. Make sure your appliance is connected to SmartThings.
b. When registration is complete, your appliance appears on your smartphone.
English54
Cycle chart

For best results, follow the load size recommendations for each dry cycle.
- Loge load: Fill the drum to about 3/4 full. Do not add items over this level as they need to tumble freely.
- Medium load : Fill the drum to about 1 / 2 full.
- Small load : Fill the drum with 3-5 items, not more than 1/4 full.
| Cycle Recommended items Load size Dry level | |||
| Normal Cottons, work clothes, linens, mixed loads | ● | Normal dry, level 5 (Adjustable) | |
| Time Dry Any load | ● | ||
| Heavy Duty Heavy fabrics such as jeans, corduroys, heavy work clothes | ● | Normal dry, level 5 (Adjustable) | |
| Mixed Load Mixed load is consisting of cotton and synthetics fabrics | ● | Normal dry, level 5 (Adjustable) | |
| Small Load Small loads | ○ | ||
| Delicates Underwear, blouses, lingerie | ● | Normal dry, level 5 (Adjustable) | |
| Sanitize Bedding, Curtains, Children's clothing Very Dry (No Change) | ● | ||
| Wrinkle Release | Shirts, Trouser, Blouses | ○ | - |
| Towels | Bath towels and similar Items | ● | Normal dry, level 5 (Adjustable) |
| Activewear | Water-repellent wear, performance clothes, sports wear (Maximum : 4 lbs) | ● | Normal dry, (No Change) |
| Denim | Jeans, Denims | ● | Normal dry, level 5 (Adjustable) |
| Shirts | Shirt, Blouses | ○ | Normal dry, level 5 (Adjustable) |
| Wool | For machine washable and tumble dryable wool only (Maximum amount : 3 lbs) | ○ | Normal dry, (No Change) |
| Perm Press | Shirts, synthetic fabrics, knits, wrinkle-free cottons, permanent press | ● | Normal dry, level 5 (Adjustable) |
| Air Fluff | Foam, rubber, plastic | ○ | - |
55English
Operations
451663

NOTE
: factory setting, : can be selected
| Cycle Functions (Temp. Control) Time | Options | |||
| Damp Alert Wrinkle Prevent | ||||
| Normal Medium, level 4 | ○ | ○ | ||
| Time Dry High, level 5 (Adjustable) | ○ | ○ | ||
| Heavy Duty High, level 5 | ○ | ○ | ||
| Mixed Load Medium, level 4 | ○ | ○ | ||
| Small Load High, level 5 | ○ | ○ | ||
| Delicates Extra low, level 1 | ○ | ○ | ||
| Sanitize High, level 5 | ○ | |||
| Wrinkle Release | Medium low, level 3 (Adjustable) | ○ | ○ | |
| Towels High, level 5 | ○ | ○ | ||
| Activewear | Low, level 2 | ○ | ||
| Denim | Medium, level 4 | ○ | ○ | |
| Shirts | Medium, level 4 | ○ | ○ | |
| Wool | Low, level 2 | ○ | ||
| Perm Press Medium, level 4 | ○ | ○ | ||
| Air Fluff | - | ○ | ○ | |
English56

Drying guide
The best way to dry items is to follow the instructions on the care label. If no drying instructions are provided, see the following table for reference.
| Items Description | |
| Bedspreads & Comforters | Follow the care label instructions or dry using Bedding. ·Make sure the item is thoroughly dry before using or storing. ·May require repositioning in the drum to ensure even drying. |
| Blankets | Use Normal and dry only one blanket at a time for best tumbling action. ·Make sure blankets are thoroughly dry before using or storing. |
| Curtains & Draperies | Use PERM PRESS and the medium low temperature setting to help minimize wrinkling. ·Dry curtains and draperies in small loads for best results and remove as soon as possible after the cycle is complete. |
| Cloth Diapers Use Normal and | the Medium temperature setting for soft, fluffy diapers. |
| Down-filled Items (jackets, sleeping bags, comforters, etc.) | Use Normal and the Medium temperature setting. ·Add a couple of dry towels to absorb moisture and shorten drying time. |
| Foam Rubber (rug backs, stuffed toys, shoulder pads, etc.) | Do not dry on a heat setting. 温馨提示 Drying a rubber item with heat may damage it or cause a fire. |
| Pillows | Use Normal. ·Add a couple of dry towels and a pair of clean sneakers to help the tumbling action and to fluff the pillows. ·Do not dry kapok or foam pillows using a heated drying cycle. |
| Plastics (shower curtains, outdoor furniture covers, etc.) | Use TIME DRY and the Low temperature settings depending on the care label instructions. |

WARNING
Do not dry:
- Fiberglass items (curtains, draperies, etc.)
- Woolens, unless recommended on the label
- Items spotted or soaked with vegetable or cooking oils
Maintenance
Keep the dryer clean for best performance and to lengthen its life cycle.
WARNING
Certain internal parts are intentionally not grounded and may present a risk of electric shock only during servicing.
Service Personnel - Do not contact the following parts while the appliance is energized: Control board and inlet valve.
Cleaning
Control panel
- Clean with a soft, damp cloth. Do not use abrasive substances.
- Do not spray liquid cleaning agents directly onto the dryer display.
- Some laundry pre-treatment soil and stain removers may damage the control panel.
- When using liquid cleaning agents, apply them to the cleaning cloth. Do not apply them directly to the dryer. Wipe up any spills or overspray immediately.
Drum
- Remove any stains from the drum with an all-purpose cleaner.
- Tumble old towels or rags to remove any remaining stains or cleaning substances. Stains may still be visible, but will not affect subsequent loads.
Powder coated drum
To clean the powder coated drum, use a damp cloth with a mild, non-abrasive cleaner suitable for easily marred surfaces.
Remove cleaner residue and dry with a clean cloth.
Dryer exterior
- Clean with a soft, damp cloth. Do not use abrasive substances.
- Protect the surface from sharp objects.
- Do not place any heavy or sharp objects or a detergent container on the dryer. They can scratch or damage the top cover of the dryer.
- The dryer has a high-gloss finish on the entire surface. Be careful not to scratch or damage the surface.
Exhaust system
- Check and clean the exhaust system on a regular basis to maintain optimum performance.
- The external exhaust hood must be cleaned frequently to ensure proper air flow.
English58
Vent sensor
The dryer features a vent sensor that detects and notifies you when it is time to clean the ductwork. Check the following if you get the "Check the lint filter or vent condition" message when you turn on the dryer.
NOTE
- For duct installation, see Exhaust ducting guide on page 37 and Ducting requirements (Not applicable to ventless (heat pump) models) on page 19.
The dryer may keep running even if the duct is clogged, but the drying time will be extended. - When you get the message check the lint filter and the ducts, and clean them if necessary.
- If the message keep appears, it is because the duct is installed or connected with some restrictions (it's too long or has too many bends). This is not a system failure. However, drying time may be extended on the drying performance may be degraded.
Troubleshooting
Checkpoints
If you encounter a problem with the dryer, first check the table below and try the suggestions.
| Problem Action | |
| Dryer does not start. | Make sure the dryer is plugged in. Make sure the door is properly closed. Check the fuse or reset the circuit breaker. If you opened the door during a cycle, tap and hold again. Clean the filter. Make sure Child Lock is not activated. |
| The dryer does not warm up. | Check your home's circuit breakers or fuses. Some cycles do not require heat. Check the selected cycle again. For a gas dryer, make sure the gas supply is on. Clean the lint filter and exhaust duct. The dryer may have moved into the cool-down phase of the cycle. |
| Items are not dried. | Check all of the above. Additionally: Make sure the exhaust hood outside your home can open and close freely. Check the exhaust system for lint buildup. Ducting should be inspected and cleaned annually. Use a 4" rigid metal exhaust duct. Do not overload. 1 wash load = 1 dryer load. Dry heavy items and light weight items separately. Large, bulky items, such as blankets or comforters, may require repositioning to ensure even drying. Make sure that your washer is draining properly and extracting adequate water from the load. The load may be too small to tumble properly. Add a few towels and restart the dryer. The load may be too large to tumble properly. Remove some items and restart the dryer. Clean the lint filter. |
| The dryer is too loud. | Look for coins, loose buttons, nails, and other objects and remove them immediately. Check the lint filter. Remove any items stuck inside the lint filter. Make sure the dryer is level and standing firmly on the floor. The dryer may hum due to air moving through the drum and fan. This is normal. It is normal to hear the dryer gas valve or heating element cycle on and off during the drying cycle. |
English60
| Problem Action | |
| Items are not dried evenly. | • Seams, pockets, and other parts of clothing are harder to dry than others. This is normal. • Sort heavy and light items separately. |
| There is a smell coming from the dryer. | • The smell of paint, varnish, cleaning agents, and other household items could have circulated in the air and entered the dryer. If you notice such a smell, ventilate completely before using the dryer. • If drying in an enclosed area, the dryer could cause the ambient temperature to rise. Accordingly, make sure to open a window and ventilate the area. • Do not attempt to dry wet items after leaving them in the washing machine or dryer for a long time. |
| The dryer turns off before the items are dry. | • The load is too small. Throw in few additional items like towels and try drying again. |
| The clothes have lint on them. | • Always make sure the lint filter is clean before putting items into the dryer. When drying items that generate a large amount of lint, you may need to clean the lint filter in the middle of a cycle. • Some fabrics (such as white towels) causes more lint and should be dried separately from fabrics that lint attaches easily (such as black linen pants). • Check the inside of the pockets to make sure they are empty before drying. |
| Items still wrinkled after Wrinkle Prevent (Wrinkle Away, Wrinkle Release). | • Small loads of 1 to 4 items work best. • Load fewer items. Load similar-type items. • Take out the items immediately after drying is complete. |
| Water drips from the nozzle when the Steam cycles starts. | • This is steam condensation. The dripping water will stop after a short time. |
| Sprayed water is not visible during Steam cycles. | • Sprayed water is difficult to see when the door is closed. |
| Extended time. | • Sensor Dry automatically senses the moisture in the load and shuts the dryer off when the selected dryness level is reached. The drying time can change according to the type and amount of laundry. See the cycle chart for reference. |
If a problem persists, contact a local Samsung service center.
Troubleshooting
Information codes
If the dryer fails to operate, you may see an information code on the display panel. To determine what you should do, check the list of codes in the table below, and then try the suggested actions.
| Information code | Meaning Action | |
| Door is open Operating the dryer with the door open. | ·Make sure the door is properly closed. ·Make sure laundry is not caught in the door | |
| FC Invalid power source frequency. | ·Try restarting the cycle. ·If this information code remains, contact a Samsung service center. | |
| AC | Electronic control problem (Invalid Communication). | Contact a Samsung service center. |
| HC High temperature heating check. | ·Clean the lint filter. ·If this information code remains, contact a Samsung service center. | |
| 9C1 | The electronic control needs to be checked. | ·Check if power cord is connected properly. ·Check if the electrical outlet is working properly. ·If the information code remains, contact a Samsung service center. |
| tC | The Thermistor1 resistance is very low or high. | ·Check for a clogged lint screen. ·Check if the vent system is restricted. ·If this information code remains, contact a Samsung service center. |
| tC5 | The Thermistor2 resistance is very low or high. | ·Check for a clogged lint screen. ·Check if the vent system is restricted. ·If this information code remains, contact a Samsung service center. |
| dF Incorrect door switch. Contact a Samsung service center. | ||
If any information code keeps appearing on the display, contact a Samsung service center.
English62
Specifications
Fabric care chart
The following symbols provide garment care direction. The clothing care labels include symbols for drying, bleaching, ironing, and dry cleaning. The use of symbols ensures consistency among garment manufacturers of domestic and imported items. Follow care label directions to optimize garment life and reduce laundering problems.
Wash cycle
| Normal | |
| Permanent press/Wrinkle resistant/ Wrinkle control | |
| Gentle/Delicates | |
| Hand wash |
Water temperature
| *** | Hot |
| ** | Warm |
| • | Cold |

NOTE
The Water Temperature table lists appropriate wash water temperatures for various items. The temperature range is 106-126°F (41-52°C) for Hot, 84-106°F (29-41°C) for Warm, and 61-84°F (16-29°C) for Cold. (Wash water temperature must be a minimum of 61°F (16°C) for detergent activation and effective cleaning.)
Bleach
| Any bleach (when needed) | |
| Only non-chlorine (color-safe) bleach (when needed) | |
| Tumble dry |
Normal
| ○ | Permanent press/Wrinkle resistant/ Wrinkle control |
| ○ | Gentle/Delicates |
Special instructions
| Line dry/Hang to dry | |
| Drip dry | |
| Dry flat |
Heat setting
| High |
| Medium |
| Low |
| Any heat |
| No heat / Air |
Iron dry or steam temperatures
| High | |
| Medium | |
| Low |

Specifications
45163
Warning symbols for laundering
| Do not wash | |
| Do not wring | |
| Do not bleach | |
| Do not tumble dry | |
| No steam (added to iron) | |
| Do not iron |
Dry-clean
| ○ | Dry-clean |
| ⊗ | Do not dry-clean |
| □ | Line dry / Hang to dry |
| III | Drip dry |
| - | Dry flat |
Protecting the environment
This appliance is manufactured from recyclable materials. If you decide to dispose of this appliance, please observe local waste disposal regulations. Cut off the power cord so that the appliance cannot be connected to a power source. Remove the door so that animals and small children cannot get trapped inside the appliance.
Specification sheet
| Type Front loading dryer | ||
| Capacity (Cu.ft) 4.0 | ||
| Weight lb (kg) 88 (40) | ||
| Heater rating Electric (W) 2200 | ||
| Power consumption (W) 2500 | ||
English64
LIMITED WARRANTY (U.S.A.)
SAMSUNG DRYER
LIMITED WARRANTY TO ORIGINAL CONSUMER PURCHASER WITH PROOF OF PURCHASE
This SAMSUNG brand product, as supplied and distributed by SAMSUNG ELECTRONICS AMERICA, INC. (SAMSUNG) and delivered new, in the original carton to the original consumer purchaser, is warranted by SAMSUNG against manufacturing defects in materials or workmanship for the limited warranty period, starting from the date of original purchase, of:
One (1) Year All Parts and Labor
This limited warranty is valid only on products purchased and used in the United States that have been installed, operated, and maintained according to the instructions attached to or furnished with the product. To receive warranty service, the purchaser must contact SAMSUNG at the address or phone number provided below for problem determination and service procedures. Warranty service can only be performed by a SAMSUNG authorized service center. The original dated bill of sale must be presented upon request as proof of purchase to SAMSUNG or SAMSUNG's authorized service center to receive warranty service.
SAMSUNG will provide in-home service within the contiguous United States during the warranty period at no charge, subject to availability of SAMSUNG authorized servicers within the customer's geographic area. If in-home service is not available, SAMSUNG may elect, at its option, to provide transportation of the product to and from an authorized service center. If the product is located in an area where service by a SAMSUNG authorized servicer is not available, you may be responsible for a trip charge or required to bring the product to a SAMSUNG authorized service center for service.
To receive in-home service, product must be unobstructed and accessible to the service agent.
During the applicable warranty period, a product will be repaired, replaced, or the purchase price refunded, at the sole option of SAMSUNG. SAMSUNG may use new or reconditioned parts in repairing a product, or replace the product with a new or reconditioned product. Replacement parts and products are warranted for the remaining portion of the original product's warranty or ninety (90) days, whichever is longer. All replaced parts and products are the property of SAMSUNG and you must return them to SAMSUNG.
This limited warranty covers manufacturing defects in materials or workmanship encountered in normal household, noncommercial use of this product and shall not cover the following: damage that occurs in shipment, delivery, installation, and uses for which this product was not intended; damage caused by unauthorized modification or alteration of the product; product where the original factory serial numbers have been removed, defaced, changed in any way, or cannot be readily determined; cosmetic damage including scratches, dents, chips, and other damage to the product's finishes; damage caused by abuse, misuse, pest infestations, accident, fire, floods, or other acts of nature or God; damage caused by use of equipment, utilities, services, parts, supplies, accessories, applications, installations, repairs, external wiring or connectors not supplied or authorized by SAMSUNG; damage caused by incorrect electrical line current, voltage, fluctuations and surges; damage caused by failure to operate and maintain the product according to instructions; in-home instruction on how to use your product; and service to correct installation not in accordance with electrical or plumbing codes or correction of household electrical or plumbing (i.e., house wiring, fuses, or water inlet hoses). The cost of repair or replacement under these excluded circumstances shall be the customer's responsibility.
LIMITED WARRANTY (U.S.A.)
Visits by an authorized servicer to explain product functions, maintenance or installation are not covered by this limited warranty. Please contact SAMSUNG at the number below for assistance with any of these issues.
EXCLUSION OF IMPLIED WARRANTYES
IMPLIED WARRANTY, INCLUDING THE IMPLIED WARRANTY OF MERCHANTABILITY OR FITNESS FOR A PARTICULAR PURPOSE, ARE LIMITED TO ONE YEAR OR THE SHORTEST PERIOD ALLOWED BY LAW. Some states do not allow limitations on how long an implied warranty lasts, so the above limitations or exclusions may not apply to you. This warranty gives you specific rights, and you may also have other rights, which vary from state to state.
LIMITATION OF REMEDIES
YOUR SOLE AND EXCLUSIVE REMEDY IS PRODUCT REPAIR, PRODUCT REPLACEMENT, OR REFUND OF THE PURCHASE PRICE AT SAMSUNG'S OPTION, AS PROVIDED IN THIS LIMITED WARRANTY. SAMSUNG SHALL NOT BE LIABLE FOR SPECIAL, INCIDENTAL OR CONSEQUENTIAL DAMAGES, INCLUDING BUT NOT LIMITED TO TIME AWAY FROM WORK, HOTELS AND/OR RESTAURANT MEALS, REMODELING EXPENSES, LOSS OF REVENUE OR PROFITS, FAILURE TO REALIZE SAVINGS OR OTHER BENEFITS REGARDLESS OF THE LEGAL THEORY ON WHICH THE CLAIM IS BASED, AND EVEN IF SAMSUNG HAS BEEN ADVISED OF THE POSSIBILITY OF SUCH DAMAGES. Some states do not allow exclusion or limitation of incidental or consequential damages, so the above limitations or exclusions may not apply to you. This warranty gives you specific rights, and you may also have other rights, which vary from state to state.
SAMSUNG does not warrant uninterrupted or error-free operation of the product. No warranty or guarantee given by any other person, firm, or corporation with respect to this product shall be binding on SAMSUNG.
To obtain warranty service, please contact SAMSUNG at:
Samsung Electronics America, Inc.
85 Challenger Road
Ridgefield Park, NJ 07660
This SAMSUNG brand product, as supplied and distributed by SAMSUNG ELECTRONICS CANADA, INC. (SAMSUNG) and delivered new, in the original carton to the original consumer purchaser, is warranted by SAMSUNG against manufacturing defects in materials and workmanship for a limited warranty period of:
One (1) year part and labor
This limited warranty begins on the original date of purchase, and is valid only on products purchased and used in the Canada.
To receive warranty service, the purchaser must contact SAMSUNG for problem determination and service procedures.
Warranty service can only be performed by a SAMSUNG authorized service center.
The original dated bill of sale must be presented upon request as proof of purchase to SAMSUNG or SAMSUNG's authorized service center.
SAMSUNG will provide in-home service during the warranty period at no charge, subject to availability within the Canada.
In-home service is not available in all areas.
To receive in-home service, product must be unobstructed and accessible to the service agent.
If service is not available, SAMSUNG may elect to provide transportation of the product to and from an authorized service center.
SAMSUNG will repair, replace, or refund this product at our option and at no charge as stipulated herein, with new or reconditioned parts or products if found to be defective during the limited warranty period specified above.
All replaced parts and products become the property of SAMSUNG and must be returned to SAMSUNG. Replacement parts and products assume the remaining original warranty, or ninety (90) days, whichever is longer.
This limited warranty covers manufacturing defects in materials and workmanship encountered in normal, noncommercial use of this product and shall not apply to the following: damage that occurs in shipment; delivery and installation; applications and uses for which this product was not intended; altered product or serial numbers; cosmetic damage or exterior finish; accidents, abuse, neglect, fire, water, lightning, or other acts of nature or God; use of products, equipment, systems, utilities, services, parts, supplies, accessories, applications, installations, repairs, external wiring or connectors not supplied or authorized by SAMSUNG that damage this product or result in service problems; incorrect electrical line voltage, fluctuations and surges; customer adjustments and failure to follow operating instructions, maintenance and environmental instructions that are covered and prescribed in the instruction book; product removal and reinstallation; problems caused by pest infestations.
This limited warranty does not cover problems resulting from incorrect electric current, voltage or supply, light bulbs, house fuses, house wiring, cost of a service call for instructions, or fixing installation errors.
SAMSUNG does not warrant uninterrupted or error-free operation of the product.
Warranty (CANADA)
EXCEPT AS SET FORTH HEREIN, THERE ARE NO WARRANTYES ON THIS PRODUCT EITHER EXPRESS OR IMPLIED, AND SAMSUNG DISCLAIMS ALL WARRANTYES INCLUDING, BUT NOT LIMITED TO, ANY IMPLIED WARRANTYES OF MERCHANTABILITY, INFRINGEMENT OR FITNESS FOR A PARTICULAR PURPOSE.
NO WARRANTY OR GUARANTEE GIVEN BY ANY PERSON, FIRM, OR CORPORATION WITH RESPECT TO THIS PRODUCT SHALL BE BINDING ON SAMSUNG.
SAMSUNG SHALL NOT BE LIABLE FOR LOSS OF REVENUE OR PROFITS, FAILURE TO REALIZE SAVINGS OR OTHER BENEFITS, OR ANY OTHER SPECIAL, INCIDENTAL OR CONSEQUENTIAL DAMAGES CAUSED BY THE USE, MISUSE, OR INABILITY TO USE THIS PRODUCT, REGARDLESS OF THE LEGAL THEORY ON WHICH THE CLAIM IS BASED, AND EVEN IF SAMSUNG HAS BEEN ADVISED OF THE POSSIBILITY OF SUCH DAMAGES.
NOR SHALL RECOVERY OF ANY KIND AGAINST SAMSUNG BE GREATER IN AMOUNT THAN THE PURCHASE PRICE OF THE PRODUCT SOLD BY SAMSUNG AND CAUSING THE ALGEGD DAMAGE.
WITHOUT LIMITING THE FOREGOING, PURCHASER ASSUMES ALL RISK AND LIABILITY FOR LOSS, DAMAGE, OR INJURY TO PURCHASER AND PURCHASER'S PROPERTY AND TO OTHERS AND THEIR PROPERTY ASRISING OUT OF THE USE, MISUSE, OR INABILITY TO USE THIS PRODUCT.
THIS LIMITED WARRANTY SHALL NOT EXTEND TO ANYONE OTHER THAN THE ORIGINAL PURCHASER OF THIS PRODUCT, IS NONTRANSFERABLE AND STATES YOUR EXCLUSIVE REMEDY.
Some provinces do not allow limitations on how long an implied warranty lasts, or the exclusion or limitation of incidental or consequential damages, so the above limitations or exclusions may not apply to you.
This warranty gives you specific rights, and you may also have other rights, which vary from province to province.
To obtain warranty service, please contact SAMSUNG at:
Samsung Electronics Canada Inc.
2050 Derry Road West,
Mississauga, Ontario L5N 0B9 Canada
www.samsung.com/ca/support (English)
www.samsung.com/ca_fr/support (French)
Visits by a Service Engineer to explain functions, maintenance, or installation is not covered by warranty. Please contact the Samsung call center at the number above for help with any of these issues.
English68

Scan the QR code* or visit
www.samsung.com/spsn
to view our helpful
How-to Videos and Live Shows
*Requires reader to be installed on your smartphone
Scan this with your smartphone
QUESTIONS OR COMMENTS?
| COUNTRY CALL OR VISIT US ONLINE AT | |
| U.S.A 1-800-SAMSUNG (726-7864) www.samsung.com/us/support | |
| CANADA 1-800-SAMSUNG(726-7864) | www.samsung.com/ca/support (English) www.samsung.com/ca_fr/support (French) |
Sèche-linge
19 Chapin Rd. Building D Pine Brook NJ 07058
Tél: 1-973-808-6375 Fax: 1-973-808-63
Notification IC
Ridgefield Park, NJ 07660
Samsung Electronics Canada Inc.
2050 Derry Road West,
Mississauga, Ontario L5N 0B9 Canada
www.samsung.com/ca/support (English)
www.samsung.com/ca_fr/support (French)
Scan the QR code* or visit
www.samsung.com/spsn
to view our helpful
How-to Videos and Live Shows
*Requires reader to be installed on your smartphone
Scan this with your smartphone
DES QUESTIONS OU DES COMMENTAIRES?
| PAYS APPELEZ LE OU RENDEZ-VOUS SUR LE SITE | |
| U.S.A 1-800-SAMSUNG (726-7864) www.samsung. com/us/support | |
| CANADA 1-800-SAMSUNG(726-7864) | www.samsung.com/ca/support (English) www.samsung.com/ca_fr/support (French) |
Secadora
Manual del usuario
DV25B6900E*

Contents
19 Chapin Rd. Building D Pine Brook NJ 07058
Teléf.: 1-973-808-6375 Fax: 1-973-808-63
Aviso IC
Ridgefield Park, NJ 07660
Samsung Electronics Canada Inc.
2050 Derry Road West,
Mississauga, Ontario L5N 0B9 Canada
www.samsung.com/ca/support (English)
www.samsung.com/ca_fr/support (French)
Scan the QR code* or visit
www.samsung.com/spsn
to view our helpful
How-to Videos and Live Shows
*Requires reader to be installed on your smartphone
Scan this with your smartphone
TIENE PREGUNTAS O COMENTARIOS?
| PAís LLAME AL O VISITENOS EN LÍNEA EN | |
| U.S.A 1-800-SAMSUNG (726-7864) www.samsung.com/us/support | |
| CANADA 1-800-SAMSUNG(726-7864) | www.samsung.com/ca/support (English) www.samsung.com/ca_fr/support (French) |