ZIRPE120GYN - Vibratory plate Zipper - Free user manual and instructions
Find the device manual for free ZIRPE120GYN Zipper in PDF.

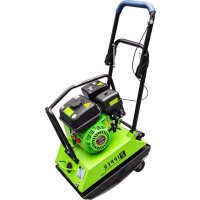
| Product type | Vibrating plate |
| Brand | Zipper |
| Model | ZIRPE120GYN |
| Engine | 1 cylinder 4-stroke G200F, power 4.1 kW |
| Plate dimensions (L x W) | 620 x 450 mm |
| Centrifugal force | 26 kN |
| Vibration frequency | 4700 vpm |
| Compaction depth | 300 mm |
| Net weight / Gross weight | 115 / 123 kg |
| Machine dimensions (L x W x H) | 920 x 450 x 950 mm |
| Fuel tank capacity | 3.6 L (unleaded gasoline 95 octane) |
| Guaranteed sound power level LWA | 107 dB(A) |
| Maximum allowable inclination | 20° |
| Maximum forward speed | 25 m/min |
| Power source | Gasoline (internal combustion engine) |
| Main functions | Compaction of granular soils (gravel, sand), vibration of paving stones/bricks (with rubber mat) |
| Maintenance and cleaning | Check levels before each use; change engine oil at 20h then every 100h; clean air filter every 50h; check belt every 50h; oil vibrating unit every 200h |
| Safety | Emergency stop via speed controller; wear protective equipment (hearing, gloves, goggles, shoes); do not use indoors or near flames; shut off engine before maintenance |
| Spare parts and repairability | Use only genuine ZIPPER parts; warranty 2 years (DIY) / 1 year (professional) |
| General information | Manual available in French; pre-assembled; includes rubber mat, transport device, tools |
Frequently Asked Questions - ZIRPE120GYN Zipper
User questions about ZIRPE120GYN Zipper
0 question about this device. Answer the ones you know or ask your own.
Ask a new question about this device
Download the instructions for your Vibratory plate in PDF format for free! Find your manual ZIRPE120GYN - Zipper and take your electronic device back in hand. On this page are published all the documents necessary for the use of your device. ZIRPE120GYN by Zipper.
USER MANUAL ZIRPE120GYN Zipper
14.1 Intended Use of the Machine 24
14.1.1 Prohibited Applications / Hazardous Misapplications 24
14.2 User Requirements 24
14.3 General Safety Instructions 24
14.4 Special Safety Instructions for operating the ZI-RPE120GYN 25
14.5 Safety instructions for machines with internal combustion engine 25
14.6 HazardWarnings 26
15 STARTING-UP 26
15.1 Assembly 26
15.1.1 Checking delivery content 26
15.1.2 Assembling 26
15.2 Measures before each use 27
15.2.1 Checking the Engine Oil Level 27
15.2.2 Checking the fuel tank level 28
16 OPERATION 28
16.1 Information on Initial Start-up 29
16.1.1 Test Run Initial Start-up 29
16.1.2 Notes on the first 20 operating hours.. 29
16.2 Operating Instructions 29
16.3 Starting the engine 30
16.4 Stopping the Machine 31
16.4.1 Emergency Stop 31
16.4.2 Switching off the machine 31
17 MAINTENANCE 31
17.1 Maintenance and servicing plan 31
17.1.1 Table of Activities 31
17.2 Changing oil of the Vibrating Unit 32
17.2.1 Exciter oil exchange 32
17.3 Engine Oil Change 32
17.4 Cleaning the air filter 33
17.5 Checking and replacing V-belt and coupling 33
17.5.1 Checking the V-belt tension 33
17.5.2 Re-tensioning the V-belt 34
17.5.3 Changing the V-belt 34
17.6 Checking the coupling 34
17.7 Cleaning the Spark Plug 34
18 TRANSPORT 34
18.1 Short Distance Transport 34
18.2 Lifting and placing on other means of transport 35
19 STORAGE 35
DISPOSAL 35
21 TROUBLESHOOTING
PREFACIO (ES) 36
23 SEGURIDAD
23.1 Uso adequado 37
23.1.1 Uso prohibido 37
40.2.2 Motor / engine, 66
EN CE-Conformal! - This product complies with the EC-directives.
EN Follow the instructions!
EN No open flame, fire, open source of ignition and smoking prohibited!
EN Danger of Intoxication! Only use outdoors and far from open windows and vents!
EN Wear personal protective equipment!
EN ATTENTION: Check Oil! Engine don't start with low oil!!
Warning signs and/or stickers on the machine which are illegible or have been removed must be replaced immediately!
ES
These operating instructions contain information and important notes for safe commissioning and handling of the ZIPPER plate compactor ZI-RPE120GYN, hereinafter referred to as "machine".

The manual is an integral part of the machine and must not be removed. Keep it for later use in a suitable place, easily accessible to users (operators), protected from dust and moisture, and enclose it with the machine if it is passed on to third parties!
Please pay special attention to the chapter Safety!
Due to the constant further development of our products, illustrations and contents may differ slightly. If you notice any errors, please inform us.
Subject to technical changes!
Inspect the goods immediately after receipt and note any complaints on the consignment note when accepted by the deliverer!
Transport damage must be reported separately to us within 24 hours.
Holzmann cannot accept any liability for unnoticed transport damage.
Copyright
© 2018
This documentation is protected by copyright. All rights reserved! In particular the reprint, the translation and the removal of photos and illustrations will be prosecuted.
The place of jurisdiction shall be the court responsible for ZIPPER Maschinen.
Customer Service Address
This section contains information and important notes on safe commissioning and handling of the machine.

For your own safety, read these operating instructions carefully before putting the machine into operation. This will enable you to handle the machine safely and prevent misunderstandings as well as personal injury and damage to property. In addition, observe the symbols and pictograms used on the machine as well as the safety and hatard information!
14.1 Intended Use of the Machine
The machine is intended exclusively for the following activities:
For compacting soils (e.g. granular soils consisting of gravel and sand or mixtures of both) and for vibrating paving stones, bricks, etc. on small to medium-sized areas.
The rubber mat should only be used to vibrate paving stones, bricks and the like! Other materials such as gravel, chippings etc. can be processed without a rubber mat.
ZIPPER-MASCHINEN accepts no responsibility or warranty for any other use or use beyond this and for any resulting damage to property or injury.
14.1.1 Prohibited Applications / Hazardous Misapplications
- Operation of the machine without adequate physical and mental aptitude
- Operating the machine without corresponding knowledge of the operating instructions of the vibratory plate or the engine manual.
- Changes in the design of the machine
- Operating the machine in a potentially explosive environment
- Operating the machine indoors or in closed areas
- Operation of the machine without functioning or missing mudguards
- Operation of the machine in hard soil, frozen soil and mixed soil containing fragments of Bricks.
- Remove the safety markings attached to the machine.Modify, circumvent or disable the safety devices of the machine.
- Use of the machine for the transport of persons
The improper use or disregard of the versions and instructions described in this manual will result in the voiding of all warranty and damage claims against ZIPPER-MASCHINEN.
14.2 User Requirements
The machine is designed to be operated by one person. Always operate the machine from behind. Never stand next to or in front of the machine when the engine is running.
The prerequisites for operating the machine are physical and mental aptitude as well as knowledge and understanding of the operating manual.
Please note that local laws and regulations may determine the minimum age of the operator and restrict the use of this machine!
Put on personal protective equipment before starting work with/on the machine.
Work on electrical components or equipment may only be carried out by a qualified electrician or under the instruction and supervision of a qualified electrician.
14.3 General Safety Instructions
To avoid malfunctions, damage and health hazards when working with the machine, the following points in particular must be observed in addition to the general rules for safe working:
- Before each use, check that the machine is in perfect condition. Ensure that all guards are in the correct place and in working order and that all nuts, bolts, etc. are firmly tightened.
-
Ensure adequate lighting conditions in the working and surrounding areas of the machine.
-
Keep hands and feet away from moving machine parts and always ensure a safe stand when working.
- Make sure that the area to be tamped does not contain any "live" electric cables, gas or water lines which could be damaged by vibration.
- Remove adjustment tools from the machine before switching it on.
- Never leave the running machine unattended.
- Ensure that unauthorised persons maintain an appropriate safety distance from the machine and keep children away from the machine in particular.
- The machine may only be operated, serviced or repaired by persons who are familiar with it and who have been informed of the dangers arising during this work.
Always wear suitable personal protective equipment (ear protection, dust mask, safety shoes, close-fitting protective clothing, etc.)! - Do not work on the machine if it is tired, not concentrated or under the influence of medication, alcohol or drugs!
- Never operate the machine in the presence of flammable liquids or gases (danger of explosion!).
- Carry out conversion, adjustment, measuring and cleaning work only when the engine is switched off.
- Only use spare parts and accessories recommended by ZIPPER machines.
14.4 Special Safety Instructions for operating the ZI-RPE120GYN
- Longer continuous use of the plate compactor can lead to circulatory disturbances, especially of the hands, caused by vibration. Therefore, take regular breaks!
- Wear suitable protective gloves to reduce the vibration intensity. The hardness of the surface to be treated, personal predisposition to circulatory disorders and low outside temperatures considerably reduce the permitted period of use.
- When working in or near excavations or building pits, make sure that the walls are stable and do not run the risk of collapsing due to vibration.
- Keep away from edges and trenches and avoid situations where the vibratory plate could tip over.
- Excessive noise can cause hearing damage and temporary or permanent hearing loss. Wear hearing protection certified to health and safety regulations to limit noise exposure.
- Do not increase the regulated idle speed of the engine above 3,500 rpm. This could result in damage to the machine or personal injury.
14.5 Safety instructions for machines with internal combustion engine
- Do not touch the engine and/or muffler during operation or immediately after switching off! These areas become hot during operation and can cause burns.
- Do not touch the spark plug connector when the engine is running (electric shock!).
- Do not operate the unit in closed areas or in poorly ventilated rooms unless there is adequate ventilation through exhaust fans or hoses. (Danger from carbon monoxide!)
- Do not smoke while the machine is in operation.
- Do not smoke when refuelling the machine.
- Refuel the machine only in a well ventilated area.
- Do not refuel the machine when the engine is running or the machine is still hot.
- Do not refuel the machine near an open flame.
- Do not spill any fuel when refuelling.
- Do not crank a flooded petrol engine as long as the spark plug is removed - fuel accumulated in the cylinder sprays out of the spark plug opening.
- Do not carry out an ignition spark test on petrol engines if the engine is flooded or petrol can be smelled. A stray spark could ignite the vapors.
- Do not use petrol or other types of fuel or flammable solutions to clean machine parts, especially in enclosed spaces. Vapors from fuels and solutions may explode.
Always keep the area around the muffler free from foreign substances such as leaves, paper, cardboard, etc. A hot muffler could ignite these substances and cause a fire. - Close the fuel filler cap again after refuelling.
-
Check the fuel line and tank regularly for leaks and cracks. Do not operate the machine if leaks in the fuel system are known.
-
Store fuel only in designated and approved containers.
14.6 HazardWarnings
Despite the intended use of the machine, certain residual risks remain. Due to the structure and construction of the machine, hazardous situations may occur when handling the machines:
| DANGER | |
| ! | A safety instruction designed in this way indicates an imminently hazardous situation which, if not avoided, will result in death or serious injury. |
| WARNING | |
| ! | Such a safety instruction indicates a potentially hazardous situation which, if not avoided, may result in serious injury or even death. |
| CAUTION | |
| ! | A safety instruction designed in this way indicates a potentially hazardous situation which, if not avoided, may result in minor or moderate injury. |
| NOTICE | |
| ! | A safety note designed in this way indicates a potentially dangerous situation which, if not avoided, may result in property damage. |
Irrespective of all safety regulations, your common sense and your corresponding technical suitability/training are and will remain the most important safety factor for error-free operation of the machine. Safe working depends first and foremost on you!
15 STARTING-UP
| NOT ICE | |
| The use of paint thinners, petrol, aggressive chemicals or abrasives will damage the surfaces! Only use mild detergents for cleaning. | |
15.1 Assembly
15.1.1 Checking delivery content
The machine is delivered pre-assembled. Unpack the machine and check that supplied parts are complete and in order.
15.1.2 Assembling
| HIN WEIS | |
| ! | The use of paint thinners, petrol, aggressive chemicals or abrasives leads to material damage to the surfaces! Therefore use only mild detergents for cleaning! |
The machine is supplied pre-assembled. The parts that have been dismantled to facilitate transport must be assembled before start-up/use.
Procedure:
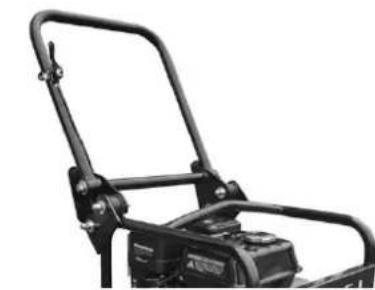
- Fasten holding bracket to the base frame using screws, washers and snap rings (see illustration on the left).

- Mount throttle lever to the holding bracket (see picture on the left).
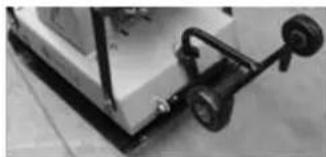
- If desired, fix the rubber mat to the underside of the machine using the metal strips and screws also supplied, and fit the transport device (see illustration on the left).
15.2 Measures before each use
NOTICE

The use of paint thinners, petrol, aggressive chemicals or abrasives leads to material damage to the surfaces! Therefore use only mild detergents for cleaning!
- Observe the safety instructions (at the beginning of this manual).
- Clean the machine and remove dirt and dust if necessary.
- If the air filter is dirty, blow the filter cartridge from the inside by moving a jet of dry compressed air up and down. Continue until all dust has been removed. Replace the air filter with a new one if necessary.
- Check the carburettor for external dirt and dust and clean it with dry compressed air if necessary.
- Check the nuts and bolts for tightness. (Screws or bolts loosened by vibrations can lead to accidents!)
15.2.1 Checking the Engine Oil Level
NOTICE

Too low an oil level will damage the engine and shorten the service life of your machine. Therefore, check the engine oil level before each start and top up if necessary.

-
To check the engine oil level, place the machine on a safe, level surface. Switch off the engine and allow the machine to stand for ten minutes so that the circulating oil can collect in the oil pan.
-
Unscrew the oil dipstick and wipe with a clean, lint-free cloth or a non-fibrous paper towel.
- Push the measuring rod back into the opening as far as it will go, but do not screw it in. (Make sure that the rod has really been pushed in completely - sometimes it cants itself).
-
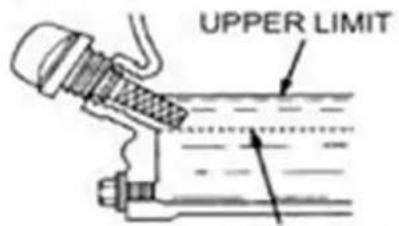
Pull out the oil dipstick again and read off the oil level. There are two markings for this - see illustration on the left.
-
If the oil level is low, refill recommended oil up to the upper edge (maximum filling volume: approx. 0.5 litres).
-
Insert the oil dipstick again and tighten.
15.2.2 Checking the fuel tank level
NOTICE

Observe the safety regulations for fuel control. Filter the fuel during refuelling to prevent foreign particles from entering the combustion chamber. Wipe up leaked fuel.
Procedure:
- Unscrew the tank cap (sits on the fuel tank).
- Level check in the form of a visual inspection. If necessary, top up with petrol with the appropriate octane number (RON 95).
- Close the fuel filler cap tightly after refuelling.
16 OPERATION
- Save the working environment before you start compressing.
- Only put the machine into operation after you have read and understood the safety instructions and carried out the necessary measures before initial commissioning.
- The correct moisture content of the soil is very important for correct compaction. Compaction of dry materials is facilitated by moistening the material. Too much moisture leaves behind water-filled cavities which weaken the load-bearing capacity of the soil.
- Wetness or excessive irrigation can lead to overloading and death of the engine.
16.1 Information on Initial Start-up
NOTICE

Note that the machine is delivered without engine oil and fuel. Make sure that the fluif containers are filled before the machine is put into operation for the first time.
ATTENTION: The machine does not start until the engine oil has been refilled to the upper limit.
Also check the excitation oil level before initial operation!
16.1.1 Test Run Initial Start-up
- Let the machine run idle for about 3 minutes.
- Watch out for abnormal noises.
- Do you pay attention to the exhaust fumes (too black, too white)?
16.1.2 Notes on the first 20 operating hours
In order to optimize the life expectancy of your machine, the following points should be observed:
- Spare the engine for the first 20 operating hours (this also applies to used engines after extensive maintenance). This means lower speed and lower maximum working load than during normal operation.
- Change the engine oil after the first 20 hours of operation.
16.2 Operating Instructions
- Always ensure an optimum oil level.
- Never tighten the cable while the engine is running. This will damage the engine.
- The pull mechanism for changing the engine speed is limited by an adjusting screw. This is factory set. Never change this setting on your own, you could overload the motor.
- Under no circumstances should you operate the machine on slopes of more than 20^ , as even with an optimum oil level the engine may not be supplied with sufficient lubrication.
- In the direction of the vibratory plate advance and within a range of one meter around the vibrator, nobody but the operator must stand.
- During the compaction and raising of an earthwork, the soil should first be compacted about 10 to 15cm inside the edge two to three times, then the edge is compacted.
- If you shake the soil inside a building, the vibrating plate should not touch the base structure, the reinforced concrete piles, the base of the machine, the underground pipes, etc. The vibrating plate should not be in contact with the base structure.
- When working inside the building, the vibratory plate or eccentric block must not strike against the walls.
- If several vibrator plates are used simultaneously on one surface, the parallel distance between the machines should not be less than five metres and the distance between the front and rear machines should not be less than ten metres.
- If the machine is working in an environment that is just about perfect, e.g. on soft or uneven ground, make sure to reduce the horsepower to the lowest level to prevent the machine from sinking. On slopes (max. 20^ allowed!!!), make sure that the machine does not tip over.
-
Pay increased attention to the following particularly dangerous areas:
-
When working in tunnels, good ventilation must be provided to prevent accidents. In addition, there must be a functioning control system for the functioning of the fresh air supply.
The stability of the machine should be taken into account when working and parking the machine in order to avoid dangers.
16.3 Starting the engine
| FUEL LEVER ON OFF | 1. Set the fuel switch to the "On" position. |
| ENGINE ON/OFF SWITCH | 2. Also set the motor on/off switch to the "On" position |
| CHoke lever CLOSED OPEN | Note: The closed position of the choke lever enriches the fuel mixture to start a cold engine. The open position provides the correct fuel mixture for normal operation after starting and for restarting a warm engine. 3. Move the choke lever to the "Closed" position (only for cold engine) |
| THrottle LEVER FAST SLOW | 4. Set the throttle lever to "half throttle" (= middle position between "fast" and "slow"). |
| STARTER GRIP | 5. Grasp the starter handle and pull it out slowly. The resistance becomes strongest at a certain point. This point corresponds to the compression point. Let the rope roll back a little from this point and then pull it out powerfully. 6. Switch the choke lever to "Open" as soon as the engine is running. 7. Open throttle, the engine starts to vibrate. |
16.4 Stopping the Machine
16.4.1 Emergency Stop
In case of danger and/or in an emergency situation, you can quickly switch off the vibratory plate with the speed governor by pushing it completely into the STOP position.
16.4.2 Switching off the machine
- Set the upper throttle lever to "minimum" and let the engine run idle for approx. 3 minutes at low engine speed.
- Then set the engine ON/OFF switch (ignition switch) to the OFF position.
- Close the fuel switch.
- Wait until the engine has cooled down before storing the machine.
17 MAINTENANCE
WARNING

Hot surfaces and rotating machine parts while the engine is running can cause serious injury or even death. Always switch off the machine for conversion, adjustment, cleaning and maintenance work and secure it against unintentional startup.
17.1 Maintenance and servicing plan
17.1.1 Table of Activities
| What to do? | When to do / how often? |
| Check fuel level | before each start-up |
| Check engine oil level | before each start-up |
| Control of the operating elements | before each start-up |
| Check for damaged parts | before each start-up |
| Checking for loose or lost screws | before each start-up |
| Change engine oil | first after 20 h, then every 100 h |
| Check V-belt | every 50 h; replacement after 300 h or 1 year |
| Change exciter oil | every 200 h |
| air filter cleaning | every 50 h, replacement after 300 h or 1 year |
| spark plug test | every 100 h; replacement after 300 h or 1 year |
The specified intervals refer to working under "normal" operating conditions. Depending on the load, a change/exchange may also be necessary at an earlier point in time.
17.2 Changing oil of the Vibrating Unit
NOTICE


Waste oils are toxic and must not be released into the environment! If necessary contact local authorities for information on proper disposal.
17.2.1 Exciter oil exchange

- Disassemble the V-Belt cover Remove the screws of the V-Belt cover and afterwards the cover.
- Disassemble the V-Belt Detension the V-Belt and remove it.
-
Remove the machine upper part from the base plate
-
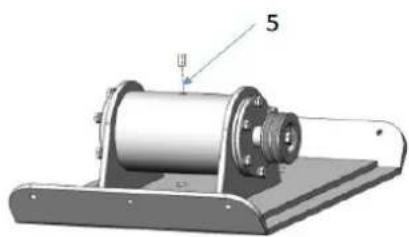
Loosen the 4 screws(1,2,3,4)
- Lift the upper part off the base plate
- Open the draining screw on the exciter (5)
- Empty used exciter oil
- Fill in new exciter oil (20W20 or 15W30 is recommended). Quantity approx.. 200ml
-
Assemble the drain screw again and tighten it.
-
Assemble the upper part of the machine again
- Assemble the V-Belt (check belt tension and adjust if necessary).
- Assemble the belt cover again.
17.3 Engine Oil Change
NOTICE


Waste oils are toxic and must not be released into the environment! If necessary contact local authorities for information on proper disposal.
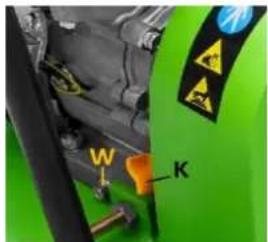
- Remove the lifting frame
- Loosen the oil drain plug (W) on the rear of the engine.
- Open the oil tank cap (K). Collect the draining oil in a collecting container and dispose of it properly!
- Tighten the oil drain plug again after emptying.
- Top up with fresh oil via the filling opening (K). Only use high-quality engine oil!
17.4 Cleaning the air filter
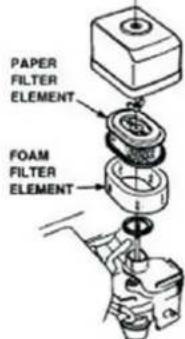
A contaminated air filter can contribute to problems starting the machine, loss of performance during operation and shorten engine life. Zipper Machines does not accept any liability for engine damage caused by failure to clean the air filter regularly.
-
To clean the air filter, first loosen the wing nut on the air filter housing, remove the cover (foam filter element) and remove the air filter cartridge (paper filter element). Clean both elements mechanically with a soft brush.
-
If only the air filter cartridge is to be cleaned, blow it from the inside by moving a dry jet of compressed air up and down until all the dust has been removed.
An air filter change is pending when:
- the engine power drops and fuel consumption increases at the same time
the oil consumption increases - the starting of the engine becomes more difficult
17.5 Checking and replacing V-belt and coupling
WARNING

Warning of danger of detection/trapping in! Never attempt to check the V-belt while the engine is running. Your hands could get caught between the V-belt and the clutch. Serious hand injuries may result.
NO TIC E

If the vibratory power of the machine - regardless of the number of operating hours - suddenly decreases or stops completely during normal operation, first of all check the V-belt and coupling.
Loose or worn V-belts reduce power transmission efficiency, result in poor compaction performance and shorten the service life of the belt itself. Therefore, check the V-belt tension at the specified intervals.
17.5.1 Checking the V-belt tension
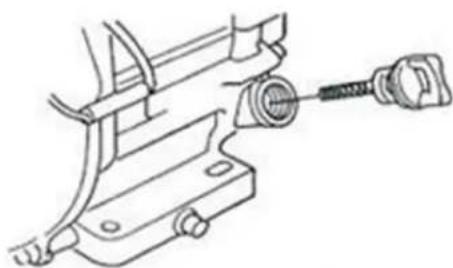
- Loosen the screws (S) of the V-belt cover and remove them.
- Check tension
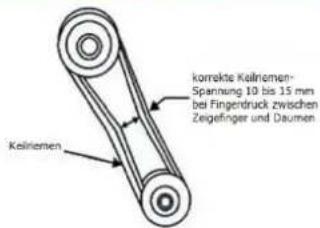
- The V-belt tension is OK if the belt yields approx. 10 to 15mm under pressure with thumb and index finger (see illustration on the left). If the V-belt is too loose or too tight, adjust the tension!
- Reinstall the V-belt cover after a positive check.
17.5.2 Retensioning the V-belt
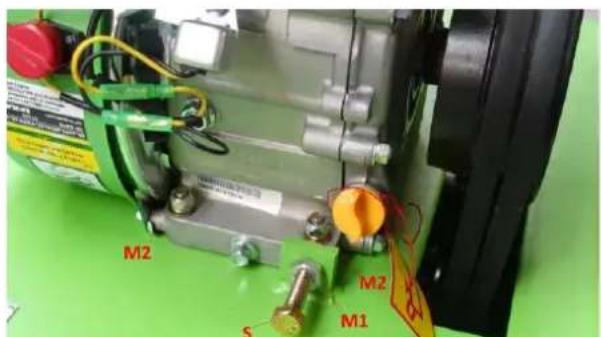
The V-belt is tensioned by moving the engine block on the vibratory plate.
- Remove the V-belt cover.
- Loosen the nuts (M2) that fix the engine block to the vibratory plate.
- Loosen the lock nut (M1) to move the engine block with the screw (S). Screw in screw S (turn to the right) = tighten the belt. Unscrew screw S (turn to the left) = loosen belt.
- Once the belt has the correct tension, retighten the nuts fixing the motor block to
the vibratory plate (M2) and the lock nuts (M1).
- Finally reinstall the V-belt cover
17.5.3 Changing the V-belt
- Loosen the V-belt and move it to the maximum foremost position (unscrew S).
- Engage a cranked wrench in the locking screw of the belt.
- Turn the wrench counterclockwise to loosen the V-belt.
- Clean the drive wheels including the V-groove and the inside of the protective cover.
- Tighten the new V-belt.
- Bring the engine block into the rear position so that the V-belt yields inwards by 10 to 15 mm at finger pressure and tighten the fastening screws again.
- Finally, reattach the V-belt protective cover.
17.6 Checking the coupling
Check the coupling at the same time as the V-belt. With the belt removed, check the outside for seizure and the "V" groove for wear and damage with your eyes. Clean the V-groove as required. The wear of the lining or the shoe should be checked with a running check. If the shoe is worn, the power transmission will be insufficient and the shoe will slip.
17.7 Cleaning the Spark Plug
- Pull out the spark plug cap and remove impurities from the outside of the spark plug.
- Then unscrew the spark plug using the spark plug wrench.
- Check the ceramic insulation, clean the electrodes (metal tips) and check the distance between the contacts. It should be 0.7 to 0.8mm .
- Reassemble the cleaned (or replaced) spark plug and replace the spark plug cap.
18 TRANSPORT
WARNING

Never lift or transport the machine with the engine running!
18.1 Short Distance Transport
For transport over short distances, use the hand holder and the mounted transport device:
- Release the transport device from the rubber holder and support the wheel axle on the ground.
- Pull the machine backwards until the base plate rests on the rubber supports of the wheel suspension.
- Press the handle vertically until the centre of gravity of the machine is behind the wheel axle.
Only move the machine on level and firm ground!
18.2 Lifting and placing on other means of transport
NOTICE

Two people are required to lift and place the machine on another means of transport - one person to operate the hoist and one person to keep the machine in balance.
- When transporting over long distances, fold the handle forward as far as possible.
- Make sure that the lifting device including accessories is designed for the weight of the machine.
- Check the fixing of the lifting frame before lifting
- Lift the machine only a few centimetres to check the load capacity.
- Than lift the machine as gently as possible afterwards to the desired position.
- Secure the load properly for transport.
19 STORAGE
- If the machine is not used for a longer period of time (>30 days):
- Empty the oil tanks and fuel tanks.
- Remove the spark plug and pour a few drops of engine oil into the cylinder. Using a rope starter, turn the engine a few times so that the oil is well distributed inside the cylinder. Clean the spark plug and replace it.
- Cover the cooled machine and store it out of the reach of children and unauthorised persons in a well-ventilated, dry and frost-free environment.
20 DISPOSAL

Do not dispose of your machine in residual waste. Contact your local authorities for information on available disposal options. If you buy a new vibratory plate or equivalent from your dealer, he is obliged in certain countries to dispose of your old machine properly.
21 TROUBLESHOOTING
WAR N I NG

Hot surfaces and rotating machine parts while the engine is running can cause serious injury or even death. Always stop the machine before carrying out troubleshooting work and secure it against unintentional restarting.
| Fault | Possible cause / remedy |
| Motor does not start | Check ON/OFF switch and make sure it is positioned to "ON". Check fuel supply. Check engine oil level (a sensor prevents starting if oil level is too low). Make sure that the spark plug ignition cable is connected. Check spark plug Check carburettor and air filter and make sure they are clean. |
| Motor stops | Check fuel supply. Check that the fuel tap is open. Check oil levels. Check the condition of the air filter. |
| Engine does not deliver enough power: | Check fuel supply. Check that the fuel tap is open. Check the condition of the air filter. Check throttle position |
| Insufficient vibration | Check whether the V-belt slips or is lost. Check throttle position |
| Machine does not move freely | Check the underside of the disc for buildup. |
22 PREFACIO (ES)
Estimado cliente!
(EN) With original ZIPPER spare parts you use parts that are attuned to each other shorten the installation time and elongate your machines lifespan.
IMP OR TANT
The installation of other than original spare parts voids the warranty! So you always have to use original spare parts
When you place a spare parts order please use the service formular you can find in the last chapter of this manual. Always take a note of the machine type, spare parts number and partname. We recommend to copy the spare parts diagram and mark the spare part you need. You find the order address in the preface of this operation manual.
40.2.2 Motor / engine,

Company ZIPPER Maschinen GmbH grants for mechanical and electrical components a warranty period of 2 years for amateur use; and warranty period of 1 year for professional use, starting with the purchase of the final consumer. In case of defects during this period, which are not excluded by paragraph 3, ZIPPER will repair or replace the machine at its own discretion.
2.) Report:
In order to check the legitimacy of warranty claims, the final consumer must contact his dealer. The dealer has to report in written form the occurred defect to ZIPPER. If the warranty claim is legitimate, ZIPPER will pick up the defective machine from the dealer. Returned shipments by dealers which have not been coordinated with ZIPPER, will not be accepted and refused.
3.) Regulations:
a) Warranty claims will only be accepted, when a copy of the original invoice or cash voucher from the trading partner of ZIPPER is enclosed to the machine. The warranty claim expires if the accessories belonging to the machine are missing.
b) The warranty does not include free checking, maintenance, inspection or service works on the machine. Defects due to incorrect usage of the final consumer or his dealer will not be accepted as warranty claims either. Some examples: usage of wrong fuel, frost damages in water tanks, leaving fuel in the tank during the winter, etc.
c) Defects on wear parts are excluded, e.g. carbon brushes, collection bags, knives, cylinders, cutting blades, clutches, sealings, wheels, saw blades, splitting crosses, riving knives, riving knife extensions, hydraulic oils, oil/air/fuel filters, chains, spark plugs, sliding blocks, etc.
d) Also excluded are damages on the machine caused by incorrect or inappropriate usage, if it was used for a purpose which the machine is not supposed to, ignoring the user manual, force majeure, repairs or technical manipulations by not authorized workshops or by the customer himself, usage of non-original ZIPPER spare parts or accessories.
e) After inspection by our qualified personnel, resulted costs (like freight charges) and expenses for not legitimated warranty claims will be charged to the final customer or dealer.
f) In case of defective machines outside the warranty period, we will only repair after advance payment or dealer's invoice according to the cost estimate (incl. freight costs) of ZIPPER.
g) Warranty claims can only be granted for customers of an authorized ZIPPER dealer who directly purchased the machine from ZIPPER. These claims are not transferable in case of multiple sales of the machine.
4.) Claims for compensation and other liabilities:
The liability of company ZIPPER is limited to the value of goods in all cases. Claims for compensation because of poor performance, lacks, damages or loss of earnings due to defects during the warranty period will not be accepted. ZIPPER insists on its right to subsequent improvement of the machine.
44 GARANTÍA Y SERVICIO (ES)
1.) Garantia:
We monitor the quality of our delivered products in the frame of a Quality Management policy.
Your opinion is essential for further product development and product choice. Please let us know about your:
- Impressions and suggestions for improvement.
- experiences that may be useful for other users and for product design
- Experiences with malfunctions that occur in specific operation modes
We would like to ask you to note down your experiences and observations and send them to us via FAX, E-Mail or by post
Erworbenvon/purchasedfrom:
E-Mail/e-mail:
Additional information
INCOMPLETELY Filled SERVICE FORMS CANNOT BE PROCESSED! FOR GUARANTEE CLAIMS PLEASE ADD A COPY OF YOUR ORIGINAL SALES / DELIVERY RECEIPT OTHERWISE IT CANNOT BE ACCEPTED.
FOR SPARE PART ORDERS PLEASE ADD TO THIS SERVICE FORM A COPY OF THE RESPECTIVE EXPLODED DRAWING WITH THE REQUIRED SPARE PARTS BEING MARKED CLEARLY AND UNMISTAKABLE.
THIS HELPS US TO IDENTIFY THE REQUIRED SPARE PARTS FASTLY AND ACCELERATES THE HANDLING OF YOUR INQUIRY.