SRSWS1 - Pregnant SONY - Free user manual and instructions
Find the device manual for free SRSWS1 SONY in PDF.

| Technical Features | Wireless speaker, 30 W power, Bluetooth connectivity, 10-meter range, 6-hour battery life. |
|---|---|
| Usage | Ideal for televisions, home audio systems, and outdoor events. |
| Maintenance and Repair | Regularly clean with a soft cloth, avoid exposure to water. In case of issues, consult Sony customer service. |
| Safety | Do not use near water, avoid extreme temperatures, do not disassemble the device. |
| General Information | Compatible with Bluetooth devices, lightweight and portable, ergonomic design for comfortable use. |
Frequently Asked Questions - SRSWS1 SONY
User questions about SRSWS1 SONY
0 question about this device. Answer the ones you know or ask your own.
Ask a new question about this device
Download the instructions for your Pregnant in PDF format for free! Find your manual SRSWS1 - SONY and take your electronic device back in hand. On this page are published all the documents necessary for the use of your device. SRSWS1 by SONY.
USER MANUAL SRSWS1 SONY
What you can do with the speaker 3
Checking the supplied items 3
Preparation 4
Setting up the transmitter 4
Charging the speaker 5
Playing the TV's audio through the speaker 6
Changing the settings 8
Adjusting the vibration level 8
Turning off the operation tone 8
Turning off the automatic power shutdown function 9
Alternative ways of using the speaker 10
Connecting the transmitter using the audio cable 10
Connecting the speaker directly using the dedicated audio cable .... 11
Connecting a second speaker 11
Troubleshooting 12
Steps to take when in trouble 12
About this product 15
Parts and Controls 15
Specifications 16
Maintenance 16
Before operating the unit, please read this guide thoroughly and retain it for future reference.
Owner's Record
The serial number is located on the left side of the Speaker.
Record the serial number in the space provided below. Refer to them whenever you call upon your Sony dealer regarding this product.
Model No. SRS-WS1
Serial No.
What you can do with the speaker
US
You can start using this unit by connecting the transmitter to the TV with the supplied digital optical cable.
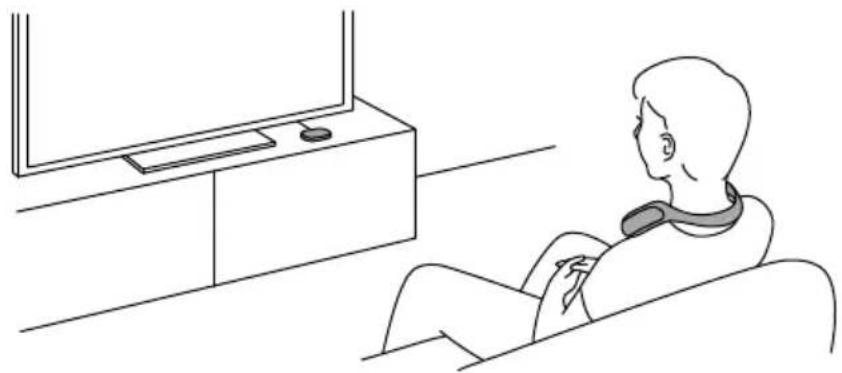
Simply place the speaker on your shoulders and you can enjoy realistic sound and dynamic vibration. You can enjoy the real atmosphere of movies, games or music videos.*
- Maximum range: Line of sight approx. 30 m (with 1 set of speaker connected)/ 10 m (with 2 sets connected).
Checking the supplied items
Contact your dealer immediately if any of these items are missing. The number in ( ) is the quantity of items supplied.
Speaker (1)

Micro USB cables (2)

Transmitter (1)

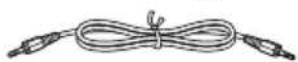
Digital optical cable (1)

Charging cradle (1)
Audio cable (1)
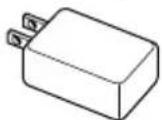
□ AC adapter (2)
Dedicated audio cable (1)

□ Operating Instructions (this booklet) (1)
Safety and Regulatory Booklet (1)
Warranty (1)
Preparation
Setting up the transmitter
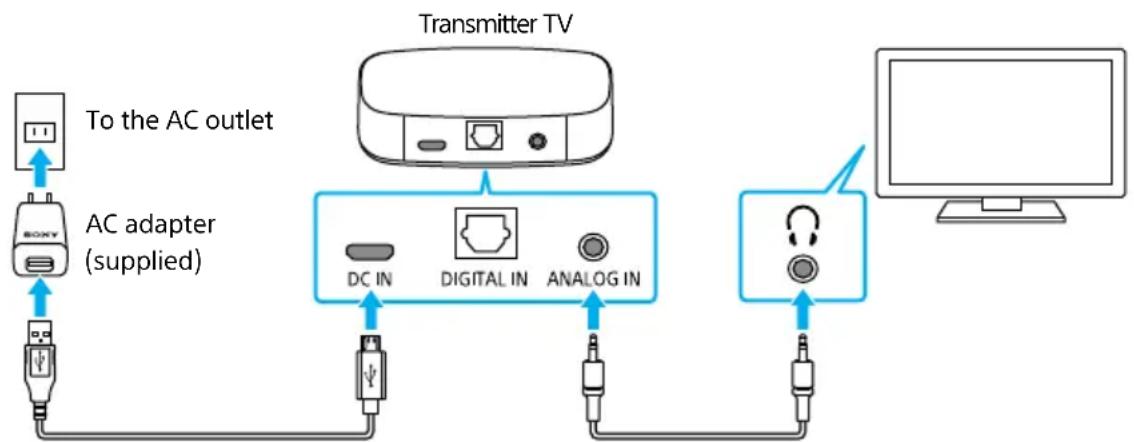
1 Connect the transmitter to the TV and the power outlet
Connect the transmitter and an adapter using the micro USB cable and plug the AC adapter into the AC outlet.
If your TV is equipped with a digital optical output terminal, connect the transmitter and the TV using the digital optical cable.
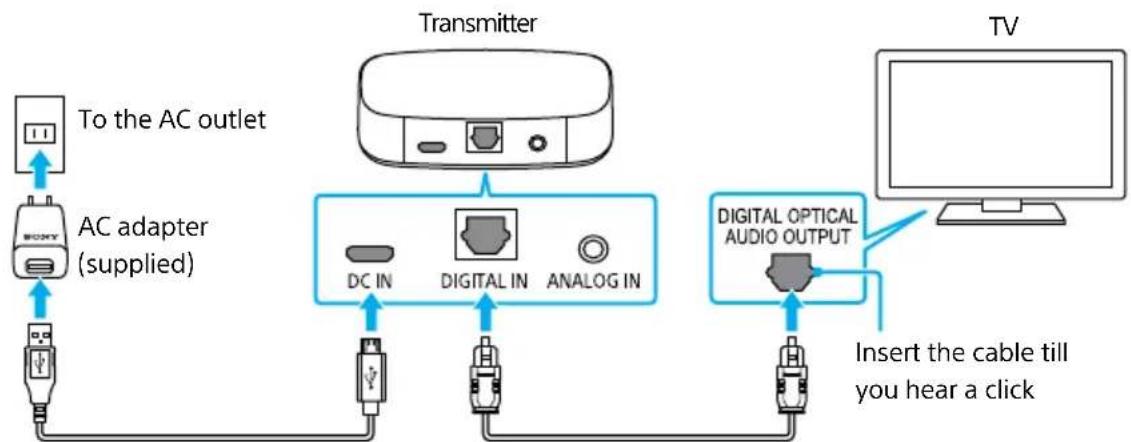
Micro USB cable (supplied) Digital optical cable (supplied)
If your TV is not equipped with a digital optical terminal
Connect the transmitter and the TV using the audio cable. See "Connecting the transmitter using the audio cable" (page 10).

2 Set the TV's digital audio output to PCM (Pulse Control Modulation)
Change the setting to PCM in advance. The digital optical input signals are only compatible with 48kHz linear PCM. The sound may not output properly if the digital audio output on the TV is set to any setting other than PCM.
For details, refer to the operating instructions of the TV.
Example: if using a Sony TV (the settings may vary depending on the model)
Set [Settings] - [Display & Sound] - [Audio output] - [Digital audio out] - [PCM] or [Settings] - [Sound] - [Digital audio out] - [PCM].
Charging the speaker
Before using the speaker for the first time, make sure to charge it.
If you have not charged the unit, it may not turn on.
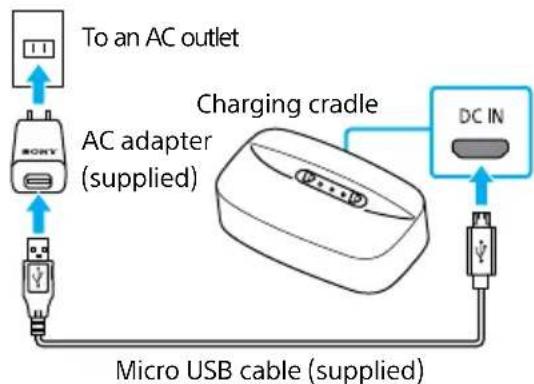
1 Connect the charging cradle to the AC outlet
Connect the charging cradle and an AC adapter using the micro USB cable and plug the AC adapter into an AC outlet.
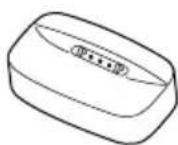
2 Place the speaker on the charging cradle
The indicator on the charging cradle lights up in orange and the power indicator on the speaker flashes slowly when the speaker is charging. When charging is complete, the indicator on the charging cradle and the power indicator on the speaker will turn off. The speaker cannot be used while it is charging.
Colors of power indicator and what they indicate
The color of the power indicator on the speaker changes depending on the remaining battery level. Green: Approximately more than 4 hours remaining Yellow: Approximately 2 to 4 hours remaining Red: Approximately less than 2 hours remaining
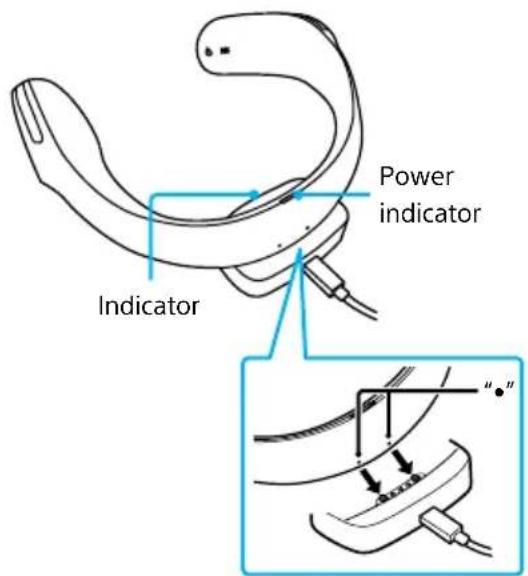
Place the speaker and align dots to the convex of the charging cradle.
Hints
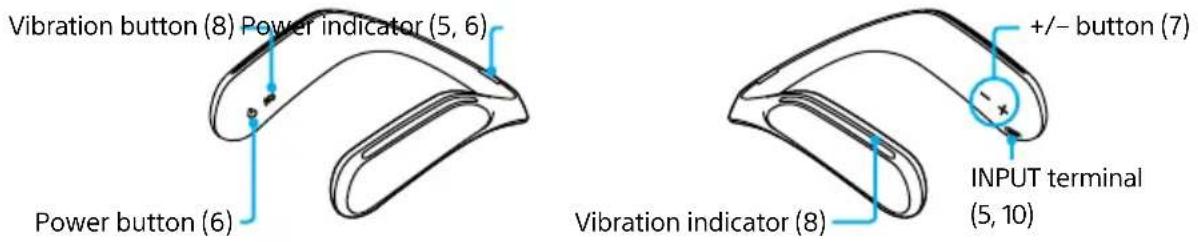
The speaker can also be charged through the INPUT terminal of the speaker.
Connect the speaker and an AC adapter using the micro USB cable and plug the AC adapter into the power outlet.
The speaker cannot be used when it is charging.

Playing the TV's audio through the speaker
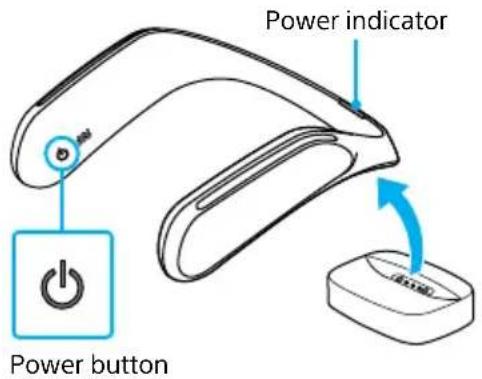
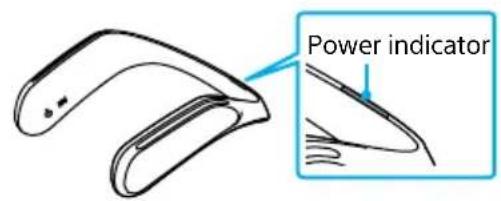
1 Turn on the speaker
Lift the speaker from the charging cradle and press the power button. The power indicator lights up in green when turned on. The power indicator changes its color in a few seconds to indicate the remaining battery level (page 5).
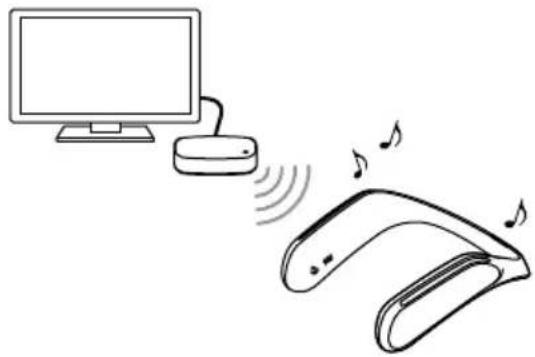
2 Turn on the TV
You should hear sound from the speaker and feel it vibrate.
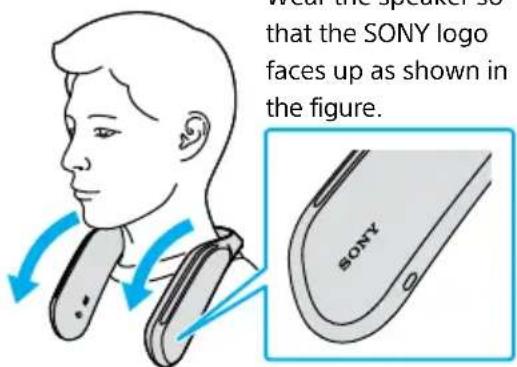
3 Wear the speaker properly
Place the speaker on your shoulders in the right direction.
If you cannot hear the sound from the speaker
See "Steps to take when in trouble" (page 12).
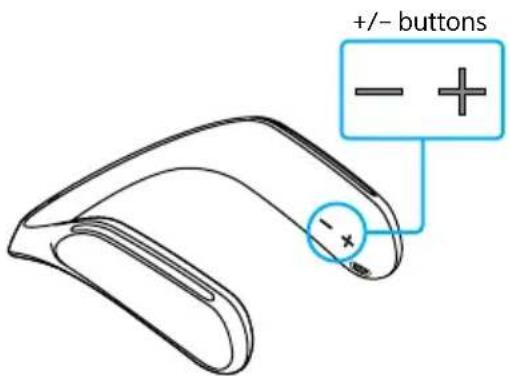
4 Adjust the volume using the + / - buttons
+: Increases the volume
Decreases the volume

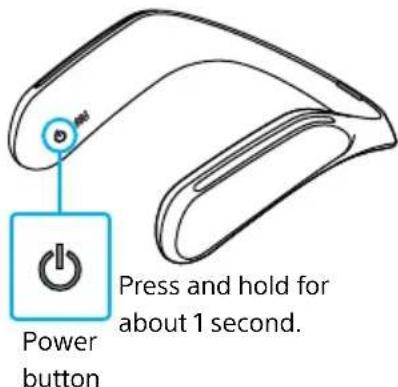
5 Turn off the power when you finish using the speaker
To turn off the power, press and hold the power button (for about 1 second).
The speaker turns off automatically in 15 minutes once the TV has been turned off (auto turn off function).
US
Changing the settings
Adjusting the vibration level
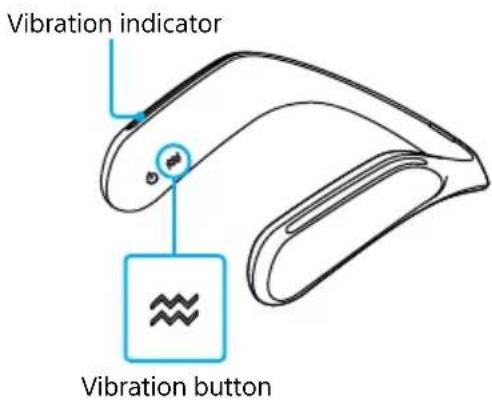
1 Press the vibration button
Each time you press the vibration button, the vibration level changes, and the number of the vibration indicators also changes.
Indications of the vibration indicator and the vibration level
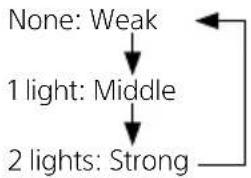
When you change the vibration level, it also affects the sound tone.
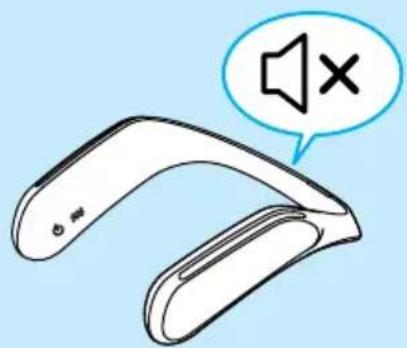
Turning off the operation tone
1 Press and hold + button and - button at the same time
You hear a sound when the setting is changed. To turn on the operation tone, press and hold + button and - button at the same time.
Press and hold both buttons for about 2 seconds.
Changing the settings (continued)
Turning off the automatic power shutdown function
This function helps to save energy by turning off the device when no sound is played for the last 5 minutes.
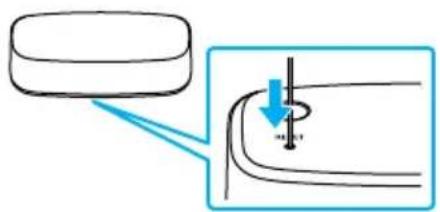
1 Keep pressing the pairing button over 10 seconds.
Indicator blinks twice and turn off this function.
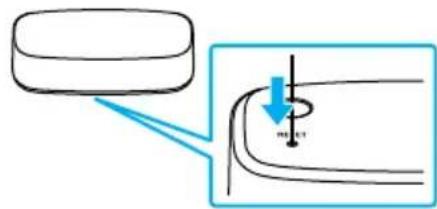
To turn on this function:
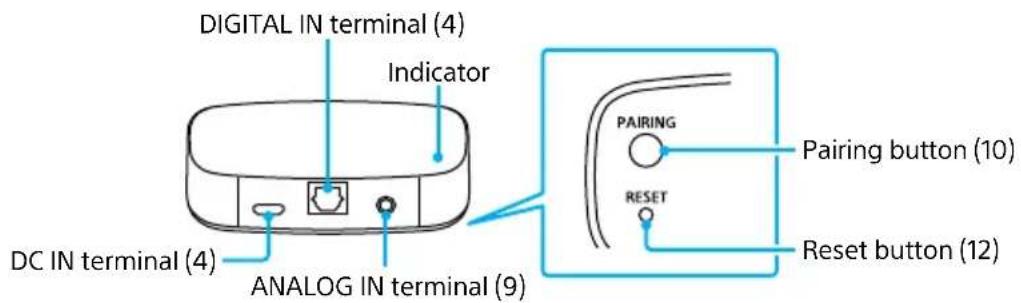
Keep pressing the pairing button and push reset button with a sharp-edged Pen or the like.
Then indicator blinks twice and turn on this function.
Alternative ways of using the speaker
Connecting the transmitter using the audio cable
If your TV is not equipped with a digital optical terminal or if you are already using a device compatible with the digital optical cables, connect the transmitter to the headphone terminal using the audio cable.
1 Connect the transmitter and the TV using the audio cable
Micro USB cable (supplied) Audio cable (supplied)
When the audio cable is connected to the headphone terminal, you hear no sound from the TV. Depending on the TV, if you change the settings, you can also hear the sound from the TV at the same time. For details, refer to the operating instructions of the TV.
When you hear some noise from the speaker
See "Steps to take when in trouble" (page 14).
Alternative ways of using the speaker (continued)
Connecting the speaker directly using the dedicated audio cable
You can also directly connect the speaker and another audio device using the supplied dedicated audio cable.
1 Connect the supplied dedicated audio cable to a device you wish to use
The auto turn off function will not work with this condition.
Make sure that you always use the supplied dedicated audio cable.
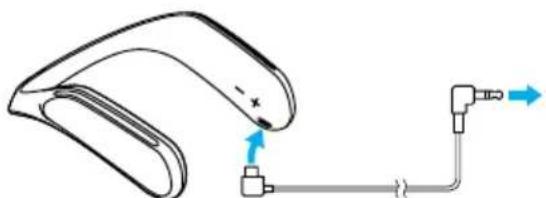
Dedicated audio cable (supplied)
Connecting a second speaker
You can connect up to 2 sets of speakers to the transmitter at once. Pair the speakers first if you are using them for the first time with this unit.
To pair the speakers again, follow the steps below.
You cannot pair the speakers with devices other than this transmitter (such as Bluetooth devices).
1 Set the speaker to the pairing mode
Turn on the speaker, press and hold the vibration button (for 5 seconds or longer) till the power indicator starts flashing in yellow.
Pair the speaker near the transmitter.
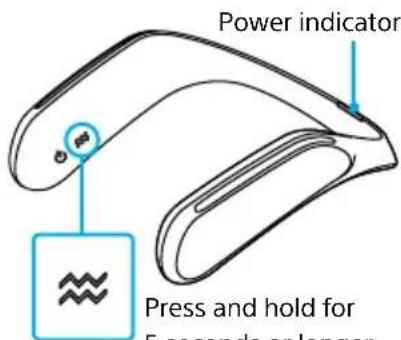
Vibration button
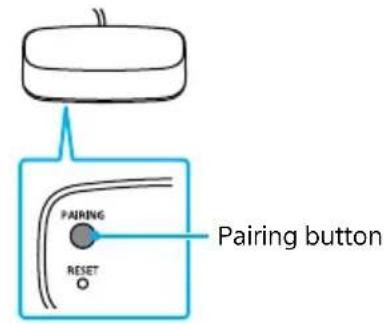
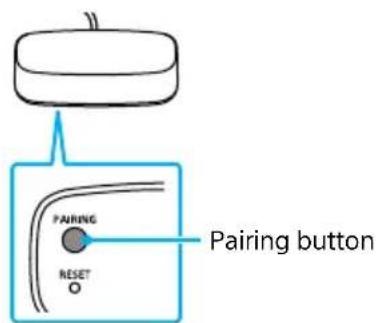
2 Press the pairing button located on the bottom of the transmitter
Press the pairing button while the power indicator on the speaker is flashing in yellow.
When pairing is completed, the indicator stops flashing and lights up.
Troubleshooting
1 Read this booklet
Look for the relevant item in "Steps to take when in trouble" (below).
2 Check the website support
You will find the latest support information and detailed problem-solving methods.
URL: https://www.sony.com/electronics/support Model name: SRS-WS1

3 If the problem still persists
Contact a Sony sales representative or repair service.
Steps to take when in trouble
Symptoms
You cannot hear sound. (The indicator on the transmitter lights up in red or does not light up.)
You cannot hear the sound. (The indicator on the transmitter lights up in yellow.)
Possible causes
The cable is not fully inserted. Connections are incorrect.
The TV volume is set to minimum.
The TV setting is incorrect (when connected with the digital optical cable).
Countermeasures
Reconnect the TV and the transmitter (page 4). Fully insert the cable.
Increase the volume on the TV.
Make sure that the digital audio output setting on the TV is set to linear PCM (page 4). For setting methods, refer to the operating instructions of your TV.
Troubleshooting (continued)
You cannot hear the sound. (The indicator on the transmitter lights up in yellow.)
The transmitter is connected to an AV amplifier or a home theater system with the digital optical cable.
Make sure that the audio output setting is set to linear PCM (page 4), or use the supplied audio cable (page 10).
You cannot hear the sound. (The indicator on the transmitter lights up in green.)
The speaker and the transmitter are not paired.
If the power indicator on the speaker is flashing in green, it may be because the speaker is not paired. See "Connecting a second speaker" (page 11).
The battery is low.
Charge the speaker (page 5).
The signals are not being received.
Reset the speaker and the transmitter. Press the power button and vibration button on the speaker at the same time.

Press the reset button located on the bottom of the transmitter with a sharp-edged pen or the like.
| You cannot hear the sound. (The indicator on the transmitter lights up in green.) | The speaker volume is set to the minimum. | Increase the volume on the speaker (page 7). |
| You can hear some noise. | The contact of the headphone terminal on the TV is poor. | Make sure that the audio cable is fully inserted into the headphone terminal on the TV. Inserting and removing the audio cable a few times may make the connection better. |
| The sound is interrupted. | Other radio waves are interfering. | Keep the distance from wireless devices or microwave ovens as much as you can. The sound may be interrupted if a smartphone or tablet is near by because it is transmitting and receiving signals even when its screens is turned off. If the speaker is interfering with other wireless connections (such as TV or sound bar speakers), move the transmitter around (e.g. if the transmitter is placed on the left hand side of the TV, move it around to the right hand side). |
| No sound detection function is sometimes working. | Try to turn off no sound detection function (page 9). | |
| The power turns off automatically. | Auto turn off function is working. | Using the audio cable, if you hear no sound or little sound for 10 minutes or longer, the speaker turns off automatically. The indicator on the transmitter lights up in red. |
| The volume is low. | The headphone volume on the TV is low. | Adjust the headphone volume on the TV. To find out how to adjust the headphone volume, refer to the operating instructions of the TV. |
About this product
Parts and Controls
The numbers in () below are the related page numbers.
Speaker
Transmitter
Indicators on the transmitter
Lights up (Green): The audio is being sent to the speaker.
Lights up (Red): The audio is not being sent to the speaker.
Lights up (Yellow): The audio is not being sent to the speaker.
(When the digital audio output setting on the TV is not set to PCM.)
None: The power is not turned on.
Charging cradle

Specifications
Speaker
Types Speaker system with built-in amplifier
Practical maximum output 1W + 1W^
Speaker unit 30mm× 2 (full range)
Input terminal Stereo mini jack (used with the supplied cable)
Power Lithium ion battery
Continuous play time (Approx.) 7 hours*
Required charging time (Approx.) 3 hours*
Operating temperature range 0^ to 40^
Dimensions (width/height/depth) (Approx.) 210mm× 75mm× 205mm
Mass (Approx.) 335 g
- These may vary depending on the environment.
Charging cradle
Power DC 5 V (with the supplied AC adapter)
Dimensions (width/height/depth) (Approx.) 76mm× 17mm× 45mm
Mass (Approx.) 70 g
Transmitter
Modulation method Other methods
Frequency band 2.4 GHz band
Maximum communication range Line of sight approx. 30m with 1 set of speaker connected)/10 m (with 2 sets connected)
Input terminal 1 stereo mini jack, 1 optical audio input terminal (square shape) (only for fs = 48kHz PCM)
Power DC 5 V (with the supplied AC adapter)
Dimensions (width/height/depth) (Approx.) 76mm× 17mm× 45mm
Mass (Approx.) 30 g
- Design and specifications are subject to change without notice.
Maintenance
Before liquid enters the speaker, lightly pat it with a soft dry cloth or a cloth that has been soaked in water or warm water and wrung dry.
Depending on the type of stain, you may not be able to remove it.
Table des matieres
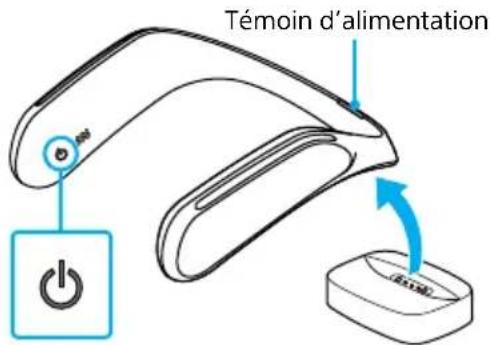
Touched alimentation

Cables USB micro (fourni) Cable audio (fourni)
URL: https://www.sony.com/electronics/support