KV13VM42 - TV SONY - Free user manual and instructions
Find the device manual for free KV13VM42 SONY in PDF.
Download the instructions for your TV in PDF format for free! Find your manual KV13VM42 - SONY and take your electronic device back in hand. On this page are published all the documents necessary for the use of your device. KV13VM42 by SONY.
USER MANUAL KV13VM42 SONY
Owner's Record The model and serial numbers are located at the rearof the video TV. Record these numbers in the spacesprovided below. Refer to them whenever you callupon your Sony dealer regarding this product.Model No. Serial No.
- Operate the Video/TV only on 120 V AC.
- One blade of the plug is wider than the other for safety purposes and will fit into the power outlet only one way. If you are unable to insert the plug fully into the outlet, contact your dealer.
- Should any liquid or solid object fall into the cabinet, unplug the Video/TV and have it checked by qualified personnel before operating it any further.
- Unplug the Video/TV from the wall outlet if you are not to going to use it for several days or more. To disconnect the cord, pull it out by the plug. Never pull the cord itself. Installing
- To prevent internal heat build-up, do not block the ventilation openings.
- Do not install the Video/TV in a hot or humid place, or in a place subject to excessive dust or mechanical vibration. Cleaning Clean the Video/TV with a soft dry cloth. Never use strong solvents such as thinner or benzine, which might damage the finish of the cabinet. Transport Keep the original carton and packing materials to use for safety transport of your Video/TV in the future. Information You are cautioned that any changes or modifications not expressly approved in this manual could void your authority to operate this equipment. If you have any questions or problems concerning your Video/TV, please contact your nearest Sony dealer. This Video/TV receiver displays closed captioning in accordance with 15.119 of the FCC rules. Caution Television programs, films, video tapes and other materials may be copyrighted. Unauthorized recording of such material may be contrary to the provisions of the copyright laws. Also, use of this Video/TV receiver for other private viewing of programs broadcast on VHF or UHF or transmitted by cable companies for the use of the general public may require authorization from the broadcaster/cable company and/or program owner. To prevent fire or shock hazard, do not expose the unit to rain or moisture. This symbol is intended to alert the user to the presence of uninsulated “dangerous voltage” within the product's enclosure that may be of sufficient magnitude to constitute a risk of electric shock to persons. This symbol is intended to alert the user to the presence of important operating and maintenance (servicing) instructions in the literature accompanying the product. CAUTION TO PREVENT ELECTRIC SHOCK, DO NOT USE THIS POLARIZED AC PLUG WITH AN EXTENSION CORD,
RECEPTACLE OR OTHER OUTLET UNLESS THE
BLADES CAN BE FULLY INSERTED TO PREVENT BLADE EXPOSURE. When using TV games, computers, and similar products with your Video/TV, keep the brightness and contrast functions at low settings. If a fixed (non-moving) pattern is left on the screen for long periods of time at a high brightness or contrast setting, the image can be permanently imprinted onto the screen. These types of imprints are not covered by your warranty because they are the result of misuse. Note to CATV system installer This reminder is provided to call the CATV system installer's attention to Article 820-40 of the NEC that provides guidelines for proper grounding and, in particular, specifies that the cable ground shall be connected to the grounding system of the building as close to the point of cable entry as practical. Note on condensation If the Video/TV is brought directly from a cold to a warm location, moisture may condense inside the VCR and cause damage to the video head and tape. When you first install the Video/TV, or when you move it from a cold to a warm location, wait for about one hour before operating the Video/TV. PrecautionsGetting Started
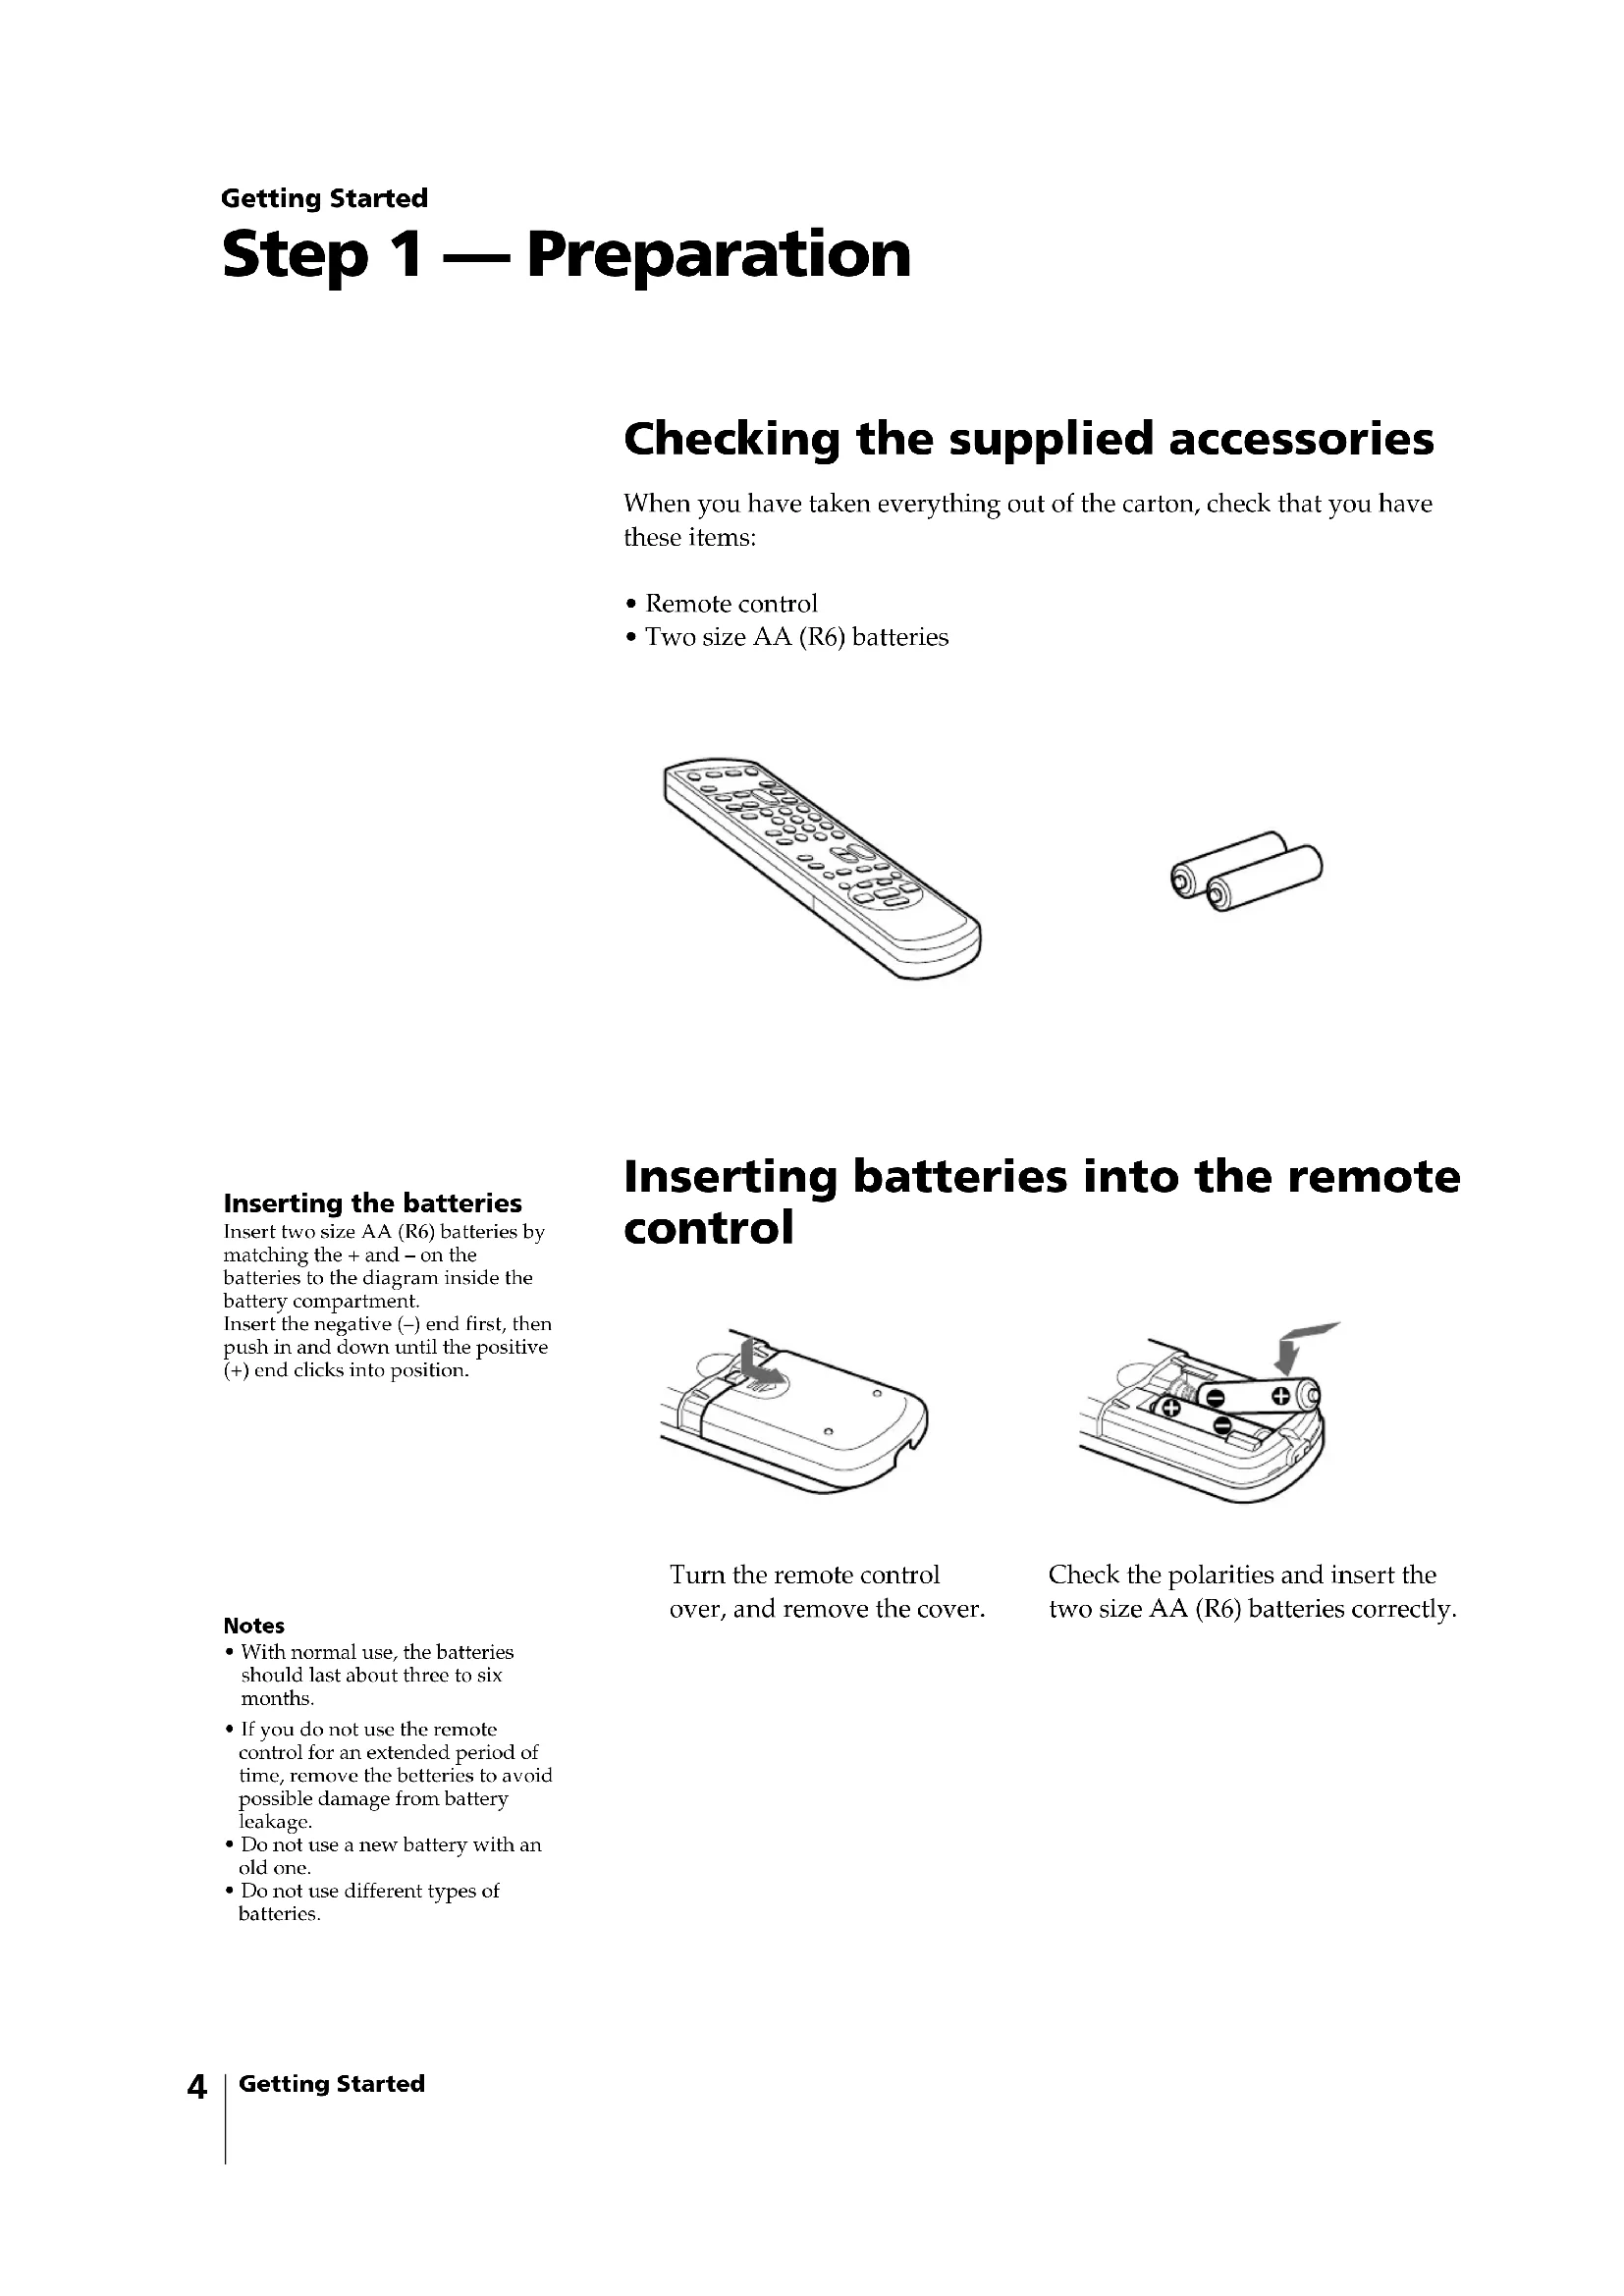
- VCR Plus+ and PlusCode are registered trademarks ofGemstar Development Corporation.The VCR Plus+ system is manufactured under license fromGemstar Development Corporation. The instructions in this manual are for models KV-13VM42, KV-13VM43, KV-20VM42, and KV- 20VS42. Before you begin to read this manual, refer to the model number located on the rear of your Video/TV. Model KV-20VS42 is used for illustration purposes throughout this manual. Any differences in operation are indicated in the text, for example, “KV-20VS42 only.”4 Getting Started Checking the supplied accessories When you have taken everything out of the carton, check that you have these items:
- Two size AA (R6) batteries Inserting batteries into the remote control Getting Started Step 1 — Preparation Turn the remote control over, and remove the cover. Check the polarities and insert the two size AA (R6) batteries correctly. Notes• With normal use, the batteriesshould last about three to sixmonths.• If you do not use the remotecontrol for an extended period oftime, remove the betteries to avoidpossible damage from batteryleakage.• Do not use a new battery with anold one.• Do not use different types ofbatteries. Inserting the batteries Insert two size AA (R6) batteries bymatching the + and – on thebatteries to the diagram inside thebattery compartment.Insert the negative (–) end first, thenpush in and down until the positive(+) end clicks into position.Getting Started
Step 2 — Connecting the Antenna Although you can use either an indoor or outdoor antenna with your Video/TV, we recommend connecting an outdoor antenna or a cable TV system for better picture quality. Connecting an antenna Connect your antenna cable to the VHF/UHF antenna terminal. If you cannot connect your antenna cable directly to the terminal, follow the instructions that match your cable type. Connecting an antenna/cable TV system Connecting a single cable to the antenna Connect the cable directly to the antenna. Connecting to a cable box Some pay cable TV systems use scrambled or encoded signals that require a cable box to view all channels. If you control all channel selection through your cable box, you should consider using the CHANNEL FIX feature (see “Selecting the Video/TV’s Cable Box Input Channel – CHANNEL FIX” on page 38.) Notes• Most VHF/UHF combinationantennas have a signal splitter.Remove the splitter beforeattaching the appropriateconnector.• If you use the U/V mixer, snowand noise may appear in thepicture when viewing cable TVchannels over 37 (W+1).• The cable box is supplied by thecable company.(Rear of Video/TV)VHF/UHF(Rear of Video/TV)VHF/UHF(Rear of Video/TV)VHF/UHFAntenna connector(not supplied)EAC-66 U/V mixer(not supplied)(Rear of Video/TV)VHF/UHF(Rear of Video/TV)VHF/UHF 75-ohm coaxialcable 300-ohmtwin lead cable Coaxial cable andtwin lead cable6 Getting Started Step 3 — Setting Up the Video/TV Automatically –
To reset the factory settings Press POWER on the Video/TV while pressing RESET on the remote control. AUTO PROGRAMENGLISH :
REC STANDBY POWER EJECT TIMER REC You can set up your Video/TV easily by using the AUTO SET UP feature. To set up each item individually, see “Changing the menu language” (page 11), “Setting cable TV on or off” (page 9), and “Presetting channels – AUTO PROGRAM” (page 10). Before you begin
- Connect the antenna or cable to the Video/TV. 1 Press POWER to turn the Video/TV on. 2 Select the on-screen menu language. If you prefer Spanish or French to English, you can change the on-screen menu language by pressing CHANNEL – for Spanish or VOL + for French. All of the on-screen menus are set to the factory preset condition in the selected language. 3 Press VOL – to start AUTO SET UP. “AUTO PROGRAM” appears on the screen and the Video/TV starts scanning and presetting channels automatically. When all receivable channels are stored, “AUTO PROGRAM” disappears and the lowest numbered channel is displayed. To exit AUTO SET UP Press INPUT SELECT.Getting Started
Erasing and adding channels After AUTO SET UP, you can erase unnecessary channels or add more channels. 1 Press MENU to display the main menu. The main menu appears. 2 Move the cursor (z) to “SET UP” with + ◊ or – √ and press SELECT. The SET UP menu appears. 3 Move the cursor (z) to “CHANNEL SET UP” with + ◊ or – √ and press SELECT. The CHANNEL SET UP menu appears. 4 Move the cursor (z) to “CHANNEL SKIP/ADD” with + ◊ or – √ and press SELECT. The CHANNEL SKIP/ADD menu appears. V IDEOAUDIOTIMER TAPE SET UPMove Select ExitSELECT MENU Note If CHANNEL SKIP/ADD appearsin black, the Video/TV is set toreceive a video input signal throughthe input jacks and you cannot selectCHANNEL SKIP/ADD. PressINPUT SELECT so that a channelnumber appears on the screen. SKIP ADD Use
Getting Started 5 Erase and/or add channels: To erase an unwanted channel (1) Make sure the cursor (z) is beside SKIP. (2) Press CH +/– or the 0 - 9 buttons to select the channel you want to erase and press SELECT. The message “Channel will be skipped” appears for several seconds and the cursor (z) moves to ADD. To add a channel (1) Make sure the cursor (z) is beside ADD. (2) Press CH+/– or the 0 - 9 buttons to select the channel you want to add and press SELECT. The message “Channel will be added” appears and the cursor (z) moves to SKIP. 6 To erase and/or add other channels, repeat step 5. 7 Press MENU to return to the original screen. SKIP
Note If CABLE appears in black, the Video/TV is set to receive a video input signal through the input jacks and you cannot select CABLE. Press INPUT SELECT so that a channel number appears on the screen. CABLE: OFFCHANNEL FIX: OFFAUTO PROGRAMCHANNEL SKIP/ADDVCR P l us+ SET UPCHANNEL SET UP MENU Move Select ExitSELECT MENU CABLE: ONCHANNEL FIX: OFFAUTO PROGRAMCHANNEL SKIP/ADDVCR P l us+ SET UPCHANNEL SET UP MENU Move Select ExitSELECT MENU EJECTCOUNTER/REMAINCOUNTERRESETSLEEP MENU
MENU CAPTION VISION: CC 1CABLE: OFFCHANNEL FIX: OFFAUTO PROGRAMCHANNEL SKIP/ADDVCR P lus+ SET UPCHANNEL SET UP MENU Move Select ExitSELECT MENU Setting cable TV on or off If you have connected the Video/TV to a cable TV system, set CABLE to ON (the factory setting). If not, set CABLE to OFF to watch VHF or UHF channels. 1 Press MENU to display the main menu. 2 Move the cursor (z) to “SET UP” with + ◊ or – √ and press SELECT. The SET UP menu appears. 3 Move the cursor (z) to “CHANNEL SET UP” with + ◊ or – √ and press SELECT. The CHANNEL SET UP menu appears. 4 Move the cursor (z) to “CABLE” with + ◊ or – √ and press SELECT. The selected position turns red. 5 Using + ◊ or – √, select “ON” or “OFF” and press SELECT. 6 Press MENU to return to the original screen.10 Getting Started Presetting channels – AUTO PROGRAM You can preset TV channels easily by using the AUTO PROGRAM feature. Preset channels during the day rather than late at night, when some channels may not be broadcasting. 1 Press MENU to display the main menu. 2 Move the cursor (z) to “SET UP” with + ◊ or – √ and press SELECT. The SET UP menu appears. 3 Move the cursor (z) to “CHANNEL SET UP” with + ◊ or – √ and press SELECT. The CHANNEL SET UP menu appears. 4 Move the cursor (z) to “AUTO PROGRAM” with + ◊ or – √ and press SELECT. “AUTO PROGRAM” appears on the screen and the Video/TV starts scanning and presetting channels automatically. When all receivable channels are stored, “AUTO PROGRAM” disappears and the lowest numbered channel is displayed. 5 Press MENU to return to the original screen. To exit AUTO PROGRAM Press any button. Receivable channels for thisVideo/TVVHF: 2 – 13UHF: 14 – 69Cable: 1 – 125 Note If AUTO PROGRAM appears inblack, the Video/TV is set to receivea video input signal through theinput jacks and you cannot selectAUTO PROGRAM. Press INPUTSELECT so that a channel numberappears on the screen.To erase unnecessary channels,or to add channelsSee “Erasing and adding channels”(page 7).CABLE: OFFCHANNEL FIX: OFFAUTO PROGRAMCHANNEL SKIP/ADDVCR P l us+ SET UPCHANNEL SET UP MENU Move Select ExitSELECT MENU AUTO PROGRAM EJECT COUNTER/ REMAIN COUNTER RESET SLEEP MENU CHVOL SELECTRESET INDEX JUMP ENTER TAPE SPEED X2 PAUSE SEARCH REC SLOW VCR Plus MUTING DISPLAY POWER
Changing the menu language If you prefer Spanish or French to English, change the menu language with the following steps. 1 Press MENU to display the main menu. 2 Move the cursor (z) to “SET UP” with + ◊ or – √ and press SELECT. The SET UP menu appears. 3 Move the cursor (z) to “LANGUAGE” with + ◊ or – √ and press SELECT. The language position turns red. 4 Using + ◊ or – √, select the language you want and press SELECT. The entire menu appears in the selected language. 5 Press MENU to return to the original screen. EJECTCOUNTER/REMAINCOUNTERRESETSLEEP MENU
Mover Seleccionar Salir SELECT MENU MENU12 Getting Started Step 4 — Setting the Clock Note If there are only a few channels inyour area that carry time signals,setting the clock automatically maytake up to about 45 minutes. Ifnothing happens even after you waitfor about 45 minutes, set the clockmanually. AUTO
CURRENT TIME SETMANUAL
MENU Move Select ExitSELECT MENU FULL AUTOOPTIONSAUTO CURRENT TIME SETMove Select ExitSELECT MENU Setting the clock automatically Some TV and cable channels transmit time signals with their broadcasts. Your Video/TV can pick up these time signals to automatically set the clock (AUTO CLOCK). The AUTO CLOCK feature works only if a channel in your area is broadcasting a time signal. If your Video/TV cannot pick up the signals, set the clock manually (page 15). 1 Press MENU to display the main menu. 2 Move the cursor (z) to “TIMER” with + ◊ or – √ and press SELECT. The TIMER menu appears. 3 Move the cursor (z) to “CURRENT TIME SET” with + ◊ or – √ and press SELECT. The CURRENT TIME SET menu appears. 4 Move the cursor (z) to “AUTO” with + ◊ or – √ and press SELECT. The AUTO CURRENT TIME SET menu appears. 5 Move the cursor (z) to “FULL AUTO” with + ◊ or – √ and press SELECT. The message “Please turn TV off to receive clock data” appears for 5 seconds. 6 To activate the Auto Clock setting, press POWER to turn the Video/TV off. The time signals automatically set the time for your time zone and adjust for daylight saving time. EJECTINPUTSELECTCOUNTER/REMAINCOUNTERRESETSLEEP MENU
AUTO STANDARD TIME DAYLIGHT SAVING TIMEDAYLIGHT SAVING TIME Move Select ExitSELECT MENU AUTO MANUAL CH___CURRENT TIME SET CHANNELMove Select ExitSELECT MENU If the clock does not activate If the clock is set, but your time zone or daylight saving time is not set correctly, you can adjust these settings manually. If you live close to a time zone border, the Video/TV’s clock may not match the actual broadcast times of the programs. To confirm the time zone of the broadcast service, contact your cable company and set the clock accordingly. 1 Follow steps 1-5 in “Setting the clock automatically” and select “OPTIONS” in step 5. The CURRENT TIME SET CHANNEL menu appears. If you know a channel number that carries a time signal (1) Move the cursor (z) to “MANUAL” with + ◊ or – √ and press SELECT. The CH position turns red. (2) Using the 0-9 buttons, enter the channel number and press SELECT. Then skip steps 2-5. 2 Move the cursor (z) to “AUTO” with + ◊ or – √ and press SELECT. The AUTO CURRENT TIME SET menu appears. 3 Move the cursor (z) to “TIME ZONE” with + ◊ or – √ and press SELECT. The TIME ZONE menu appears. 4 Using + ◊ or – √, select “AUTO.” Then move the cursor (z) to “OK,” and press SELECT. The DAYLIGHT SAVING TIME menu appears. EJECTINPUTSELECTCOUNTER/REMAINCOUNTERRESETSLEEP MENU
Getting Started 5 Using + ◊ or – √, select “AUTO,” “STANDARD TIME,” or “DAYLIGHT SAVING TIME.” (See the table below). Then move the cursor (z) to “OK,” and press SELECT. Choose ToAUTO Select to set the daylight saving time automatically.STANDARD TIME Select if your area does not use daylight saving time.DAYLIGHT SAVING TIME Select if your area uses daylight saving time. 6 To activate the Auto Clock setting, press POWER to turn the Video/TV off.
Setting the date and clock manually Setting the date and clock enables you to use the timer feature for recording or automatically turning the Video/TV on or off. 1 Press MENU to display the main menu. 2 Move the cursor (z) to “TIMER” with + ◊ or – √ and press SELECT. The TIMER menu appears. 3 Move the cursor (z) to “CURRENT TIME SET” with + ◊ or – √ and press SELECT. The CURRENT TIME SET menu appears. 4 Move the cursor (z) to “MANUAL” with + ◊ or – √ and press SELECT. The CURRENT TIME SET menu appears. 5 Press SELECT to start setting the clock. The month section turns red. 6 Using + ◊ or – √, set the month and press SELECT. The day section turns red. 7 Using + ◊ or – √ and SELECT, set the day, year, hour and minute in the same way as in step 6. 8 After setting the minutes, press SELECT. The clock starts working. 9 Press MENU to return to the original screen. To display the timePress DISPLAY.If you have made a mistakePress ? to return to the previousposition.If the clock has stopped and“--/--” is displayedYou have to re-set the clock.EJECTCOUNTER/REMAINCOUNTERRESETSLEEP MENU
Move Select Exit SELECT MENU MENU16 Getting StartedThe VCR Plus+ system feature allows you to simplify the task ofprogramming your Video/TV to make recordings with the timer. Settingup your Video/TV involves coordinating the TV channel number (thenumber you turn to on your Video/TV or VCR to watch a program) withthe guide channel (the number that’s assigned to that channel in yourprogram guide). To find the guide channel numbers, look in the “ChannelLine-up Chart” in the program guide for your area that features VCRPlusCode numbers. It usually looks like the example on the next page. Setting the guide channel 1 Press MENU to display the main menu. 2 Move the cursor (z) to “SET UP” with + ◊ or – √ and press SELECT. The SET UP menu appears. 3 Move the cursor (z) to “CHANNEL SET UP” with + ◊ or – √ and press SELECT.The CHANNEL SET UP menu appears. 4 Move the cursor (z) to “VCR Plus+ System” with + ◊ or – √ and press SELECT.The VCR Plus+ System SET UP menu appears. 5 Press SELECT to enter the guide channel number. The GUIDE CH position turns red. Step 5 — Setting Up VCR Plus+
system Note If VCR Plus+ System appears inblack, the Video/TV is set to receivea video input signal through theinput jacks and you cannot selectVCR Plus+ System. Press INPUTSELECT so that a channel numberappears on the screen.If you have made a mistakePress ? to return to the previousposition.EJECTINPUTSELECTCOUNTER/REMAINCOUNTERRESETSLEEP MENU CHVOLSELECTRESETINDEX JUMP ENTER
6 Press the 0-9 buttons to enter the channel number assigned in the guide channel and press ENTER. The TV CH position turns red. 7 Press the 0-9 buttons to enter the actual channel number on your Video/ TV and press ENTER. 8 Repeat steps 6 and 7 for each guide channel number you want to enter. 9 Move the cursor (z) to “CHANNEL LIST” with + ◊ or – √ and press SELECT to confirm your channel settings. 10 After you finish presetting, press MENU to return to the original screen. SAMPLE CABLE
Basic Operations This section explains the basic functions to use while watching the TV. Most of the operations can be done using the remote control. Switching the Video/TV on and off Switching on Press POWER. The STANDBY lamp flashes until the picture appears. Switching off Press POWER. The Video/TV enters standby mode and the STANDBY lamp on the front of the Video/TV lights up in red if a tape is inserted in the Video/TV. If a tape is not inserted in the Video/TV, the STANDBY lamp disappears. Selecting TV programs Turn the cable mode ON or OFF to select the type of channel you want to watch. For more information on setting the cable mode, see “Setting cable TV on or off” on page 9. Press CH +/– or the 0-9 buttons on the remote control, or CHANNEL +/– on the Video/TV. To select a double-digit numbers using the 0-9 buttons For example, if you want to select 21, first press 2, then press 1. Adjusting the volume Press VOL +/–. Muting the sound Press MUTING. “MUTING” appears on the screen. To resume normal sound, press MUTING again, or press VOL +. Switching quickly between two channels Press JUMP. The channel switches to the previously selected channel. Pressing JUMP again switches the channel back to the originally selected channel. Basic Operations Watching the TV Note You can not jump to channels youscanned through using the CH +/–buttons.INPUTSELEECT– VOL + – CHANNEL
Adjusting the picture When watching TV programs, you can adjust the picture to suit your taste. You can adjust the picture received through the input jacks as well. These adjustments are retained in memory even when you turn off the TV. 1 Press MENU to display the main menu. The main menu appears. 2 Move the cursor (z) to “VIDEO” with + ◊ or – √ and press SELECT. The VIDEO menu appears. 3 Using + ◊ or – √, select the item you want to adjust and press SELECT. 4 Adjust the picture with + ◊ or – √ and press SELECT. With each press, the vertical bars increase or decrease and the figure at the right margin changes to show the control level. (See the table below.) 5 To adjust other items, repeat steps 3 and 4 above. 6 Press MENU to return to the original screen. The adjusted control levels are stored. Description of adjustable items To restore the factory settings Press RESET after selecting and displaying the VIDEO menu. All of the settings are restored to the factory settings. Item PICTUREBRIGHTNESSCOLOR HUE SHARPNESSPress –
√ toDecrease picture contrast.Darken the picture.Decrease color intensity.Make picture tones purplish.Soften the picture.Press +
Basic Operations Adjusting the sound (KV-20VS42 only) You can adjust the bass, treble, and balance to suit your taste. You can adjust the sound of the signal received through the input jacks as well. 1 Press MENU to display the main menu. 2 Move the cursor (z) to “AUDIO” with + ◊ or – √ and press SELECT. The AUDIO menu appears. 3 Select the item you want to adjust. For example: To adjust bass, move the cursor (z) with + ◊ or – √ to “BASS” and press SELECT. 4 Adjust the selected item: Press + ◊ or – √ to adjust the item and press SELECT. 5 To adjust other items, repeat steps 3 and 4 above. 6 Press MENU to return to the original screen. Description of adjustable items To restore the factory settings Press RESET after selecting and displaying the AUDIO menu. All of the settings are restored to the factory settings. Item BASS TREBLEBALANCEPress –
√ toDecrease the low pitched sounds.Decrease the high pitched sounds.Emphasize the left speaker's volume.Press +
◊ toIncrease the low pitched sounds.Increase the high pitched sounds.Emphasize the right speaker'svolume. BASS
Selecting stereo or bilingual programs (KV-20VS42 only) The Multichannel TV Sound (MTS) feature allows you to switch between stereo, mono, and Second Audio Program (SAP). 1 Press MENU to display the main menu. 2 Move the cursor (z) to “AUDIO” with + ◊ or – √ and press SELECT. The AUDIO menu appears. 3 Move the cursor (z) to “MTS” with + ◊ or – √ and press SELECT. The selected position turns red. 4 Using + ◊ or – √, select “STEREO,” “SAP,” or “MONO” and press SELECT. To restore the factory settings Press RESET after selecting and displaying the AUDIO menu. All of the settings are restored to the factory settings. ChooseSTEREO SAP MONO
Select for stereo reception when viewing a program broadcast in stereo.Select to listen to a bilingual broadcast.Select for mono reception (use to reduce noise during stereo broadcasts). BASS
MENU Move Select ExitSELECT MENU Note If you set MTS to “SAP” and a SAPsignal is not being broadcast, nosound will come from the speakers.(However, the program’s primaryaudio channel will be recorded.) Seepage 22 for a table describing therelation between the speakers andthe source signal. EJECT INPUT SELECT COUNTER/ REMAIN COUNTER RESET SLEEP MENU CHVOL SELECTRESET INDEX JUMP ENTER TAPE SPEED X2 PAUSE SEARCH REC SLOW VCR Plus MUTING DISPLAY POWER
Basic Operations This table describes the relation between the sound output from the speaker, the recorded sound, and the MTS mode. For instance, if you set MTS to “SAP” and a SAP signal is not being broadcast, the sound from the speakers is muted. However, if you record the same program, the sound will be recorded in the program’s primary audio channel (stereo or mono). Source Signal Mono Stereo Mono
SAP MTS Mode Mono Stereo SAP Mono Stereo SAP Mono Stereo SAP Mono Stereo SAP On-screen Display None None SAP None STEREO SAP None None SAP None STEREO SAP Speaker Output L R L + R L + R L + R L + R Mute Mute L + R L + R
Mute Mute L + R L + R L + R L + R SAP SAP L + R L + R
SAP SAP Recorded Sound Hi-Fi “L” Hi-Fi “R” Normal Track Track Track L + R L + R L + R L + R L + R L + R L + R L + R L + R L + R L + R L + R L R L + R L R L + R L + R L + R L + R L + R L + R L + R
L + R L + R L + R L R L + R SAP SAP SAPBasic Operations
Listening to surround sound effects (KV-20VS42 only) The surround feature simulates the sound reproduction of a movie theater or a concert hall. Surround is only effective for stereo programs. 1 Press MENU to display the main menu. 2 Move the cursor (z) to “AUDIO” with + ◊ or – √ and press SELECT. The AUDIO menu appears. 3 Move the cursor (z) to “SURROUND” with + ◊ or – √ and press SELECT. The selected position turns red. 4 Using + ◊ or – √, select “ON” or “OFF” and press SELECT. To restore the factory settings Press RESET after selecting and displaying the AUDIO menu. All of the settings are restored to the factory settings. BASS
Basic Operations Displaying on-screen information Press DISPLAY to turn the display on or off. The channel number, date and time, audio mode are displayed. Press DISPLAY repeatedly to scroll between XDS ON, CAPTION, and DISPLAY OFF. For more information on XDS and CAPTION, see page 39. To make the indications disappear, press DISPLAY repeatedly until “DISPLAY OFF” appears. Watching a video input signal through the line input jacks Press INPUT SELECT repeatedly until the desired input indicator appears. To return to the normal TV picture, press INPUT SELECT until the channel number appears. For more information on using the line input jacks, see page 57. Listening with headphones Plug the headphones (not supplied) into the 2 (headphones) jack which is located inside the cover on the front of the Video/TV. The sound from the speaker is turned off. Current date and time Channel number Audio mode
8:40PM 4/9FRI STEREOBasic Operations
This section shows you how to insert a video cassette and to play it. For more information on using the advanced features, see “Additional Operations” on pages 36 through 57. Inserting a video cassette Gently insert a cassette with the arrow indication facing upwards. The cassette is automatically loaded into the cassette compartment and the Video/TV turns on. If you insert a cassette without a safety tab, playback automatically starts. Ejecting a video cassette Press EJECT 6. You can eject the cassette even if the power is in standby mode. Protecting your cassette against accidental erasure The cassette has a safety tab to protect against accidentally erasing a previous recording. Break off the safety tab with a screw driver or a similar tool to prevent recording. If the safety tab is removed, the cassette is ejected when you try to record on it. To record on a cassette with the safety tab broken off, simply cover the tab hole with adhesive tape. Resetting the tape counter The tape counter helps you to locate a certain scene after playback. Press COUNTER RESET on the remote control to set the counter to “00:00:00” before playing the tape. The tape counter is automatically reset to “00:00:00” whenever a cassette is inserted. The Video/TV keeps counting the length of the tape being played. Note, however, that the tape counter does not count the portions without video signals recorded. Playing a Tape Adhesive tapeSafety tabINPUTSELEECT– VOL + – CHANNEL + REC STANDBYPOWERTIMER RECEJECT EJECT INPUT SELECT COUNTER/ REMAIN SLEEP MENU CHVOL SELECTRESET INDEX JUMP ENTER TAPE SPEED X2 PAUSE SEARCH REC SLOW VCR Plus MUTING DISPLAY POWER
COUNTER RESET26 Basic Operations Playing a tape 1 Insert the tape. The Video/TV automatically turns on. If you insert a cassette without a safety tab, playback automatically begins. 2 Press PLAY ·. Playback begins. On screen-information automatically disappears after several seconds. To stop playback Press STOP p. The Video/TV returns to the normal TV picture. To stop playback for a moment Press PAUSE P. The picture pauses. Press PAUSE P again or press PLAY · to resume playback. If you leave your Video/TV in pause mode, normal playback resumes after about 5 minutes. To fast forward the tape Press STOP p, then press FF ). To rewind the tape Press STOP p, then press REW 0. To view a tape at high speed During playback, press and hold REW 0 (rewind) or FF ) (fast forward). A high-speed picture appears on the TV screen. To resume normal playback, release the button. To view the picture while in fast forward or rewind mode Press and hold FF ) during fast forward or REW 0 during rewind. The picture appears on the screen. When you release the button, fast forward or rewind mode is resumed. To view the picture at high speed During playback, press SEARCH ) or SEARCH 0. To view the picture at twice the normal speed During playback, press X2. To view the picture in slow motion During playback, press SLOW & +/–. To playback frame by frame Press PAUSE P during normal playback, then press 7 (frame). Notes• The sound is muted during alloperations except for normalplayback.• If the OFF timer is activatedduring playback, playback stops.INPUTSELEECT– VOL + – CHANNEL + REC STANDBYPOWEREJECTTIMER REC EJECT INPUT SELECT COUNTER/ REMAIN COUNTER RESET SLEEP MENU CHVOL SELECTRESET INDEX JUMP ENTER TAPE SPEED X2 PAUSE SEARCH REC SLOW VCR Plus MUTING DISPLAY POWER
Playing a tape repeatedly – AUTO REPEAT You can play the recorded portion of a tape repeatedly. 1 Press MENU. The main menu appears. 2 Move the cursor (z) to “TAPE” with + ◊ or – √ and press SELECT. The TAPE menu appears. 3 Move the cursor (z) to “AUTO REPEAT” with + ◊ or – √ and press SELECT. The selected position turns red. 4 Using + ◊ or – √, select “ON” and press SELECT. 5 Press MENU to return to the original screen. 6 Press PLAY ·. Playback begins. When the tape reaches the end, it will automatically rewind and begin playing again. V IDEOAUDIOTIMER TAPE SET UPMove Select ExitSELECT MENU TAPE REMAIN: T-120AUTO REPEAT: OFFNOISE REDUCTION: OFFTRACKING TAPE MENU Move Select ExitSELECT MENU TAPE REMAIN: T-120AUTO REPEAT: OFFNOISE REDUCTION: OFFTRACKING TAPE MENU Move Select ExitSELECT MENU TAPE REMAIN: T120AUTO REPEAT: ONNOISE REDUCTION: OFFTRACKING TAPE MENU Move Select ExitSELECT MENU Note If you eject the cassette tape or turnoff the power, AUTO REPEAT willreturn to OFF.EJECTINPUTSELECTCOUNTER/REMAINCOUNTERRESETSLEEP MENU
Basic Operations Displaying on-screen information Press DISPLAY to turn the display on or off. The date and time, tape operation mode is displayed. Press DISPLAY repeatedly to scroll between XDS ON, CAPTION, and DISPLAY OFF. For more information on XDS and CAPTION, see page 39. Displaying the tape counter Press COUNTER/REMAIN to display the tape counter. The tape counter shows the tape travel time in hours, minutes and seconds during recording or playback. Each time you press COUNTER/REMAIN, the time counter and the remaining tape time counter appears alternately. Press COUNTER RESET to restore the counter to “00:00:00.” When you use a 2-hour (120 minute) tape, set TAPE REMAIN to T-120. When you use a tape longer than 120 minutes, set TAPE REMAIN to OTHERS. 1 Press MENU to display the main menu. 2 Move the cursor (z) to “TAPE” with + ◊ or – √ and press SELECT. 3 Move the cursor (z) to “TAPE REMAIN” with + ◊ or – √ and press SELECT. The selected position turns red. 4 Using + ◊ or – √, select “T-120” (the factory setting) or “OTHERS” and press SELECT. 5 Press MENU to return to the original screen. Notes
- The tape operation mode is displayed on the screen whenever you change the mode.
- If you are rewinding a tape and the time counter is displayed on the screen, the tape will stop when the counter reaches “00:00:00.” Use this function to search for the beginning of a recording. Tape operation mode Current date and time Time counter Remaining tape time counter SP 00:00:36REM 1:15TAPE REMAIN: T-120AUTO REPEAT: OFFNOISE REDUCTION: OFFTRACKING TAPE MENU Move Select ExitSELECT MENU
Recording TV programs Caution Television programs, films, video tapes and other materials may be copyrighted. Unauthorized recording of such material may be contrary to the provisions of the copyright laws. Also, use of this recorder with cable television transmission and/or program owner. 1 Insert a cassette with a safety tab. The Video/TV turns on automatically. 2 Press INPUT SELECT until a channel number appears on the screen. To record from a cable box, turn it on. 3 Press TAPE SPEED to select the recording speed, SP (Standard Play), or EP (Extended Play). Recording in EP mode will extend the length of your tape. Maximum recording time SP mode: 2 hours 40 minutes with T-160 EP mode: 8 hours with T-160 4 Select the channel with CH +/–. You can also use the 0-9 buttons on the remote control. To enter double-digit numbers (such as 24), first press 2, then press 4. 5 Press REC r. The REC lamp on the front of the Video/TV lights up and recording begins. To stop recording Press STOP p. When the tape reaches the end, it stops and ejects the cassette. To pause recording Press PAUSE P. To resume recording, press PAUSE P again. You can cut out an unwanted scene during recording with this button. 1 Press PAUSE P when an unwanted scene appears on the screen. Recording pauses. 2 Press PAUSE P again to release the pause mode at the desired scene. Recording resumes from the point set in step 2. When the recording pause mode is left on for more than 5 minutes, the Video/TV stops recording. Recording with the TV off Press POWER. The TV screen is turned off and the STANDBY lamp and REC lamp on the front of the Video/TV light up. The Video/TV continues recording. Recording TV Programs INPUTSELEECT– VOL + – CHANNEL
REC STANDBYPOWEREJECTTIMER REC Note If the ON or OFF timer is activated during recording, the TV screen turns on or off, but the recording continues. EJECT INPUT SELECT COUNTER/ REMAIN COUNTER RESET SLEEP MENU CHVOL SELECTRESET INDEX JUMP ENTER TAPE SPEED X2 PAUSE SEARCH REC SLOW VCR Plus MUTING DISPLAY POWER
Basic Operations The Timer Recording function allows you to preset your Video/TV to record up to six programs within a one-month period. Before you begin
- Make sure that the time and date clock are set. If not, the message “Please set the clock first” is displayed on the screen. Refer to “Setting the Clock” on page 12.
- Make sure that the loaded cassette has its safety tab. If a cassette without safety tab is loaded, the message “Please insert a recordable tape” is displayed. Setting the timer Here’s an example of how to record a program broadcast on channel 26 from 8:15 PM to 9:55 PM on Wednesday, 6th of October 1999, in EP mode. 1 Press TIMER ON SCREEN. The TIMER SET/CHECK menu appears. 2 Press SELECT. Today’s date and the day of the week appears in red. 3 Press + ◊ until “6 WED” appears. For daily and weekly recording, see “Daily/weekly recording” on page 32. Recording TV Programs Using the Timer If you have made a mistakePress ? to return to the previousposition and correct the setting.To erase the settingsPress RESET while displaying theTIMER SET/CHECK menu.If you try to enter a recordingstart time that is prior to thecurrent timeAll of the items of the recordingsettings are erased.If you set MTS to “SAP” in theAUDIO menu (KV-20VS42 only)The SAP signal will be recorded onlyif a SAP signal is being broadcast.Otherwise, the program’s primaryaudio channel will be recorded(stereo or mono.) See page 22 for atable describing the relation betweenthe speakers and the source signal.EJECTINPUTSELECTCOUNTER/REMAINCOUNTERRESETSLEEP MENU
4 Press SELECT, then set the hour of the recording start time to “8” with + ◊ or – √. 5 Press SELECT, then set the minute of the recording start time to “15” with + ◊ or – √. 6 Press SELECT, then set the hour of the recording stop time to “9” with + ◊ or – √. 7 Press SELECT, then set the minute of the recording stop time to “55” with + ◊ or – √. 8 Press SELECT, then set the channel to “26” with + ◊ or – √. 9 Press SELECT, then set the recording speed to EP with + ◊ or – √. If you try to do an incorrectoperationThe Video/TV displays a messageon the screen and interrupts theoperation.When the ON timer overlaps atimer program• If the start time of the ON timer isthe same or earlier than that of atimer recording program, the ONtimer activates and the timerrecording does not operate.• If the start time of the ON timer islater than that of a timer recordingprogram, the TV screen turns on atthe ON timer start time, and therecording continues.EJECTINPUTSELECTCOUNTER/REMAINCOUNTERRESETSLEEP MENU
EP32 Basic Operations 10 Press SELECT. The message “Please turn TV off to set timer” is displayed for three seconds. Then the TIMER SET/CHECK menu reappears and the cursor (z) is displayed at the left margin. 11 When you want to set other programs, press – √ to move the cursor (z) to the next line, then repeat steps 2 through 10. 12 Press MENU to exit the TIMER SET/CHECK menu. 13 Press POWER to turn off the Video/TV. The TIMER REC lamp on the front of the Video/TV lights up and the Video/TV enters recording standby mode. The Video/TV turns on automatically and starts recording at the preset start time, and the TIMER REC lamp on the front of the Video/TV lights up. Daily/weekly recording You can preset your Video/TV to record the same program every day of the week (daily recording) or the same program on the same day every week (weekly recording). Press – √ in step 3 until the desired setting appears in the “DATE” position. With each press, the setting changes as follows: 4 (today) n SUN-SAT n MON–FRI n EVERY SAT n EVERY FRI n EVERY THU n EVERY WED n EVERY TUE n EVERY MON n EVERY SUN n 3 (next month) n 2...... To cancel timer recording 1 Press POWER to turn on the Video/TV. 2 Press TIMER ON SCREEN. 3 Using + ◊ or – √, select the timer setting which you want to stop recording and press RESET. Using the Video/TV before timer recording starts To use the Video/TV before timer recording begins, just press POWER. The TIMER REC lamp turns off and the Video/TV switches on. When preset timer recordingsoverlap• If the turn-on time of twoprograms are the same, theprogram listed first in the menuhas priority.• If the recording start time of thesecond program comes beforerecording of the first program isover, the second program startsrecording only after the firstprogram has finished.EJECTINPUTSELECTCOUNTER/REMAINCOUNTERRESETSLEEPCHVOLSELECTRESETINDEXJUMP ENTERTAPE SPEEDX2 PAUSESEARCH REC SLOW VCR PlusMUTING DISPLAYPOWER
Checking the timer settings You can display the list of the timer settings which you preset. Press TIMER ON SCREEN. The TIMER SET/CHECK menu appears. Press TIMER ON SCREEN again to erase the TIMER SET/CHECK menu. Changing or cancelling the timer settings 1 Press TIMER ON SCREEN to display the TIMER SET/CHECK menu. 2 Select the setting you want to change or cancel with + ◊ or – √. 3 To change the setting Using + ◊ or – √ and SELECT, re-enter the items you want to change. Refer to steps 2 through 10 of “Setting the timer” on pages 30 through 32. To cancel the setting Press RESET. 4 Press TIMER ON SCREEN to return to the original screen. 5 If there are other timer settings on the list, press POWER to set the Video/ TV to timer recording standby mode. EJECTINPUTSELECTCOUNTER/REMAINCOUNTERRESETSLEEP MENU
EP34 Basic Operations Recording using QUICK TIMER You can preset your Video/TV to start recording immediately and to automatically stop recording after a specific time period. Even if you have not set the clock, QUICK TIMER recording can be used. To record 1 Insert a cassette with its safety tab intact. 2 Select the channel which you want to record with the 0-9 buttons or CH
3 Press QUICK TIMER REC on the front of the Video/TV. “QUICK TIMER 0:00” appears on the screen. 4 Press QUICK TIMER REC repeatedly to select the recording time period. With each press, the time period changes as follows: The time period turns yellow and recording starts. Even if you switch off the Video/TV, it continues recording. When the preset time period has elapsed, the Video/TV stops recording. To stop QUICK TIMER recording Press STOP p or QUICK TIMER REC repeatedly until “QUICK TIMER 0:00” appears on the screen. To change the recording timeperiod after QUICK TIMERrecording beginsPress QUICK TIMER REC until thedesired time period appears. Note If the OFF timer is activated duringquick timer recording, the TV screenturns off, but the quick timerrecording continues.0:00 0:30 1:00 .... 7:30 8:00INPUTSELEECT– VOL + – CHANNEL
How the VCR Plus+ system works Whenever you want to record a TV program, all you need to do is look up the program’s “PlusCode,” a number assigned to each program published in the TV section of most newspapers, cable TV listings, and even TV GUIDE magazine. Then, just enter the PlusCode number of the program you want and the VCR is automatically programmed to record that show. It’s that simple. You can preset up to six programs within a one month time frame. To take advantage of this function, you must first set up your Video/TV and assign channel positions to the various guide channels. For details, see “Setting Up VCR Plus+
- Make sure that the time and date are set correctly. If not, refer to “Setting the Clock” on page 12.
- Make sure that the loaded cassette has its safety tab intact. 1 Press the VCR Plus button. The VCR Plus+ System menu appears. 2 Press the 0-9 buttons to enter the desired program’s PlusCode number. 3 Press TAPE SPEED repeatedly to select SP, EP, or AT (automatic tape speed) and press SELECT. AT will automatically adjust the tape speed between SP and EP so that the program you selected fits in the tape. (Note that recording may stop if the tape is not long enough to record the program in EP mode.) The recording information (date, start and stop times, channel number, and tape speed) appears in green. Check that the information is correct. If it is not, press RESET to cancel the setting. 4 Repeat steps 2 to 3 to preset another timer setting. 5 Press POWER to turn the Video/TV off. The TIMER REC lamp on the front of the Video/TV lights up and the Video/TV enters recording standby mode. If you have made a mistakeentering program‘s PlusCodePress RESET and re-enter the correctnumber.To check the timer settingPress TIMER ON SCREEN. You cancheck the list of the timer settings.The timer will not accept asetting in the following cases:• When you enter the PlusCodenumber of a program that hasalready ended.• When you enter the PlusCodenumber of a program that hasalready been set to record.• If the 6 programs have alreadybeen preset, “6 programs havealready been set” appears on thescreen. Recording TV Programs Using VCR Plus+
to set timer TAPE SPEED VCR Plus+ System PlusCode number36 Additional Operations You can set the Video/TV to turn on and off at any time. Make sure the clock is set correctly. If it is not, set the clock first (page 12). 1 Press MENU to display the main menu. 2 Move the cursor (z) to “TIMER” with + ◊ or – √ and press SELECT. The TIMER menu appears. 3 Move the cursor (z) to “ON/OFF TIMER” with + ◊ or – √ and press SELECT. The ON/OFF TIMER menu appears. 4 Press SELECT to enter the ON/OFF TIMER setting. 5 Press + ◊ or – √ to set the day(s), and press SELECT. Each time you press + ◊ or – √, the days change as shown below. EVERY SUN-SAT n EVERY MON-FRI n SUNDAY ...n... SATURDAY n EVERY SUNDAY ...n... EVERY SATURDAY. 6 Press + ◊ or – √ to set the time (hour then minute) that you want the Video/TV to turn on and press SELECT. 7 Press + ◊ or – √ to set the duration time and press SELECT. With each press, the duration increases by one hour for up to twelve hours. Additional Operations Automatically Switching the Video/TV On or Off –
If you have made a mistakePress ? to return to the previousposition.To erase the settingsPress RESET while the ON/OFFtimer menu is displayed. Note If the OFF timer is activated duringquick timer recording, the TV screenturns off, but the quick timerrecording continues.EVERY MON–FRI12:00 AM _H CH___ON/OFF TIMERSet the daySUN 12:00 AM MENU Move Select ExitSELECT MENU EVERY MON–FRI12:02 AM _H CH___ON/OFF TIMERSet the timeSUN 12:00 AM MENU Move Select ExitSELECT MENU EVERY MON–FRI12:02 AM 1H CH___ON/OFF TIMERSet the durationSUN 12:00 AM MENU Move Select ExitSELECT MENU EJECTINPUTSELECTCOUNTER/REMAINCOUNTERRESETSLEEP MENU
CHVOLSELECTINDEXJUMP ENTERTAPE SPEEDX2 PAUSESEARCH
REC SLOW VCR PlusMUTING DISPLAY
______––:–– AM _H CH___ON/OFF TIMERSUN 12:00 AM MENU Move Select ExitSELECT MENU37 Additional Operations 8 Press + ◊ or – √ to set the channel and press SELECT. 9 Press MENU to return to the original screen. If you are not using the Video/TV, press POWER to set the Video/TV in standby mode. One minute before the Video/TV turns off, the message “TV will turn off soon” appears on the screen. Switching Off Automatically – Sleep Timer You can automatically switch the Video/TV into standby mode after a selected time period. Press SLEEP. With each press, the time period (in minutes) changes as follows: One minute before the TV switches into standby mode, the message “TV will turn off soon” is displayed on the screen. OFF 30 60 90 EVERY MON–FRI12:02 AM 1H CH 1ON/OFF TIMERSelect a channelSUN 12:00 AM MENU Move Select ExitSELECT MENU EJECTINPUTSELECTCOUNTER/REMAINCOUNTERRESETSLEEP MENU CHVOLSELECTRESETINDEX JUMP ENTER
TAPE SPEEDX2 PAUSESEARCH
REC SLOW VCR PlusMUTING DISPLAY
POWER TV38 Additional Operations Use the CHANNEL FIX feature to prevent the Video/TV’s input channel from being accidentally changed. It is recommended that you set up your Video/TV as follows when you connect a cable box. 1 Press MENU to display the main menu. 2 Move the cursor (z) to “SET UP” with + ◊ or – √ and press SELECT. The SET UP menu appears. 3 Move the cursor (z) to “CHANNEL SET UP” with + ◊ or – √ and press SELECT. The CHANNEL SET UP menu appears. 4 Move the cursor (z) to “CHANNEL FIX” with + ◊ or – √ and press SELECT. The selected position turns red. 5 Using + ◊ or – √, select the Video/TV’s cable box input channel that you want to set and press SELECT. With each press, the input mode changes as follows: When you set CHANNEL FIX to “2-6,” you can only watch the TV channel that you have fixed, or the input line. When you set CHANNEL FIX to “LINE,” you cannot switch the line input to a TV channel. When you want to switch CHANNEL FIX off, set it to “OFF.” 6 Press MENU to return to the original screen. Selecting the Video/TV’s Cable Box Input Channel – CHANNEL FIX CABLE: OFFCHANNEL FIX: OFFAUTO PROGRAMCHANNEL SKIP/ADDVCR P l us+ SET UPCHANNEL SET UP MENU Move Select ExitSELECT MENU CABLE: OFFCHANNEL FIX: OFFAUTO PROGRAMCHANNEL SKIP/ADDVCR PLUS+ SET UPCHANNEL SET UP MENU Move Select ExitSELECT MENU
Additional Operations Some programs are broadcast with Caption Vision. To display Caption Vision, select either CC1, CC2, TEXT1, or TEXT2 from the menu. CC1 or CC2 shows you an on-screen version of the dialogue or sound effects of a program. (The mode should be set to CC1 for most programs.) TEXT1 or TEXT2 shows you on-screen information presented using either half or the whole screen. It is not usually related to the program. Some programs are broadcast with XDS (Extended Data Service) which shows a network name, program name, program length, call letters and time of the show. When you select XDS with the DISPLAY button, this information will be displayed on the screen if the broadcaster offers this service. 1 Press MENU to display the main menu. 2 Move the cursor (z) to “SET UP” with + ◊ or – √ and press SELECT. The SET UP menu appears. 3 Move the cursor (z) to “CAPTION VISION” with + ◊ or – √ and press SELECT. The caption setting turns red. 4 Using + ◊ or – √, select the caption type you want and press SELECT. 5 Press MENU to return to the original screen. To cancel caption display Press DISPLAY repeatedly until “DISPLAY OFF” appears on the screen. With each press, the display changes as follows: Note Poor reception of TV programs cancause errors in Caption Vision.Captions may appear with errorsinstead of the correct words. Displaying Caption Vision/XDS On-screen information n XDS n Caption Vision or Text DISPLAY OFF
Additional OperationsThe TV programs and movies shown on TV are given a rating signal basedon the following rating systems.In U.S.A.: U.S. Television Parental Guidelines to rate television programs(U.S. TV ratings), and Motion Picture Association of America (MPAA)Guidelines to rate movies including those shown on TV (movie ratings).In Canada: Canadian English Language ratings to rate television programsin English, and Canadian French Language ratings to rate those in French.To block programs you feel are unsuitable for your children, you need toset the TV for the desired rating systems. Sony’s predetermined ratings arealso available.See pages 49 to 51 for a description of the ratings.The Parental Control feature of the Video/TV functions by receiving therating signal from your local broadcasting station or cable serviceprovider. Activating the Parental Control feature First, set a password, then select your desired rating from Sony’spredetermined ratings. 1 Press MENU to display the main menu. 2 Move the cursor (z) to “SET UP” with + ◊ or – √ and press SELECT. The SET UP menu appears. 3 Move the cursor (z) to “PARENTAL CONTROL” with + ◊ or – √ and press SELECT. 4 Move the cursor (z) to “PASSWORD” with + ◊ or – √ and press SELECT. The password position turns red. Blocking Out Programs – Parental Control If you have made a mistakePress ? to return to the previousposition. Note When playing a tape on whichblocked programs are recorded, theblock will be effective in normalplayback mode. In other tapeoperation modes or if the tape iswell-worn or old, the block may notbe effective.PASSWORD: PARENTAL CONTROLMove Select ExitSELECT MENU MENU EJECT INPUT SELECT COUNTER/ REMAIN COUNTER RESET SLEEP MENU CHVOL SELECTRESET INDEX JUMP ENTER TAPE SPEED X2 PAUSE SEARCH REC SLOW VCR Plus MUTING DISPLAY POWER
- Do not enter “4357” corresponding to “HELP” on a phone number pad. (See page 48.) If you enter “4357,” “Invalid password, please try again” appears. 6 To confirm the password, re-enter the same password with the 0–9 buttons. Your password is stored and the PARENTAL CONTROL menu automatically appears. If you want to change the password, see page 47. 7 Move the cursor (z) to “PARENTAL LOCK” with + ◊ or – √ and press SELECT. The selected position turns red. 8 Using + ◊ or – √, select “ON” and press SELECT. 9 Move the cursor (z) to “RATING” with + ◊ or – √ and press SELECT. The rating position turns red. PASSWORD: PARENTAL CONTROLMove Select ExitSELECT MENU MENU Confirm passwordPARENTAL LOCK: OFFPARENTAL CONTROLMove Select ExitSELECT MENU CHANGE PASSWORD MENU PARENTAL LOCK: OFFPARENTAL CONTROLMove Select ExitSELECT MENU CHANGE PASSWORD MENU PARENTAL LOCK: ONPARENTAL CONTROLMove Select ExitSELECT MENU
MENU Ages up to 642 Additional Operations 10 Using + ◊ or – √, select a desired rating (“CHILD,” “YOUTH,” or “YOUNG ADULT”) and press SELECT. If you want to select the ratings from “CUSTOM,” go to step 4 of “Selecting custom ratings in U.S.A.” on page 43 or “Selecting custom ratings in Canada” on page 46, according to your country. 11 Press MENU to return to the original screen. To deactivate the Parental Control feature If you set “PARENTAL LOCK” in the PARENTAL CONTROL menu to “OFF,” the Parental Control feature will not work and you can view all TV programs and movies shown on TV. 1 Perform steps 1–4 of “Activating the Parental Control feature” on page 40. 2 Enter your four digit password using the 0–9 buttons. The PARENTAL CONTROL menu appears. 3 Move the cursor to “PARENTAL LOCK” with + ◊ or – √ and press SELECT. The selected position turns red. 4 Using + ◊ or – √, select “OFF” and press SELECT. 5 Press MENU to return to the original screen. To unlock the Parental Control feature temporarily When you select a Parental Control program, no sound or picture except for a channel number will appear. The indicator is displayed. To view the program, follow the steps below. 1 Press ENTER to display the password screen. 2 Enter your password using the 0–9 buttons. Parental Control will be canceled (“PARENTAL LOCK” set to “OFF”) until you turn your Video/TV off. PARENTAL LOCK: ONPARENTAL CONTROLMove Select ExitSELECT MENU
Additional Operations Selecting custom ratings in U.S.A. If you want to select the ratings to be blocked from “CUSTOM” once you have activated the Parental Control feature (page 40), follow the procedure below. For a detailed description of each rating, see “What the Ratings Mean” on page 49. 1 Perform steps 1–4 of “Activating the Parental Control feature” on page 40. 2 Enter your four digit password using the 0–9 buttons. The PARENTAL CONTROL menu appears. 3 Move the cursor (z) to “RATING” with + ◊ or – √ and press SELECT. The rating position turns red. 4 Using + ◊ or – √, select “CUSTOM” and press SELECT. The CUSTOM RATINGS menu appears. First, select TV ratings. 5 Move the cursor (z) to “TV RATINGS” with + ◊ or – √ and press SELECT. The TV RATINGS menu appears. 6 Move the cursor (z) to the TV rating to be blocked with + ◊ or – √ and press SELECT. The selected position turns red. TV RATINGSCUSTOM RATINGSMove Select ExitSELECT MENU
MOVIE RATINGSUNRATED: VIEW ALL
MENU Select categoryTV–Y: _TV–Y7 : _ FV_TV–G: _TV–PG: _ D_ L_ S_ V_TV–14: _ D_ L_ S_ V_TV RATINGSMove Select ExitSELECT MENU Select categoryTV–MA: _ L_ S_ V_ MENU TV–Y: _TV–Y7 : _ FV_TV–G: _TV–PG: D_ L_ S_ V_TV–14: _ D_ L_ S_ V_TV RATINGSMove Select ExitSELECT MENU Allow ratingTV–MA: _ L_ S_ V_ MENU EJECTINPUTSELECTCOUNTER/REMAINCOUNTERRESETSLEEP MENU
Additional Operations 7 Using + ◊ or – √, select “ ” and press SELECT. The indicator automatically appears beside the selected rating and all “higher” ratings, indicating that the programs that match the ratings will be blocked. Some ratings have additional content ratings called “extenders.” The extenders are defined as follows: D (Sexually Suggestive Dialog), FV (Fantasy Violence), L (Coarse Language), S (Sexual Situations) and V (Violence). By setting the extenders, you can define additional viewing limits. For more details of extenders, see page 50. All of the extenders included in the selected ratings will be blocked. If you wish to allow any of them to be viewed, go to step 8. 8 Select the extender to be viewed by pressing SELECT. Each time you press SELECT, the selected position moves to the next extender. 9 Using + ◊ or – √, select “–” and press SELECT. “–” appears beside the selected extender, indicating that the programs that match the extender can be viewed. If you select “ ,” “ ” is displayed to show that the programs that match the extender will be blocked again. 10 Repeat steps 8 and 9 for other extenders. All programs that match the ratings you select and higher, except for the extenders that were canceled, will be blocked. 11 After setting of the TV ratings is complete, move the cursor (z) to “ MENU” with + ◊ or – √ and press SELECT to return to the CUSTOM RATINGS menu. TV–Y: _TV–Y7 : _ FV_TV–G: _TV–PG: D L S VTV–14: D L S VTV RATINGSMove Select ExitSELECT MENU Block ratingTV–MA: L S V MENU TV–Y: _TV–Y7 : _ FV_TV–G: _TV–PG: D L S VTV–14: D L S VTV RATINGSMove Select ExitSELECT MENU Block contentTV–MA: L S V MENU TV–Y: _TV–Y7 : _ FV_TV–G: _TV–PG: D_ L S VTV–14: D L S VTV RATINGSMove Select ExitSELECT MENU Select categoryTV–MA: L S V MENU EJECTCOUNTER/REMAINCOUNTERRESETSLEEP MENU
Additional Operations Second, select movie ratings. 12 Move the cursor (z) to “MOVIE RATINGS” with + ◊ or – √ and press SELECT. The MOVIE RATINGS menu appears. 13 Move the cursor (z) to the movie rating to be blocked with + ◊ or – √ and press SELECT. The selected position turns red. 14 Using + ◊ or – √, select “ ” and press SELECT. The indicator automatically appears beside the selected rating and all “higher” ratings, indicating that the programs that match the ratings will be blocked. 15 Press MENU to return to the original screen. To block TV programs and/or movies for which a rating signal is not given (NR and N/A) For a description of the NR and N/A ratings, see page 49. 1 Perform steps 1–4 of “Selecting custom ratings in U.S.A.” on page 43. 2 Move the cursor (z) to “UNRATED” with + ◊ or – √ and press SELECT. The selected position turns red. G: _R: _X: _PG: _PG–13: _NC–17: _MOVIE RATINGSMove Select ExitSELECT MENU Select rating MENU G: _R: _X: _PG: _PG–13: NC–17: _MOVIE RATINGSMove Select ExitSELECT MENU Allow rating MENU EJECTINPUTSELECTCOUNTER/REMAINCOUNTERRESETSLEEP MENU
G: _R: X: PG: _PG–13: NC–17: MOVIE RATINGSMove Select ExitSELECT MENU Select rating MENU TV RATINGSCUSTOM RATINGSMove Select ExitSELECT MENU
MOVIE RATINGSUNRATED: VIEW ALL
MENU View all unratedprogramming46 Additional Operations 3 Using + ◊ or – √, select the type of programs to be blocked and press SELECT. 4 Press MENU to return to the original screen. Selecting custom ratings in Canada If you want to select the ratings to be blocked from “CUSTOM” once you have activated the Parental Control feature (page 40), follow the procedure below. For a detailed description of each rating, see “What the Ratings Mean” on page 49. 1 Perform steps 1–4 of “Activating the Parental Control feature” on page 40. 2 Enter your four digit password using the 0–9 buttons. The PARENTAL CONTROL menu appears. 3 Move the cursor (z) to “RATING” with + ◊ or – √ and press SELECT. The rating position turns red. 4 Using + ◊ or – √, select “CUSTOM” and press SELECT. The CUSTOM RATINGS menu appears. TV RATINGSCUSTOM RATINGSMove Select ExitSELECT MENU
MOVIE RATINGSUNRATED: BLOCK TV
MENU Select categoryEJECTINPUTSELECTCOUNTER/REMAINCOUNTERRESETSLEEP MENU
Select To block VIEW ALL BLOCK TV BLOCK MOVIES BLOCK ALL No program (to view any unrated TV program and movie) Unrated TV programs Unrated movies Unrated TV programs and movies ENGL I SH RATINGSCUSTOM RATINGSMove Select ExitSELECT MENU
FRENCH RATINGSU. S. A. RATINGS
MENU Select rating system47 Additional Operations 5 Using + ◊ or – √, select the rating you want to block and press SELECT. The selected rating menu appears. 6 Move the cursor (z) to the TV rating to be blocked with + ◊ or – √ and press SELECT. The selected position turns red. 7 Using + ◊ or – √, select “ ” and press SELECT. The indicator automatically appears beside the selected rating and all “higher” ratings, indicating that the programs that match the ratings will be blocked. Some U.S. TV ratings have additional content ratings called “extenders,” such as D, FV, L, S, and V. By setting the extenders, see steps 7 to 10 of “Selecting custom ratings in U.S.A.” on page 44. For more details of extenders, see page 50. All of the extenders included in the selected ratings will be blocked. If you wish to allow any of them to be viewed, go to step 8 of “Selecting custom ratings in U.S.A.” on page 44. 8 Press MENU to return to the original screen. Changing the password 1 Perform steps 1–4 of “Activating the Parental Control feature” on page 40. 2 Enter your four digit password using the 0–9 buttons. The PARENTAL CONTROL menu appears. C: _PG: _C8+: _G: _14+: _18+: _ENGLISH RATINGSMove Select ExitSELECT MENU Select rating MENU Canadian English ratingsG: _8 ans+: _16 ans+: _13 ans+: _18 ans+: _FRENCH RATINGSMove Select ExitSELECT MENU Select rating MENU Canadian French ratingsU.S. TV ratingsTV–Y: _TV–Y7 : _ FV_TV–G: _TV–PG: _ D_ L_ S_ V_TV–14: _ D_ L_ S_ V_TV RATINGSMove Select ExitSELECT MENU Select categoryTV–MA: _ L_ S_ V_ MENU EJECT INPUT SELECT COUNTER/ REMAIN COUNTER RESET SLEEP MENU CHVOL SELECTRESET INDEX TAPE SPEED X2 PAUSE SEARCH REC SLOW VCR Plus MUTING DISPLAY POWER
C: _PG: C8+: _G: _14+: _18+: _ENGLISH RATINGSMove Select ExitSELECT MENU Allow rating MENU Example: Canadian English ratingsC: _PG: C8+: _G: _14+: 18+: ENGLISH RATINGSMove Select ExitSELECT MENU Block rating MENU48 Additional Operations 3 Move the cursor (z) to “CHANGE PASSWORD” with + ◊ or – √ and press SELECT. The CHANGE PASSWORD menu appears. 4 Move the cursor (z) to “PASSWORD” with + ◊ or – √ and press SELECT. The password position turns red. 5 Enter a new four digit password using the 0–9 buttons. 6 Enter the password set in step 5 again to confirm. If you entered it incorrectly, “Password incorrect, please try again” appears. Re-enter the correct password. 7 Press MENU to return to the original screen. If you have forgotten your password 1 Perform steps 1–4 of “Activating the Parental Control feature” on page 40. 2 Enter the master password “4357” (corresponding to “HELP” on a phone number pad). You can then store a new password. PASSWORD: CHANGE PASSWORDMove Select ExitSELECT MENU MENU EJECTINPUTSELECTCOUNTER/REMAINCOUNTERRESETSLEEP MENU
- If you entered “4357” as your password the first time, you cannot store a password. (See step 5 of “Activating the Parental Control feature” on page 41.)
- When you select a Parental Control program and the indicator is displayed on the screen, you cannot view that program even if you enter “4357.” (See “To unlock the Parental Control feature temporarily” on page 42.)49 Additional Operations Sony’s predetermined ratings These are original ratings that Sony predetermined according to the viewer’s age. Each rating allows you to view the certain programs, as follows: See below for a description of each rating. U.S. movie ratings U.S. movie ratings are for movies (including those shown on TV) rated according to the Motion Picture Association of America (MPAA) Guidelines. What the Ratings Mean Ratings in U.S.A. RatingsCHILD:Suitable for children under the age of 6YOUTH:Suitable for children aged 7 and olderYOUNG ADULT:Suitable for children aged 13 and olderViewable U.S. movie ratingsG, NR, and N/AG, PG, NR, and N/AG, PG, PG-13, NR, and N/AViewable U.S. TV ratingTV-Y, TV-G, and TV-NRTV-Y, TV-Y7, TV-G, TV-PG, and TV-NRTV-Y, TV-Y7, TV-G, TV-PG, TV-14, andTV-NR Note NR and N/A ratings are shown together as “UNRATED” in the menu.Ratings (General Audiences—All AgesAdmitted) (Parental Guidance Suggested. SomeMaterial May Not Be Suitable ForChildren)PG-13(Parents Strongly Cautioned. SomeMaterial May Be Inappropriate ForChildren Under 13) (Restricted, Under 17 RequireAccompanying Parent Or AdultGuardian)NC-17 or X(No One 17 Or Under Admitted) (Not Rated) N/A (Not Applicable)ExplanationsIn G-rated films no strong words are used, the violence is at a minimum, nudity and sexscenes are not present, nor is there any drug use.This is a film which may need to be monitored first by parents.Parents are alerted to be very careful about the attendance of their under-teenage childrenwhen viewing.This film includes hard language, tough violence, nudity, drug abuse or other elements ofconcern.This is a film that most parents would consider not suitable for children aged 17 andunder. There may be violence, sex, aberrational behavior, drug abuse or other elements ofconcern.This is a film that a producer has not rated, intending to have his film widely released.This is a film that a producer considers outside the scope of the MPAA ratings.50 Additional Operations U.S. TV ratings U.S. TV ratings are for TV programs rated according to the U.S. Television Parental Guidelines. Explanations This program is designed for young children aged 2–6 and is appropriate for all children. This program is designed for children aged 7 and above. Themes and elements in this program may include mild fantasy violence or slapstick violence, or may frighten children under the age of 7. Most parents would find this program suitable for all ages. It contains little or no violence, no strong language and little or no sexual dialog or situations. This program contains some material that parents may find unsuitable for younger children. This program contains some material that many parents would find unsuitable for children under the age of 14. This program is specifically designed to be viewed by adults and therefore may be unsuitable for children under the age of 17. This is a program broadcast without any rating, such as news, news flashes or sports. Note The TV-NR rating is shown as “UNRATED” in the menu. Extenders D (Sexually Suggestive Dialog) FV (Fantasy Violence) L (Coarse Language) S (Sexual Situations) V (Violence) Explanations Programs containing suggestive dialog, or sexual innuendo Programs containing cartoon violence occurring in TV-Y7 programs only Programs containing coarse language Programs containing sexual content Programs containing violence. There may be some profanity, violence or brief nudity in these programs. About the extenders of U.S. TV ratings TV-Y7, TV-PG, TV-14 and TV-MA ratings have additional content ratings called “extenders” to define additional viewing limits. The extenders are defined as follows: Ratings TV-Y (All Children) TV-Y7 (Directed to Older Children) TV-G (General Audience) TV-PG (Parental Guidance Suggested) TV-14 (Parents Strongly Cautioned) TV-MA (Mature Audience Only) TV-NR (Not Rated/Unrated) Ratings in Canada Sony’s predetermined ratings These are original ratings that Sony predetermined according to the viewer’s age. Each rating allows you to view the certain programs, as follows: See below for a description of each rating. Ratings Viewable Canadian English Language ratings Viewable Canadian French Language ratings Viewable U.S. TV ratings CHILD: Suitable for children under the age of 7 YOUTH: Suitable for children aged 8 and older YOUNG ADULT: Suitable for children aged 14 and older C and G C, G, C8+ and PG C, G, C8+, PG and 14+
G and 8 ans+ G, 8 ans+, 13 ans+ TV-Y, TV-G, and TV-NR TV-Y, TV-Y7, TV-G, TV-PG, and TV-NR TV-Y, TV-Y7, TV-G, TV-PG, TV-14, and TV-NR51 Additional Operations Canadian English Language ratings The Canadian English Language ratings are for TV programs in English broadcast in Canada. Ratings
(Programming intended for children under age 8)
(General Audience) C8+ (Programming generally considered acceptable for children 8 years and over to watch on their own)
(Parental Guidance) 14+ (Programming contains themes or content which may not be suitable for viewers under the age of 14.) 18+ (Adult)
(Exempt) Explanations There will be no realistic scenes of violence or no offensive language, nudity or sexual content. Careful attention is paid to themes, which could threaten children’s sense of security and well-being. These programs contain very little violence, either physical or verbal or emotional. There may be some inoffensive slang, no profanity and no nudity. Violence will not be portrayed as the preferred, acceptable, or only way to resolve conflict; or encourage children to imitate dangerous acts which they may see on television. There will be no profanity, nudity or sexual content. Programming intended for a general audience but which may not be suitable for younger children. Parents may consider some content inappropriate for unsupervised viewing by children aged 8–13. Parents are strongly cautioned to exercise discretion in permitting viewing by pre-teens and early teens. These programs contain violence integral to the development of the plot, character or theme, intended for adult audiences. They may contain graphic language and explicit portrayals of nudity and/or sex. Exempt programming includes: news, sports, documentaries and other information programming; talk shows, music videos, and variety programming. Note The E (Exempt) rating is not shown in the menu. Canadian French Language ratings The Canadian French Language ratings are for TV programs in French broadcast in Canada. Ratings
(General) 8 ans+ (8+ General - Not recommended for young children) 13 ans+ (Programming may not suitable for children under the age of 13.) 16 ans+ (Programming is not suitable for children under the age of 16.) 18 ans+ (Programming restricted to adults)
(Exempt) Explanations Programming intended for audience of all ages. These programs contain no violence, or the violence they contain is minimal or is depicted appropriately with humor or caricature or in an unrealistic manner. Programming intended for a broad audience but contains light or occasional violence that could disturb young children. Viewing with an adult is recommended for young children (under the age of 8). Viewing with an adult is strongly recommended for children under 13. These programs contain frequent scenes of violence or intense violence. These programs contain constant violence or scenes of extreme violence. Exempt programming. Note The E (Exempt) rating is not shown in the menu.52 Additional Operations Setting Your Favorite Channels – FAVORITE CHANNEL The FAVORITE CHANNEL feature allows your Video/TV to memorize the channels that you watch the most. If the feature is set to AUTO, the last five channels you selected with the 0-9 buttons are automatically set as your favorite channels. If you want to input your own selection of channels, set the feature to MANUAL. 1 Press MENU to display the main menu. 2 Move the cursor (z) to “SET UP” with + ◊ or – √ and press SELECT. 3 Move the cursor (z) to “FAVORITE CHANNEL” with + ◊ or – √ and press SELECT. The FAVORITE CHANNEL menu appears. 4 Press SELECT to set the mode. The MODE position turns red. 5 Select “AUTO” or “MANUAL” with + ◊ or – √ and press SELECT. If you select AUTO, skip steps 6 through 8. The last five channels you selected with the 0-9 buttons are automatically set as your favorite channels. If you select MANUAL, the favorite channel numbers become white, indicating that favorite channels can be entered. 6 Move the cursor (z) with + ◊ or – √ to select a channel and press SELECT. The selected position turns red.
Additional Operations 7 Using + ◊ or – √, select the channel that you want to set as your favorite channel and press SELECT. 8 Repeat steps 6 and 7 to set the other favorite channels. 9 Press MENU to return to the original screen. Selecting your favorite channels 1 Press SELECT. The favorite channels menu appears. 2 Move the cursor (z) with + ◊ or – √ to select the channel you want to watch and press SELECT. The selected channel will appear on the screen. To exit the favorite channel menu Press + ◊ or – √ to select “Exit” and press SELECT.
Additional Operations The Video/TV automatically marks the tape with an index signal at the point where each recording begins. These signals can be used to find a specific recording. Playing back to the beginning of each program – Index Scan 1 Insert a tape with index signals. 2 Press INDEX once during playback. 3 Press ) FF or 0 REW to search for individual programs ahead or behind the current position. The tape rewinds or rapidly advances to the next index signal. Each time an index signal is detected, the index scan number appears and the tape plays for about 5 seconds, then rewinds or rapidly advances to the next index signal. 4 Press PLAY · at the desired program. Locating the desired program – Index Search You can locate a desired program and play it back by designating how many index signals to skip ahead or behind the current position. 1 Insert a cassette with index signals. 2 Press INDEX. 3 Using the 0-9 buttons, enter the number of index signals you want to skip. For example, if the tape at INDEX 02 and you want to locate INDEX 05, press 0 and 3. 4 Press ) FF or 0 REW to begin the search for the program ahead or behind the current position. “INDEX SEARCH 03” appears on the screen. When the desired signal is found, playback begins automatically. Searching Using the Index Function To stop searchingPress STOP p.INDEX SCAN 01INDEX SEARCH 03EJECTINPUTSELECTCOUNTER/REMAINCOUNTERRESETSLEEP MENU
Additional Operations Adjusting the tracking automatically The tracking condition is automatically adjusted on this Video/TV. The AUTO TRACKING indicator will appear for three seconds while the Video/TV is searching for the best tracking condition. Adjusting the tracking manually If streaks or snow noise appear on the screen during normal playback or slow picture, adjust the picture tracking condition manually. 1 Press MENU to display the main menu. 2 Move the cursor (z) to “TAPE” with + ◊ or – √ and press SELECT. The TAPE menu appears. 3 Move the cursor (z) to “TRACKING” with + ◊ or – √ and press SELECT. The TRACKING menu appears. 4 Select “TRACKING ADJUST” with + ◊ or – √ and press SELECT. The tracking meter appears. 5 Using + ◊ or – √, adjust the tracking until the picture is clear. 6 Press SELECT. The TRACKING menu reappears. 7 Press MENU to return to the original screen. Enhancing Video Picture Quality To return to automatictrackingSet AUTO to ON in the TRACKINGmenu with + ◊ or – √ and pressSELECT.NORMAL TRACKINGTRACKING ADJUSTTAPE REMAIN: T-120AUTO REPEAT: OFFNOISE REDUCTION: OFFTRACKING TAPE MENU Move Select ExitSELECT MENU
INPUT SELECT56 Additional Operations You can automatically reduce the picture noise on the video playback picture by setting NOISE REDUCTION to ON. Use this feature when you are playing a well-worn or old video, such as a rental video. 1 Press MENU to display the main menu. 2 Move the cursor (z) to “TAPE” with + ◊ or – √ and press SELECT. The TAPE menu appears. 3 Move the cursor (z) to “NOISE REDUCTION” with + ◊ or – √ and press SELECT. The selected position turns red. 4 Using + ◊ or – √, select “ON” and press SELECT. The picture noise is reduced. 5 Press MENU to return to the original screen. Reducing the Picture Noise TAPE REMAIN: T-120AUTO REPEAT: OFFNOISE REDUCTION: OFFTRACKING TAPE MENU Move Select ExitSELECT MENU TAPE REMAIN: T-120AUTO REPEAT: OFFNOISE REDUCTION: OFFTRACKING TAPE MENU Move Select ExitSELECT MENU TAPE REMAIN: T-120AUTO REPEAT: OFFNOISE REDUCTION: ONTRACKING TAPE MENU Move Select ExitSELECT MENU EJECTCOUNTER/REMAINCOUNTERRESETSLEEP MENU
Additional Operations INPUTSELEECT
REC STANDBY POWER EJECT TIMER REC Watching the picture input from optional equipment To connect a video camera To connect a VCR without a cable box To connect a VCR with a cable box To watch the video input signal Press INPUT SELECT so that “LINE” appears on the screen. Connecting Optional Equipment Notes
- When connecting optional equipment, such as videogames, please use the connecting cables recommended by the equipment's manufacturer.
- To connect monaural video equipment, connect the audio output of the video equipment to AUDIO L (MONO) of the video TV (KV-20VS42 only). Front to video/audio outputs to video/audio outputs Cable box to LINE IN (VIDEO/AUDIO L (MONO)/R) jacks Front (KV-20VS42 only) Rear Rear (KV-20VS42 only) to VIDEO/AUDIO jacks to video/audio outputs to VIDEO/AUDIO jacks Rear Rear (KV-20VS42 only) to VIDEO/AUDIO jacks to LINE IN (VIDEO/AUDIO L (MONO)/R) jacks to LINE IN (VIDEO/AUDIO L (MONO)/R) jacks58 Additional Information If, after reading the following instructions, you have additional questions related to the use of your Sony Video/TV, please call one of the following members (English only). Customers in the continental United States contact the Direct Response Center at: 1-800-222-SONY (7669) Customers in Canada contact the Customer Relations Center at: (416) 499-SONY (7669) Additional Information Troubleshooting Function TV reception Clock and timer Playback Problems No picture (screen is dark), no sound Good picture but no sound No color or poor color (screen is dark) for color programs, but good sound. No picture, no sound from video input source Cannot receive VHF or UHF channels when using an antenna. TV is fixed to one channel The clock has stopped and “--/--” is displayed. Power is on, but the tape does not run. Poor playback picture Possible causes and remedies
- The AC power cord is disconnected. / Connect the AC power cord.
- The Video/TV is switched off. / Press POWER.
- The Parental Control feature is activated. / See “Activating the Parental Control feature” on page 40.
- The headphones are connected to the 2 jack. / Disconnect the headphones.
- MUTING is displayed on the screen. / Press MUTING.
- Check antenna/cable connections. (page 5)
- Adjust “PICTURE,” “BRIGHTNESS,” “COLOR,” “HUE,” and “SHARPNESS” in the VIDEO menu. (page 19)
- The connecting cord between the Video/TV and the input source is disconnected. / Connect it firmly.
- Input is not selected correctly. / Press INPUT SELECT until the desired input indicator appears. (page 24)
- Cable setting is not correct. / Set CABLE to OFF.
- Cable setting is not correct. / Set CHANNEL FIX to OFF.
- The power has been interrupted or the AC power cord is disconnected for more than 30 minutes. / Re-set the clock and timer settings if necessary. (pages 15, 30)
- Moisture has condensed in the Video/TV. / Turn the power off, unplug the AC power cord and leave the Video/TV for about one hour.
- Adjust the tracking. (page 55)
- The video heads are dirty. / The video heads are dirty (see page 59). Clean the video heads using a Sony video head cleaning cassette. If Sony cleaning cassettes are not available in your area, have the heads cleaned at your nearest Sony service facility (a standard service charge will be required). Do not use a commercially available liquid type cleaning cassette other than Sony’s, as they may damage the video heads. / The video heads may have to be replaced. Consult your local Sony dealer for more information.59 Additional Information initial terminal contamination Symptoms caused by contaminated video heads
- Normal picture • Rough picture • Unclear picture • No picture (or black& white screen appears) Function Playback Recording Timer recording Others Possible causes and remedies
- The tape is defective. / Use a new tape.
- The safety tab of the cassette has been removed. / Cover the tab hole with adhesive tape, or use another cassette with a safety tab. (page 25)
- No cassette has been inserted. / Insert a cassette with the safety tab.
- The tape is at its end. / Rewind the tape.
- The clock has not been set. / Set the current time and date. (page 12)
- You made a mistake when setting the timer. / Check the setting steps. (pages 30 through 32)
- The safety tab of the cassette has been removed. / Cover the tab hole with adhesive tape, or use another cassette with a safety tab.
- No cassette has been inserted. / Insert a cassette with its safety tab.
- No setting was made for the timer. / Set the timer to record a program. (pages 30 through 32)
- You did not press POWER to turn off the Video/TV and set the timer.
- There has been a power interruption lasting more than 30 minutes.
- The Multichannel TV Sound feature was set to SAP but a SAP program was not being broadcast. (KV-20VS42 only) / Set the MTS setting to STEREO or MONO.
- The Video/TV is equipped with a self-diagnosis function. If there is a problem with your Video/TV, the STANDBY lamp on the front panel will flash repeatedly. Counting the number of flashes helps you inform qualified Sony personnel of the Video/TV’s condition. / Press POWER on the Video/TV to turn it off, then inform qualified Sony personnel or the Direct Response Center (page 58) of the number of flashes.
- Another cassette is already inserted. /Press EJECT 6 to eject the cassette.
- The batteries are low. /Replace the batteries. (page 4)
- The batteries are installed incorrectly. /Install the batteries with correct polarities. (page 4)
- Moisture condensation occurred. / Turn the power off, unplug the AC power cord and leave the Video/TV to dry for over one hour. Problems The sound drops out. The cassette is ejected when you press REC r. Recording does not function. Timer settings cannot be made. The cassette is ejected when you press POWER to set the timer. The TIMER REC lamp does not light up even though you press POWER to set the timer. Timer recording was not made. No sound is recorded on the audio track. The picture turns off and the STANDBY lamp on the front panel flashes (self- diagnosis function) A cassette cannot be inserted. The remote control does not work. The VCR does not operate.60 Additional Information KV-13VM42/KV-13VM43/ KV-20VM42 AUDIO IN: phono jack (2) Input level: 500 mVrms Input impedance: 47 kilohms KV-20VS42 AUDIO IN: phono jack (4) Input level: 500 mVrms Input impedance: 47 kilohms Headphones jack KV-20VS42: Stereo minijack KV-13VM42/KV-13VM43/ KV-20VM42: Mono minijack General Clock Quartz locked Clock back up Approx. 30 minutes min. Power requirements 120 V AC, 60 Hz Power consumption TV power ON KV-13VM42/KV-13VM43: 69 W KV-20VM42: 88 W KV-20VS42: 89 W Standby KV-13VM42/KV-13VM43/ KV-20VM42/KV-20VS42: 2.9 W Operating temperature 5°C to 40°C (41°F to 104°F) Storage temperature –20°C to 60°C (–4°F to 140°F) Dimensions KV-13VM42/KV-13VM43: Approx. 375 × 399 × 408 mm (w/h/d) (14
/4 inches) Mass KV-13VM42/KV-13VM43: Approx. 14.5 kg (31 lbs. 16 oz) KV-20VM42/KV-20VS42: Approx. 26 kg (57 lbs. 5 oz) Accessories supplied Remote control (1) Size AA (R6) batteries (2) Design and specifications are subject to change without notice. TV Section Television system American TV Standard Channel coverage VHF: 2-13/UHF:14-69/ CATV: 1-125 Picture tube KV-13VM42/43: Microblack
Trinitron® tube KV-20VM42: Trinitron® Tube 20-inch picture measured diagonally KV-20VS42: Trinitron® Tube 20-inch picture measured diagonally Screen size KV-13VM42/43: 13-inch picture measured diagonally KV-20VM42/KV-20VS42: 20-inch picture measured diagonally Antenna 75-ohm external antenna terminal for VHF/UHF Video Section Format VHS NTSC standard VCR system KV-13VM42/KV-13VM43/KV- 20VM42: Rotary 4-head helical scanning monaural system KV-20VS42: Rotary 4-head helical scanning Hi-Fi stereo system Audio recording system KV-13VM42/KV-13VM43/ KV-20VM42: Monaural KV-20VS42: HiFi Stereo Video signal NTSC color, EIA standards Tape speed SP: 33.35 mm/s (1
First please connectthe antennaPress INPUT SELECT to exit ENGLISH :
Coupure Coupure L + R L + R L + R L + R SAP SAP L + R L + R
REC SLOW VCR PlusMUTING DISPLAY
CLASSEMENT ANGLA I S
(Tous publics-Tous âges)
CAPT I ON V I S I ON: CC 1
L + R L + R L + R L R L + R
REC SLOW VCR PlusMUTING DISPLAY
CAPT I ON V I S I ON: CC 1
CAPT I ON V I S I ON: TEXT2