USER MANUAL Macchina de caffé Americano B412 BORETTI
Coffee maker ★Instruction booklet
1-4 KOPJES KOFFIE ZETTEN

All of our products are always submitted to a strict quality control before they are sold to you.
Should you nevertheless experience problems with your device, we sincerely regret this.
In that case, we kindly request you to contact our customer service.
Our staff will gladly assist you.

+3214217191

info@linea2000.be
Monday - Thursday: 8.30 - 12.00 and 13.00 - 17.00
Friday: 8.30 - 12.00 and 13.00 - 16.30
This appliance has a two year warranty period. During this period the manufacturer is responsible for any failures that are the direct result of construction failure. When these failures occur the appliance will be repaired or replaced if necessary. The warranty will not be valid when the damage to the appliance is caused by wrong use, not following the instructions or repairs executed by a third party. The guarantee is issued with the original till receipt. All parts, which are subject to wear, are excluded from the warranty.
If your device breaks down within the 2-year warranty period, you can return the device together with your receipt to the shop where you purchased it.
The guarantee on accessories and components that are liable to wear-and-tear is only 6 months.
The guarantee and responsibility of the supplier and manufacturer lapse automatically in the following cases:
If the instructions in this manual have not been followed.
In case of incorrect connection, e.g., electrical voltage that is too high.
In case of incorrect, rough or abnormal use.
In case of insufficient or incorrect maintenance.
In case of repairs or alterations to the device by the consumer or non-authorised third parties.
If the customer used parts or accessories that are not recommended or provided by the supplier / manufacturer.

SAFETYINSTRUCTIONS
When using electrical appliances, basic safety precautions should always be taken, including the following:
- Read all instructions carefully. Keep this manual for future reference.
-
Make sure all packaging materials and promotional stickers have been removed before using the appliance for the first time. Make sure children cannot play with the packaging material.
This appliance is intended to be used in household and similar applications such as:
-
staff kitchen areas in shops, offices and other working environments;
farm houses;
-
by clients in hotels, motels and other residential type environments;
-
bed and breakfast type environments.
-
This appliance is not intended for use by persons (including children) with reduced physical, sensory or mental capabilities, or lack of experience and knowledge, unless they have been given supervision or instruction concerning use of the appliance by a person responsible for their safety.
Children should be supervised to ensure that they do not play with the appliance.
-
This appliance can be used by children aged from 16 years and above if they are continuously supervised. This appliance can be used by people with reduced physical, sensory or mental capabilities or lack of experience and knowledge if they have been given supervision or instruction concerning use of the appliance in a safe way and understand the hazards involved. Keep the appliance and its cord out of reach of children aged less than 16 years. Cleaning and user maintenance shall not be done by children.
-
The appliance must be disconnected from its power source when not in use, during service and when replacing parts. Allow to cool before putting on or taking off parts, and before cleaning the appliance.
-
If the supply cord is damaged, it must be replaced by the manufacturer, its service agent or similarly qualified persons in order to avoid a hazard.
-
CAUTION: In order to avoid a hazard this appliance must not be supplied through an external switching device, such as a timer, or connected to a circuit that is regularly switched on and off by the utility.
-
The surfaces of the appliance are likely to get hot during use. It is advised not to touch the surfaces of the appliance other than the handles to avoid burns.
-
Never leave the appliance unattended while it is functioning.
- Do not use or store this appliance outdoors.
-
Do not use this appliance for other than intended use.
-
Check carefully that the voltage and frequency of the power net match the indications on the rating label of the appliance.
-
The plug must be plugged into an appropriate outlet that is installed and grounded in accordance with all local standards and requirements.
-
Do not operate this appliance with a damaged cord or plug or in the event the appliance malfunctions or has been damaged in any manner. Return the appliance to the Boretti Elektro Service Department or its service agent for examination, repair, or electrical or mechanical adjustment. Do not try to repair the appliance yourself.
- To protect against electrical shock or burns, do not immerse unit, cord, or plug in water or other liquid.
- Do not operate the appliance with wet hands.
- A short power supply cord is provided to reduce the risk of becoming entangled in or tripping over a longer cord. DO NOT USE WITH AN EXTENSION CORD.
- Unwrap the cord completely to prevent overheating of the cord.
- Do not let the power supply cord hang over the edge of a counter, or touch hot surfaces.
- Do not allow the power cord supply to run underneath or around the unit.
- Do not place on or near a hot gas or electric burner or sink, or in a heated oven.
- Do not place near flammable materials, gases or explosives.
- Make sure the appliance is correctly assembled, then plug the cord in the wall outlet. To disconnect, always make sure that the coffee maker is switched off, then remove the plug from the wall. Never pull the cord or appliance to remove the plug from the socket.
- Failure to maintain this appliance in a clean condition could adversely affect the life of the appliance and possibly result in a hazardous situation.
- During boiling, hot steam may come through the filter or any other opening. Keep hands and face at a safe distance during operation.
- Any injury or damage caused by failure to comply with these rules are at your own risk. Neither the manufacturer, importer, or the supplier may be held liable.
- Do not overfill the kettle. Never add water above the maximum level marked on the appliance.
- Do not spill any liquid on the connector.
The appliance must not be immersed in water or any other liquid for cleaning
Only use the utensils delivered with the appliance.
- Do not move the appliance while in use or when still hot. Allow to cool before moving the appliance.
- Never use the coffee maker when it is empty. Always make sure that there is water in the water tank when you switch on the appliance.
- Do not use the appliance when it shows signs of damage.
- Do not put a hot carafe on a wet or cold surface.
- Never use the coffee maker without the lid on the carafe.
- Never leave an empty carafe on a hot keep-warm plate. The carafe could crack.
SAVE THESE INSTRUCTIONS FOR FUTURE REFERENCE

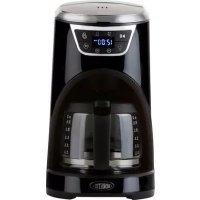
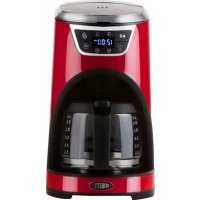
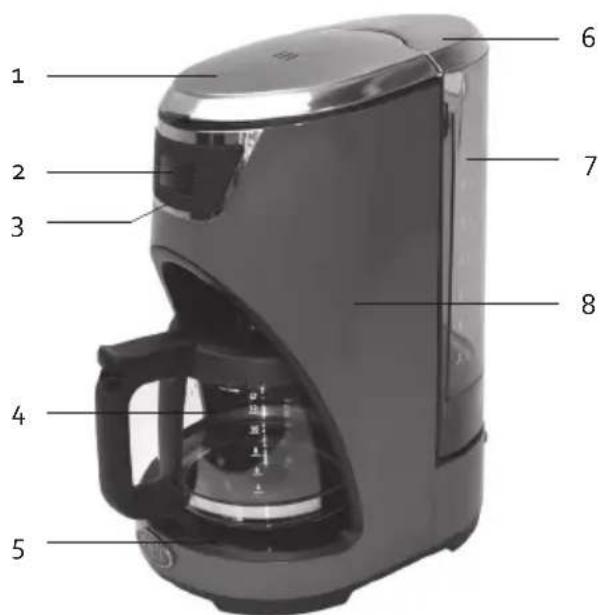
PARTS
- Top cover
- Display
- Control panel
- Glass carafe
- Keep-warm plate
- Lid of water tank
- Water tank
- Casing
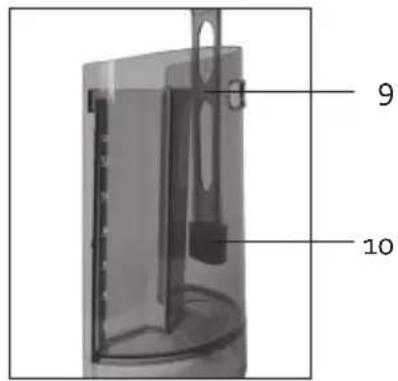
- Water filter holder
- Water filter
- Permanent coffee filter

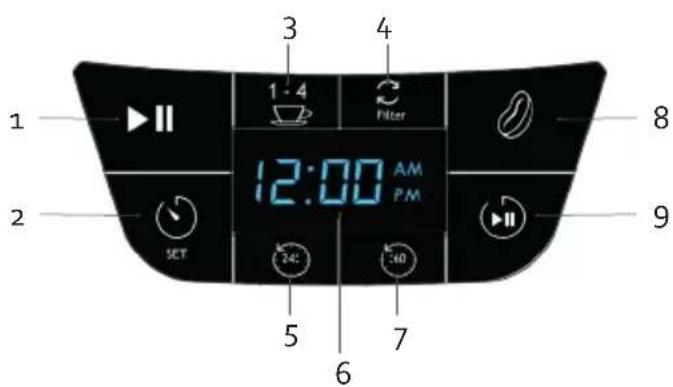
CONTROL PANEL
- Start/Stop button
- Setting the timer
- 1 to 4 cups
- Cleaning and descaling
- Hours
- Display clock/timer
- Minutes
- Setting the strength
9.Start timer

BEFORE THE FIRST USE
- Check if all accessories are included and if the appliance is not damaged.
- Rinse the appliance twice by allowing only water to run through it. Follow the instructions
for 'setting coffee', but do not add any ground coffee. Pour the water out once done.
- Clean the permanent filter, the filter holder, the pot and the lid of the pot thoroughly with hot water or in the dishwasher.
- Wipe the casing and the hot plate a soft, moist cloth.
★ USE
After +/- 2 minutes, the appliance will go into standby mode. The display will fade. If you wish to perform a function or wish to see the clock, you will have to take it out of standby. To do this, press any button.
SETTING THE TIME

Use the 'hours' button and the 'minutes' button to set the time.
- When you put the plug of the coffee machine into the outlet, the pre-set time of 12:00 will appear on the display.
- Press the 'hours' button to set the hours. The clock has a 12-hour time indication. AM means before noon, and PM means after noon.
- Press the 'minutes' button to set the minutes (between 0 and 59).
- You can speed up setting the clock by pressing and holding the buttons.
MAKING COFFEE

- Open the lid of the water reservoir. Lift the reservoir out and fill it with cold water up to the maximum line (12/6 cups). Replace the water reservoir and close the lid.
- Open the lid. Add the desired amount of ground coffee to the permanent filter or use a paper filter type # 4 .
- Close the lid and place the glass pot on the hot plate.
- Put the plug into the outlet and press the start/stop button II. The button's indicator light will light up and the coffee machine will start.
- You can remove the pot from the coffee machine and pour coffee at any time for a
maximum of 20 seconds. The appliance will automatically stop dripping.
- Once the coffee is done, the appliance will beep three times.
The amount of coffee will be somewhat less that the amount of water you put in, since the coffee grounds absorbs water.
- Be careful when pouring: the coffee is hot immediately after it is ready.
- For safety reasons, it is sensible to keep the lid of the glass pot on the pot. This also keeps the coffee hot longer.
- The hot plate will keep the coffee warm for 40 minutes after the coffee is ready. After 40 minutes, the machine will switch off automatically to save energy. You will hear 5 beeps at that time. If the pot is empty before the 40 minutes have gone by, then press the start/stop button to switch it off.
- Make sure that the coffee machine is switched off and always remove the plug from the outlet if the appliance is not being used.
Pointers for great coffee
- A clean coffee maker is essential to make great tasting coffee. Clean the appliance regularly according to the guidelines. Always use fresh, cold water in the coffee maker.
- Store coffee in a dry and cool place.
- Do not reuse any coffee, as this will greatly affect the taste of your coffee. We also do not recommend reheating coffee.
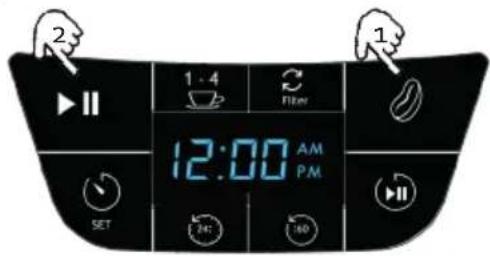
MAKING 1-4 CUPS OF COFFEE

This function optimises the flavour if you wish to set 1-4 cups of coffee. The water runs through more slowly to create an optimum coffee flavour. Fill the water reservoir with only the amount of water you need. For 4 cups of coffee, fill to the level 42 indicator. Press the '1 to 4 cups' button and then the start/stop button both buttons will light up. When the coffee is ready, you will hear 3 beeps, the indicator lights of the buttons will turn off and the appliance will go into keep warm mode.
SETTING THE STRENGTH
The coffee machine makes an average strength coffee by default. If you wish to have stronger coffee, you can select the 'set strength' function. The water runs through more slowly, so that all the flavours are there. So your coffee develops its full flavour. Press the 'set strength' button, then the start/stop button Both buttons will light up. When the coffee is ready, you will hear 3 beeps, the indicator lights of the buttons will turn off and the appliance will go into keep warm mode.
SETTING THE TIMER
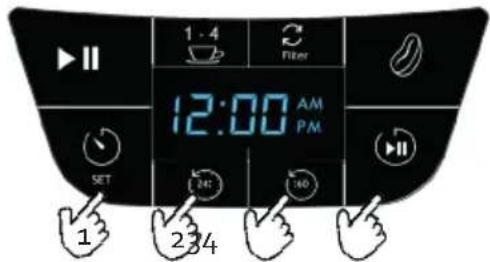
- First set the time (see 'setting the time').
- Press the 'set timer' button. The button will light up and the display will show the time set. The clock has a 12-hour time indication. AM means before noon, and PM means after noon.
- Enter the time you want the appliance to start making coffee. This is done with the 'hours' and 'minutes' buttons. If you do not enter anything within 5 seconds, the display will return to the clock.
- Once you have set the desired time, press on the 'start timer' button. The indicator light of the 'set timer' button will go out, and the 'start timer' light will light up. The timer has now been set.
- The display returns to the clock.
Switching off the timer
To erase the time set and to switch off the timer, press the 'start timer' button The button will no longer be lit.
Checking the timer
To check the time set, press the 'start timer' button. The button will no longer be lit. Press the 'set timer' button. The time selected earlier will appear on the display. Press the 'start timer' button again to confirm and reactivate the timer.

CLEANING AND MAINTENANCE
Caution: Unplug the appliance and let it cool down before cleaning it. Never immerse the cord, the plug or the appliance in water or other fluids in order to avoid the risk of electrical shock.
- Clean the permanent filter, the filter holder, the pot and the lid of the pot thoroughly with hot water or in the dishwasher.
- Wipe the casing and the hot plate a soft, moist cloth.
DECALCIFICATION AND REPLACE THE WATER FILTER

When?
Regularly decalcify your coffee maker. Regular decalcification contributes to a constant coffee quality, a lower energy use and prolongs the durability of your coffee maker.
The appliance will emit a signal after every 70 coffee cycles. The 'clean and descale' button will light up. Descale the appliance and replace the water filter.
How?
- Descaling
-
Press the 'clean and descale' button to switch off the indicator light.
-
Open the water reservoir. Fill the reservoir, using 1 / 2 cleaning vinegar and 1 / 2 cold water.
- Insert a paper filter. Do not use the permanent filter to descale. Do not add any coffee.
- Turn the coffee machine on using the start/stop button. Allow the mixture to run through. Repeat until the fluid coming out is no longer yellow.
Pour out the mixture.
Now let the coffee maker run at least twice with only water, until the vinegar smell has disappeared.
How do you replace the water filter?
- Open the water reservoir. Remove the water filter from the reservoir.
- Open the holder and remove the water filter. Put in a new water filter and close the holder.
- Replace the water filter holder in the water reservoir.

★ ENVIRONMENTAL GUIDELINES

This symbol on the product or on its packaging indicates that this product may not be treated as household waste. Instead it must be brought to the applicable collection point for recycling of electrical and electronic equipment. By ensuring this product is disposed of correctly, you will help prevent potential negative consequences for the environment and human health, which could otherwise be caused by inappropriate waste handling of this product. For more detailed information about recycling of this product, please contact your local city office, your household waste disposal service or the shop where you purchased the product.

The packaging is recyclable. Please treat the packaging ecologically.

GARANTIA