Espresso B400 - Coffee machine BORETTI - Free user manual and instructions
Find the device manual for free Espresso B400 BORETTI in PDF.
| Product type | Automatic espresso machine |
| Brand | Boretti |
| Model | Espresso B400 |
| Supply voltage | 220-240 V |
| Power | 1350 W (estimated) |
| Water tank capacity | 1.2 L (approx.) |
| Milk tank capacity | 0.5 L (approx.) |
| Pump pressure | 15 bar |
| Functions | Espresso, double espresso, cappuccino, latte, milk froth |
| Customization | Adjustable water quantity, adjustable froth |
| Number of filters | 2 (1 cup and 2 cups) |
| Housing material | Plastic and metal |
| Dimensions (W x D x H) | 30 x 25 x 35 cm (estimated) |
| Net weight | 5 kg (estimated) |
| Maintenance | Manual cleaning of milk tank, frother, and filter holder; automatic descaling cycle |
| Safety | Automatic shut-off, overheating protection, indicator lights |
| Warranty | 2 years |
| Included accessories | Filter holder, 1 and 2 cup filters, measuring spoon, milk tank |
Frequently Asked Questions - Espresso B400 BORETTI
User questions about Espresso B400 BORETTI
0 question about this device. Answer the ones you know or ask your own.
Ask a new question about this device
Download the instructions for your Coffee machine in PDF format for free! Find your manual Espresso B400 - BORETTI and take your electronic device back in hand. On this page are published all the documents necessary for the use of your device. Espresso B400 by BORETTI.
USER MANUAL Espresso B400 BORETTI
natural_image
Exterior view of a modern BOKETTO coffee maker with control knobs and a glass stand (no visible text or symbols)B400-B401-B402
Espressomachine ★Handleiding
Espresso machine ★ Instruction booklet
natural_image
Two black-and-white icons: a triangular warning symbol with an exclamation mark and an open book (no text or symbols present)natural_image
Simple line drawing of a cooking pot with a handle and lid, showing a downward arrow indicating compression (no text or symbols)2

natural_image
Simple line drawing of a mechanical device with a handle and internal component (no text or symbols)natural_image
Illustration of hands using a tool to extract dark liquid from a small container (no text or symbols)
natural_image
Illustration of a hand using a dropper to measure a small container (no text or symbols present)
natural_image
Illustration of a hand holding a small object with a pointer and arrow, no text or symbols presentnatural_image
Illustration of a hand using a tool to clean or store coffee using a machine (no text or symbols visible)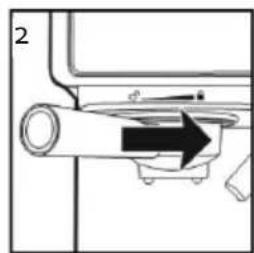
natural_image
Diagram of a mechanical component with a black arrow indicating direction (no text or symbols)
natural_image
Technical line drawing of a mechanical component with a circular base and flange (no text or symbols)natural_image
Technical line drawing of a mechanical device with a pressure gauge and lever (no text or symbols)★ ONTKALKING
natural_image
Line drawing of a coffee maker with handle and control panel (no text or symbols)text_image
Prohibition sign with crossed-out trash bin and black rectangular symbol belownatural_image
Recycling symbol icon with three chasing arrows forming a triangle (no text or labels)natural_image
Simple line drawing of a cooking pot with a handle and lid, no text or symbols presentnatural_image
Illustration of hands pouring dark liquid into a container (no text or symbols)
natural_image
Illustration of a hand using a mechanical tool to measure a container or container (no text or symbols present)
natural_image
Illustration of a hand holding a small container with a pointer and a magnifying glass, no text or symbols presentnatural_image
Illustration of a hand using a small tool to press or install a coffee cup into a machine (no text or symbols visible)
natural_image
Diagram of a mechanical component with a black arrow indicating direction (no text or symbols)
natural_image
Technical line drawing of a mechanical component with no visible text or symbolsPlacer la (les) tasse(s)
natural_image
Technical line drawing of a mechanical device with a pressure gauge and lever (no text or symbols)
DÉTARTRER
natural_image
Line drawing of a microwave oven with control panel and indicator lights (no text or symbols)text_image
Warning symbol for a trash bin with crossed lines indicating no waste or discharge, and a black rectangular block below.natural_image
Recycling symbol icon with three chasing arrows forming a triangle (no text or labels)natural_image
Diagram showing two steps of a cooking process: adding a lid to a pot and rotating the lid with a curved arrow (no text or symbols)2
natural_image
Line drawing of a hand using a tool to clean or prepare a small container inside a container (no text or symbols)
natural_image
Mechanical assembly diagram showing a cylindrical component with an arrow indicating motion direction (no text or symbols)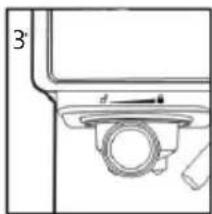
natural_image
Technical line drawing of a mechanical component with a circular feature and dimension label (no text or symbols)natural_image
Technical line drawing of a mechanical device with a pressure gauge and lever (no text or symbols)ENTKALKEN
natural_image
Line drawing of a coffee maker with handle and control panel (no text or symbols)text_image
Prohibition sign with crossed-out trash bin and no text, indicating no waste disposal or restrictionnatural_image
Recycling symbol icon with three chasing arrows forming a triangle (no text or labels)All of our products are always submitted to a strict quality control before they are sold to you. Should you nevertheless experience problems with your device, we sincerely regret this.
In that case, we kindly request you to contact our customer service.
Our staff will gladly assist you.

+32 14 21 71 91

info@linea2000.be
Monday – Thursday: 8.30 – 12.00 and 13.00 – 17.00
Friday: 8.30 – 12.00 and 13.00 – 16.30
This appliance has a two year warranty period. During this period the manufacturer is responsible for any failures that are the direct result of construction failure. When these failures occur the appliance will be repaired or replaced if necessary. The warranty will not be valid when the damage to the appliance is caused by wrong use, not following the instructions or repairs executed by a third party. The guarantee is issued with the original till receipt. All parts, which are subject to wear, are excluded from the warranty.
If your device breaks down within the 2-year warranty period, you can return the device together with your receipt to the shop where you purchased it.
The guarantee on accessories and components that are liable to wear-and-tear is only 6 months.
The guarantee and responsibility of the supplier and manufacturer lapse automatically in the following cases:
- If the instructions in this manual have not been followed.
- In case of incorrect connection, e.g., electrical voltage that is too high.
- In case of incorrect, rough or abnormal use.
- In case of insufficient or incorrect maintenance.
- In case of repairs or alterations to the device by the consumer or non-authorised third parties.
- If the customer used parts or accessories that are not recommended or provided by the supplier / manufacturer.

SAFETY INSTRUCTIONS
When using electrical appliances, basic safety precautions should always be followed to reduce the risk of fire, electric shock and/or injury to persons, including the following:
- Read all instructions.
■ Make sure that your outlet voltage corresponds to the voltage stated on the rating label of the coffee maker. - To protect against fire, electric shock and injury to persons do not immerse cord, plug or unit in water or other liquid.
- Close supervision is necessary when any appliance is used by or near children.
- Unplug from outlet when not in use and before cleaning. Allow to cooling before putting on or taking off parts, and before cleaning the appliance.
- Do not operate any appliance with a damaged cord or plug or after the appliance malfunctions, or has been damaged in any manner. Return appliance to an authorized service facility for examination, repair or adjustment.
-
The use of accessory not recommended by the appliance manufacturer may result in fire, electric shock or injury to persons.
-
To disconnect, turn any control to the off position then remove plug from wall outlet.
- Do not touch any hot surfaces, use handles or knobs.
- Do not use outdoors or for commercial purposes.
- Do not let cord hang over edge of table or counter, or touch hot surface.
- Use on a hard, flat level surface only, to avoid interruption of airflow underneath the appliance.
■ Always be sure to place the water reservoir tightly back in the unit with its lid closed and fill with water on or above the minimum before turning appliance on. - Do not remove the porta-filter while brewing coffee. Please make sure the three lights are on before you remove the porta-filter to make additional coffee. Caution should also be taken while removing the porta-filter since the metal parts will be hot. Please make sure to hold it by the handle and to use the filter retention clip to dispose the grounds. Caution should be taken when moving unit with hot liquids.
-
Do not remove the water reservoir until unit is turned off.
-
This appliance is not intended to be operated by means of an external timer or separate remote-control system.
- The appliance can be used by children aged from 8 years and above and persons with reduced physical, sensory or mental capabilities or lack of experience and knowledge if they have been given supervision or instruction concerning use of the appliance in a safe way and understand the hazards involved. Children shall not play with the appliance. Cleaning and user maintenance shall not be made by children unless they are older than 8 and supervised.
- Keep the appliance and its cord out of reach of children less than 8 years.
Before removing any of the parts and accessories, make sure the three lights are on, press the power button to the off position "O" and unplug the appliance. - Do not remove the porta-filter at any time during the brewing process.
- Do not place on or near a hot gas or electric burner, or in a heated oven.
- Do not use appliance for other than intended use.
- Do not leave the appliance on unattended.
■ This appliance is intended to be used in household and similar applications such as:
a) Staff kitchen areas in shops, offices and other working environments;
b) Farm houses;
c) By clients in hotels, motels and other residential type environments;
d) Bed and breakfast type environments.
■ Save these instructions.
CAUTION: PRESSURE
In order to avoid possible burns to body parts and/or other injury from hot steam and water or damages to the unit, never remove the water reservoir or the porta-filter while your espresso/cappuccino maker is brewing coffee or frothing. Make sure the three lights are on before you can remove the porta-filter to make additional cups of coffee. If you need to add more water or milk to the reservoirs, please make sure the three lights are on and ensure to switch off the unit by pressing the red button on the side of the unit to the off position "O".

PARTS
- Water tank lid
- Removable water tank
- Espresso/custom button with indicator
- Cappuccino/Froth button with indicator
- Latte/Clean button with indicator
- Indicator
- Prota-filter
- Cup height adjusting drawer
- Drip tray
-
Power switch I/O
-
Frothed tube lever
- Frothed milk dispensing tube
- Milk reservoir lid
- Suction tube
- Removable/Clear milk reservoir
- Porta-filter retention clip
- Filter for single shot of espresso
- Filter for double shot of espresso
- Measuring scoop/tamper

text_image
1 2 3 4 5 6 7 8 9 10

text_image
16 17 18 19
BEFORE THE FIRST USE
Cleaning and priming the unit prior to first use
Please refer to the "Parts" section to familiarize with the product and identify all parts.
- Please make sure the unit is off "O" by pressing the power button located on the side of the unit. Make sure it is unplugged from the electrical outlet.
- Remove stickers and labels from the unit. Remove the orange silicon rubber ring from the bottom of the water reservoir.
- First remove and then wash the water reservoir, the milk reservoir, the porta-filter, the three filters and measuring scoop in a mixture of mild detergent and water. Rinse each thoroughly and place them back into the unit.
- Refer to the instructions on "PLACING THE PORTA-FILTER" section before placing or removing the porta-filter and filter from the unit.
NOTE: In order for your unit to work properly time after time, clean it after every use.
Important: prime the unit
To prime unit, run the steam cycle for 90 seconds by following the steps below:
- Fill water reservoir between the "Min" and "Max" levels.
- Fill the milk reservoir with water between the "Min" and "Max" levels.
- Select one of the filters and place it on the porta-filter. Place the porta-filter in the unit ensuring it is properly locked and place a cup under it. Also, make sure the tip of the frothed milk dispensing tube is inside the cup.
- Plug the appliance into the appropriate outlet.
- Turn the power button on "I".
- The three control panel lights will start blinking. Once these lights become solid, press the cappuccino button twice.
- Once this process is completed, the three control panels will turn on solid.
Now your unit has been primed and is ready to be used.
★ USE
Filling the water reservoir
-
Fill the reservoir with water, you may either use a jar to fill it up or remove it from the unit and then fill it up under the tap. If you have removed it from the unit to fill up with water, please make sure to place it back tightly in its place. Fill the reservoir with the desired amount of water ensuring it ranges within the "MIN" and "MAX" markings on the tank. Never use warm or hot water to fill the water reservoir.
-
Close the water reservoir lid and place it back in the unit ensuring it fits tightly.
Filling the milk reservoir
If you plan to prepare cappuccino or latte, remove the milk reservoir from the unit and open the lid then pour the quantity of cold milk you estimate you will need between the "Min" and "Max" levels. When done, place the milk reservoir back in the unit ensuring it fits tightly.
Note: It is advised to use whole milk to get the best foam result.
Choose the filter
Select the filter to be used as follows:
- FOR A SINGLE SHOT—use the filter for a single shot of espresso if using ground coffee.
- FOR A DOUBLE SHOT OR TWO SINGLE SHOTS- use filter for a double shot.
1

2

Inserting the filter
- To insert the selected filter in the porta-filter, make sure to align the notch on the filter with the groove inside the porta-filter.
- Turn the filter to the left or right to lock in place. This will help secure the filter in the porta-filter.
NOTE: To remove and clean the filter, turn filter to the left or right 2 to align the filter notch with the groove inside the porta-filter.
1
natural_image
Simple line drawing of a mechanical device with a handle and a cylindrical component, no text or symbols present.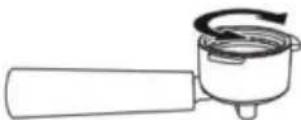
WARNING: Make sure the filter has cooled before attempting to remove the filter.
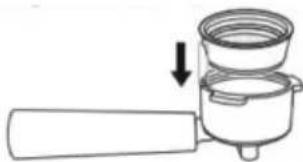
Filling with ground coffee
Place the selected filter on porta-filter as follows:
- Fill the filter with fresh, fine ground espresso coffee (do not overfill).
Note: the ground coffee amount shouldn't exceed the MAX mark - Tamp and compress firmly and evenly ground coffee.
- Clean any excess coffee from the rim to ensure proper fit under brew head.

natural_image
Illustration of a hand pouring liquid into a container (no text or symbols)
natural_image
Illustration of a hand using a tool to measure a small object, with no visible text or symbols.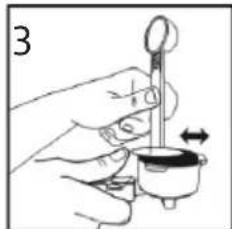
natural_image
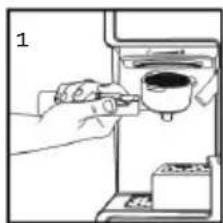
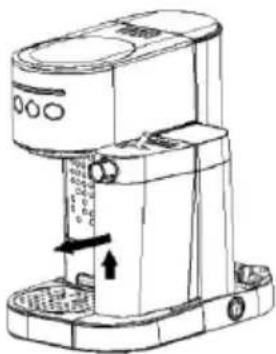
Illustration of a hand holding a small object with a pointer, showing motion (no text or symbols)Place the porta-filter
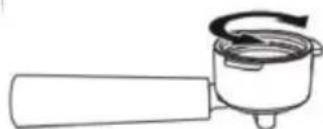
- Position porta-filter underneath the brew head, attach porta-filter by first moving retainer clip back.
- Position handle so that the handle lines up with the open lock icon " " on the unit and fits into the groove.
- Then, slowly turn it to the right until the retention clip is aligned with the closed lock symbol "on the unit.
natural_image
Illustration of a hand using a tool to press or brush into a coffee machine (no text or symbols visible)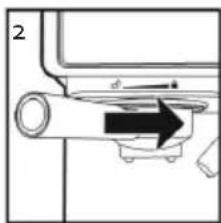
text_image
2 d
natural_image
Technical line drawing of a mechanical component with no visible text or symbolsPlacing the cup(s)
- Pull out the height adjustment tray if you are using a small "demitasse" cup to brew espresso.
-
Keep the height adjustment tray inside its compartment if you are using a larger cup to brew cappuccino.
-
Keep the height adjustment tray inside its compartment if you are using a larger cup to brew latte.
CAUTION: When brewing cappuccino or latte, please make sure to adjust the frothing tube lever in order to position the froth milk dispensing tube inside the cup to be used.
Select the function
PREPARING ESPRESSO
- Press the Espresso Button once to brew one single shot.
- Press the Espresso Button twice to brew a double shot.
Press and hold the Espresso Button for 3 seconds to customize the brewing to your preference. When done, press the Espresso Button once again to stop it.
The unit will start brewing the espresso according to your selection. The unit will turn off automatically and the lights will become solid indicating that the cycle has been completed. Your delicious espresso is ready to be enjoyed.
NOTE: To brew less coffee than the preset serving, press the function button to stop the brewing process when the amount of coffee desired is reached.
PREPARING CAPPUCCINO
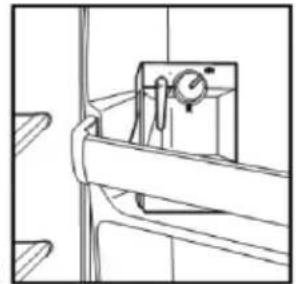
Prior to preparing your cappuccino, adjust the quantity of frothed milk according to your preference by turning the Froth Control Knob to the right for more foam and to the left for less foam.


Note: The foam intensity can be adjusted during the brewing cycle.
- Press the Cappuccino Button once to brew a small cup of cappuccino.
- Press the Cappuccino Button twice to brew a large cup of cappuccino.
The unit will start brewing the cappuccino according to your selection. Your delicious cappuccino is ready to be enjoyed.
PREPARING LATTE
Prior to preparing your latte, adjust the quantity of frothed milk according to your preference by turning the Froth Control Knob to the right for more foam and to the left for less foam.


- Press the Latte Button once to brew a small cup of latte.
- Press the Latte Button twice to brew a large cup of latte.
PREPARING FROTH MILK
The unit also allows you to prepare froth milk only. Press and hold the Cappuccino Button for 3 seconds if you wish to add more foam to your beverage or to prepare froth milk for any other beverage, e.g. macchiato, hot chocolate, chai latte, etc. When done, press the Cappuccino Button once again to stop it.
AFTER PREPARING YOUR BEVERAGES WITH MILK
Once you are done preparing your beverage with milk, you can either store the unit's milk reservoir directly in the refrigerator (ready to be used for the next time) or dispose of the leftover milk.
natural_image
Technical line drawing of a mechanical assembly with no visible text or symbols★ DESCALING
With the milk reservoir placed in position the appliance will remind the user to perform descaling in a way of six indicators quickly flashing alternately. At that time, the user shall fill the water tank with 600ml clean water and dedicated descaler, then press Espresso and Latte buttons simultaneously and the appliance enter into descaling condition automatically, then the six indicators slowly flash alternately. After working for about 30min the six indicators quickly flash alternately and then the user shall empty the water tank and refill it with 600ml clean water. After it, press the Espresso and Latte buttons simultaneously again and the appliance continuous to perform descaling, at that time, the six indicators slowly flash alternately. After working for about 30min, the appliance stops working and goes back to the standby condition. Empty the water reservoir and milk reservoir and fill the water reservoir with clean water for usage.
★ CLEANING AND MAINTENANCE
Cleaning the milk reservoir and frothing tube
Even though you can store the milk reservoir with left over milk in the refrigerator, it is important to clean the reservoir and frothing tube regularly to avoid clogging and building residues. In order to clean the milk reservoir, please follow the instructions listed below:
- Remove the milk reservoir from the unit
- Remove the lid of the reservoir.
-
Pour any milk left and rinse and wash the milk reservoir and its lid thoroughly with warm soapy water. Rinse and dry well. Do not use abrasive cleaners and scouring pads, as they will scratch the finish. The milk reservoir is also dishwasher safe (top rack). Do not place the lid of the milk reservoir and the drip tray in the dishwasher.
Note: Also remove the suction tube and dispensing tube for better cleaning. -
Place a large empty cup under the frothing tube.
-
Press and hold the Latte/clean button for 3 seconds and then release it. The unit will start releasing steam through the frothing tube, let it run for a few seconds until you don't see any milk in cup. When done press the Latte/ clean button once to stop the process.
-
Dispose any water left on the milk reservoir and place it back in the unit.
Note: For removing the milk reservoir, you should raise it up a little on the front, then pull it out.
natural_image
Line drawing of a mechanical device with internal components and directional arrows (no text or symbols)Cleaning the brew head, the porta-filter and filter
- Switch the power button on the side of the unit to the off position "O" and unplug the power cord from the electrical outlet.
- Some of the metal parts might still be hot. Do not touch them with your hands until they have cooled.
- Remove the porta-filter and discard the coffee grounds or used pod. Wash both the porta-filter and filter with warm soapy water and rinse them well. Do not wash the porta-filter and filters in the dishwasher.
- Wipe lower part of the brew head in the unit with a damp cloth or paper towel to remove any coffee grounds that might have been left.
- Place the porta-filter (without any filter) back in the brew head in the unit.
- Place an empty large cup under the porta-filter.
- Press the espresso button once and let the unit brew with water only until it stops automatically.
Cleaning the water reservoir
Discard the remaining water by removing the reservoir and turning it upside down over the sink. It is recommended to empty the water reservoir between uses. Wash the water reservoir with soapy water, rinse it well and wipe it dry. The water reservoir is also dishwasher safe.
Cleaning the unit
- Wipe housing with a soft wet cloth. Do not use abrasive cleaners or scouring pads, as they will scratch the finish.
- Do not store the porta-filter in the brew head. This can adversely affect the seal between the brew head and the porta-filter while brewing espresso.
CAUTION: Do not immerse appliance in water.

PROBLEMS AND CAUSES
| PROBLEM CAUSES SOLUTIONS | ||
| Coffee does not come out. | No water in reservoir.Coffee grind is too fine.Too much coffee in the filter.Appliance was not turned on or plugged in.Coffee has been tamped/ compressed too much.Orange silicon rubber was not removed. | Add waterGrind medium ground coffee.Fill filter with less coffee.Plug unit into electrical outlet and turn it on.Refill filter basket with coffee, do not tamp too much.Remove orange rubber silicon from water reservoir. |
| Coffee comes out around the edge of the porta-filter. | Porta-filter not rotated to full lock position.Coffee grounds around the filter basket rim.Too much coffee in the filter. | Rotate filter holder to full lock position.Wipe off rim and brewing head.Fill with less coffee. |
| Milk is not foamy after frothing or it is not coming out of the frothing tube | Ran out of steamMilk is not cold enough.Frothing tube is blocked. | Ensure there is enough water in the reservoir.Chill milk and frothing pitcher prior to making cappuccino.Follow the instructions to clean the milk reservoirs & frothing tube. |
| Coffee comes out too quickly | Ground coffee is too coarse.Not enough coffee in filter. | Use a finer grind.Use more coffee. |
| Coffee is too weak. 1. Using small filter for double shot of espressoGround coffee is too coarse. | Use large filter for double shot of espressoUse a finer grind. | |
| The three control panel lights are flashing alternatively | Water tank is out of water. Add water to reservoir. | |

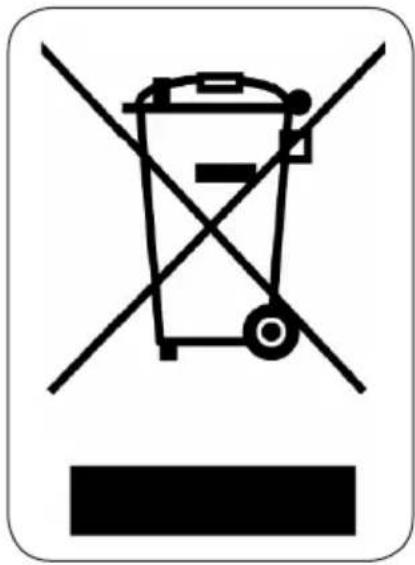
ENVIRONMENTAL GUIDELINES

text_image
Prohibition sign depicting a trash bin crossed with a diagonal line, indicating no waste or discharge.This symbol on the product or on its packaging indicates that this product may not be treated as household waste. Instead it must be brought to the applicable collection point for recycling of electrical and electronic equipment. By ensuring this product is disposed of correctly, you will help prevent potential negative consequences for the environment and human health, which could otherwise be caused by inappropriate waste handling of this product. For more detailed information about recycling of this product, please contact your local city office, your household waste disposal service or the shop where you purchased the product.

natural_image
Recycling symbol icon with three chasing arrows forming a triangle (no text or labels)The packaging is recyclable. Please treat the packaging ecologically.

GARANTIA
natural_image
Diagram showing two steps of a cooking process: adding a lid to a bowl and rotating into a side dish (no text or symbols present)natural_image
Illustration of hands pouring dark liquid into a small container (no text or symbols)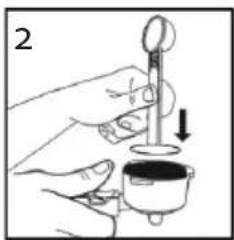
natural_image
Illustration of a hand using a tool to press or install a small object, with an arrow indicating downward motion (no text or symbols present)
natural_image
Illustration of a hand holding a candle with a flame above a cup, no text or symbols presentnatural_image
Line drawing of a hand using a tool to clean or prepare a coffee machine (no text or symbols present)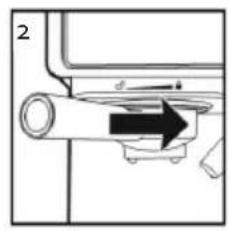
natural_image
Diagram of a mechanical assembly with a cylindrical component and directional arrow (no text or symbols)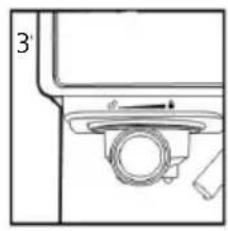
natural_image
Technical line drawing of a mechanical component with no visible text or symbolsColocar la(s) taza(s)
natural_image
Technical line drawing of a mechanical assembly with no visible text or symbolsDESPUÉS DE PREPARAR BEBIDAS CON LECHE
natural_image
Technical line drawing of a coffee maker with directional arrows indicating motion (no text or symbols)text_image
Prohibition sign with crossed-out trash bin and black rectangular symbol belownatural_image
Recycling symbol icon with three chasing arrows inside a rounded square (no text or labels)natural_image
Simple line drawing of a mechanical device with a handle and a lid, no text or symbols present2
natural_image
Simple line drawing of a mechanical component with a handle and curved arrow (no text or symbols)natural_image
Illustration of a hand pouring liquid into a cup (no text or symbols)
natural_image
Illustration of a hand using a tool to measure a small container or container (no text or symbols present)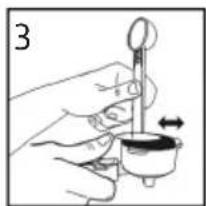
natural_image
Illustration of a hand holding a small object with a pointer and arrow, no text or symbols presentnatural_image
Line drawing of a hand using a tool to clean or prepare food from a machine (no text or symbols)
natural_image
Diagram of a mechanical assembly with a cylindrical component and directional arrow (no text or symbols)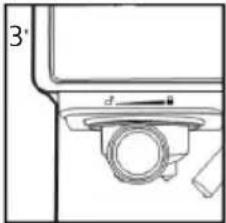
natural_image
Technical line drawing of a mechanical component with no visible text or symbolsVložení hrnečků
PŘÍPRAVA MLÉČNÉ PĚNY
natural_image
Technical line drawing of a mechanical device with a dial and lever (no text or symbols)★ ODVÁPNĚNÍ
natural_image
Technical line drawing of a mechanical device with no visible text or symbolsOHLED NA ŽÍVOTNÍ PROSTŘEDÍ
text_image
Warning sign with crossed-out trash bin and no text, indicating no waste or dischargenatural_image
Recycling symbol icon with three chasing arrows forming a triangle (no text or labels)natural_image
Simple line drawing of a cooking pan with a handle and lid, no text or symbols present2

natural_image
Simple line drawing of a mechanical component with a handle and curved arrow (no text or symbols)natural_image
Illustration of hands pouring dark liquid into a small container (no text or symbols)
natural_image
Illustration of a hand using a dropper to measure a small container with a downward arrow (no text or symbols)
natural_image
Illustration of a hand holding a small object with a pointer and arrow, no text or symbols presentUmiestnenie páky do kávovaru
natural_image
Illustration of a hand using a tool to press a coffee cup into a machine (no text or symbols visible)
natural_image
Diagram of a mechanical device with a cylindrical component and an arrow indicating direction (no text or symbols)