
PIXMA G4510 - Printer CANON - Free user manual and instructions
Find the device manual for free PIXMA G4510 CANON in PDF.
| Features | Details |
|---|---|
| Printer type | Inkjet multifunction printer |
| Functions | Printing, scanning, copying, fax |
| Print resolution | 4800 x 1200 dpi |
| Print speed | Up to 15 pages per minute in black and white, 10 pages per minute in color |
| Connectivity | USB, Wi-Fi, Ethernet |
| Compatibility | Windows, macOS, Android, iOS |
| Paper tray capacity | 250 sheets |
| Ink type | Pigmented and colored ink |
| Maintenance | Print head cleaning, cartridge replacement |
| Dimensions | 375 x 377 x 160 mm |
| Weight | 6.3 kg |
| Power consumption | About 12 W in operation, 0.8 W in standby mode |
| Warranty | 1 year |
Frequently Asked Questions - PIXMA G4510 CANON
User questions about PIXMA G4510 CANON
0 question about this device. Answer the ones you know or ask your own.
Ask a new question about this device
Download the instructions for your Printer in PDF format for free! Find your manual PIXMA G4510 - CANON and take your electronic device back in hand. On this page are published all the documents necessary for the use of your device. PIXMA G4510 by CANON.
USER MANUAL PIXMA G4510 CANON
Read Safety and Important Information (addendum) first.
Lea primero Informacion de seguidade e informacion importante (apendice).
Installing the Printer page 1
Instalacion de la impresora.. pagina 1
UcTaHOBJIeHHI npHTepa cToPiHa 1
1 1

Connecting with Computer and Smartphone/Tablet . page 4
How to Hold Printer Explanatory Movies
JaK TpImaTn npInTeP DoBikOe BiJeO
aalblll aas aasgaaagaae


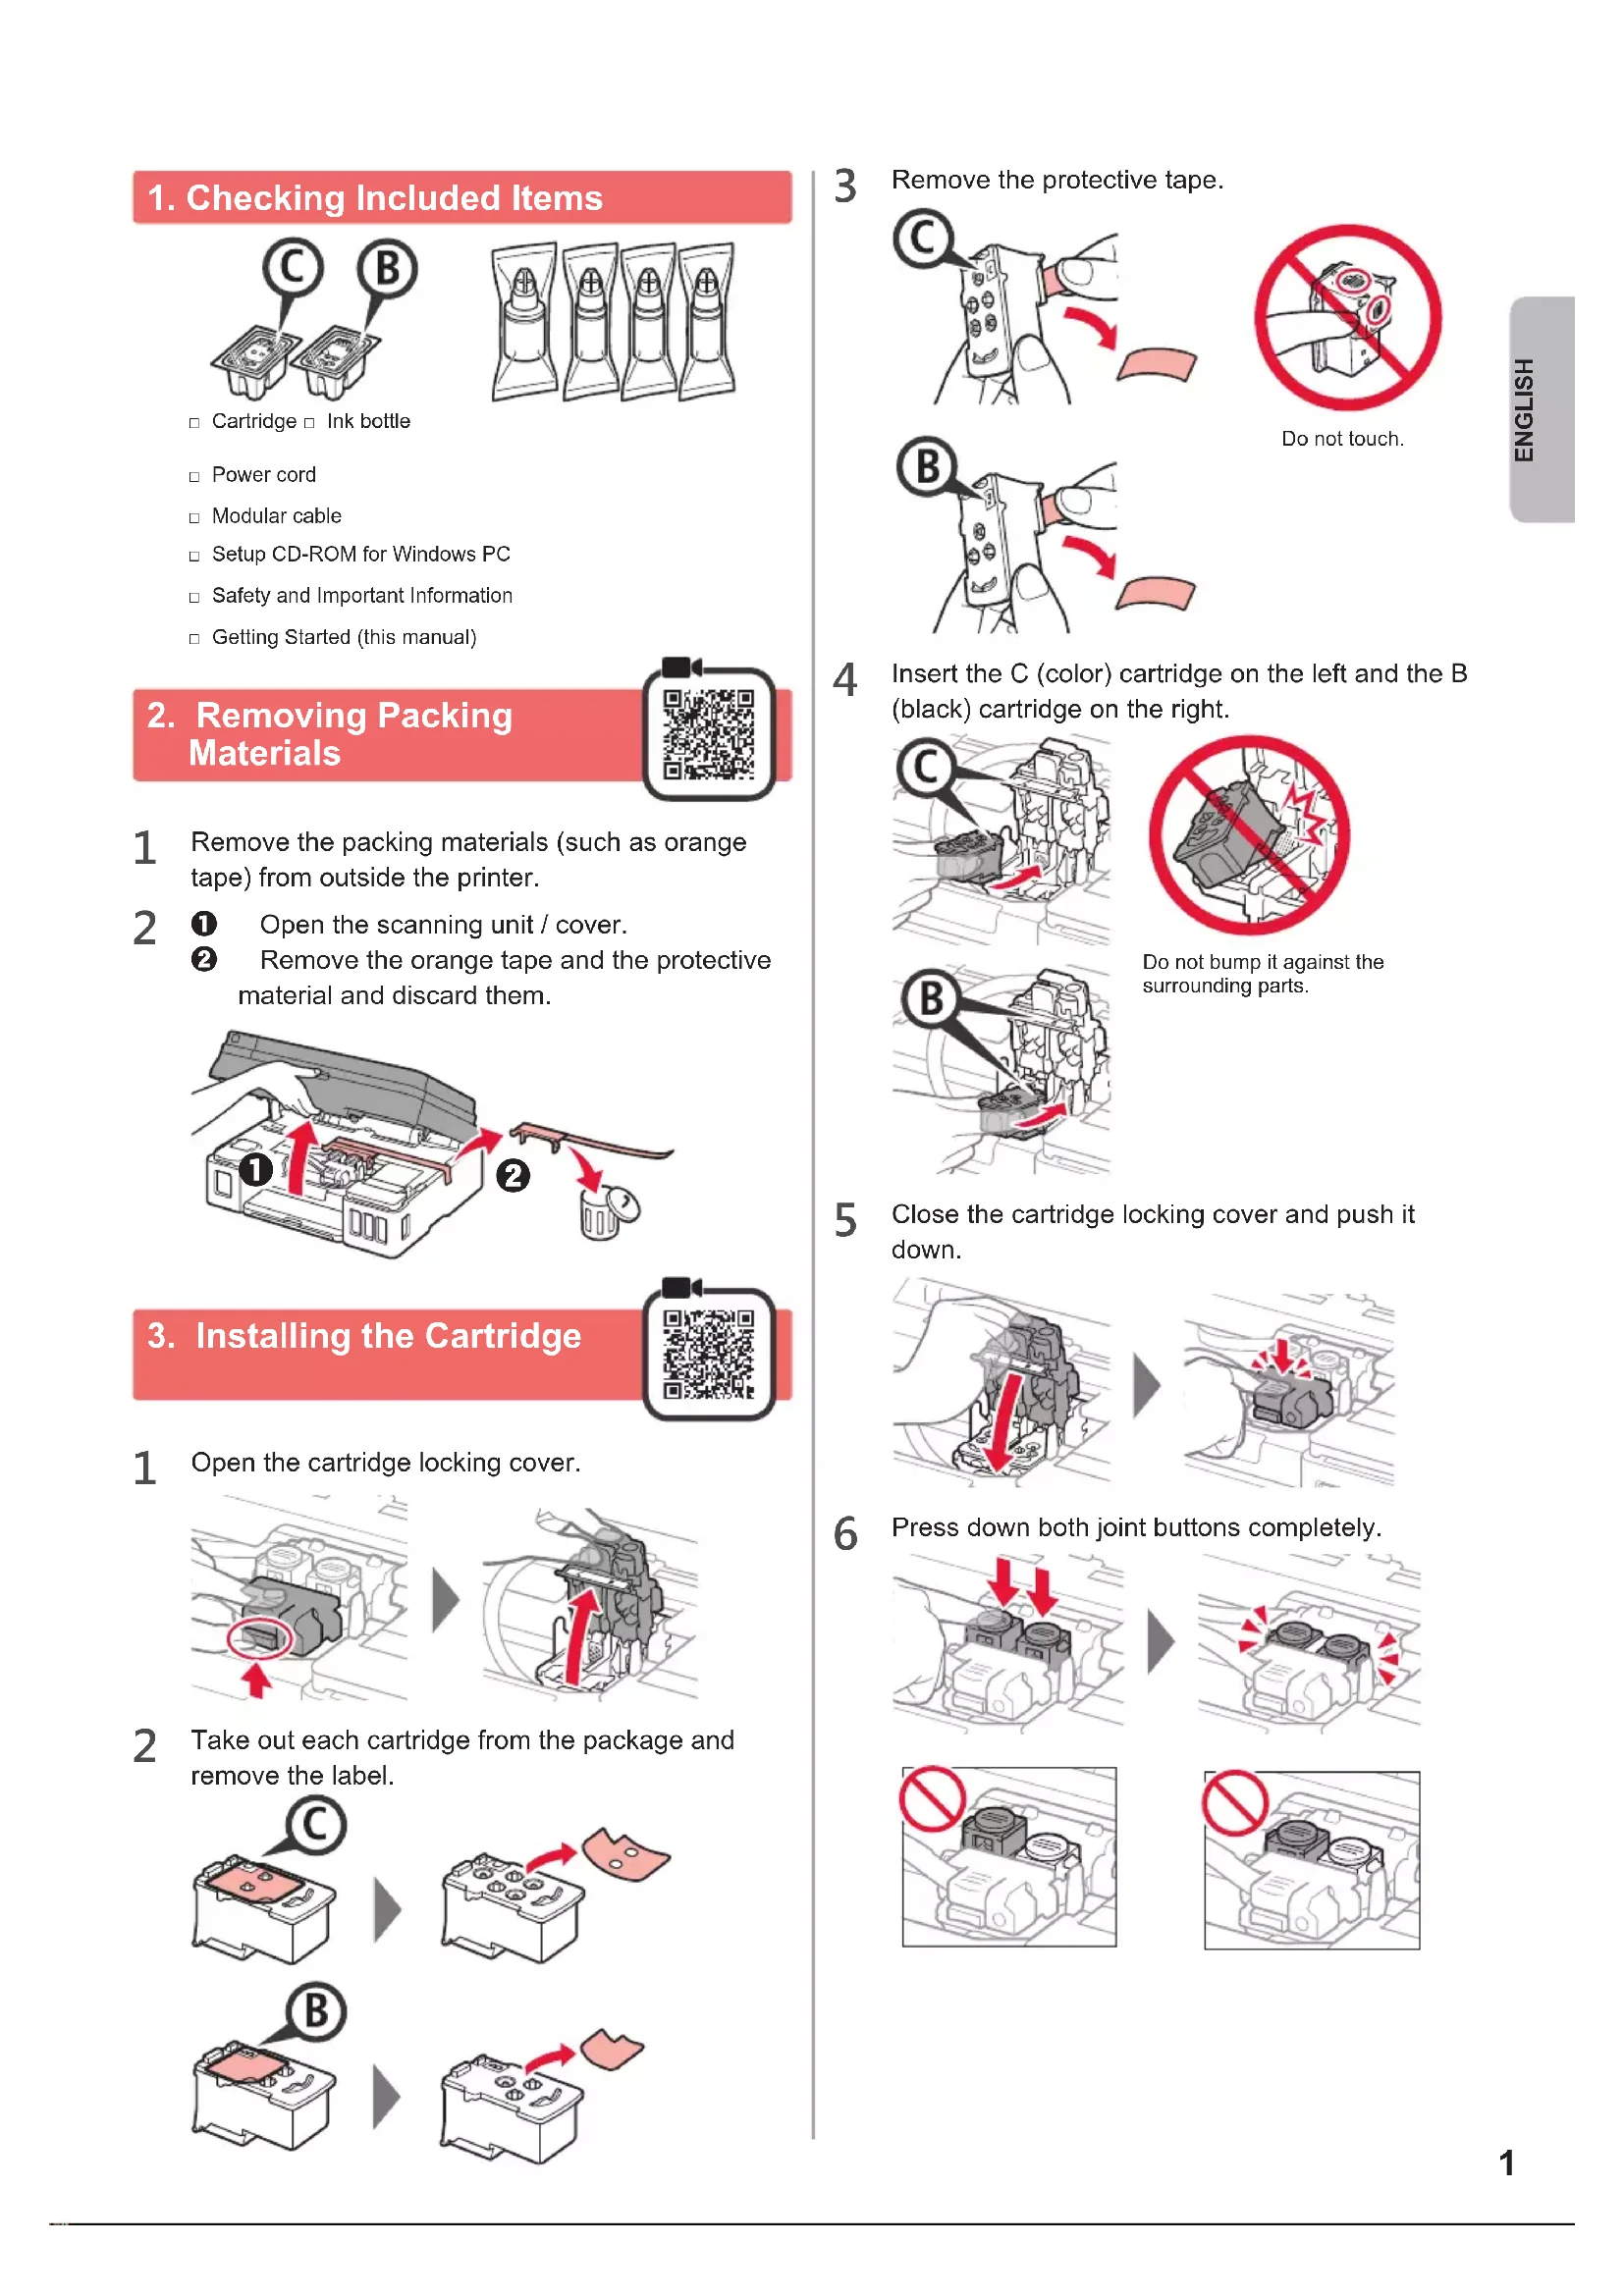
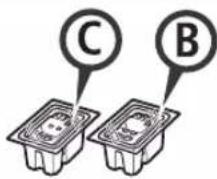
1. Checking Included Items
Cartridge Ink bottle
Power cord
Modular cable
Setup CD-ROM for Windows PC
Safety and Important Information
Getting Started (this manual)
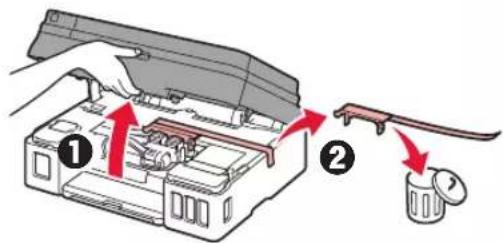
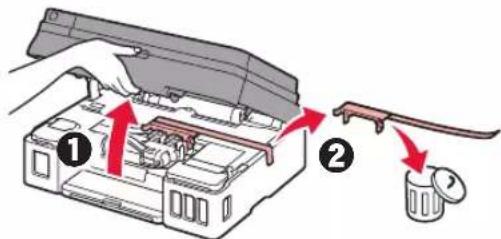
2. Removing Packing Materials

1 Remove the packing materials (such as orange tape) from outside the printer.
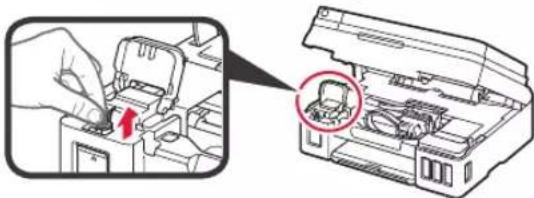
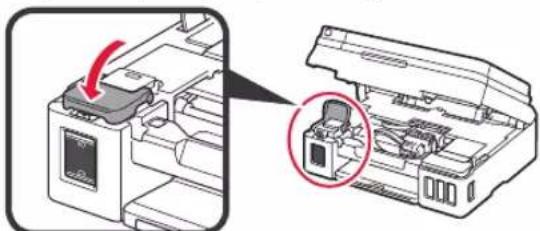
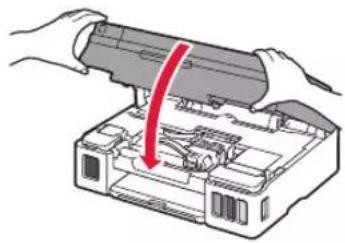
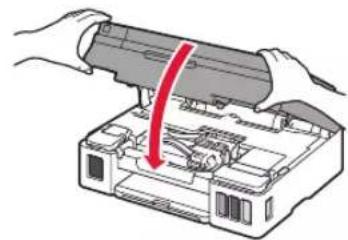
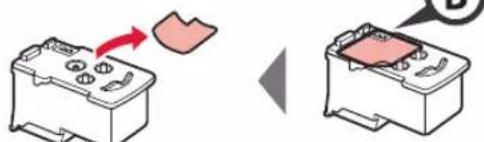
2 ① Open the scanning unit / cover.
Remove the orange tape and the protective material and discard them.
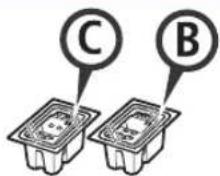
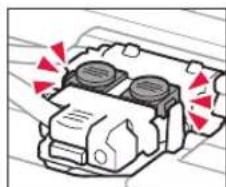
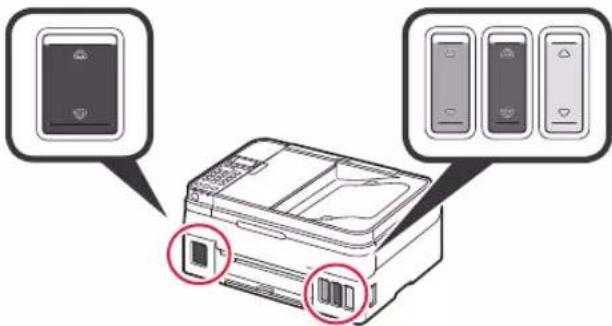
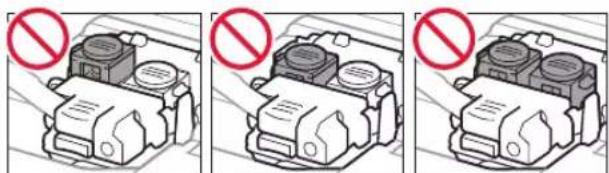
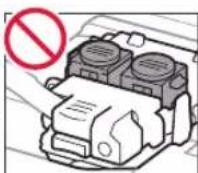
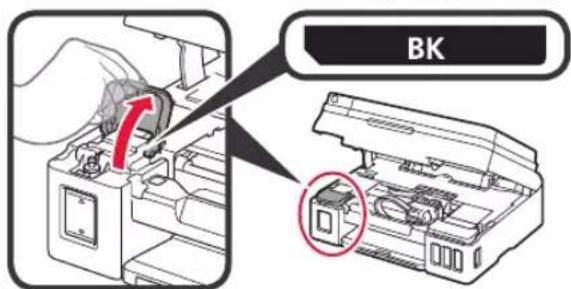
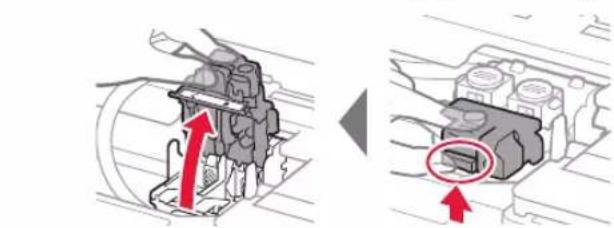
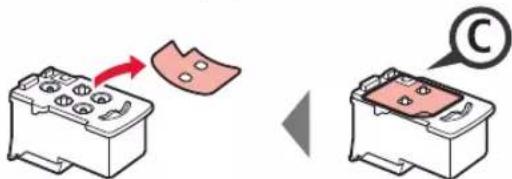
3. Installing the Cartridge

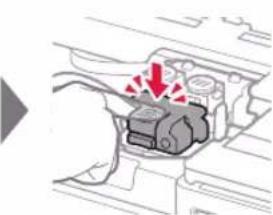
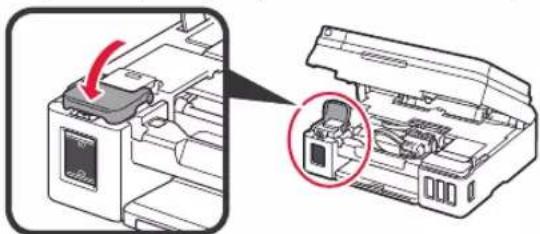
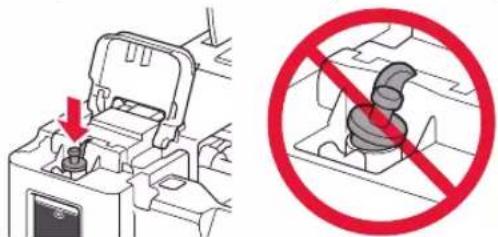
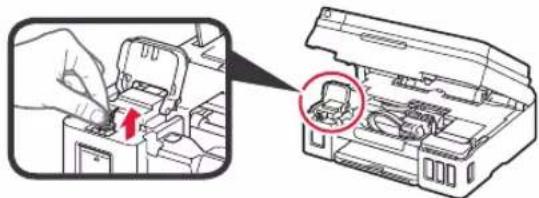
1 Open the cartridge locking cover.
2 Take out each cartridge from the package and remove the label.

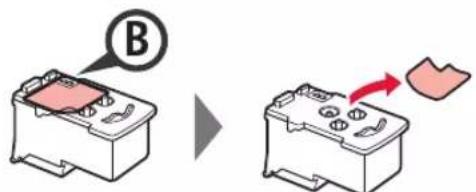
3 Remove the protective tape.

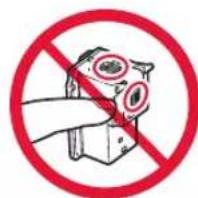
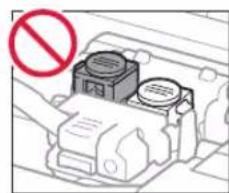
Do not touch.

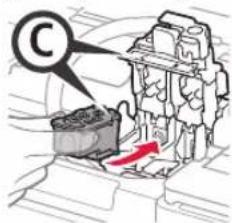
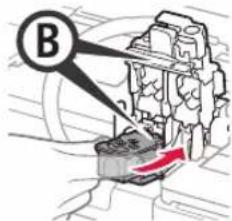
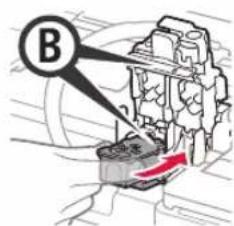
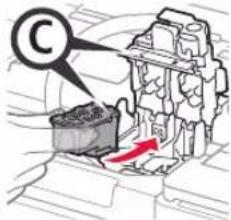
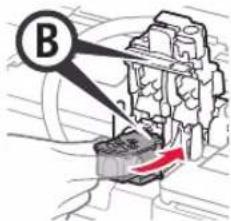
4 Insert the C (color) cartridge on the left and the B (black) cartridge on the right.

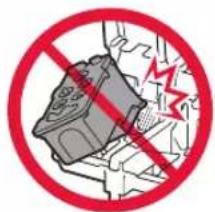
Do not bump it against the surrounding parts.
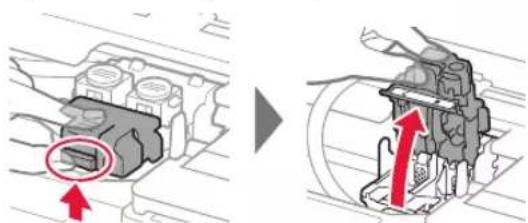
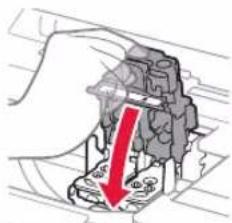
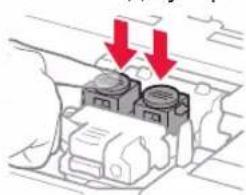
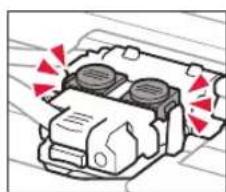
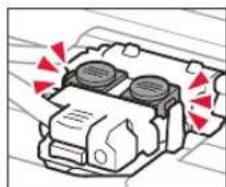
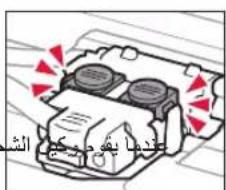
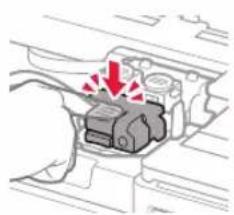
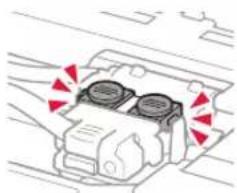
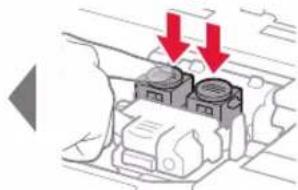
5 Close the cartridge locking cover and push it down.
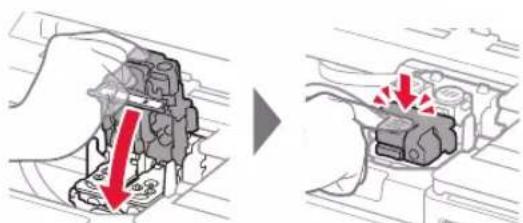
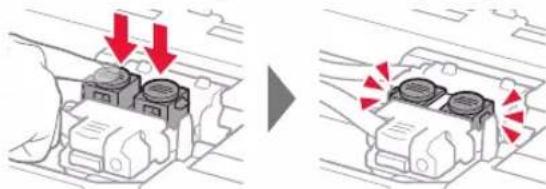
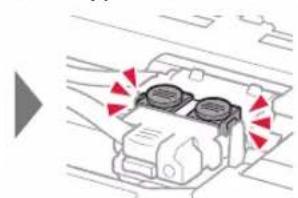
6 Press down both joint buttons completely.

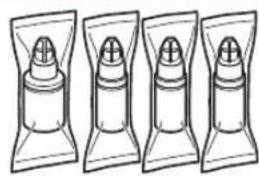
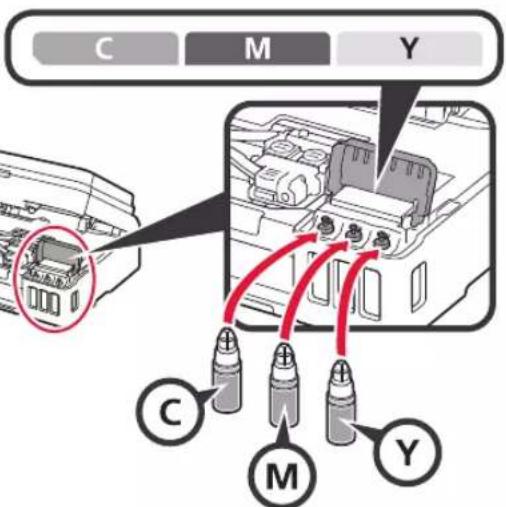
4. Pouring Ink

This product requires careful handling of ink. Ink may splatter when the ink tanks are filled with ink. If ink gets on your clothes or belongings, it may not come off.
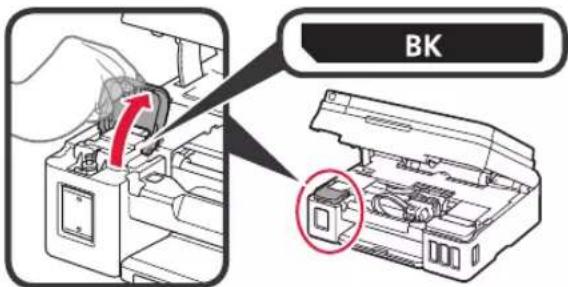
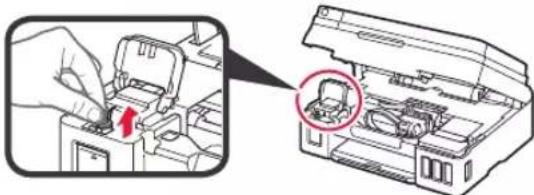
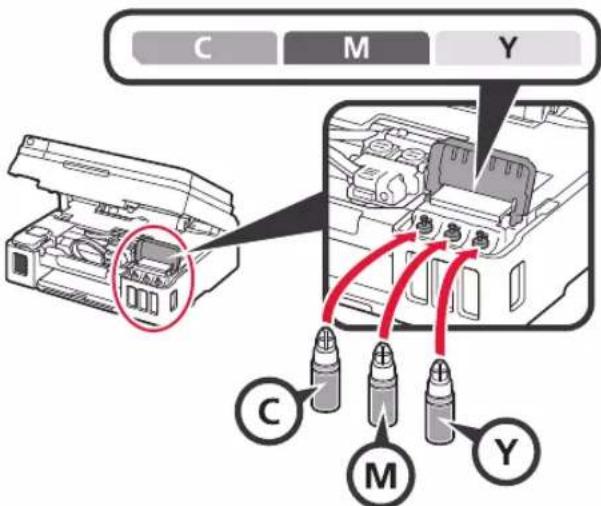
1 Open the ink tank cover.
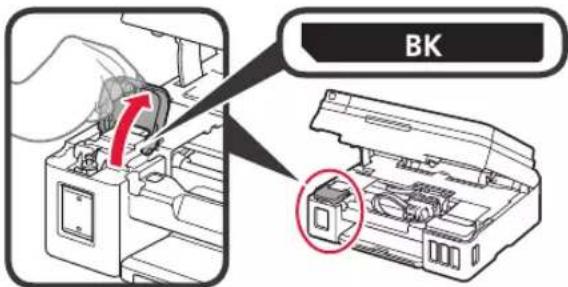
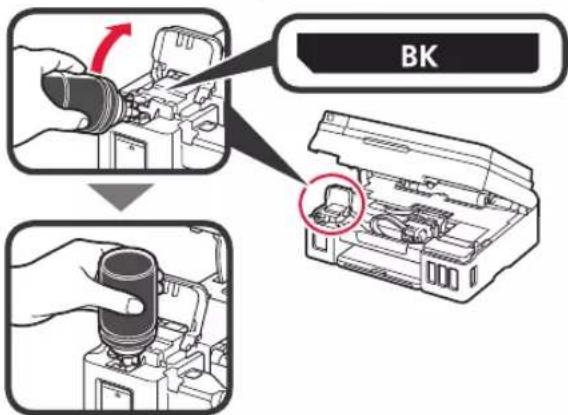
2 Grab and remove the tank cap of the ink tank.
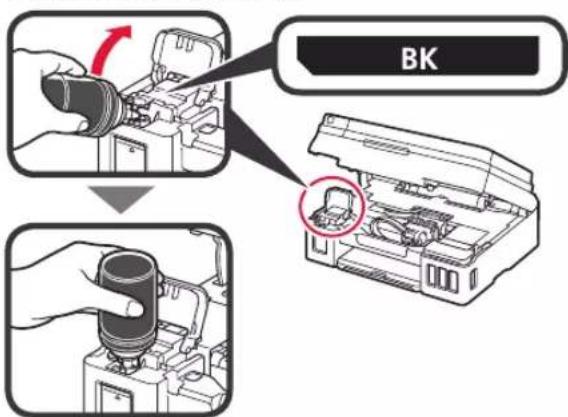
3 Hold the ink bottle upright and remove the bottle cap.

4 Insert the nozzle of the ink bottle into the inlet and stand the ink bottle upside down.
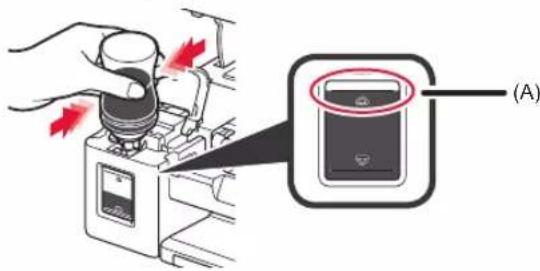
Pour all ink into the ink tank.
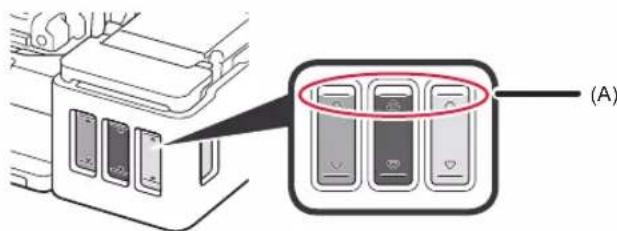
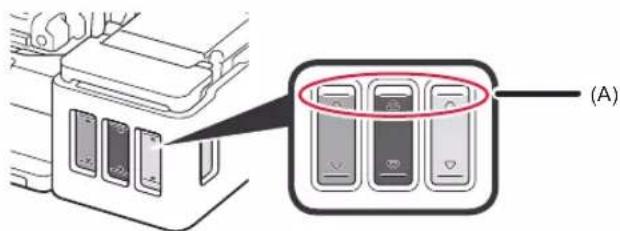
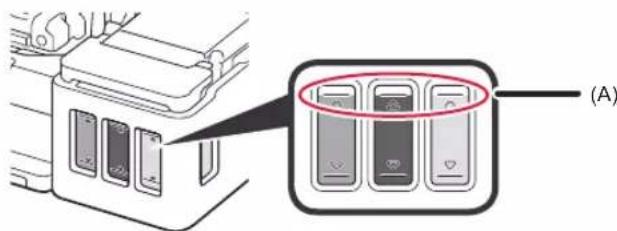
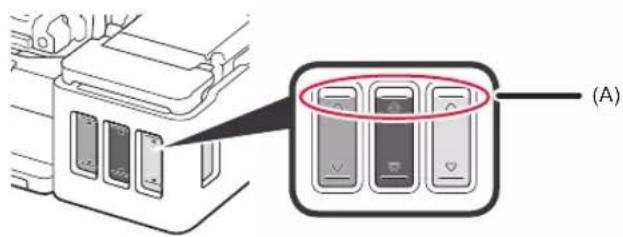
Confirm that the ink has been filled to the upper limit line (A).
6 Replace the tank cap securely.
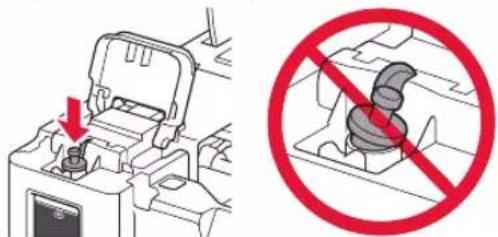
7 Close the ink tank cover.

8 Repeat steps 1 to 7 to pour all ink into the corresponding ink tanks on the right according to the label.

Confirm that the ink has been filled to the upper limit line (A).
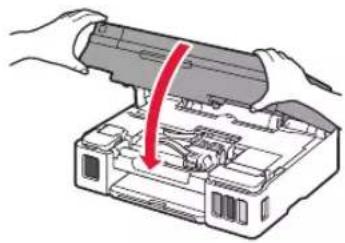
9 Close the scanning unit / cover.
5. Turning on Printer

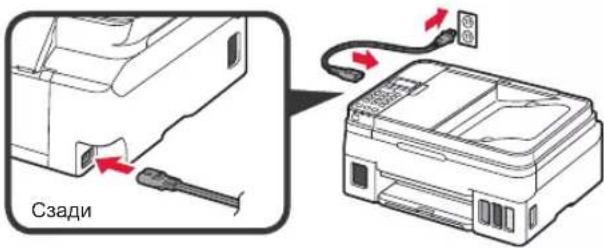
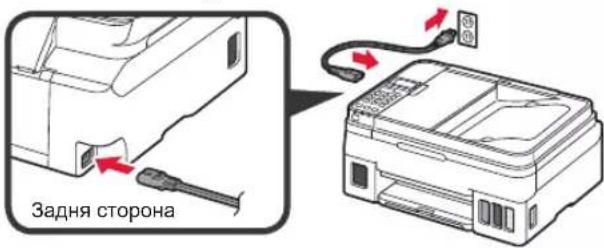
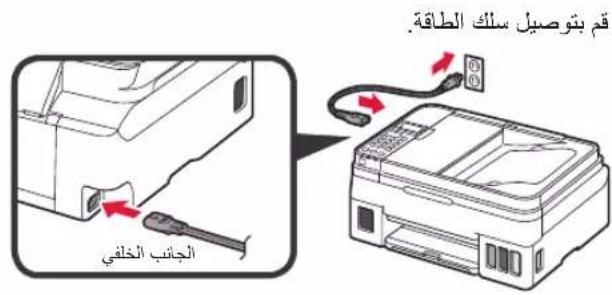
1 Connect the power cord.
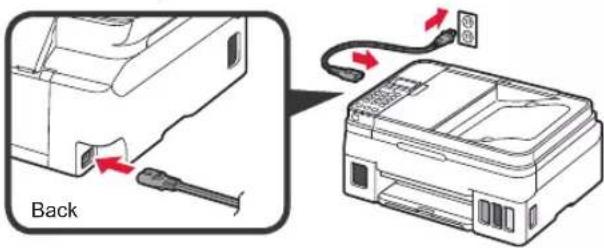
Do not connect any cables except the power cord yet.
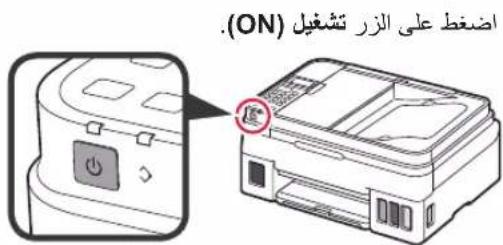
2 Press the ON button.
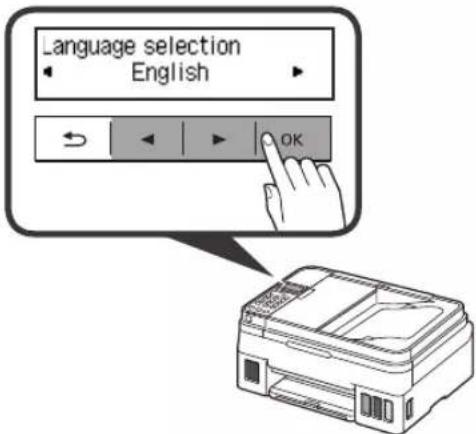
3 When the following screen appears, use the and buttons to select a language, and then press the OK button.

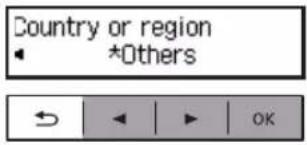
4 If the following screen appears, select your country or region, and then press the OK button.

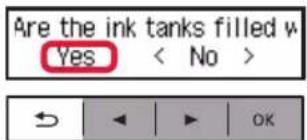
5 Confirm that all the ink tanks have ink in them.

6 Select Yes with the and buttons, and then press the OK button.


6. Preparing for Connection
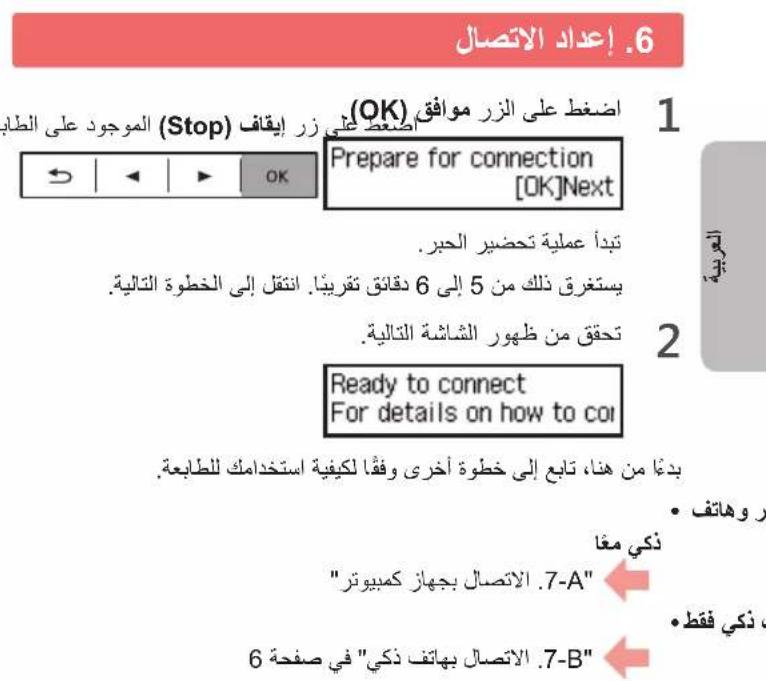
1 Press the OK button.
Prepare for connection [OK]Next

Preparing the ink starts.
This takes about 5 to 6 minutes. Proceed to the next step.
2 Check that the following screen appears.
Ready to connect For details on how to co
From here on, proceed to a step according to how you use the printer.
- To use the printer by connecting only to a computer or both to a computer and smartphone

"7-A. Connecting to Computer"
- To use the printer by connecting only to a smartphone

"7-B. Connecting to Smartphone" on page 6
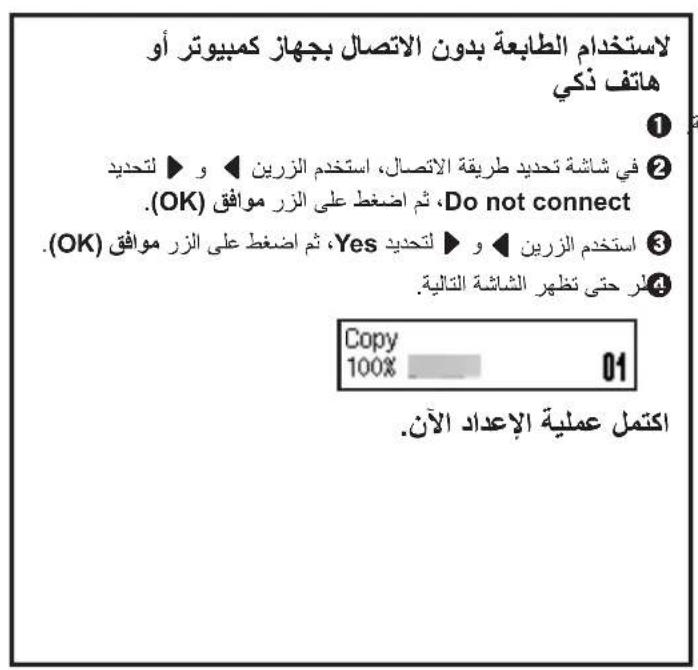
To use the printer without connecting to a computer or smartphone
Press the Stop button on the printer.
In the connection method selection screen, use the and buttons to select Do not connect, and then press the OK button.
Use the and buttons to select Yes, and then press the OK button.
Wait until the following screen appears.

The setup is now complete.
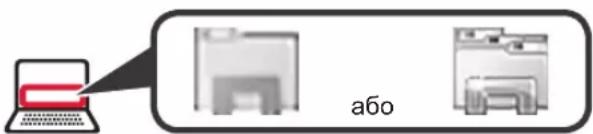
7-A. Connecting to Computer

You need a connection setup for each computer. Proceed with the setup from step 1 for each computer.
1 Start the setup file for either method A method. B

Downloading from the Internet
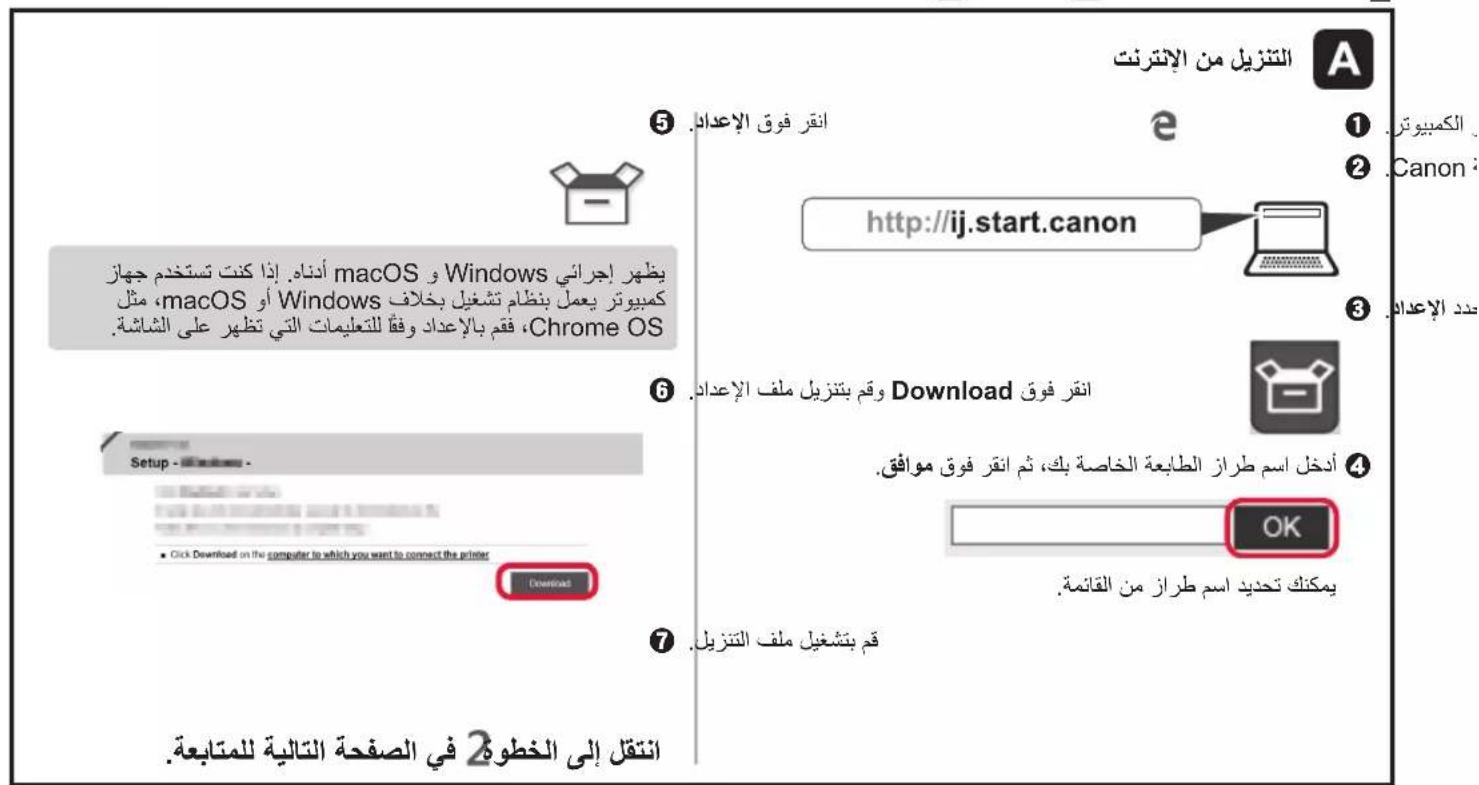
1 Open a web browser (etc.) on your computer.
Input the following URL and access the Canon website.
http://ij.start.canon

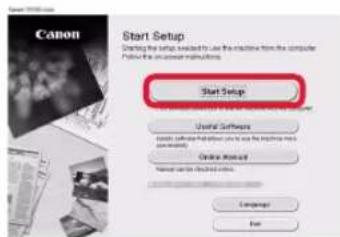
Select Set Up.

4 Input the model name of your printer and click OK.

You can select a model name from the list.
Click Setup.

The procedures for Windows and macOS are shown below. If you are using a computer with an OS other than Windows or macOS, such as a Chrome OS, do the setup according to the on-screen instructions.
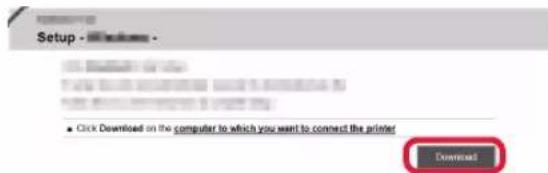
Click Download and download the setup file.

7 Execute the downloaded file.
Proceed to step 2 on the next page to continue.

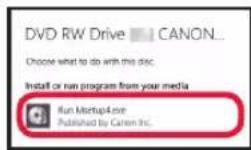
Using Setup CD-ROM (Windows Only)
1 Load the Setup CD-ROM in your computer.

When using Windows 10 or Windows 8.1:
When the following message appears on the right side of your computer screen, click it.

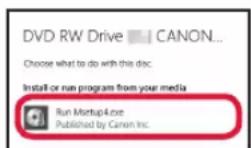
If the following screen appears, click Run Msetup4.exe.
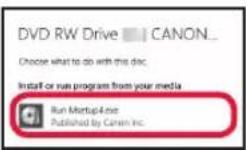
If the User Account Control dialog box appears, click Yes.
When This Message Does Not Appear (or Has Disappeared)
- Click File Explorer on the taskbar.
- Click This PC on the left side of the opened window.
- Double-click the CD-ROM icon on the right side of the window. If the contents of the CD-ROM appear, double-click Msetup4.exe.
- Proceed to step 0
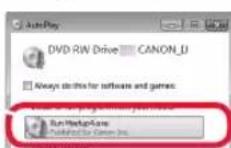
When using Windows 7:
When the AutoPlay screen appears, click Run Msetup4.exe.
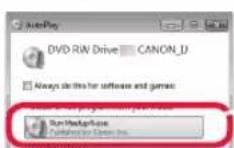
If the User Account Control dialog box appears, click Continue.
When Play Screen Does Not Appear
- Click Computer from the start menu.
- Double-click the CD-ROM icon on the right side of the opened window. If the contents of the CD-ROM appear, double-click Msetup4.exe.
Proceed to step 2 to continue.
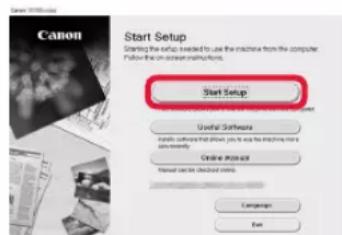
2 Click Start Setup.
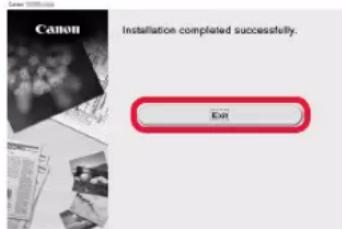
If the following screen appears, click Exit.
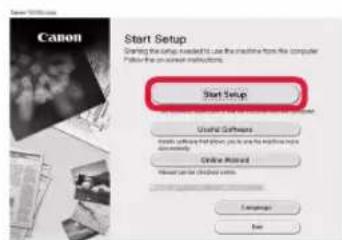

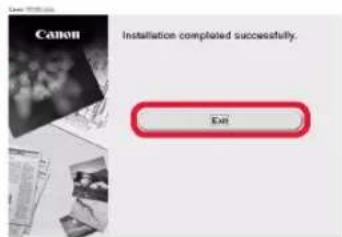
The setup is complete when the following screen appears on the printer's screen. You can print from your computer.

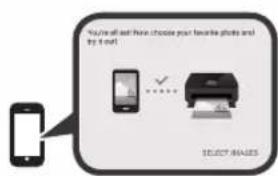
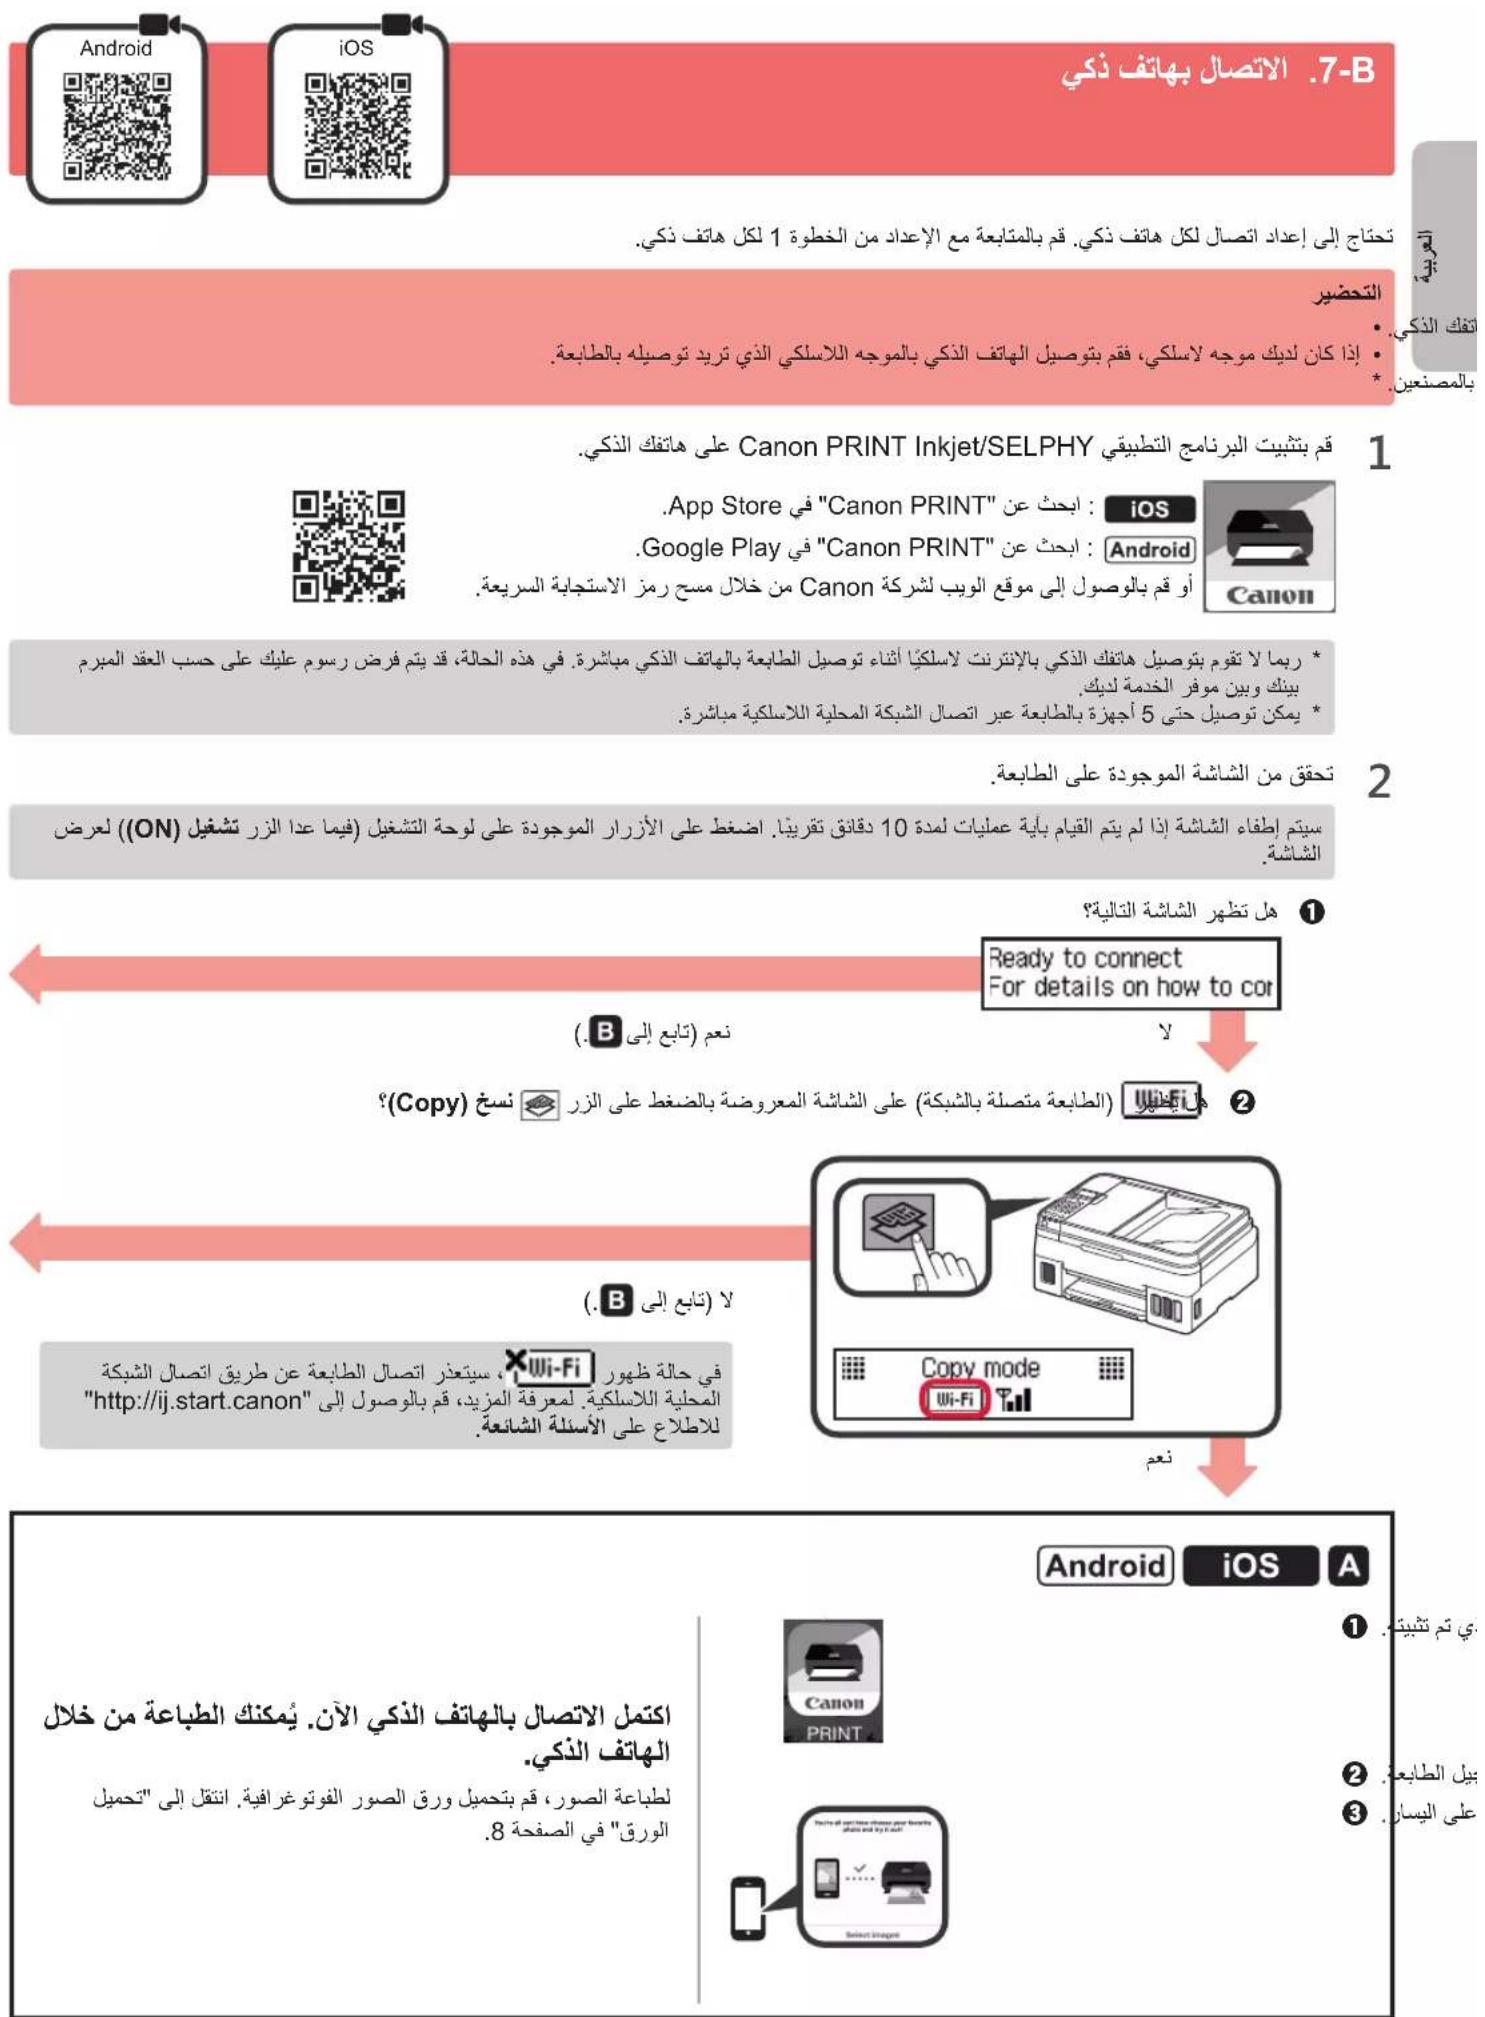
7-B. Connecting to Smartphone
You need a connection setup for each smartphone. Proceed with the setup from step 1 for each smartphone.
Preparation
- Turn on Wi-Fi on your smartphone.
If you have a wireless router, connect your smartphone to the wireless router you want to connect to the printer. - For operations, refer to manuals of your smartphone and the wireless router or contact those manufacturers.
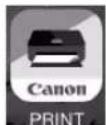
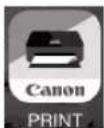
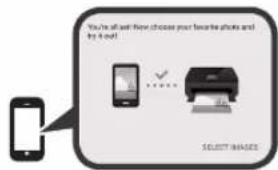
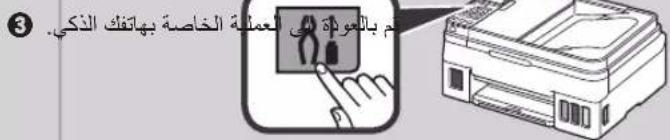
1 Install the application software Canon PRINT Inkjet/SELPHY in your smartphone.
ios : Search "Canon PRINT" in App Store.
Android:Search"Canon PRINT"in Google Play.
Or access the Canon website by scanning the QR code.

- You may not connect your smartphone to the Internet wirelessly during connecting the printer to the smartphone directly. In that case, you may be charged depending on the contract with your service provider.
- Up to 5 devices can be connected to the printer via wireless LAN connection directly.
2 Check the display on the printer.
The screen turns off when no operation is made for about 10 minutes. Press one of the buttons on the operation panel (except for the ON button) to display the screen.
1 Does the following screen appear?

2 Does Wi-Fi (the printer is connected to the network) appear on the screen displayed by pressing the Copy button?
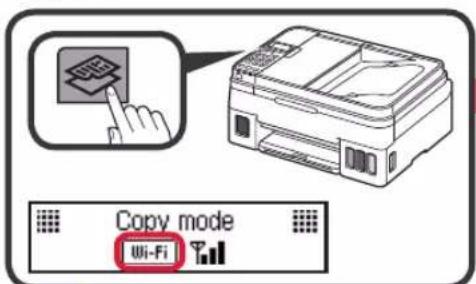
No (Proceed to B)
If appears, the printer cannot communicate by wireless LAN connection. For details, access "http://ij.start.canon" to see Frequently Asked Questions.

iOS
Android
Tap the installed application software.
Follow the on-screen instructions to register the printer.
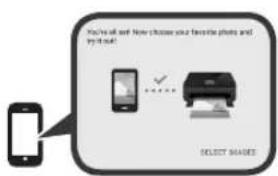
Make sure that the right screen appears.
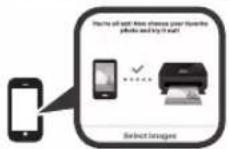
The connection with your smartphone is now complete. You can print from your smartphone.
To print photos, load photo paper. Proceed to "Loading Paper" on page 8.

Procedures below vary depending on iOS or Android. Select your operating system and proceed to its procedure.
iOS
Tap Settings on your smartphone's home screen, and tap Canon_ij_XXXX in the Wi-Fi settings.


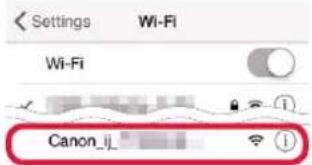
If Canon_ij_XXXX does not appear on the list, see "Troubleshooting" below to operate the printer, and then repeat step ①.
Tap the installed application software.
3 Follow the on-screen instructions to register the printer.
Follow the on-screen instructions to proceed with the setup.
If you select Auto Select Conn. Method (recommended) on the connection method selecting screen, the appropriate connection method is selected automatically depending on your environment.
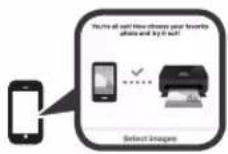
4 Make sure that the following screen appears.
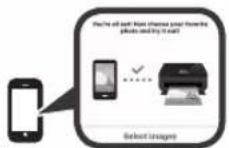
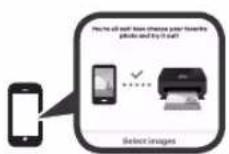
The connection with your smartphone is now complete. You can print from your smartphone.
To print photos, load photo paper. Proceed to "Loading Paper" on page 8.
Android
Tap the installed application software.
Follow the on-screen instructions to register the printer.
If a message saying "Printer is not registered. Perform printer setup?" does not appear, see "Troubleshooting" below to operate the printer, and then wait for a while until the message appears.
Follow the on-screen instructions to proceed with the setup.
- The appropriate connection method is selected depending on your environment.
If two printer names appear on the Register Printer screen as shown below, select A. A) G4010 series (xxx.xxx.xxx.xxx) B) Direct-xxxx-G4010series
3 Make sure that the following screen appears.

Troubleshooting
Printer is not found from your smartphone.
Press the Setup button on the printer.
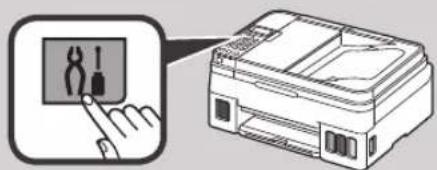
Use the and buttons to select Wireless LAN setup > Easy WL connect, and then press the OK button.
3 Return to the operation of your smartphone.
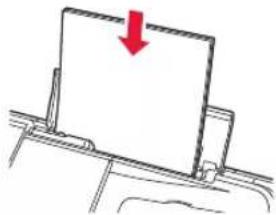
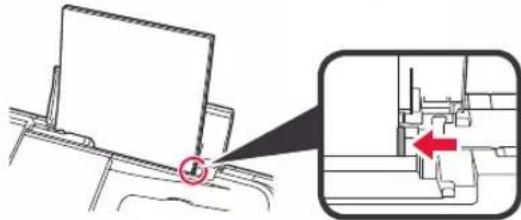
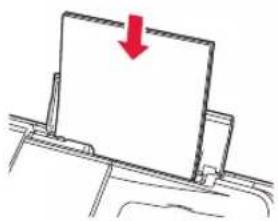
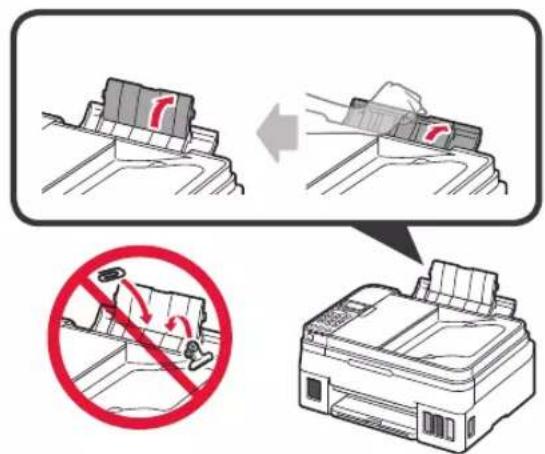
1 Open the paper support and the paper support extension.
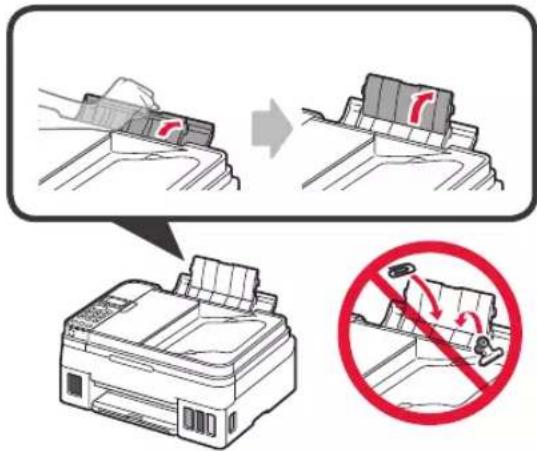
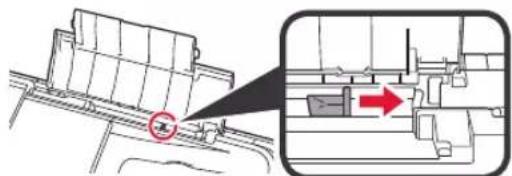
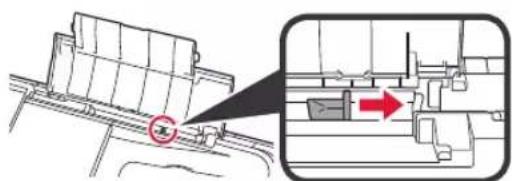
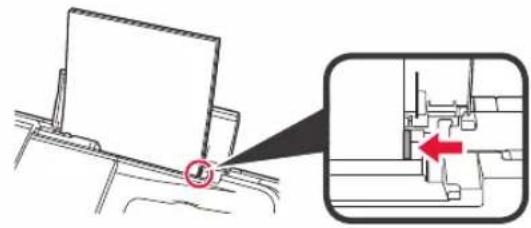
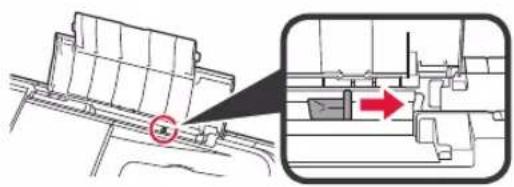
2 Slide the right paper guide to the end.
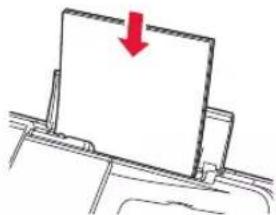
3 Load paper with the print side facing up.

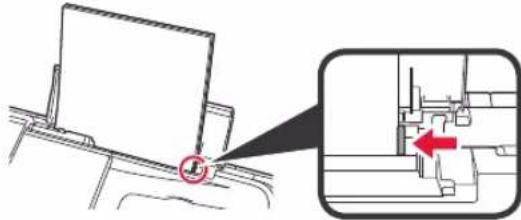
4 Slide the right paper guide to align it with the side of the paper stack.
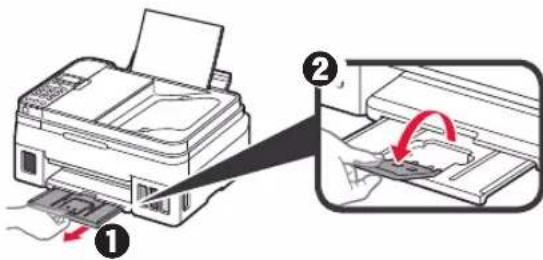
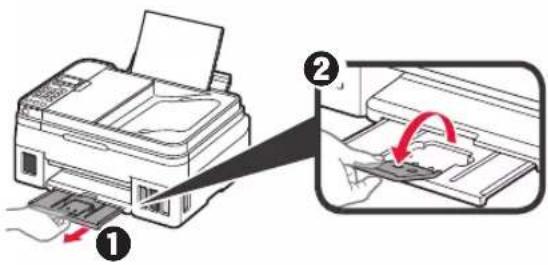
5 1 Pull out the paper output tray.
Open the output tray extension.
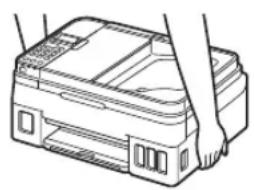
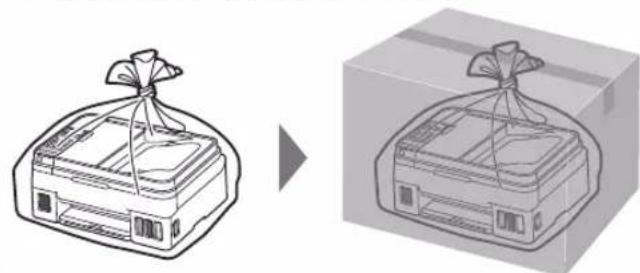
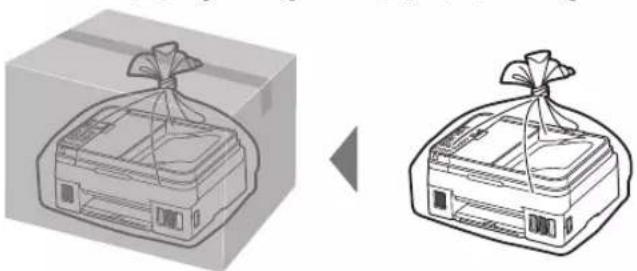
Transporting Your Printer
When relocating the printer, make sure of the following. Refer to the Online Manual for details.
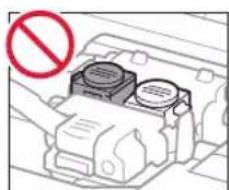
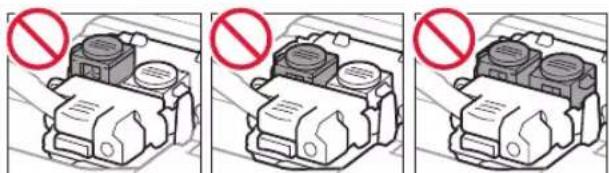
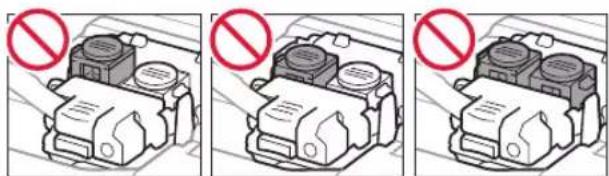
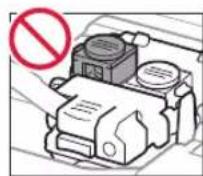
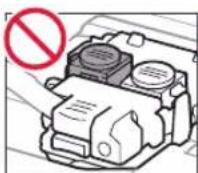
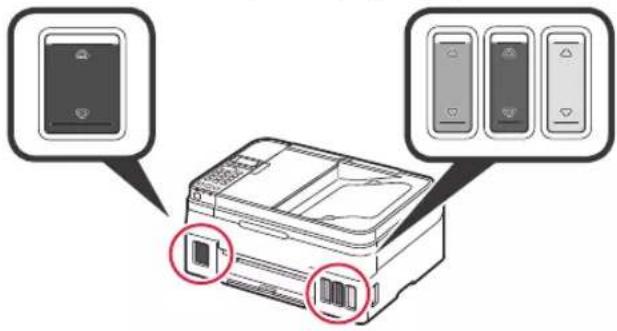
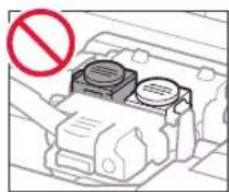
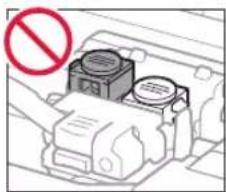
Check that both joint buttons are pressed down completely to avoid ink leaks.
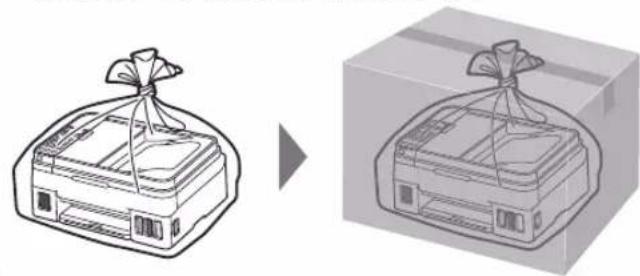
Pack the printer in a plastic bag in case ink leaks.
- Pack the printer in a sturdy box so that it is placed with its bottom facing down, using sufficient protective material to ensure safe transport.
- Do not tilt the printer. Ink may leak.
- Please handle with care and ensure the box remains flat and NOT turned upside down or on its side, as the printer may be damaged and ink in the printer may leak.
- When a shipping agent is handling transport of the printer, have its box marked "THIS SIDE UP" to keep the printer with its bottom facing down. Mark also with "FRAGILE" or "HANDLE WITH CARE".
Prepare for connection [OK]Next

Ready to connect For details on how to co
Click Downloaded on the computer to which you want to connect the printer

Prepare for connection [OK]Next

Ready to connect For details on how to co
He yadapTe NM no OKpykaIOUIM DeTaIaM.
5 3akpoIte fikcnpyuouky KpbIuKy KapTpndka n npnxMnte ee.
6 Haxmnte do ynopa obe coeHNHTeBHBie KHOJKN.

4. 3aIIbKa YepHnI

3TOT npOdyKT Tpe6yEt OCTOPoKHOro 06paueHnC ueHNamn. Pn 3aONHeHnuePbHbIX KOHTeHepOB ueHNla Moryt pa36pb13raTbcr. EcnN ueHNla nonaYr Ha oDeXdU nn DpyRne Beu, OH NOrYr He OCTnpaTbcr.
1 OTKpoIe KpbIiKky YepHnIbHOro KOHTeHepa.
2 Bo3bMntecb 3a KOIINaOcKoHTeHepa u ydaIte eroc cepHNbHoro KOHTeHepa.
3 YdepKnBaJcnaKOH C cepHnAmn BepTnKaJIbHO, CHIMTe KOJNaQOK cnaKoHa.

4 BCTaBBTe HAKOHeuHc FNaKoHa C YepHnIaMn BO BnyCKHOE OTBepCTne NpeBepHnTe FNaKOH C YepHnIaMn BBepx DHom.
5 BbIeIe BCE uepHnla B uepHnIbHbIKoHTeHep. Y6eIITecb, yTO uepHnla DOCTnraT BepxHero npedena (A).

6 OctopoxkHO yCTaHOBnTe Ha MeTO KOJNaOH KOTHeHepa.

7 3akpoTe KpbIkky CheHnJIbHO KOHTeHepa.
8 NOBTOPrTe DeiCTBn1-7,HTo6bHaHnITb YepHnIa B COOTBeTCTByIOUne YepHnIbHbIe KOHTeHepbCnpaba cornaCHO MapKnupOBKe.

Y6eHntecb, YTO cepHnna doctnraIOT BepxHero npedena (A).
9 3akpoTe moDyNb cKaHnpoBaHn/ KpbIiKy.

5. Влючения пиHTepa

1 PoiKnHouYte Ka6eNb nHTaHn.
He nodknouaHTe HnkaKnx Ka6eneH a 3tOM 3Tane, Kpome Ka6eI NITAHN.
2 HaxmTe KhoNky BKI (ON).

3 Pn noBHeHn nKa3aHHOro HxKe 3KpaHa BbI6epnte Ra3bIK C NOMOuBIO KHOIOK a 3aTeM HaKMITE KONky OK.
4 IpnnoBnHn noka3aHHoro Hxke 3KpaHa Bb6epnte CBOO CTpaHy nn peHOnn HaxmTe KHOKNy OK.
5 Y6eINTEcB, YTO BO BCex YepHnJIbHbIX KOHTeHepax IMeOTcYepHnJa.
6 BbIepuTe Da (Yes) c NOMOUsHo KHONoK a 3aTEM HaxMnte KhoNky OK.
Moxet notpe6oBaTbCt O5 Do 6 MNHy. IpeenIte K cJeDyUOeMy Wary.
2 Y6eIntecb, yTO OTo6paKaetcN oKa3aHHbH HIXe 3KpaH.
Ready to connect For details on how to co
Iocne 3Toro nepennte K HnykHOMy wary B COOTBETCTBn C TEM, KAK BBI NcnoJb3yeTe npHTep.
- UTo6bI HcNoJIb3OBAt b npHTeP c NODKJIIOUeHHEm K KOMNbIOTepy nII KOMNbIOTepy n CmapTfoHy 《7-A. IOnKJIIOUeHne K KOMNbIOTepy》
- 4To6bI nCNoJIb3OBAtB npHTeP, NOkJIIOuHBeroToJIbKO KcMapTfoHy 7-B. IOnKnHueHne K cMapTfoHy» Ha cTp. 6
YTo6bl NcNoJIb3OBaTb npnHTep 6e3 NOdKJIIOUeHnK KOMNbIOTepy nIN cMaprfoHy
1 Haxmte KhONky Cton (Stop) Ha npHTepe.
C NOMOJIbIO KHOJOK Ha 3KpaHe BbI6opa cnocoba nOdkJIIOUeHnBbI6epnte He noKnIOuATbcr (Do not connect), a 3aTEM HAXMITE KHOJKy OK.
C NOMOJIbIO KHOJOK BbIePHTe Da (Yes) HAXMITE KHONKY OK.
4 IopoKdTe, noka He NOBITcN oka3aHHbH Hxke 3kpaH.

Hactpoika 3aBepseHa.
Click Download on the computer to which you want to connect the printer

Ecnn3TOcoo6ueHHeNoRBJETcN(nINNCye3JIO
- Haxmte PpOBoDnK (File Explorer) Ha nHeJn 3aJaU.

- Haxmnte 3tot PK (This PC) B neBOJ qactn OTKpbBwEroCg OKHa.
3.ДвждьшЕЛКНITE 3HAQOK KOMnAKT-DnCKaB npabOu YactN OKHa.Korda oTo6pa3ntcra CoepKIMoe KOMnAKT-DnCKa,ДвждьшЕЛКНITE paJn Msetup4.exe. - IpeenDnte K wary 0
PnncnoJb3ObaHnn Windows 7:
EcnBb6paTb ABTom.Bb6op MeToDa
NoDKHOU.(pekomeh.) (Auto Select Conn.
Method(recommended))Ha 3KpaHe Bb6opa
MeToDA NOKJIIOUeHnA, COOTBeTCTByIOuM MeToD
NOKJIIOUeHnA 6yTeBb6paH ABtOMaTneCKN
B 3aBNCIMOCTn OT BaWeI CeTEBOI Cpebl.
4 y6eintecb, YTO OTo6paKaTcra yka3aHHbH HnKe 3KpA.H.
PoiKJIIOUeHHe K cMapTcOHy BbINOJHHeO. Tenepb MoXHo neyataTb co cMapTcOHa.
Yto6bI HaneuataTb foToIpaΦn, 3aRpy3nte foTo6yMaIry. IpeenDInTe B pa3dEe «3arpy3ka foTo6ymaI» Ha cTpaHnue 8.
Android
Kochntecb yctaHOBJeHHoro npINOxKeHnA.
CneIyTe HNCTpyKzmaH Ha 3kpaHe, YTO6bI BblONHHTb perncTpaunIO npHTepa.
Ecni coo6eHne «PnHTep He 3apeHcTpnpObaH. BbINOHNtB hAcTpoKy npHTepa? (Printer is not registered. Perform printer setup?)» HE NOBUNTOB, BblONHTE INCTpyKUIN No pa6ote c npHTepOM B pa3dJe «YcTpaHeHne HEnOJaIOK» BHN3y, a 3ATEM NIOOXNTe HEMHOrO, Noka COo6eHne He NOBITCA.
CneyuTe HNCTpyKuMaH 3kpaHe, YTO6bI npoDOnKtB HaCTpoiKy.
Bb6op noDxOJyero MeToDa noKnHoueHn 3aBNCIT OT NcNoJIb3yeMoN cpebl.
- Ecni Ha 3kpaHe PerncTpaun npnHTepa (Register Printer) OTo6paxKaOTcra Dba Ha3BaHnna npnHTepa, KaK Noka3aHO B IpIMepe HnKe, BbI6epnte A.
A) G4010 series (xxx.xxx.xxx.xxx)
B) Direct-xxxx-G4010series
3 y6eIntecb, yTO OTo6paKaetcra yka3aHHbH HnKe 3KpaH.

YcTpaHHeHne HenoJaOK
PpHTepe He o6hApyeKeH co cMaprfoHa.
Hakmtte Ha npHTepe KhoNky HactpoKa (Setup).
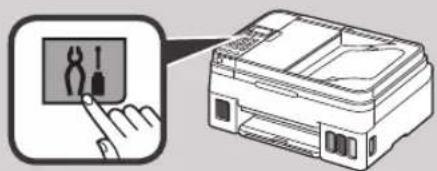
C NOMOJIbHO KHONOK BB6epNTe Hactp. 6ecnp. cetn (Wireless LAN setup) > Ipoct. 6ecnp. nodkn. (Easy WL connect) n HaKMITE KHONKY OK.
BepHnTeCb K BblIOJIHeHHIO DeIcTBn Ha cMapTfoHe.
1 OtkpoTe ynp dJa 6yMaRn n DoonHnteNbHbI ynp dJa 6yMaRn.

2 CdbnHbTe npaByHO HappaBnIooyIO 6ymarNdo KOHua.
3 3aRpy3nTe 6yMaIy IuCeBOB CToPOHOB BBepx.

4 NpeeBnHbTe npaByo HnpaBnIouyO 6ymarN Do COBMeueHnco CTOnkO 6ymarN.
5 BbIDBnHbTe JIoTOK npHema 6ymar.
OTKPOITe DOIOHTeHbI JIoTOK pInema 6yma.

Iepemeene npntepa
Pn npemeeHnn npntepa no3a6oTbTecb o cneyuOeM. Ira noIyueHna noDpo6hix cBeHn cm. OhnaH-pykoBODCTBO.
Bo n36eXaHHe yTeuKn YepHnI y6eHntEcB TOM,TO o6e coeHNHTenbHbIe KHOKN HxKaTbI Do yNopa.
B cnyuae yTeuKn YepHnI nOmeCTne npHtep B nJaCTNKOBbI naKet.
YnaknyTe npHTe B TBepdyuKOpo6ky, NOMEcTNB ERO HxKHO Yo AcTh Ba DHO Kopo6Kn N CNOJb3y JDOCTaTOUHOe KOINueCTBO 3aunTHoro MaTePnana dJa 6e3oNaCHO TpaHCnOpTnPOBkn.
- He haknohny Te npnHTep. YepHna MoryT BbITEyb.
- O6paauiTecb ocToPOxHO, YoToBbI KOpO6ka neXaIaPobHO n HE nepeBopauHbAlacb o6paTHo CTOpOHnHa 60K, NocKOJIbky B 3ToM ClyUae BO3MOxHO NOBpeXDeHHe npHTepa nn yTeuKa YepHnI.
Korda 3kneDnTop 6ydt npHImMaTb 3aKa3 Ha TpaHCnOpTnpOBky npnHTepa, npnkpenTe 3TNKeTKy «BEPXHRA CTOPOHA» dna oBecepeHn TpaHCnOpTnpOBKn npnHTepa HxKHeu qactbBHN. Kpome Toro, npnkpenTe 3TNKeTKy «XPYNIKOE» nIi «OBPAUATbCRA C OCTOPOXHOCTbIO!»

6 OsepeXHO BCTaHOBtB Ha MiCue KOBNaOcK OOpHnIbHnI.
7 3akpnIe KpnuKy OOpHnIbHnIcI.
8 NobTopitb Kpokn 1-7,06 HauNTBci YOpHnna y BiNobiDiHcYopHnIbHnCi,po3TaUoBaHi npabOpuy, BiNobiDHO Do MapkyBaHHra.
IpekeKaHTeC, 10 OOpHNo HAnlTo Do BepXHbOi o6MeKyBaJIbHOi NiHII (A).
9 3akpnTe MoDyNb cKaHyBaHHa / KpuuKy.
5. YbIMKHeHn npHTepa

1 PnncHaHte WHyp XNBHeHHa.
He npueHynte XoDnHex Ka6enib Ha cboMy etani, OKpim shhya KINBneHH.
2 HaTnCHiTB KHOHkY YBIMK. (ON).

3 3KIOO 3'ABNTbCn HabeDeHnHXyekpaH, CKOpNCaTaeCn KOnkamn iI ,uO6 Bn6paTn MOBy,a Notim HaTnCHITb KOnky OK.

4 RaKIO 3'ABNTbcHaBeHEnn HNKeH eKpaH, Bn6epiTb CBOIO KpaIHy a6o perioH i HaTncHiTB KHOKNy OK.

5 IpekoHaTeC8, 0 BCi OOpHnIbHnCi HAnOBHeHO OOpHnIOM.

6 Bn6epiTb TaK (Yes) 3a donomoro KhoNOK i ▲, a notim HATNCHTb KhoNky OK.

1 HaTnCiHtB KhoNkY OK.


IouhETbc nIDrotOBka OOpHnla.
3a3Bnaye TpBaC 5-6 XBnH. IpeenDiTb Do HAcTyNHorO KpOy.
2 Maocob'3KOBO 3'BAHTnCnHaBeHeHn HxKue ekpaH.
Ready to connect For details on how to co
Iotim nepenitb do hactynHoro kpoky BiinobiHDO BnKOpncTaHH npHTepa.
- Ⅲo6 BnKOpNCtOByBaTH npHTEp, nIiKNIOuHBUN Horo Jnue do KOMN'HOTepa a6o KOMN'HOTepa Ta CmapTfoHa

Ha3By mojdi moxha Bn6paTn 3i cnNcKy.
HaTnCHiB HAcTpOIOBaHHa.

Dani onicaHNo npoueIpyn dnn Windows i macOS. RaIOB Bn BnKOpNCTOBye TE KOM'IOTeP 3 OC, BiIMHHoO BID Windows i macOS, k-OT Chrome OS, DToTpMmYTEcb IHCTpykui, kki 3'JrBnTmMyTbCra Ha ekpaHi.
KnaHITb 3aBaHTaxnTn 3aBaHTaxkTe paIN BCTaHOBNEHHA.
73anyctitb 3abaHTaxKeHn faaiI.
IpeenidtBdoKpOky 2HaHacTyHnHcTOpIHci,06 npoDobxHTN.

BukopncTahnK KomnakT-dncka 3 nporpamoIO BcTaHOBHeHH (tiIbKn DnJa Windows)
1 BCTaBTe KOMnAkrT-DnCK i3 npOrpAmOIO BCTaHOBnEHHRA KOMnIOTep.

Windows 10 a6o Windows 8.1
KoNnB npaBi yactHi ekpaHa KOMn'IoTepa 3'BAITbCJIe NOBIOMJleHH, KlaChHt b NOrO.

3 RaKUO 3'ABNTbC TaKn ekpaH,HaTNCHTb KHONKy 3anyctntu Msetup4.exe (Run Msetup4.exe).
4 RaKuo 3'ABNTbCra diaIorOBe BIKHO CnyX6a 3axncty KopncTyBauiB (User Account Control), KnaHITb Tak (Yes).
Kaio ce NobidomnHHe 3'YBnOcra (a6o 3nKIO
- Knauchitb Ppobidnck (File Explorer) Ha naheJI 3aBdaHb.
- KnaunHtB nyHKT LcH NK (This PC) nibopyy y BIKHI, 0o BiDkPnOcR.
3.ДычклачитпikTORpamyKOMnaKT-DnCKa npabopyu y BiKHi. KoIN BiIObopa3ntbcra BMICT KOMNaKT-DnCKa,ДычклачитфаIJMsetup4.exe. - IpeenidItb Do KpOKy 0
DnA Windows 7
KoJIN 3'YBNTbC eKpaH AToBoiTbOpEHn (AutoPlay), KnaHiTb 3anyCTnT Msetup4.exe (Run Msetup4.exe).

3 RaKIO 3'ABNTbcra DianorOBe BIKHO CnyX6a 3axncty KopncTyBauiB (User Account Control), KnaUHITb PpOobxntu (Continue).
KaioeKpaH ABTOBtBopeHHA (AutoPlay) He 3'YBnEeTbC
- Knauchitb Komn'otep (Computer) y roJIOBHOmy MeHIO.
2.Дычклачиь niktorpaMy KOMnakT-DnCKa npabopyy y BiKhi, lo BiDknpoLocr. KoIN BiIObopa3ntbcra BMICT KOMnakT-DnCKa,ДычI klachit phanMsetup4.exe.
Ipeeniditbdo kpoky 2o6 npoobxntn.
2 Bn6epiB nyHKT 3anyck HacrpooBaHHa (Start Setup).
KJIO 3'ABNTcra TAKn ekpaH, HATNCHTb KHOKNy Buxi (Exit).

Uo6 npoOBXHTn
HaCTpoOBaHH,
DOtpmMyTeEc b IHcTpyKci,
Aki 3'ABTLAMyTbCra Ha ekpaHi.
KoIIeKpaH npInTepa BiIO6paXaE HabeDeHn HIXyE eKpaH, HAcTpoIbAHNHa 3aBepSeHo. Tenep MoXHa dpyKyBaTn 3 KOMn'IoTepa.

5 1 BuTnHiTb IOTOK BvBeDeHnnapepy.
BbDkPnIe nOIOBkyBaU BvBIDHO JOTka.

TpaHcnpTyBaHH npHTepa
Iiud nepemieHn npHTepa nepekoHaTecra, 0B nDToPmyeTecra HabeJeHX HxKue iHCTpykui. 0o6 oTpmaTn DOKnaDiHi BiDOMOcTi, INB. DokymeT OHnaHOBn noci6Hnk.
3a06 3anobirnpotikahHIO yOpHnla, nepekoHaTeCra, 0o 0nDiKHOKN 3'cHaHH HaTNCHYTO NOBHCIO.
Pomictb npntep y noJIeTnJeHOBn nakeT, Ocklbkn OOpHnlo MoKe npotikatn.
IomictiB npHtep y TBepdy Kopo6ky HnKhbOu YactnoHO npHTepa DoHN3y Kopo6Kn, BnKOpNCTOByOuN DOCTAHTHO KJIbKicTB 3axnCHoro MATEpiany Dna rapaHTyBaHH 6e3neHOro TpaHcnpTyBaHH.
He haxnIyTe npHTep. YOpHnIO MOKe BNTeKtN.
- NObOdbTec3 Kopo6koO oBepeKHO Ta nepeKoHaHTec3, 100 CTiHKn pIBHi, BOHa HE nepeBepHyTa DOrOpn dHOM a6o Ha6ik, OckIbKn npHTep MoKe NOuKOJNTncb, a YOpHNIO B HbOMy MOKe BNTeKTN.
HannuithhaKopo6ui3 npHTepom LUM BOKOM IOGOPN》,0o6 niuc TpaHCnOpTyBaHHa EKcneINTOp 3aBxJn TpIMab pInHTep HxhboCTOpOHIOdoHN3y.TakXHannuithKPNXKE》 a6o IIOBOIDNTICb OBEPEXHO
a
3
a 1
4
5
J 1
0
2^2 + ( 2 - x) ^2 = 5x^2
2
aaii jn nnnn nn nnnn nnnn nnnn nnnn nnnn nnnn nnnn nnnn nnnn nnnn nnnn nnnn nnnn nnnn nnnn nnnn nnnn nnnn nnnn nnnn nnnn nnnn nnnn nnnn nnnn nnnn nnnn nnnn nnnn nnnn nnnn nnnn nnnn nnnn
1
4
aai
Jaaalaii jae auijai jie yall Jai
gao gao gao jai jia yu yu gao gao gao aal bai
jLjLgJlJnJnJnJnJnJnJnJnJnJnJnJnJnJnJn
14 20
e iie 1iie 1iie
y
Ae aee eae ee eae eae eae eae eae eae eae eae eae eae eae eae eae eae eae eae eae eae eae eae eae eae eae eae eae eae eae eae eae eae eae eae eae eae eae eae eae eae eae eae eae eae eae eae eae eae eae eae eae eae eee

Android
iOS
1 (Settings)
.Wi-Fi Canon_ijXXXX
② S_ AOB = 12 · BO · OB = 12 × 5 × 3

Printer is not registered."Loiaa aI aI aI aI aI aI aI aI aI aI aI aI aI aI aI aI aI aI aI aI aI aI aI aI aI aI aI aI aI aI aI aI aI aI aI aI aI aI aI aI aI aI aI aI aI aI aI aI aI aI aII
1 1
A 2010 series (xxx.xxx.xxx) B)Direct-xxxx-G4010series
Canon_ij_XXXX 1
2

3 Auto Select Conn. Method (recommended)
3
4
sill llll lns n aolal saiy.
8aallg"glll 11 jaiyj gaiy
g2x1. g(1)
siill diiia jaojall jgail jini

Wireless LAN setup > 2.4.1.2.3.4.5.6.7.8.9.10.11.12.13.14.15.16.17.18.19.20.21.22.23.24.25.26.27.28.29.30.31.32.33.34.35.36.37.38.39.40.41.42.43.44.45.46.47.48.49.50.51.52.53.54.55.56.57.58.59.60.61.62.63.64.65.66.67.68.69.70.71.72.73.74.75.76.77.78.79.80.81.82.83.84.85.86.87.88.89.90.91.92.93.94.95.96.97.98.99.. (OK) Easy WL connect
1 AaBil
(bie Windows pbi)

1

Window
2
jai jai
(1a jai) (1) aaij0s oae jaoe 1.

J (This PC) 2
a aal gaaal bgaal aa jajgai jai jai 3
J1
yjg jia jai jia jia jia jia jia jia jia jia
.Msetup4.exe
4 1
.(Run Msetup4.exe) Msetup4.exe
.(Yes) (User Account Control)
(AutoPlay)
(Computer)
aall gaaal bgaal aaj jaojagla jai jai 2
g j 1j j j j j j j j j j j j j j j j j j j j j j j j j j j j j j j j j j j j
.Msetup4.exe
J (AutoPlay) J (Run Msetup4.exe) Msetup4.exe
P (Continue) .(User Account Control)
aaii 2gii jai
.(Exit)
.(Start Setup)
2


aal 15 15 15 15
J 1

01

J.7-A
jss 1 sbsall jz 1sll
aaiy
(OK)


1
.(OK) jj 1e Jia 5 4 Yes


4
9
5

aalb15.5
1
aalal aal alilulu
6
2
(OK)
3
.(A)gall all bgs
.
jol jia elie
1 7 1 1
(A)
5

4
aill j 10iie jll i 10iie jll i 10iie jll
1
Ailljpa ylln jy qalil n jall eJae
2
aai jll aie all jy g yag oal j
3

jll j j j j j j j j j j j j j j j j
4

1

A


s y 1 (y) C a b j B
a aal 1
Jaaa aae

Jolil Jilil jnil gjbnial
3

□
aalld
j
Windows
aI11 IcIgai, juiI cIgai
()
4

1.2
j(g)
1
1 ① 2
2
5

3
1
aallll jbiipjgiil jiaaijbjg jzjai
2

Access Online Manual Acesse o Manual On-line Ooctyn K DokymeHTy OHnaH-pykoBOcTBO
Acceso al Manual en linea Acces au Manuel en ligne Ooctyno DokymeHTa OHnaHOBNIoci6HNK

From browser
Do navegador
U36pay3epa
caiaial
Dees el navegador