USER MANUAL FGV760RVS ETNA
Description of the appliance 5
Control panel 6
Decorative cover 6
First use
Using the oven 7
Setting the clock 9
Use
Oven functions table 10
Using the gas hob 11
Operation
Operating the oven 12
Operating the oven with electronic timer 12
Operating the hob 15
Maintenance
Cleaning the appliance 16
Removing and cleaning the guide rails 16
Replacing the oven lamp 17
Removing the oven door 17
Malfunctions
Fault table 18
Installation
General 20
Gas connection 20
Electrical connection 21
Installation 22
Technical data 23
Environmental aspects
Disposal of the appliance and packaging 26
Introduction
Congratulations on the purchase of this cooker. This product is designed to offer optimum user-friendliness. The cooker has a wide range of settings, so you can always select the correct cooking method.
Read this manual to learn how to get the most out of your cooker. In addition to information about operating the oven, you will also find background information that may be useful when using the appliance.

Please read the separate safety instructions carefully before using the appliance!
Read this manual before using the appliance and keep it in a safe place for future use.
You can find the most recent version of the instructions for use on our website.
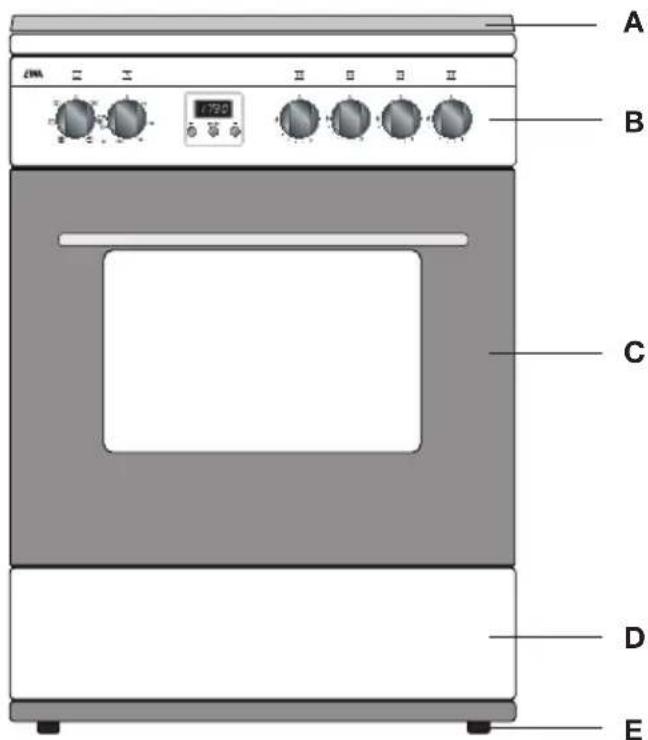
Description of the appliance
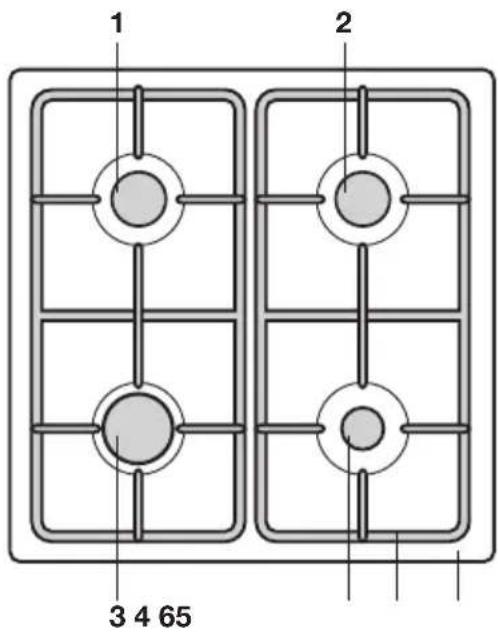
- Semi-rapid burner
- Semi-rapid burner
- Rapid burner
- Auxiliary burner
- Pan support
- Drip tray
A. Decorative cover
B. Control panel
C.Oven
D. Storage compartment
E. Levellers
Control panel
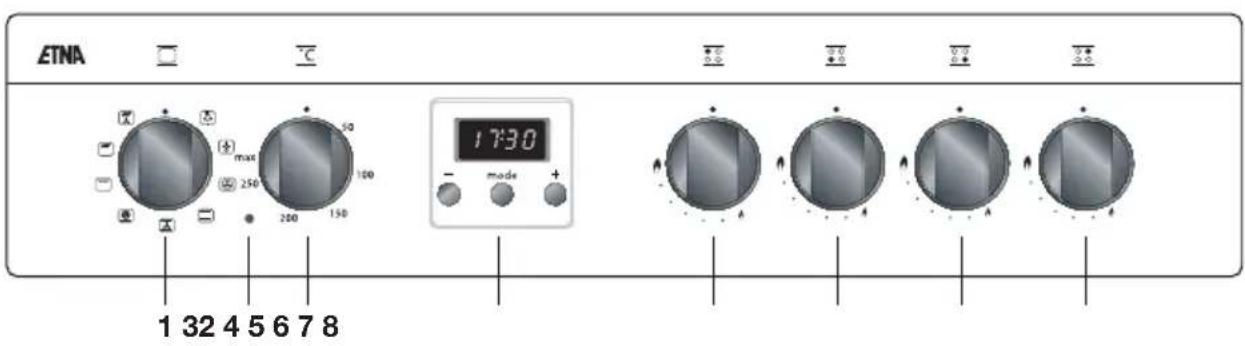
- Oven function knob
- Oven thermostat control light
- Oven temperature knob
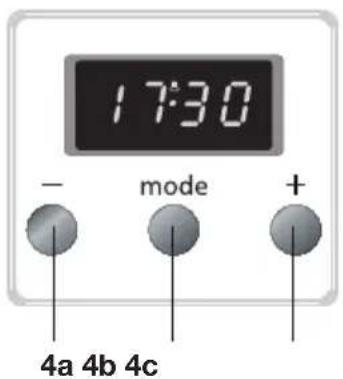
- Electronic timer
4a. - key
4b.Mode key
4c. + key
5. Left rear semi-rapid burner control knob
6. Left front rapid burner control knob
7. Right front auxiliary burner control knob
8. Right rear semi-rapid burner control knob
Decorative cover
- Always raise the decorative cover when using the hob. Before lifting the decorative cover, you should make sure it is dry.
- The decorative cover can break through heating. Ensure that all burners / cooking zones are switched off and cooled down before closing the decorative cover.
- If there is water on the decorative cover, dry it before opening. If you fail to do so, moisture may enter the unit.
- Do not use the decorative cover as a cooking surface.
Using the oven
- Remove all accessories from inside the oven and clean them with warm soapy water. Do not use any abrasive cleaning materials.
- Set the oven at its highest setting for one hour with top and bottom heat (see 'Operating the oven'). This will remove any protective grease used during manufacture.
- When heating the oven for the first time you will notice a 'new-oven smell'. Do not worry, this is normal. If necessary, switch on the cooker hood.
After letting it cool down, clean the oven with warm water.
- Only preheat the oven if it is required in the recipe or in the tables of this manual.

Warning!
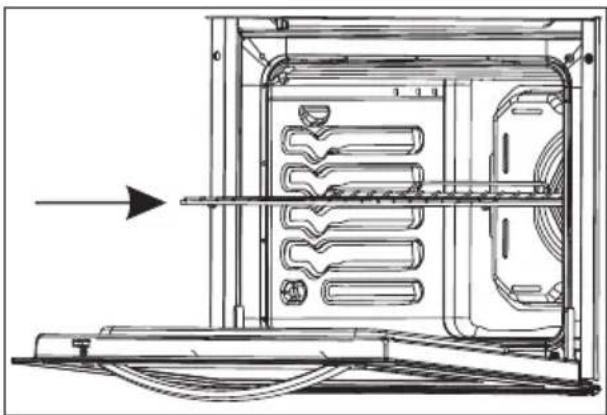
Place the oven rack in the rail and slide it all the way to the back of the oven.
Energy-conscious use of the oven
- Open the oven door as little as possible.
- Prepare dishes with the same cooking temperature (e.g. an apple pie and an oven dish) on the same grid at the same time, or above each other using the hot air function. You can also let meat stew at the same time.
- Prepare a number of dishes consecutively, for example an oven meal after a cake. Often, the preparation time of the second dish will be 10 minutes shorter because the oven is still hot.
- Because the oven is insulated, the residual heat from the oven will continue to cook dishes with longer cooking times (from 1 hour). Turn the oven off 10 minutes earlier than indicated, but leave the door closed.
- Preheating is generally not necessary, with the exception of dishes with cooking times of less than 30 minutes, or when indicated by a recipe.
- Remove everything you do not need for the dish out of the oven.
- Turn the oven off before taking out the cooked dish.
Ovenware
- In principle, you can use any type of heat-resistant ovenware.
- Do not rinse glass ovenware with cold water immediately after use. The sudden temperature difference can cause the glass to crack.
- Use black or dark baking tins. These conduct heat better and allow the food to cook more evenly.
Do not cover the oven floor
- Covering the oven bottom with, for example, aluminium foil or a baking tray can lead to overheating and damage to the enamel.
It is possible to prevent spring forms from leaking onto the oven floor by folding a container out of aluminium foil and placing it on the grid under the form or by laying baking paper under it.
Keeping food warm
- You can use the oven to keep already-prepared dishes warm. To do so, select the hot air setting and a temperature of 75^ . Cover dishes you want to keep warm to prevent them from drying out.
Roasting meat
Large pieces of meat, from 1 kg, are the most suitable. The meat will get a regularly shaped, crispy crust, with virtually no weight loss.
- Rub the meat with salt and spices fifteen minutes beforehand. Use 80 to 100g of butter or fat (or a mixture of the two) per 500g of meat for roasting.
Cooking times
- Flat, thin pieces require approximately 5 minutes less cooking time than thick or rolled pieces of meat. When cooking larger pieces of meat, cook for 15 to 20 minutes longer per 500 grams extra.
Put the meat in a roasting pan and douse in hot butter or fat. Place the meat in the roasting pan with the fatty side facing up. Make sure to baste meat without a fatty side every 15 minutes. Meat with a fatty side should be basted every 30 minutes.
- If the gravity is too dark, add a few spoonful's of water now and then during roasting.
- Cover the meat loosely with foil and let it stand for 10 minutes before serving.
Oven runners
- The oven walls are fitted with runners so that the oven grid or baking sheet can be placed at different levels. For the correct level, consult a baking guide or food packaging instructions.
Drawer
Your appliance has a drawer to store accessories like trays, shelves, grids, small pots and pans.

Warning!
The inside surface of drawer may become hot during use.
Do not store any food, plastic or inflammable materials in the drawer.
Setting the clock
When the cooker is connected for the first time, the time will flash '0-00'. The correct time of day has yet to be set.
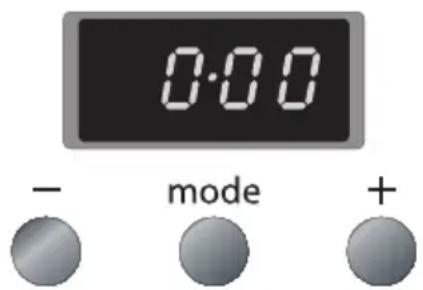
- Press the + and - keys at the same time.
A cooking symbol will appear in the display. The dot in the middle of the time display will also flash. You can now set the time of day.
- Use the + and - keys to set the correct time (while the dot is flashing).
Now wait 5 seconds; the time of day is confirmed automatically.
The current time appears in the display and the dot stops flashing.
Oven functions table
Your appliance is accompanied by a range of oven functions, depending on the model. Consult the table to select the preferred function. Also, consult the instructions for preparation on the dish packaging.
| Oven light |
| Defrosting
You can use the fan of the convection oven for defrosting. The fan blows cold air.
Take the frozen products out of the packaging and place them in a dish. Slide the dish onto the rack in rack position 3. |
| Hot Air
The fan in the back wall distributes the hot air in the oven. This heats the dishes. You can bake on multiple levels simultaneously, which will save energy. The convection fan system is excellent for baking cakes, cookies and apple pies. |
| Top and bottom heat (conventional)
The dish is heated by radiant heat from the bottom and top elements. Always place the dish in the middle of the oven. This mode is suitable for preparing dishes in a traditional way. Baked goods rise well and are beautifully browned. |
| Conventional + fan
The air in the oven is heated by the top and bottom elements. The fan in the back wall blows hot air around the oven. This heats the dishes. |
| Hot air + Bottom heat
This function simultaneously uses the bottom heat element and the fan with hot air heating. This function is especially useful for baking pizzas. This gives the best results when baking moist or heavy cake, fruit tarts with leavened dough or short crust pastry and cheesecake. |
| Grill
The dishes are heated by radiant heat from the combined grill element. Flat pieces of meat, chicken or other poultry can be cooked on the grill directly. This grill mode can also be used to toast bread. |
| Grill + top heat
This mode is used for quick grilling. In this mode, the oven has a larger grill surface than in the conventional grill mode. Preheat the oven for 5 minutes. Slide the rack into the top rack position. Then place a baking sheet in the third rack position to catch the grease from the dish. |
| Grill + top heat + fan
The combined effect of the grill, top element and the fan gives your food optimal crunch and is the ideal setting for broiling dishes. Preheat the oven for 5 minutes. Slide the rack into the top rack position. Then place a baking sheet in the third rack position to catch the grease from the dish. |
Using the gas hob
- Regularly check that the burner caps and burner rings are correctly positioned on the burner bases. Incorrect positioning can result in poor ignition, poor combustion or damage to the caps.
- Over time, the enamel on the support point can become burnt-in because the burner heats the pan support very strongly. This is unavoidable and is therefore not covered by the guarantee.
- Always ensure that the flames remain under the pan. A lot of energy is lost when flames burn around the outside of the pan. The handles will also become too hot. Do not use pans with a base diameter smaller than 12cm . Smaller pans will not be stable.

Wrong Right
- When frying, stir-frying, cooking through large quantities, or deep-frying, it is best to use the rapid burner.
- Preparing sauces, simmering and boiling can be done best on the auxiliary burner. On its high setting this burner is large enough for cooking food right through.
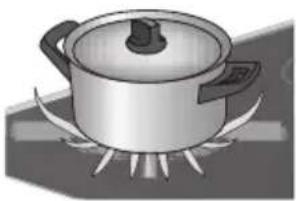
Cook with the lid on the pan. This way you save up to 50% energy.
- Use pans with a flat, clean, dry base. Pans with a flat base stand stably and pans with a clean base transfer the heat more effectively to the food.
- Keep the lid on the saucepan while cooking and save energy. Clean saucepans absorb heat more efficiently.
Pans
The recommended pan base diameters are:
for the rapid burner, at least 22-26 cm:
for the semi-rapid burner, at least 14-22 cm:
for the auxiliary burner, at least 12-18 cm.
Flame failure device
- The flame failure device ensures that the gas supply is closed if the flame goes out during the cooking process.
- Hold the control knob pressed in at the high position for approximately 5 seconds.
The flame failure device will switch on.
Operating the oven
- Turn the oven function knob to select an oven function. Consult the table in chapter 'Oven functions table 'to select the preferred function. Also consult the instructions for preparation on the dish packaging.
- Turn the temperature knob to set an oven temperature (between 50 and 270^ ). The oven thermostat control light will light up.

If necessary, first preheat the oven before placing the recipe in the oven.
Operating the oven with electronic timer
The electronic timer can be used in different ways:
- It allows you to determine the duration of baking / roasting / grilling. The oven switches off when the set time has elapsed. An audible signal will sound once the time is up. The maximum baking time you can set is 10 hours.
- You can also use the timer to set the time at which the baking/roasting/grilling should stop. The oven will operate with the preset temperature and function until the set time. An audible signal will sound once the time is up.
- Finally, you can enter a duration and an end time (for an automatic baking process). The oven will start and stop automatically. An audible signal will sound once the automatic baking process is finished.
The timer can also be used as a kitchen timer. The kitchen timer will not switch off the oven.
Programming the baking time
- Select a temperature with the temperature knob and an oven function with the function knob.
- The thermostat light for the oven lights up and the oven is switched on.
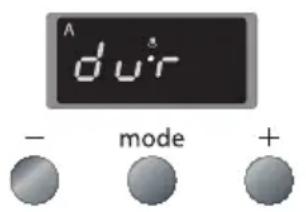
- Press the 'mode' key until 'dur' appears in the display.
- The display will now alternate between 'dur' and '0-00' and the 'A' flashes.
- Use the + and - keys (while the 'A' is flashing) to set the correct duration.
- Now wait 5 seconds; the set time is confirmed automatically.
- The time of day appears in the display again and the 'A' stops flashing.
-
The oven gives an audible signal when the set time has elapsed. The 'A' starts flashing and the oven switches off automatically.
-
After the cooking time has elapsed, first turn the temperature knob and the function knob to '0'. Then press any key to switch off the alarm signal.
Programming the end of the baking time
- Select a temperature with the temperature knob and an oven function with the function knob.
The thermostat light for the oven lights up and the oven is switched on.
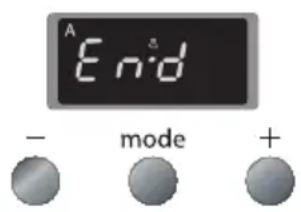
- Press the 'mode' key until 'End' appears in the display.
The display will now alternate between 'End' and the earliest possible end time and the 'A' flashes.
- Use the + and - keys to set the desired end time (while the 'A' is flashing).
- Now wait 5 seconds; the set time is confirmed automatically.
The time of day appears in the display again and the 'A' stops flashing. The oven sounds a signal when the end time has been reached. The 'A' starts flashing and the oven switches off automatically.
- After the cooking time has elapsed, first turn the temperature knob and the function knob to '0'. Then press any key to switch off the alarm signal.
Programming the automatic baking process
You can program the oven to turn on and off automatically by setting a duration and end time. The oven will calculate the start time and switch off automatically after the end of the cooking time.
Example:
Current time: 17:30,
the set duration of the baking process: 1 hour and 15 minutes,
the set end time of the baking process: 19:45.
The oven will start the baking process at 18:30 with the preset temperature and function and will stop at 19:45.
- Press the 'mode' key until 'dur' appears in the display.
The display will now alternate between 'dur' and '0-00' and the 'A' flashes.
- Use the + and - keys (while the 'A' is flashing) to set the correct duration.
- Press the 'mode' key until 'End' appears in the display.
The display will now alternate between 'End' and the earliest possible end time and the 'A' flashes.
- Use the + and - keys to set the desired end time (while the 'A' is flashing).
The cooking symbol disappears.
- Now wait 5 seconds; the set time is confirmed automatically.
The time of day appears in the display again and the 'A' stops flashing.
- Select a temperature with the temperature knob and an oven function with the function knob.
The oven automatically switches on when the calculated start time has been reached
The thermostat light for the oven lights up and the cooking symbol appears in the display.
The oven sounds a signal when the end time has been reached.
The 'A' starts flashing and the oven switches off automatically.
-
After the cooking time has elapsed, first turn the temperature knob and the function knob to '0'. Then press any key to switch off the alarm signal.
-
You can see and/or adjust the remaining time of the baking process or the end time in the display at any moment: press the 'mode' key until 'dur' or 'End' appears in the display; the 'A' in the display flashes. Use the + and the - keys to adjust the duration or the end time (while the 'A' is flashing).
- If you want to switch off the oven during baking, set the remaining duration of the baking process to '0·00' and set the temperature knob and the function knob to '0'.
Kitchen timer
The audible signal of the kitchen timer will only sound after the expiry of the set time. The kitchen timer will not switch off the oven.
- Press the 'mode' key.
A small clock appears in the display and the dot in the middle of the time display flashes.
- Use the + and - keys to set the correct time (while the dot is flashing).
Now wait 5 seconds; the set time is confirmed automatically.
The time of day appears in the display again and the clock stops flashing.
The time now begins to count down automatically.
When the time has elapsed, a beep sounds and the clock symbol flashes.
- Press any key to switch off the alarm signal.

You can see and/or adjust the remaining time of the kitchen timer in the display at any moment: press the 'mode' key, the remaining time of the timer appears in the display and the clock symbol flashes. Use the + and the - keys to adjust the time (while the clock symbol is flashing).
Setting the audible signal
You can select one of three different audible signals. Ensure that the current time is shown in the display.
- Hold the - key until you hear an audible signal.
You will then hear a different audible signal when you press the - key again.
Wait for 5 seconds after you hear the desired signal; the set signal is confirmed automatically.
Operating the hob
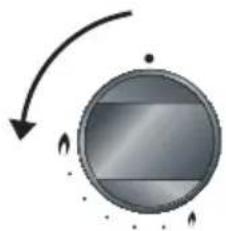
- Push in the control knob and turn it to the left to the high setting. The burner will ignite.
The control knob should be pushed in and held for about 10 seconds because of the flame safeguard.
The gas flame can be smoothly adjusted from high to low. If the burner fails to light after repeated attempts, check to ensure that the burner cap is properly positioned.
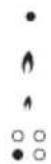
0 position
High setting
Low setting
Burner zone

In case the flames are accidentally put out, turn the knob to the "off" position, wait for 60 seconds and re-ignite the burner again as described.
If the burner fails to ignite or doesn't stay on, check that:
- the burner cap and burner ring are seated correctly in the burner housing;
- the burner/spark plug and thermocouple are clean and dry.
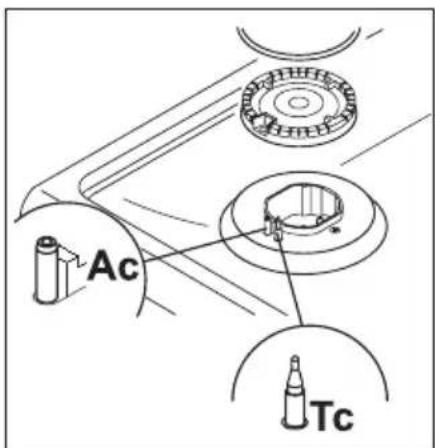
Ac: Burner spark plug
Tc: thermocouple
Cleaning the appliance

Clean the appliance after use. This will prevent food debris from becoming burnt onto the appliance and causing stubborn stains.
Cleaning the cooker
- Clean the appliance daily with water and a detergent or all-purpose cleaner.
- Remove stubborn stains on enamel with a non-abrasive cream or a soft sponge.
- Never use scouring powders, aggressive cleaning agents, green scours.
- Remove stubborn stains with a special cleaner for stainless steel. Always clean in the direction of the structure of the steel in order to avoid shiny spots. Clean afterwards with a polish or maintenance product for stainless steel.
- Do not drop hot burner caps in cold water. Because of the strong cooling, they might be damaged. This damage is not covered by the guarantee.
- Damage to the screen or pan support is not covered by the guarantee.
Cleaning the oven

Disconnect the appliance before starting with cleaning or reparation. Preferably, by taking the plug out of the socket or by turning off the mains switch.
- The inside of the oven door, the base of the oven, the baking sheet and the roasting tin are all completely enamelled. These are best cleaned with hot, soapy water or a little liquid detergent; rinse well with clean water.
- Clean the outside of the oven with warm soapy water or liquid soap. Rinse with clean water.
- Clean the glass in the oven door with soapy water or with a glass-cleaning product.
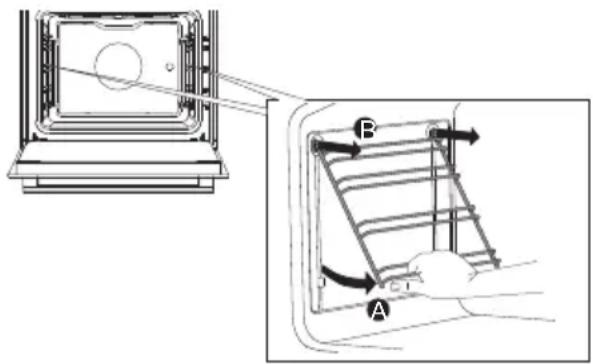
Removing and cleaning the guide rails
- Grasp the guide rails at the bottom and tilt them towards the middle of the oven (A).
- Remove the guide rails from the holes in the back wall (B).
Replacing the oven lamp

Before replacing the oven lamp, switch off the appliance by removing the plug from the socket or switching off the fuse in the fuse box. Allow the appliance to cool down. Wear hand protection when removing the lamp.
The appliance contains a light source of energy efficiency class G.
- Unscrew the glass cover (anticlockwise) and replace the oven lamp.
Fit a new lamp with the same specifications (230 V, 15-25 Watt, type E14, resistant to 300^ ).
- Screw the glass cover back on tightly.

The lamp in this household appliance is only suitable for illumination of this appliance. The lamp is not suitable for household room illumination. The lamp is consumable material and is not covered by the guarantee.
Removing the oven door
To clean the inside of the oven it is possible to remove the oven door.
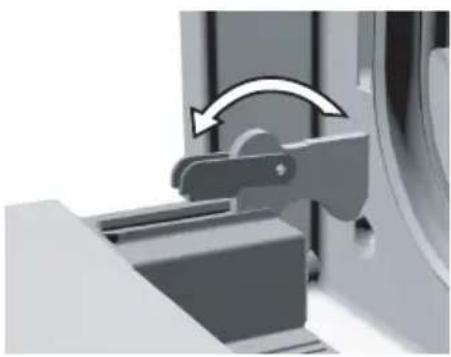
- Open the oven door fully and turn the pawls back as far as they will go.
- Close the door slowly so that the clips are in the flanges (in which the pawls fit).
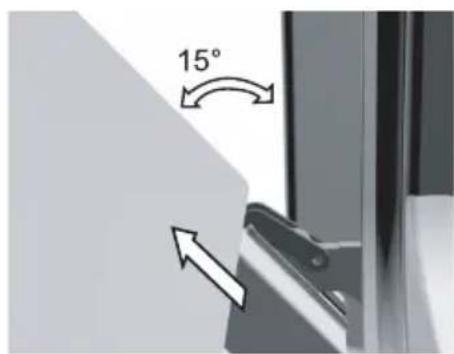
- At approximately 15^ (relative to the closed door position) lift the door slightly upwards and lift it out of both hinge holders.
Use the reverse order to assemble the door.
- Insert the door at an angle of 15^ in the hinges on the front of the appliance and push the door forwards and downwards so that the hinges slide into their notches.
Check to be sure the hinge notches are properly in place.
- Then open the door fully and turn the pawls back to their initial position.
- Close the door slowly and check that it closes properly.
If the door does not open or close properly, make sure the hinge notches are positioned correctly in the hinge holders.
Fault table
If you are uncertain about whether your appliance is functioning properly, this does not automatically mean there is a defect. Make sure to check the points mentioned below in the table first, or visit our website 'www.Etna.nl' for more information.
| Problems with the hob Possible | le cause Solution | |
| There is a smell of gas in the vicinity of the appliance. | The appliance connection is leaking. | Turn off the main gas tap.Contact your installer. |
| A burner does not ignite. Plug | not in socket. Insert the plug into | the wall socket. |
| Fuse defective/fuse in meter cabinet switched off. | Replace the fuse or switch on the fuse in the fuse box. |
| Spark plug dirty/damp. Clean/dry | dry the spark plug. |
| Burner parts not correctly installed. | Assemble the burner parts using the centring ridges. |
| Burner parts dirty/damp. Clean/dry | dry the burner components. Make sure that the outflow holes are open. |
| Main gas supply valve closed. Open the main gas valve. |
| Fault in gas mains. Consult you | gas supplier. |
| Gas bottle or tank is empty. Connect a new gas bottle or have the tank refilled. |
| Wrong type of gas used. Check | whether the gas used is suitable for the appliance.Contact your installer if it is not correct. |
| Control knob not pressed in far enough. | Keep the control knob pressed in far enough between full and low. This can take longer the first time because of the gas supply. |
| The burner does not burn evenly. | Burner parts not placed correctly. | Assemble the burner parts using the centring ridges. |
| Burner parts dirty/damp. Clean/dry the burner parts.Make sure that the outflow holes are open. |
| Wrong type of gas used. Check | whether the gas used is suitable for the appliance.Contact your installer if it is not correct. |
| Problems with the hob Possible cause Solution | |
| The burner goes out after igniting. | Control knob not pressed in long enough. | Keep the control knob pressed in for at least 10 seconds. |
| Problems with the oven Possible cause Solution | |
| The oven light does not work. The oven light is defect. Replace | the oven light. |
| The oven does not heat up. No | temperature set. Set the tempera |
| tature using the temperature knob. |
| Electronic timer active. Set the | electronic timer to‘0:00’. |

A visit by a service technician during the warranty period will be charged if the appliance is not functioning because of improper use!
General
A registered installer should only connect this appliance. The gas connection and the electrical connection must comply with national and local regulations.

Read the separate safety instructions first!
Note!
- This appliance must be earthed at all times.
- Installation, maintenance or repairs should only be carried out by professionals who are authorised by the manufacturer, as failure to do so will void the guarantee.
- The device should be disconnected from the mains prior to installation, maintenance or repairs. The device is only disconnected from the electric power if:
the main switch of the domestic electrical system is switched off;
the fuse of the domestic electrical system has been completely removed;
the plug has been pulled out of the socket.
- Faulty parts may only be replaced with original Etna parts. Only these parts are guaranteed by Etna to meet the safety requirements.
- If the connecting cable is damaged, it may only be replaced by the manufacturer, the manufacturer's service organisation or equivalently qualified persons, in order to avoid dangerous situations.
Gas connection
Gasconnection: RC 1/2" (ISO 7/1-RC 1/2)
- The gas connection must comply with national and local regulations. For the Netherlands this includes the GAVO regulations (NEN 1078). Amongst other things these regulations instruct that only approved materials are to be used.

The type of gas and the country for which the appliance has been designed are indicated on the ratings plate. The appliance is set in the factory for G25/G25.3 (natural gas) with a pressure of 25 mbar. Appliance category I II2L3B/P + II2EK3B/P.
- We recommend that the hob be connected by means of a fixed pipe. Connection using a specially-designed safety hose is also permitted.
- The pipe behind the oven must be made entirely out of metal.
Note!
A safety hose may not be bent and must not come into contact with moving parts of kitchen units.
The connection tap for the appliance must always be positioned such that it is easily accessible.
The type of gas and the country for which the appliance has been designed are shown on the appliance identification card.

Before using the appliance for the first time, check the connections using water and washing-up liquid to ensure that there are no gas leaks.
Electrical connection
230 V~/50/60Hz
The electrical connection must comply with national and local regulations. For the Netherlands this includes the NEN 1010 amongst other standards.
- The wall plug socket and plug should always be accessible.
- Make sure that the cable does not come into contact with parts of the oven that may become hot.
- If you want to make a fixed connection, make sure that an omnipolar switch with a contact separation of at least 3mm is fitted in the supply cable.
- The appliance should not be connected to the mains via a multiplug adapter or extension cable, as the safe use of the equipment cannot be guaranteed.
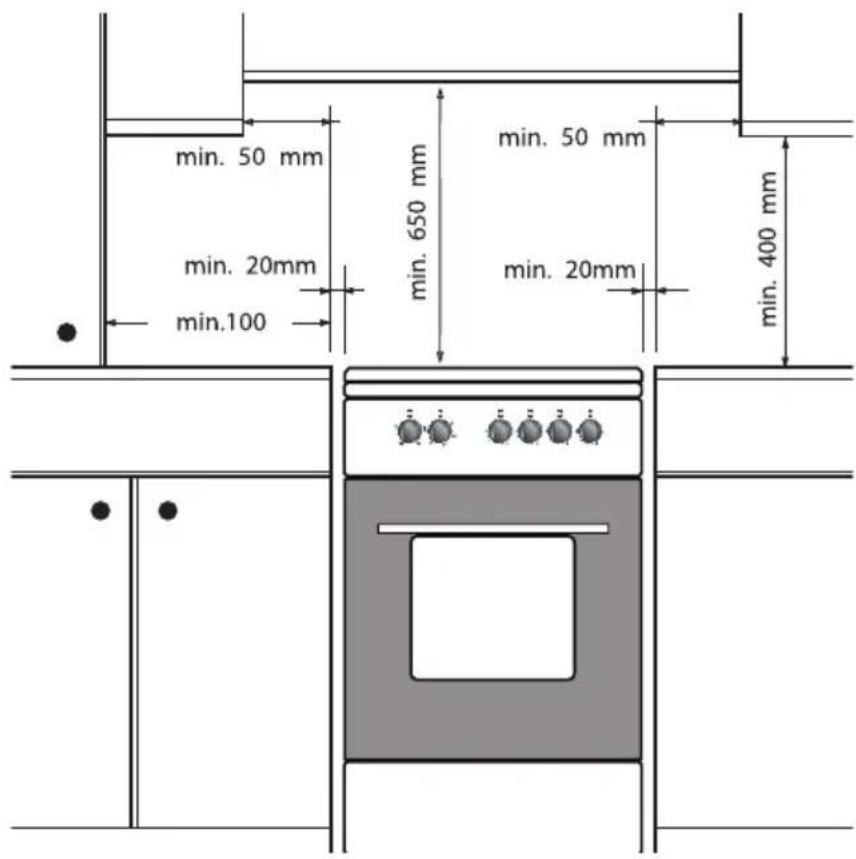
Installation
- When placing the cooker next to a tall cupboard or another wall made of flammable material, keep at least 50~mm distance between the cooker and the walls.
- Also keep a minimum distance of 650~mm between the hob and any cooker hood placed above the cooker.
- If you place the cooker in a kitchen unit, the minimum space must be adhered to.
- If the cooker is built in between kitchen cabinets, the lining of the units must be able to withstand temperatures up to 90^ .
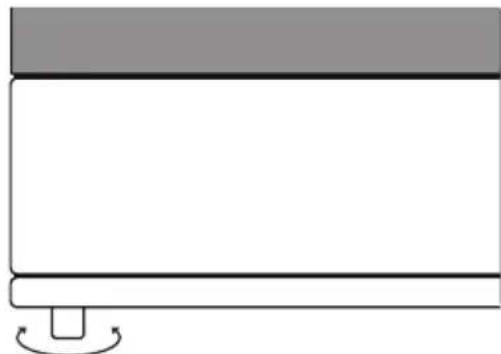
Levelling
- The height of the cooker can be adjusted with the adjusting feet.
- If you want to install the cooker on a platform, make sure that it is securely fastened.

After installation of the device, check whether the burners work properly. The flame pattern should be regular and stable on the high setting, and the burners must not go out on low.
Technical data
The data plate on the appliance indicates the total nominal load, the required voltage and the frequency. The data plate is located at the right lower corner behind the door.
This appliance meets all relevant CE guidelines.
| Brand | | ETNA |
| Model FGV660 | | --- | FGV760--- |
| Type of Oven Electric Electric | | | |
| Mass Kg 41(+/-2) 49(+/-2) | | | |
| Energy Efficiency Index - conventional 119.1 116.7 | | | |
| Energy Efficiency Index - fan forced 105.7 103.6 | | | |
| Energy Class A A | | | |
| Energy consumption (electricity) - conventional kWh/cycle 0.98 | | 0.98 | |
| Energy consumption (electricity) - fan forced kWh/cycle | 0.87 | 0.87 | |
| Number of cavities | 1 | 1 | |
| Heat Source | | Electric Electric | |
| Volume | | 65 69 | |
| This oven complies with EN 60350-1 | | | |
Energy Saving Tips for the oven
Cook the meals together, if possible.
- Keep the pre-heating time short.
- Do not elongate cooking time.
- Do not forget to turn-off the oven at the end of cooking.
- Do not open oven door during cooking period.
| Brand | | ETNA |
| Model FGV660--- FGV760--- | | | |
| Type of hob Gas Gas | | | |
| Number of Cooking Zones 4 4 | | | |
| Heating Technology-1 Gas Gas | | | |
| Size-1 cm Auxiliary Auxiliary | | | |
| Energy Efficiency-1 % NA NA | | | |
| Heating Technology-2 Gas Gas | | | |
| Size-2 cm Semi rapid Semi | rapid | | |
| Energy Efficiency-2 % | 59.0 | 59.0 | |
| Heating Technology-3 Gas Gas | | | |
| Size-3 cm Semi rapid Semi | rapid | | |
| Energy Efficiency-3 % | 59.0 | 59.0 | |
| Heating Technology-4 Gas Gas | | | |
| Size-4 | cm | Rapid | Wok |
| Energy Efficiency-4 % | 57.0 | 56.00 | |
| Energy Efficiency hob | % | 58.3 | 58.0 |
| This oven complies with EN 30-2-1 | | | |
Energy Saving Tips for the hob
Use cookwares having flat base.
Use cookwares with proper size.
Use cookwares with lid.
- Minimize the amount of liquid or fat.
- When liquid starts boiling, reduce the setting.
FGV660...
| G30 28-30mbar 7.5 kW 545 g/h
II2L3B/P- II2EK3B/P NL Class: 1 | NG/G25
25 mbar | NG/G20/G25.3
20/25 mbar | LPG/G30
28-30 mbar |
| RAPID BURNER |
| Injector diam (1/100 mm) 125 125 125 | 5 85 | | | |
| Nominal Rating (kw) 3 3 3 | | | | 3 |
| Consumption in 1h 332.2 l/h 325.0 l/h | 285.6 l/h 218.1 g/h | | | |
| SEMI-RAPID BURNER |
| Injector diam (1/100 mm) 94 94 94 65 | | | | |
| Nominal Rating (kw) 1.75 1.75 1.75 | 1.75 | | | |
| Consumption in 1h | 193.8 l/h 189.6 | /h 166.7 l/h 1 | 27.2 g/h | |
| AUXILIARY BURNER |
| Injector diam (1/100 mm) | 72 72 72 50 | | | |
| Nominal Rating (kw) 1 1 1 | 1 | | | |
| Consumption in 1h | 110.7 l/h 108.3 | /h | 95.2 l/h | 72.7 g/h |
FGV760...
| G30 28-30mbar 8.3 kW 604 g/h
II2L3B/P- II2EK3B/P NL Class: 1 | NG/G25
25 mbar | NG/G20/G25.3
20/25 mbar | LPG/G30
28-30 mbar |
| WOK BURNER |
| Injector diam (1/100 mm) 148 148 148 | 98 | | | |
| Nominal Rating (kw) | 3.8 | 3.8 | 3.8 3.8 | |
| Consumption in 1h | 420.8 l/h 411.7 | /h 361.9 l/h | 276.3 g/h | |
| SEMI-RAPID BURNER |
| Injector diam (1/100 mm) 94 94 94 | 65 | | | |
| Nominal Rating (kw) 1.75 1.75 1.75 1 | .75 | | | |
| Consumption in 1h | 193.8 l/h 189.6 | /h 166.7 l/h | 127.2 g/h | |
| AUXILIARY BURNER |
| Injector diam (1/100 mm) | 72 72 72 | 50 | |
| Nominal Rating (kw) 1 1 1 | 1 | | | |
| Consumption in 1h | 110.7 l/h | 108.3 l/h | 95.2 l/h | 72.7 g/h |
Disposal of the appliance and packaging
This product is made from sustainable materials. However, the appliance must be disposed of responsibly at the end of its useful life. The government can provide you with information about this.
The appliance packaging can be recycled. The following materials have been used:
cardboard;
polyethylene film (PE);
CFC-free polystyrene (hard PS foam).
Dispos of these materials responsibly in accordance with legal provisions.
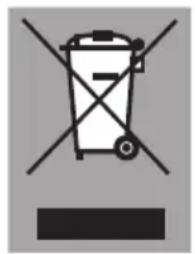
The product has a pictogram of a crossed-out waste container. This indicates that household appliances must be disposed of separately. This means that the appliance may not be processed via the regular waste flow at the end of its useful life. You should take it to a special municipal waste depot or a sales outlet that offers to do this for you.
Collecting household equipment separately prevents harm to the environment and public health. The materials used in manufacturing this appliance can be recycled, which provides considerable savings in energy and raw materials.
We hereby declare that our products satisfy the applicable European Directives, Orders and Regulations, as well as the requirements stated in the referenced standards.
www.etna.nl
www.etna.be

671762

