Tower QS - Air purifier Winix - Free user manual and instructions
Find the device manual for free Tower QS Winix in PDF.

| Product Type | Air Purifier |
| Brand | Winix |
| Model | Tower QS (AGN335 Series) |
| Dimensions (L x D x H) | 310 mm x 310 mm x 750 mm |
| Weight | 8.3 kg |
| Supply Voltage | AC 220 V - 240 V ~ 50/60 Hz |
| Rated Power | 55 W |
| Maximum Room Area | 90 m² |
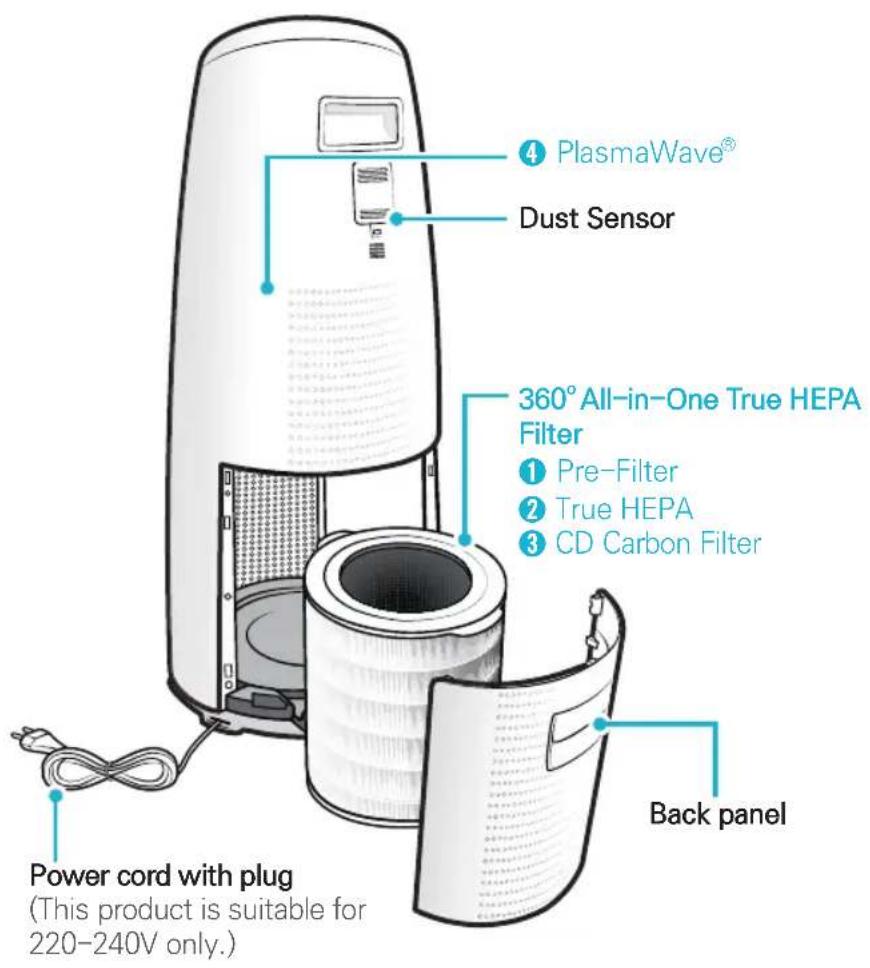
| Filtration | 4 stages: pre-filter, carbon filter CD, True HEPA filter, PlasmaWave |
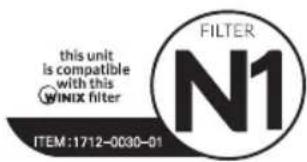
| Filter | 360° All-in-One True HEPA Filter (ref. 1712-0030-01) |
| Filter Cleaning Frequency | Every 14 days (vacuum cleaner or soft brush, do not wash) |
| Filter Replacement Frequency | Every 12 months |
| Ventilation Modes | Auto, Sleep, Manual (Low, Medium, High, Turbo) |
| Special Functions | PlasmaWave (ionizer), Built-in Bluetooth (2x8W speaker), air quality sensor |
| Air Quality Indicator | Blue LED (good), amber (average), red (poor) |
| Dust Sensor Cleaning | Every 2 months with a cotton swab |
| Exterior Cleaning | Soft damp cloth, every 1-2 months |
| Warranty | 2 years (valid in Europe) |
| Safety Instructions | Do not use without filter, do not block air inlets, unplug before cleaning |
Frequently Asked Questions - Tower QS Winix
User questions about Tower QS Winix
0 question about this device. Answer the ones you know or ask your own.
Ask a new question about this device
Download the instructions for your Air purifier in PDF format for free! Find your manual Tower QS - Winix and take your electronic device back in hand. On this page are published all the documents necessary for the use of your device. Tower QS by Winix.
USER MANUAL Tower QS Winix
this manual before operating.
- The product warranty is printed on the back of this guide, so please keep it in a safe place for future use.
CONTENTS
4-STAGE AIR PURIFICATION 3
CONTROLS 4
WHERE TO USE 5
360^ All-in-One True HEPA Filter 6
360^ All-in-One True HEPA Filter ANATOMY 7
INSTALLING FILTERS 8
SAFETY AND CAUTIONS 10
INITIAL OPERATION 11
AUTO & SLEEP 12
FILTER CARE 16
CLEANING CARE 20
FREQUENTLY ASKED QUESTIONS 22
UNIT SPECIFICATIONS 25
SPECIFICATIONS (Speaker, Bluetooth) 26
PRODUCT WARRANTY 27
French 28
German 55
This product is suitable for 220 - 240V only.
4-STAGE AIR PURIFICATION
PACKAGE CONTENTS
Unit
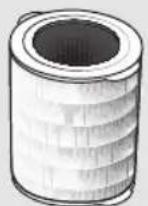
360^ All-in-One True
HEPA Filter
User Manual
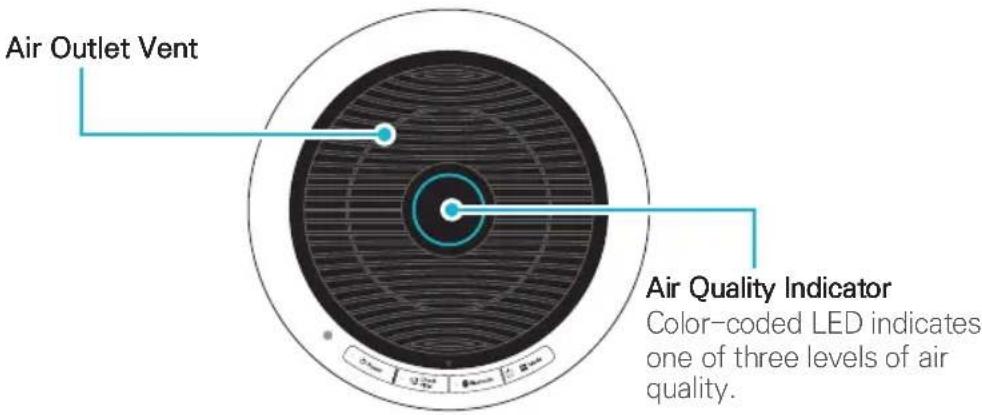
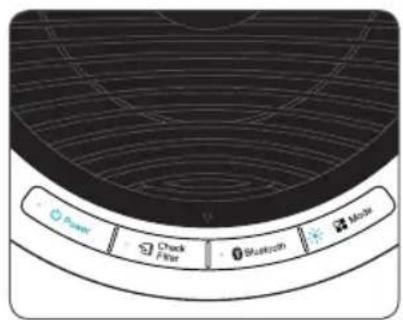
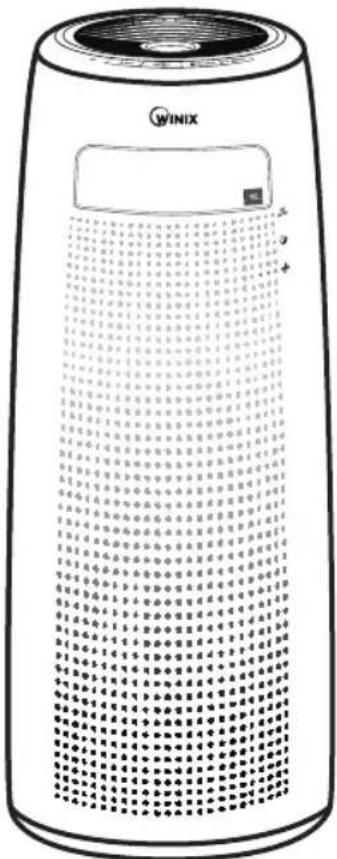
CONTROLS
Mode Button
- Press to cycle through manual fan speeds (Low, Medium, High, Turbo).
- Pressing will also cycle through Auto and Sleep Modes.
- When sleep mode is selected the Air Quality Indicator light will be turned off.
- Press and hold for at least 3 seconds to enable or disable PlasmaWave.
Reset Button
After replacing a filter, press the RESET button for at least 5 seconds.
Bluetooth indicator
Indicator is lit when Bluetooth is connected.
PlasmaWave® Indicator
Indicates whether PlasmaWave is enabled or disabled.
Light Sensor
Detects the amount of ambient light within the environment, to adjust the brightness of the LED indicators.
Power Button
Turns the unit on or off.
Bluetooth button
Turns Bluetooth connection ON/OFF
Change Filter Indicator
LED light indicates when it is time to change the filter.
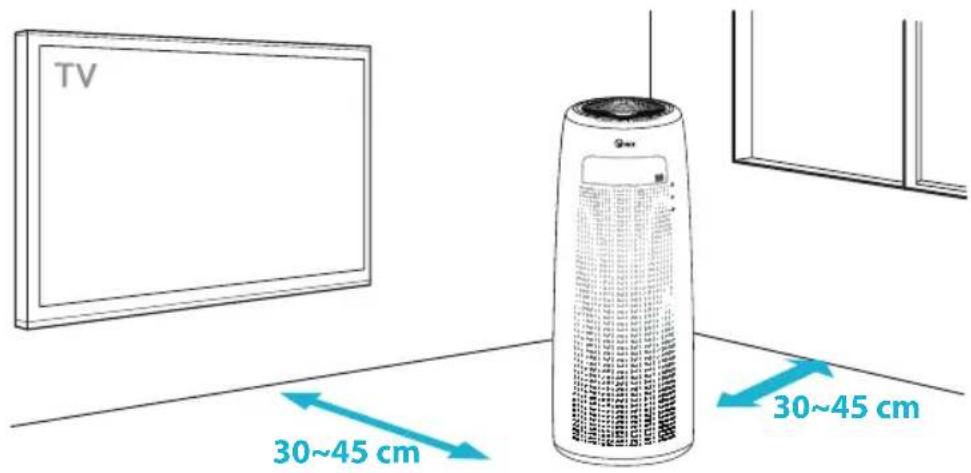
WHERE TO USE
-
Allow 30 - 45cm of space between TVs, radios, and other electronic products
-
electromagnetic interference from certain electronics may cause product malfunction.
-
Place indoors away from direct sun light
-
direct exposure may cause product malfunction or failure.
-
Only place on hard, flat surfaces
-
flimsy or slanted surfaces may result in abnormal noise and vibrations.

WARNING
Follow these instructions to reduce the risk of serious injury or death and to reduce risk of damaging the unit.

Do not use around mist or fumes from industrial oil or around large quantities of metallic dust

Do not place around heating elements

Do not install in any sort of motor or transport vehicle (trucks, boats, ships, etc.)

Do not place in an area with excessive amounts of noxious gases

Do not place near any flammable materials (aerosols, fuel, gases etc.)

Do not have unit facing into wind or draft

Do not place below any electrical outlet

Do not place in excessively humid areas where unit may become wet
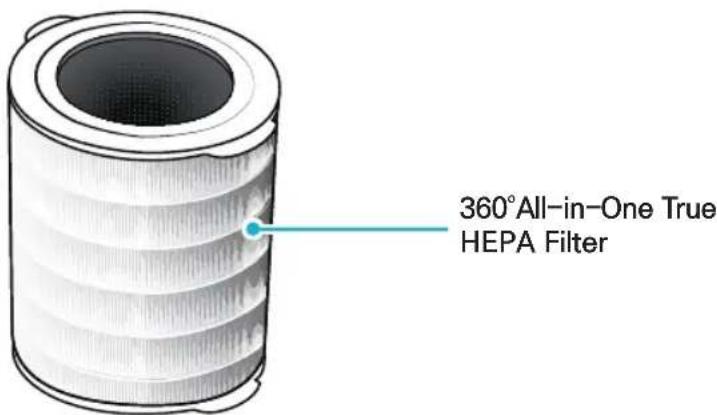
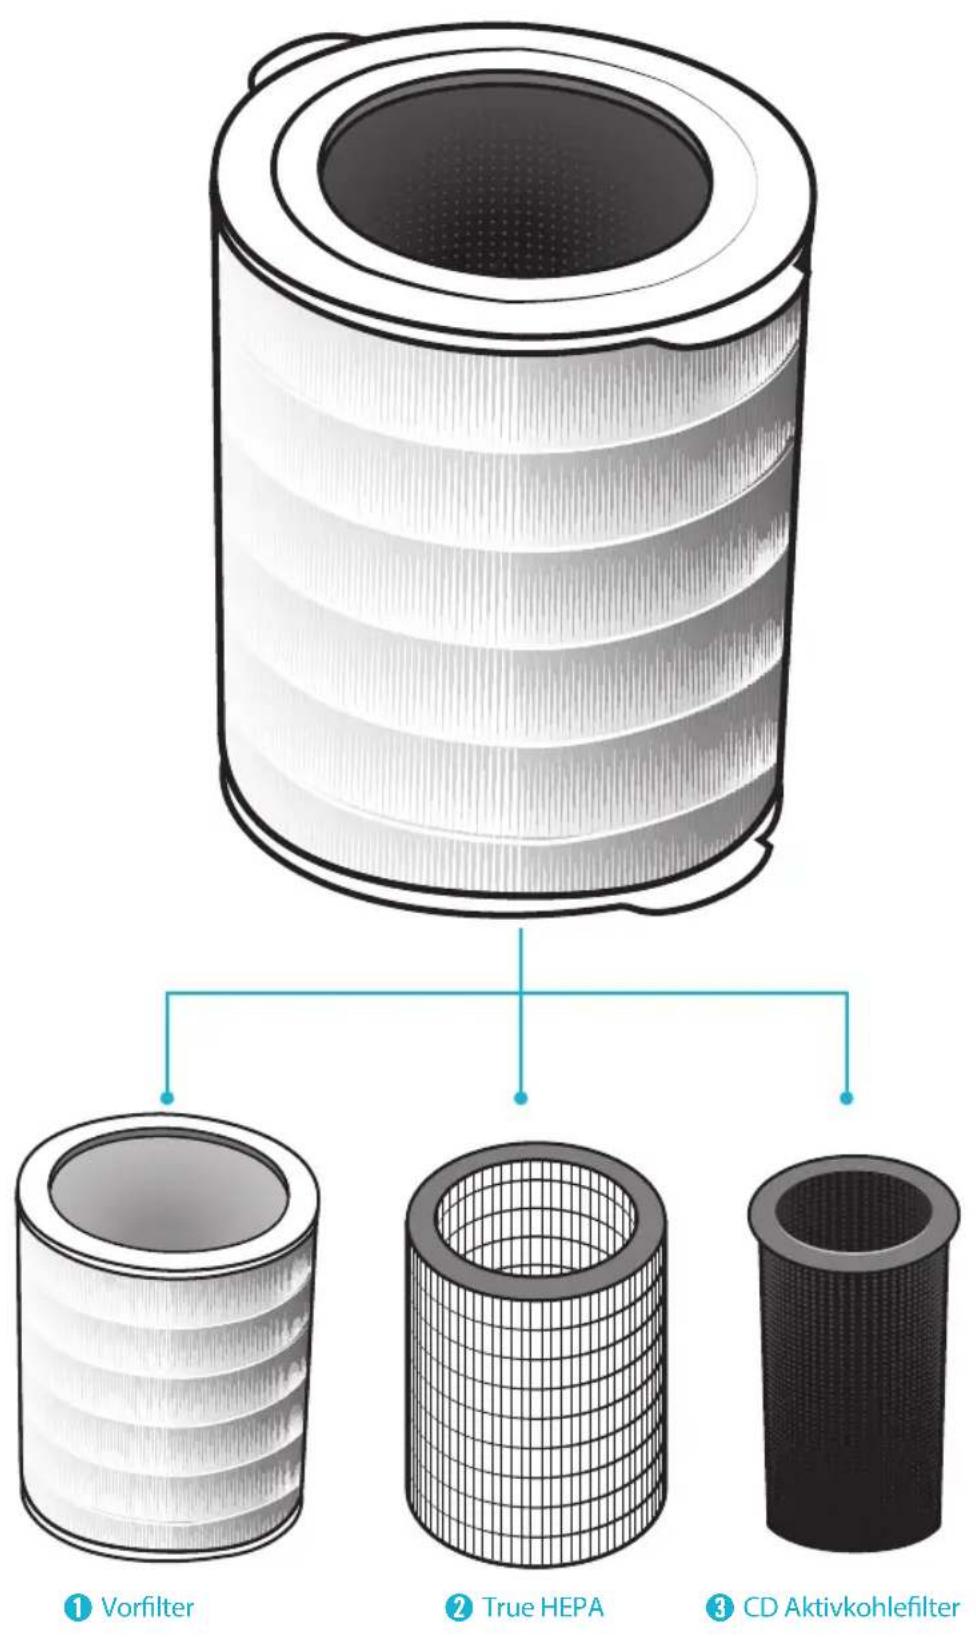
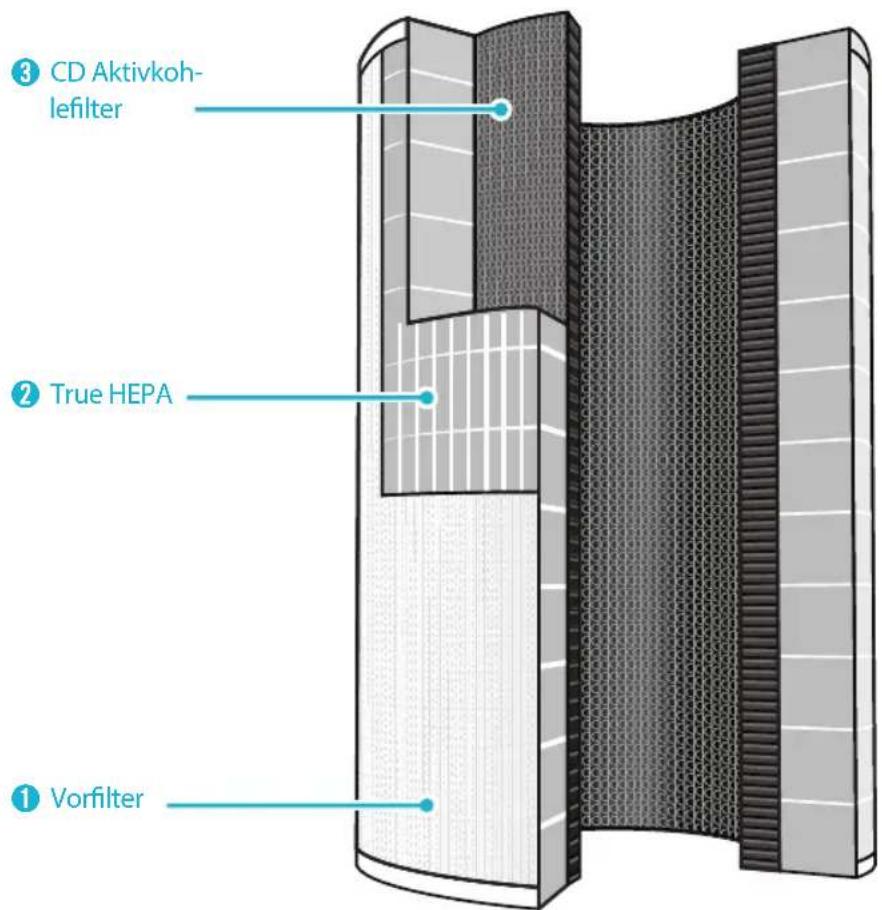
360^ All-in-One True HEPA Filter
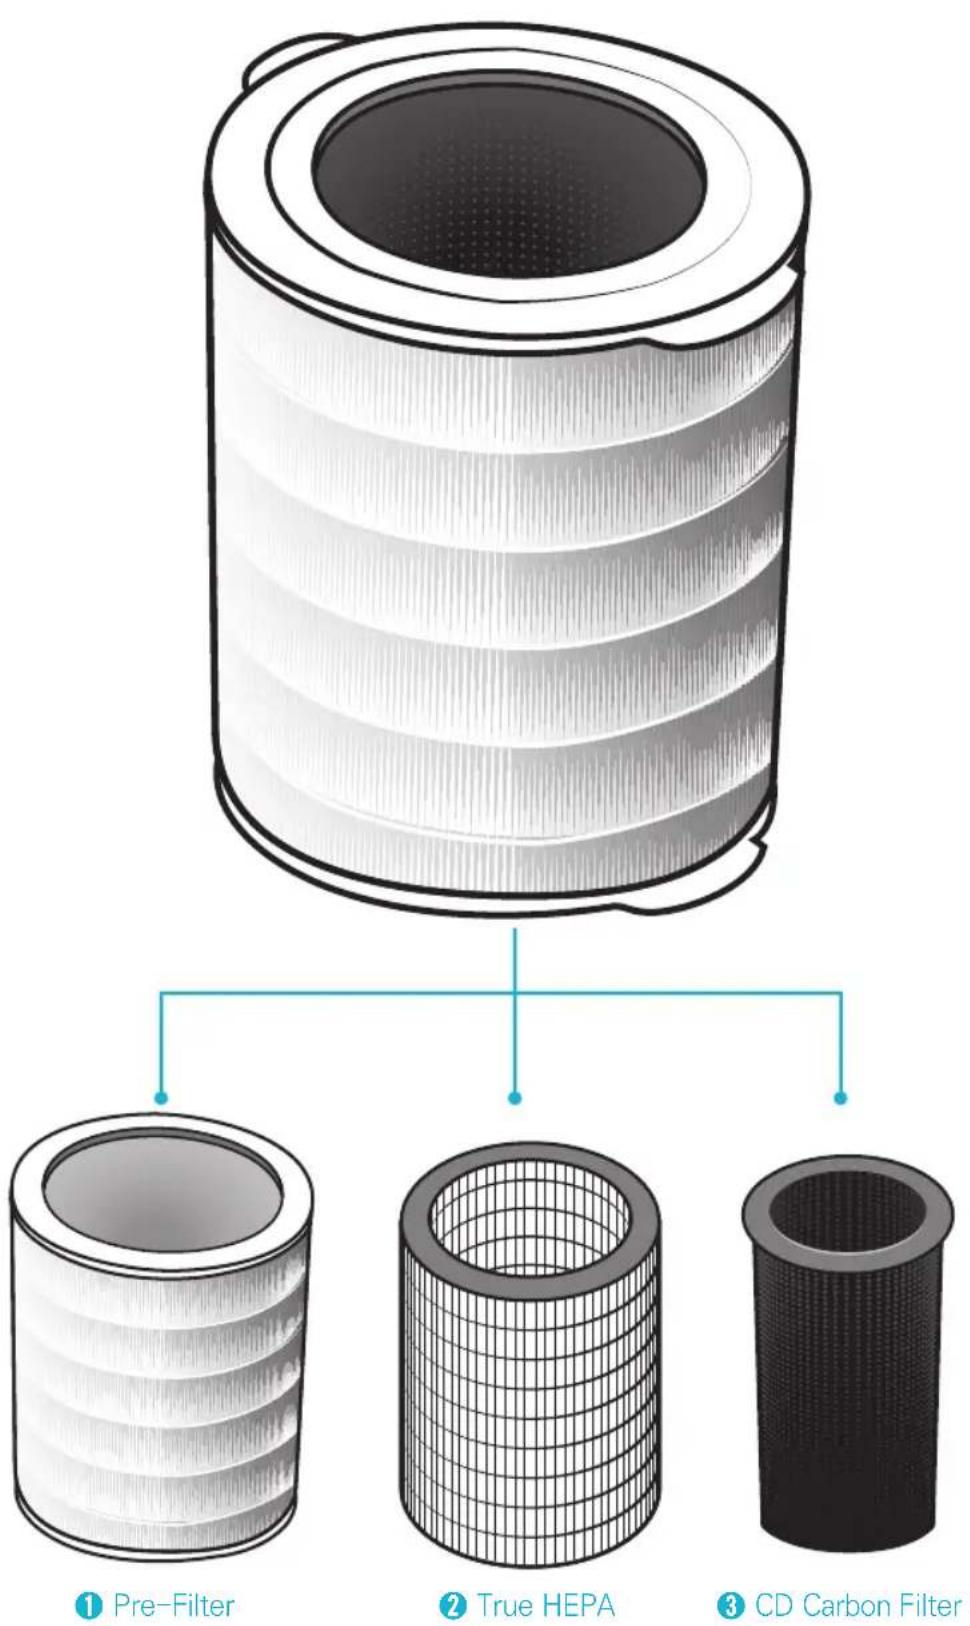
360^ All-in-One True HEPA Filter ANATOMY
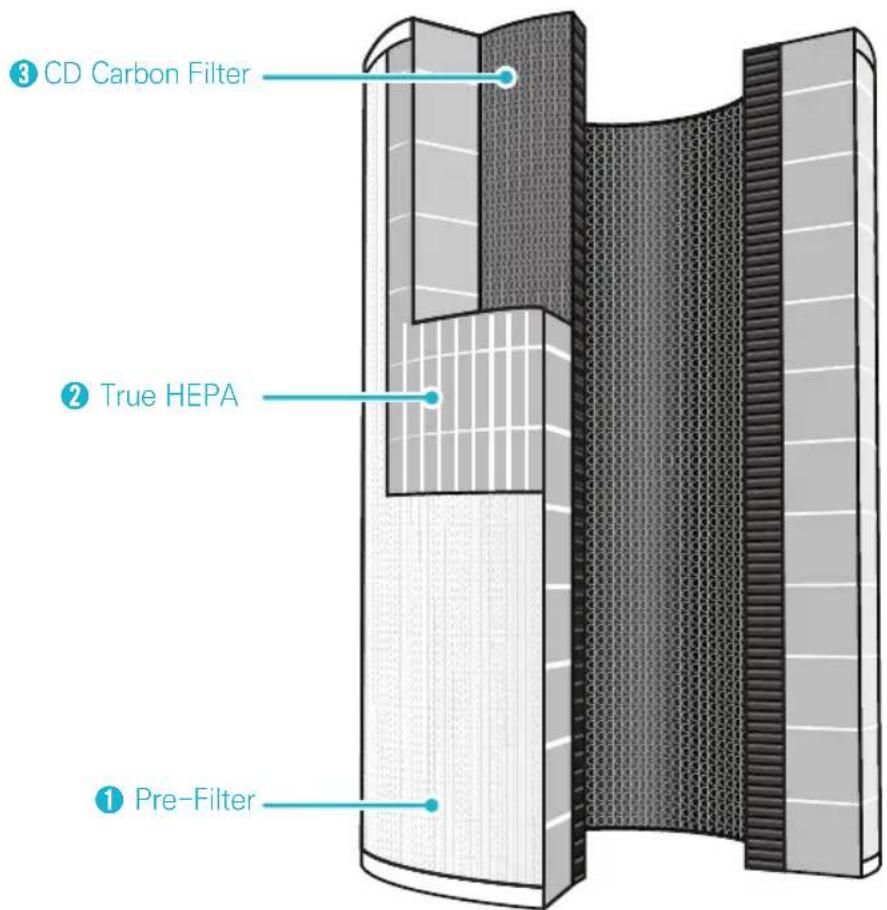
1 Pre-Filter designed to catch larger airborne particles found indoors.
True HEPA captures 99.97% of airborne allergens including; pollen, Mould spores, dust, pet dander, microbes, and smoke. *particles as small as 0.3 microns in size
CD Carbon Filter reduces VOCs and household Odours from cooking, pets, and smoke.

Note
The 360^ All-in-One True HEPA Filter is one unit and the individual components of the filter cannot be purchased separately.
INSTALLING FILTERS
This product comes with all required filters. The protective plastic wrap must be removed from the filter before use.
※ Operating the unit without removing the plastic wrap may result in product failure.
※ Unplug and make sure the unit is turned off before installing filter.
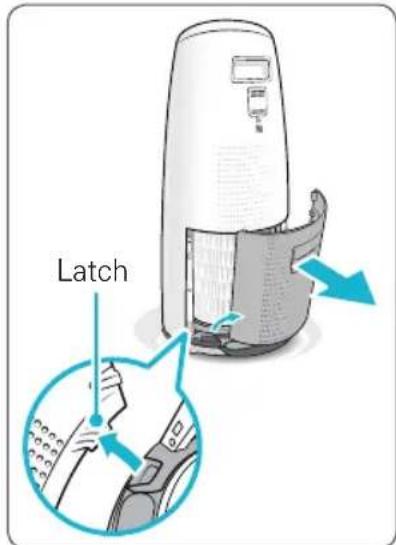
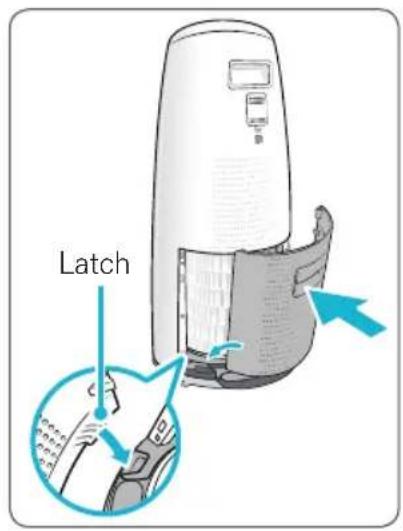
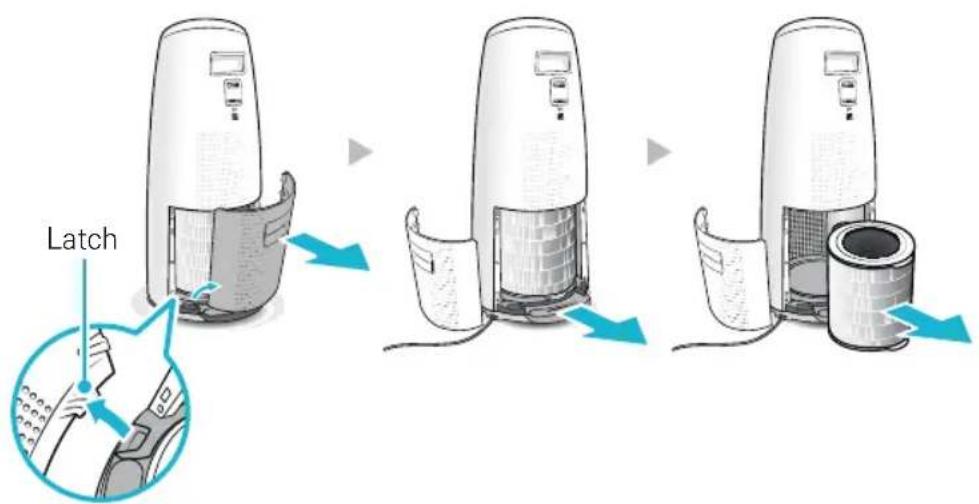
① Remove the back panel by grasping handle and pulling back, towards yourself.
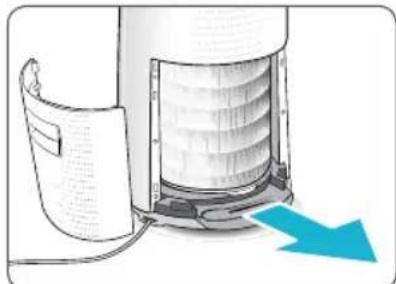
② Once the back panel is removed, grasp the handle near the bottom of the unit, and pull towards yourself to lower and release the filter.
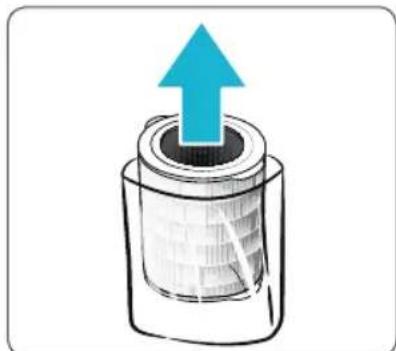
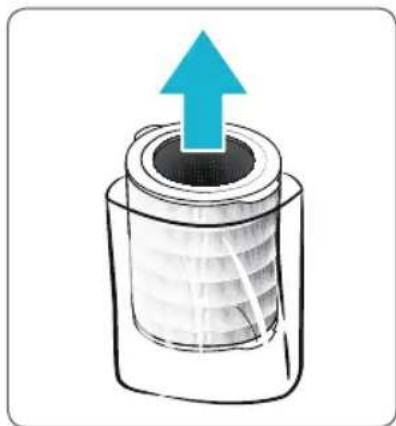
③ Remove the 360^ All-in-One True HEPA filter from the unit. Remove the plastic wrap from the filter.
- Operating the unit without removing filters from plastic wrap may cause abnormal noise, deformation, or fire as a result of overheating.

Note
Refer to pages 17 - 19 for details on how to replace filters.
INSTALLING FILTERS
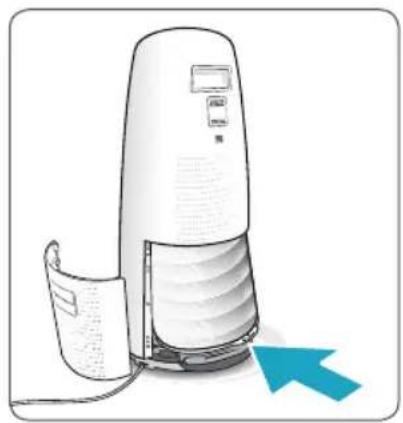
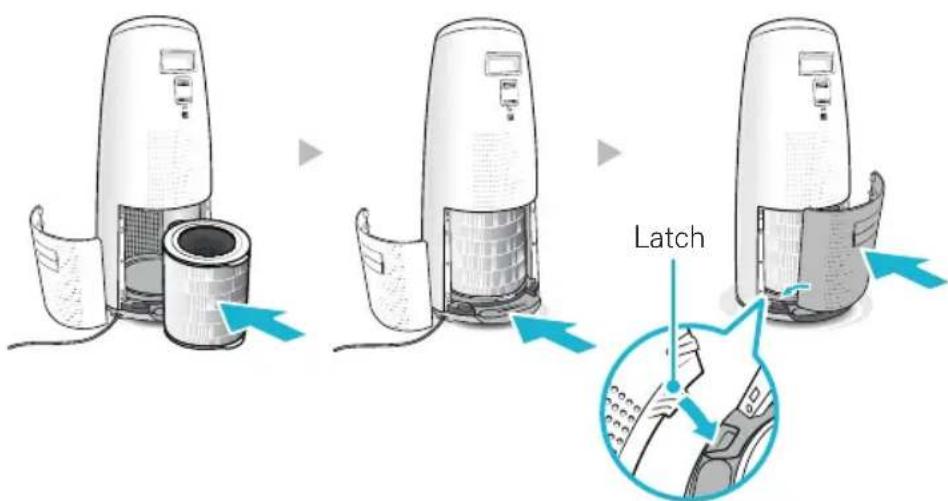
④ Install the filter, top side up, into the unit until it is fully inserted. Grasp lower handle near bottom of the unit and push in until the filter locks into place.
The top of the filter shows the opening into the filter. Whereas the bottom is solid, with no opening.
- When installing the filter you will know it is fully inserted because it will no longer be able to be pushed further.
⑤ Replace the back panel by first inserting the latch at the bottom edge into the base of the unit, then rotate the panel upward toward the top of the unit until the panel snaps into the unit.
6 When to service and replace filter:
| Filter | Indicator Light | When to service | When to replace |
| 360° All-in-One True HEPA Filter | Check Filter | Clean once every 14 days | Lasts up to 12 months |
※ Intervals between filter replacement may vary depending on environment.
※ For optimal use, the filter can be cleaned once every 14 days.
※ To clean the filter, vacuum the outside of the filter with a soft brush.
※ THIS FILTER CANNOT BE WASHED
To purchase replacement Winix filters:
contact your local dealer
SAFETY AND CAUTIONS
Before operating this equipment, carefully read and follow these safety cautions
Ensure filter is inserted before running unit
running unit without the filter can shorten the units life and cause electric shock or injury.
Be sure foreign objects are NOT inserted into the vents on the unit
objects can include pins, rods, and coins.
Do not touch any part of the interior of the unit with wet hands
the high voltage may cause electric shock.
Ensure unit intake and outlet vents do not become blocked
blockage may lead to increased internal temperatures causing product failure and deformation.
Do not use the unit as a step stool or place heavy objects on it
personal injury may occur or product failure and deformation.

WARNING
Follow these instructions to reduce the risk of serious injury or death and to reduce risk of damaging the unit.

Do not pull on the power cord when unplugging the unit

Do not tie or knot power cord when unit is in operation

If the unit becomes submerged in water, unplug it and contact customer service

Do not unplug or move the unit while in operation

Do not plug additional appliances into the same outlet or power supply

Do not touch the plug with wet hands

Unplug unit when not in operation for extended periods of time

Cord can become damaged by forcefully bending, pulling, twisting, bundling, pinching or placing heavy objects on it
If the supply cord is damaged, it must be replaced by the manufacturer, its service agent or similarly Qualified persons in order to avoid a hazard.
2 This appliance is not intended for use by persons (including children) with reduced physical sensory or mental capabilities, or lack of experience and knowledge, unless they have been given supervision or instruction concerning use of the appliance by a person responsible for their safety.
3 Children should be supervised to ensure that they do not play with the appliance.
INITIAL OPERATION
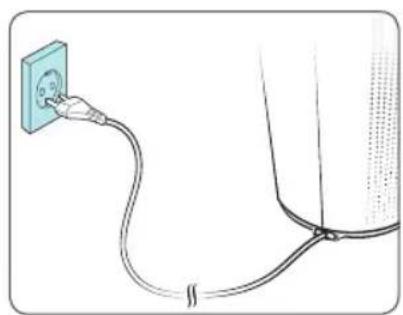
① Insert the power cord into an electrical outlet.
② Press the 'Power' button.
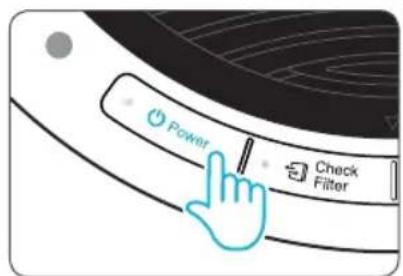

Note
- During the first 30 seconds of power up, the Air Quality Indicator will flash as the Smart Sensor measure the air quality in the environment, after which normal operation will begin.
③ By default, when the unit first powers on, the mode will be set to Auto with PlasmaWave enabled.
- When in Auto mode, the fan speed will be automatically adjusted according to the environments air quality.
- PlasmaWave® works to remove armful airborne contaminants.

Note
- In Auto mode, as the indoor air quality improves, the fan speed will automatically be reduced to Low.
- When the unit is running, you may hear a chirping or buzzing sound. The sound is from large particles passing through PlasmaWave®, it is normal and does not signify product failure. To disable PlasmaWave®, see page 13.
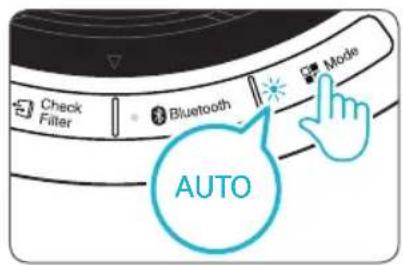
AUTO & SLEEP
1. Auto Mode
Enables auto operation based on the unit's air quality Smart Sensor.
① Press the Mode button to select Auto mode.
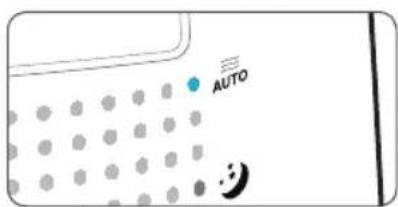
The LED 'Auto' light will indicate when Auto mode is activated, and operation will begin.

Note
- When in Auto mode the fan speed is automatically adjusted according to the indoor air quality. As the indoor air quality improves, the fan speed will automatically be reduced. If the indoor air quality decreases, the fan speed will automatically increase.
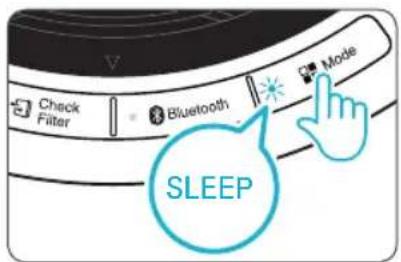
2. Sleep Mode
① Press the Mode button to select Sleep mode.
The LED "Sleep" light will indicate when Sleep mode is activated, and operation will begin.

Note
- When Sleep mode is selected, the fan speed is automatically set to Low. The fan speed can be manually changed by pressing the Fan Speed button, changing the unit into manual mode.
- When Sleep Mode is activated, the Air Quality Indicator LED light is disabled.
MANUAL & PLASMAWAVE
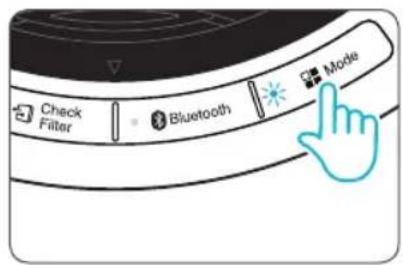
3. Manual Mode (setting fan speed)
Users can opt to manually set the fan speed to Low, Medium, High, or Turbo.
① Press the Mode button to set the desired fan speed.
- When the button is pressed the unit will cycle through Auto Mode, Sleep Mode and fan speeds (Low, Medium, High, Turbo).

Note
- When Manual Mode is selected, Auto and Sleep Modes are automatically disabled.
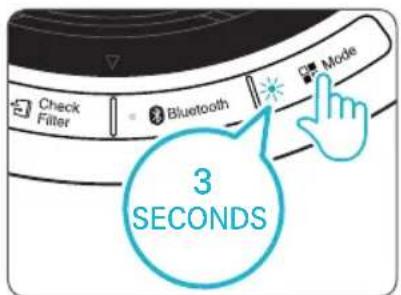
4. PlasmaWave®
By default, PlasmaWave is enabled whenever the unit is powered on.
① When the unit is on, press and hold the Mode button for at least 3 seconds to enable or disable this feature.
- When PlasmaWave is enabled the indicator light will be on. When it is disabled the light will be off.

Note
- In Auto mode, as the indoor air quality improves, the fan speed will automatically be reduced to Low.
- When the unit is running, you may hear a chirping or buzzing sound. The sound is from large particles passing through PlasmaWave, it is normal and does not signify product failure.
BLUETOOTH & AIR QUALITY INDICATOR
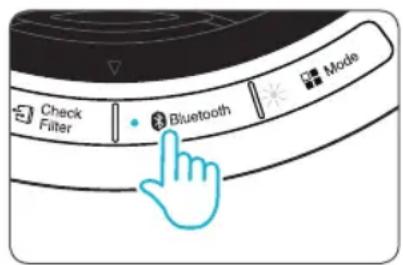
5. Bluetooth
① Press the [Bluetooth] button.
- This button turns the Bluetooth connection ON / OFF.
- The indicator is lit when Bluetooth is connected.
How to set up Bluetooth pairing
- Setting up a Bluetooth connection (pairing) between the unit and a particular device is required the first time they are used together.
- Once the pairing has been set up, the device connects automatically when it is turned on.
① DEVICE PAIRING INSTRUCTIONS: Press the (Bluetooth) icon. The LED will blink as the unit enters pairing mode.
② Select "TOWER QS JBL" from the Bluetooth device to attempt pairing.
③ When pairing is complete, the LED will blink and a beeping sound will be heard.
④ Music from a Bluetooth-enabled device can be played through the unit's speaker.
How to deactivate a Bluetooth pairing
Press and hold the Bluetooth icon for at least 3 seconds. The LED will blink as the pairing is canceled.
(To pair with another device, the existing pairing must be disabled.)

NOTICE
- The unit maintains a one-to-one link with the paired Bluetooth-enabled device. Once the pairing is canceled, the unit can be linked with a different device.
Bluetooth pairing and fan speed
- When pairing is complete, the fan speed switches to [Low]. Note that the fan speed remains the same when in the manual sleep mode.
- The fan speed can be re-adjusted manually if desired after it has switched to [Low].
- Once the pairing is canceled, the fan speed will return to its original state.
BLUETOOTH & AIR QUALITY INDICATOR
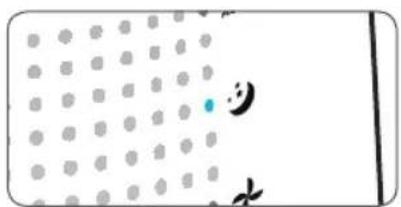
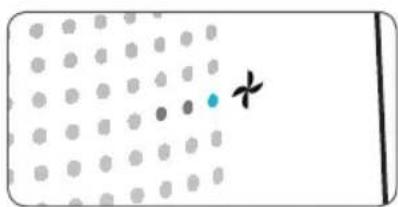
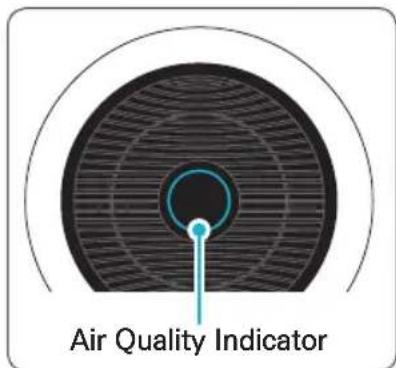
6. Air Quality Indicator
When on, the LED light will indicate the current indoor air quality according to three levels: BLUE (good), AMBER (fair), RED (poor).

Note
Air quality level is displayed on the indicator, based on the Smart Sensor. Depending on the immediate environment, the indicator may change frequently in color or stay the same for lengthy periods of time.
- When the unit is in Sleep Mode the Air Quality Indicator will be turned off to allow for ultimate night time operation.
FILTER CARE
1. Know The Filters
When the Check Filter indicator LED is on, it is time to replace the filter.
| Filter | Indicator Light | When to service | When to replace |
| 360° All-in-One True HEPA Filter | Check Filter | Clean once every 14 days | Lasts up to 12 months |
※ Intervals between filter replacement may vary depending on environment.
※ For optimal use, the filter can be cleaned once every 14 days.
※ To clean the filter, vacuum the outside of the filter with a soft brush.
※ THIS FILTER CANNOT BE WASHED
To purchase replacement Winix filters:
contact your local dealer

Note
- The filters' life varies depending on the level of pollutants in the air. The more dust present in the environment, the more dust accumulates in the filters, shortening the life.
- If the filter is heavily soiled or has a bad Odour, or if the fan strength is significantly weakened, replace the filter even if the Change Filter indicator has not yet turned on.
FILTER CARE
2. Removing Filters
Turn the unit power off before removing filters.
Remove the back panel by grasping the handle and gently pulling towards yourself.
① Grasp the lower handle on the unit and pull straight out, towards yourself until the filter is released.
② Pull out the 360^ All-in-One True HEPA Filter.
3.Preparing New Filters
① Remove replacement filter from protective plastic wrap.
- Operating the unit without removing filters from plastic wrap may cause abnormal noise, deformation, or fire as a result of overheating.

NOTICE
- For optimal performance, only genuine Winix filters should be used with this unit.
FILTER CARE
4. Replacing Filters
① Install the filter, top side up, into the unit until it is fully inserted. Grasp lower handle near bottom of the unit and push in until the filter locks into place.
- The top of the filter shows the opening into the filter. Whereas the bottom is solid, with no opening.
- When installing the filter you will know it is fully inserted because it will no longer be able to be pushed further.
② Replace the back panel by first inserting the latch at the bottom edge into the base of the unit, then rotate the panel upward toward the top of the unit until the panel snaps into the unit.
5. Resetting The Unit
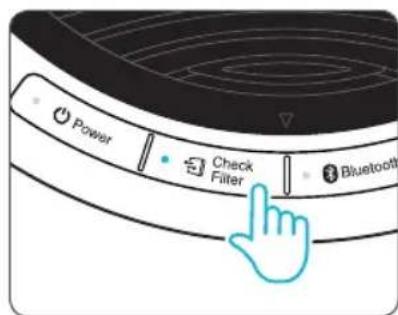
① After replacing the filter, turn the power back on and then press and hold the Check Filter button for at least 5 seconds to RESET the filter life in your unit.
FILTER CARE
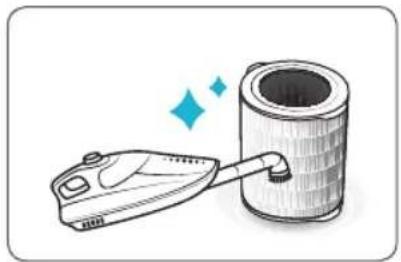
6. Cleaning the filter
Intervals between filter cleaning may vary depending on the air quality.
① Clean with a vacuum or a soft brush
- Only clean the pre-filter.
- This filter CANNOT be washed.
NOTICE
- Do not use benzene, alcohol, or other volatile fluids, which may cause damage or discoloration.
CLEANING CARE
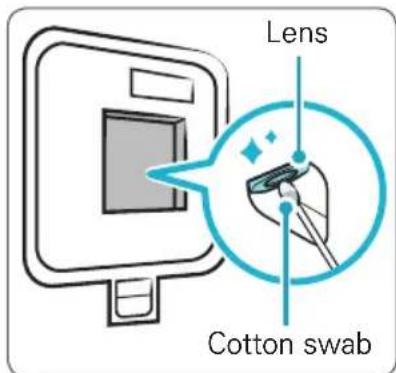
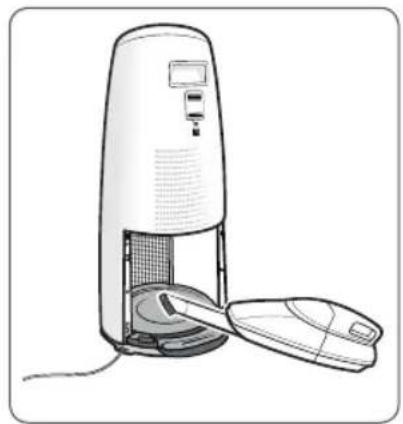
1. Cleaning the Dust Sensor
For optimal performance of the Dust Sensor, which detects airborne dust and ultrafine particles, clean it every two months. Clean it more frequently when the unit is running in a place with high dust levels.
① Open the Dust Sensor cover.
② Use a damp cotton swab to wipe the lens and intake area of the Dust Sensor.
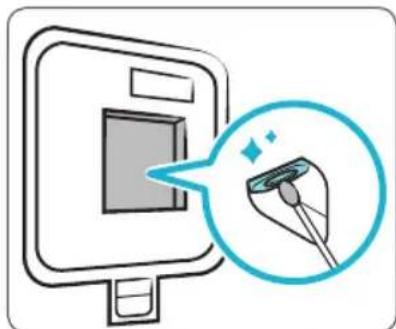
To clean the sensor area, use only water. Do not use volatile substances such as alcohol or acetone.
③ Wipe away any remaining moisture with a dry cotton swab.
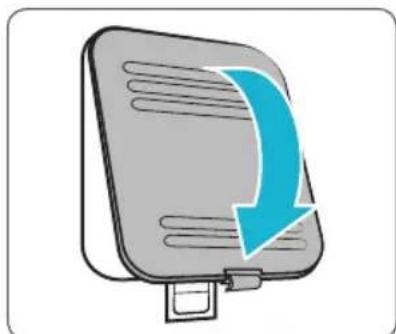
④ Close the Dust Sensor cover.
- The Dust Sensor cover may be cleaned using a vacuum cleaner.

CLEANING CARE
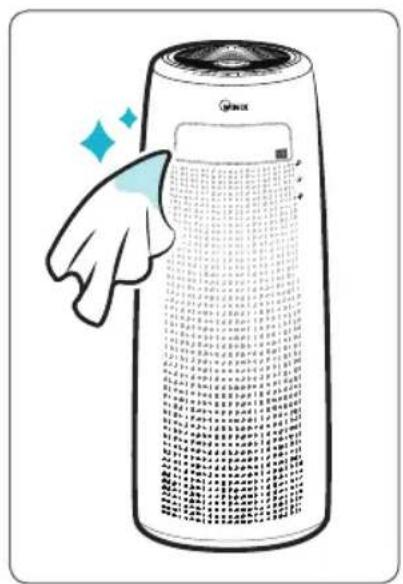
2. Cleaning the Exterior & Interior
① Wipe with a soft damp cloth using room temperature water. Afterwards, wipe it down with a clean dry cloth.
To keep unit in peak condition, clean every 1 - 2 months.
② In order to clean the interior, open the back panel and remove filter, then use vacuum cleaner to remove excess dirt and dust.
For optimal performance, clean every 1 - 2 months.

NOTICE
- When cleaning the unit, always unplug the power cord first and then wait until the unit has cooled down.
- Never disassemble, repair, or modify this unit yourself.
- Do not use flammable sprays or liquid detergents.
- Do not allow children to clean or maintain the unit.
Before cleaning or maintaining, ensure unit is unplugged.
Frequently Asked Questions
| Problem Check / Actions to take | |
| It does not turn on at all. | ·Is the plug securely attached to the outlet? - Make sure the outlet has power going to it, and ensure the plug is secured. ·Is there a power outage? - Check to see if other lights and electrical equipment are working and try again. |
| It doesn’t work in Auto Mode. | ·Has Auto Mode been selected? - Press the Mode button until Auto Mode is selected. ·Is the sensor blocked or clogged? - Use a damp cotton swab to wipe the lens and intake area of the dust sensor, and then wipe the dust sensor with a dry cotton swab. (Cleaning interval: EVERY 2 MONTHS) |
| It vibrates and makes a lot of noise. | ·Is it running on a slanted or uneven surface? - Move the unit to a hard, flat, even area of the floor. |
| The power plug and outlet feel hot. | ·Is the plug securely plugged in? - Make sure the plug is properly plugged into the outlet. |
FREQUENTLY ASKED QUESTIONS
| Problem Check / Actions to take | |
| There is a strange smell. | ·Is it being used in a place with a lot of smoke, dust, or odours? - Clean the air intakes on either side and clean the pre-filter. - Clean or change the filter. |
| The fan strength is weak. The unit is not purifying the air. | ·Is the Check Filter indicator light on? - Change the filters as required. |
| The display panel is dim. | ·Is the Light Sensor blocked by debris? - When Auto Mode is on, Sleep Mode is automatically activated when the Light Sensor detects that the room is dark. |
Frequently ASKED QUESTIONS
When a Bluetooth connection is in use
| Problem Check / Actions to take | |
| No sound is coming out. | ·Are the unit and device placed too far apart? Or is there interference from a wireless LAN, other 2.4 GHz wireless device, or microwave oven? -Check the Bluetooth connection between the unit and the device. -Re-do the Bluetooth pairing between the unit and the device. -If you are pairing the unit with a PC, check whether the computer's output settings are set properly for the Bluetooth device. -Increase the volume of the device. -Check whether the audio source is actually playing from the device. |
| The audio output stops or drops out while music is playing. | ·Move the unit to a different spot if it is near any device that emits electromagnetic waves (e.g., a wireless LAN, another Bluetooth device, a microwave oven). -If any obstacle stands between the unit and the device, remove it or shift the device away from the obstacle. -Move the unit or change the position of the device. |
| I am unable to pair the device with the unit. | ·Move the unit and Bluetooth audio device closer together. -Make sure that pairing mode is activated. -If the Bluetooth signal is impeded by some obstruction such as a wall, the connection may be unstable or prone to disconnection. Move the unit and device closer together, or try plugging the power cord in again. |
UNIT SPECIFICATIONS
| Model Name AGN335 Series | |
| Power Voltage | AC 220 V - 240 V ~ 50 / 60 Hz |
| Power Rate | 55 W |
| Room Area Served | MAX 90㎡ |
| Dimensions | 310 mm(W) x 310 mm(D) x 750 mm(H) |
| Weight | 8.3 kg |
| Replacement Filter | FILTER N1 / ITEM : 1712-0030-01 |
The exterior, design, and product specifications may be changed without prior notice to improve product performance.
SPECIFICATIONS (Speaker, Bluetooth)
| Speaker | ||
| Category Specifications | ||
| Speaker system | Full range | 41 mm, 2 X 8W |
| Passive radiator | - | |
| Enclosure type | Dual passive radiator | |
| Effective frequency range | 90 Hz ~ 20 kHz | |
| Impedance Full range | 4-ohm | |
| Amplifier | |
| Rated output power | 6 W/Channel |
| Wireless Bluetooth module | |
| Frequency range | 2.4 GHz (2402 ~ 2480 MHz) |
| Max. transmission range | 10 m |
| Compatible Bluetooth profiles | HSP, HFP, A2DP, AVPVP |
PRODUCT WARRANTY
The terms of the warranty are as follows.
① This product is manufactured under stringent quality control and inspections.
② Warranty void if product failure is a result of negligence or misuse by the consumer, shipping and service fees may be incurred even during the warranty period.
(3) The warranty must be presented upon bringing the product for service.
(4) Store the warranty in a safe place, as it cannot be reissued.
(5) This warranty is valid only in the Europe.
| Product Name | Air Purifier | |
| Model Name | AGN335 Series | |
| Purchase Date | ||
| Warranty period | Two (2) years | |
| Place of purchase | ||
| Place of purchase Tel. | ||
| Customer | Address | |
| Name | ||
| Tel. | ||
※ After purchase, be sure to complete all of the above information.
PURIFICATEUR D'AIR WINIX
OModèle
AGN335 Series
GARANTIE DU PRODUIT 54
Francais 28
Allemand 55
- For optimal performance, only genuine Winix filters should be used with this unit.
MAINTENANCE DU Filtre
QUESTIONS FREQUEMMENT POSÉES
QUESTIONS FREQUEMMENT POSÉES
QUESTIONS FREQUEMMENT POSÉES
360^ All-in-One True HEPA Filter
360^ All-in-One True HEPA-Filter AUFBAU
Developed in partnership with
Drexel University
(Philadelphia, PA, USA)

INIX