Ultranova - Synthesizer NOVATION - Free user manual and instructions
Find the device manual for free Ultranova NOVATION in PDF.

| Product Type | Polyphonic Digital Synthesizer |
| Brand | Novation |
| Model | Ultranova |
| Polyphony | Up to 20 voices |
| Keyboard | 37 velocity-sensitive keys with aftertouch |
| Oscillators | 3 digital oscillators with classic waveforms and 36 wavetables |
| Filters | 2 filters with 14 types (low-pass, high-pass, band-pass) |
| Envelopes | 6 envelope generators (ADSR) |
| LFO | 3 low-frequency oscillators with multiple waveforms |
| Effects | Compressor, distortion, delay, reverb, chorus, gator, equalizer |
| Vocoder | 12 bands with included gooseneck dynamic microphone |
| Arpeggiator | Patterns: up, down, random, etc. |
| Modulation Matrix | 20 slots for assigning sources and destinations |
| Connectivity | MIDI In/Out/Thru, USB (2 inputs/4 outputs audio), 6.35mm jack outputs, S/PDIF |
| Power Supply | DC 12V 1250 mA (adapter included) or USB power |
| Dimensions (approx.) | 85 x 30 x 10 cm (estimated) |
| Weight (approx.) | 5 kg (estimated) |
| Care and Cleaning | Use a soft, dry cloth. Avoid solvents. |
| Safety | May produce high sound levels; protect your hearing. |
| Spare Parts and Repairability | Contact Novation support or an authorized dealer. |
| General Information | Automap integration, LCD screen with 8 touch-sensitive rotary encoders |
Frequently Asked Questions - Ultranova NOVATION
User questions about Ultranova NOVATION
0 question about this device. Answer the ones you know or ask your own.
Ask a new question about this device
Download the instructions for your Synthesizer in PDF format for free! Find your manual Ultranova - NOVATION and take your electronic device back in hand. On this page are published all the documents necessary for the use of your device. Ultranova by NOVATION.
USER MANUAL Ultranova NOVATION
IMPORTANT SAFETY INSTRUCTIONS
- Read these instructions.
- Keep these instructions.
- Heed all warnings.
- Follow all instructions.
- Clean only with dry cloth.
- Do not install near any heat sources such as radiators, heat registers, stoves, or other apparatus (including amplifiers) that produce heat.
- Do not defeat the safety purpose of the polarized or grounding-type plug. A polarized plug has two blades with one wider than the other. A grounding type plug has two blades and a third grounding prong. The wide blade or the third prong are provided for your safety. If the provided plug does not fit into your outlet, consult an electrician for replacement of the obsolete outlet.
- Protect the power cord from being walked on or pinched particularly at plugs, convenience receptacles, and the point where they exit from the apparatus.
- Only use attachments/accessories specified by the manufacturer.
- Use only with the cart, stand, tripod, bracket, or table specified by the manufacturer, or sold with the apparatus. When a cart is used, use caution when moving the cart/apparatus combination to avoid injury from tip-over.

- Unplug this apparatus during lightning storms or when unused for long periods of time.
- Refer all servicing to qualified service personnel. Servicing is required when the apparatus has been damaged in any way, such as power-supply cord or plug is damaged, liquid has been spilled or objects have fallen into the apparatus, the apparatus has been exposed to rain or moisture, does not operate normally, or has been dropped.
No naked flames, such as lighted candles, should be placed on the apparatus.
WARNING: Excessive sound pressure levels from earphones and headphones can cause hearing loss.
WARNING: This equipment must only be connected to USB 1.0, 1.1 or 2.0 type reports.
ENVIRONMENTAL DECLARATION
Compliance Information Statement: Declaration of Compliance procedure
Product Identification: Novation UltraNova
Responsible party: American Music and Sound
Address: 5304 Derry Avenue #C
Agoura Hills,
CA 91301
Telephone: 800-994-4984
This device complies with part 15 of the FCC Rules. Operation is subject to the following two conditions: (1) This device may not cause harmful interference, and (2) this device must accept any interference received, including interference that may cause undesired operation.
For USA
To the User:
- Do not modify this unit! This product, when installed as indicated in the instructions contained in this manual, meets FCC requirements. Modifications not expressly approved by Novation may void your authority, granted by the FCC, to use this product.
- Important: This product satisfies FCC regulations when high quality shielded cables are used to connect with other equipment. Failure to use high quality shielded cables or to follow the installation instructions within this manual may cause magnetic interference with appliances such as radios and televisions and void your FCC authorization to use this product in the USA.
-
Note: This equipment has been tested and found to comply with the limits for a Class B digital device, pursuant to part 15 of the FCC Rules. These limits are designed to provide reasonable protection against harmful interference in a residential installation. This equipment generates, uses and can radiate radio frequency energy and, if not installed and used in accordance with the instructions, may cause harmful interference to radio communications. However, there is no guarantee that interference will not occur in a particular installation. If this equipment does cause harmful interference to radio or television reception, which can be determined by turning the equipment off and on, the user is encouraged to try to correct the interference by one or more of the following measures:
-
Reorient or relocate the receiving antenna.
- Increase the separation between the equipment and receiver.
- Connect the equipment into an outlet on a circuit different from that
to which the receiver is connected. - Consult the dealer or an experienced radio/TV technician for help.
For Canada
To the User:
This Class B digital apparatus complies with Canadian ICES-003
Focusrite Audio Engineering Limited has conformed and [its/this] product[s] conform[s], where applicable, to the European Union's Directive 2002/95/EC on Restrictions of Hazardous Substances (RoHS) as well as the following sections of California law which refer to RoHS, namely sections 25214.10, 25214.10.2, and 58012, Health and Safety Code; Section 42475.2, Public Resources Code.
COPYRIGHT AND LEGAL NOTICES
Novation and Automap are registered trade marks of Focusrite Audio Engineering Limited. UltraNova is a trade mark of Focusrite Audio Engineering Limited.
Sony/Philips Digital Interface (SPDIF) is a trade mark of Sony Corporation and Philips Electronics VST is a trade mark of Steinberg Media Technologies GmbH
Audio Units (AU) is a trade mark of Apple, Inc.
RTAS is a trade marks of Avid, Inc.
2010 © Focusrite Audio Engineering Limited. All rights reserved
CONTENTS
Introduction 3
Key Features: 3
About this manual 3
What's in the box? 3
Power requirements 3
Hardware Overview 4
Top view - controls. 4
Rear view - connections. 5
Getting Started 6
Standalone and computer operation - a foreword 6
Standalone operation - audio and MIDI connections 6
Using headphones 6
A word about Menu Navigation 6
Scrolling through Patches 7
Searching through Categories 7
Comparing patches 7
Storing a Patch 7
Entering patch name (Page 1) 7
Saving a patch (Page 2) 8
Updating the UltraNova's Operating System (PC) 8
Synthesis Tutorial 8
Pitch 8
Tone 8
Volume 9
The Oscillators And Mixer. 9
10 Envelopes And Amplifier 11
LFOs. 12
Summary 12
UltraNova signal flow diagram 1
Synth Edit section 1
- Hardware Navigation 1
Oscillators 1, 2 and 3
Per-oscillator parameters (Page 1) 13
Per-oscillator parameters (Page 2) 14
Common Oscillator parameters 14
The Mixer 1
Mixer parameters (Page 1). 14
Mixer parameters (Page 2) 15
Filters 1 and 2 16
Per-filter parameters (Page 1) 16
Common Filter parameters (Page 2) 17
Voices 18
Envelopes 19
Envelope 1 (Amplitude) parameters (Page 1) 19
Envelope 1 (Amplitude) parameters (Page 2) 20
Common Envelope Parameter 21
Envelope 2 (Filter) parameters (Page 1) 21
Envelope 2 (Filter) parameters (Page 2) 22
Common Envelope Parameter 22
Envelopes 3 to 6 parameters (Page 1) 22
Envelope 3 parameters (Page 2) 23
Common Envelope Parameter 23
LFOS. 23
LFO 1 parameters (Page 1) 23
LFO 1 parameters (Page 2) 25
The Modulation Matrix 25
Modulation Matrix Menu 25
Control Section 26
TheAnimate controls 26
Tweak Controls 26
Touched/Filter Knob. 27
The Filter button 27
The Lock button 27
The Arpeggiator 27
The Chorder 28
Effects (FX) 28
FX Menu Page 1 - Panning 28
FX Menu Page 2 - Routing 29
FX Menu Page 3 - FX Level controls. 29
FX Menu Page 4 - FX parameters 30
EQ Menu. 30
Compressor Menu 30
Distortion Menu 31
Delay Menu. 31
Reverb Menu. 32
Chorus Menu 32
Gator Menu 33
The Vocoder 34
Automap 35
Using the UltraNova as a software controller 35
Audio Menu Page 1 - Inputs 35
Audio Routing in the UltraNova 35
Audio Menu Page 2-Headphones 36
Audio Menu Page 3 - Outputs 1 and 2, and Host source 36
Audio Menu Page 4 - Outputs 3 and 4 36
Audio Menu Page 5 - SPDIF Output 37
Global settings 37
Global Menu Page 1 - MIDI and other settings 37
Global Menu Page 2 - Tuning, Velocity, sampling frequency and footswitch 37
Global Menu Page 3 - Clock 38
Global Menu Page 4 - Patch transfer 38
Global Menu Page 5 - Global and Audio settings dump 39
Global Menu Page 6-Calibration 39
Global Menu Page 7 - OS Transmit. 39
Waveform Table 40
Sync Values Table 40
LFO Waveform Table 41
Modulation Matrix Sources Table 41
Modulation Matrix Destination Table 42
Tweak Parameters. 42
Filter Table 44
Arp Pattern Table 44
Gator Modes Table 44
Effects Type Table 44
INTRODUCTION
Thank you for purchasing the UltraNova synthesizer. The UltraNova is a powerful digital synthesizer equally at home in live performance or a recording environment.
NOTE:The UltraNova is capable of generating audio with a large dynamic range, the extremes of which can cause damage to loudspeakers or other components, and also to your hearing
Key Features:
Full polyphony, with up to 20 voices
- Classic analogue synth waveforms
36 wavetable
14 filter types
- Built-in digital FX section with compression, panning, EQ, reverb, delay, distortion, chorus and Gator effects
12-band Vocoder with dynamic gooseneck microphone (supplied)
37-note velocity-sensitive keyboard with aftertouch
Full MIDI Automap integration
LCD display with 8 touch-sensitive, rotary multi-function controls
- 2-in/4-out USB audio interface (Sound Card)
The following features are available in conjunction with the appropriate UltraNova/Novation software (downloadable):
- Automap - plug-in control of MIDI devices and Digital Audio Workstations (DAWs).
UltraNova Editor (VSTTM, AU™, RTAS™ plug-in) for DAW - Mac/Windows-based librarian software for management of patches
About this manual
We don't know whether you've got years of experience with electronic keyboards, or if this is your very first synth. In all probability, you're somewhere between the two. So we've tried to make this manual as helpful as possible for all types of user, and this inevitably means that more experienced users will want to skip over certain parts of it, while relative novices will want to avoid certain parts of it until they're confident they've mastered the basics.
However, there are a few general points that are useful to know about before you continue reading this manual. We've adopted some graphical conventions within the text, which we hope all types of user will find helpful in navigating through the information to find what they need to know quickly:
Abbreviations, conventions, etc.
As the eight rotary encoders are referred to repeatedly throughout the manual, we've abbreviated them to REn, where n is a number between 1 and 8, referring to the encoder in question.
Where top panel controls or rear panel connectors are referred to, we've used a number thus: [x] to cross-reference to the top panel diagram, and thus: x to cross-reference to the rear panel diagram. (See pages4 and 5)
We've used BOLD CAPS to name top panel controls or rear panel connectors. We've used LCD dot-matrix text to denote text which appears on the LCD at the beginning of each parameter description and within the parameter tables, but Bold to indicate this text within the main manual paragraphs.
Tips

These do what it says on the tin: we include bits of advice, relevant to the topic being discussed that should simplify setting up the UltraNova to do what you want. It's not mandatory that you follow them, but generally they should make life easier.
Extra Info

These are additions to the text that will be of interest to the more advanced user and can generally be avoided by the novice. They are intended to provide a clarification or explanation of a particular area of operation.
WHAT'S IN THE BOX?
The UltraNova has been carefully packed in the factory and the packaging was designed to withstand rough handling. Should the unit appear to have been damaged in transit, do not discard any of the packing material and notify your music dealer.
Save all the packing materials for future use if you ever need to ship the unit again.
Please check the list below against the contents of the packaging. If any items are missing or damaged, contact the Novation dealer or distributor where you purchased the unit.
UltraNova synthesizer
- Gooseneck microphone
DC power supply unit (PSU)
Easy Start Guide
This manual
USB cable
- Automap PRO unlock code
Warranty Registration card
POWER REQUIREMENTS
The UltraNova is shipped with a 12 V DC, 1250 mA power supply. The centre pin of the coaxial connector is the positive (+ve) side of the supply. The UltraNova can either be powered by this AC-to-DC mains adaptor, or by the USB connection to a computer. The PSU comes with detachable adaptors to fit sockets in most countries; when powering the UltraNova from the mains PSU, please ensure that your local AC supply is within the range of voltages required by the adaptor - i.e., 100 to 240 VAC - BEFORE you plug it into the mains.
We strongly recommend that you only use the supplied PSU. Failure to do so will invalidate your warranty. Power supplies for your Novation product can be purchased from your music dealer if you have lost yours.

If powering the UltraNova via the USB connection you should be aware that although the USB specification agreed by the IT industry states that a USB port should be able to supply 0.5 A at 5V, some computers - particularly laptops - are unable to supply this current. Unreliable operation of the synth will result in such an when powering the UltraNova from a laptop's USB port, it is strongly recommended a laptop is powered from AC mains rather than its internal battery.
HARDWARE OVERVIEW
Top view - controls
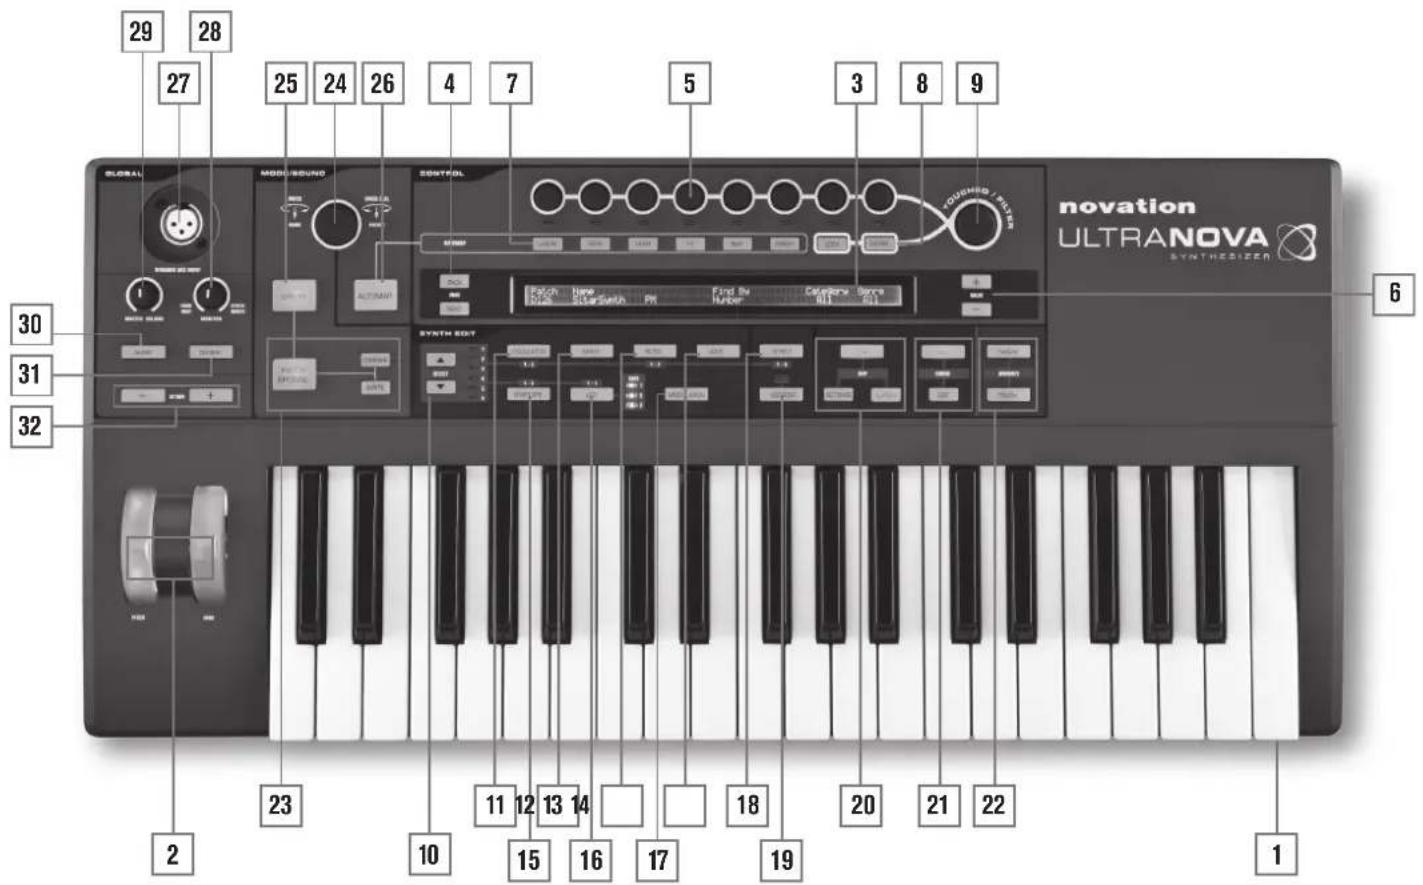
[1] 37-note (3 octaves) keyboard with velocity and aftertouch sensing.
[2] PITCH and MOD wheels. The PITCH wheel is mechanically biased to return to the centre position when released.
[3] 2-row x 72-character LCD dot matrix display. For most menus, the display is divided into eight zones from left to right, with each zone corresponding to one of the rotary encoders [5].
CONTROL section
[4] PAGE BACK and NEXT buttons: these are used to step forwards and backwards between menu pages. They illuminate to indicate that additional pages are available. They have no function if the current menu only has one page.
[5] Rotary encoders - 8 touch-sensitive, detented rotary controls for parameter selection. Touching each control selects a parameter for adjustment, the parameters being indicated in the upper row of the LCD display [3] immediately below it. Multiple parameters may be selected for simultaneous adjustment if wished. (Use of a rotary encoder in the manual text is indicated by 'REn', where n is the number of the encoder; e.g. 'RE1' refers to rotary encoder 1). The touch sensitivity of the conductive knobs is also used to make them active touch controllers, and envelope-triggering and other effects can be performed by simply touching the knobs.
[6] VALUE + and - buttons: These adjust the value of the currently-selected parameter as indicated by the LED below the encoder in use - either up or down. The parameter value is indicated in the lower row of the LCD display.
[7] Automap controls: the LEARN, VIEW, USER, FX, INST and MIXER buttons are used, in conjunction with the rotary encoders, with Novation's Automap software (see [26]).
[8] LOCK and FILTER buttons: these operate in conjunction with the TOUCHED/FILTER knob [9]. FILTER assigns the knob to control the cut-off frequency of Filter 1; LOCK fixes the function of the knob to the last touched parameter.
[9] TOUCHED/FILTER: this is a large, touch-sensitive, "smooth-action" control intended to aid more expressive performance when playing live. It either duplicates the action of the last-touched rotary encoder, or, if the FILTER button [8] has been pressed, Filter 1's frequency.
SYNTH EDIT section
The buttons in the Synth Edit area of the control panel are laid out in logical order of sound generation and treatment.
[10] SELECT and buttons: several of the main synth blocks are duplicated: there are 3 oscillators, 6 envelope generators, 5 FX blocks, 3 LFOs and 2 filters. Each block has its own menu, and the SELECT buttons let you select which block is to be controlled. The 1 to 6 LEDs alongside indicate the block currently selected.
[11] OSCILLATOR button: opens an Oscillator Menu (two pages). The UltraNova has 3 oscillators, and the oscillator to be controlled can be chosen with the SELECT and buttons.
[12] MIXER button: opens the Mixer Menu (two pages).
[13] FILTER button: opens a Filter Menu (two pages). The UltraNova has 2 filters, each with its own menu. The filter to be controlled is selected with the SELECT and buttons.
[14] VOICE button: opens the Voice Menu (one page).
[15] ENVELOPE button; opens an Envelope Menu (two pages). The UltraNova has 6 envelope generators, each with its own menu. The envelope generator to be controlled is selected with the SELECT and buttons.
[16] LFO button: opens an LFO Menu (two pages). The UltraNova has 3 LFOs (low frequency oscillators), each with its own menu. The LFO to be controlled is selected with the SELECT and buttons. The set of 3 dedicated LEDs adjacent to the LFO button blink to indicate the current frequency of each LFO.
[17] MODULATION button: opens the Modulation Menu (one page).
[18] EFFECT button: opens an Effects (FX) Menu (four pages). The UltraNova has 5 FX sections and the section to be controlled can be chosen with the Select K and J buttons.
[19] VOCODER button: opens the Vocoder Menu (one page). An LED illuminates when the Vocoder is active.
[20] ARP controls: the ON, SETTINGS and LATCH buttons control the UltraNova's Arpeggiator functions. The Arp Menu (one page) is displayed by pressing the SETTINGS button, the ON button enables/disables the arpeggiator and the
LATCH button applies the arpeggior effect to the last note(s) played continuously, until a subsequent key is pressed. LATCH can be pre-selected so that it is effective as soon as the Arpeggior is enabled.
[21] CHORD controls: the UltraNova lets you play a chord with a single keyboard note. The ON button enables the Chorder function; the EDIT button opens the Chord Edit Menu, from where chord definition and transposition can be performed.
[22] Animate controls: the TWEAK and TOUCH buttons enable alternative modes of the eight rotary encoders, allowing them to be used dynamically in performance.
TWEAK lets you set up a custom "control panel" of sound parameters for each patch that you use, so that you can readily access those most needed; TOUCH activates the encoders' touch sensitivity, letting you introduce pre-programmed alterations to your sound just by touching a knob.
MODE/SOUND controls
[23] Patch controls: the PATCH BROWSE button, together with the COMPREA and WRITE buttons, lets you audition the UltraNova's stored patches, compare them with the current synth settings (particularly useful when modifying sounds) and overwrite the patch with the current settings if wished.
[24] PATCH SELECT/SPEED DIAL rotary control: used in patch selection. Note that this control has a push as well as a rotary function.
[25] SYNTH BUTTON: this puts the UltraNova into Synth mode, enabling the internal sound generation and sound card functions.
[26] AUTOMAP BUTTON: Automap mode is the alternative to Synth mode, and effectively disables the synthesizer control functions, allowing the UltraNova to act as an Automap controller for plug-ins and DAWs. Use of this function requires Novation's Automap software package. Note that the synthesiser will still output audio when triggered by MIDI from your DAW software.
GLOBAL controls
[27] Dynamic Mic Input: an XLR socket for the connection of the supplied goosenecck microphone, or alternative dynamic microphone (i.e. a mic not requiring phantom power to operate). The mic signal can be routed to the vocoder, mixed internally with the synth and routed to the audio outputs. Additionally the mic input may be routed directly to the DAW using the internal sound card. This input is overridden when a jack plug is plugged in to Input 1 [11] on the rear panel.
[28] MONITOR: this rotary control adjusts the balance between audio from the Host (PC or Mac, if connected) and the combined audio from the synth and audio inputs.
[29] MASTER VOLUME: the level control for the main audio outputs (and also for the headphone output if the default setting for headphone level control in the Audio Menu is retained.)
[30] AUDIO BUTTON: opens the Audio Menu (seven pages), allowing audio routing and level adjustments to be made.
[31] GLOBAL BUTTON: opens the Global Menu (seven pages).
[32] OCTAVE + and - buttons: these two buttons transpose the keyboard up or down one octave each time they are pressed, to a maximum of five octaves down or four octaves up. When both LEDs are off (the default state), the lowest note on the keyboard is one octave

Rear view - connections
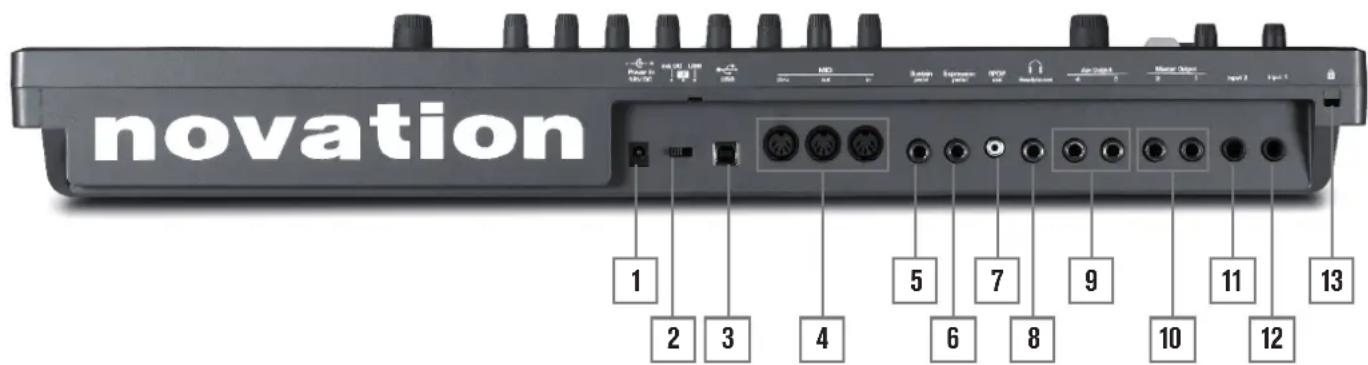
{1) DC power connector: standard 2.2 mm socket for connecting the external 12 V DC PSU (supplied). See page 3.
{2} On/off switch: 3-position switch:
| POSITION | ACTION |
| Left | Enables external 12 V DC input [1] |
| Centre | Off |
| Right | Enables power via USB port [3] |
{3} USB port: Type B USB 1.1 (USB 2.0-compatible) socket for connection to PC or Mac
{4} MIDI connectors: standard MIDI In/Out/Thru sockets (5-pin DINs)
(5) Sustain pedal socket: 2-pole (mono) 14 '' jack socket for connection of a sustain pedal. Both NO and NC pedal types are compatible; if the pedal is connected when the UltraNova is powered on, the type will be automatically sensed during boot-up (provided your foot is not on the pedal!).
(6) Expression pedal socket: 3-pole (stereo) 1/4 jack socket for connection of an expression pedal. A full list of supported pedals can be found on the Novation answerbase at www.novationmusic.com/answerbase
{7}SPDIF output: phono socket (RCA jack) carrying digital version of main outputs 1 & 2 in S-PDIF format.
[8] Headphone socket: 3-pole 144 jack socket for stereo headphones. Phones volume and mix can be adjusted independently from the Audio menu.
(9) Aux Outputs 3 & 4: 2 × 14 jack sockets. Outputs are unbalanced, at +6 dBu maximum level.
(10) Main outputs 1 & 2: 2 × 1% jack sockets carrying main stereo output. Outputs are unbalanced, at +6 dBu maximum level.
(11) Input 2: 1/4 jack socket for external mic or line level audio inputs. The signal at Input 2 may be mixed internally with Input 1 using the Audio Menu. Inputs are balanced, and can accept a maximum input level of +2 dBu.
(12) Input 1: 14 jack socket for external mic or line level audio inputs. This input overrides an XLR connector plugged into the Dynamic Mic Input [27] on the top panel. Inputs are balanced, and can accept a maximum input level of +2 dBu.
(13) Kensington Lock Port: to secure your synthesizer.
GETTING STARTED
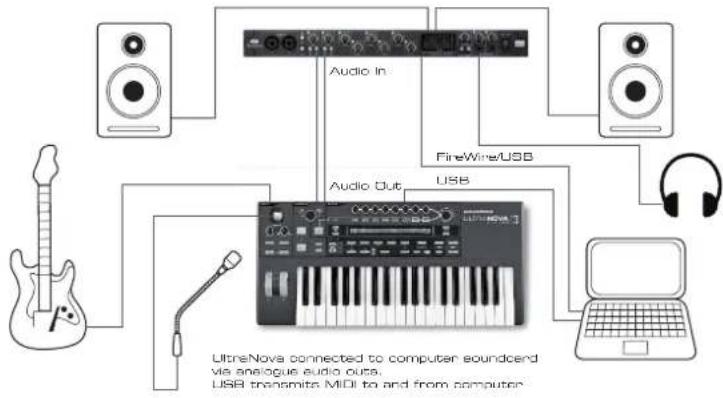
Standalone and computer operation - a foreword
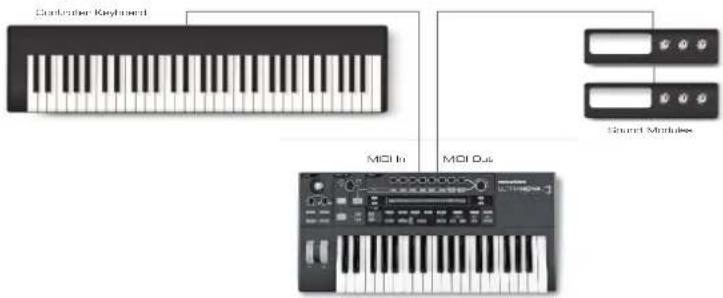
The UltraNova may be used as a standalone synthesizer, with or without MIDI connections to/from other sound modules or keyboards. It may also be connected via its USB port to a computer (Windows or Mac) running a DAW application. The UltraNova can then be controlled entirely from the computer by using the UltraNova Editor plug-in. The UltraNova Librarian is a separate software application which greatly assists in the organising, saving and recall of patches.
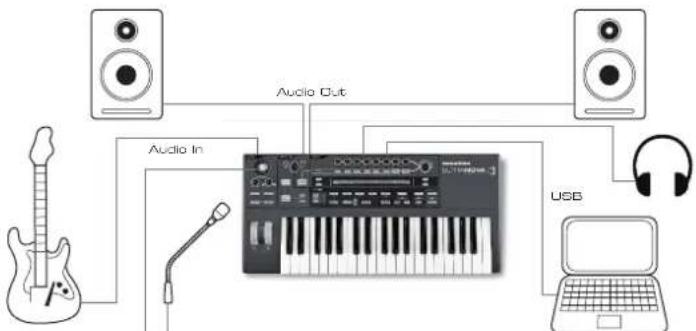
UltrasNova connected to a computer via USB. USB transmits audio and MIDI to and from the computer.
The methods of connecting the UltraNova to accommodate the various methods of working are covered in the documentation supplied with the UltraNova Editor and UltraNova Librarian software packages. The Installers for this software, and the related USB drivers may be downloaded from
http://novationmusic.com/support/ultranova.
Standalone operation - audio and MIDI connections
The simplest and quickest way of getting started with the UltraNova is to connect the two rear panel jack sockets marked Master Output 1 and 2 {10} to the inputs of a stereo amplifier, audio mixer, powered speakers, third-party computer sound card or other means of monitoring the output.

Note: the UltraNova is not a computer MIDI interface. MIDI can be transmitted between UltraNova synth and computer but MIDI cannot be transmitted to and from the UltraNova MIDI DIN ports from the computer.
If using the UltraNova with other sound modules, connect MIDI OUT{4} on the UltraNova to MIDI IN on the first sound module, and daisy-chain further modules in the usual way. If using the UltraNova with a master keyboard, connect the controller's MIDI OUT to MIDI IN on the UltraNova, and ensure that the master keyboard is set to MIDI channel 1 (the UltraNova's default channel).
Novation Ultrahova Version 1,0.00
With the amplifier or mixer off or muted, connect the AC adaptor to the UltraNova {1}, and plug it into the AC mains. Turn the UltraNova on by moving the rear panel switch (2) to Ext DC. During power-up the display shows the firmware version number for a few seconds:
after which the Patch Menu appears:
Patch Name
Piedo Circuit Hotion
Turn on the mixer/amplifier/powered speakers, and set the Monitor Balance [28] to 12 o'clock, and turn up the Master Volume control [29] until you have a healthy sound level from the speakers when you play the keyboard.
Using headphones
Instead of speakers via an amplifi er and/or an audio mixer, you may wish to use a pair of stereo headphones. These may be plugged into the rear panel headphone output socket [8]. The main outputs are still active when headphones are plugged in.
NOTE: The UltraNova headphone amplifier is capable of outputting a high signal level please take care when setting the output level.
The factory default setting for headphones' level is for their volume to be controlled by the Master Volume control. However, it is possible to set the headphones' level independently; although the Audio Menu is discussed in detail later in the manual, it may be useful to know how to do this now. Press the AUDIO button [30] to open the Audio Menu, then press the PAGE NEXT button [4] to access the Headphone Page:
Headphones Level Control
Follow master volume (1+2 only)
Level 1 Balance 1 + 2 / 3 + 4 12?0
Turning RE1 anticlockwise changes the Headphone Level Control setting to Use Level and Balance 1 + 2 / 3 + 4 . Then the headphone level can be adjusted independently of the main outputs with RE6 (and any balance between synth sounds and inputs with RE7).
A word about Menu Navigation
The UltraNova has been designed to give the player maximum control over sound character and system operation with the minimum of hassle. All the main menus are selected by a single press on a dedicated button; for example, pressing the OSCILLATOR button will always open the Oscillator Menu regardless of whereabouts in the menu system you might currently be. There is no need to "back up" or "Exit" any menu, you can always go directly from one menu to another with a single button press.
Several of the synth processing blocks - such as the Oscillator and Envelope Menus - are duplicated; for example, there are 3 separate oscillators, each with its own menu. When you re-select a menu for such a multiple block, it will open at the one you last used. For example, if you adjust parameters of Envelope 4, then go to another menu to adjust some other parameters, and then press the ENVELOPE button again, the Envelope Menu will re-open with the parameters for Envelope 4 visible. The same principle applies to menus which have multiple pages - UltraNova remembers which parameters you were last adjusting, and re-opens the menu at the last-used page.
SCROLLING THROUGH PATCHES
Your UltraNova comes pre-loaded with a set of factory patches, which may be auctioned from the opening Patch Menu. The opening Patch Menu can always be accessed by pressing the SYNTH button [25]. The patches are arranged as 4 banks (A to D), each with 127 patches (000 to 126). Rotate RE1 to scroll through the patches. The new sound is loaded as soon as the patch data shows in the display. Alternatively, the PATCH/BANK knob [24] can be used to dial through the whole set; in this case, rotate the PATCH/BANK knob to select the patch and push and rotate the knob select the bank. Note that the name of the patch is also displayed.
SEARCHING THROUGH CATEGORIES
Apart from being arranged in 4 banks, the patches are also categorised for you according to the type of sound; this makes finding suitable sounds much easier. Each patch belongs to both a Genre and a Category; the Genre broadly indicates the musical area for which the patch might be suitable, the Category further subdivides the set by sonic characteristics. Press the PATCH BROWSE button [23], and the display below appears:
| Patch Name | Find By | Category | Genre |
| A000 Init Program | A000-D127 | All | All |
The display shows the location and name of the currently-selected patch. The default is for all patches to be available, because the Genre and Category search criteria are both set to 'All'. RE8 and RE7 let you reduce the number of available patches by filtering only those which belong to a selected Genre and/or Category respectively.
Once the filter criteria have been set, the reduced patch set can be browsed either in location order (the default), or by name, alphanumericly. This choice is set by RE5, which sets the 'Find By' parameter to either 'A000-D127' (location order) or 'A-Z' (alpha sort).

If there are no matches for the Genre/Category combination selected you will not be able to change the patch - try a different combination!
The Genres and Categories are listed below:
| CATEGORY DISPLAY SHOWS: | |
| Bass | Bass |
| Bell | Bell |
| Classic | Classic |
| Drum | Drum |
| Keyboard | Keyboard |
| Lead | Lead |
| Movement | Movement |
| Pad | Pad |
| Poly | Poly |
| SFX | SFX |
| String | String |
| External Input | ExtInput |
| Vocoder | Vocoder |
| GENRE DISPLAY SHOWS: | |
| Classic | Classic |
| Drum 'n' Bass/ Breaks | D&B/Brks |
| House | House |
| Industrial | Industri |
| Jazz | Jazz |
| R 'n' B/Hip Hop | R&B/HHop |
| Rock and Pop | Rock/Pop |
| Techno | Techno |
| Dubstep | Dubster |
COMPARING PATCHES
When editing stored patches to create new sounds it may be useful to compare the edited version with the original stored patch. This is achieved by using the COMPARE [23] button. Press the COMPREAte button and play a key, and you will hear the original stored patch. Release the COMPREAte button play the key again and you will hear the patch in its currently edited state. If you press the COMPREAte button while in any of the menu pages (except the Write menu), the stored patch parameters will be displayed. You can compare the currently edited patch with any preset stored in the UltraNova. This is useful when selecting a new location for the patch to be saved to. To do this, press the WRITE [23] button twice to access page 2 of the Write menu. Using RE2 (Bank) and RE3 (Patch) select the stored patch that you want to compare. Pressing and holding the COMPREAte button and a key will enable the stored patch to sound.
Note: If the WRITE button is pressed again (while in page 2 of the Write menu), the currently edited patch will be saved in the location selected by RE2 and RE3. To avoid saving the edited patch press any other synth button to exit the Write menu (e.g., SYNTH [25]).
STORING A PATCH
It is possible to store or write your own patches directly into the UltraNova without using the UltraNova Librarian software application. The Write menu consists of two pages and both can be accessed by pressing the WRITE [23] button. A third press of the WRITE button will store the preset. It is also possible to move between the pages using the PAGE BACK and NEXT buttons [4].
Entering patch name (Page 1)
RE8: Punctuation and special characters
| MATCHES | POS | UPPER | Lower | Number | Punctuate |
| A o | Init Program | A a 0 | space |
RE1: Not used.
RE2: Cursor Position
This moves the cursor position up and down the text string for the purpose of editing characters.
RE3: Character select
Turning RE3 scrolls through the entire character set (A-Z, a-z, 0-9 and special characters). The location of the character being edited is determined by RE2.
RE4: not used
RE5: Uppercase characters
The parameter scrolls through the uppercase character set 'A' to 'Z'. The location of the character being edited is determined by RE2. Press the flashing button directly below RE5 to enter the character and automatically increment the cursor to its next position.
RE6: Lowercase characters
The parameter scrolls through the lowercase character set 'a' to 'z'. The location of the character being edited is determined by RE2. Press the flashing button directly below RE6 to enter the character and automatically increment the cursor to its next position.
RE7: Numerical characters
The parameter scrolls through the numerical character set '0' to '9'. The location of the character being edited is determined by RE2. Press the flashing button directly below RE7 to enter the character and automatically increment the cursor to its next position.
The parameter scrolls through a set of punctuation and special characters. The location of the character being edited is determined by RE2. Press the flashing button directly below RE8 to enter the character and automatically increment the cursor to its next position.
Saving a patch (Page 2)
| PATCHSPUE | Bank | Patch | Destination | SaveCat9 | SaveGenre |
| Dest+C6G | R | R | Init Program | None | None |
RE1: Not used.
RE2: Bank selection
Use this control to select which bank (A,B,C or D) the patch is to be written to.
RE3: Patch position
Use this control to select the patch destination number where the currently edited sound will be written to. The current destination patch name will be displayed under RE4 and RE5 for reference, although this will be overwritten with the new patch name if the patch is saved without changing the position.

Use the COMPARE button to listen to the patch selected by RE2 and RE3.
RE4 - RE5: Not used.
RE6: Category select
Select a category for the new patch. See page 7 for the list of categories.
RE7: Genre select
Select a genre for the new patch. See page 7 for the list of available genres.
RE8: Not used.

To exit the Write menu press any other synth button (e.g., SYNTH [25]).
Note: A faster method of managing patches (writing, loading, renaming, reordering etc.) is by using the downloadable UltraNova Librarian. This can be downloaded free of charge from http://nobationmusic.com/support/ultranova.
Updating the UltraNova's Operating System (PC)
OS update files will be available from time to time at www.novationmusic.com/support/ultranova in the form of a MIDI SysEx file. The update procedure requires the UltraNova to be connected via USB to a computer which has first had the necessary USB drivers installed. Full instructions on performing the update will be supplied with the download.
SYNTHESIS TUTORIAL
This section covers the subject of sound generation in more detail and discusses the various basic features available in the UltraNova's sound generation and processing blocks.
It is recommended that this chapter is read carefully if analogue sound synthesis is an unfamiliar subject. Users familiar with this subject can skip this chapter and move on to the next chapter.
To gain an understanding of how a synthesizer generates sound it is helpful to have an appreciation of the components that make up a sound, both musical and non-musical.
The only way that a sound may be detected is by air vibrating the eardrum in a regular, periodic manner. The brain interprets these vibrations (very accurately) into one of an infinite number of different types of sound.
Remarkably, any sound may be described in terms of just three properties, and all sounds always have them. They are:
Pitch
Tone
Volume
What makes one sound different from another is the relative magnitudes of the three properties as initially present in the sound, and how the properties change over the duration of the sound.
With a musical synthesizer, we deliberately set out to have precise control over these three properties and, in particular, how they can be changed during the "lifetime" of the sound. The properties are often given different names: Volume may be referred to as Amplitude, Loudness or Level, Pitch as Frequency and Tone as Timbre.
Pitch
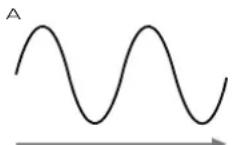
As stated, sound is perceived by air vibrating the ear drum. The pitch of the sound is determined by how fast the vibrations are. For an adult human, the slowest vibration perceived as sound is about twenty times a second, which the brain interprets as a bass type sound; the fastest is many thousands of times a second, which the brain interprets as an high treble type sound.
Time Time
If the number of peaks in the two waveforms (vibrations) are counted, it will be seen that there are exactly twice as many peaks in Wave B as in Wave A. (Wave B is actually an octave higher in pitch than Wave A). It is the number of vibrations in a given period that determines the pitch of a sound. This is the reason that pitch is sometimes referred to as frequency. It is the number of waveform peaks counted during a given period of time which defines the pitch, or frequency.
Tone
Musical sounds consist of several different, related pitches occurring simultaneously. The loudest is referred to as the 'fundamental' pitch and corresponds to the perceived note of the sound. Other pitches making up the sound which are related to the fundamental in simple mathematical ratios are called harmonics. The relative loudness of each harmonic as compared to the loudness of the fundamental determines the overall tone or 'timbre' of the sound.
Consider two instruments such as a harpsichord and a piano playing the same note on the keyboard and at equal volume. Despite having the same volume and pitch, the instruments still sound distinctly different. This is because the different note-making mechanisms of the two instruments generate different sets of harmonics; the harmonics present in a piano sound are different to those found in a harpsichord sound.
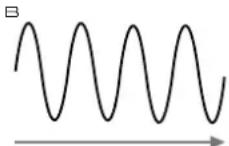
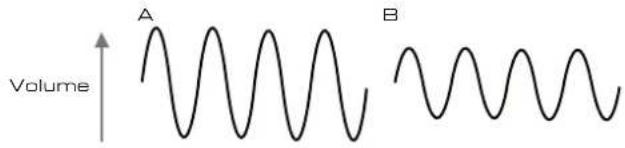
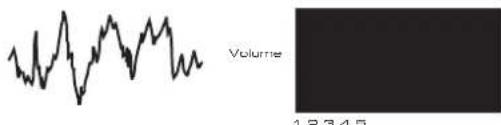
Volume
Volume, which is often referred to as the amplitude or loudness of the sound is determined by how large the vibrations are. Very simply, listening to a piano from a metre away would sound louder than if it were fifty metres away.
Having shown that just three elements may define any sound, these elements now have to be related to a Musical synthesizer. It is logical that a different section of the Synthesizer 'synthesizes' (or creates) these different elements.
One section of the synthesizer, the Oscillators, provide raw waveform signals which define the pitch of the sound along with its raw harmonic content (tone). These signals are then mixed together in a section called the Mixer, and the resulting mixture is then fed into a section called the Filter. This makes further alterations to the tone of the sound, by removing (filtering) or enhancing certain of the harmonics. Lastly, the filtered signal is fed into the Amplifier, which determines the final volume of the sound.
Oscillators Mixer Filter Amplifier

Additional synthesizer sections - LFOs and Envelopes - provide further ways of altering the pitch, tone and volume of a sound by interacting with the Oscillators. Filter and Amplifier, providing changes in the character of the sound which can evolve over time. Because LFOs' and Envelopes' only purpose is to control (modulate) the other synthesizer sections, they are commonly known as 'modulators'.
These various synthesizer sections will now be covered in more detail.
The Oscillators And Mixer
The Oscillator is really the heartbeat of the Synthesizer. It generates an electronic wave (which creates the vibrations when eventually fed to a loudspeaker). This Waveform is produced at a controllable musical pitch, initially determined by the note played on the keyboard or contained in a received MIDI note message. The initial distinctive tone or timbre of the waveform is actually determined by the waveform's shape.
Many years ago, pioneers of musical synthesis discovered that just a few distinctive waveforms contained many of the most useful harmonics for making musical sounds. The names of these waves reflect their actual shape when viewed on an instrument called an Oscilloscope, and these are: Sine waves, Square waves, Sawtooth waves, Triangle waves and Noise.
Each waveform shape (except noise) has a specific set of musically-related harmonics which can be manipulated by further sections of the synthesizer.
The diagrams below show how these waveforms look on an oscilloscope, and illustrate the relative levels of their harmonics. Remember, it is the relative levels of the various harmonics present in a waveform which determine the tone of the final sound.
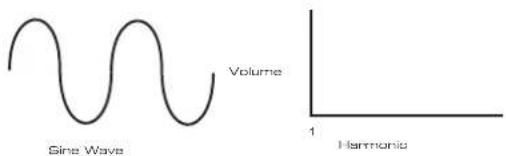
Sine Waves
These possess just a single harmonic. A sine waveform produces the "purest" sound because it only has its single pitch (frequency).
Triangle Waves
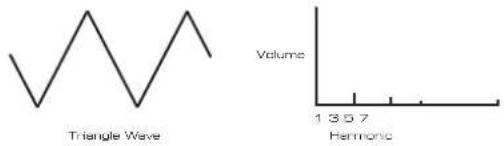
These contain only odd harmonics. The volume of each decreases as the square of its position in the harmonic series. For example, the 5th harmonic has a volume 1/25 th of the volume of the fundamental.
Sawtooth Waves
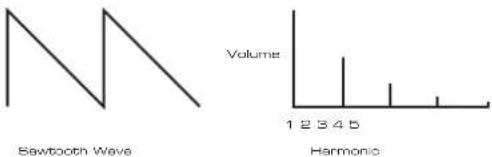
These are rich in harmonics, and containing both even and odd harmonics of the fundamental frequency. The volume of each is inversely proportional to its position in the harmonic series.
Square / Pulse Waves
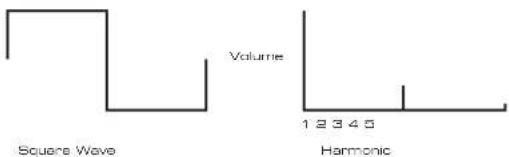
These only have odd harmonics, which are at the same volume as the odd harmonics in a sawtooth wave.
It will be noticed that the square waveform spends equal amounts of time in its 'high' state and its 'low' state. This ratio is known as the 'duty cycle'. A square wave always has a duty cycle of 50% which means it is 'high' for half the cycle and 'low' for the other half. In the Ultranova, it is possible to adjust the duty cycle of the basic square waveform to produce a waveform which is more 'rectangular' in shape. These are often known as Pulse waveforms. As the waveform becomes more and more rectangular, more even harmonics are introduced and the waveform changes its character, becoming more 'nasal' sounding.
The width of the pulse waveform (the 'Pulse Width') can be altered dynamically by a modulator, which results in the harmonic content of the waveform constantly changing. This can give the waveform a very 'fat' quality when the pulse width is altered at a moderate rate.

Noise Waves
These are basically random signals, and have no one fundamental frequency (and therefore no pitch property). All frequencies are at the same volume. Because they possess no pitch, noise signals are often useful for creating sound effects and percussion type sounds.
Digital Waveforms
In addition to the traditional types of Oscillator waveforms detailed above, the UltraNova also offers a set of carefully selected, digitally-generated waveforms containing useful harmonic elements normally difficult to produce using traditional Oscillators.
Wavetables
A "wavetable" is essentially a group of digital waveforms. The UltraNova's 36 wavables each contain 9 separate digital waveforms. The benefit of a wavetable is that consecutive waveforms in the wavetable can be blended. Some of the UltraNova's wavables contain waveforms with similar harmonic content, while others contain waveforms with greatly differing harmonic content. Wavables come alive when the 'wavetable index' - the position within the wavetable - is modulated, resulting in a sound that continually changes character, either smoothly or abruptly.
9 Waves make up a wave table
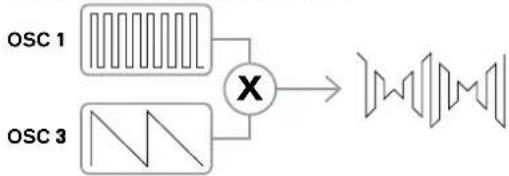
Ring Modulation
A Ring Modulator is a sound generator that takes signals from two of the UltraNova's oscillators and effectively "multiples" them together. The Ultranova has 2 Ring Modulators, one takes Osc 1 and Osc 3 as inputs, and the other takes Osc 2 and Osc 3. The resulting output depends on the various frequencies and harmonic content present in each of the two oscillator signals, and will consist of a series of sum and difference frequencies as well as the frequencies present in the original signals.
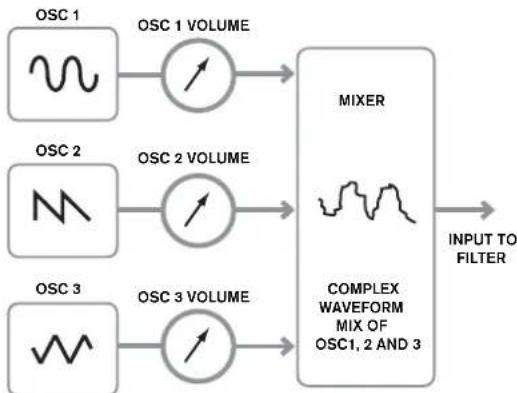
The Mixer
To extend the range of sounds that may be produced, typical analogue synthesizers have more than one Oscillator. By using multiple Oscillators to create a sound, it is possible to achieve very interesting harmonic mixes. It is also possible to slightly detune individual Oscillators against each other, which creates a very warm, 'fat' sound. The UltraNova's Mixer allows mixing of three independent Oscillators, a separate Noise Oscillator and two Ring Modulator sources.
The Filter
The Ultranova is a subtractive music synthesizer. Subtractive implies that part of the sound is subtracted somewhere in the synthesis process.
The Oscillators provide the raw waveforms with plenty of harmonic content and the Filter section subtracts some of the harmonics in a controlled manner.
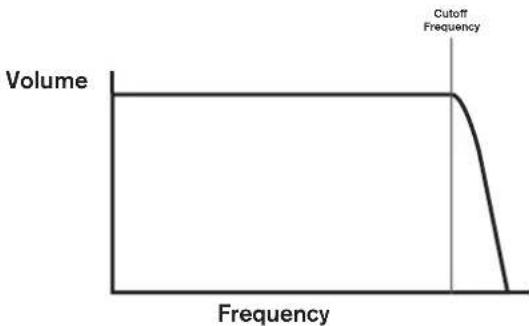
14 types of Filter are available on the UltraNova, though these are varieties of three basic filter types: Low Pass, Band Pass and High Pass. The type of Filter most commonly found on synthesizers is the Low Pass type. With a Low Pass Filter, a cut-off point (or cut-off frequency) is chosen and any frequencies below the point are passed, and frequencies above are filtered out. The setting of the Filter Frequency parameter dictates the point below which frequencies are removed. This process of removing harmonics from the waveforms has the effect of changing the sound's character or timbre. When the Frequency parameter is at maximum, the filter is completely "open" and no frequencies are removed from the raw Oscillator waveforms.
In practice, there is a gradual (rather than a sudden) reduction in the volume of the harmonics above the cut-off point of a Low Pass Filter. How rapidly these harmonics reduce in volume as frequency increases above the cut-off point is determined by the Filter's slope. The slope is measured in 'volume units per octave'. Since Volume is measured in decibels, this slope is usually quoted as so many decibels per octave (dB/occt). Typical values are 12 dB/occt and 24 dB/occt. The higher the number, the greater the rejection of harmonics above the cut-off point, and the more pronounced the filtering effect.
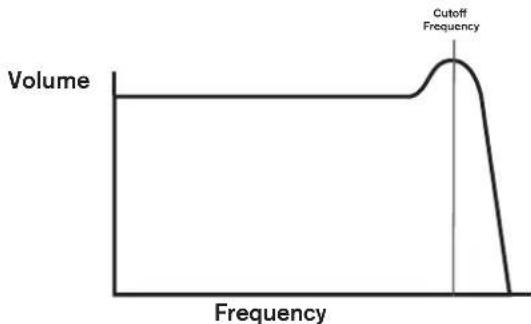
A further important parameter of the Filter is its Resonance. Frequencies at the cut-off point may be increased in volume by the Filter Resonance control. This is useful for emphasizing certain harmonics of the sound.
As Resonance is increased, a whistling-like quality will be introduced to the sound passing through the filter. When set to very high levels, Resonance actually causes the filter to self-oscillate whenever a signal is being passed through it. The resulting whistling tone being produced is actually a pure sine wave, the pitch of which depends on the setting of the Frequency knob (the filter's cut-off point). This resonance-produced sine wave can actually be used for some sounds as an additional sound source if wished.
The diagram below shows the response of a typical low pass filter. Frequencies above the cut-off point are reduced in volume.
When resonance is added, frequencies at the cut off point are boosted in volume.
In addition to the traditional Low Pass Filter type, there are also High Pass and Band Pass types. The type of Filter used is selected with the Filter Type parameter.
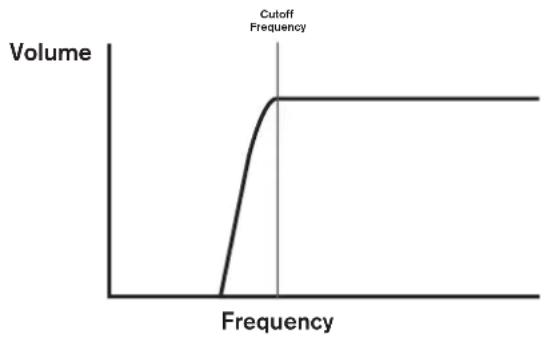
A High Pass Filter is similar to a Low Pass Filter, but works in the "opposite sense", so that frequencies below the cut-off point are removed. Frequencies above the cut-off point are passed. When the Filter Frequency parameter is set to zero, the filter is completely open and no frequencies are removed from the raw Oscillator waveforms.
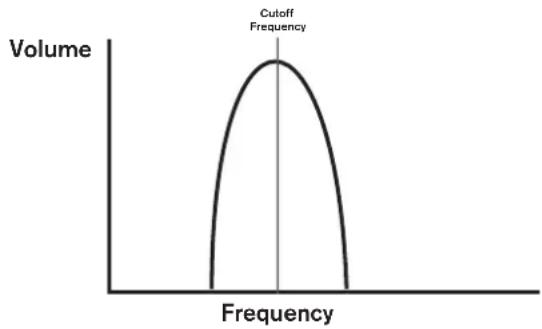
When a Band Pass Filter is used, only a narrow band of frequencies centered around the cut-off point are passed. Frequencies above and below the band are removed. It is not possible to fully open this type of Filter, and allow all frequencies to pass.
Envelopes And Amplifier
In earlier paragraphs, the synthesis of the pitch and the timbre of a sound were described. The next part of the Synthesis Tutorial describes how the volume of the sound is controlled. The volume of a note created by a musical instrument often varies greatly over the duration of the note, according to the type of instrument.
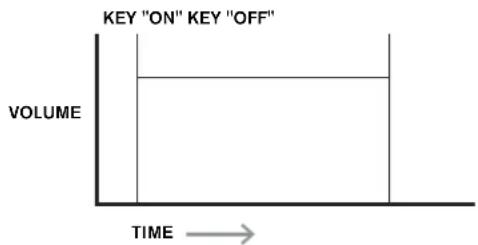
For example, a note played on an Organ quickly attains full volume when a key is pressed. It stays at full volume until the key is released, at which point the volume level falls instantly to zero.
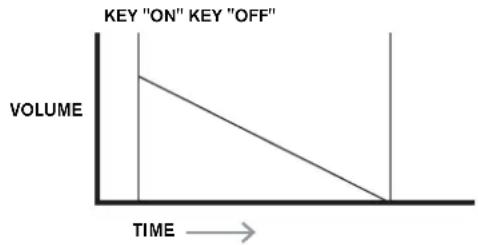
A Piano note quickly attains full volume after a key is pressed, and gradually falls in volume to zero after several seconds, even if the key is held.
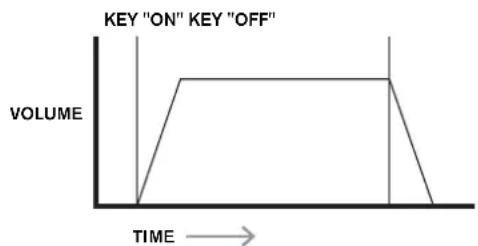
A String Section emulation only attains full volume gradually when a key is pressed. It remains at full volume while the key is held down, but once the key is released, the volume falls zero fairly slowly.
In an analogue synthesizer, changes to a sound's character which occur over the duration of a note are controlled by a section called an Envelope Generator. The UltraNova has 6
Envelope Generators (called Env 1 to Env 6). Env 1 is always related to an Amplifier, which controls the note's amplitude - i.e., the volume of the sound - when the note is played.
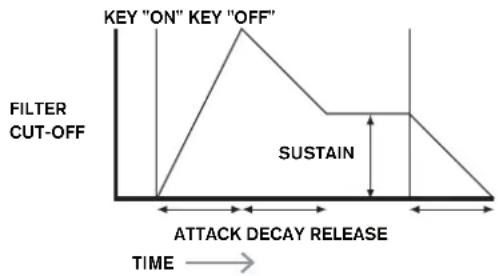
Each envelope generator has four main controls which are used to adjust the shape of the envelope.
Attack Time
Adjusts the time it takes after a key is pressed for the volume to climb from zero to full volume. It can be used to create a sound with a slow fade-in.
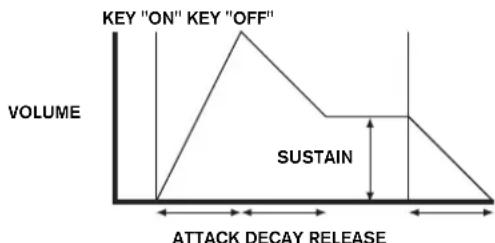
Decay Time
Adjusts the time it takes for the volume to fall from its initial full volume to the level set by the Sustain control while a key is held down.
Sustain Level
This is unlike the other Envelope controls in that it sets a level rather than a period of time. It sets the volume level that the envelope remains at while the key is held down, after the Decay Time has expired.
Release Time
Adjusts the time it takes for the volume to fall from the Sustain level to zero once the key is released. It can be used to create sounds that have a "fade-out" quality.
A typical synthesizer will have one or more envelopes. One envelope is always applied to the amplifier to shape the volume of each note played. Additional envelopes can be used to dynamically alter other sections of the synthesizer during the lifetime of each note. The UltraNova's second Envelope Generator (Env 2) is used to modify the filter cut-off frequency over the lifetime of a note.
In the UltraNova, Envelope Generators 3 to 6 can be used for special purposes, such as Modulating the Wavetable index or FX levels.
LFOs
Like the Envelope Generators, the LFO section of a synthesizer is a Modulator. Thus instead of being a part of the sound synthesis itself, it is used to change (or modulate) other sections of the synthesizer. For example, an LFO can be used to alter Oscillator pitch, or Filter cutoff frequency.
Most musical instruments produce sounds that vary over time both in volume and in pitch and timbre. Sometimes these variations can be quite subtle, but still contribute greatly towards characterising the final sound.
Whereas an Envelope is used to control a one-off modulation over during the lifetime of a single note, LFOs modulate by using a repeating cyclic waveform or pattern. As discussed earlier, Oscillators produce a constant waveform which can take the shape of a repeating sine wave, triangle wave etc. LFOs produce waveforms in a similar way, but normally at a frequency which is too low to produce a sound that the human ear could perceive. (In fact, LFO stands for Low Frequency Oscillator.)
As with an Envelope, the waveforms generated by the LFOs may be fed to other parts of the synthesizer to create the desired changes over time - or 'movements' - to the sound. The UltraNova has three independent LFOs, which may be used to modulate different synthesizer sections and can run at different speeds.
A typical waveshape for an LFO would be a Triangle wave.
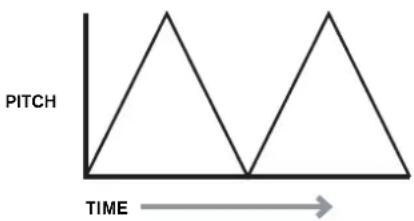
Imagine this very low frequency wave being applied to an Oscillator's pitch. The result is that the pitch of the Oscillator slowly rises and falls above and below its original pitch. This would simulate, for example, a violinist moving a finger up and down the string of the instrument whilst it is being bowed. This subtle up and down movement of pitch is referred to as the 'Vibrato' effect.
Alternatively, if the same LFO signal were to modulate the Filter cut-off frequency instead of the Oscillator pitch, a familiar wobbling effect known as 'wah- wah' would be result.
As well as setting up various sections of the synthesizer to be modulated by LFOs, additional Envelopes may also be used as modulators at the same time. Clearly, the more Oscillators, Filters, Envelopes and LFOs there are in a synthesizer, the more powerful it is.
Summary
A synthesizer can be broken down into five main sound generating or sound modifying (modulating) blocks.
1 Oscillators that generate waveforms at a various pitches.
2 A Mixer that mixes the outputs from the Oscillators together.
3 Filters that remove certain harmonics, changing the character or timbre of the sound.
4 An Amplifier controlled by an Envelope generator, which alters the volume of a sound over time when a note is played.
5 LFOs and Envelopes that can be used to modulate any of the above.
Much of the enjoyment to be had with a Synthesizer is with experimenting with the factory preset sounds and creating new ones. There is no substitute for 'hands on' experience. Experiments with adjusting the UltraNova's many parameters will eventually lead to a fuller understanding of how the various controls alter and help shape new sounds. Armed with the knowledge in this chapter, and an understanding of what is actually happening in the machine when tweaks to the knobs and switches are made, the process of creating new and exciting sounds will become easy - Have fun.
ULTRANOVA SIGNAL FLOW DIAGRAM
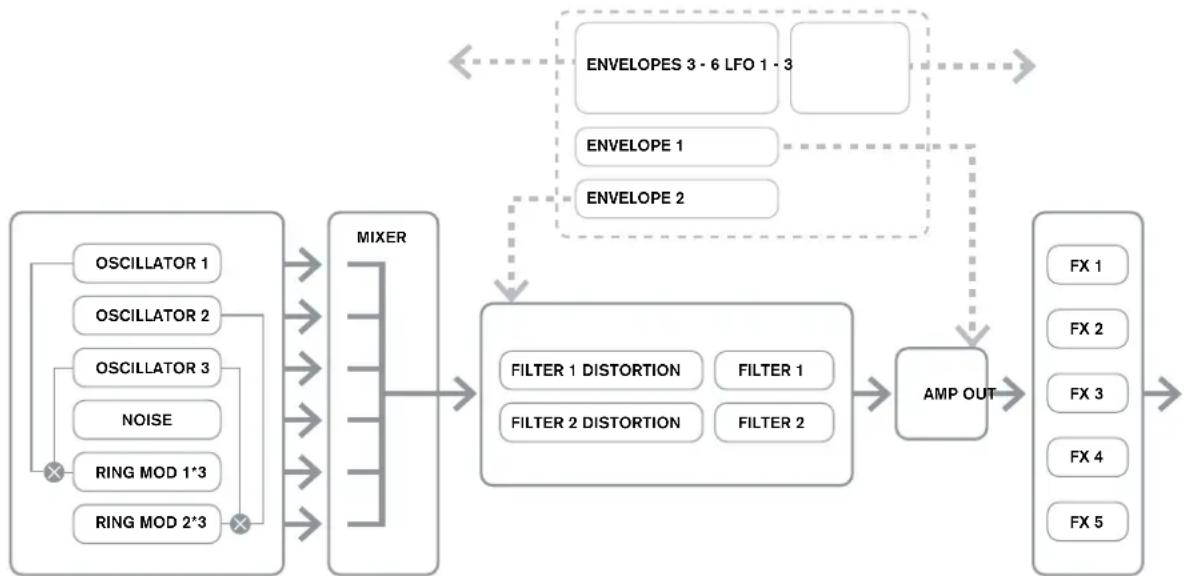
SYNTH EDIT SECTION
Hardware Navigation
See page 4 for an overview of the UltraNova and a brief description of what each of the top panel controls do.
On the UltraNova, all the menus which control the sound generation and sound processing blocks are accessed by the buttons in the Synth Edit area of the top panel.
When a menu is called up, the parameter values displayed are those of the currently-selected patch.
Each menu is accessed by its own dedicated button, and has between one and four pages. If a menu has more than one page, one of the two PAGE buttons [4] will be illuminated, and these can be used to scroll through the additional pages. Up to eight parameters of the menu are displayed on the LCD, and each is varied with the rotary encoder immediately above the parameter text.
Using the menu buttons [11] to [22], you can go directly from one menu to another with a single button press. Some of the sound generation/processing blocks are duplicated (e.g. Oscillator), and the SELECT buttons [10] are used to select which particular block of that type is to be controlled. The UltraNova remembers which block was last accessed, and also which menu page, and when that menu is recalled, it re-opens with the last settings visible.
OSCILLATORS 1, 2 AND 3
The UltraNova has three identical oscillators and a noise source; these are the synth's sound generators. Pressing the OSCILLATOR button [11] opens the Oscillator Menu, which has two pages for each oscillator. One of the SELECT buttons and one of the PAGE buttons will be illuminated, indicating that more than one oscillator is available to be controlled and that further menu pages are available. A total of 16 parameters per oscillator is displayed for adjustment, eight per page. However, note that five of these are common to all three oscillators, and another to the noise source; these six parameters appear on menu Page 2 for every oscillator.
Per-oscillator parameters (Page 1)
Upsilon: Upsilon Upsilon Upsilon Upsilon Upsilon Upsilon Upsilon Upsilon Upsilon Upsilon Upsilon Upsilon Upsilon Upsilon Upsilon Upsilon Upsilon Upsilon Upsilon Upsilon Upsilon Upsilon Upsilon Upsilon Upsilon Upsilon Upsilon Upsilon Upsilon Upsilon Upsilon Upsilon Upsilon Upsilon Upsilon Upsilon Upsilon Upsilon Upsilon Upsilon Upsilon Upsilon Upsilon Upsilon
Oscillator 1 is used as the example in the descriptions which follow, however all 3 oscillators are identical in operation.
RE1: Coarse tuning
Displayed as: 01Semi
Initial value: 0
Range of adjustment: -64 to +63
This parameter sets the basic per-oscillator tuning. Incrementing its value by 1 shifts the pitch of every note on the keyboard up by one semitone for the selected oscillator only, thus setting it to +12 effectively shifts the oscillator tuning up one octave. Negative values detune in the same manner. See also Transpose at page 38.
RE2: Fine tuning
Displayed as: 01Cents
Initial value: 0
Range of adjustment: -50 to +50
This parameter lets you make finer adjustments to the tuning. The increments are cents (1/100 of a semitone), and thus setting the value to 50 tunes the oscillator to a quarter-tone midway between two semitones.
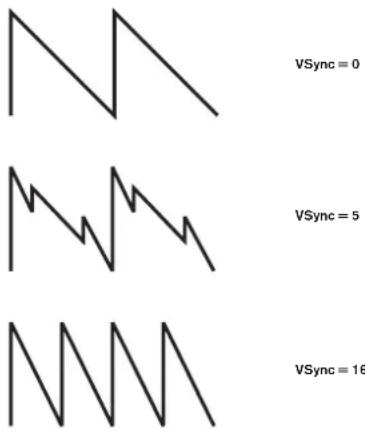
RE3:Virtual Oscillator Sync
Displayed as:01USync
Initial value: 0
Range of adjustment: 0 to 127
Oscillator Sync is a technique of using an additional "virtual" oscillator to add harmonics to the first, by using the virtual oscillator's waveform to retrigger that of the first. This technique produces an interesting range of sonic effects. The nature of the resulting sound varies as the parameter value is altered because the virtual oscillator frequency increases as a multiple of the main oscillator frequency as the parameter value increases. When the Vsync value is a multiple of 16, the virtual oscillator frequency is a musical harmonic of the main oscillator frequency. The overall effect is a transposition of the oscillator that moves up the harmonic series, with values in between multiples of 16 producing more discordant effects.

To get the best out of Vsync, try modulating it using the LFO. Try assigning it to the MOD wheel for 'hands-on' control.
RE4: Oscillator waveform
Displayed as: O1wave
Initial value: Sawtooth
Range of adjustment: See table at page 40 for full details
This selects the oscillator's waveform from a range of 72 options. As well as analogue synth-type waveforms like sine, square, sawtooth, pulse and 9 ratios of sawtooth/pulse mix, there are various digital waveforms and 36 wavables consisting of nine individual waveforms per wavetable, plus the two audio input sources.

If audio input sources are selected, then any additional oscillator parameters will have no effect on the sound. The audio input will be used as the source for subsequent manipulation (e.g., filters, modulation, etc).
To hear either of the audio inputs a note must be played on the keyboard.

It is possible to create a MIDl gate effect on vocals using audio inputs as the source.
RE5: Pulse Width/Wave Table Index
Displayed as:01Pw/Idx
Initial value: 0
Range of adjustment: -64 to +63
This control has two functions, depending on the waveform selected by RE4. With pulse waveforms, it varies the pulse width of the oscillator output. This basic effect can most easily be heard by adjusting RE5 with RE4 set to PW; you will note how the harmonic content varies and at high settings the sound becomes quite thin and metallic. A pulse wave is essentially an asymmetric square wave; when set to zero, the waveform is a normal square wave. (See page 9.) RE5 has a different function if the oscillator waveform is set to be one of the 36 Wave Tables (see RE4 above). Each Wave Table consists of nine related waveforms, and the setting of RE5 determines which is in use. The total parameter value range of 128 is divided into 9 (approximately) equal segments of 14 value units, so setting the value to anything between -64 and -50 will generate the first of the 9 waveforms, -49 to -35 the second, and so on. See also the Wave Table Interpolation parameter (RE2 on Oscillator Menu Page 2), which can be used to introduce further variation in the way wavetables are used.
RE6: Hardness
Displayed as: O1Hard
Initial value: 127
Range of adjustment: 0 to 127
The Hardeness parameter modifies the harmonic content of the waveform, reducing the level of the upper harmonics as the value is decreased. Its effect is akin to that of a low-pass filter, but operates at oscillator level. You will note it has no effect on a sine waveform, as this is the one waveform with no harmonics.
RE7: Density
Displayed as: 0Dense
Initial value: 0
Range of adjustment: 0 to 127
The density parameter effectively adds copies of the oscillator waveform to itself. Up to eight additional virtual oscillators are used for this, depending on the value of the parameter. This produces a "thicker" sound at low to medium values, but if the virtual oscillators are detuned slightly (see RE8 below), a more interesting effect is obtained.
RE8: Density Detuning
Displayed as: O1DrsDtn
Initial value: 0
Range of adjustment: 0 to 127
This parameter should be used in conjunction with the Density control. It detunes the virtual density oscillators, and you will notice not only a thicker sound, but the effect of beating as well.

The Density and Density Detune parameters can be used to "thicken" the sound, and simulate the effect of adding additional Voices. The Unison and Unison
Detune parameters in the Voice Menu can be used to create a very similar effect, but using Density and Density Detune have the advantage of not needing to use additional Voices, which are finite in number.
Per-oscillator parameters (Page 2)
UPChmH UIUInt Nodub MUBRate UscFift UscPhase FixNote Noiseup +12 127 0 65 0 Edeg Off White
RE1: Pitch wheel range
Displayed as: QIptchih
Initial value: +12
Range of adjustment: -12 to +12
The pitch wheel can vary the oscillator pitch by up to an octave, up or down. The units are in semitones, so with a value of +12 , moving the pitchwheel up increases the pitch of the notes being played by one octave, and moving it down takes them down an octave. Setting the parameter to a negative value has the effect of reversing the operating sense of the pitch wheel. You will find that many of the factory patches have this parameter set to +2 allowing a pitch wheel range of 1 tone. It is worth noting that (like all per-oscillator parameters) the value can be set independently for each oscillator.
RE2: Wave Table Interpolation
Displayed as: QIWTInt
Initial value: 127
Range of adjustment: 0 to 127
This parameter sets how smooth the transition is between adjacent waveforms in the same wavetable. A value of 127 will create a very smooth transition, with the adjacent waveforms blending together. With a value of zero the transitions will be abrupt and obvious. With a high 01WInt value set, it is possible retain a mix of adjacent waveforms if the modulation value remains fixed. When modulating the wavetable Index (via LFO, etc.), the wavetable interpolation parameter sets how smooth (or not!) the transition is.
Common Oscillator parameters
The remaining parameters in the Oscillator Menu are common to all 3 oscillators. They are available whichever oscillator is selected by the SELECT button [10].
RE3: Single Fixed Note
Displayed as: FixNote
Initial value: Off
Range of adjustment: Off, C# -2 to G 8
Some sounds need not be chromatically-dependent. Examples would be certain percussion sounds (e.g., bass drums), and sound effects, such as a laser gun. It is possible to assign a fixed note to a patch, such that playing any key on the keyboard generates the same sound. The pitch on which the sound is based may be any semitone note in a range of over ten octaves. With the parameter set Off, the keyboard behaves as normal. With it set to any other value, every key plays the sound at the pitch corresponding to the value.
RE4: Vibrato depth
Displayed as:Modvib
Initial value: 0
Range of adjustment: 0 to 127
Adding vibrato to an oscillator modulates (or varies) the pitch of the note cyclically, adding a "wobble" to the tone. This parameter determines the vibrato depth, and hence how obvious the "wobble" is. The mod wheel is used to apply vibrato, with the ModVib parameter
value representing the maximum depth of vibrato that can be obtained with the mod wheel in its fully 'up' position. On the UltraNova, VibMod and MvibRate (below) are common parameters that affect all oscillators and do not require the use of the LFO section.
RE5: Vibrato Rate
Displayed as: MvibRate
Initial value: 65
Range of adjustment: 0 to 127
This parameter sets the rate (or frequency) of the vibrato from very slow (value=0) to very fast (value=127).
RE6: Oscillator Drift
Displayed as: Osdrift
Initial value: 0
Range of adjustment: 0 to 127
When the three oscillators are set to the same tuning, their waveforms are perfectly synchronised. Old analogue synthesizers were unable to stay perfectly in tune, and Oscillator Drift 'emulates' this imperfection by applying a controlled amount of detuning so that the oscillators are slightly out of tune with each other. This adds a "fuller" character to the sound.
RE7: Oscillator Phase
Displayed as: OsCPhase
Initial value: 0deg
Range of adjustment: Free, Odeg to 357deg
This adjusts the point in the waveform at which the oscillators start, and is adjustable in 3 degree increments over one whole waveform cycle (360). The effect of this is to add a slight "click" or "edge" to the start of the note, as the instantaneous output voltage when the key is pressed is not zero. Setting the parameter to 90 or 270 produces the most obvious effect. With the parameter set to 0^ , the oscillators always start precisely in step. If Free is set, the phase relationship of the waveforms is unrelated to when a key is pressed.
RE8: Noise Source Type
Displayed as: NoiseType
Initial value: White
Range of adjustment: White, High, Band or High-band
In addition to the three main oscillators, the UltraNova also has a noise generator. White noise is defined as a signal with "equal power at all frequencies", and is a familiar "hissing" sound. Restricting the bandwidth of the noise generator alters the characteristic of the "hiss", and the other three options for this parameter apply such filtering. Note that the noise generator has its own input to the mixer, and in order to hear it in isolation, its input will need to be turned up and the oscillator inputs turned down. (See 15.)
THE MIXER
The outputs of the three oscillators and the noise source are passed to a simple audio mixer, where their individual contributions to the overall sound output can be adjusted.
Most of the factory patches use either two, or all three oscillators, but with their outputs summed in various combinations of levels. Pressing the MIXER button [12] opens the
Mixer Menu, which has two pages. One of the PAGE buttons will be illuminated, indicating that further menu pages are available. A total of 6 inputs and two FX sends are available for adjustment on Page 1, and each input can be solo'd on Page 2.

As with any other audio mixer, don't be tempted to turn all the inputs up. The mixer should be used to balance sounds. If multiple sources are in use, then each input setting should be about halfway - about 64 or so, and the more inputs you are using, the more careful you need to be. If you get this wrong, you risk internal signal clipping, which will sound extremely unpleasant.
Mixer parameters (Page 1)
U1Level U2Level U3Level RMI+3LVi RMI=3LVi NoizelL Vi FprFALvi PatFALvi 127 0 0 0 0 GJB GJE
RE1: Oscillator 1 Level
Displayed as:01Level
Initial value: 127
Range of adjustment: 0 to 127
This parameter sets the amount of Oscillator 1's signal present in the overall sound.
RE2: Oscillator 2 Level
Displayed as: 0ZLevel
Initial value: 0
Range of adjustment: 0 to 127
This parameter sets the amount of Oscillator 2's signal present in the overall sound.
RE3: Oscillator 3 Level
Displayed as:03Level1
Initial value: 0
Range of adjustment: 0 to 127
This parameter sets the amount of Oscillator 3's signal present in the overall sound.
RE4: Noise Source Level
Displayed as: NoiseLvl
Initial value: 0
Range of adjustment: 0 to 127
This parameter sets the amount of Noise present in the overall sound.
RE5: Ring Modulator Level (Oscs. 1*3)
Displayed as: RMI*3L01
Initial value: 0
Range of adjustment: 0 to 127
In its simplest form, a Ring Modulator is a processing block with two inputs and one output, which effectively "multiplies" the two input signals together. Depending on the relative frequencies and harmonic content of the two inputs, the resulting output will contain a series of sum and difference frequencies as well as the fundamentals. The UltraNova has two Ring Modulators; both use Oscillator 3 as one input, one combines this with Oscillator 1, the other with Oscillator 2. The Ring Modulator outputs are available as two additional inputs to the mixer, controlled by RE5 and RE6. The parameter controlled by RE5 sets the amount of the Osc. 1^3 Ring Modulator output present in the overall sound.

Try the following settings to get a good idea of what a Ring Modulator sounds like.
On Mixer Menu Page 1, turn down the levels of Oscs 1, 2 & 3 and turn up RM1*3Lvi. Then go to the Oscillator Menu page. Set Osc3 to an interval either +5 , +7 or +12 semitones above Osc1 and the sound will be harmonious. Changing the pitch of Osc 1 to other semitone values creates discordant, but interesting sounds. O1 Cents can be varied to introduce a 'beating' effect.
RE6: Ring Modulator Level (Oscs. 2*3)
Displayed as: R12*3Lv1
Initial value: 0
Range of adjustment: 0 to 127
The parameter controlled by RE6 sets the amount of the Osc. 2 * 3 Ring Modulator output present in the overall sound.
RE7: Pre-FX level send
Displayed as: PreFMLv1
Initial value: 0dB
Range of adjustment: -12dB to +18dB
The summed mixer inputs are routed through the FX block (even if no effects are active) at a level determined by RE7. This control should be adjusted with care to avoid overloading the FX processing.
RE8: Post-FX level return
Displayed as: PstFXLv1
Initial value: 0dB
Range of adjustment: -12dB to +12dB
This parameter adjusts the level returned from the output of the FX processor. Thus both
RE7 and RE8 will alter the signal level even when all FX slots in the FX block are bypassed.

PreFXLvi and PsTFXLvi are critical controls and incorrect adjustment can produce clipping in the FX processing section and elsewhere. It is always a good idea to set up the FX parameters you think you need first (in the Effects Menu, see page 28), and then increase these two parameters carefully until you get the amount of FX you're after.
Mixer parameters (Page 2)
The Solo functions on Mixer Menu Page 2 operate just like the Solo buttons on a hardware (or indeed software) mixer. Activating a Solo lets you listen to that input's contribution to the overall sound alone. You can also solo more than one input if you wish, and what you hear will be the sum of the inputs.
There are two methods of enabling Solo:
touching the appropriate encoder knob(s) enables solo temporarily while the knob is touched (note that the LCD text does not reflect this).
turning the knob activates solo mode until the knob is turned back again.

Solo settings are not saved with the Patch.
RE1: Oscillator 1 Solo
Displayed as: O1Solo
Initial value: Off
Range of adjustment: Off or On
Mutes all mixer inputs except Oscillator 1.
RE2: Oscillator 2 Solo
Displayed as: 02Sol0
Initial value: Off
Range of adjustment: Off or On
Mutes all mixer inputs except Oscillator 2.
RE3: Oscillator 3 Solo
Displayed as:03Sol0
Initial value: Off
Range of adjustment: Off or On
Mutes all mixer inputs except Oscillator 3.
RE4: Noise Source Solo
Displayed as: HoisSolo
Initial value: Off
Range of adjustment: Off or On
Mutes all mixer inputs except the Noise Source.
RE5: Ring Modulator (Oscs 1 & 3) Solo
Displayed as: Rm13501o
Initial value: Off
Range of adjustment: Off or On
Mutes all mixer inputs except that from the Ring modulator (Oscillators 1 and 3).
RE6: Ring Modulator (Oscs 2 & 3) Solo
Displayed as: Rm23So1o
Initial value: Off
Range of adjustment: Off or On
Mutes all mixer inputs except that from the Ring modulator (Oscillators 2 and 3).
RE7/8: not used
FILTERS 1 AND 2
The UltraNova has two identical filter sections, which modify the harmonic content of the oscillators' outputs. They can be thought of as elaborate tone controls, with the additional ability of being dynamically controllable by other parts of the synth. Pressing the FILTER button [13] opens the Filter Menu, which has two pages for each filter. One of the SELECT buttons and one of the PAGE buttons will be illuminated, indicating that more than one filter is available to be controlled and that further menu pages are available. A total of 12 parameters per filter is displayed for adjustment, eight on Page 1, four on Page 2. Note that those on Page 2 are common to both filters, and these appear whichever filter is selected. Note that it is possible to use the two filter blocks together, placing them in various series/ parallel configurations, by adjustment of the common parameter Filter Routing.
Per-filter parameters (Page 1)
| FiFRe-1 | FiRes | FiEnv2 | FiTrack | FiTrace | FiDMnt | FiDlotype | FiDlNorm |
| 127 | 0 | 0 | 127 | LF24 | 0 | Diode | 64 |
Filter 1 is used as the example in the descriptions which follow, but the two are identical in operation.
RE1: Filter frequency
Displayed as: FIFRe
Initial value: 127
Range of adjustment: 0 to 127
This parameter sets the frequency at which the filter type selected by RE5 operates. In the case of hi-pass or low-pass filters, it is the "cut-off" frequency; for band-pass filters, it is the "centre" frequency. Sweeping the filter manually will impose a "hard-to-soft" characteristic on almost any sound.

If Filter Frequency Link is set On (see Filter Menu page 2, RE3, below), RE1 assumes a different function in the case of Filter 2 only:
RE1: Filter 2 frequency offset
Displayed as: F#1<>F#2
Initial value: +63
Range of adjustment: -64 to +63
See page 18 for more info
RE2: Filter resonance
Displayed as: FiRes
Initial value: 0
Range of adjustment: 0 to 127
This parameter adds gain to the signal in a narrow band of frequencies around the frequency set by RE1. It can accentuate the swept-filter effect considerably. Increasing the resonance parameter is very good for enhancing modulation of the cut-off frequency, creating a very edgy sound. Increasing Resonance also accentuates the action of the Filter Frequency parameter, so that as the Filter knob is moved, a more pronounced effect is obtained.

If Filter Resonance Link is set On (see Filter Menu page 2, RE4, below), RE2 assumes a slightly different function.
RE1:Filter 1 & 2 Resonance
Displayed as: F1&F2Res
Initial value: 0
Range of adjustment: 0 to 127
RE3: Filter control by Envelope 2
Displayed as: F1Env2
Initial value: 0
Range of adjustment: -64 to +63
The filter's action may be triggered by Envelope Generator 2. Envelope 2's own menu provides comprehensive control over precisely how this shape of the envelope is derived. See page 21. RE3 lets you control the "depth" and "direction" of this external control; the higher the value, the greater the range of frequencies over which the filter will swoop. Positive and negative values make the filter sweep in opposite directions, but the audible result of this will be further modified by the filter type in use.
RE4: Filter tracking
Displayed as: FiTrack
Initial value: 127
Range of adjustment: 0 to 127
The pitch of the note played can be made to alter the cut-off frequency of the filter. At the maximum value (127), this frequency moves in semitone steps with the notes played on the keyboard - i.e., the filter tracks the pitch changes in a 1:1 ratio (e.g., when playing two
notes an octave apart, the filter cut off frequency will also change by one octave). At minimum setting (value 0), the filter frequency remains constant, whatever note(s) are played on the keyboard.
RE5:Filter type
Displayed as: F1Type
Initial value: LP24
Range of adjustment: See table at page 44
The UltraNova filter sections offer 14 different types of filter: four hi-pass and four low-pass (with different slopes), and 6 band-pass filters of various types. Each filter type differentiates between frequency bands in a different way, rejecting some frequencies and passing others, and thus each imposes a subtly different character on the sound.
RE6: Distortion Amount
Displayed as: F1D4mnt.
Initial value: 0
Range of adjustment: 0 to 127
The filter section includes a dedicated distortion generator; this parameter adjusts the degree of distortion treatment applied to the signal. The basic 'type' of distortion added is set by RE7 (see below). The distortion is added pre-filter (but see below).

Filter Distortion is always added before the filter, and therefore the filter frequency affects the amount of distortion you hear. If you want to filter your sound before it is distorted, try settings similar to the following:
| PARAMETER VALUE | |
| Prouting Series | |
| Fbalance 127 | |
| F10Amt 8 | |
| F20Amnt | As required |
RE7: Filter Distortion Type
Displayed as: F10Type
Initial value: Diode
Range of adjustment: See Page 31
The distortion generator for each filter is located immediately before the filter section itself.
The type of distortion generated can be selected with the Distortion Type parameter.
RE8: Filter Q Normalisation
Displayed as: F10norm
Initial value: 64
Range of adjustment: 0 to 127
This parameter alters the bandwidth of the peak created by the resonance control F1Res.
The value of F1Res has to be set to something other than zero for this parameter to have
any effect. This feature enables the Filter section to emulate many of the filter responses
found on various classic analogue and digital synths.

Common Filter parameters (Page 2)
The remaining parameters in the Filter Menu are common to all both filters. They are available whichever filter is selected by the SELECT button [10].
| FBalance FRoutine FreeLink ResLink | |
| -64 | Parallel Off Off |
RE1: Filter balance
Displayed as: FBalance
Initial value: -64
Range of adjustment: -64 to +63
UltraNova's two filter sections may be used simultaneously, but configured in different ways (see RE2 below). Low-pass and band-pass filters could be combined in parallel to create speech-like sounds (see Tips below). For configurations using both filters, RE1 lets you mix the outputs of the two filter sections together in whatever combination you want. The minimum parameter value of -64 represents maximum output from Filter 1 and no output from Filter 2, and the maximum value of +63 represents maximum output from Filter 2 and no output from Filter 1. With a value of 0, the outputs of the two filter sections are mixed in equal proportion.
RE2: Filter Routing
Displayed as: F1Routing9
Initial value: Parallel
Range of adjustment: Bypass, Single, Series, Parallel, Paral2, Drum
UltraNova provides five possible combinations of the two filter blocks, plus bypass. Single mode uses Filter 1 only, the other modes interconnect the two filter sections in various ways.
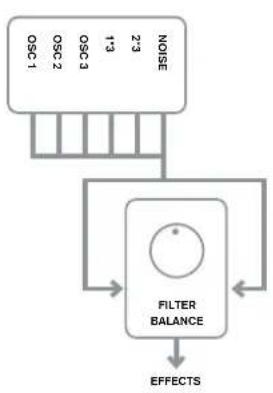
Bypass
No filters in circuit
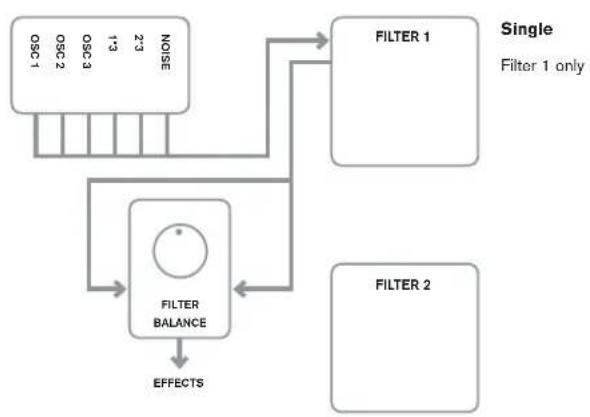
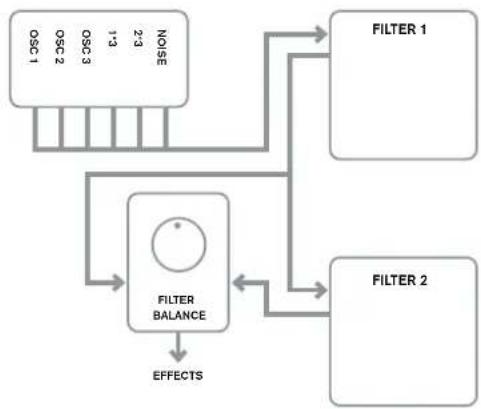
Series
Filter 1 feeds Filter 2, but output is still derived from Filter Balance control
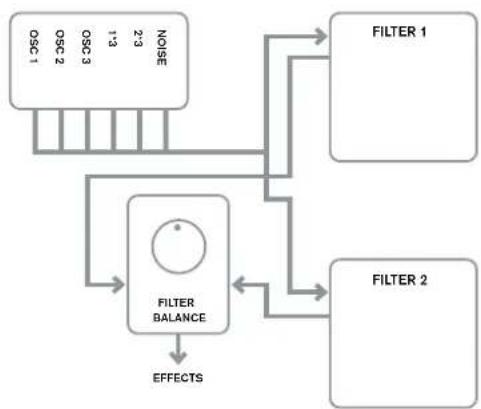
Parallel
Filter sections are driven with the same input signal, and their output balance is adjusted by RE1
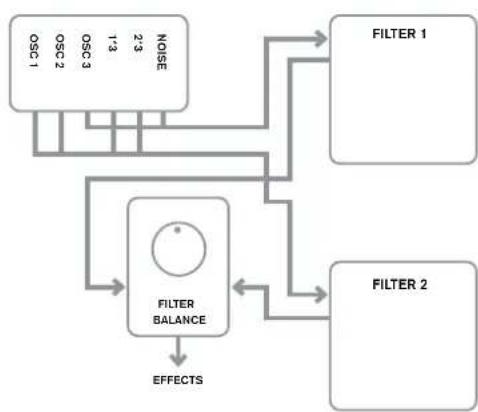
Parallel 2
As Parallel Mode, but Filter 1 is driven by Osc 3 and Noise source, remaining sources feed Filter 2.
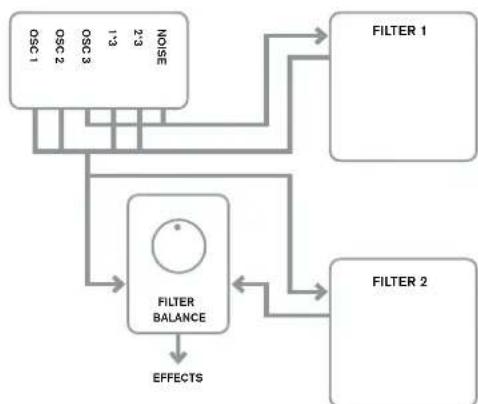
Drum
As Parallel Mode 2, but Filter 1's output is added to Filter 2's input signals.
Note that Parallel 2 and Drum modes differ in an important respect from the others in that the Filter 1 and Filter 2 are fed from different sources. This allows the noise source and Osc 3 to be filtered in a different way from Oscillators 1 and 2 and the Ring Modulator Outputs, an important requirement when creating certain percussive sounds.

Two examples of Filter routings...
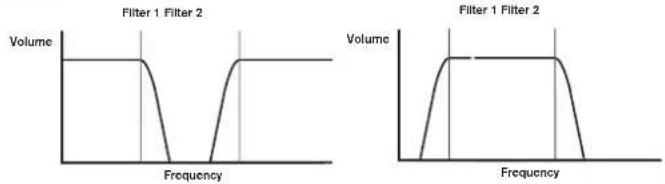
...a Notch Filter: ...a Wideband Bandpass Filter
F1Type:LP F1Type:LP
F2Type:HP F2Type:HP
F1Routing: Parallel F1Routing: Series
RE3:Filter Frequency Link
Displayed as: FreqLink
Initial value: Off
Range of adjustment: Off or On
Setting Frequency Linking to On creates a relationship between the frequencies of the two Filter sections, and re-assigns the function of RE1 for Filter 2 from Frequency to Frequency Offset (see Filter Menu Page 1, RE1, above). Filter 2's offset is relative to Filter 1's frequency.
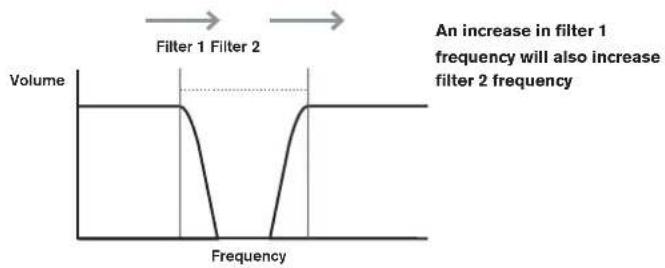
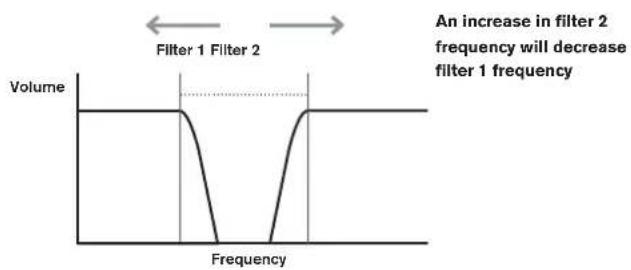
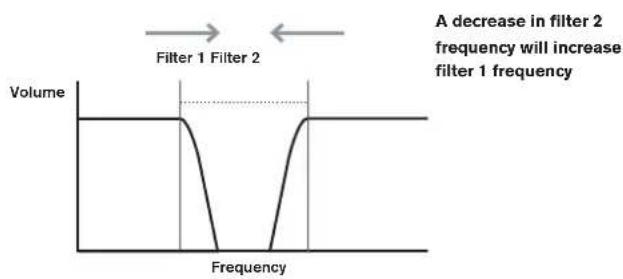
RE4:Filter Resonance Link
Displayed as: ResLink
Initial value: Off
Range of adjustment: Off or On
Setting Resonance Linking to On applies the same Resonance parameter value to both Filter 1 and Filter 2. The Filter Resonance control (RE2, Page 1) affects both filters, regardless of which filter is currently selected for adjustment.
RE5-RE8: Not used
VOICES
The UltraNova is a multi-voice, polyphonic synthesizer, which basically means you can play chords on the keyboard, and every note you hold down will sound. Each note is termed a 'voice', and the UltraNova's DSP engine is sufficiently powerful to ensure that you will always run out of fingers before you run out of voices! (But this does depend on how many voices are assigned to each note - see the Unison parameter in the Voice Menu below). However, if you are controlling the UltraNova from a MIDI sequencer, it is theoretically possible to run out (there are a maximum of 20 voices internally). Although this is likely to happen only rarely, users may occasionally observe this phenomenon, which is termed 'voice stealing'.
The alternative to polyphonic voicing is mono. With mono voicing, only one note sounds at a time; pressing a second key while holding the first down will cancel the first and play the second - and so on. The last note played is always the only one that you hear. All the early synths were mono, and if you are trying to emulate a 1970s analogue synth, you may wish to set the voicing to mono as the mode imposes a certain restriction on playing style that will add to authenticity.
Pressing the VOICE button [14] opens the Voice Menu, which is a single page. In addition to selecting polyphonic or mono voicing, the menu also lets you set the portamento and other related voicing parameters.
Unison Undetune PortTime PortMode PreGuide PoleMode Off 25 Off Expo0 Polyi
RE1: Unison Voices
Displayed as: Unison
Initial value: Off
Range of adjustment: Off, 2, 3, 4
Unison can be used to "thicken" the sound by assigning additional voices (up to 4 in total) for each note. Be aware that the "reservoir" of voices is finite and with multiple voices assigned, polyphony is accordingly reduced. With 4 voices per note, a four-note chord approaches the UltraNova's limit, and if further notes are added to the chord, "voice stealing" is implemented and the initial note(s) played may be cancelled.

If the limitation on polyphony imposed by Unison Voices is restrictive, a similar effect can be obtained by using multiple oscillators and adjusting their Density and Detune parameters. In fact, most of the factory patches use Density and Detune rather than Unison to achieve their multi-timbral effect.
RE2:Unison Detune
Displayed as:UnDetune
Initial value: 25
Range of adjustment: 0 to 127
Unison Detune applies only when Unison Voices is set to something than Off. The parameter determines how much each voice is detuned relative to the others; you will be able to hear a difference in the sound of the same note with different numbers of voices even if Unison Detune is set to zero, but the sound gets more interesting as it is increased in value.

Changing the settings of Unison Voices or Unison Detune while holding a note down has no effect on the sound. The new settings will only be effective when a fresh note is played.
RE3: Not used.
RE4: Portamento Time
Displayed as: PortTime
Initial value: Off
Range of adjustment: Off, 1 to 127
With Portamento active, notes played sequentially glide from one to the next, rather than immediately jumping to the desired note pitch. The synth remembers the last note played and the glide will start from that note even after the key has been released. The Porta-
mente Time is the duration of the glide, and a value of 70 equates to approximately 1 second. Portamento is primarily intended for use in a mono Mode (see RE5 below), where it is particularly effective. It can also be used in a Poly mode, but its operation can be unpredictable, particularly when chords are played. Note that Pre-Glide must be set to zero in order for Portamento to be operative.
RE5: Portamento Mode
Displayed as: PortMode
Initial value: Expo
Range of adjustment: Expo or Linear
This sets the 'shape' of the Portamento and Pre-Glide (see RE6 below) transitions from one note to the next. In Linear mode, the glide alters the pitch evenly between the previous note and that being played. In Expo mode, the pitch changes more rapidly at first, and then approaches the 'target' note more slowly, i.e., exponentially.
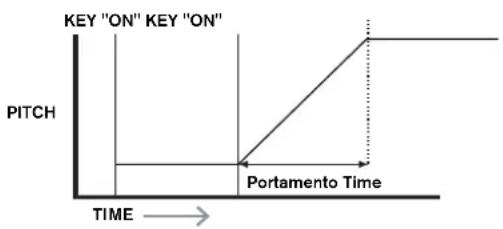
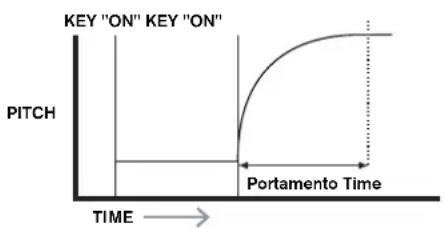
RE6:Pre-Glide
Displayed as: FreGlide
Initial value: 0
Range of adjustment: 0, -12 to +12
Pre-Glide takes priority over Portamento, though it does use the Portamento Time parameter to set its duration. Pre-Glide is calibrated in semitones, and each note played will actually begin on a chromatically-related note up to an octave above (value = +12) or below (value = -12) the note corresponding to the key pressed, and glide towards the 'target' note. This differs from Portamento in that, e.g., two notes played in sequence will each have their own Pre-Glide, related to the notes played, and there will be no glide
'between' the notes.

Although the use of Portamento is not recommended in Poly modes when playing more than one note at a time, this restriction does not apply to Pre-Glide, which can be very effective with full chords.
RE7: Polyphony Mode
Displayed as: Polymode
Initial value: Poly1
Range of adjustment: Mono, MonoAG, Poly1, Poly2, Mono2
As the names imply, three of the possible modes are mono and two are polyphonic.
Mono - this is standard monophonic mode, only one note sounds at a time, and the 'last
played" rule applies.
MonoAG - AG stands for Auto-Glide. This is an alternative mono mode, which differs
from Mono in the way Portamento and Pre-Glide work. In Mono mode, Portamento and
Pre-Glide apply both if notes are played separately, or in a legato style (when one note is played when another is already held down). In MonoAG mode, Portamento and Pre-Glide only work if the keys are played in a legato style; playing notes separately produces no glide effect.
Poly1 - in this polyphonic mode successively playing the same note(s) uses separate voices and the notes are therefore 'stacked', so the sound gets louder as more notes are played. The effect will only be evident on patches with a long amplitude release time.
Poly2 - in this alternative mode, successively playing the same note(s) uses the original voices, so the volume increase inherent in Poly1 mode is avoided.
Mono 2 - this differs from Mono in the way the Attack phases of the Envelopes are triggered. In Mono mode, when playing Legato style, the envelopes are only triggered once, by the initial key press. In Mono 2 mode, every key press will re-trigger all the Envelopes.
RE8: Not used
ENVELOPES
The UltraNova provides a great deal of flexibility in the use of envelopes in sound creation, based on the familiar ADSR concept.
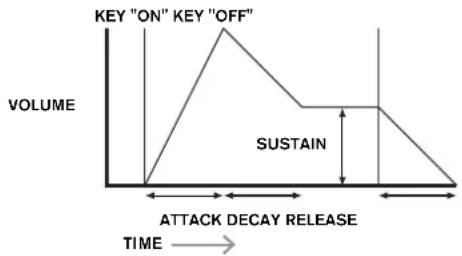
The ADSR envelope can be most easily visualised by considering the amplitude (volume) of a note over time. The envelope describing the "lifetime" of a note can be split into four distinct phases, and adjustments are provided for each of these:
Attack - the time it takes for the note to increase from zero (e.g. when the key is pressed) to its maximum level. A long attack time produces a "fade-in" effect.
Decay - the time it takes for the note to drop in level from the maximum value reached at the end of the attack phase to a new level, defined by the Sustain parameter.
Sustain - this is an amplitude value, and represents the volume of the note after the initial attack and decay phases - i.e., while holding the key down. Setting a low value of Sustain can give a very short, percussive effect (providing the attack and decay times are short).
Release - This is the time it takes for the note's volume to drop back to zero after the key is released. A high value of Release will cause the sound to remain audible (though diminishing in volume) after the key is released.
Although the above discusses ADSR in terms of volume, note that the UltraNova is equipped with six separate Envelope generators, allowing control of other synth blocks as well as amplitude - e.g., filters, oscillators, etc.
Pressing the ENVELOPE button [15] opens the Envelope Menu, which has two pages for each envelope. One of the SELECT buttons and one of the PAGE buttons will be illuminated, indicating that more than one envelope is available to be controlled and that further menu pages are available. A total of 16 parameters per envelope is displayed for adjustment, eight per Page. Note that the last parameter on Page 2 is common to all envelopes, and this appears on Page 2 for all envelopes.
Envelope 1 (Amplitude) parameters (Page 1)
Amrrtt 2 Amr Dec 127 Amr Rel Amr Uloc Amr Prr Amrr 0 OFF Amrr 0 Re-Trig
Envelope generator 1 controls the ADSR parameters of the notes' amplitudes.
RE1: Amplitude Attack Time
Displayed as: AmiAtt.
Initial value: 2
Range of adjustment: 0 to 127
This parameter sets the note's attack time. With a value of 0 the note is at its maximum level immediately the key is pressed; with a value of 127, the note takes over 20 seconds to reach its maximum level. At the mid-setting (64), the time is approx. 220 ms (provided
Amplitude Attack Slope (Page 2, RE1) has a value of zero).
RE2: Amplitude Decay Time
Displayed as: AmpDc
Initial value: 90
Range of adjustment: 0 to 127
This parameter sets the notes' decay time. Decay time only has meaning if the Sustain parameter value is set to less than 127, as the Decay phase will be inaudible if the sustain level is the same as the level reached during the attack phase. At the mid-setting (64), the time is approx. 150 ms (provided Amplitude Decay Slope (Page 2, RE2) has a value of 127).
RE3: Amplitude Sustain Level
Displayed as: AmpSUS
Initial value: 127
Range of adjustment: 0 to 127
The value of the Sustain parameter sets the volume of the note after the completion of the decay phase. Setting a low value will obviously have the effect of emphasising the start of the note; setting it to zero will render the note silent after the decay phase has elapsed.
RE4: Amplitude Release Time
Displayed as: AmpRe1
Initial value: 40
Range of adjustment: 0 to 127
Many sounds acquire some of their character from the notes remaining audible after the key is released; this "hanging" or "fade-out" effect, with the note gently dying away naturally (as with many real instruments) can be very effective. A setting of 64 gives a Release Time of approx. 300 ms. The UltraNova has a maximum release time of approx. 30 seconds (with
Release set to 127), but shorter times will probably be more useful! The relationship between the parameter value and the Release Time is not linear - see the graph below.

Note that when playing polyphonically with sounds having long release times, it is possible for 'Voice Stealing' to occur. This means that some notes still sounding (in their Release phase) might suddenly cut off when other notes are played. This is more likely to happen when multiple Voices are in use. See page 18 for more information on this topic.
RE5: Amplitude Velocity
Displayed as: AmpVeloc
Initial value: 0
Range of adjustment: -64 to +63
Amplitude Velocity does not modify the shape of the ADSR amplitude envelope in any way, but adds touch sensitivity to overall volume, so that with positive parameter values, the harder you play the keys, the louder will be the sound. With Amplitude Velocity set to zero, the volume is the same regardless of how the keys are played. The relationship between the velocity at which a note is played and volume is determined by the value. Note that negative values have the inverse effect.

For the most "natural" playing style, try setting Amplitude Velocity to about +40.
RE6: Amplitude Envelope Repeat
Displayed as: HmpRept
Initial value: 0
Range of adjustment: 0 to 126, KeyOff
By using Amplitude Repeat, it is possible to repeat the Attack and Decay phases of the envelope before the Sustain phase is initiated. This can produce an interesting "stuttering" effect at the start of the note if the Attack and Decay times are set appropriately. The value of the Repeat parameter (from 0 to 126) is the actual number of repeats, so that if you set it to, e.g. 3, you will hear a total of four attack/decay phases of the envelope - the initial one, plus three repeats. The maximum setting of KeyOff generates an infinite number of repeats.
RE7: Amplitude Touch Trigger
Displayed as: AmPTTtrg
Initial value: Off
Range of adjustment: Off, T1ReTrig to T8ReTrig
You will have noticed that the UltraNova's rotary encoders are touch-sensitive - the associated LED illuminates as soon as the knob is touched. This touch sensitivity can be utilised in real time to provide creative control over the sound, which is especially useful when playing live.
Amplitude Touch Trigger assigns any one of the encoder knobs to act as a re-trigger button - as soon as the knob is touched, the amplitude envelope is re-triggered. After making the assignment, in order to use the feature it is necessary to open theAnimate Touch mode by pressing the TOUCH button [22] (select Page 1 if it is not already visible); you will see
that an 'R' appears under RE1, below the selected encoder to confirm the assignment of Envelope1 to that encoder. The touch-sensitive knob is now active.
| 123456 | 123456 | 123456 | 123456 | 123456 | 123456 | 123456 |
| 0 | 0 | 0 | 0 | 0 | 0 | 0 |
RE8: Amplitude Multi-trigger
Displayed as: AmPITrig
Initial value: Re-Trig
Range of adjustment: Legato or Re-Trig
When this parameter is set to Re-Trig, each note played will trigger its full ADSR amplitude envelope, even if other keys are held down. In Legato mode, only the first key to be pressed will produce a note with the full envelope, all subsequent notes will omit the attack and decay phases, and sound only from the start of the Sustain phase. "Legato" literally means "smoothly", and this mode aids this style of playing.
It is important to appreciate that for the Legato mode to be operative, mono voicing must be selected - it will not work with polyphonic voicing. See page 19

What is Legato? As stated above, the musical term Legato means "smoothly". A Legato keyboard style is one where at least two notes overlap. This means that as you play the melody, you keep the previous (or an earlier) note sounding as you play another
note. Once that note is sounding, you then release the earlier note.
Legato style playing is relevant to some of the UltraNova's sonic possibilities. In the case of Amplitude Multi-Trigger, for example, it is important to appreciate that the envelope will re-trigger if any 'gap' is left between notes.
Envelope 1 (Amplitude) parameters (Page 2)
AmAPs1S AmAPs2S AmAPs3Tk AmAPs4Tk AmAPs5Tk AmAPs6Tk LlAeLkTne 0 127 0 0 0 127 0 0 3
RE1: Amplitude Attack Slope
Displayed as: RmRtSLP
Initial value: 0
Range of adjustment: 0 to 127
This parameter controls the "shape" of the attack characteristic. With a value of 0, the volume increases linearly during the attack phase - that is to say, increases by equal amounts in equal time intervals. A non-linear attack characteristic may be selected as an alternative, where the volume increases more rapidly at first. The diagram below illustrates this:
RE2: Amplitude Decay Slope
Displayed as: AmpDC51P
Initial value: 127
Range of adjustment: 0 to 127
This parameter applies the same function as Amplitude Attack Slope to the Decay phase of the envelope. With a value of 0, the volume drops linearly from the maximum value to that defined by the Sustain parameter, but setting Decay Slope to a higher value will cause the volume to reduce more rapidly initially. The diagram below illustrates this:
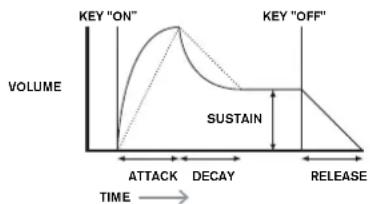
RE3: Amplitude Attack Track
Displayed as: HMPtTk
Initial value:0
Range of adjustment: -64 to +63
This parameter relates a note's attack time to its position on the keyboard. When
Amplitude Attack Track has a positive value, the attack time of a note decreases the higher up the keyboard it is played. Conversely, lower notes have a longer attack time. This aids in simulating the effect of a real stringed instrument (such as a grand piano), where the mass of the strings on the lower notes have a slower response time when struck. When a negative value is applied, the relationships are reversed.
RE4: Amplitude Decay Track
Displayed as: AmpDecTic
Initial value: 0
Range of adjustment: -64 to +63
This parameter works in exactly the same way as Attack Track, except that it is the Decay time of a note that becomes dependent on its position on the keyboard.
RE5: Amplitude Sustain Rate
Displayed as: AmpSusRt
Initial value: Flat
Range of adjustment: -64 to Flat to +63
With this parameter set to Flat, the volume during the Sustain phase of the envelope remains constant. Additional variations to a note's character can be obtained by causing the note to become louder or quieter while the key is hold. A positive value of Sustain Rate will cause the volume to increase during the Sustain phase, and it will continue to do so until maximum level is reached. The parameter controls the rate at which the note increases volume, and the higher the value, the faster the rate of increase. Any Release time set will act as normal when the key is released, whether or not the maximum volume has been reached. If a negative value is set, the volume during the Sustain phase drops, and if the key is not released, the note will eventually become inaudible.


Lower values (positive or negative) of Amplitude Sustain Rate are generally more useful.
RE6: Amplitude Sustain Time
Displayed as: AmpSuaTm
Initial value: 127
Range of adjustment: 0 to 126, KeyOff
This parameter sets the duration of the Sustain phase. With a value of KeyOff, the note will remain audible continuously until the key is released (unless a negative value of Sustain
Rate has been applied to reduce its volume). Any other value of Sustain Time will cut the note off automatically after a pre-determined time if the key is still held down. Release
Time still applies if the key is released sooner. A value of 126 sets the Sustain time to approx. 10 seconds, while values around 60 set it to about 1 second.
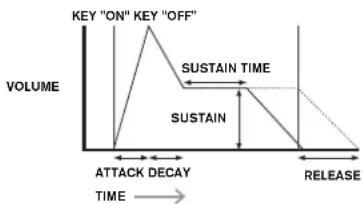
RE7: Amplitude Level Track
Displayed as: AmplvItk
Initial value: 0
Range of adjustment: -64 to +63
This parameter works in a similar way to the other "tracking" parameters Attack Track and
Decay Track (RE3 & RE4), but it is the volume of the note which is changed, according to the interval between it and the Track Note set by RE8. With a positive value, notes higher than the Track Note get progressively louder the further from the Track Note they are, and vice-versa. With a negative value, notes higher than the Track Note get progressively quieter the further from the Track Note they are, and again, vice-versa. Note that this volume modification is applied to all phases of the amplitude envelope equally; it is the overall volume of the note which changes with Level Track. The effect should be used sparingly; low values have a better effect.

Note that although Amplitude Level Track appears to operate in a very similar manner to Amplitude Attack Track and Amplitude Decay Track, only Level Track uses a user-definable note as the reference (set by RE8), above which notes
got louder and below which got softer. The Attack and Decay Track parameters (RE3 and RE4) have a fixed reference note at C 3.
Common Envelope Parameter
This parameter is available on Page 2 of the menu for every Envelope.
RE8: Level Track Reference Note
Displayed as: LVTknte
Initial value: C 3
Range of adjustment: C-2 to G 8
This sets the reference note used for Amplitude Level Track. When active, this parameter increases the volume for notes above the chosen Track Note, and reduces it for notes below it. C 3, the default value, is Middle C on the keyboard; this is the C one octave above the lowest note on the keyboard (also C), providing no OCTAVE buttons [32] are selected.
Envelope 2 (Filter) parameters (Page 1)
| F1UALL | F1UDoc | F1UBus | F1URel | F1UAlloc | F1URept | F1UTrIF8 | F1UTrIF9 |
| 2 | 75 35 45 | 0 9 OFF | Re-Trig | ||||
The parameters available for adjustment with Envelope generator 2 closely match those for Envelope generator 1. Whereas Envelope 1 is concerned with modifications to the sound's amplitude envelope, Envelope 2 gives you "dynamic" filtering, by establishing a relationship between the filter section and ADSR Filter Envelope 2, resulting in the filter frequency being varied by the shape of the envelope.

In order to hear the effect of any of the Filter Envelope parameters, you will first need to go to the Filter Menus and set up some filtering. Then set RE5 on Filter Menu Page 1 (F1Env2 or F2Env2) to an initial value of approx. +30 and ensure that the filter is not fully open - i.e., set F1Freq to mid-range.
RE1: Filter Attack Time
Displayed as: F1tAtt.
Initial value: 2
Range of adjustment: 0 to 127
This parameter sets how the filter section acts during the note's Attack phase. The higher the value, the longer it takes for the filter to react during this phase.

To evaluate the action of the Filter Envelope parameters for each of the ADSR phases (RE1 to RE4), it may be helpful not to set all three to zero.
RE2: Filter Decay Time
Displayed as: F1tDec
Initial value: 75
Range of adjustment: 0 to 127
This parameter sets how the filter section acts during the note's Decay phase. Again, the higher the parameter value, the longer the period for which filtering is applied.
RE3: Filter Sustain Level
Displayed as: F1tSus
Initial value: 35
Range of adjustment: 0 to 127
The frequency of the filter (cut-off or centre, depending on filter type) "settles" at a value set by the Filter Sustain Level. Thus, once the Attack and Decay stages of the envelope are completed, the harmonic content that will be most evident in the sound will be determined by this parameter. Remember that if the filter frequency parameter (as set in the Filter Menu) is set at a too low or too high a value, the envelope's effect will be limited.
RE4: Filter Release Time
Displayed as: F1tRel
Initial value: 45
Range of adjustment: 0 to 127
As Filter Release is increased in value, the note undergoes increasingly more filter action once the key is released.

Note that the Amplitude Release time (in Envelope 1's parameters) must be set sufficiently high to produce an audible "fade-out" before the effect of filtering on the "tail" of the note is evident.
RE5:Filter Velocity
Displayed as: Fittveloc
Initial value: 0
Range of adjustment: -64 to +63
As Amplitude Velocity adds touch sensitivity to volume, so Filter Velocity can be set to make filter action touch sensitive. With positive parameter values, the harder you play the keys, the greater will be the effect of the filter. With Filter Velocity set to zero, the sound's characteristics are the same regardless of how the keys are played. Note that negative values have the inverse effect.
RE6:Filter Repeat
Displayed as: FitRept
Initial value: 0
Range of adjustment: 0 to 126, Infinity
When Filter Repeat is set to a value other than zero, the Attack and Decay phases of the envelope are repeated before the Sustain phase is initiated. This has a similar effect to Amplitude Repeat and use of either both repeat parameters can create some be quite striking sounds.
RE7:Filter Touch Trigger
Displayed as: FlTTTrig
Initial value: Off
Range of adjustment: Off, T1ReTrig to T8ReTrig, T1Trig to T8Trig, T1Enable to T8Enable Unlike Amplitude Touch Trigger, Filter Touch Trigger has three options per touch-sensitive control: Trigger, Re-trigger and Enable. However, as with Amplitude Touch
Trigger, it is necessary to enable theAnimate Touch mode by pressing the TOUCH button [22] in order to use the function.
Re-Trigger - acts in a similar way to Amplitude Re-Trigger, except that it is the filter action which is re-triggered by touching the selected encoder knob. The note plays as normal when the key is pressed, touching the knob re-triggers the entire envelope. Re-Trigger mode is confirmed on Page 1 of theAnimate Touch menu by the letter 'R' in the appropriate position.
Trigger - in this mode, the envelope-triggered filter action is not initiated by pressing a key, and the note will initially sound with no envelope acting on the filter. Touching the knob (while the key is pressed) will trigger the filter envelope. Trigger mode is confirmed on Page 1 of theAnimate Touch menu by the letter T in the appropriate position.
Enable - in this mode, the envelope-triggered filter action is initiated by the keyboard, but only while the knob is being touched. Thus you can very easily flip between the sound with and without the action of the envelope on the filter. Enable mode is confirmed on Page 1 of theAnimate Touch menu by the letter 'E' in the appropriate position.
RE8:Filter Multi-trigger
Displayed as: FItMTrig
Initial value: Re-Trig
Range of adjustment: Legato or Re-Trig
This operates in a very similar way to Amplitude Multi-trigger. When set to Re-Trigger, each note played will trigger its full ADSR envelope, even if other keys are held down.
With the envelope applied to the filter section, this means that the effect of any envelope-triggered filtering will be heard on every note. When set to Legato, only the first key to be pressed will produce a note with the full envelope and thus produce any filtering effect. All subsequent notes will lack any dynamic filtering. Remember that for the Legato mode to be operative, mono voicing must be selected - it will not work with polyphonic voicing. See page 18.

See page 20for more details about Logato style.
Envelope 2 (Filter) parameters (Page 2)
FITHSLIF FITOSLIF FitHtK FitDecTk FitSusRT FitSusTm FitLvlk LvYKHe 0127 0012 003
RE1: Filter Attack Slope
Displayed as: FItAt.S1P
Initial value: 0
Range of adjustment: 0 to 127
This parameter controls the "shape" of the attack characteristic as applied to the filters. With a value of 0, any filtering effect applied to the Attack phase increases linearly - that is to say, increases by equal amounts in equal time intervals. A non-linear attack characteristic may be selected as an alternative, where the filter effect increases more rapidly at first.
RE2: Filter Decay Slope
Displayed as: F1tDcS1P
Initial value: 127
Range of adjustment: 0 to 127
This corresponds to Filter Attack Slope in the same manner that Amplitude Decay
Slope corresponds to Amplitude Attack Slope. Thus the linearity of the reaction of the filter section during the Decay phase of the envelope can be varied, from linear to a more exponential slope, where any filter effect is more pronounced during the first part of the Decay phase.
RE3:Filter Attack Track
Displayed as: F1tAttTk
Initial value: 0
Range of adjustment: -64 to +63
Like Amplitude Attack Track, this parameter relates a note's attack time to its position on the keyboard. When Filter Attack Track has a positive value, the filtering effect during the Attack phase of a note is shortened as you go up the keyboard. Conversely, lower notes have their attack time increased. When a negative value is applied, the relationships are reversed.
RE4: Filter Decay Track
Displayed as: F1tDecTk
Initial value: 0
Range of adjustment: -64 to +63
This parameter works in exactly the same way as Attack Track, except that it is the filter effect during the Decay phase of a note that becomes dependent on its keyboard position.
RE5: Filter Sustain Rate
Displayed as: F1tSusRt
Initial value: Flat
Range of adjustment: -64 to Flat to +63
With a value of Flat, filter frequency remains constant during the Sustain phase of the note. If Filter Sustain Rate is given a positive value, the filter frequency continues to increase during the Sustain phase, thus the character of the note continues altering audibly for longer. With low values of Filter Sustain Rate, the change is slow, and increases in rapidity as the value is increased. With negative values, the filter frequency decreases during the Sustain phase. See page 21 for an illustration.
RE6: Filter Sustain Time
Displayed as: F1tSuS Tm
Initial value: 127
Range of adjustment: 0 to 126, Keyoff
This parameter also applies to the Sustain phase, and sets how long any envelope-triggered filtering remains active. When set to Keyoff, the filtering remains applied continuously until the key is released. Any lower value of Sustain Time will cause the filtering effect to suddenly stop before the note ends, and you will be left with release phase of the envelope. This does, of course, only occur if the Amplitude Sustain Time is longer than the Filter Sustain Time, otherwise the note will stop sounding altogether before the filter has cut off.
RE7:Filter Level Track
Displayed as: F1tLv1Tk
Initial value: 0
Range of adjustment: -64 to +63
This parameter works in a similar way to the other "tracking" parameters, but it is the depth with which the envelope is applied to the filter which alters, in relation to the interval between the note played and the Track Note set by RE8. With a positive value, the envelope-triggered filtering effect becomes progressively more pronounced for notes higher than the Track Note the further from the Track Note they are, and vice-versa. With a negative value, notes higher than the Track Note undergo progressively less filtering the further from the Track Note they are, and again, vice-versa.
Common Envelope Parameter
See page 21. The Track Reference Note parameter is available at RE8 on Page 2 of the menu for every Envelope.
ESHT 83Doc ES2sue E5Rel E5elay ESRepeat E3Tr19 E3Tr19
Envelopes 3 to 6 parameters (Page 1)
In addition to dedicated Amplitude and Filter envelopes, the UltraNova is equipped with four further assignable envelopes, Envelopes 3 to 6. Control of these can be selected with the SELECT button [10]. These envelopes have virtually the same set of parameters as the
Amplitude and Filter envelopes, but they can be assigned at will to control many other synth functions, including most oscillator parameters, filters, EO and panning among others. The assignment of Envelopes 3 to 6 to other synth parameters is performed in the Modulation Menu (see page 25 for full details). In order to audition their effects, you must first open the Modulation Menu and set Modulation Patch 1's Source to Env3 and the Destination to a parameter of your choice (e.g. Global Oscillator Pitch - 0123Pitch).
The arrangement of parameters for Envelopes 3 to 6 is identical, and the arrangement closely follows that of Envelopes 1 and 2 (Amplitude and Filters). Although denoted as Envelope 3, the parameter summaries below apply equally to Envelopes 3, 4, 5 & 6, so are not repeated.
The actual function of Envelopes 3 to 6 will obviously depend on what they are routed to control in the Modulation Menu. However, the derivation of the envelope parameters themselves follow those already described for the Amplitude and Filter envelopes, with the exception of the Delay parameter (Page 1, RE5), whose function is described below.
RE1: Envelope 3 Attack Time
Displayed as: EATt
Initial value: 10
Range of adjustment: 0 to 127
RE2:Envelope 3 Decay Time
Displayed as: E3Dec
Initial value: 70
Range of adjustment: 0 to 127
RE3:Envelope 3 Sustain Level
Displayed as: EUSUS
Initial value: 64
Range of adjustment: 0 to 127
RE4:Envelope 3 Release Time
Displayed as: E3Re1
Initial value: 40
Range of adjustment: 0 to 127
RE5:Envelope 3 Delay
Displayed as: E50e1ay
Initial value: 0
Range of adjustment: 0 to 127
This parameter delays the start of the entire envelope. When a key is pressed, its notes sounds normally, with Envelopes 1 and 2 acting as they are programmed. But any further modulation effects triggered by Envelopes 3 to 6 will be delayed by a time set by the Delay parameter. The maximum value of 127 represents a delay of 10 seconds, while a value of about 60 70 represents a delay of approximately 1 second.
RE6:Envelope 3 Repeat
Displayed as: E3Repeat
Initial value: 0
Range of adjustment: 0 to 127
RE7: Envelope 3 Touch Trigger
Displayed as: E3TTri9
Initial value: Off
Range of adjustment: Off, T1ReTrig to T8ReTrig, T1Trig to T8Trig, T1Enable to T8Enable
RE8:Envelope 3 Multi-trigger
Displayed as: E3MTri9
Initial value: Re-Trig
Range of adjustment: Legato or Re-Trig
Envelope 3 parameters (Page 2)
ESHTSLP E80CSLP E8HTK ESDectE3SSusRat ESSusTIN E5L10K LULTKne 0127 000127 0C3
RE1: Envelope 3 Attack Slope
Displayed as: E3At51P
Initial value: 0
Range of adjustment: 0 to 127
RE2:Envelope 3 Decay Slope
Displayed as: E3DcS1P
Initial value: 0
Range of adjustment: 0 to 127
RE3: Envelope 3 Attack Track
Displayed as: E3RtTk
Initial value: 0
Range of adjustment: -64 to +63
RE4: Envelope 3 Decay Track
Displayed as: E3DecTk
Initial value: 0
Range of adjustment: -64 to +63
RE5:Envelope 3 Sustain Rate
Displayed as: E3SusRat
Initial value: 0
Range of adjustment: -64 to +63
RE6:Envelope 3 Sustain Time
Displayed as: ESSusTim
Initial value: 127
Range of adjustment: 0 to 127
RE7:Envelope 3 Level Track
Displayed as: E3Lv1Tk
Initial value: 0
Range of adjustment: -64 to +63
Common Envelope Parameter
See page 21. The Track Reference Note parameter is available at RE8 on Page 2 of the menu for every Envelope.
LFOs
The UltraNova has three separate Low Frequency Oscillators (LFOs). These are designated LFO1, 2 and 3, are identical in terms of features, and can be used freely to modify many other synth parameters, such as oscillator pitch or level, filters, panning, etc.
The assignment of LFOs 1 to 3 to other synth parameters is performed in the Modulation Menu (see page 25 for full details). In order to audition their effects, you should first open the Modulation Menu and set Modulation Patch 1's Source to Lfo1+/- or Lfo1* and the Destination to a parameter of your choice. Note also that the Depth control on this menu
(RES) determines the amount of LFO modulation applied to the Destination parameter, and increasing this value will have a different effect depending on what the Destination parameter is, but can generally be taken to mean "more effect". The interpretation of negative values of Depth will also depend on the chosen Destination parameter.
The LFO section has its own set of three LEDs, one per LFO. These monitor the output of each LFO to provide a convenient visual reference as to their frequency, waveform and phase.
Pressing the LFO button [16] opens the LFO Menu, which has two pages for each LFO. One of the SELECT buttons and one of the PAGE buttons will be illuminated, indicating that more than one LFO is available to be controlled and that further menu pages are available. A total of 12 parameters per LFO is displayed for adjustment, eight on Page 1 and four on Page 2. Because the three LFOs' parameters are identical, only the functions of LFO1 are described.
- Selecting Lfo1+ as the source makes the LFO vary the controlled parameter in a positive sense (i.e. increasing) only. Selecting it as Lfo1+/- varies it in both a positive and a negative sense. These options, and others related to them, are discussed in greater detail at page 25.
LFO 1 parameters (Page 1)
LIkate LIkSync LlWave LIphase LIStey LIksync LlComm LlOmeSht 68 Off Sine 0 Off Off
RE1: LFO 1 Rate
Displayed as: L1Rate
Initial value: 68
Range of adjustment: 0 to 127
Rate is the oscillator's frequency. A value of 0 disables the LFO, and most musical effects
are likely to use values in the 40-70 range, though higher or lower values may be appropriate for certain sound effects.

When the LFO Rate is set to zero, the LFO is "stopped", but will still apply an offset to the parameter it is modulating of a magnitude dependent on where it stopped in its cycle.
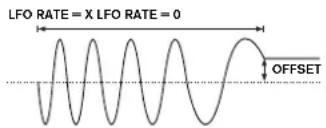
RE2: LFO 1 Rate Sync
Displayed as: LRSync
Initial value: Off
Range of adjustment: See table at page 40.
This control allows the frequency of the LFO to be synchronised to an internal/external MIDI clock. When set to Off, the LFOs run at a frequency set by the Rate parameter
(RE1). At all other settings RE1 becomes inoperative, and the LFO rate is determined by
Rate Sync, which in turn is derived from the MIDl clock. When using internal MIDl clock, the rate can be set in the Arp Edit Menu with RE8.
RE3:LFO1 Waveform
Displayed as: L1Wave
Initial value: Sine
Range of adjustment: see table at page 41.
The UltraNova's LFOs are able to generate not only the familiar sine, sawtooth, triangle and square waveforms for modulation purposes, but are also able to produce a wide range of preset sequences of various lengths and random waveforms. A common use of an LFO is to modulate the main oscillator(s), and with many of the sequenced waveforms, setting the
Depth parameter in the Modulation Menu to either 30 or 36 (see table) will ensure that the resulting oscillator pitches will be musically associated in some way.
RE4:LFO1 Phase
Displayed as: LiPhase
Initial value: 0
Range of adjustment: 0deg to 357deg
This control is only active if L1KSync (RE6) is set On. It determines the start point of the LFO waveform when the key is pressed. A complete waveform has 360^ , and the control's increments are in 3^ steps. Thus a half-way setting (180deg) will cause the modulating waveform to start at half-way through its cycle.
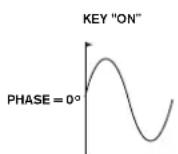
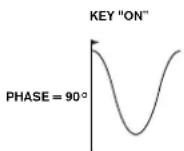
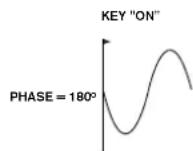
RE5:LFO1Slew
Displayed as: LiSlew
Initial value: Off
Range of adjustment: Off, 1 to 127
Slew has the effect of modifying the shape of the LFO waveform. Sharp edges become less sharp as Slew is increased. The effect of this can be easily observed by selecting
Square as the LFO waveform and setting the rate fairly low so that the output when a key is pressed alternates between just two tones. Increasing the value of Slow will cause the transition between the two tones to become a "glide" rather than a sharp change. This is caused by the vertical edges of the square LFO waveform being slewed.

Note that Slew has an effect on all LFO waveforms, including sine. The effect of LFO Slew differs somewhat with different LFO waveforms. As Slew is increased, the time taken to reach maximum amplitude is increased, and can ultimately result in it never being achieved at all, though the setting at which this point is reached will vary with waveform.
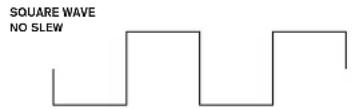
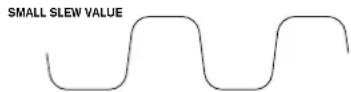
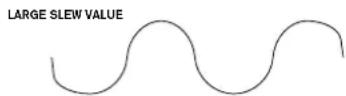
RE6: LFO 1 Key Sync On/Off
Displayed as: L1K5ync
Initial value: Off
Range of adjustment: On or Off
Each LFO is runs continuously, 'in the background'. If the Key Sync setting is Off, there is no way of predicting where the waveform will be when a key is pressed. Consecutive presses of a key will inevitably produce varying results. Setting Key Sync to On re-starts the LFO at the same point on the waveform every time a key is pressed. The actual point is set by the Phase parameter (RE3).
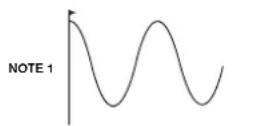
Key Sync OFF Key Sync ON
KEY"ON"
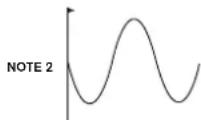
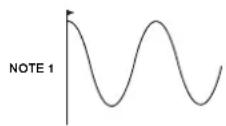
KEY"ON"

RE7: LFO 1 Common Sync
Displayed as: LiComm
Initial value: Off
Range of adjustment: On or Off
Common Sync is only applicable to polyphonic voices. It ensures that the phase of the LFO waveform is synchronised for every note being played. When to set Off, there is no such synchronisation, and playing a second note while one is already pressed will result in an unsynchronised sound as the modulations will be out of time.
Common Sync OFF Common Sync OFF
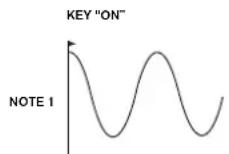
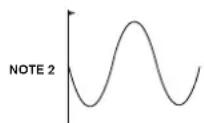
KEY"ON"
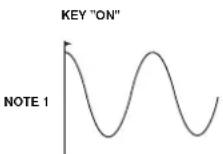
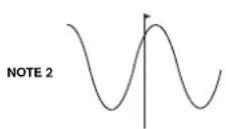
KEY"ON"

Set LFO Common Sync to On for an emulation of early analogue polyphonic synths.
RE8:LFO1One-Shot
Displayed as: L1OneSht
Initial value: Off
Range of adjustment: On or Off
As its name suggests, setting this parameter to On causes the LFO to generate just a single cycle of its waveform. Note that a full waveform cycle is always generated regardless of the setting of LFO Phase; if LFO Phase is set to 90, the one-shot waveform will start at the 90 point, execute a full cycle, and end at 90.
LFO 1 parameters (Page 2)
ESRSEIP ESDSCIP ESHTikk ESDecik ESSusKat ESSusTim ESLUTK LOLTkNTe 0127 00127 003
RE1:LFO1Delay
Displayed as: Li#eLiay
Initial value: 0
Range of adjustment: 0 to 127
LFO Delay is a time parameter whose function is determined by L1InOut (RE3).
RE2:LFO1DelaySync
Displayed as: L10Sync
Initial value: Off
Range of adjustment: See table at page 40.
When this parameter is set to Off, the LFO delay is controlled by the Delay parameter
(RE1). At all other settings RE1 becomes inoperative, and the LFO delay is derived from
the internal/external MIDI clock.
RE3: LFO 1 Fade In/Fade Out
Displayed as: Li InOut
Initial value: Fadeln
Range of adjustment: Fadeln, FadeOut, GateIn, GateOut
The function of the four possible settings of Intro are as follows:
Fadelin - the LFO's modulation is gradually increased over the time period set by the Delay parameter (RE1).
Gateln - the onset of the LFO's modulation is delayed by the time period set by the LFO
Delay parameter, and then starts immediately at full level.
FadeOut - the LFO's modulation is gradually decreased over the time period set by the Delay parameter (RE1), leaving the note with no LFO modulation.
GateOut - the note is fully modulated by the LFO for the time period set by the Delay parameter (RE1). At this time, the modulation stops abruptly.
RE4:LFO1 Delay Trigger
Displayed as: LiTrig
Initial value: Legato
Range of adjustment: Logato or Re-Trig
This parameter works in conjunction with the Fade In/Fade Out function set by RE3. In
Re-Trig mode, every note played has its own delay time, as set by the Delay parameter (or MIDI clock if L1Dsync is active). In Legato mode, it is only the first note of a legato-style passage which determines the Delay time - i.e. second and subsequent notes do not re-trigger the Delay function. For the Legato setting of Delay Trigger to be operative, mono voicing must be selected - it will not work with polyphonic voicing. See page 18.

See page 21 for more details about Legato style.
RE5-RE8: Not used
THE MODULATION MATRIX
The heart of a versatile synthesizer lies in the ability to interconnect the various controllers, sound generators and processing blocks such that one is controlling - or "modulating"- another, in as many ways as possible. UltraNova provides tremendous flexibility of control routing, and there is a dedicated menu for this, the Modulation Menu.

Pressing the MODULATION button [17] opens the Modulation Menu, which is a single page. The menu may be visualised as a system for connecting controlling sources to a specific area of the synth. Each such connection assignment is termed a 'slot', and there are 20 such slots, accessed by RE1 (see below). Each slot defines how one or two control sources are routed to a controlled parameter. The routing possibilities available in each of the 20 slots are identical, and the control description below is applicable to all of them.

The Modulation Matrix is both variable and additive. What do we mean by a 'variable' and 'additive' matrix?
By 'variable', we mean that it is not just the routing of a controlling source to a controlled parameter which is defined in each slot, but also the "magnitude" of the control. Thus the 'amount' of control - or control 'range' - used is up to you.
By 'additive' we mean that a parameter may be varied by more than one source, if wished. Each slot allows for two sources to be routed to a parameter, and their effects are multiplied together. This means that if either of them is at zero, there will be no modulation. However, there is no reason why you can't have further slots routing these or other sources to the same parameter. In this case, the control signals from different slots "add" to produce the overall effect.
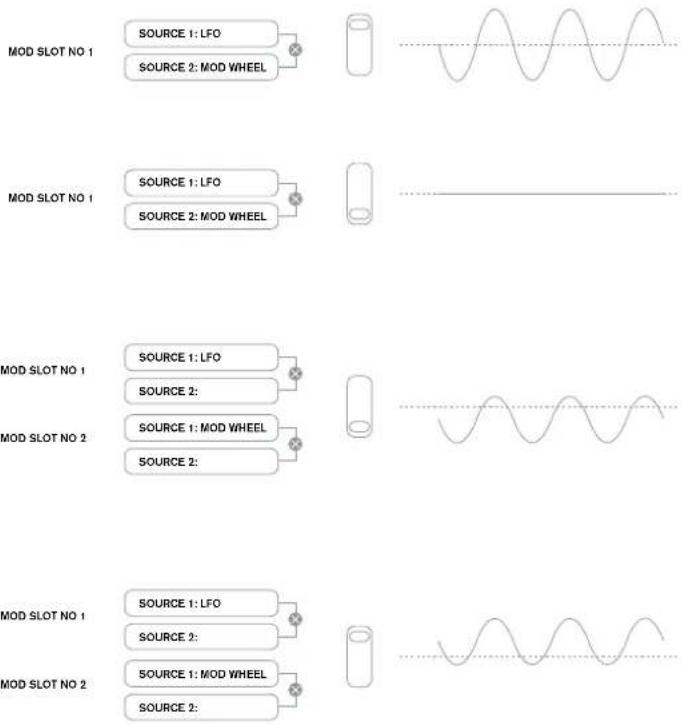
Mod Wheel Position

You need to be careful when setting up patches like this to ensure that the combined effect of all the controllers acting simultaneously still creates the sound that you want.
In addition, the Modulation Menu lets you assign the touch-sensitive knobs on any of the eight rotary encoders as additional controllers, so as long as theAnimate Touch mode is enabled (see page 26).
Modulation Matrix Menu
Number Source1 Source2 TouchSel Destin Depth 1 Direct Direct Off 0125Pth @
RE1: Patch number
Displayed as: Number
Initial value: 1
Range of adjustment: 1 to 20
The Modulation Matrix has 20 'slots', each defining a routing assignment of one (or two) sources to a destination. All the patches have the same selection of sources and destinations and any or all can be used. The same source can control multiple destinations, and one destination can be controlled by multiple sources.
RE2: Source 1
Displayed as: Source1
Initial value: Direct
Range of adjustment: see table at page 41
This selects a control source (modulator), which will be routed to the destination set by
RE5. Setting both RE2 and RE3 to Direct means no modulation is defined.
RE3: Source 2
Displayed as: Source2
Initial value: Direct
Range of adjustment: see table at 41
This selects a second control source for the chosen destination. If only one source per patch is being used, set RE3 to Direct.
RE4: Touch controller enable
Displayed as: TouchSel
Initial value: Off
Range of adjustment: Off, Touch1 to Touch8
The touch-sensitive knobs of the eight rotary encoders can be programmed as touch controllers, initiating a change to a parameter value (defined by Destination - RE5) when touched. Note that Animate Touch mode must be enabled for the touch controllers to be active. TheAnimate Touch menu will confirm that a controller has been assigned by the appropriate M number being something other than zero. See next chapter for more details regarding using the touch controllers. Note that when both a touch controller and other sources (Source1 and/or Source 2) are assigned in the same slot, the touch controller acts as a switch for the other sources, whose effect will only be heard when the touch control is activated.

Note that the Touch controls can also be directly assigned to re-trigger/trigger the envelopes via the Envelope Menus (RE7 on Page 2 of each Menu)
RE5: Destination
Displayed as: Destin
Initial value: 0123Pch
Range of adjustment: see table at page 42
This sets which UltraNova parameter is to be controlled by the selected source (or sources) in the current patch. The range of possibilities comprises:
Parameters that directly affect the sound:
all oscillator pitch (0123Ptch)
- four parameters per oscillator
the six mixer inputs from the oscillators, noise source and ring modulators
per-filter distortion amount, frequency and resonance, plus filter bar
Parameters that can also act as modulating sources (thus permitting recursive modulation): LFO 1 to 3 rate
- the Decay phases of Envelope 1 (amplitude) and Envelope 2 (Filter)
RE6:Depth
Displayed as: Depth
Initial value: 0
Range of adjustment: -63 to +84
The Depth control sets the level of the control being applied to the Destination - i.e., the parameter being modulated. If both Source 1 and Source 2 are active in the slot in question, Depth controls their combined effect.

Depth effectively defines the "amount" by which the controlled parameter varies when under modulation control. Think of it as the "range" of control. It also do
termines the "sense" or polarity of the control - positive Depth will increase the
value of the controlled parameter and negative Depth will decrease it, for the same control input. Note that having defined source and destination in a patch, no modulation will occur until the Depth control is set to something other than zero.

With both sources set to Direct and TouchSel set to Off, the Depth control becomes a "manual" modulation control which will always affect whichever parameter is set as the Destination.
RE7-RE8: Not used
CONTROL SECTION
TheAnimate controls
The Touch Controls
As already mentioned in preceding sections of the manual, the UltraNova's eight rotary encoders are fitted with conductive rubber knobs, making them touch-sensitive. You can program them to trigger a change in a parameter, and use them in performance to produce changes in your sound, or effects which may be either subtle or dramatic.
What each Touch Control actually does is programmed in the Envelope and/or Modulation Menus, and the options available for parameter control by touch are discussed in the relevant manual sections (see pages 20 and 25). However, the touch controls are only active when Touch Mode has been enabled by pressing the TOUCH button [22].
$$ \begin{array}{c c c c c c c c c} H 1 2 3 4 5 8 & H 1 2 3 4 5 6 & H 1 2 3 4 5 6 & H 1 2 3 4 5 6 & H 2 2 3 4 5 6 & H 1 2 3 4 5 6 & H 1 2 3 4 5 6 \ \hline \text {0} & \text {0} & \text {0} & \text {0} & \text {0} & \text {0} & \text {0} \ \hline \text {0} & \text {0} & \text {0} & \text {0} & \text {0} & \text {0} & \text {0} \ \hline \end{array} $$
Unlike the other UltraNova menus, the Touch Menu does not provide any parameter adjustment, it merely confirms the touch control assignments that have been made in other menus.
While the upper row of the display remains constant, the lower row provides two items of information:
If Touch Controls have been assigned to trigger modulations set up in the Modulation Matrix, the number of modulation assignments appears under the letter 'M'. The value displayed represents how many individual modulation slots have been set to be triggered by each touch control. The use of Touch Controls with the Modulation Matrix is described in full detail on this page.
If a Touch Control has been assigned to one of the envelopes, an 'R', 'T' or 'E' appears below one of the digits 1 to 6, the number corresponding to the Envelope number. The use of Touch Controls with Envelopes is described in full detail at page 20.
Thus if Touch Control 1 has been assigned to re-trigger Envelope 1 (Amplitude) and Touch Control 2 to trigger Envelope 2 (Filters), the display looks like this:
$$ \begin{array}{c c c c c c c c c c c} M & 1 2 3 4 5 6 & M & 1 2 3 4 5 6 & M & 1 2 3 4 5 6 & M & 1 2 3 4 5 6 & M & 1 2 3 4 5 6 & M & 1 2 3 4 5 6 \ 0 & B & 0 & T & 0 & 0 & 0 & 0 & 0 & 0 & 0 \end{array} $$
If two further assignments of parameters to a Touch Control have been made in the Modulation Matrix, a '2' will show below the 'M':
$$ \begin{array}{c c c c c c c c c} H & 1 2 4 5 6 & H & 1 2 4 5 6 & M & 1 2 4 5 6 & H & 1 2 4 5 6 & M & 1 2 4 5 6 \ 0 & R & G & T & 2 & 0 & 0 & 0 & 0 & 0 \end{array} $$
Note that with Envelope 1 (Amplitude), re-triggering () of the envelope is the only option available. Envelopes 2 to 5 permit a choice of re-triggering () , triggering (T) or enable (E) functions.
Tweak Controls
While playing live, it is often desirable to manually adjust some aspect or other of the sound – i.e., "tweak" a particular parameter. Although the UltraNova's design allows access to most parameters with a minimum of button presses, an even more elegant solution is to arrange for the main parameters that you may need to tweak to all be available simultaneously, regardless in which menu they are normally found. You will find that all the factory Patches have some Tweak Controls assigned to them already, but you can change their function or add others if you wish.
The eight rotary encoders can act as Tweak Controls, and any of 127 parameters may be assigned to them, in any order. Furthermore, Tweak assignments and settings are saved along with any other parameter changes, so are always there once you have set them up and re-saved the Patch. Note that saving Patches to certain categories will automatically add some Tweak Control assignments for you. But if you have made your own Tweak Control assignments as part of your Patch creation, these will take priority.
The Tweak Controls are activated by pressing the TWEAK button [22], which opens the Tweak Menu. The menu has two pages: Page 2 is used for setting up the Tweak controls, while Page 1 is used during performance and displays the parameter name and value assigned to each rotary encoder.
Tweak Menu Page 2:
Tweak1 Tweak2 Tweak3 Tweak4 Tweak5 Tweak6 Tweak7 Tweak8 0x1Cisc1s Osc2Cents FIFreq FIRes FIDec LiRate FXIANT FX2Rent
Each encoder may have any of the available parameters (see list at page 42) assigned to it for adjustment. Any Tweak Control assignments which form part of a fcatory Patch will be displayed.
Tweak Menu Page 1:
| 05c1Cents | 05c2Cents | F1Free | F1Res | F1Doc | L1Rate | FX1Rent | FX2Rent |
| +25 | -25 | 13 | 45 | 76 | 4 | 64 | 4 |
When a parameter is been assigned to a rotary encoder - either as part of the Patch or via manual assignment - the upper row shows the parameter name and the lower row the parameter value, just as they are displayed in their "native" menu.
Note that Tweak and Touch modes are mutually exclusive - the encoders cannot be assigned to both functions simultaneously, either globally or individually.
Touched/Filter Knob
The large TOUCHED/FILTER knob [9] is a further very useful control in live performance, particularly if TOUCH or TWEAK functions are being used. It is used in conjunction with the adjacent buttons FILTER and LOCK [8].
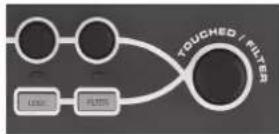
The knob's function is to mimic that of the last-touched rotary encoder (this includes Tweak mode). This continues to apply even when the currently-open menu or menu page is changed. Thus if you have the Mix Menu open, and are using RE6 to vary Noise Level, you will find that you can also vary Noise Level with the Touched/Filter knob. But if you change to the Filter Menu, the Touched/Filter knob will assume control of Filter 1 Distortion Amount (assuming the Filter Menu opens at Page 1) without any of the rotary encoders being touched, because it remains assigned to mimic RE6. Think of Touched/Filter as a "copy" of the last-touched rotary encoder when you are in parameter adjustment mode, using the menus as normal.
If you are using either Tweak or Touch modes, then the rotary encoders are no longer available to control any sound parameters in the 'normal' way, but you can still control the last parameter adjusted with the Touched/Filter knob. This functionality is always available, as long as both FILTER and LOCK functions [8] are not enabled.
The Filter button
The parameter most often needed for dynamic adjustment is probably Filter 1 frequency, and pressing the FILTER button [8] assigns control of this single parameter to the Touched/Filter knob (hence its name!). Thus whatever else is going on, you can always have control of your main filter frequency.

The TOUCHED/FILTER knob's function may be given control of Filter 1's cut-off frequency permanently, if wished. This can be set up on Page 1 of the Global Menu with RE6. See page 37 for more details.
The Lock button
As described above, the function of the TOUCHED/FILTER knob will change with the currently-selected menu, because the knob mimics a physical encoder rather than the parameter the encoder is currently controlling. If LOCK is active, the parameter currently being adjusted, and not the physical encoder, is assigned to the knob. Thus if there is a parameter you want access to continuously, while perhaps retaining access to other parameters in other menus, using LOCK will fix control of that parameter to the TOUCHED/
FILTER knob and it will remain so until LOCK is deselected.

Note that some factory Patches include activation of the LOCK button; this will be indicated by the button being illuminated. This will mean that a parameter is already assigned to the TOUCHED/FILTER knob. Try adjusting it to see what happens!
THE ARPEGGIATOR
The UltraNova has a powerful Arpeggiator feature which allows arpeggios of varying complexity and rhythm to be played. If a single key is pressed, the note will be retriggered by the Arpeggior. If you play a chord, the Arpeggior idertifies its notes and plays them individually in sequence (this is termed an arpeggio pattern or "arp sequence"); thus if you play a C major triad, the selected notes will be C, E and G.
Arpeggiator operation in the UltraNova is controlled by the three ARP buttons [20], ON, SETTINGS and LATCH. The ON button enables or disables the Arpeggiator, while the LATCH button plays the currently selected arp sequence repeatedly without the keys being held. LATCH can also be pressed before the Arpeggiator is enabled. When the Arpeggior is enabled, the UltraNova will immediately play the arp sequence defined by the last set of notes played, and will do so indefinitely.
Editing of all Arpeggiatior functions is carried out in the Arpeggiator Menu, which is opened by pressing the SETTINGS button.
| ArrSunc | ArrMode | ArrPatt | ArrTime | ArrOctve | ArrKsunc | ArrUei | ClockPER |
| 10th | Up | 1 | 64 | Off | Off | 120 |
RE1: Arpeggiator Rate Sync
Displayed as: HPrSync
Initial value: 16th
Range of adjustment: see table at page 40
This parameter effectively determines the beat of the arp sequence, based on the tempo rate set by RE8.
Range of adjustment: see table at page 44
When enabled, the Arpeggiator will play all notes held down in a sequence which is determined by the ArpMode parameter. The third column of the table describes the nature of the sequence in each case.
RE3: Arpeggiator Pattern
Displayed as: AirPatt.
Initial value: 1
Range of adjustment: 1 to 33
As well as being able to set the basic timing and mode of the arp sequence (with RE1 and RE2), you can also introduce further rhythmic variations with the Arpeggiator Pattern parameter.

You should spend some time experimenting with different combinations of Arp Mode and Arp Pattern. Some patterns work better in certain Modes.
RE4: Arpeggiator Gate Time
Displayed as: ArPGTime
Initial value: 64
Range of adjustment: 1 to 127
This parameter sets the basic duration of the notes played by the Arpeggiator (though this will be further amended by both the ArpPatt and ArpSync settings). The lower the parameter value, the shorter the duration of the note played. At its maximum value, one note in the sequence is immediately followed by the next without a gap. At the default value of 64, the note duration is exactly half the beat interval (as set by RE8 Tempo Clock), and each note is followed by a rest of equal length.
RE5: Arpeggiator Octaves
Displayed as: App Octue
Initial value: 1
Range of adjustment: 1 to 8
This setting adds upper octaves to the arp sequence. If ArpOctve is set to 2, the sequence is played as normal, then immediately played again an octave higher. Higher values of ArpOctve extend this process by adding additional higher octaves. ArpOctve values greater than 1 have the effect of doubling, tripling, etc., the length of the sequence. The additional notes added duplicate the complete original sequence, but octave-shifted. Thus a four-note sequence played with ArpOctve set to 1, will consist of eight notes when ArpOctve is set to 2.
RE6:Arpeggiator Key Sync
Displayed as: AHPKSunc
Initial value: Off
Range of adjustment: Off or On
Arpeggiator Key Sync determines how the sequence behaves when an extra note is played.
When Off, the new note is simply added to the sequence at the appropriate point. When On, the sequence restarts every time a new note is played. Note that ArpKSync only applies if LATCH [20] is On.
RE7:Arpeggiator Velocity
Displayed as: ArpVel
Initial value: Off
Range of adjustment: Off or On
When set to On, the note velocities used for each note in the arp sequence will be those pre-programmed with the pattern. When set to Off, the velocities of the notes as you play them are used by the Arpeggiator. This lets you include dynamics in the Arpeggiator sequence.

For Arpeggiator Velocity to work, you need to set AmpVeloc (RE5 in Envelope 1)
Menu Page 1) to a value greater than 0, otherwise there will be no variation in dynamics.

Try assigning Velocity to other parameters in the Modulation Matrix for some interesting results.
RE8:Tempo clock
Displayed as: Clock BPM
Initial value: 120
Range of adjustment: 40 to 250
This parameter sets the tempo in BPM (Beats Per Minute) on which the arp sequence is based, when using its internal clock. It also defines the Tempo for all synchronised aspects of the Patch, thus its setting will be used by the various Sync parameters in the FX and Sync Menus.
IMPORTANT - If the UltraNova is set to receive an external MIDI clock, the ClockBPM setting will be ignored. Note also that the displayed value for ClockBPM will remain at its last 'internal' value if external sync is selected. See page 38 for more details about external sync.
THE CHORDER
The UltraNova's Chorder is a very useful feature which permits you to play chords containing up to ten notes by pressing a single key. The resulting chord uses the lowest note played as its bass; all the other notes in the chord will be above the bass.
The two top panel CHORD buttons control the Chorder [21]; ON simply enables or disables the Chorder function, EDIT opens the Chord Edit Menu.
| TRANSPose | 2007 | BASS | 11 | 12 | 13 | 14 | 15 | 16 | 17 | 18 | 19 |
| 0 | START | ACCEPT | - | - | - | - | - | - | - | - | - |
Programming the chord:
With the Chord Edit Menu open, press the VIEW button [7], (indicated by START on the display). Its LED will be flashing, but this will go off when the button is pressed, and the LED in the adjacent USER button (indicated by ACCEPT in the display) will flash instead.
Now play the chord you want to program; you can play it in any key or inversion you wish. The Chorder will identify the keys being pressed and indicate them in the lower row of the display, with the lowest note of the chord always showing as a 0. The semitone intervals of the other notes in the chord will be shown counting from the left. Thus if you play a flattened seventh chord, the display will show:
| Transposon | ** | Bass | I1 | I2 | I3 | I4 | I5 | I6 | I7 | I8 | I9 | |
| θ | START | ACCEPT | θ | 4 | 7 | 10 | - | - | - | - | - | - |
Now press the USER key to accept your selection. The chord function can now be enabled by pressing the ON button. You will find that pressing any key on the keyboard now plays a flattened seventh chord, with the key pressed forming the lowest note of the chord.
Be aware that the semitone intervals displayed are those from the whole twelve-tone scale, not those from the eight-note tonic sol-fa usually used to describe the notes comprising a chord – thus the major third in the example above appears as '4' because it is four semitones above the root, the natural fifth as '7' because it is 7 semitones above, and so on.

Note that the Arpeggiator precedes the Chorder within the UltraNova's synth engine. This has the consequence that if both the Arpeggiator and Chorder are in use, the entire chord resulting from each key press will be arpeggiated.
RE1: Transposition control
Displayed as:Transpose
Initial value: 0
Range of adjustment: -11 to +11
The transposition control is calibrated in semitone intervals, and the pitch of the chord can be shifted up to 11 semitones, either up or down.
RE2 to RE8: Not used.
EFFECTS (FX)
The UltraNova comes equipped with a comprehensive set of DSP-based effects processors, which can be applied to both the synth sound and any audio applied to the UltraNova's audio inputs.
The FX section comprises five processing "slots", each of which may be "loaded" with an FX processor from a pool of devices that includes panning, equalisation, compression, delay, chorus, distortion, reverb and Gator effects. In addition to the slots, controls are also provided for global FX parameters like panning, FX level, FX feedback, etc.
The FX Menus are opened with the EFFECT button [18]. Either three or four menu pages are available, depending whether any slots have been loaded with FX devices. The first three pages provide controls for panning, FX levels, FX device selection and device routing, and are constant. The fourth page is the control page for the processing slot currently selected by the SELECT buttons [10], so if multiple slots are in use, then additional menu pages can be accessed by using the SELECT buttons.
FX Menu Page 1 - Panning
RE1: not used.
FEN
PanRosan PanKate PanSycn PanUerth 0 48 Off 0
RE2 Pan control
Displayed as: PanPosn
Initial value: 0
Range of adjustment: -64 to +63
This is the main manual pan control and positions the dry (pre-FX) synth sound/Input audio in the stereo image between outputs 1 and 2, and also between outputs 3 and 4, if they are in use. Negative values of PanPosn move the sound to the left and positive values to the right. Note that some FX (e.g. reverb, chorus) are inherently stereo, and these are added post-panning. Thus if you are using a sound that uses FX such as these, PanPosn will appear to not entirely localise the sound fully left or right at its extreme settings.
RE3: Pan Rate
Displayed as: PanRate
Initial value: 40
Range of adjustment: 0 to 127
Automatic panning is also possible, and the Pan section has a dedicated sinowave LFO which controls this. The PanRate parameter controls the LFO frequency, and thus how rapidly the sound moves between left and right and back again. With a value of 40, the sound takes approx. 3 seconds to complete a full cycle, and the range of control allows extremely slow or extremely fast panning.

For the most effective results with Pan Rate, ensure that PanPosn is set 0 (i.e. centre panning)
RE4: Pan Rate Sync
Displayed as: PanSync Initial value: Off
Range of adjustment: see table at page 40
Auto-panning rate may synchronised to the internal or external MIDI clock, using a wide variety of tempos.
RE5: Pan Depth
Displayed as: FanDepth Initial value: 0
Range of adjustment: 0 to 127
This control determines the amount of image shift applied by the auto-panner. At its maximum value of 127, the auto-panner will pan the sound both fully left and fully right; lower values will pan less extremely, with the sound remaining more centrally located. The auto-panner is effectively off when the parameter value is zero (but the manual pan control RE2 is still operative).
RE6 to RE8: Not used.
FX Menu Page 2 - Routing
| Routing 1×(2+3+4+5) | SLOTFR SLOTFR SLOTFR SLOTFR SLOTFR Bypass Bypass Bypass Bypass Bypass |
This menu page is where you assign the effects you need. You can also specify their configuration - whether they are "connected" serially, with the output of one feeding the input of another, or are in parallel, where the synth sound is fed to the inputs of more than one FX device simultaneously, the device outputs then being mixed together.
RE1: FX Slot routing
Displayed as: Routing
Initial value: 1 (2+3+4+5)
Range of adjustment: see diagrams below
This parameter lets you configure the interconnection of the FX slots. The five slots may be interconnected in serial, in parallel, or in various combinations of serial and parallel.
1+2+3+4+5
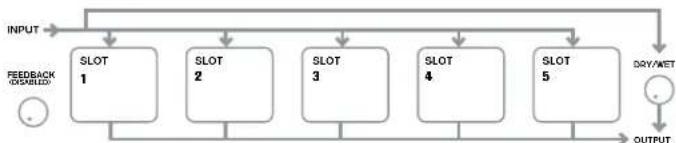
1)(2+3+4+5)
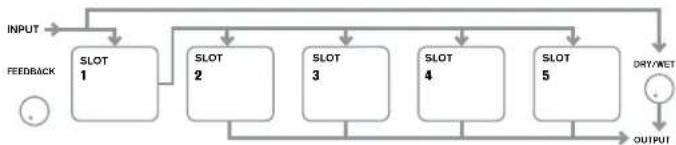
1>2>(3+4+5)
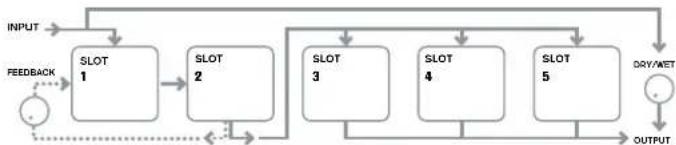
1>2>3(4+5)
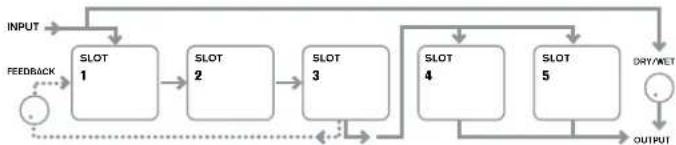
1>2>3>4>5
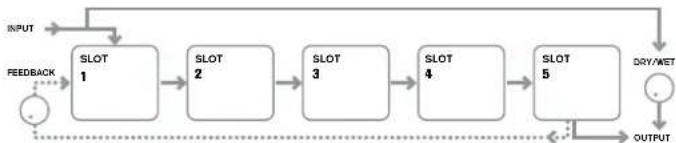
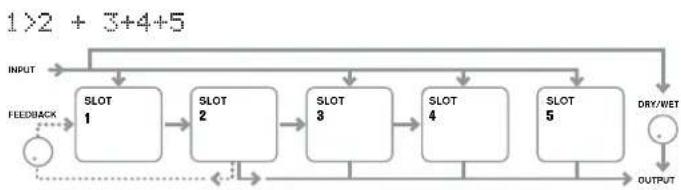
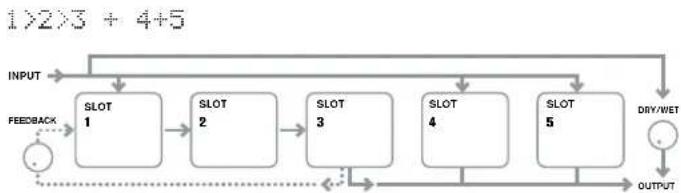
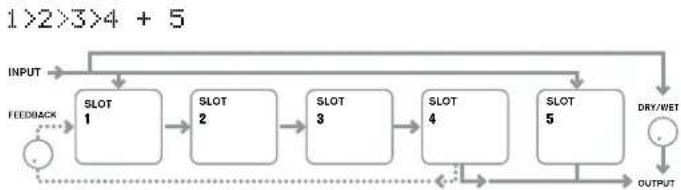

The FX types can be categorised in various ways: some are time-based (chorus,
delay), others are static (EO, distortion). Some should be used as an FX send/
return loop (implying a parallel connection), others as an insert (implying a serial
connection). Depending on the synth sound itself and the actual effects being used, some
configurations will clearly work better than others. When using multiple effects, try a few
different interconnections to see which works best.
RE2: Not used.
RE3 to RE7: Slot Effect Selection
Displayed as: S1otnR (where n=1 to 5)
Initial value: Bypass
Range of adjustment: see table at page 44
Each of the five slots may be loaded with one of the available FX processors. Use the rotary
encoder for any slot to select an effect from the list of those available. The table shows the
"pool" of FX devices available. As DSP capacity is finite, each device in the list may only be
loaded into one slot, and once it has been loaded, it will no longer appear in the list of avail
able processors for the other slots. You will see that multiples of most of the FX devices are
provided, to allow the most creative use of the FX.
RE8: Not used.
FX Menu Page 3 - FX Level controls
| FXFedbok | FX1Rent | FX2Rent | FX3Rent | FX4Rent | FX5Rent | FXMetLv1 |
| 0 | 64 | 64 | 64 | 64 | 64 |
RE1: Effect feedback
Displayed as: FX Fedlock
Initial value: 0
Range of adjustment: 0 to 127
This parameter controls how much signal is fed back to the input of the effects chain from
its output. The FX Slot from which the feedback is derived varies with the FX Routing
configuration in use - see diagram. However, with all routing configurations, the feedback
is added back into the chain at FX Slot 1. Note that not all configurations employ feedback.
RE2 Not used.
RE3 to RE7: Effect Amount
Displayed as: Fxntnnt (where n=1 to 5)
Initial value: 64
Range of adjustment: 0 to 127
The precise function of this parameter depends on which FX device is loaded into the slot. See the table below for a summary. The five controls are identical, and there is one for each slot. If the slot is bypassed, the encoder for that slot doesn't do anything.
| FX TYPE ADJUSTED PARAMETER | |
| Compressor Level | |
| EQ Level | |
| Distortion Amount or bit/sample rate reduction | |
| Delay Send and Return levels | |
| Chorus Level | |
| Reverb Send and Return levels | |
| Gator Level |
RE8: FX Level
Displayed as:FXnetLvl
Initial value: 127
Range of adjustment: 0 to 127
This adjusts the overall level of the processed signal (which is then mixed with the unprocessed signal). Note that the individual contributions of the processor in each FX Slot can be adjusted with RE3 to RE7 (see below).
FX Menu Page 4 - FX parameters
The menu which appears as Page 4 is determined by the SELECT buttons [10], which can be pressed to scroll up or down through the five FX slots. A slot which has no FX device loaded will display the following message:
This FX blot is bypassed or inactive
Each FX device has its own menu; these are described in turn below.
EQ Menu
One equaliser device is available. It can be loaded into any FX slot.
E0 E0BAsL0 2001dL0 E0TrbL0 E0BAsPr 64 E0HIsPr 64 E0BPr
The equaliser is a three-band 'swept' type, with cut/boost and frequency controls for each band. The LF and HF sections are second-order (slope of 12 dB/octave) sholving filters, and the MF section is a bell-response filter.

Note that FXAmount parameter should be set to 127 for the full gain range of RE2, RE3 and RE4 to be available.
RE1: Not used.
RE2: LF Cut/Boost
Displayed as: E0BasisL1
Initial value: 0
Range of adjustment: -64 to +63
This parameter controls the LF response of the equaliser; a value of 0 gives a flat response in the LF region, positive values will give a rise in the LF response - i.e., more bass, and negative values will have the opposite effect. The range of adjustment is ± 12 dB (with
FXAmount set to 127).
RE3: MF Cut/Boost
Displayed as: EOMidLvi
Initial value: 0
Range of adjustment: -64 to +63
This parameter controls the MF response of the equaliser; a value of 0 gives a flat response in the MF region, positive values will give a rise in the MF response - i.e., more mid
frequencies (the voice region of the audio spectrum), and negative values will accordingly reduce the MF response. The range of adjustment is ± 12 dB (with FXAmount set to 127).
RE4: HF Cut/Boost
Displayed as: EQTrbLvl
Initial value: 0
Range of adjustment: -64 to +63
This parameter controls the HF response of the equaliser; a value of 0 gives a flat response in the HF region, positive values will give a rise in the HF response - i.e., more treble, and negative values less treble. The range of adjustment is ± 12 dB (with FXAmount set to 127).
RE5:LF Frequency
Displayed as: EOBasFrag
Initial value: 64
Range of adjustment: 0 to 127
The equaliser is a "swept" type, which means that in addition to being able to increase or decrease the treble, mid or bass, you can also control the frequency band over which the Cut/Boost controls are effective - i.e., just what is meant by "bass", "mid" and "treble".
This gives you much more accurate control over the frequency response. Increasing the value of EQBasFrq increases the frequency below which the LF cut/boost control (RE2) is effective, so in general, RE2 will have more effect on the sound the higher the value of
EQBasFrq. Decreasing the value of EQBAsFrq will lower the frequency below which the cut/boost control is effective with a value of 0 corresponding to approx. 140Hz . The maximum value of 127 corresponds to about 880Hz and the default value of 64 to about 500Hz .
RE6: MF Frequency
Displayed as: EQMidFrag
Initial value: 64
Range of adjustment: 0 to 127
Increasing the value of this parameter increases the "centre" frequency of the MF response. The centre frequency is the one that gets the maximum amount of cut or boost as you adjust RE3, and this control will have a proportionately decreasing effect on frequencies above and below the centre frequency. The range of adjustment is from 440Hz (value = 0) to 2.2kHz (value = 127). The default value of 64 corresponds to approximately 1.2kHz .
RE7: HF Frequency
Displayed as: EQTrbFrag
Initial value: 64
Range of adjustment: 0 to 127
Decreasing the value of EQTrbFrq decreases the frequency above which the HF cut/boost control (RE3) is effective, so in general, RE3 will have more effect on the sound the lowe the value of EQTrbFrq. Increasing the value of EQTrbFrq will raise the frequency above which the cut/boost control is effective, with a value of 127 corresponding to about 4.4kHz . A value of 0 corresponds to about 650Hz and the default value of 64 to about 2kHz .
RE8: Not used
Compressor Menu
CIPRESI CIRAITCITAPSH CINCTAK CIRE1 CINHID CIGA8 2.0 -20 0 64 32 127
Two compressor devices are available. These can be loaded into any two FX slots. Their facilities are identical; the example below illustrates Compressor 1.
The compressors can be used to reduce the dynamic range of the synth sound/Input audio, which gives the effect of "thickening" the sound and/or giving it more "punch" or impact. They are particularly effective on sounds with a strong percussive content.
RE1: Not used.
RE2: Compression Ratio
Displayed as: C1Ratio
Initial value: 1.0
Range of adjustment: 1.0 to 13.7
With the minimum value of 1.0 set, the compressor has no effect as 1.0 means that every change in input level results in an equal change in output level. The parameter sets the degree to which sounds which are louder than the Threshold level (set by RE3) get reduced in volume. If the Ratio is set to 2.0, a change in input level results in a change in output level of only half the magnitude, thus the overall dynamic range of the signal is reduced. The higher the setting of Ratio, the more compression is applied to those parts of the sound which are above the Threshold level.
RE3: Threshold Level
Displayed as: C1Thresh
Initial value: -20
Range of adjustment: -60 to 0
Threshold defines the signal level at which compressor action starts. Signals below the threshold (i.e. the quieter parts of the sound) are unaltered, but signals exceeding the threshold (the louder sections) are reduced in level - in the ratio set with RE2 - resulting in an overall reduction of the dynamic range of the sound.

Note that any alteration in volume resulting from compressor action has nothing to do with how the output level of the synth is set. Whether you are using the
Ultranova's MASTER VOLUME control or an Expression pedal to control your
overall volume, any compression in the FX section is applied 'before' these volume control methods, and thus will remain constant.
RE4: Attack Time
Displayed as: C1Attack
Initial value: 0
Range of adjustment: 0 to 127
The Attack Time parameter determines how fast the compressor applies gain reduction to a signal exceeding the threshold. With percussive sounds - such as struck drums or plucked bass - it may be desirable to compress the main envelope of the sound while retaining the distinctive front edge or "attack phase" of the sound. A low value gives a fast attack time, and compression will be applied to the front edge of the signal. High values give slow response times, and percussive leading edges will not be compressed, to give a "punchier" sound. The range of attack times available is from 0.1 ms to 100 ms.
RE5: Release Time
Displayed as: CrlRel
Initial value: 64
Range of adjustment: 0 to 127
This parameter should be adjusted in conjunction with the Hold Time parameter (see
RE6 below). Release Time determines the time period over which the gain reduction is removed (resulting in no compression) after the completion of the Hold Time. Low values give a short Release Time, high values a long one. The range of release times available is from 25 ms to 1 second.
RE6: Hold Time
Displayed as: Cihold
Initial value: 32
Range of adjustment: 0 to 127
Hold Time determines for how long any gain reduction applied to a signal exceeding the Threshold remains applied after the signal level drops below the Threshold. At the end of the Hold Time, the amount of gain reduction is reduced over the Release Time, set with RE5. Low values give a short Hold Time, high values a long one. The range of hold times available is from 0.5 ms to 500 ms.

Compressor times are of particular importance with repetitive, rhythmic sounds. For example, setting too short a Hold Time may result in audible "pumping" of background noise between notes, which can be quite unpleasant.
Hold, Release and Attack Times are usually best adjusted in conjunction with one another, by ear, to obtain an optimum effect with the particular sound you are using.
RE7: Auto Gain
Displayed as: C1Gain
Initial value: 127
Range of adjustment: 0 to 127
A consequence of compression is that the overall volume of the sound may be reduced.
The UltraNova's compressors automatically "make up" for this loss of level, and ensure that the level of the compressed signal remains as near as possible to that of the input. Auto
Gain provides additional gain, which may be useful in situations where heavy compression is used.
RE8: Not used.
Distortion Menu
Distortion is usually regarded as something undesirable, and although we all take great pains most of the time to avoid it, there are circumstances when adding some carefully-controlled distortion gives you exactly the sound you're after.
Distortion arises when a signal is passed through a non-linear channel of some kind, the non-linearity producing alterations to the waveform which we hear as distortion. The nature of the circuitry exhibiting the non-linearity dictates the precise nature of the distortion. The UltraNova's distortion algorithms are able to simulate various types of non-linear circuitry, with results ranging from a slight thickening of the sound to something really quite nasty.

Care should be taken when selecting different Distortion Types, as the same setting of the FXAmnt control will produce very different volumes depending on the Distortion Type in use.
The UltraNova has two distortion effect devices. Those may be loaded into any two FX slots. Their facilities are identical; the example below illustrates Distortion 1.
DISTORTUISTYPESTUCOMP Diode 100
RE1: Not used.
RE2: Distortion 1 Type
Displayed as: Dst1Type
Initial value: Diode
Range of adjustment: see below
Diode - Simulation of analogue circuitry producing distortion where the waveform is progressively "squared-off" as the amount of distortion is increased.
Valve - Simulation of analogue circuitry producing distortion similar to Diode, but at extreme settings alternate half-cycles of the waveform are inverted.
Clipper - Simulation of a digital overload.
XOver - Simulation of the crossover distortion generated by bi-polar analogue circuitry, e.g., amplifier output stages.
Rectify - All negative-going half-cycles are inverted, simulating the effect of rectification.
BitsDown - Reproduces the "grainy" quality associated with lower bit rates, as found in older digital devices.
RateDown - Gives the effect of reduced definition and HF loss, similar to the use of a low sample rate.
RE3: Distortion 1 Compensation
Displayed as: Dst1COMP
Initial value: 100
Range of adjustment: 0 to 127
Distortion Compensation only has an effect on Diode and Valve distortion types. Increasing compensation reduces the harshness of the distortion effect.
RE4 to RE8: Not used.
Delay Menu
The Delay FX processor produces one or more repetitions of the note played. Although the two are intimately related in an acoustic sense, delay should not be confused with reverb in terms of an effect. Think of delay simply as "Echo".
The UltraNova has two delay lines. These can be loaded into any two FX slots. Their facilities are identical; the example below illustrates Delay 1.
DELAY1 DlgTime DlgSync DlgFlock DlgLR DlgWidth DlgSlew
64 Off 64 1/1 127 127
RE1: Not used.
RE2:Delay 1 Time
Displayed as: D19Time
Initial value: 64
Range of adjustment: 0 to 127
This parameter sets the basic delay time. With Dly1Sync (see RE3 below) set to Off, the note played will be repeated after a fixed time. Higher values correspond to a longer delay, with the maximum value of 127 equating to approx. 700 ms. If Delay Time is varied (either manually or via modulation), while a note is being played, pitch shifting will result. See also Delay Slew, RE7.
RE3:Delay1Sync
Displayed as: Dui1Syn
Initial value: Off
Range of adjustment: see table at page 40
Delay time may synchronised to the internal or external MIDI clock, using a wide variety of tempo dividers/multipliers to produce delays from about 5 ms to 1 second.

Be aware that the total delay time available is finite. Using large tempo divisions at a very slow tempo rate may exceed the delay time limit.
RE4:Delay 1 Feedback
Displayed as: DuiiFbck
Initial value: 64
Range of adjustment: 0 to 127
The output of the delay line is connected back to the input, at a reduced level; Delay 1 Feedback sets the level. This results in multiple echoes, as the delayed signal is further repeated. With Dly1Fbck set to zero, no delayed signal at all is fed back, so only a single echo results. As you increase the value, you will hear more echoes for each note, though they still die away in volume. Setting the control in the centre of its range (64) results in about 5 or 6 audible echoes; at the maximum setting, the repetitions will still be audible after a minute or more.
RE5:Delay1Left-RightRatio
Displayed as: DisilR
Initial value: 1/1
The value of this parameter is a ratio, and determines how each delayed note is distributed between the left and right outputs. Setting Dly1L/R to the default 1/1 value places all echoes centrally in the stereo image. With other values, the larger number represents the delay time, and an echo will be produced at this time in one channel only, depending whether the larger number is to the left of the slash or the right. It will be accompanied by a faster echo in the other channel, at a time defined by the ratio of the two numbers. Values with OFF to one side of the slash result in all the echoes being in one channel only.

The PanPosn parameter (FX Menu Page 1, RE2) sets the overall stereo placement of both the initial note and its delayed repetitions, and takes precedence.
This means, for example, that if you select 1/OFF as the L/R Ratio, so that all
the echoes are on the left, these echoes will gradually diminish if you set a positive value of PanPosn, which pans the signal to the right. When PanPosn is at +63 (fully right), you will hear no echoes at all.
RE6:Delay 1 Stereo Image Width
Displayed as: D1y1btdn
Initial value: 127
Range of adjustment: 0 to 127
The Width parameter is only really relevant to settings of Delay L/R Ratio which result in the echoes being split across the stereo image. With its default value of 127, any stereo placement of delayed signals will be fully left and fully right. Decreasing the value of Dly
1Width reduces the width of the stereo image and panned echoes are at an intermediate position between centre and fully left or right.
RE7:Delay1SlewRate
Displayed as: D1y1Slew
Initial value: Off
Range of adjustment: Off, 1 to 127
Delay 1 Slew Rate only has an effect on the sound when the Delay Time is being modulated. Modulating delay time produces pitch-shifting. With DSP-generated delays, very fast changes of delay time are possible, but these may produce unwelcome effects, including digital glitching and clicks. Delay Slew Rate effectively slows the applied modulation down, so that any such glitches resulting from trying to change the delay time too rapidly may be avoided. The default value of Off corresponds to the maximum rate of change, and the delay time will attempt to follow any modulation accurately. Higher values will produce a smoother effect.
RE8: Not used.
Reverb Menu
The Reverb algorithms add the effect of an acoustic space to a sound. Unlike delay, reverberation is created by generating a dense set of delayed signals, typically with different phase relationships and equalisations applied to re-create what happens to sound in a real acoustic space.
The Ultranova has two reverb processors. These can be loaded into any two FX slots. Their facilities are identical; the example below illustrates Reverb 1.
KEVERB1 RvDltape RvIDec LrgHsll 960
RE1: Not used.
RE2:Reverb Type
Displayed as: RubiTime
Initial value: LrgHall
Range of adjustment: Chamber, Small Room, Large Room, Small Hall, Large Hall, Great Hall
UltraNova provides six different reverb algorithms, designed to simulate the reflections which occur in rooms and halls of various sizes.
RE3:Reverb Decay
Displayed as: RubiDec
Initial value: 90
Range of adjustment: 0 to 127
The Decay parameter sets the basic reverb time of the selected space. It can be thought of as setting the size of the room.
RE4 to RE8: Not used.
Chorus Menu
Chorus is an effect produced by mixing a continuously delayed version of the signal with the original. The characteristic swirling effect is produced by the Chorus processor's own LFO making very small changes in the delays. The changing delay also produces the effect of multiple voices, some of which are pitch-shifted; this adds to the effect.
The Chorus processor can also be configured as a Phaser, where varying phase shift is applied to the signal in specific frequency bands, and the result remixed with the original signal. The familiar 'swishing' effect is the result.
The UltraNova has four chorus processors. Those may be loaded into any four FX slots. Their facilities are identical; the example below illustrates Chorus 1. Note that although the parameters are named 'Chorus', they are all effective in both Chorus and Phaser modes.
CHOROSI CHIFPE CHIRATE CHISNC CHIPBCK CHIDEPH CHIDELSCHORus 28 Off +1064 64
RE1: Not used.
RE2: Chorus 1 Type
Displayed as: Ch1Type
Initial value: Chorus
Range of adjustment: Chorus or Phaser
Configures the FX processor as either a Chorus or Phaser.
RE3:Chorus 1 Speed
Displayed as: Ch1Rate
Initial value: 20
Range of adjustment: 0 to 127
The Rate parameter controls the frequency of the Chorus processor's dedicated LFO.
Lower values give a lower frequency, and hence a sound whose characteristic changes more gradually. A slow rate is generally more effective.
RE4:Chorus 1 Sync
Displayed as:ChiSync
Initial value: Off
Range of adjustment: See table at page 40
Chorus Rate may synchronised to the internal or external MIDI clock, using a wide variety of tempos.
RE5:Chorus 1 Feedback
Displayed as: Ch1Fbck
Initial value: +10
Range of adjustment: -64 to +63
The Chorus processor has its own feedback path between output and input, and a certain amount of feedback will usually need to be applied to get an effective sound. Higher values will generally be needed when Phaser mode is selected. Negative values of Feedback mean that the signal being fed back is phase-reversed.
RE6:Chorus 1 Depth
Displayed as: ChiDepth
Initial value: 64
Range of adjustment: 0 to 127
The Depth parameter determines the amount of LFO modulation applied to the Chorus delay time, and thus the overall depth of the effect. A value of zero produces no effect.
RE7:Chorus 1 Delay
Displayed as:ChiDelay
Initial value: 64
Range of adjustment: 0 to 127
Chorus Delay is the actual delay that is used to generate the chorus/phaser effect. Dynamically altering this parameter will produce some interesting effects, though the difference in sound between different static settings is not marked, unless Chorus Feedback is at a high value. The overall effect of Chorus Delay is more pronounced in Phaser mode.

Modulating Chorus Delay with an LFO gives a much richer, dual chorus effect.
RE8: Not used.
Gator Menu
The built-in Gator is a very powerful Novation effect. In essence, it is similar to a Noise Gate, triggered by a repeating pattern derived from the internal or external MIDI clock. This breaks a note up rhythmically. However, as well as being able to control the more "traditional" sonic aspects of a Noise Gate, you can also edit the patterns, to create a sequence up to 32 notes long, each note having its own volume, if desired. The pattern is saved with any other changes you make to the Patch, so you can think of the Gator as a 32-step volume sequencer.

Note that for the Gator to have its full effect, the FX Amount setting for the Slot into which it is loaded needs to be at maximum - 127. In addition to this, the FX Routing configuration will also have a bearing on its audibility.
The UltraNova has one Gator. It can be loaded into any of the FX slots. Unlike the other FX Menus, the Gator Menu has two pages.
Gator Menu Page 1 - gate parameters
| GATOR | GToN/Off | GToLatch | GToSync | GToSync | GToSlew | GToDecay | GToKDel |
| On Off | 16th On | 16 64 B |
RE1: Not used.
RE2: Gator On/Off
Displayed as: GtOn/Off
Initial value: Off
Range of adjustment: Off or On
This switches the Gator effect on or off.
RE3: Gator Latch
Displayed as: GitLatch
Initial value: Off
Range of adjustment: Off or On
With the Latch Off, a note sounds only while its key is pressed. With Latch On, pressing a key will cause the note, modified by its Gator pattern, to sound continuously. It is cancelled by setting GtLatch to Off again.
RE4: Gator Rate Sync
Displayed as: GtRSync
Initial value: 16th
Range of adjustment: See table at page 40
The clock driving the Gator's trigger is derived from the UltraNova's master tempo clock and the BPM may be adjusted by RE8 in the Arpeggiator Menu. Gator Rate may synchronised to the internal or external MIDI clock, using a wide variety of temps.
RE5: Gator Key Sync
Displayed as: Gt.KSsync
Initial value: On
Range of adjustment: Off or On
When Key Sync is On, every time you press a key, the Gator pattern restarts at its beginning. With Key Sync Off, the pattern continues independently in the background.
RE6: Gator Edge Slew
Displayed as: GtSlew
Initial value: 16
Range of adjustment: 0 to 127
Edge Slew controls the rise time of the triggering clock. This in turn controls how fast the gate opens and closes and thus whether the note has a sharp attack or a slight "fade-in" and "fade-out". Higher values of GtSlew lengthen the rise time, and thus slow down the gate response.
RE7: Gator Hold
Displayed as:GtHold
Initial value: 64
Range of adjustment: 0 to 127
The Gator Hold parameter controls how long the Noise Gate is open for once it has been triggered, and thus the duration of the note heard. Note that this parameter is independent of the clock tempo or Rate Sync parameter, and that the note duration set by GtDecay is constant, whatever speed the pattern is running at.
RE8: Gator Left-Right Delay
Displayed as: GtL/RoEs
Initial value: 0
Range of adjustment: -64 to +63
To enhance the effect of sequenced patterns further, the Gator includes a dedicated delay processor. When set to zero, the notes in the pattern are centrally located in the stereo image. With positive values, the notes are panned hard left and a delayed repetition of the note is panned hard right. The value of the parameter controls the delay time. With negative values, a pre-echo results (an echo which precedes the note). The stereo imaging is the same, with the timed pattern note itself on the left and the pre-echo on the right.
Gator Menu Page 2 - pattern editor
| GATOR | GtMode EditGroup | EEE | |
| Mono16 | 1 |
The pattern is depicted by the solid white characters to the right of the display, each of which represents the level for that step. There are two rows of 16 characters (see table page 44) as (A) and (B) respectively. Each row's 16 notes are further divided into 4 Edit Groups, giving a total of 8 Groups. The height of the character represents the volume of the note within the sequence, which is also adjustable. See RE5-8 for more information.

Note that in this menu page, the rotary encoders do not line up exactly above the areas of the LCD display they relate to.
RE1: Not used.
RE2: Gator Mode
Displayed as: GtMode
Initial value: Mono16
Range of adjustment: see table at page 44
The Mode parameter allows you to select one of 6 methods of combining the two sets of four note Groups, {A} and {B}. Three of the modes are mono, and three are stereo, in which notes in Set (A) are routed to the Left output and those in Set (B) to the Right output.

The Pan controls on FX Menu Page 1 will override the stereo Gator Modes. The stereo modes will only operate as described if the main FX Pan controls are set centrally.
RE3 and RE4: Select Edit Group
Displayed as: EditGroup
Initial value: 1
Range of adjustment: 1 to 8
The pattern editor lets you adjust the steps in the sequence in groups of four, called Edit Groups. Edit Groups 1 to 4 constitute the top row of the pattern display, Set {A}, and hence the first 16 steps of the pattern. Edit Groups 5 to 8 constitute the bottom row of the pattern display, Set {B}, and hence the second 16 steps of the pattern (except when Mono16 Mode is selected, the pattern then consisting only of the first 16 steps). Either
RE3 or RE4 may be used to select Edit Groups. A set of four letter "E's" is displayed in the central area of the LCD, and these change position as RE3/RE4 is moved, to indicate the step positions of the sequence that are selected for editing.
RE5 to RE8: Step Editors
The four remaining rotary encoders control which individual stops will be present in the Gator pattern. The pattern to be played is represented by the 32 'solid' characters to the right of the LCD. When Edit Group 1 is selected (by RE3/RE4), RE5 will select Step 1, RE6 Step 2, RE7 Step 3 and RE8 Step 4. When Edit Group 2 is selected, RE5 will select Step 5, RE6 Step 6, and so on. The rotary encoders do not only select whether a particular step is part of the sequence, they also set the volume of the step. Seven different levels are possible, plus 'off' - i.e., the Step not being played at all. The height of the 'solid' character indicates the step's volume.
THE VOCODER
A Vocoder is a device which analyzes selected frequencies present in an audio signal (called a Modulator), and superimposes these frequencies onto another sound (called the Carrier). It does this by feeding the Modulator signal into a bank of band pass filters. Each of these filters (12 of them on the UltraNova) covers a particular band in the audio spectrum, and the filter bank thus "splits" the audio signal into 12 separate frequency bands.
The result of this arrangement is that the spectral content - i.e. the "character" of the audio signal is "imposed" upon the synth sound, and what you hear is a synth sound simulating the audio input (typically a vocal).
The final character of the vocoded sound will depend greatly on the harmonics present in the synth sound used as the Carrier. Patches very rich in harmonics (for example using Sawtooth Waves) will generally give the best results.
Typically, the Modulator signal used by a Vocoder would be a human voice speaking or singing into a microphone. This creates the distinctive robotic or 'talky' like sounds which have recently returned to popularity and are now being used in lots of current music genres. Bear in mind however, that the Modulator signal need not be restricted to human speech. Other types of Modulator signal can be used (for example, an electric guitar or drums) and can often give quite unexpected and interesting results.
The most common way of using the Vocoder is with the dynmaic goosenck mic supplied with the UltraNova (or any other dynamic mic) plugged into the top panel XLR socket. Alternatively, the Modulator signals may be from an instrument or other source connected to the AUDIO IN sockets [11] & [12], located on the rear panel, but remember that a jack plug connected at Input 1 will override the top panel XLR input. The Modulator input to the Vocoder is always mono, so a stereo source connected to Inputs 1 and 2 will be summed.
The pitch of the final vocoded sound will depend on the notes that the Carrier (the currently selected Patch) is playing. Notes can either be played on the UltraNova's keyboard or received via MIDI from an external keyboard or sequencer. Both Carrier and Modulator signals must be present simultaneously for the Vocoder effect to work, so notes must be played while the Modulator signal is present.
The Vocoder is enabled and controlled by pressing the VOCODER button [19], which opens the Vocoder Menu.
$$ \begin{array}{l l} \text {O n / O f f} & \text {B a l a n c e W i d t h S i L e v e l S i b t u r e} \ \text {O f f} & \text {v 6 7 m o} \ & \text {H i g h P a s s} \end{array} $$
RE1: Vocoder On/Off
Displayed as: On/Off
Init value: Off (On now for audition)
Range of adjustment: Off or On
Enables/disables the Vocoder function. When set to Off, the vocoder may be configured and auditioned as long as the Vocoder Menu is displayed. Vocoder action will stop if another Menu is opened. Once the Vocoder has been set On, it will remain operational with any Menu open.
RE2 & RE3: Not used.
RE4: Vocoder Balance
Displayed as: Balance
Init value: v63 m0
Range of adjustment: v0 c64 to v63 c1; v63 m0 to v0 m63
Characteristic Vocoder sounds are obtained by blending the Vocoder output with one or other of the two source signals. This parameter lets you mix the output of the vocoder (v) with either the Modulator signal (m) or the Carrier signal (c). Rotating the encoder clockwise, you will see that the first half of the value range comprises combinations of Vocoder and Carrier - "v0 c64" means only Carrier signal and no Vocoder effect at all, "v32 c32" means that Vocoder output and Carrier signal are mixed in equal proportions. The second half of the value range performs the same mixing principle of Vocoder output and Modulator signal.
RE5: Vocoder Width
Displayed as: width
Initvalue:127
Range of adjustment: 0 to 127
The outputs of each Vocoder filter band are routed to the Left and Right channels alternately to produce a stereo image with good depth. Decreasing the value of Width will progressively route all the filter outputs to both outputs, so with Width set to zero, the Vocoder output will be in mono and centrally located in the stereo image.
RE6: Vocoder Sibilance Level
Displayed as: SibLevel
Init value: 40
Range of adjustment: 0 to 127
Determines the amount sibilance that will be present in the final vocoded signal, and can make the Vocoder emphasise the explosive 'S' and 'T' sounds found in speech. Sibilance can be added to give the Vocoder to give a more distinctive sound and to make vocoded vocals more intelligible.
RE7: Vocoder Sibilance Type
Displayed as: SibType
Init value: HighPass
Range of adjustment: High Pass or Noise
In the default setting of HiPass, sibilance is extracted from the Modulator signal (i.e. the vocalist's natural voice) by filtering. This setting will allow some of the Modulator signal to be heard. If you want to add some sibilance to the vocoded vocals, but the performer's voice just isn't that sibilant naturally, you can artificially simulate sibilance by selecting Noise as Sibilance Type. This will add a small level of noise to the Modulator signal and the vocoder will treat the additional HF content in the same manner as it would natural sibilance.
RE8: Not used.
AUTOMAP®
Using the UltraNova as a software controller
Automap is a software application that comes with all new Novation keyboards and controllers. Automap should be installed on your computer, and will act as an interface between your DAW software and your UltraNova. It communicates directly with your DAW and plug-ins, so you have full control over other instruments and effects from your UltraNova.
Press the AUTOMAP button [26] to enter Automap Mode. The synth will no longer respond to the controls. whose actions will instead be written to the .LEARN, VIEW, USER, FX, INST and MIXER [7] are used in conjunction with the Automap software.
Full instructions for using Automap are available from
www.novationmusic.com/support.
AUDIO ROUTING IN THE ULTRANOVA
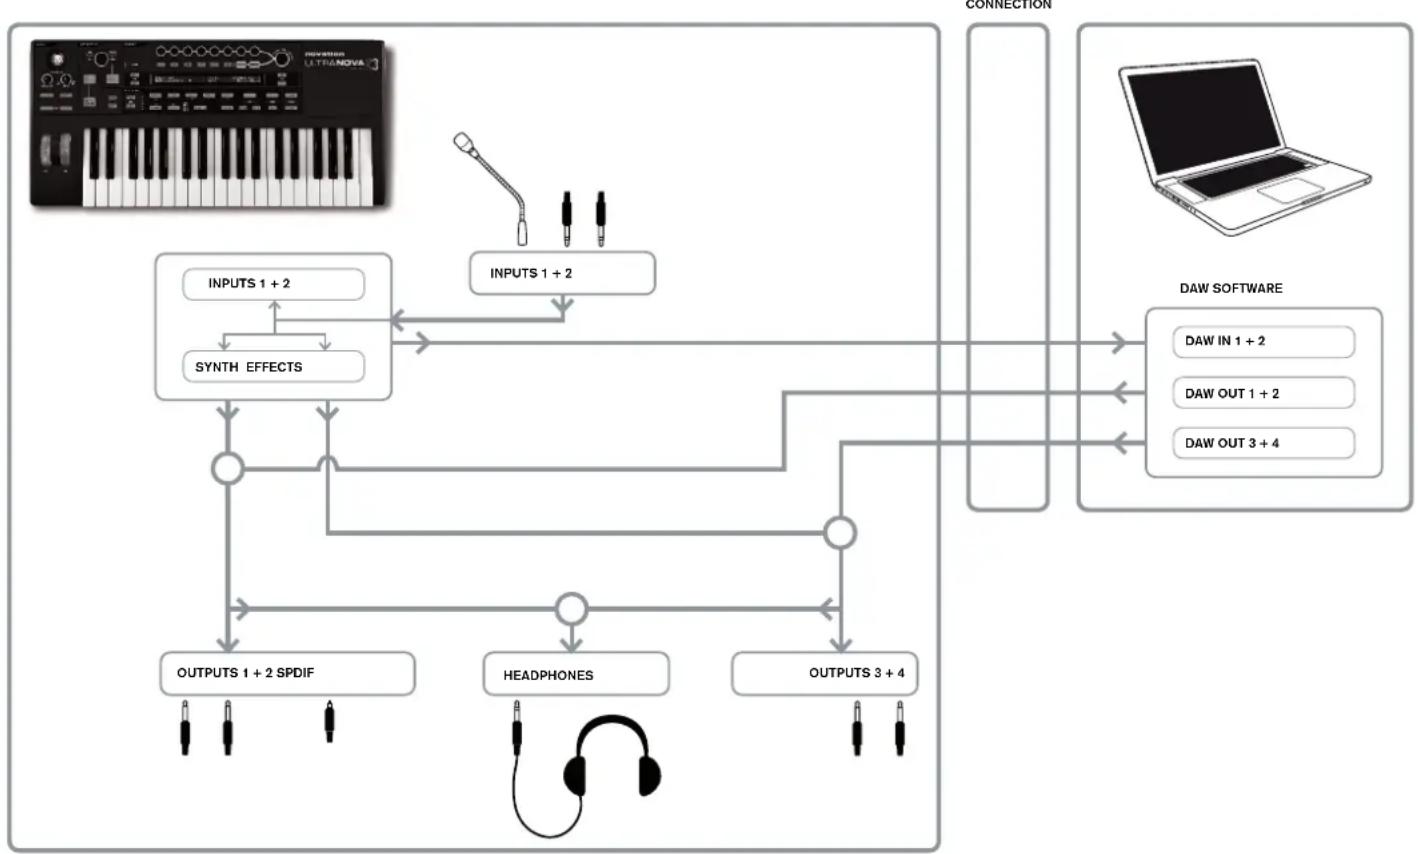
AUDIO ROUTING IN THE ULTRANOVA
The UltraNova can also be used as a computer Sound Card/Audio Interface. You can connect audio signals from microphones, instruments and line level (+2dB max.) sources and route them into your computer via USB. Furthermore, up to four audio channels from the computer (e.g., the outputs of your DAW - the 'Host') may be routed through the UltraNova to its audio outputs. DAW channels 1 & 2 may feed Outputs 1 & 2, while DAW channels 3 & 4 may feed Outputs 3 & 4. A combination of hardware and software controls lets you refine the mix of audio inputs, synth sounds and DAW audio channels at the various outputs.
Note that settings made in the Audio Menu are not saved with any Patch changes. However, it is possible to save the Audio Menu settings (along with the Global Menu settings at the same time) by pressing WRITE [23] while in the Audio (or Global) menu. This will ensure that the next time you power up your UltraNova, these settings will be restored instead of the original factory defaults.
The Audio Menus are opened with the AUDIO button [30]. The menu has 5 pages; pages 1 to 5 provide controls for Inputs, headphones, Outputs 1 & 2, Outputs 3 & 4, and SPDIF Outputs respectively.
Audio Menu Page 1 - Inputs
| Ini2Link | IniGain | In2Gain | In1 -60 | |--------| | 0dB | In1→FX | In2→FX |
| Indept | Off | Off | In2 -60 | |--------| | 0dB 0 | 0 | 0 |
RE1: Input Linking
Displayed as: Ir12Link
Default value: Indept
Range of adjustment: Indept or Stereo
In Independent mode (Indept), separate gain adjustment is available for the two audio inputs (Inputs 1 and 2). In Stereo mode, the same gain adjustment is applied to both inputs simultaneously (see RE2 and RE3 below). FX Sends from the audio inputs are linked in a similar way (see RE7 and RE8 below).
RE2: Input 1 Gain
Displayed as: In1Gain
Default value: Off
Range of adjustment: -10 to +65
With Input Linking (RE1) set to Indept, this control adjusts gain for Input 1 only. With Input Linking set to Stereo, gain for both Inputs 1 and 2 will be adjusted as a pair. The parameter value is calibrated directly in dBs of gain. As the gain is increased, the signal at the input will be seen on the bargraph meters (below RE5). The gain should be adjusted so that the meters peak two or three segments below '0dB' on the loudest passages.
RE3: Input 2 Gain
Displayed as: In2Gain
Default value: Off
Range of adjustment: -10 to +65
Adjusts input gain for Input 2 with Input Linking (RE1) set to Indep and for both Inputs 1
and 2 with Input Linking set to Stereo. Operation is otherwise identical to RE2.
RE4 to RE6: Not used.
RE7: Input 1 FX Send
Displayed as: In1+Fx
Default value: 0
Range of adjustment: 0 to 127
This parameter adjusts the amount of Input 1's signal sent to the FX processor for the currently selected Patch. If Input Linking is set to Stereo, it simultaneously adjusts the FX send level for both Input 1 and Input 2.

Try scrolling through the factory Patches to experiment with the different FX which they contain to see how different FX alter your input signal. Alternatively, try one of the Patches in the ExtInput category.
RE8: Input 2 FX Send
Displayed as: In2Fx
Default value: 0
Range of adjustment: 0 to 127
This parameter adjusts the amount of Input 2's signal sent for FX processing. If
Input Linking is set to Stereo, it simultaneously adjusts the FX send level for both Input 1 and Input 2.
Audio Menu Page 2-Headphones
Headphones Level Control
Follow master volume (1+2 only)
Level Balance 1+2/3+4 1279
RE1: Headphone level control select
Displayed as: HeadPhones Level Control
Default value: Follow master volume (1+2 only)
Range of adjustment: Follow master volume (1+2 only) or
Use Level and Balance 1+2/3+4
With Follow master volume (1+2 only) selected, the level of the signal at the stereo headphone socket [8] will be adjusted by the Master Volume control [29]. The Headphone volume (RE6) and Headphone balance (RE7) controls will be inoperative. What you hear in the headphones will be the same mix and balance as that being fed to Outputs 1 and 2. With Use Level and Balance 1 + 2 / 3 + 4 selected, the Headphone volume and source blend may be adjusted independently by RE6 and RE7.
RE2 to RE5: Not used.
RE6: Headphone volume
Displayed as: Level I
Default value: 127
Range of adjustment: 0 to 127
This adjusts the headache volume, when Use Level and Balance 1+2/3+4 is selected by RE1.
RE7: Headphone balance
Displayed as: Balance
Default value: 0
Range of adjustment: -64 to +63
When Use Level and Balance 1 + 2 / 3 + 4 is selected by RE1, the audio at the headphones socket is a mix of the signal at Outputs 1 and 2 (a stereo pair) and that at Outputs 3 and 4 (another stereo pair). Refer to the following menu pages for details on how to set up Outputs 1 & 2 and 3 & 4.
RE8:Not used.
Audio Menu Page 3 - Outputs 1 and 2, and Host source
Outputs 1 & 2 may carry a mix of synth sounds, the audio sources connected at Inputs 1 and/or 2, and DAW channels 1 & 2. The default setting for the Output 1+2 mix is synth sound at full level and no external audio, apart from any routed to the FX processor. The MONITOR control [28] on the top panel provides a balance between DAW channels 1 & 2 and the mix of synth sound and audio inputs set up with RE3, RE4 and RE5. The USB port can additionally send a further mix directly to a computer.
OUTPUTS Sinh Input1 Input2 RECORD Mode 1+2 127 0 0 Sinh
RE1: Not used, but LCD confirms that this page is concerned with Outputs 1 & 2.
RE2: Synth level
Displayed as: Sunth
Default value: 127
Range of adjustment: 0 to 127
RE2 adjusts the level of sounds generated by the synthesiser present in the mix at Outputs 1 and 2.
RE3: Input 1 level
Displayed as: Input
Default value: 0
Range of adjustment: 0 to 127
Audio from Input 1 may be mixed into Outputs 1 and 2 by adjusting RE3. With Input Linking (RE1 on Audio Menu Page 1) set to Indept, RE3 adjusts level for Input 1 only. With Input Linking set to Stereo, the level of both Inputs 1 and 2 will be adjusted as a pair.
RE4: Input 2 level
Displayed as: InPut.2
Default value: 0
Range of adjustment: 0 to 127
Audio from Input 2 may be mixed into Outputs 1 and 2 by adjusting RE4. With Input Linking (RE1 on Audio Menu Page 1) set to Indept, RE4 adjusts level for Input 2 only. With Input Linking set to Stereo, the level of both Inputs 1 and 2 will be adjusted as a pair.
RE5 and RE6: Not used.
RE7: Record Mode
Displayed as:RECORD Mode
Default value: Synth
Range of adjustment: Synth, Inputs, Synth+Inputs
In addition to the analogue outputs 1 to 4 and the S/PDIF digital audio output, a further digital audio output is available via the UltraNova's USB port. This allows synth sounds and/or audio inputs to be sent via USB direct to your computer audio application for recording (or any other) purpose. RE7 lets you select whether this feed comprises just synth sounds, just the signals at the audio inputs, or a mix of the two.
RE8: Not used
Audio Menu Page 4 - Outputs 3 and 4
OUTPUTS Synth Input1 Input2 Level1 Balance (Host3+4/Synth+Inps) 3+4 0 127 0 127 0
Outputs 3 & 4 may also carry a mix of synth sounds, the audio sources connected at Inputs 1 and/or 2, and DAW channels 3 & 4. The default setting for the Output 3+4 mix is no synth sound and external audio at full level. RE6 provides a balance between DAW channels 3 & 4 and the mix of audio inputs and synth sounds set up with RE3, RE4, RE5 and RE6.
RE1: Not used, but LCD confirms that this page is concerned with Outputs 3 & 4.
RE2: Synth level
Displayed as: Sunth
Default value: 0
Range of adjustment: 0 to 127
RE2 adjusts the level of sounds generated by the synthesiser at Outputs 3 and 4.
RE3: Input 1 level
Displayed as: Input1
Default value: 127
Range of adjustment: 0 to 127
Audio from Input 1 may be mixed into Outputs 3 and 4 by adjusting RE3. With Input Linking (RE1 on Audio Menu Page 1) set to Indept, RE3 adjusts level for Input 1 only. With Input Linking set to Stereo, the level of both Inputs 1 and 2 will be adjusted as a pair.
RE4: Input 2 level
Displayed as: Input.2
Default value: 0
Range of adjustment: 0 to 127
Audio from Input 2 may be mixed into Outputs 3 and 4 by adjusting RE4. With Input Link
ing (RE1 on Audio Menu Page 1) set to Indept, RE4 adjusts level for Input 2 only. With
Input Linking set to Stereo, the level of both Inputs 1 and 2 will be adjusted as a pair.
RE5: Outputs 3 & 4 Level
Displayed as: Level1
Default value: 127
Range of adjustment: 0 to 127
This is an independent level control which adjusts the output volume at Outputs 3 and 4 at
all times. (This is the equivalent of Outputs 1/2's MASTER VOLUME hardware control.)
RE6: Outputs 3 & 4 Balance
Displayed as: Balance (Host3+4/Synth+Inps)
Default value: 0
Range of adjustment: -64 to +63
The mix available at Outputs 3 and 4 may also include audio from DAW Channels 3 + 4 , and this control provides a balance between this audio and the mix of synth sound and audio inputs set up with RE3, RE4 and RE5. With a value of -64, only the DAW channels will be heard; with a value of +63, only the synth/inputs mix will be heard. A setting of zero gives an equal blend.
RE8: Not used.

If you want to use the Ultranova's FX engine to process audio from the DAW (e.g., a rhythm track) use two jack cables to connect Outputs 3 & 4 to Inputs 1 & 2. You can now add effects processing to the rhythm track in the same way you can add effects to any other input.
Audio Menu Page 5 - SPDIF Output

RE1:SPDIF Output
Displayed as:SPDIF
Default value: Off
Range of adjustment: On, Off
The SPDIF output can be turned On or Off.
GLOBAL SETTINGS
Pressing the GLOBAL button [31] opens the Global Menu (seven pages). This menu contains a set of synth and audio system functions which, once set up, will not generally need to be accessed on a regular basis. The Global Menu also includes the routines to update the UltraNova's Operating System. Note that settings made in the Global Menu are not saved with any Patch changes. However, it is possible to save the Global Menu settings (along with the Audio Menu settings at the same time) by pressing WRITE [23] while in the Global (or Audio) menu. This will ensure that the next time you power up your UltraNova, these settings will be restored instead of the original factory defaults.
Global Menu Page 1 - MIDI and other settings
Protect Local MidiChan MidiOut Touch/Filter Off On 1 Off Set by Patch
RE1: Memory Protection
Displayed as: Protect
Default value: Off
Range of adjustment: Off or On
This is a safety feature, used to prevent accidental erasure of memories and loss of data.
When set to On, writing Patches or Global data into memory will be prevented, and a brief warning message (CANNOT SAVE - MEMORY PROTECT IS ON!!) shown on the UltraNova's display. It is recommended that Memory Protect is left On unless Patches are being edited for storing in memory, or a System Exclusive dump from a computer is to be received.
RE2: Local Control On/Off
Displayed as: Local
Default value: On
Range of adjustment: Off or On
This control determines whether the UltraNova is to be played from its own keyboard, or to respond to MIDI control from an external device, such as a MIDI sequencer or master keyboard. Set Local to On to use the keyboard, and to Off if you are going to control the synth externally via MIDI or use the UltraNova's keyboard as a master keyboard.

A primary use of Local Control On/Off is to avoid unwanted MIDI loops through external equipment. When set to Off, the UltraNova's keyboard and all other controls still transmit MIDI messages from the MIDI OUT port if MIDI OUT On/
Off (RE4) is enabled. If any external equipment is set to re-transmit MIDI back to the
UltraNova, then the synth will still operate. This will avoid notes sounding twice, a reduction
in polyphony or any other unpredictable effects.
RE3: Assign MIDI Channel
Displayed as: MidiChan
Default value:
Range of adjustment: 1 to 16
The MIDI protocol provides 16 channels allowing up to 16 devices to co-exist on a MIDI network, if each is assigned to operate on a different MIDI channel. Assign MIDI Channel lets you set the UltraNova to receive and transmit MIDI data on a particular channel, so that it can interface correctly with external equipment.
RE4: MIDI Out On/Off
Displayed as: MidiOut
Default value: Off
Range of adjustment: Off or On
This control enables the UltraNova to transmit MIDI Out messages from the MIDI OUT port [4] as the synth is played. Set this parameter to On if you want to record MIDI data or trigger additional external MIDI equipment from the UltraNova's keyboard via the MIDI
OUT port. However, it is important to note that MIDl data is always transmitted via USB.
RE5: Touched/Filter knob control
Displayed as: Touch/Filter
Default value: Set by Patch
Range of adjustment: Set by Patch or Always Filter
This setting determines how the TOUCHED/FILTER knob [9] operates. With the default setting of Set by Patch, the knob operates as described on page 27, either acting as a copy of the last rotary control to be touched or, with FILTER [8] enabled, to vary the cut-off frequency of Filter 1. Because the setting of the FILTER button is saved with the Patch data, the function of the knob is determined by the Patch. If RE5 is set to Always Filter, the TOUCHED/FILTER knob is set to control the filter frequency permanently.
RE6 to RE8: Not used.
Global Menu Page 2
- Tuning, Velocity, sampling frequency and footswitch
TuneLent Transpre KdoUe UelKesF DritRate FoetSuth Whights 0 0 Curve 4 Medium 48kHz Ruto Or
RE1: Master Fine Tuning
Displayed as: TuneCent.
Default value: 0
Range of adjustment: -50 to +50
This control adjusts the frequencies of all the Oscillators by the same small amount, allowing you to fine-tune the whole synth to another instrument if necessary.
The increments are cents (1/100 of a semitone), and thus setting the value to 50 tunes the synth to a quarter-tone midway between two semitones. A setting of zero tunes keyboard with the A above middle C at 440Hz - i.e., standard Concert Pitch.
RE2:Key Transposition
Displayed as: Transpose
Default value: 0
Range of adjustment: -24 to +24
Transpose is a very useful global setting which "shifts" the whole keyboard one semitone at a time up or down. It differs from oscillator tuning in that it modifies the control data from the keyboard rather than the actual oscillators. Thus setting Transpose to +4 means that you can play with other instruments in the actual key of E major, but only need to play white notes, as if you were playing in C major.
RE3: Keyboard Velocity
Displayed as: Kbdue1
Default value: Curve 4
Range of adjustment: Curve 1 to Curve 7; Fixed 7 to Fixed 127
Selects one of 128 Velocity tables which relate the Velocity response of the keys to the force applied to them as they are played. Curve 4 is the default setting, and should be acceptable for most playing styles.

Use Curve 1 if playing with a light touch, and Curve 7 if you require a heavier touch. Try different curves to suit your individual playing style(s).
RE4: Velocity Response
Displayed as: Ue1Resp
Default value: Medium
Range of adjustment: Soft, Medium, Hard
The response to MIDI velocity information from the keyboard, or an external device such as a MIDI controller keyboard or a sequencer may be set using this function. A setting of
SOFT indicates that smaller changes in velocity (a lighter playing style) will create a large change in response to velocity, be it volume or any other modulation destination that velocity is routed to. A setting of HARD indicates that higher changes in velocity - a much harder playing style, will create large changes in response to velocity. MEDIUM is obviously a compromise between these two.
RE5: Sampling frequency
Displayed as: DfltRate
Default value: 48KHz
Range of adjustment: 44.1KHz, 48KHz
This setting affects digital audio output signals sent via the UltraNova's S/PDIF and USB ports. The available sampling frequencies of 44.1 kHz and 48 kHz are the two most commonly encountered in digital audio systems. If the UltraNova is being used with a DAW, the sample rate will be determined by the DAW, not the UltraNova. The setting of RE5 only has validity when the UltraNova is used in a "stand-alone" mode.

If you are intending to ultimately burn the UltraNova's output onto an audio CD, 44.1KHz should be used, and set either on the DAW or the UltraNova, as described.
RE6: Footswitch configuration
Displayed as: FootSutn
Default value: Auto
Range of adjustment: Auto, N/Open, N/Closed
A sustain footswitch (pedal) can be connected to the UltraNova via the Sustain pedal socket [5]. Ascertain whether your sustain pedal is of the Normally-open or Normally-closed type, and set this parameter to suit. If you are unsure which it is, connect the footswitch with the UltraNova unpowered, and then power it on (without your foot on the pedal!) Provided the default value of Auto is still set, the polarity will now be correctly sensed.
RE7: Wheel lights
Displayed as: WheelLights
Default value: On
Range of adjustment: On, Off
The pitch and modulation wheels can be backlit with blue LEDs. This setting allows you to turn these LEDs on or off.
RE8: Not used.
Global Menu Page 3 - Clock
UlockSource Auto
Clock) 128 BPM Status) Internal Clock
RE1:Clock Source
Displayed as: ClockSource
Default value: Auto
Range of adjustment: Auto, Internal, Ext-Auto, Midi, Usb
The UltraNova uses a master MIDl clock in order to set the tempo (rate) of the arpeggiator and to provide a time base for synchronisation to an overall tempo. This clock may be derived internally or provided by an external device able to transmit MIDl clock. The Clock Source setting determines whether the UltraNova's tempo-synchronised features (Arpeggiator, Chorus Sync, Delay Sync, Gator Sync, LFO Delay Sync, LFO Rate Sync & Pan Rate Sync) will follow the tempo of an external MIDl clock source or follow the tempo set by the ClockBPM parameter in the Arp Edit Menu (RE8).
Auto - when no external MIDI clock source is present the UltraNova will default to the internal MIDI clock. Tempo (BPM) will be that set by the ClockBPM parameter in the Arp Edit menu (RE8). If an external MIDI clock is present the UltraNova will synchronise to it. Internal - the UltraNova will synchronise to the internal MIDI clock irrespective of what external MIDI clock sources may be present.
Ext-Auto - this is an auto-detect mode whereby the UltraNova will synchronise to any external MIDI clock source (via USB or MIDI connection). If no external clock is detected, the tempo "flywheels" to the last-known clock rate.
Midi - synchronisation will only be to an external MIDl clock connected to the MIDl input socket. If no clock is detected, the tempo "flywheels" to the last-known clock rate.
Usb - synchronisation will only be set to the external MIDI clock received via the USB connection. If no clock is detected, the tempo "flywheels" to the last-known clock rate.
When set to any of the external MIDI clock sources the tempo will be at the MIDI Clock rate received from the external source (e.g., a sequencer). Make sure the external sequencer is set to transmit MIDI Clock. If unsure of the procedure, consult the sequencer manual for details.
Most sequencers do not transmit MIDI Clock while they are stopped. Synchronisation of the UltraNova to MIDI Clock will only be possible while the sequencer is actually recording or playing. In the absence of an external clock, the tempo will flywheel and will assume the last known incoming MIDI Clock value. (Note that the UltraNova does NOT revert to the tempo set by the ClockBPM parameter set in the Arp Edit Menu (RE8)).
StockSource Ext-Ruto
LOCK)16 BPN Status)Fly-Wheeling
RE2 to RE8: Not used.
Global Menu Page 4 - Patch transfer
Patch data can be transferred between the UltraNova and a computer in either direction. This section of the Global Menu lets you store or backup Patches externally onto a computer. The UltraNova Librarian software will normally be used for this, and this lets you organise your Patches in a variety of ways as well. Patch transfer takes place in the form of MIDI SysEx messages. This menu page is the "control panel" for transferring Patch data from the UltraNova to a computer, a process known as a "data dump". See UltraNova Librarian documentation for information on transferring Patch data from a computer into the UltraNova.
DUMP to bank Patch Name Current OnePatch OneBank RIBanks USBort A Init Program
RE1:Dump Port Select
Displayed as: DUMP to
Default value: USBport
Range of adjustment: USBport or MIDlout
This control selects which external data port is to be used for a data dump. If using the UltraNova Librarian or a computer based MIDI tools software package, this should be set to USBport; if using other MIDI management software with standard MIDI cables instead of a USB connection, select MIDlout.
RE2: Bank Select
Displayed as: Bank
Default value: (currently selected)
Range of adjustment: A to D
This allows you to select the Bank of Patches to dump. It will initially display the Bank of the currently-selected Patch. If this is not the one you want, select another.
RE3: Patch Select
Displayed as: Patch
Default value: (currently selected)
Range of adjustment: 1 to 127
This will display the number of the currently-selected Patch. If this is not one of the Patch(es) you want to dump, you can select another.
RE4:Not used.
RE5: The encoder is not used.
Display shows: Current
Press the button below RE5 if you want to dump only the current Patch. This will include any parameter changes which have been made, but not saved.
RE6: The encoder is not used.
Display shows: OnePatch
Press the button below RE6 if you want to dump the current Patch in its original form (as last saved). In this case, any alterations which have been made to it will not be included.
RE7: The encoder is not used.
Display shows: One Bank
Press the button below RE7 if you want to dump all 127 Patches in the currently-selected Bank.
RE8: The encoder is not used.
Display shows: All Banks
Press the button below RE8 if you want to dump all the Patches currently in the UltraNova.
Global Menu Page 5 - Global and Audio settings dump
In addition to saving Patch data via a dump to a computer, it is also possible to dump the current settings of the Global and Audio Menus.

RE1:Dump Port Select
Displayed as: DUMP to
Default value: USBport
Range of adjustment: USBport or MIDlout
This control selects which external data port is to be used for the dump.
RE2:Not used.
RE3: The encoder is not used.
Display shows: Globals & Audio
Press the button below RE3 if you want to dump the current settings of the Global and Audio Menus.
RE4 to RE8: Not used.
Global Menu Page 6-Calibration
The UltraNova's controllers should all operate correctly out of the box, however on occasion it may be necessary to calibrate them to ensure they operate as intended. In particular, this procedure is recommended following an OS update. The controllers that can be calibrated are: the pitch wheel (PITCH), the Mod wheel (MOD) and Aftertouch. To calibrate a controller you need to move it to its extremes, e.g., turn the Pitch wheel downwards as far as it can go (you will notice that the BendWhl value on the display will show zero). Then rotate the Pitch wheel to its opposite extent (the BendWhl value will show 255). With the Pitch wheel in its central position, it should return a BendWhl value of approximately 128. The Pitch wheel is now calibrated, and the procedure for calibrating the Mod wheel is identical (use the ModWhl parameter).

To calibrate Aftertouch, lightly press a key, and observe the Aftouch parameter value of zero; then press the key hard, and observe the value of 127. Aftertouch is now calibrated.
Correctly calibrated controllers should return the following values:
Pitch - Min. (0); Centre (128); Max. (255)
Mod - Min. (0); Max. (127)
Aftertouch - Min. (0); Max. (127)
After performing the above procedure, press WRITE [23] to store the revised calibration.
RE1-5: Not used, but note that the Aftertouch value (see below) is displayed below RE5.
RE6: SetAftouch
SetAftouch sets Aftertouch sensitivity. With a value set to 127 you will find that only a very slight difference in key pressure is required to return a control value of zero and one of 127, displayed as the Aftouch value. With lower values of SetAftouch, the pressure difference is more marked. In general, keeping SetAftouch set to a mid-range value will give the best results.
RE7-8: Not used.
Global Menu Page 7 - OS Transmit
If you want to make a backup copy of the UltraNova's operating system, it is possible to

perform a SysEx dump of the data to your computer from this page.
To transmit the OS, press the flashing button under RE3.
Waveform Table
| DISPLAY FORM | |
| Sine | Sine |
| Triangle | Triangle |
| Sawtooth | Sawtooth |
| Saw9:1P# | Sawtooth Pulse Width 9:1 Ratio |
| Saw8:2P# | Sawtooth Pulse Width 8:2 Ratio |
| Saw7:3P# | Sawtooth Pulse Width 7:3 Ratio |
| Saw6:4P# | Sawtooth Pulse Width 6:4 Ratio |
| Saw5:5P# | Sawtooth Pulse Width 5:5 Ratio |
| Saw4:6P# | Sawtooth Pulse Width 4:6 Ratio |
| Saw3:7P# | Sawtooth Pulse Width 3:7 Ratio |
| Saw2:8P# | Sawtooth Pulse Width 2:8 Ratio |
| Saw1:9P# | Sawtooth Pulse Width 1:9 Ratio |
| P# | Pulse Width |
| Square | Square |
| BassCamp | Camp Bass |
| Bass_FM | Frequency Modulated Bass |
| EP_Dull | Dull Electric Piano |
| EP_Bell | Bell Electric Piano |
| Clav | Clavinova |
| DoubleReed | Double Reed |
| Retro | Retro |
| StrrrMch1 | String Machine 1 |
| StrrrMch2 | String Machine 2 |
| Organ_1 | Organ 1 |
| Organ_2 | Organ 2 |
| Evi10g | Evil Organ |
| HiStuff | High Stuff |
| Bell_FMI | Frequency Modulated Bell 1 |
| Bell_Ft2 | Frequency Modulated Bell 2 |
| DigBell1 | Digital Bell 1 |
| DigBell12 | Digital Bell 2 |
| DigBell13 | Digital Bell 3 |
| DigBell14 | Digital Bell 4 |
| DigiPad | Digital Pad |
| Utable 1 | Wavetable 1 |
| Utable ....... | Wavetable ... |
| Utable ....... | Wavetable ... |
| Utable36 | Wavetable 36 |
| AudioInL | Left Audio Input (or Gooseneck Microphone) |
| AudioInR | Right Audio input |
Sync Values Table
| DISPLAY DETAILS | CHORUS SYNC | LFO RATE SYNC LFO DELAY SYNC PAN SYNC | ARP SYNC GATOR SYNC FX DELAY SYNC |
| 32nd T | 48 cycles per 1 bar | ✓ | ✓ |
| 32nd | 32 cycles per 1 bar | ✓ | ✓ |
| 16th T | 24 cycles per 1 bar | ✓ | ✓ |
| 16th | 16 cycles per 1 bar | ✓ | ✓ |
| 8th T | 12 cycles per 1 bar | ✓ | ✓ |
| 16th D | 8 cycles per 3 beats / 32 cycles per 3 bars | ✓ | ✓ |
| 8th | 8 cycles per 1 bar | ✓ | ✓ |
| 4th T | 6 cycles per 1 bar | ✓ | ✓ |
| 8th D | 4 cycles per 3 beats / 16 cycles per 3 bars | ✓ | ✓ |
| 4th | 4 cycles per 1 bar | ✓ | ✓ |
| 1 + 1/3 | 3 cycles per 1 bar | ✓ | ✓ |
| 4th D | 2 cycles per 3 beats / 8 cycles per 3 bars | ✓ | ✓ |
| 2nd | 2 cycles per 1 bar | ✓ | ✓ |
| 2 + 2/3 | 3 cycles per 2 bars | ✓ | ✓ |
| 3 beats | 1 cycle per 3 beats / 4 cycles per 3 bars | ✓ | ✓ |
| 4 beats | 1 cycles per 1 bar | ✓ | ✓ |
| 5 + 1/3 | 3 cycles per 2 bars | ✓ | ✓ |
| 6 beats | 1 cycle per 6 beats / 2 cycles per 3 bars | ✓ | ✓ |
| 8 beats | 1 cycle per 2 bars | ✓ | ✓ |
| 10 + 2/3 | 3 cycles per 4 bars | ✓ | |
| 12 beats | 1 cycle per 12 beats /1 cycle per 3 bars | ✓ | |
| 13 + 1/3 | 3 cycles per 10 bars | ✓ | |
| 16 beats | 1 cycle per 4 bars | ✓ | |
| 18 beats | 1 cycle per 18 beats /2 cycles per 9 bars | ✓ | |
| 19 + 2/3 | 3 cycles per 8 bars | ✓ | |
| 20 beats | 1 cycle per 5 bars | ✓ | |
| 21 + 1/3 | 3 cycles per 16 bars | ✓ | |
| 24 beats | 1 cycle per 6 bars | ✓ | |
| 28 beats | 1 cycle per 7 bars | ✓ | |
| 30 beats | 2 cycles per 15 bars | ✓ | |
| 32 beats | 1 cycle per 8 bars | ✓ | |
| 36 beats | 1 cycle per 9 bars | ✓ | |
| 42 beats | 2 cycles per 21 bars | ✓ | |
| 48 beats | 1 cycle per 12 bars | ✓ | |
| 64 beats | 1 cycle per 16 bars | ✓ |
LFO WAVEFORM TABLE
| DISPLAY WAVEFORM EXTRA INFO | ||
| Sine | Traditional LFO shapes | |
| Triangle | ||
| Sawtooth | ||
| Square | ||
| Rand S/H | Jumps to random values every cycle of the LFO | |
| Time S/H | Jumps to min and max value each held for a random amount of time | |
| PianoEnv | A curved sawtooth shape | |
| Seq 1 | These are sequences that jump to different values, holding each for a sixteenth of the LFO cycle rate. | |
| Seq 2 | ||
| Seq 3 | ||
| Seq 4 | ||
| Seq 5 | ||
| Seq 6 | ||
| Seq 7 | ||
| Altern 1 | These are sequences that jump between a minimum and a maximum value, each value held for a varying interval of time. | |
| Altern 2 | ||
| Altern 3 | ||
| Altern 4 | ||
| Altern 5 | ||
| Altern 6 | ||
| Altern 7 | ||
| Altern 8 | ||
| Chromat | These are "melodic" sequences of various kinds. When modulating oscillator pitch, to obtain chromatic results, set Modulation Depth to either ±30 or ±36. | |
| Major | ||
| Major 7 | ||
| Minor 7 | ||
| Min#r# 1 | ||
| Min#r# 2 | ||
| Diminish | ||
| DecMinor | ||
| Minor3rd | ||
| Pedal | ||
| 4ths | ||
| 4ths x12 | ||
| 1625 Maj | ||
| 1625 Min | ||
| 2511 | ||
Modulation Matrix Sources Table
| DISPLAY SOURCE COMMENTS | ||
| Direct | No modulation source selected. | |
| Modulheel | Mod Wheel Mod Wheel is the controller. | |
| AftTouch | Alftertouch Modulation | is proportional to the pressure applied to a key while it is held down. (Monophonic afttouch). |
| Express | Expression pedal An external foot pedal provides the control. | |
| Velocity | Key velocity Modulation is proportional to hard the key is played. | |
| Keyboard | Key position Modulation is proportional to key position. | |
| Lfo1+ | LFO 1 '+' = LFO increases value of controlled parameter in a positive sense only. | |
| Lfo1+/- | ||
| Lfo2+ | LFO 2 | '+'= LFO increases and decreases value of controlled parameter equally. |
| Lfo2+/- | ||
| Lfo3+ | LFO 3 | |
| Lfo3+/- | ||
| Env1Amp Env2Fill Env3 - Env6 | Envelopes 1 to 6 All six envelopes are triggered by a keypress, and any/all may be used to vary parameters over time. Note that Env1 and Env 2 are "hard-wired" to control Amplitude and Filter parameters, but are still available to control other parameters. | |
MOD MATRIX DESTINATION TABLE
| DISPLAY DESTINATION COMMENTS | ||
| Oscillators: | ||
| 0123Pitch | Global oscillator pitch All Oscillators: Pitch Transpose | |
| 01Pitch | Per-oscillator pitch Oscillator 1: Pitch Transpose | |
| 02Pitch | Oscillator 2: Pitch Transpose | |
| 03Pitch | Oscillator 3: Pitch Transpose | |
| 01Usync | Per-oscillator Variable Sync Oscillator 1: Virtual Sync | |
| 02Usync | Oscillator 2: Virtual Sync | |
| 03Usync | Oscillator 3: Virtual Sync | |
| 01Pw/Idx | Per-oscillator pulse width/Wave Table Index | Oscillator 1: Pulsewidth / Wavetable Index |
| 02Pw/Idx | Oscillator 2: Pulsewidth / Wavetable Index | |
| 03Pw/Idx | Oscillator 3: Pulsewidth / Wavetable Index | |
| 01Hard | Per-oscillator hardness Oscillator 1: Hardness | |
| 02Hard | Oscillator 2: Hardness | |
| 03Hard | Oscillator 3: Hardness | |
| Mixors: | ||
| 01Level | Mixer input levels Mixer: Oscillator 1 Level | |
| 02Level | Mixer: Oscillator 2 Level | |
| 03Level | Mixer: Oscillator 3 Level | |
| NoiseLvl | Mixer: Noise Level | |
| RM1*3Lvl | Mixer: Ring Mod 1*3 Level | |
| RM2*3Lvl | Mixer: Ring Mod 2*3 Level | |
| Filters: | ||
| F10Amt | Pre-filter distortion, per-filter | Filter 1: Distortion Amount |
| F20Amt | Filter 2: Distortion Amount | |
| F1Freq | Per-filter frequency Filter 1: Frequency | |
| F2Freq | Filter 2: Frequency | |
| F1Res | Per-filter resonance Filter 1: Resonance | |
| F2Res | Filter 2: Resonance | |
| FBalance | Filter 1/Filter 2 balance Filter Balance | |
| LFOs: | ||
| L1Rate | Per-LFO frequency LFO 1: Rate | |
| L2Rate | LFO 2: Rate | |
| L3Rate | LFO 3: Rate | |
| Envelopes: | ||
| EnviDec | Envelope Decay Time Envelope 1 (Amp): Decay Time | |
| EnviDec | Envelope 2 (Filter): Decay Time | |
| FX: | ||
| FX1Amt | FX1: FX Amount | |
| FX2Amt | FX2: FX Amount | |
| FX3Amt | FX3: FX Amount | |
| FX4Amt | FX4: FX Amount | |
| FX5Amt | FX5: FX Amount | |
| FXFeedback | FX: FX Feedback | |
| FXletDry | FX: Wet Level | |
| Ch1Rate | Chorus parameters Chorus 1: Rate | |
| Ch1Depth | Chorus 1: Depth | |
| Ch1Delay | Chorus 1: Delay | |
| Ch1Back | Chorus 1: Feedback | |
| Ch2Rate | Chorus 2: Rate | |
| Ch2Depth | Chorus 2: Depth | |
| Ch2Delay | Chorus 2: Delay | |
| Ch2Fback | Chorus 2: Feedback | |
| Ch3Rate | Chorus 3: Rate | |
| Ch3Depth | Chorus 3: Depth | |
| Ch3Delay | Chorus 3: Delay | |
| Ch3Fback | Chorus 3: Feedback | |
| Ch4Rate | Chorus 4: Rate | |
| Ch4Depth | Chorus 4: Depth | |
| Ch4Delay | Chorus 4: Delay | |
| Ch4Fback | Chorus 4: Feedback | |
| D1viTime | Delay parameters | Delay 1: Delay Time |
| D1viFbak | Delay 1: Feedback | |
| D1vi2Time | Delay 2: Delay Time | |
| D1vi2Fbak | Delay 2: Feedback | |
| EQBasLvi | EQ settings | EQ: Bass Level |
| EQBasFreq | EQ: Bass Frequency | |
| EQMidLvi | EQ: Mid Level | |
| EQMidFreq | EQ: Mid Frequency | |
| EQTrbLvi | EQ: Treble Level | |
| EQTrbFreq | EQ: Treble Frequency | |
| PanPosn | Pan Position | Pan: Pan Position |
TWEAK PARAMETERS TABLE
| DISPLAY | AREA | DETAIL |
| ---- | ||
| PortTime | Voice: Portamento Time | |
| FXJETLv1 | FX: Wet Level | |
| PstFXLv1 | Mixer: Post FX Level | |
| PanPosn | FX: Pan Position | |
| UnDetune | Voice: Unison Detune | |
| Oscillators: | ||
| 01UTInt | Oscillator 1 parameters | Oscillator 1: Wavetable Interpolation |
| 01Pw/Idx | Oscillator 1: Pulsewidth / Wavetable Index | |
| 01U5sync | Oscillator 1: Virtual Sync | |
| 01Hard | Oscillator 1: Hardness | |
| 01Dense | Oscillator 1: Density | |
| 01DnsDtn | Oscillator 1: Density Detune | |
| 01Semi | Oscillator 1: Semitone Transpose | |
| 01Cents | Oscillator 1: Cents Transpose | |
| 02UTInt | Oscillator 2 parameters | Oscillator 2: Wavetable Interpolation |
| 02Pw/Idx | Oscillator 2: Pulsewidth / Wavetable Index | |
| 02Usync | Oscillator 2: Virtual Sync | |
| 02Hard | Oscillator 2: Hardness | |
| 02Dense | Oscillator 2: Density | |
| 02DnsDtn | Oscillator 2: Density Detune | |
| 02Semi | Oscillator 2: Semitone Transpose | |
| 02Cents | Oscillator 2: Cents Transpose | |
| OSoftInt. | Oscillator 3 parameters Oscillator 3: Wavetable Interpolation | |
| 03PU/Idx | Oscillator 3: Pulsewidth / Wavetable Index | |
| 03Usync | Oscillator 3: Virtual Sync | |
| 03Hard | Oscillator 3: Hardness | |
| 03Dense | Oscillator 3: Density | |
| 03OnsDtn | Oscillator 3: Density Detune | |
| 03Semi | Oscillator 3: Semitone Transpose | |
| 03Cents | Oscillator 3: Cents Transpose | |
| Mixer: | ||
| 01Level | Mixer: Oscillator 1 Level | |
| 02Level | Mixer: Oscillator 2 Level | |
| 03Level | Mixer: Oscillator 3 Level | |
| RM1*3Lvl | Mixer: Ring Mod 1*3 Level | |
| RM2*3Lvl | Mixer: Ring Mod 2*3 Level | |
| NoiseLvl | Mixer: Noise Level | |
| Filters: | ||
| Fbalance | Filter Balance | |
| F1Freq | Filter 1: Frequency | |
| F1Res | Filter 1: Resonance | |
| F1Damnt | Filter 1: Distortion Amount | |
| F1Track | Filter 1: Keyboard Tracking | |
| F2Freq | Filter 2: Frequency | |
| F2Res | Filter 2: Resonance | |
| F2Damnt | Filter 2: Distortion Amount | |
| F2Track | Filter 2: Keyboard Tracking | |
| F1Env2 | Filter 1: Envelope 2 Amount | |
| F2Env2 | Filter 2: Envelope 2 Amount | |
| Envelope 1: | ||
| AmpAtt | Envelope 1 (Amp): Attack Time | |
| AmpDec | Envelope 1 (Amp): Decay Time | |
| AmpSus | Envelope 1 (Amp): Sustain Level | |
| AmpRel | Envelope 1 (Amp): Release Time | |
| Envelope 2: | ||
| FltAtt | Envelope 2 (Filter): Attack Time | |
| FltDec | Envelope 2 (Filter): Decay Time | |
| FltSust | Envelope 2 (Filter): Sustain Level | |
| FltRel | Envelope 2 (Filter): Release Time | |
| Envelope 3: | ||
| E3Delay | Envelope 3: Delay | |
| E3Att | Envelope 3: Attack Time | |
| E3Dec | Envelope 3: Decay Time | |
| E3Sus | Envelope 3: Sustain Level | |
| E3Re1 | Envelope 3: Release Time | |
| LFOs: | ||
| L1Rate | LFO 1: Rate | |
| L1RSync | LFO 1: Sync Rate | |
| L1Slew | LFO 1: Slow Amount | |
| L2Rate | LFO 2: Rate | |
| L2RSync | LFO 2: Sync Rate | |
| L2Slew | LFO 2: Slew Amount | |
| L3Rate | LFO 3: Rate | |
| L3RSync | LFO 3: Sync Rate |
| L351ew | LFO 3: Slew Amount | |
| FX: | ||
| FX1Rmnt | FX1: FX Amount | |
| FX2Rmnt | FX2: FX Amount | |
| FX3Rmnt | FX3: FX Amount | |
| FX4Rmnt | FX4: FX Amount | |
| FX5Rmnt | FX5: FX Amount | |
| FXFedbck | FX: FX Feedback | |
| Reserved | ||
| Reserved | ||
| D191Time | Delay parameters Delay 1: Delay Time | |
| D191Sync | Delay 1: Delay Sync Time | |
| D191Fbck | Delay 1: Feedback | |
| D191Slew | Delay 1: Slew Amount | |
| D192Time | Delay 2: Delay Time | |
| D192Sync | Delay 2: Delay Sync Time | |
| D192Fbck | Delay 2: Feedback | |
| D192Slew | Delay 2: Slew Amount | |
| Ch1Rate | Chorus parameters Chorus 1: Rate | |
| Ch1Fbck | Chorus 1: Feedback | |
| Ch1Depth | Chorus 1: Depth | |
| Ch1Delay | Chorus 1: Delay | |
| Ch2Rate | Chorus 2: Rate | |
| Ch2Fbck | Chorus 2: Feedback | |
| Ch2Depth | Chorus 2: Depth | |
| Ch2Delay | Chorus 2: Delay | |
| Ch3Rate | Chorus 3: Rate | |
| Ch3Fbck | Chorus 3: Feedback | |
| Ch3Depth | Chorus 3: Depth | |
| Ch3Delay | Chorus 3: Delay | |
| Ch4Rate | Chorus 4: Rate | |
| Ch4Fbck | Chorus 4: Feedback | |
| Ch4Depth | Chorus 4: Depth | |
| Ch4Delay | Chorus 4: Delay | |
| GtSlew | Gator parameters Gator: Slow Amount | |
| GtDecay | Gator: Decay Time | |
| GtL/RDel1 | Gator: Left/Right Delay Time | |
| ArpGETime | Arpeggiator parameters Arpeggiator: Gate Time | |
| Reserved | ||
| Modulation Depth: | ||
| M1Depth | Modulation Matrix: Slot 1 Depth | |
| M...Depth | Modulation Matrix: Slot ... Depth | |
| M28Depth | Modulation Matrix: Slot 20 Depth | |
Filter Table
| DISPLAYED AS DESCRIPTION | |
| LP6NoRes | Lo-pass, 6 dB/occt, no resonance |
| LP12 | Lo-pass, 12 dB/occt |
| LP18 | Lo-pass, 18 dB/occt |
| LP24 | Lo-pass, 24 dB/occt |
| BP6/√6 | Symmetric Band-pass, 6 dB/occt |
| BP12/√12 | Symmetric Band-pass, 12 dB/occt |
| BP6/√12 | Asymmetric Band-pass, 6 dB/occt (hi-pass), 12 dB/occt (lo-pass) |
| BP12/√6 | Asymmetric Band-pass, 12 dB/occt (hi-pass), 6 dB/occt (lo-pass) |
| BP6/√18 | Asymmetric Band-pass, 6 dB/occt (hi-pass), 18 dB/occt (lo-pass) |
| BP18/√6 | Asymmetric Band-pass, 18 dB/occt (hi-pass), 6 dB/occt (lo-pass) |
| HP6NoRes | Hi-pass, 6 dB/occt, no resonance |
| HP12 | Hi-pass, 12 dB/occt |
| HP18 | Hi-pass, 18 dB/occt |
| HP24 | Hi-pass, 24 dB/occt |
Arp Pattern Table
| DISPLAYED AS DESCRIPTION COMMENTS | ||
| Up | Ascending Sequence | begins with lowest note played |
| Down | Descending Sequence | begins with highest note played |
| Up-Down1 | Ascend/ descend Seque | quence alternates |
| Up-Down2 | As UpDown1, but lowest and highest notes are played twice | |
| Played | Key order Sequence | comprises notes in the order in which they are played |
| Random | Random The keys held | are played in a continuously-varying random sequence |
| Chord | "Polyphonic" mode All keys held are played simultaneously as a chord | |
Gator Modes Table
| MODE DISPLAY DESCRIPTION | ||
| 16-note mono | Mono16 16-note mono sequence: (A) | |
| 32-note mono | MonoAlt1 32-note mono sequence: (AB) | |
| 2 x 32-note mono | MonoAlt2 2 x 16-note sequences, each repeated: (AABB) | |
| 16-note stereo | Stereo16 2 x 16-note sequences simultaneously, (A) L, (B) R | |
| 16-note stereo | SterAlt1 2 x 16-note sequences simultaneously: (A) L, (B) R, (A) R, (B) L | |
| 16-note stereo | SterAlt2 As SterAlt1, but each sequence pair is repeated | |
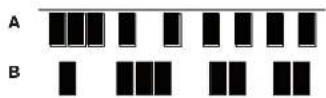
Effects Type Table
| DISPLAY | EFFECT | COMMENTS |
| Bypass | - | No effects enabled |
| Equalise | Equalisation | 3-band sweep EO |
| Compressi Compress2 | Compression | Compressor with variable threshold and ratio, and variable ADSR |
| Distorti Distort2 | Overdrive | Adds distortion effects |
| Delayi Delay2 | Delay line (Echo) | Single and multiple echos |
| Reverbi Reverb2 | Reverberation | Hall and room simulation |
| Chorusi Chorus2 Chorus3 Chorus4 | Chorus & Phasing | Time-domain effects |
| Gator | Gator | 8-level, 32-step sequencer |
INHALTSVERZEICHNIS
Einleitung 47
Hauptmerkmale: 47
Audio Routing in UltraNova. 79
UltraNova Synthesizer
Schwanenhalsmikrofon
Gleichstromnetzteil
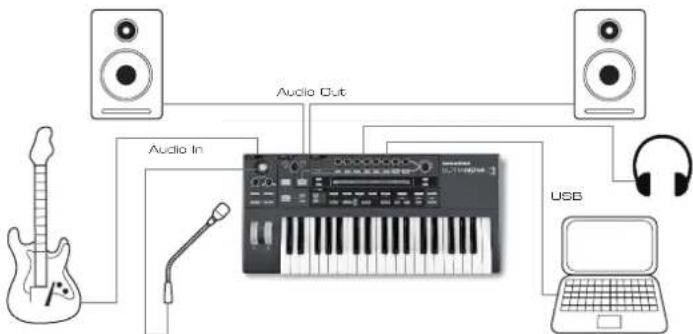
UltrasNova connected to a computer via USB. USB transmits audio and MIDI to end from the computer.
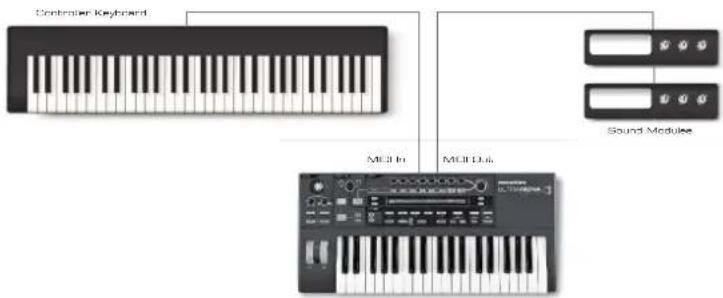
Novostion Ultranovva Version 1.0.09
| CATEGORY DISPLAYANZEIGE | |
| Bass | Bass |
| Bell | Bell |
| Classic | Classic |
| Drum | Drum |
| Keyboard | Keyboard |
| Lead | Lead |
| Movement | Movement |
| Pad | Pad |
| Poly | Poly |
| SFX | SFX |
| String | String |
| External Input | ExtInput |
| Vocoder | Vocoder |
| GENRE DISPLAYANZEIGE | |
| Classic | Classic |
| Drum 'n' Bass/ Breaks | D&B/Brks |
| House | House |
| Industrial | Industri |
| Jazz | Jazz |
| R 'n' B/Hip Hop | R&B/HHop |
| Rock and Pop | Rock/Pop |
| Techno | Techno |
| Dubstep | Dubstep |
| THICHSHUT | Posng | UPPER | Lower | Number | Punctuate |
| H o | Init Program | H a 0 space |
RE1: Ohne Funktion.
RE2: Cursor Position
| PATCHSPUE | Bank | Patch | Destination | SaveCat | SaveGenre |
| Dest+0&6 | R | B | Init Program | None | None |
RE1: Ohne Funktion.
RE2: Bankauswahl
Attack-Zeit (Attack Time)
Decay-Zeit (Decay Time)
Sustain-Pegel (Sustain Level)
RE4: Oscillator Waveform (Wellenform)
Displayanzeige:01Wave
RE2: Wave Table Interpolation
Displayanzeige:OuTInt
Initialwert: 127
RE2: Oscillator 2 Solo
Displayanzeige:025olo
Initialwert: Off
RE3: Oscillator 3 Solo
Displayanzeige:03Sol
Initialwert: Off
F1Routing: Parallel F1Routing: Series
RE3: Filter Frequency Link (Filterfrequenzkopplung)
Displayanzeige:Freelink
Initialwert: Off
RE8: Amplitude Multi-trigger
Displayanzeige:AmMTrig
RE8:Filter Multi-trigger
RE3:Envelope 3 Sustain Level
RE4:Envelope 3 Release Time
RE7:Envelope 3 Touch Trigger
RE8:Envelope 3 Multi-trigger
RE2:Envelope 3 Decay Slope
RE3: Envelope 3 Attack Track
RE4:Envelope 3 Decay Track
RE5:Envelope 3 Sustain Rate
RE7:Envelope 3 Level Track
RE3: LFO 1 Waveform (Wellenform)
Displayanzeige:Liwave
Initialwert: Sine
RE2: Source 1 (Modulationsquelle 1)
Displayanzeige:Source1
Initialwert: Direct
RE3: Source 2 (Modulationsquelle 2)
Displayanzeige:Source2
Initialwert: Direct
Touched/Filter Regler
| FX@CH=0 | FX1@HINT FX2@HINT FX3@HINT FX4@HINT FX5@HINT FX6@HINT FX7@HINT FX8@HINT FX9@HINT FX10@HINT FX11@HINT FX12@HINT FX13@HINT FX14@HINT FX15@HINT FX16@HINT FX17@HINT FX18@HINT FX19@HINT FX20@HINT FX21@HINT FX22@HINT FX23@HINT FX24@HINT FX25@HINT FX26@HINT FX27@HINT FX28@HINT FX29@HINT FX30@HINT FX31@HINT FX32@HINT FX33@HINT FX34@HINT FX35@HINT FX36@HINT FX37@HINT FX38@HINT FX39@HINT FX40@HINT FX41@HINT FX42@HINT FX43@HINT FX44@HINT FX45@HINT FX46@HINT FX47@HINT FX48@HINT FX49@HINT FX50@HINT FX51@HINT FX52@HINT FX53@HINT FX54@HINT FX55@HINT FX56@HINT FX57@HINT FX58@HINT FX59@HINT FX60@HINT FX61@HINT FX62@HINT FX63@HINT FX64@HINT FX65@HINT FX66@HINT FX67@HINT FX68@HINT FX69@HINT FX70@HINT FX71@HINT FX72@HINT FX73@HINT FX74@HINT FX75@HINT FX76@HINT FX77@HINT FX78@HINT FX79@HINT FX80@HINT FX81@HINT FX82@HINT FX83@HINT FX84@HINT FX85@HINT FX86@HINT FX87@HINT FX88@HINT FX89@HINT FX90@HINT FX91@HINT FX92@HINT FX93@HINT FX94@HINT FX95@HINT FX96@HINT FX97@HINT FX98@HINT FX99@HINT FX100@HINT FX101@HINT FX102@HINT FX103@HINT FX104@HINT FX105@HINT FX106@HINT FX107@HINT FX108@HINT FX109@HINT FX110@HINT FX111@HINT FX112@HINT FX113@HINT FX114@HINT FX115@HINT FX116@HINT FX117@HINT FX118@HINT FX119@HINT FX120@HINT FX121@HINT FX122@HINT FX123@HINT FX124@HINT FX125@HINT FX126@HINT FX127@HINT FX128@HINT FX129@HINT FX130@HINT FX131@HINT FX132@HINT FX133@HINT FX134@HINT FX135@HINT FX136@HINT FX137@HINT FX138@HINT FX139@HINT FX140@HINT FX141@HINT FX142@HINT FX143@HINT FX144@HINT FX145@HINT FX146@HINT FX147@HINT FX148@HINT FX149@HINT FX150@HINT FX151@HINT FX152@HINT FX153@HINT FX154@HINT FX155@HINT FX156@HINT FX157@HINT FX158@HINT FX159@HINT FX160@HINT FX161@HINT FX162@HINT FX163@HINT FX164@HINT FX165@HINT FX166@HINT FX167@HINT FX168@HINT FX169@HINT FX170@HINT FX171@HINT FX172@HINT FX173@HINT FX174@HINT FX175@HINT FX176@HINT FX177@HINT FX178@HINT FX179@HINT FX180@HINT FX181@HINT FX182@HINT FX183@HINT FX184@HINT FX185@HINT FX186@HINT FX187@HINT FX188@HINT FX189@HINT FX190@HINT FX191@HINT FX192@HINT FX193@HINT FX194@HINT FX195@HINT FX196@HINT FX197@HINT FX198@HINT FX199@HINT FX200@HINT FX201@HINT FX202@HINT FX203@HINT FX204@HINT FX205@HINT FX206@HINT FX207@HINT FX208@HINT FX209@HINT FX210@HINT FX211@HINT FX212@HINT FX213@HINT FX214@HINT FX215@HINT FX216@HINT FX217@HINT FX218@HINT FX219@HINT FX220@HINT FX221@HINT FX222@HINT FX223@HINT FX224@HINT FX225@HINT FX226@HINT FX227@HINT FX228@HINT FX229@HINT FX230@HINT FX231@HINT FX232@HINT FX233@HINT FX234@HINT FX235@HINT FX236@HINT FX237@HINT FX238@HINT FX239@HINT FX240@HINT FX241@HINT FX242@HINT FX243@HINT FX244@HINT FX245@HINT FX246@HINT FX247@HINT FX248@HINT FX249@HINT FX250@HINT FX251@HINT FX252@HINT FX253@HINT FX254@HINT FX255@HINT FX256@HINT FX257@HINT FX258@HINT FX259@HINT FX260@HINT FX261@HINT FX262@HINT FX263@HINT FX264@HINT FX265@HINT FX266@HINT FX267@HINT FX268@HINT FX269@HINT FX270@HINT FX271@HINT FX272@HINT FX273@HINT FX274@HINT FX275@HINT FX276@HINT FX277@HINT FX278@HINT FX279@HINT FX280@HINT FX281@HINT FX282@HINT FX283@HINT FX284@HINT FX285@HINT FX286@HINT FX287@HINT FX288@HINT FX289@HINT FX290@HINT FX291@HINT FX292@HINT FX293@HINT FX294@HINT FX295@HINT FX296@HINT FX297@HINT FX298@HINT FX299@HINT FX300@HINT FX301@HINT FX302@HINT FX303@HINT FX304@HINT FX305@HINT FX306@HINT FX307@HINT FX308@HINT FX309@HINT FX310@HINT FX311@HINT FX312@HINT FX313@HINT FX314@HINT FX315@HINT FX316@HINT FX317@HINT FX318@HINT FX319@HINT FX320@HINT FX321@HINT FX322@HINT FX323@HINT FX324@HINT FX325@HINT FX326@HINT FX327@HINT FX328@HINT FX329@HINT FX330@HINT FX331@HINT FX332@HINT FX333@HINT FX334@HINT FX335@HINT FX336@HINT FX337@HINT FX338@HINT FX339@HINT FX340@HINT FX341@HINT FX342@HINT FX343@HINT FX344@HINT FX345@HINT FX346@HINT FX347@HINT FX348@HINT FX349@HINT FX350@HINT FX351@HINT FX352@HINT FX353@HINT FX354@HINT FX355@HINT FX356@HINT FX357@HINT FX358@HINT FX359@HINT FX360@HINT FX361@HINT FX362@HINT FX363@HINT FX364@HINT FX365@HINT FX366@HINT FX367@HINT FX368@HINT FX369@HINT FX370@HINT FX371@HINT FX372@HINT FX373@HINT FX374@HINT FX375@HINT FX376@HINT FX377@HINT FX378@HINT FX379@HINT FX380@HINT FX381@HINT FX382@HINT FX383@HINT FX384@HINT FX385@HINT FX386@HINT FX387@HINT FX388@HINT FX389@HINT FX390@HINT FX391@HINT FX392@HINT FX393@HINT FX394@HINT FX395@HINT FX396@HINT FX397@HINT FX398@HINT FX399@HINT FX400@HINT FX401@HINT FX402@HINT FX403@HINT FX404@HINT FX405@HINT FX406@HINT FX407@HINT FX408@HINT FX409@HINT FX410@HINT FX411@HINT FX412@HINT FX413@HINT FX414@HINT FX415@HINT FX416@HINT FX417@HINT FX418@HINT FX419@HINT FX420@HINT FX421@HINT FX422@HINT FX423@HINT FX424@HINT FX425@HINT FX426@HINT FX427@HINT FX428@HINT FX429@HINT FX430@HINT FX431@HINT FX432@HINT FX433@HINT FX434@HINT FX435@HINT FX436@HINT FX437@HINT FX438@HINT FX439@HINT FX440@HINT FX441@HINT FX442@HINT FX443@HINT FX444@HINT FX445@HINT FX446@HINT FX447@HINT FX448@HINT FX449@HINT FX450@HINT FX451@HINT FX452@HINT FX453@HINT FX454@HINT FX455@HINT FX456@HINT FX457@HINT FX458@HINT FX459@HINT FX460@HINT FX461@HINT FX462@HINT FX463@HINT FX464@HINT FX465@HINT FX466@HINT FX467@HINT FX468@HINT FX469@HINT FX470@HINT FX471@HINT FX472@HINT FX473@HINT FX474@HINT FX475@HINT FX476@HINT FX477@HINT FX478@HINT FX479@HINT FX480@HINT FX481@HINT FX482@HINT FX483@HINT FX484@HINT FX485@HINT FX486@HINT FX487@HINT FX488@HINT FX489@HINT FX490@HINT FX491@HINT FX492@HINT FX493@HINT FX494@HINT FX495@HINT FX496@HINT FX497@HINT FX498@HINT FX499@HINT FX500@HINT FX501@HINT FX502@HINT FX503@HINT FX504@HINT FX505@HINT FX506@HINT FX507@HINT FX508@HINT FX509@HINT FX510@HINT FX511@HINT FX512@HINT FX513@HINT FX514@HINT FX515@HINT FX516@HINT FX517@HINT FX518@HINT FX519@HINT FX520@HINT FX521@HINT FX522@HINT FX523@HINT FX524@HINT FX525@HINT FX526@HINT FX527@HINT FX528@HINT FX529@HINT FX530@HINT FX531@HINT FX532@HINT FX533@HINT FX534@HINT FX535@HINT FX536@HINT FX537@HINT FX538@HINT FX539@HINT FX540@HINT FX541@HINT FX542@HINT FX543@HINT FX544@HINT FX545@HINT FX546@HINT FX547@HINT FX548@HINT FX549@HINT FX550@HINT FX551@HINT FX552@HINT FX553@HINT FX554@HINT FX555@HINT FX556@HINT FX557@HINT FX558@HINT FX559@HINT FX560@HINT FX561@HINT FX562@HINT FX563@HINT FX564@HINT FX565@HINT FX566@HINT FX567@HINT FX568@HINT FX569@HINT FX570@HINT FX571@HINT FX572@HINT FX573@HINT FX574@HINT FX575@HINT FX576@HINT FX577@HINT FX578@HINT FX579@HINT FX580@HINT FX581@HINT FX582@HINT FX583@HINT FX584@HINT FX585@HINT FX586@HINT FX587@HINT FX588@HINT FX589@HINT FX600@HINT FX601@HINT FX602@HINT FX603@HINT FX604@HINT FX605@HINT FX606@HINT FX607@HINT FX608@HINT FX609@HINT FX610@HINT FX611@HINT FX612@HINT FX613@HINT FX614@HINT FX615@HINT FX616@HINT FX617@HINT FX618@HINT FX619@HINT FX620@HINT FX621@HINT FX622@HINT FX623@HINT FX624@HINT FX625@HINT FX626@HINT FX627@HINT FX628@HINT FX629@HINT FX630@HINT FX631@HINT FX632@HINT FX633@HINT FX634@HINT FX635@HINT FX636@HINT FX637@HINT FX638@HINT FX639@HINT FX640@HINT FX641@HINT FX642@HINT FX643@HINT FX644@HINT FX645@HINT FX646@HINT FX647@HINT FX648@HINT FX649@HINT FX650@HINT FX651@HINT FX652@HINT FX653@HINT FX654@HINT FX655@HINT FX656@HINT FX657@HINT FX658@HINT FX659@HINT FX660@HINT FX661@HINT FX662@HINT FX663@HINT FX664@HINT FX665@HINT FX666@HINT FX667@HINT FX668@HINT FX669@HINT FX670@HINT FX671@HINT FX672@HINT FX673@HINT FX674@HINT FX675@HINT FX676@HINT FX677@HINT FX678@HINT FX679@HINT FX680@HINT FX681@HINT FX682@HINT FX683@HINT FX684@HINT FX685@HINT FX686@HINT FX687@HINT FX688@HINT FX689@HINT FX690@HINT FX691@HINT FX692@HINT FX693@HINT FX694@HINT FX695@HINT FX696@HINT FX697@HINT FX698@HINT FX699@HINT FX700@HINT FX701@HINT FX702@HINT FX703@HINT FX704@HINT FX705@HINT FX706@HINT FX707@HINT FX708@HINT FX709@HINT FX710@HINT FX711@HINT FX712@HINT FX713@HINT FX714@HINT FX715@HINT FX716@HINT FX717@HINT FX718@HINT FX719@HINT FX720@HINT FX721@HINT FX722@HINT FX723@HINT FX724@HINT FX725@HINT FX726@HINT FX727@HINT FX728@HINT FX729@HINT FX730@HINT FX731@HINT FX732@HINT FX733@HINT FX734@HINT FX735@HINT FX736@HINT FX737@HINT FX738@HINT FX739@HINT FX740@HINT FX741@HINT FX742@HINT FX743@HINT FX744@HINT FX745@HINT FX746@HINT FX747@HINT FX748@HINT FX749@HINT FX750@HINT FX751@HINT FX752@HINT FX753@HINT FX754@HINT FX755@HINT FX756@HINT FX757@HINT FX758@HINT FX759@HINT FX760@HINT FX761@HINT FX762@HINT FX763@HINT FX764@HINT FX765@HINT FX766@HINT FX767@HINT FX768@HINT FX769@HINT FX770@HINT FX771@HINT FX772@HINT FX773@HINT FX774@HINT FX775@HINT FX776@HINT FX777@HINT FX778@HINT FX779@HINT FX780@HINT FX781@HINT FX782@HINT FX783@HINT FX784@HINT FX785@HINT FX786@HINT FX787@HINT FX788@HINT FX789@HINT FX790@HINT FX791@HINT FX792@HINT FX793@HINT FX794@HINT FX795@HINT FX796@HINT FX797@HINT FX798@HINT FX799@HINT FX800@HINT FX801@HINT FX802@HINT FX803@HINT FX804@HINT FX805@HINT FX806@HINT FX807@HINT FX808@HINT FX809@HINT FX810@HINT FX811@HINT FX812@HINT FX813@HINT FX814@HINT FX815@HINT FX816@HINT FX817@HINT FX818@HINT FX819 @ HINT FX820 @ HINT FX821 @ HINT FX822 @ HINT FX823 @ HINT FX824 @ HINT FX825 @ HINT FX826 @ HINT FX827 @ HINT FX828 @ HINT FX829 @ HINT FX830 @ HINT FX831 @ HINT FX832 @ HINT FX833 @ HINT FX834 @ HINT FX835 @ HINT FX836 @ HINT FX837 @ HINT FX838 @ HINT FX839 @ HINT FX840 @ HINT FX841 @ HINT FX842 @ HINT FX843 @ HINT FX844 @ HINT FX845 @ HINT FX846 @ HINT FX847 @ HINT FX848 @ HINT FX849 @ HINT FX850 @ HINT FX851 @ HINT FX852 @ HINT FX853 @ HINT FX854 @ HINT FX855 @ HINT FX856 @ HINT FX857 @ HINT FX858 @ HINT FX859 @ HINT FX860 @ HINT FX861 @ HINT FX862 @ HINT FX863 @ HINT FX864 @ HINT FX865 @ HINT FX866 @ HINT FX867 @ HINT FX868 @ HINT FX869 @ HINT FX870 @ HINT FX871 @ HINT FX872 @ HINT FX873 @ HINT FX874 @ HINT FX875 @ HINT FX876 @ HINT FX877 @ HINT FX878 @ HINT FX879 @ HINT FX880 @ HINT FX881 @ HINT FX882 @ HINT FX883 @ HINT FX884 @ HINT FX885 @ HINT FX886 @ HINT FX887 @ HINT FX888 @ HINT FX889 @ HINT FX890 @ HINT FX891 @ HINT FX892 @ HINT FX893 @ HINT FX894 @ HINT FX895 @ HINT FX896 @ HINT FX897 @ HINT FX898 @ HINT FX899 @ HINT FX900 @ HINT FX901 @ HINT FX902 @ HINT FX903 @ HINT FX904 @ HINT FX905 @ HINT FX906 @ HINT FX907 @ HINT FX908 @ HINT FX909 @ HINT FX910 @ HINT FX911 @ HINT FX912 @ HINT FX913 @ HINT FX914 @ HINT FX915 @ HINT FX916 @ HINT FX917 @ HINT FX918 @ HINT FX919 @ HINT FX920 @ HINT FX921 @ HINT FX922 @ HINT FX923 @ HINT FX924 @ HINT FX925 @ HINT FX926 @ HINT FX927 @ HINT FX928 @ HINT FX929 @ HINT FX930 @ HINT FX931 @ HINT FX932 @ HINT FX933 @ HINT FX934 @ HINT FX935 @ HINT FX936 @ HINT FX937 @ HINT FX938 @ HINT FX939 @ HINT FX940 @ HINT FX941 @ HINT FX942 @ HINT FX943 @ HINT FX944 @ HINT FX945 @ HINT FX946 @ HINT FX947 @ HINT FX948 @ HINT FX949 @ HINT FX950 @ HINT FX951 @ HINT FX952 @ HINT FX953 @ HINT FX954 @ HINT FX955 @ HINT FX956 @ HINT FX957 @ HINT FX958 @ HINT FX959 @ HINT FX960 @ HINT FX961 @ HINT FX962 @ HINT FX963 @ HINT FX964 @ HINT FX965 @ HINT FX966 @ HINT FX967 @ HINT FX968 @ HINT FX969 @ HINT FX970 @ HINT FX971 @ HINT FX972 @ HINT FX973 @ HINT FX974 @ HINT FX975 @ HINT FX976 @ HINT FX977 @ HINT FX978 @ HINT FX979 @ HINT FX980 @ HINT FX981 @ HINT FX982 @ HINT FX983 @ HINT FX984 @ HINT FX985 @ HINT FX986 @ HINT FX987 @ HINT FX988 @ HINT FX989 @ HINT FX990 @ HINT FX991 @ HINT FX992 @ HINT FX993 @ HINT FX994 @ HINT FX995 @ HINT FX996 @ HINT FX997 @ HINT FX998 @ HINT FX999 @ HINT FX1000 @ HINT FX1010 @ HINT FX1020 @ HINT FX1030 @ HINT FX1040 @ HINT FX1050 @ HINT FX1060 @ HINT FX1070 @ HINT FX1080 @ HINT FX1090 @ HINT FX1100 @ HINT FX1110 @ HINT FX1120 @ HINT FX1130 @ HINT FX1140 @ HINT FX1150 @ HINT FX1160 @ HINT FX1170 @ HINT FX1180 @ HINT FX1190 @ HINT FX1200 @ HINT FX1210 @ HINT FX1220 @ HINT FX1230 @ HINT FX1240 @ HINT FX1250 @ HINT FX1260 @ HINT FX1270 @ HINT FX1280 @ HINT FX1290 @ HINT FX1300 @ HINT FX1310 @ HINT FX1320 @ HINT FX1330 @ HINT FX1340 @ HINT FX1350 @ HINT FX1360 @ HINT FX1370 @ HINT FX1380 @ HINT FX1390 @ HINT FX1400 @ HINT FX1410 @ HINT FX1420 @ HINT FX1430 @ HINT FX1440 @ HINT FX1450 @ HINT FX1460 @ HINT FX1470 @ HINT FX1480 @ HINT FX1490 @ HINT FX1500 @ HINT FX1510 @ HINT FX1520 @ HINT FX1530 @ HINT FX1540 @ HINT FX1550 @ HINT FX1560 @ HINT FX1570 @ HINT FX1580 @ HINT FX1590 @ HINT FX1600 @ HINT FX1610 @ HINT FX1620 @ HINT FX1630 @ HINT FX1640 @ HINT FX1650 @ HINT FX1660 @ HINT FX1670 @ HINT FX1680 @ HINT FX1690 @ HINT FX1700 @ HINT FX1710 @ HINT FX1720 @ HINT FX1730 @ HINT FX1740 @ HINT FX1750 @ HINT FX1760 @ HINT FX1770 @ HINT FX1780 @ HINT FX1790 @ HINT FX1800 @ HINT FX1810 @ HINT FX1820 @ HINT FX1830 @ HINT FX1840 @ HINT FX1850 @ HINT FX1860 @ HINT FX1870 @ HINT FX1880 @ HINT FX1890 @ HINT FX1900 @ HINT FX1910 @ HINT FX1920 @ HINT FX1930 @ HINT FX1940 @ HINT FX1950 @ HINT FX1960 @ HINT FX1970 @ HINT FX1980 @ HINT FX1990 @ HINT FX2000 @ HINT FX2010 @ HINT FX2020 @ HINT FX2030 @ HINT FX2040 @ HINT FX2050 @ HINT FX2060 @ HINT FX2070 @ HINT FX2080 @ HINT FX2090 @ HINT FX2100 @ HINT FX2110 @ HINT FX2120 @ HINT FX2130 @ HINT FX2140 @ HINT FX2150 @ HINT FX2160 @ HINT FX2170 @ HINT FX2180 @ HINT FX2190 @ HINT FX2200 @ HINT FX2210 @ HINT FX2220 @ HINT FX2230 @ HINT FX2240 @ HINT FX2250 @ HINT FX2260 @ HINT FX2270 @ HINT FX2280 @ HINT FX2290 @ HINT FX2300 @ HINT FX2310 @ HINT FX2320 @ HINT FX2330 @ HINT FX2340 @ HINT FX2350 @ HINT FX2360 @ HINT FX2370 @ HINT FX2380 @ HINT FX2390 @ HINT FX2400 @ HINT FX2410 @ HINT FX2420 @ HINT FX2430 @ HINT FX2440 @ HINT FX2450 @ HINT FX2460 @ HINT FX2470 @ HINT FX2480 @ HINT FX2490 @ HINT FX2500 @ HINT FX2510 @ HINT FX2520 @ HINT FX2530 @ HINT FX2540 @ HINT FX2550 @ HINT FX2560 @ HINT FX2570 @ HINT FX2580 @ HINT FX2590 @ HINT FX2600 @ HINT FX2610 @ HINT FX2620 @ HINT FX2630 @ HINT FX2640 @ HINT FX2650 @ HINT FX2660 @ HINT FX2670 @ HINT FX2680 @ HINT FX2690 @ HINT FX2700 @ HINT FX2710 @ HINT FX2720 @ HINT FX2730 @ HINT FX2740 @ HINT FX2750 @ HINT FX2760 @ HINT FX2770 @ HINT FX2780 @ HINT FX2790 @ HINT FX2800 @ HINT FX2810 @ HINT FX2820 @ HINT FX2830 @ HINT FX2840 @ HINT FX2850 @ HINT FX2860 @ HINT FX2870 @ HINT FX2880 @ HINT FX2890 @ HINT FX2900 @ HINT FX2910 @ HINT FX2920 @ HINT FX2930 @ HINT FX2940 @ HINT FX2950 @ HINT FX2960 @ HINT FX2970 @ HINT FX2980 @ HINT FX2990 @ HINT FX3000 @ HINT FX3010 @ HINT FX3020 @ HINT FX3030 @ HINT FX3040 @ HINT FX3050 @ HINT FX3060 @ HINT FX3070 @ HINT FX3080 @ HINT FX3090 @ HINT FX3100 @ HINT FX3110 @ HINT FX3120 @ HINT FX3130 @ HINT FX3140 @ HINT FX3150 @ HINT FX3160 @ HINT FX3170 @ HINT FX3180 @ HINT FX3190 @ HINT FX3200 @ HINT FX3210 @ HINT FX3220 @ HINT FX3230 @ HINT FX3240 @ HINT FX3250 @ HINT FX3260 @ HINT FX3270 @ HINT FX3280 @ HINT FX3290 @ HINT FX3300 @ HINT FX3310 @ HINT FX3320 @ HINT FX3330 @ HINT FX3340 @ HINT FX3350 @ HINT FX3360 @ HINT FX3370 @ HINT FX3380 @ HINT FX3390 @ HINT FX3400 @ HINT FX3410 @ HINT FX3420 @ HINT FX3430 @ HINT FX3440 @ HINT FX3450 @ HINT FX3460 @ HINT FX3470 @ HINT FX3480 @ HINT FX3490 @ HINT FX3500 @ HINT FX3510 @ HINT FX3520 @ HINT FX3530 @ HINT FX3540 @ HINT FX3550 @ HINT FX3560 @ HINT FX3570 @ HINT FX3580 @ HINT FX3590 @ HINT FX3600 @ HINT FX3610 @ HINT FX3620 @ HINT FX3630 @ HINT FX3640 @ HINT FX3650 @ HINT FX3660 @ HINT FX3670 @ HINT FX3680 @ HINT FX3690 @ HINT FX3700 @ HINT FX3710 @ HINT FX3720 @ HINT FX3730 @ HINT FX3740 @ HINT FX3750 @ HINT FX3760 @ HINT FX3770 @ HINT FX3780 @ HINT FX3790 @ HINT FX3800 @ HINT FX3810 @ HINT FX3820 @ HINT FX3830 @ HINT FX3840 @ HINT FX3850 @ HINT FX3860 @ HINT FX3870 @ HINT FX3880 @ HINT FX3890 @ HINT FX3900 @ HINT FX3910 @ HINT FX3920 @ HINT FX3930 @ HINT FX3940 @ HINT FX3950 @ HINT FX3960 @ HINT FX3970 @ HINT FX3980 @ HINT FX3990 @ HINT FX4000 @ HINT FX4010 @ HINT FX4020 @ HINT FX4030 @ HINT FX4040 @ HINT FX4050 @ HINT FX4060 @ HINT FX4070 @ HINT FX4080 @ HINT FX4090 @ HINT FX4100 @ HINT FX4110 @ HINT FX4120 @ HINT FX4130 @ HINT FX4140 @ HINT FX4150 @ HINT FX4160 @ HINT FX4170 @ HINT FX4180 @ HINT FX4190 @ HINT FX4200 @ HINT FX4210 @ HINT FX4220 @ HINT FX4230 @ HINT FX4240 @ HINT FX4250 @ HINT FX4260 @ HINT FX4270 @ HINT FX4280 @ HINT FX4290 @ HINT FX4300 @ HINT FX4310 @ HINT FX4320 @ HINT FX4330 @ HINT FX4340 @ HINT FX4350 @ HINT FX4360 @ HINT FX4370 @ HINT FX4380 @ HINT FX4390 @ HINT FX4400 @ HINT FX4410 @ HINT FX4420 @ HINT FX4430 @ HINT FX4440 @ HINT FX4450 @ HINT FX4460 @ HINT FX4470 @ HINT FX4480 @ HINT FX4490 @ HINT FX4500 @ HINT FX4510 @ HINT FX4520 @ HINT FX4530 @ HINT FX4540 @ HINT FX4550 @ HINT FX4560 @ HINT FX4570 @ HINT FX4580 @ HINT FX4590 @ HINT FX4600 @ HINT FX4610 @ HINT FX4620 @ HINT FX4630 @ HINT FX4640 @ HINT FX4650 @ HINT FX4660 @ HINT FX4670 @ HINT FX4680 @ HINT FX4690 @ HINT FX4700 @ HINT FX4710 @ HINT FX4720 @ HINT FX4730 @ HINT FX4740 @ HINT FX4750 @ HINT FX4760 @ HINT FX4770 @ HINT FX4780 @ HINT FX4790 @ HINT FX4800 @ HINT FX4810 @ HINT FX4820 @ HINT FX4830 @ HINT FX4840 @ HINT FX4850 @ HINT FX4860 @ HINT FX4870 @ HINT FX4880 @ HINT FX4890 @ HINT FX4900 @ HINT FX4910 @ HINT FX4920 @ HINT FX4930 @ HINT FX4940 @ HINT FX4950 @ HINT FX4960 @ HINT FX4970 @ HINT FX4980 @ HINT FX4990 @ HINT FX500 @ HINT FX501 @ HINT FX502 @ HINT FX503 @ HINT FX504 @ HINT FX505 @ HINT FX506 @ HINT FX507 @ HINT FX508 @ HINT FX509 @ HINT FX510 @ HINT FX511 @ HINT FX512 @ HINT FX513 @ HINT FX514 @ HINT FX515 @ HINT FX516 @ HINT FX517 @ HINT FX518 @ HINT FX519 @ HINT FX520 @ HINT FX521 @ HINT FX522 @ HINT FX523 @ HINT FX524 @ HINT FX525 @ HINT FX526 @ HINT FX527 @ HINT FX528 @ HINT FX529 @ HINT FX530 @ HINT FX531 @ HINT FX532 @ HINT FX533 @ HINT FX534 @ HINT FX535 @ HINT FX536 @ HINT FX537 @ HINT FX538 @ HINT FX539 @ HINT FX540 @ HINT FX541 @ HINT FX542 @ HINT FX543 @ HINT FX544 @ HINT FX545 @ HINT FX546 @ HINT FX547 @ HINT FX548 @ HINT FX549 @ HINT FX550 @ HINT FX551 @ HINT FX552 @ HINT FX553 @ HINT FX554 @ HINT FX555 @ HINT FX556 @ HINT FX557 @ HINT FX558 @ HINT FX559 @ HINT FX560 @ HINT FX561 @ HINT FX562 @ HINT FX563 @ HINT FX564 @ HINT FX565 @ HINT FX566 @ HINT FX567 @ HINT FX568 @ HINT FX569 @ HINT FX570 @ HINT FX571 @ HINT FX572 @ HINT FX573 @ HINT FX574 @ HINT FX575 @ HINT FX576 @ HINT FX577 @ HINT FX578 @ HINT FX579 @ HINT FX580 @ HINT FX581 @ HINT FX582 @ HINT FX583 @ HINT FX584 @ HINT FX585 @ HINT FX586 @ HINT FX587 @ HINT FX588 @ HINT FX589 @ HINT FX590 @ HINT FX591 @ HINT FX592 @ HINT FX593 @ HINT FX594 @ HINT FX595 @ HINT FX596 @ HINT FX597 @ HINT FX598 @ HINT FX599 @ HINT FX600 @ HINT FX601 @ HINT FX602 @ HINT FX603 @ HINT FX604 @ HINT FX605 @ HINT FX606 @ HINT FX607 @ HINT FX608 @ HINT FX609 @ HINT FX610 @ HINT FX611 @ HINT FX612 @ HINT FX613 @ HINT FX614 @ HINT FX615 @ HINT FX616 @ HINT FX617 @ HINT FX618 @ HINT FX619 @ HINT FX620 @ HINT FX621 @ HINT FX622 @ HINT FX623 @ HINT FX624 @ HINT FX625 @ HINT FX626 @ HINT FX627 @ HINT FX628 @ HINT FX629 @ HINT FX630 @ HINT FX631 @ HINT FX632 @ HINT FX633 @ HINT FX634 @ HINT FX635 @ HINT FX636 @ HINT FX637 @ HINT FX638 @ HINT FX639 @ HINT FX640 @ HINT FX641 @ HINT FX642 @ HINT FX643 @ HINT FX644 @ HINT FX645 @ HINT FX646 @ HINT FX647 @ HINT FX648 @ HINT FX649 @ HINT FX650 @ HINT FX651 @ HINT FX652 @ HINT FX653 @ HINT FX654 @ HINT FX655 @ HINT FX656 @ HINT FX657 @ HINT FX658 @ HINT FX659 @ HINT FX660 @ HINT FX661 @ HINT FX662 @ HINT FX663 @ HINT FX664 @ HINT FX665 @ HINT FX666 @ HINT FX667 @ HINT FX668 @ HINT FX669 @ HINT FX670 @ HINT FX671 @ HINT FX672 @ HINT FX673 @ HINT FX674 @ HINT FX675 @ HINT FX676 @ HINT FX677 @ HINT FX678 @ HINT FX679 @ HINTFX680 @ HINDFX681 @ HINDFX682 @ HINDFX683 @ HINDFX684 @ HINDFX685 @ HINDFX686 @ HINDFX687 @ HINDFX688 @ HINDFX689 @ HINDFX690 @ HINDFX691 @ HINDFX692 @ HINDFX693 @ HINDFX694 @ HINDFX695 @ HINDFX696 @ HINDFX697 @ HINDFX698 @ HINDFX699 @ HINDFX700 @ HINDFX701 @ HINDFX702 @ HINDFX703 @ HINDFX704 @ HINDFX705 @ HINDFX706 @ HINDFX707 @ HINDFX708 @ HINDFX709 @ HINDFX710 @ HINDFX711 @ HINDFX712 @ HINDFX713 @ HINDFX714 @ HINDFX715 @ HINDFX716 @ HINDFX717 @ HINDFX718 @ HINDFX719 @ HINDFX720 @ HINDFX721 @ HINDFX722 @ HINDFX723 @ HINDFX724 @ HINDFX725 @ HINDFX726 @ HINDFX727 @ HINDFX728 @ HINDFX729 @ HINDFX730 @ HINDFX731 @ HINDFX732 @ HINDFX733 @ HINDFX734 @ HINDFX735 @ HINDFX736 @ HINDFX737 @ HINDFX738 @ HINDFX739 @ HINDFX740 @ HINDFX741 @ HINDFX742 @ HINDFX743 @ HINDFX744 @ HINDFX745 @ HINDFX746 @ HINDFX747 @ HINDFX748 @ HINDFX749 @ HINDFX750 @ HINDFX751 @ HINDFX752 @ HINDFX753 @ HINDFX754 @ HINDFX755 @ HINDFX756 @ HINDFX757 @ HINDFX758 @ HINDFX759 @ HINDFX760 @ HINDFX761 @ HINDFX762 @ HINDFX763 @ HINDFX764 @ HINDFX765 @ HINDFX766 @ HINDFX767 @ HINDFX768 @ HINDFX769 @ HINDFX770 @ HINDFX771 @ HINDFX772 @ HINDFX773 @ HINDFX774 @ HINDFX775 @ HINDFX776 @ HINDFX777 @ HINDFX778 @ HINDFX779 @ HINDFX780 @ HINDFX781 @ HINDFX782 @ HINDFX783 @ HINDFX784 @ HINDFX785 @ HINDFX786 @ HINDFX787 @ HINDFX788 @ HINDFX789 @ HINDFX790 @ HINDFX791 @ HINDFX792 @ HINDFX793 @ HINDFX794 @ HINDFX795 @ HINDFX796 @ HINDFX797 @ HINDFX798 @ HINDFX799 @ HINDFX800 @ HINDFX801 @ HINDFX802 @ HINDFX803 @ HINDFX804 @ HINDFX805 @ HINDFX806 @ HINDFX807 @ HINDFX808 @ HINDFX809 @ HINDFX810 @ HINDFX811 @ HINDFX812 @ HINDFX813 @ HINDFX814 @ HINDFX815 @ HINDFX816 @ HINDFX817 @ HINDFX818 @ HINDFX819 @ HINDFX820 @ HINDFX821 @ HINDFX822 @ HINDFX823 @ HINDFX824 @ HINDFX825 @ HINDFX826 @ HINDFX827 @ HINDFX828 @ HINDFX829 @ HINDFX830 @ HINDFX831 @ HINDFX832 @ HINDFX833 @ HINDFX834 @ HINDFX835 @ HINDFX836 @ HINDFX837 @ HINDFX838 @ HINDFX839 @ HINDFX840 @ HINDFX841 @ HINDFX842 @ HINDFX843 @ HINDFX844 @ HINDFX845 @ HINDFX846 @ HINDFX847 @ HINDFX848 @ HINDFX849 @ HINDFX850 @ HINDFX851 @ HINDFX852 @ HINDFX853 @ HINDFX854 @ HINDFX855 @ HINDFX856 @ HINDFX857 @ HINDFX858 @ HINDFX859 @ HINDFX860 @ HINDFX861 @ HINDFX862 @ HINDFX863 @ HINDFX864 @ HINDFX865 @ HINDFX866 @ HINDFX867 @ HINDFX868 @ HINDFX869 @ HINDFX870 @ HINDFX871 @ HINDFX872 @ HINDFX873 @ HINDFX874 @ HINDFX875 @ HINDFX876 @ HINDFX877 @ HINDFX878 @ HINDFX879 @ HINDFX880 @ HINDFX881 @ HINDFX882 @ HINDFX883 @ HINDFX884 @ HINDFX885 @ HINDFX886 @ HINDFX887 @ HINDFX888 @ HINDFX889 @ HINDFX890 @ HINDFX891 @ HINDFX892 @ HINDFX893 @ HINDFX894 @ HINDFX895 @ HINDFX896 @ HINDFX897 @ HINDFX898 @ HINDFX899 @ HINDFX900 @ HINDFX901 @ HINDFX902 @ HINDFX903 @ HINDFX904 @ HINDFX905 @ HINDFX906 @ HINDFX907 @ HINDFX908 @ HINDFX909 @ HINDFX910 @ HINDFX911 @ HINDFX912 @ HINDFX913 @ HINDFX914 @ HINDFX915 @ HINDFX916 @ HINDFX917 @ HINDFX918 @ HINDFX919 @ HINDFX920 @ HINDFX921 @ HINDFX922 @ HINDFX923 @ HINDFX924 @ HINDFX925 @ HINDFX926 @ HINDFX927 @ HINDFX928 @ HINDFX929 @ HINDFX930 @ HINDFX931 @ HINDFX932 @ HINDFX933 @ HINDFX934 @ HINDFX935 @ HINDFX936 @ HINDFX937 @ HINDFX938 @ HINDFX939 @ HINDFX940 @ HINDFX941 @ HINDFX942 @ HINDFX943 @ HINDFX944 @ HINDFX945 @ HINDFX946 @ HINDFX947 @ HINDFX948 @ HINDFX949 @ HINDFX950 @ HINDFX951 @ HINDFX952 @ HINDFX953 @ HINDFX954 @ HINDFX955 @ HINDFX956 @ HINDFX957 @ HINDFX958 @ HINDFX959 @ HINDFX960 @ HINDFX961 @ HINDFX962 @ HINDFX963 @ HINDFX964 @ HINDFX965 @ HINDFX966 @ HINDFX967 @ HINDFX968 @ HINDFX969 @ HINDFX970 @ HINDFX971 @ HINDFX972 @ HINDFX973 @ HINDFX974 @ HINDFX975 @ HINDFX976 @ HINDFX977 @ HINDFX978 @ HINDFX979 @ HINDFX980 @ HINDFX981 @ HINDFX982 @ HINDFX983 @ HINDFX984 @ HINDFX985 @ HINDFX986 @ HINDFX987 @ HINDFX988 @ HINDFX989 @ HINDFX990 @ HINDFX991 @ HINDFX992 @ HINDFX993 @ HINDFX994 @ HINDFX995 @ HINDFX996 @ HINDFX997 @ HINDFX998 @ HINDFX999 @ HINDFX 1000 |
This FX Slot is bypassed or inactive
RE3: Distortion 1 Compensation
Wertebereich: Chamber, Small Room, Large Room, Small Hall, Large Hall, Great Hall
RE3:Reverb Decay (Hallzeit)
| GATOR | GToN-Off | GToLatch | GToSny | GToSny | GtSlyu | GtUcav | GtUkdel |
| On Off | 15th On | 16th 64 g |
RE1: Ohne Funktion.
RE2: Gator On/Off
Displayanzeige:GtOn/Off
Initialwert: Off
RE3: Gator Latch (Haltefungtion)
Displayanzeige:GtLatchin
Initialwert: Off
Headphones Level Control
Follow Master volume (1+2 only)
Level Balance 1+2/5+4 1270
RE1: Headphone level control select
Displayanzeige: HeadPhones Level Control
Initialwert: Follow master volume (1+2 only)
Use Level and Balance 1+2/3+4
Off On 1 Off Set by Patch
RE2: Local Control On/Off
RE5: Touched/Filter Knob Control
Initialwert: Set by Patch
| DUMP to Bank | Patch | Name Current OnePatch OneBank Hildbanks |
| USBFort R | @ Init Program | |
RE1:Dump Port Select
RE1:Dump Port Select
Current 0/5 Transmit
Current U/S Version 1.6.06
Startup 0/5 Version 1.0.00
Section Synth Edit 102
Commandes reactives 115
Commandes constamment disponibles (Tweak) 115
Bouton Touched/Filter. 116
La touche Filter 116
La touche Lock. 116
L'arpégiateur 116
ESRt ESUC ESss ESRe E3Delay ESRepeat ESTr19 ESTr19 107064000OFF Re-Trig
Bouton Touched/Filter
| APPSum | APPMode | APPPart | APPLine | APPActive | APPKount | APPUse | ClockBPF |
| 10th | Up | 1 | 64 | 1 | Off | Off | 120 |
ACCORDS SIMPLIFIÉS (CHORD)
This FX Slot is bypassed or inactive
Met I'effet Gator en service (On) ou hors service (Off).
Headphones Level Control
Follow master volume (1+2 only)
Level Balance 1+2/3+4
127 9
Use Level and Balance 1+2/3+4
Protect Local PIDiChan MidiOut Touch/Filter Off On 1 Off Set by Patch
EN1: protection de la mémoire
| DUNLP to Bank | Patch | Name Current OnePatch OneBank HIBanks |
| USBPort B | 0 | Init Progen |
EN3:selection depatch
| GURP to USBPort | ^_^ GLOBAL & AUDIO |
EN1: selection du port de transfert
| Calibrate | BendOHI ModOHI Aftouch SetAftouch |