X1 Red - Model making Hitec - Free user manual and instructions
Find the device manual for free X1 Red Hitec in PDF.

| Product Type | Charger/discharger for model batteries |
| Brand | Hitec |
| Model | X1 Red |
| Dimensions | 159 x 72.5 x 123 mm |
| Weight | 470 g |
| AC Input Voltage | 100-240 V AC |
| DC Input Voltage | 11-18 V DC |
| Max. Charge Power | 60 W |
| Charge Current Range | 0.1 - 6.0 A |
| Max. Discharge Power | 5 W |
| Discharge Current Range | 0.1 - 2.0 A |
| Compatible Battery Types | LiPo, LiFe, Li-ion, LiHV, NiCd, NiMH, Lead (Pb) |
| Number of LiPo/LiFe/Li-ion/LiHV Cells | 1 to 6 cells |
| Number of NiCd/NiMH Cells | 1 to 15 cells |
| Lead battery voltage | 2 - 20 V |
| Internal Balancer | Yes, for lithium batteries (up to 6 cells) |
| Available Charge Modes | Normal, fast, balance, storage, discharge, cycle, recharge |
| Safety Functions | Reverse polarity detection, overcharge, temperature, capacity and time protection |
| PC Software | Charge Master (free download) |
| Display | Backlit LCD with adjustable contrast |
| Maintenance | Clean with a dry cloth; avoid dust, moisture, shock |
| Warranty | Legal warranty; contact the retailer |
| Included Accessories | AC power cord, XT60 and M6 charging cables, universal balancing circuit |
Frequently Asked Questions - X1 Red Hitec
User questions about X1 Red Hitec
0 question about this device. Answer the ones you know or ask your own.
Ask a new question about this device
Download the instructions for your Model making in PDF format for free! Find your manual X1 Red - Hitec and take your electronic device back in hand. On this page are published all the documents necessary for the use of your device. X1 Red by Hitec.
USER MANUAL X1 Red Hitec
| PROGRAM SELECT(01) | |
| Battery Type: | LiPo |
| Battery Cells: | 3S |
| Mode: | Balance |
| C Current | 3.3A |
Mode Select
| PROGRAM SELECT(01) | |
| Battery Type: | LiPo |
| Battery Cells: | 3S |
| Mode: | Balance |
| C Current | 3.3A |
C. Current (Charge Current - Ladestrom)
| PROGRAM SELECT(01) | |
| Battery Type: | LiPo |
| Battery Cells: | 3S |
| Mode: | Balance |
| C Current | 3.3A |
Target Volt - (Target Voltage - Ladeschluss
| PROGRAM SELECT(01) | |
| C Current | 3.3A |
| D. Current | OFF |
| Target Volt: | 4.20V |
| Cut Volt: | OFF |
spannung)
Cut Volt - (Cutt-off Voltage - Entladeschluss-
| PROGRAM SELECT(01) | |
| C Current | 3.3A |
| D. Current | OFF |
| Target Volt: | 4.20V |
| Cut Volt: | OFF |
spannung)
| PROGRAM SELECT(01) | |
| Battery Cells: | 5S |
| Mode: | Cycle |
| C.Current | 3.0A |
| D.Current | -1.0A |
| PROGRAM SELECT(01) | |
| Cycle Count: | 4 |
| Repeak Count: | OFF |
| Trickle: | OFF |
| Cut Volt: | OFF |
| PROGRAM SELECT(01) | |
| Cycle Count: | Off |
| Repeak Count: | OFF |
| Trickle: | OFF |
| Cut Volt: | OFF |
| PROGRAM SELECT(01) | |
| Cycle Count: | OFF |
| Repeak Count: | OFF |
| Trickle: | OFF |
| Cut Volt | OFF |
CONNECT ERROR CHECK MAIN PORT
WARNING
DC IN TOO LOW
WARNING
DC IN TOO HIGH
WARNING
CELL ERROR
WARNING
CELL NUMBER
Warnings and Safety Notes. 4
Charger Layout 8
Specifications 9
Features 10
Charger Connections. 12
Getting Started 13
Operating the Charger 15
Charging Your Battery. 18
System Settings. 19
Battery Meter. 23
Warnings and Error Messages. 24
Using the Control Master - "Chargemaster" 25
Warranty and Service 26
Disposal 27
Regulatory Compliance 27
Introduction
Congratulations on your choice of the X1 RED charger. The X1 RED is a high-performance, microprocessor-controlled charger/discharger with battery management capabilities that are suitable for use with most popular battery types. The X1 RED also features integrated balancing for
six-cell, Lithium-Polymer (LiPo), Lithium-Ferrite (LiFe) and Lithium-Ion (Li-Ion), as well as the latest high voltage Lithium-Polymer (LiHV) batteries.
Please read this entire operating manual before using the X1 RED Charger.
Warnings and Safety Notes

The charging and discharging of RC hobby batteries can be dangerous.
Failure to follow these explicit warnings can result in property damage and/or loss of life.
These warnings and safety notes are of the utmost importance. You must follow these instructions for maximum safety. Failure to do so can damage the charger and the battery and in the worst cases, may cause a fire.

Never leave the charger unattended while it is connected to its power source. If any malfunction is found, terminate the process at once and refer to the operation manual.
- Never leave your charger unattended while in operation.
- Never charge on or around comubstible materials.
- Never charge a damaged battery pack.
- Low cost, no-name battery packs pose the most danger. We recommend you only use battery packs that are sold and warranted by a reputable company.
It is highly recommended that you utilize a safety device while charging lithium chemistry batteries.
Failure to follow these warnings can be considered negligence by the operator an may negate any claims for damages incurred.
Warnings and Safety Notes
The allowable AC input voltage is 100 - 240V AC
The allowable DC input voltage is 11-18V DC.
-
Keep the charger away from dust, damp, rain, heat, direct sunlight and excessive vibration.
-
If the charger is dropped or suffers any type of impact, it should be inspected by an authorized service station before using it again.
-
This charger and the battery should be put on a heat-resistant, non-flammable and non-conductive surface.
-
Never place a charger on a car seat, carpet or similar surface. Keep all flammable volatile materials away from the operating area.
-
Make sure you know the specifications of the battery to be charged or discharged to ensure it meets the requirements of this charger. If the program is set up incorrectly, the battery and charger can be damaged.
-
Fire or explosion can occur due to overcharging.
-
To avoid a short circuit between the charge lead, always connect the charge cable to the charger first, then connect the battery. Reverse the sequence when disconnecting.
-
Never attempt to charge or discharge the following types of batteries:
-
A battery fitted with an integral charge circuit or a protection circuit
-
A battery pack which consists of different types of cells (including different manufacturer's cells)
- A battery that is already fully charged or just slightly discharged and non-rechargeable batteries (these pose an explosion hazard)
- A faulty or damaged battery
- Batteries installed in a device or which are electrically linked to other components
- Batteries that are not expressly stated by the manufacturer to be suitable for the currents the charger delivers during the charge process
Please bear in mind the following points before you commence charging:
- Did you select the appropriate program suitable for the type of battery you are charging?
- Did you set up the adequate current for charging or discharging?
- Have you checked the battery voltage? Lithium battery packs can be wired in parallel and in series, i.e. a 2-cell pack can be 3.7V (in parallel) or 7.4V (in series).
- Have you checked that all connections are firm and secure?
- Make sure there are no intermittent contacts at any point in the circuit.
Standard Battery Parameters
| LiPo LiPo HV | Lion LiFe NiCd | NiMH Pb | |||||
| Nominal Voltage | 3.7V/cell 3.8V | cell 3.6V/cell 3 | 3.3V/cell 1.2V/cell 1.2V/cell 2.0V/cell | ||||
| Max. Charge Voltage | 4.2V/cell 4.35 | cell 4.1V/cell | 3.6V/cell 1.5V/cell 1.5V/cell 2.46V/ | cell | |||
| Storage Voltage | 3.8V/cell 3.85 | cell 3.7V/cell | 3.3V/cell n/a n/a | ||||
| Min. Discharge Voltage | 3.0-3.3V/cell | 3.1-3.4V/cell | 2.9-3.2V/cell | 2.6-2.9V/cell | 0.1-1.1V/cell | 0.1-1.1V/cell | 1.8V/cell |

When adjusting your X1 RED charging parameters, be sure you select the proper battery type and cell voltage for the type of cell you are charging. Charging batteries with the wrong settings may cause the cells to burst, catch fire or explode.
Warnings and Safety Notes
GB
Charging
Before charging your batteries, it is critical that you determine the maximum allowable charge rate for your batteries. The X1 RED is capable of charging at high rates that may not be suitable or safe for your particular batteries. For example, Lithium cells are typically safe to charge at 1C, or the total mAh ÷ 1000. A 1200mAh battery would have a 1C charge rate of 1.2 amps. A 4200mAh battery would have a 1C charge rate of 4.2 amps. Some manufacturers are offering Lithium cells that can be charged at greater than 1C but this should ALWAYS be verified before charging a Lithium battery at rates higher than 1C. Voltage is just as critical as the charging amperage rate and this is determined by the number of cells in series, or "S". For example, a 3S LiPo is rated at 11.1 volts ("S" multiplied by a single LiPo cell with a nominal voltage of 3.7 volts DC. 3 cells x 3.7 volts each equals 11.1 volts DC).
Connect the battery's main leads to the charger output: red is positive and black is negative. Keep in mind that the gauge or thickness of your charging leads from the X1 RED to your battery must be of an acceptable current rating to handle the applied charge current. For maximum safety and charging effectiveness, always match or exceed the main battery lead rating when assembling or selecting your charging leads. If you charge a battery at a high current rate (amperage) with a charging lead not rated for the chosen amperage, the wire could get hot, catch fire, short out and/or potentially destroy your battery and the charger. When in doubt, always use a higher gauge wire (lower AWG number). It is common to see charging leads constructed of 14AWG, 16AWG or 18AWG wire.
Always refer to recommendations from your battery manufacturer for your specific battery type and size before initiating a charge or discharge process.

Do not attempt to disassemble or modify Lithium or Lead-Acid battery packs.
Discharging
The X1 RED discharging functions are for two specific purposes:
- Refreshing the capacity of a Nickel-based battery that has lost capacity over time (NiMH or NiCd).
- Reducing the voltage of a Lithium battery for safe storage.

Lithium chemistry battery packs should only be discharged to their minimum safe voltage, no lower. Deep discharging a Lithium cell will do permanent damage. Refer to the Standard Battery Parameters table on page 6 of this manual for Minimum Discharge Voltages.
LiPo & LiHV Charge/Discharge Cycling
Lithium batteries are known to reach full capacity after a break-in period of about 10 charge/discharge cycles. We do not recommend you use the X1 RED charger to do this; normal use and recharging will achieve the same results. If you wish to perform a Lithium break-in on the bench with the X1 RED discharging to minimum acceptable voltages and performing a balance charge at 1C maximum rate is recommended. If you choose to break in your Lithium batteries under normal use, charging at only 1C for the first ten cycles will help ensure full performance and service life from your Lithium cells.
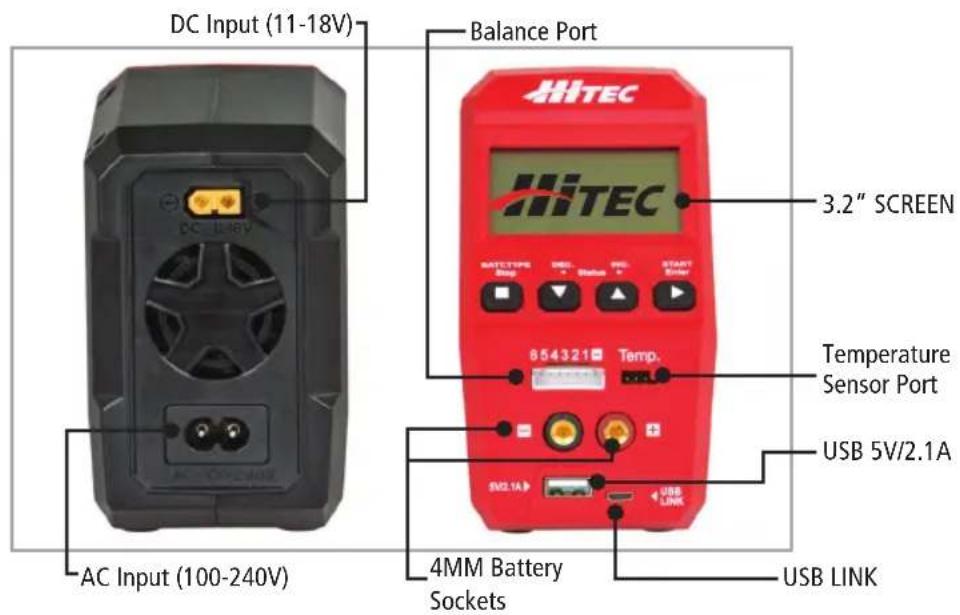
Charger Layout
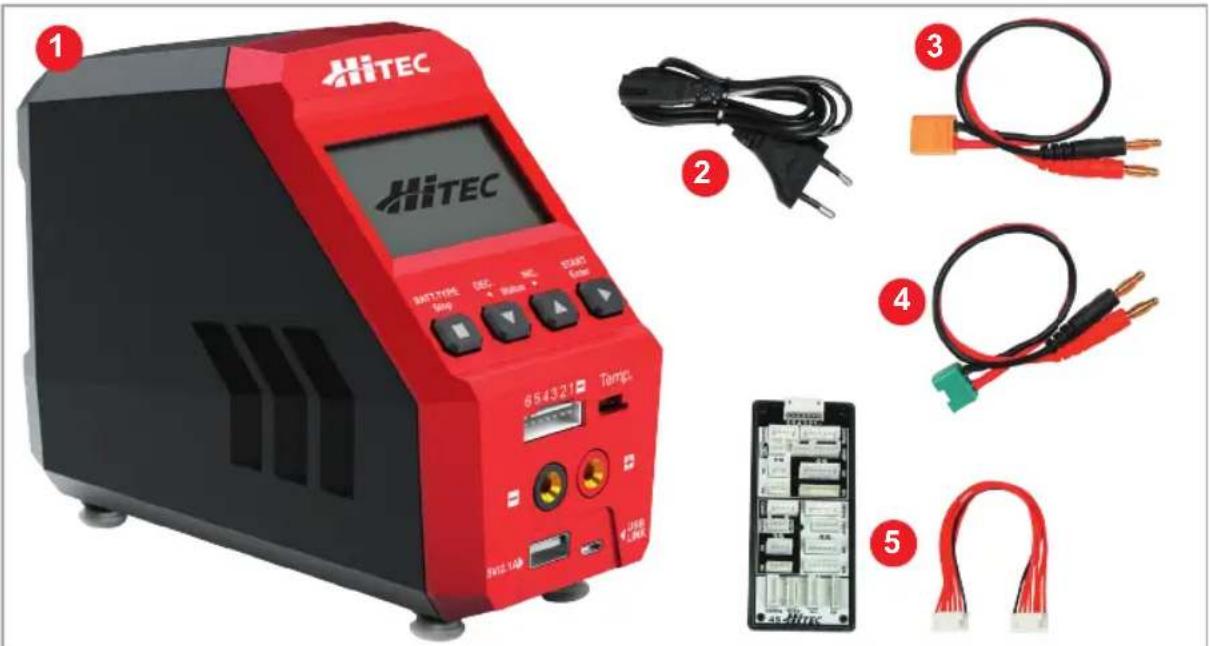
- Hitec X1 RED Charger
- AC Cord
-
XT60 Charge Cable
-
M6 Charge Cable
- Universal Balancer Board
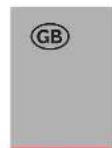
Input Buttons
Charger Layout

Specifications
| AC Input Voltage 100-240V | |
| DC Input 11-18V | |
| Maximum Charge Power 60W | |
| Charge Current Range 0.1 - 6.0A | |
| Maximum Discharge Power 5W | |
| Discharge Current Range 0.1 - 2.0 A | |
| Balancing Port Current Drain 300MA/Cell | |
| NiCd/NiMH Battery Cell Count 1-15 Cells | |
| LiPo/LiHV/LiFe/Lilon Cell Count 1 - 6 cells | |
| Pb Battery Voltage 2 - 20 V | |
| New Weight 470 G | |
| Dimensions | 159 x 72.5 x 123 mm |
Features
Optimized Operating Software
The X1 RED "auto" feature sets the charge and discharge current for you automatically, preventing overcharging which can damage your battery. In the event of an error, the X1 RED instantly disconnects the circuit and sounds an alarm. This feature can be set by the user and controlled through the two-way link for maximum safety.
Program Select
The charger can store up to 10 different charge/discharge profiles for your convenience. You can keep the data pertaining to program settings of the battery for continuous charging or discharging. Users can call out this data at any time without setting any additional programming.
Internal Independent Lithium Battery Balancer
The X1 RED features a built-in cell voltage balancer so you don't need to fuss with external balancers while charging.
Balancing Individual Cells During Discharging
When used with a balancing board the X1 RED can monitor and balance each cell in the pack individually while discharging. If the voltage of any single cell is abnormal, the X1 RED will display an error message and the process will end automatically.
Adaptable to Various Types of Lithium Batteries
The X1 RED will charge and discharge a variety of Lithium batteries such as Li-ion, LiPo, LiFe and the new higher voltage LiPo, (LiHV) batteries.
Multiple Lithium Battery Charge Modes
The X1 RED features four methods of charging: Regular charge, Fast charge, Balance charge and Storage charge modes. We highly recommend using balance charge as it is the safest and best way to charge lithium chemistry batteries. If you plan on not using your Lithium chemistry batteries for an extended period of time, Storage charge mode is recommended to optimize your packs for long term storage and maximum lifespan.
Input Power Monitoring
The X1 RED's input voltage is monitored to protect the battery from becoming damaged. The process ends automatically if it drops below the limit.
Capacity and Temperature Limits
The charge process will terminate if either the charging capacity or battery temperature exceeds the limit set by the user. The temperature function requires an optional temperature probe, which is not included with the X1 RED.
Processing Time Limit
Protect your battery by setting a maximum time limit for charging and discharging.
Cyclic Charging/Discharging
A battery can be cycled 1 to 5 times consecutively. This process is good for refreshing and balancing your battery.
Maximum Safety
Our delta-peak voltage detection program ends the charge cycle whenever a battery's voltage exceeds the set threshold.
Automatic Charging Current Limit
Charging current can be set by the user when charging Lithium, NiCd or NiMH batteries. The 'AUTO' charging mode, however, is recommended when charging NiMH batteries with low impedance and capacity.
LiPo Battery Meter
The user can check the battery's total voltage, the highest and lowest as well as each cells voltage.
PC Control Using Charge Master Software
The free Charge Master software gives you unparalleled ability to operate the charger through the computer. You can monitor pack voltage, cell voltage and other data during the operation. Additionally, you have the ability to set up the charger and update the firmware.
Charger Connections
GB
Charger Connections
1. Connecting to a power source
The Hitec X1 RED features a built-in switching power supply. You can connect the AC power cord directly to an AC socket (100-240V AC) or use an 11-18V DC power source (such as an automotive battery or 12 Volt power supply).
2. Connecting the battery

Before connecting any battery, it is absolutely essential to check one last time that the parameters were set correctly. If the settings are incorrect, the battery may be damaged and, in worse case scenarios, could even burst into flames or explode. To avoid short circuits between the banana plugs, always connect the charge leads to the charger first, and then to the battery second. Reverse the sequence when disconnecting the pack.
3. Balance Socket for Lithium Batteries in all modes
The balance wire attached to the battery must be connected to the charger, with the black wire aligned with the negative marking. Take care to maintain correct polarity. (See wiring diagram on the right side)
This diagram shows the correct way to connect your battery to the Hitec X1 RED when charging in the balance charge program mode.
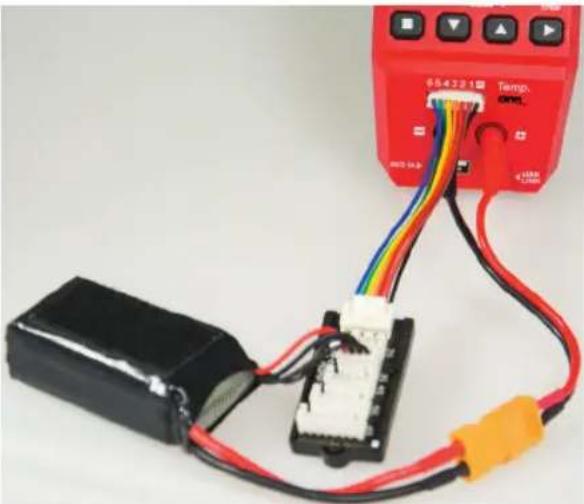

Failure to connect as shown in this diagram will damage your charger. To avoid a short circuit between the charge lead, always connect the charge cable to the charger first, then connect the battery. Reverse the sequence when disconnecting.
Getting started
Initial Setup of the Charger
After connecting the battery you are now ready to setup the charger to charge your specific type of battery. When the charger is first powered on, you will enter the PROGRAM SELECT (01) mode by default. The default mode of the charger is for a regular charge mode of a 2 Cell 2000mAh Lithium Polymer battery. If this is not the battery you plan on working with then you will need to make changes to the operation programming based on the following instruction.

Before selecting an operation, it is critical that you know the type of battery you are working with and what the manufacturer recommendations are for charging or discharging. Failure to follow the manufacturers recommendations can result in damage to the battery and possible explosion.
Getting started
Available Operations
Depending on battery type, different operations will be available. This chart shows which operations are available for the different types of batteries the X1 RED is capable of working with.
| Battery Type O | Operation Operation | Description |
| LiPo Lion LiFe LiHV | CHARGE The charge mode is for charging LiPo/LiFe/Lilon/LiHV batteries in normal mode. | |
| DISCHARGE | This mode is for discharging LiPo/LiFe/Lon/LiHV batteries. | |
| STORAGE | This program is for charging or discharging a lithium battery which will not be used again for an extended period of time. | |
| FAST CHG | A fast charge will result in a smaller than usual charging capacity but will reduce the total charge time. | |
| BAL CHARGE This mode is for balancing the voltage of LiPo battery cells while charging. | ||
| NiMH NiCd | CHARGE | The charger will charge NiMH and NiCd batteries using the charge current set by the user. |
| AUTO CHG | In this program, the charger detects the condition of the connected battery and automatically charges the battery. Note: You should set the upper limit of the charge current to avoid damage by excessive charging current. The X1 RED may not be able to detect the charge capacity of low resistance batteries. | |
| DISCHARGE This mode is for discharging a NiMH/NiCd battery | ||
| RE-PEAK | In re-peak charge mode, the charger can peak charge the battery once, twice, or three times in a row automatically. This is good for confirming the battery is fully charged and for checking how well the battery receives fast charges. | |
| CYCLE | Automatically charges/discharges the battery up to 5 times. This process can enhance the performance of NiMH/NiCd batteries. | |
| Lead Acid Pb | CHARGE This mode is for charging a Pb battery. | |
| DISCHARGE This mode is for discharging a Pb battery. | ||
GB
Operating the Charger
GB
The following is a step-by-step guide for operating the X1 RED. The screen shots and operation templates shown below are for the operation of a Li-Po BALANCE CHARGE program. Refer to the Available Operations chart on page 13 and 14 to setup your specific type of battery.
Whenever a parameter value in the program needs to be adjusted, highlight the value by pressing the START/Enter button to make it blink; to change the value press the DEC or INC buttons. The new value will be stored by re-pressing the START/Enter button. If there is another parameter to be adjusted as part of a range on the same screen, it will start blinking after the first parameter value has been confirmed.

Before you begin charging your battery, make sure you have read and understand all of the warnings and safety information contained on pages 2-4.
BATT/PROGRAM Select
| PROGRAM SELECT(01) | |
| Battery Type: | LiPo |
| Battery Cells: | 3S |
| Mode: | Balance |
| C Current | 3.3A |
Press INC and DEC to cycle through all battery types and press START/ENTER to select the appropriate battery types to be charged.
Battery Cells
| PROGRAM SELECT(01) | |
| Battery Type: | LiPo |
| Battery Cells: | 3S |
| Mode: | Balance |
| C Current | 3.3A |
Press INC and DEC to scroll through the battery cells supported by the charger. Press START/ENTER to select the appropriate cells for your battery.
Mode Select
| PROGRAM SELECT(01) | |
| Battery Type: | LiPo |
| Battery Cells: | 3S |
| Mode: | Balance |
| C Current | 3.3A |
Press INC and DEC to scroll through all available modes. If you plan to charge your battery, select Charge mode. Press the START/ENTER button to confirm the mode of your choice.
C. Current (Charge Current)
| PROGRAM SELECT(01) | |
| Battery Type: | LiPo |
| Battery Cells: | 3S |
| Mode: | Balance |
| C. Current | 3.3A |
The charger supports a maximum 6.0A charge current, but a current suitable for your battery should be set. It is inappropriate to set a high charge current for a low capacity battery,
as doing so would result in unwanted consequences. *Note that this mode is only available under the Charge mode.
D. Current (Discharge Current)
The charger supports a maximum
-2.0A discharge current, but users should set the appropriate discharge current for the battery in use.
| PROGRAM SELECT(01) | |
| Battery Cells: | 3S |
| Mode: | Discharge |
| C.Current | OFF |
| D.Current | -2.0A |
Target Volt - (Target Voltage)
| PROGRAM SELECT(01) | |
| C. Current | 3.3A |
| D. Current | OFF |
| Target Volt: | 4.20V |
| Cut Volt: | OFF |
This function is available when working with Lithium and Lead Acid (Pb) chemistry batteries. Here you can set the target voltage for each individual cell. WARNING: Setting the
target voltage too high can damage your battery and cause your battery to explode. See the packs manufacturer's recommended settings before changing this value from the defaults.
Cut Volt - (Cutt-off Voltage)
| PROGRAM SELECT(01) | |
| C. Current | 3.3A |
| D. Current | OFF |
| Target Volt: | 4.20V |
| Cut Volt: | OFF |
er Discharge mode no discharged. This functischarging. Refer to the cut-off voltage.
Operating the Charger
Cycle Mode
| PROGRAM SELECT(01) | |
| Battery Cells: | 5S |
| Mode: | Cycle |
| C.Current | 3.0A |
| D.Current | -1.0A |
In Cycle Mode, users can choose between charging>discharging or discharging>charging. There are two requirements for making the Cycle Mode accessible: 1. the
battery type must be NiMH or NiCd and 2. the mode must be Cycle. This mode is intended to help refresh your battery if it has been sitting for a long period of time.
Cycle Count
| PROGRAM SELECT(01) | |
| Cycle Count: | 4 |
| Repeak Count: | OFF |
| Trickle: | OFF |
| Cut Volt: | OFF |
In cycle mode, users must select the number of cycles (between 1 and 5) for the Cycle Count.
Repeak Count
| PROGRAM SELECT(01) | |
| Cycle Count: | Off |
| Repeak Count: | OFF |
| Trickle: | OFF |
| Cut Volt: | OFF |
There are two requirements for accessing Repeak Count: 1. the battery is either NiMH or NiCd and 2. users are in Re-Peak mode. There are 3 Repeat Counts in total.
Trickle
| PROGRAM SELECT(01) | |
| Cycle Count: | OFF |
| Repeak Count: | OFF |
| Trickle: | OFF |
| Cut Volt | OFF |
When the Trickle function is activated, the battery will continue charging, but at very low current. This function is only available when charging a NiMH or NiCd battery.
Charging Your Battery
Now that you have set all the parameters for your battery you are ready to execute the operation. Now would be a good time to check to make sure the charge settings are correct and within the battery manufacturers recommendations.

Before you begin charging your battery, make sure you have read and understand all of the warnings and safety information contained on pages 2-4.

During charging/discharging, the battery should be placed inside a fire proof/retardant bag and on a fire proof surface, away from other combustible objects.
Start the Process
Press and hold the button until you see "BATTERY CHECK..." followed by the confirmation screen.
This screen displays the number of cells you set up as "R" and the number of cells detected by the processor as "S". If both numbers are identical, you may press and hold the START button to confirm and begin charging. If these numbers do not match, press the STOP button to return to the previous screen and carefully check the number of cells of the battery pack before proceeding.
Information Displayed During the Process
Use the INC. and DEC. buttons to scroll through the various information displayed during the process.
Program Stop
During the charging process, press STOP to stop the process.
Program Complete
When the charging process is finished, an audible sound will be heard.
System Settings
GB
When powered on for the first time, your X1 RED charger will load with default values in the programmable user settings. The screen displays the following information in sequence and the user can change the value of the parameters on each screen.
When you are ready to change the parameter values in the program, press START/ENTER to make it blink, and then select the appropriate values with INC or DEC. Store the value by pressing START/ENTER once.
| Item Selection Description | ||
| SYSTEM SETUP | ||
| DC Input: 11.0V | ||
| Cut Caps: 5000mAh | ||
| Cut Time: 120min | ||
| Cut Temp: 50°C/122°F | ||
| System Setup | ||
| DC Input: 11.0V | ||
| Cut Caps: 5000mAh | ||
| Cut Time: 120min | ||
| Cut Temp: 50°C/122°F | ||
| System Setup | ||
| DC Input: 11.0V | ||
| Cut Caps: 5000mAh | ||
| CutTime: 120min | ||
| Cut Temp: 50°C/122°F | ||
| System Setup | ||
| DC Input: 11.0V | ||
| Cut Caps: 5000mAh | ||
| Cut Time: 120min | ||
| Cut Temp: 50°C/122°F | ||
| System Setup | ||
| Unit: Celsius | ||
| Resting: 10 Min | ||
| Delta Peak: 4mV | ||
| Bal. Connection: ON | ||
System Settings
| Item Selection Description | ||
| SYSTEM SETUP Unit: Celsius Resting: 10 Min Delta Peak: 4mV Bal. Connection: ON | 1-60 Min | Break time between charging and discharging process, or discharging and charging process in the cycle mode. |
| SYSTEM SETUP Unit: Celsius Resting: 10 Min Delta Peak: 4m Bal. Connection: ON | 3-15mV | Delta-peak sensitivity for NiMH/NiCd battery: The automatic charge termination program based on the principle of the Delta-peak voltage detection. When the battery's voltage exceeds the threshold, the process will be terminated automatically. |
| SYSTEM SETUP Unit: Celsius Resting: 10 Min Delta Peak: 4mV Bal. Connection: | ON/OFF | Balance Connection can be switched to OFF to allow you to charge your battery without the balance socket connected. |
| SYSTEM SETUP Key Beep: On Buzzer: On LCD Contrast 100 Factory Reset | ON/OFF | Key Beep sounds a beep with every touch of a button to confirm your action. Buzzer plays at various times during operation to alert the user to different mode changes. Both these features can be turned off. |
| SYSTEM SETUP Key Beep: On Buzzer: On LCD Contrast 100 Factory Reset |
GB
System Settings
GB
| Item Selection Description | ||
| SYSTEM SETUP Key Beep: ON Buzzer: ON LCD Contrast: 100 Factory Reset | 89-109 | Choose the LCD definition best suited to your prefe-rence. |
| SYSTEM SETUP Key Beep: ON Buzzer: ON LCD Contrast: 100 Factory Reset | Press the Start/Enter button to make “Reset” blink; then, press and hold the Start/Enter button to load the factory default settings. | |
| SYSTEM SETUP LCD Contrast: 100 Factory Reset | 100 100 | Display the hardware and firmware version. |
| FW Version: 1.01 HW Version: 1.00 | ||
| SYSTEM SETUP LCD Contrast: 100 Factory Reset FW Version: 1.01 HW Version: 1.00 |
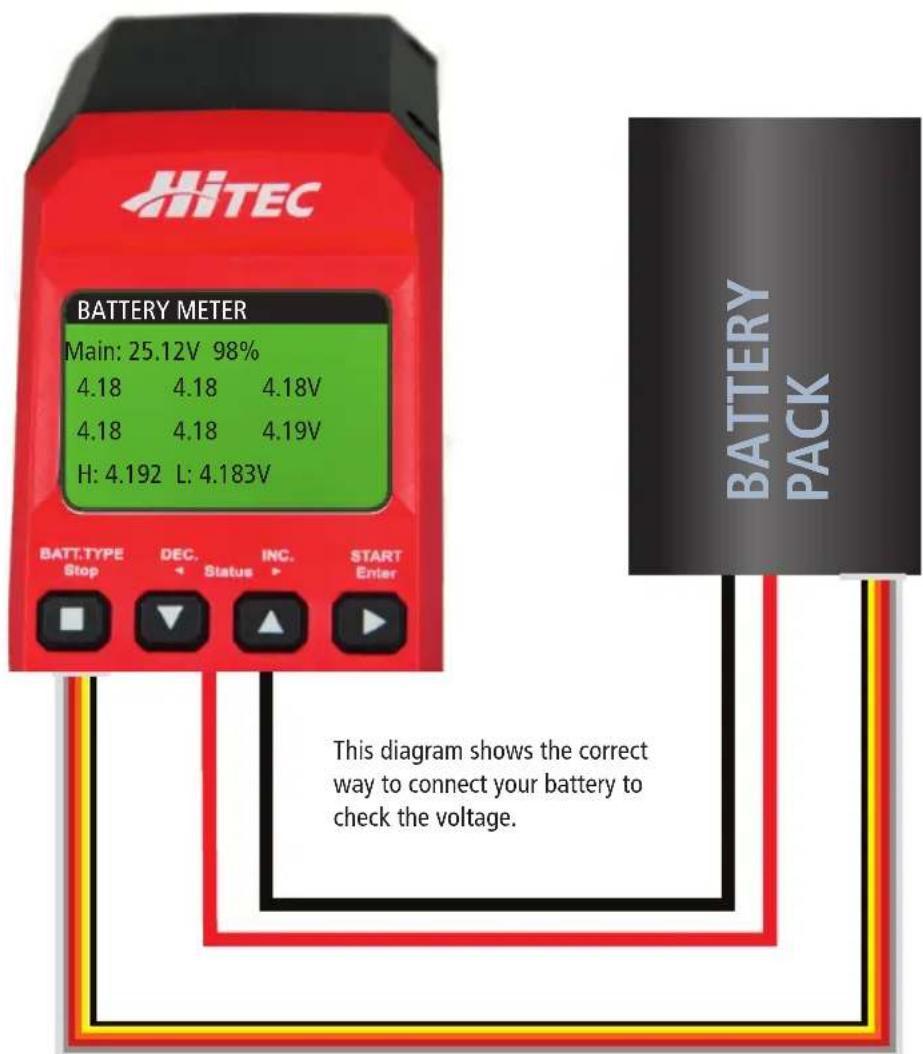
Battery Meter
The user can check the battery's total voltage, the highest voltage, the lowest voltage and each cell's voltage. Connect the battery via the charger's main battery lead to battery socket and balance wires to the balance socket as shown below.
The display indicates the current Main Voltage, Percentage of Charge, Individual Cell Voltage, and the Highest and Lowest voltages of the packs cells.

Warnings and Error Messages
GB
WARNING
REVERSE POLARITY
Incorrect polarity connected.
WARNING
CONNECTION BREAK
The battery connection has been interrupted.
WARNING
CONNECT ERROR CHECK MAIN PORT
The battery connection is wrong.
WARNING
DC IN TOO LOW
The input voltage is less than 11V.
WARNING
DC IN TOO HIGH
The input voltage is higher than 18V.
WARNING
CELL ERROR
Misoperation or connection error will activate this function.
WARNING
CELL NUMBER
The cell number is wrong.
WARNING
INT. TEMP.太O HI
WARNING
EXT.TEMP.TOO HI
The internal temperature of the unit goes too high.
WARNING
OVER CHARGE CAPACITY LIMIT
The external temperature of the battery is too high. Requires optional Tempurature Sensor to be connected.
WARNING
OVER TIME LIMIT
The battery capacity is more than the maximum capacity which the user sets.
WARNING
BATTERY WAS FULL
The charging time is longer than the maximum charging time which is set by the user.
The battery voltage is higher than the maximum voltage set by the user when charging in balance mode.
Using the Charge Control Software - "Chargemaster"
The free "Charge Master" software gives you unparalleled ability to operate the charger through the computer. You can monitor pack voltage, cell voltage and other data while charging, view charge data in real-time graphs and you can control charging and update firmware via the "Charge Master" software. In order to connect the charger to the computer and use the "Charge Master," you will need a USB cable which is not included in this
package. The cable must end on one side with an "A" plug and the opposite side with a "micro-B" plug to connect to the charger directly.
Download the latest ChargeMaster Software at: wwwultiplex-rc.de/service/downloads/hitec/software, the X1 RED uses the ChargeMaster 2 software.
Warranty and Service
MULTIPLEX Modellsport GmbH & Co.KG does not assume any liability for loss, damage or costs which arise through the improper use and operation of our products, or which are connected with such operation in any way. As far as is legally permissible, the obligation of MULTIPLEX
Modellsport GmbH & Co.KG to provide compensation for damages, on whatever legal basis, is limited to the invoice amount of the
quantity of MULTIPLEX Modellsport GmbH & Co.KG goods that were directly affected by whatever incident gave rise to the damage. This does not apply if MULTIPLEX Modellsport GmbH & Co.KG is obliged to accept unlimited liability in accordance with mandatory law for deliberate or gross negligence.
Our products are covered by the currently valid statutory guarantee regulations. If you wish to make a claim under
guarantee, please contact the model shop where you purchased the product.
The guarantee does not cover malfunctions caused by the following:
- Improper Operation
- Maintenance that was performed incorrectly, late or not at all, or performed by a non-authorized body
- Incorrect connections
- Use of non-original MULTIPLEX accessories
- Modifications / repairs that were not carried out by MULTIPLEX or a MULTIPLEX Service Centre
- Accidental or deliberate damage
- Faults due to normal wear and tear
- Operation outside the technical specifications or in connection with components from other manufacturers.
Disposal

This symbol means that it is essential to dispose of electrical and electronic equipment separately from the domestic refuse when it reaches the end of its useful life. Take your
unwanted equipment to your local communal collection point or recycling centre. This applies to all countries of the European Union, and to other European countries with separate waste collection systems.
CE Conformity Declaration
CE This device has been assessed and approved in accordance with European harmonised directives. This means that you possess a pro
duct whose design and construction fulfil the protective aims of the European Community designed to ensure the safe operation of equipment.
If required, you can request MULTIPLEX Modellsport GmbH & Co.KG to supply a copy of the unit's Conformity Declaration. Please contact the company using the contact details at the foot of the page.
Errors and omissions excepted. Technical modifications reserved.
Copyright Multiplex Modellsport 2015
Duplication and copying of the text, in whole or in part, is only permitted with the prior written approval of Multiplex Modellsport GmbH & Co.KG
| PROGRAM SELECT(01) | |
| Battery Type: | LiPo |
| Battery Cells: | 3S |
| Mode: | Balance |
| C Current | 3.3A |
| PROGRAM SELECT(01) | |
| Battery Type: | LiPo |
| Battery Cells: | 3S |
| Mode: | Balance |
| C Current | 3.3A |
| PROGRAM SELECT(01) | |
| Battery Type: | LiPo |
| Battery Cells: | 3S |
| Mode: | Balance |
| C Current | 3.3A |
C. Current (courant de charge)
| PROGRAM SELECT(01) | |
| Battery Type: | LiPo |
| Battery Cells: | 3S |
| Mode: | Balance |
| C. Current | 3.3A |
| PROGRAM SELECT(01) | |
| Battery Cells: | 5S |
| Mode: | Cycle |
| C.Current | 3.0A |
| D.Current | -1.0A |
| PROGRAM SELECT(01) | |
| Cycle Count: | 4 |
| Repeak Count: | OFF |
| Trickle: | OFF |
| Cut Volt: | OFF |
| PROGRAM SELECT(01) | |
| Cycle Count: | Off |
| Repeak Count: | OFF |
| Trickle: | OFF |
| Cut Volt: | OFF |
| PROGRAM SELECT(01) | |
| Cycle Count: | OFF |
| Repeak Count: | OFF |
| Trickle: | OFF |
| Cut Volt | OFF |
CONNECT ERROR CHECK MAIN PORT