Thermo Express Plus - Bottle warmer NUK - Free user manual and instructions
Find the device manual for free Thermo Express Plus NUK in PDF.
| Features | Details |
|---|---|
| Product type | Bottle sterilizer |
| Capacity | Up to 6 standard bottles |
| Sterilization time | About 6 minutes |
| Power source | Electric |
| Functionality | Steam sterilization |
| Materials | BPA-free plastic |
| Usage | Easy to use with one button |
| Maintenance | Easy cleaning, removable parts |
| Safety | Automatic shut-off after sterilization cycle |
| Dimensions | Compact, easy to store |
| Weight | Lightweight for easy handling |
| Warranty | 2 years |
Frequently Asked Questions - Thermo Express Plus NUK
User questions about Thermo Express Plus NUK
0 question about this device. Answer the ones you know or ask your own.
Ask a new question about this device
Download the instructions for your Bottle warmer in PDF format for free! Find your manual Thermo Express Plus - NUK and take your electronic device back in hand. On this page are published all the documents necessary for the use of your device. Thermo Express Plus by NUK.
USER MANUAL Thermo Express Plus NUK
natural_image
White NUK baby blender with black control panel and baby bottle nearby (no text or symbols visible on main body)Art.-Nr. 10.256.404
Deutsch 3
Please note inner coverpage
Français 30
natural_image
Illustration of a hand pressing a button on a device component (no text or symbols visible)E
text_image
1 2 3 4 5 6 7 8 MUKInhalt
1. Description of device.... 18
1.1 Proper use.... 18
1.2 Description of function 18
1.3 Components....19
2. Key to parts (Figure E) 19
3. Safety Instructions.... 19
3.1 Explanation of terms.... 19
3.2 Special notes for this device....19
3.3 General information....20
3.4 Protection against electric shock 21
3.5 Preventing burns and scalds....21
3.6 For your child's safety 21
3.7 Material damage 21
4. Unpacking and setting up 22
5. Operating the device.... 22
5.1 Select the operating mode, switching on and off 22
5.2 Heating baby food....23
5.3 Switching the device off early 24
5.4 Overheating cut-out 24
6. Cleaning and storing.... 25
6.1 Cleaning the device....25
6.2 Cleaning the accessories 25
6.3 Descaling....25
6.4 Storing the device 25
7. Help with problems.... 26
7.1 Replacing the fuse 27
8. Technical data 27
9. Disposal 27
10. Warranty.... 28
10.1 Service Centres....28
10.2 Supplier....28
11. Declaration of conformity.... 29
1. Description of device
1.1 Proper use

The NUK Thermo Express Plus bottle warmer is intended for the quick and gentle warming of baby food in bottles or jars. The heat is produced by heating up water on the installed heating element. At the end of the heating cycle, the device switches off automatically.
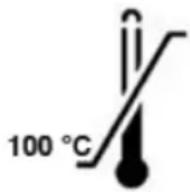
The bottles and jars used must be resistant up to temperatures of at least 100 °C. The device is therefore not suitable for polyethylene (PE) bottles or breast milk bags.
Frozen breast milk must be thawed separately and can then only be heated in plastic or glass bottles once it has reached room temperature or refrigerator temperature.
This device should only be used in dry rooms. It must not be used out in the open or in humid rooms.
This product is intended for use in private households and is not suitable for commercial purposes.
The device is likewise suitable for:
- use in staff kitchens in shops, offices and other commercial areas,
- use in agricultural settings,
- customers in hotels, motels and other accommodations,
• bed-and-breakfast establishments.
The warmer must not be used for commercial purposes or operated in moving vehicles - railway carriages, for example.
Please note, in contrast to the ages/groups quoted in “3.2 Special notes for this device” on page 19, required by law, NUK recommends that this device should only be used by those aged 12 or over, following instruction.
1.2 Description of function
The NUK bottle warmer
- is versatile and easy to use for bottles and jars up to 72 mm diameter.
- allows a gentle warming of baby food. To do so water is vaporised by the heating element inside the tank. Then the vapor heats up the baby food.
Use the enclosed vehicle adapter to heat bottles or jars in your vehicle when you are out and about. All you need is a 12 V socket in your vehicle.
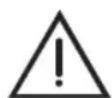
Warning!
Risk of scalding! Use the device only with the vehicle at a standstill.
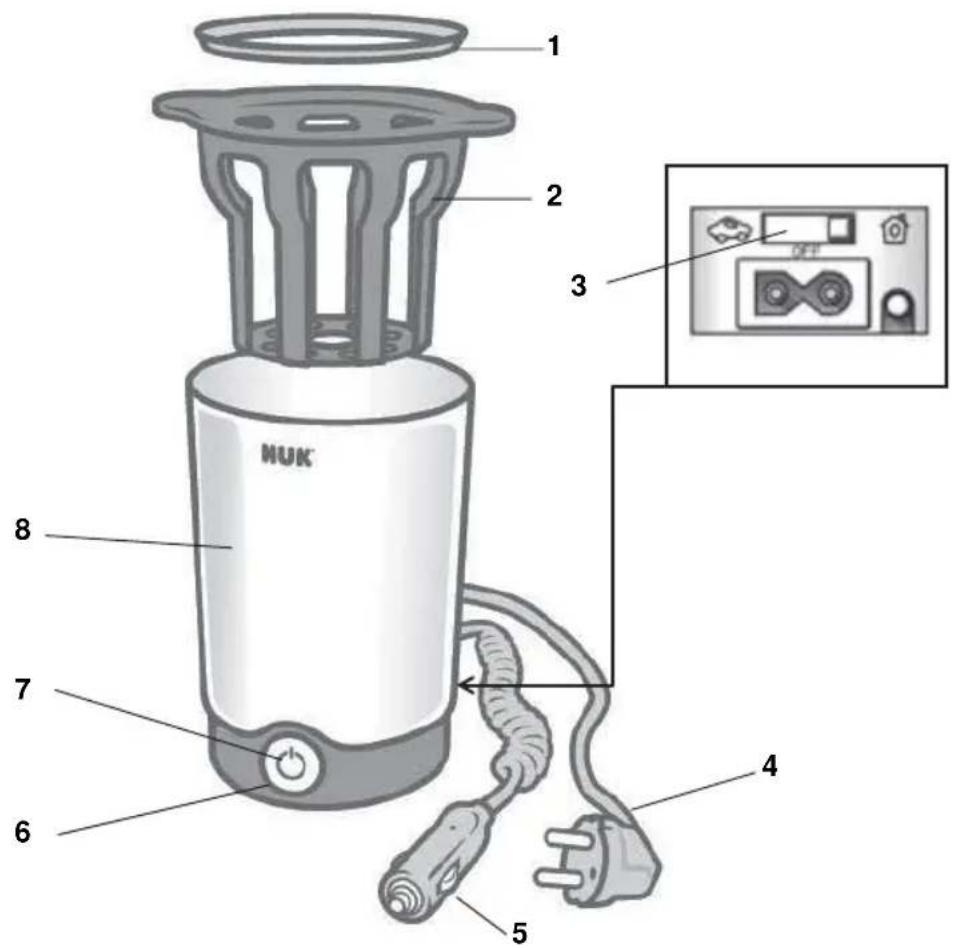
1.3 Components
- 1 bottle warmer Thermo Express Plus, consisting of:
- 1 Bottle warmer
-1 Basket
-1 Ring
- 1 Vehicle connector
• 1 set of operating instructions
2. Key to parts (Figure E)
1 Ring
2 Basket
3 "On"/"Off" mode selector switch

4 Mains power plug
5 Vehicle connector
6 Indicator lamp
7 Start button
8 Bottle warmer
3. Safety Instructions
3.1 Explanation of terms
The following keywords are used in these user instructions:

Warning!
High risk: ignoring this warning could result in a risk to life and limb.
Caution!
Medium risk: ignoring may result in damage.
Note:
Low risk: points to be noted when handling the device.
3.2 Special notes for this device

Warning! Follow the instructions below to prevent injuries or damage.
- Please read these instructions for use carefully before using the device. These instructions form
part of the device and must be kept to hand at all times.
- Children aged 3 or over and people with reduced physical, sensory or mental capacity, or lack of experience and/or knowledge, should only use this device if they are under supervision and have been instructed in the safe use of the device and have understood the resulting hazards. Children must not play with this device.
- Children must not carry out cleaning and user maintenance tasks, unless they are aged over 8 and are under supervision.
- Children under the age of 3 and domestic animals must be kept away from the appliance and the power supply cable.

- Do not use the bottle warmer in the event of obvious defects on the device, cable or connector.
- To protect you against an electric shock, the cable may not come into contact with water or cooker hotplates.
- In order to prevent hazards, if the power cord is damaged, it must be replaced by the manufacturer, its Customer Service department or a similarly qualified person.
- Mains voltage has to match the voltage quoted on the underside of the device.
- Do not immerse the device in water or use it outdoors.
- The device must not be operated with an external timer or a separate remote control system like a remote control socket, for example, because the device should never be left unsupervised during operation, so that you can intervene in good time if it malfunctions.
- Only use the device for warming baby food in a domestic environment. Incorrect use involves potential hazards to the user.
- Set up the baby food warmer so that it is steady and level and so that your child cannot tip it over or pull it off the table or kitchen counter by its cable.
- The device should never be placed in the vicinity of hot surfaces, in heated ovens or in the vicinity
of gas or electrical devices, as this may cause damage to the device.
- The device may only be operated with clean drinking water.
- Replace the water each time before warming up a bottle or glass to prevent germ formation.
- During heating: Bottles or jars must not be tightly sealed during heating in the food warmer, otherwise excessive pressure may build up (risk of explosion/material damage).
- After heating: Stir the contents of the jar or lightly rotate the bottle. Before feeding your child, check on the inside of your wrist whether the temperature of the food is safe for your baby. A sensible temperature is around 37 °C, which is the same as your own body temperature.
- Do not heat baby food for too long. For food hygiene reasons, do not exceed 20 minutes.
- After use unplug the device from the mains to prevent it from being inadvertently switched on.
3.3 General information
- Use the device and its accessories only for the proper use described (see “1.1 Proper use”).
- Never leave the device unsupervised during operation, so that you can intervene in good time if it malfunctions.
3.4 Protection against electric shock
Warning! The following safety instructions are intended to protect you from electric shock.
- If the device is damaged, it must not be used under any circumstances. Only have the device repaired by qualified specialists. Contact the manufacturer for this purpose.
- Only parts which correspond to the original device data must be used for repairs.
- In the event of any malfunction, the device may only be repaired by authorized specialists.
- Never touch the device, the power cord or the mains plug with wet hands.
- Always remove the power cord by the plug. Never pull on the power cord.
- Ensure that the power cord is never kinked or crushed.
3.5 Preventing burns and scalds
Warning! Hot surfaces can lead to burns, so:
- Never touch the inside of the device during operation. Always wait until the device has cooled down.
- The device emits hot steam during operation. Avoid skin contact. Keep your face and hands a safe distance away.
-
We recommend not moving the device during operation.
-
Use the device only with the vehicle at a standstill.
- Always allow the device to cool down before cleaning it.
3.6 For your child's safety

Warning! Plastic Bags may cause suffocation.
- Plastic bags are not meant as a toy. Keep away from children.
3.7 Material damage
Caution! To prevent material damage, follow the instructions below.
- Do not place the device on a hot cooker hotplate.
- Do not expose the device to direct sunlight, as UV rays and overheating may make the plastic brittle.
- Never switch on the device without filling it with water.

4. Unpacking and setting up
- Take the individual parts out of the packaging.
-
Check that the individual parts are complete (see "1.3 Components" on page 19) and undamaged.
-
Clean the device thoroughly before using it for the first time (see "6. Cleaning and storing" on page 25).
- Set up device on a firm, level, non-slip, heat-resistant surface so that it cannot tip over.
5. Operating the device
5.1 Select the operating mode, switching on and off
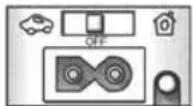
You must specify whether the device should be connected to the mains 220-240 V (domestic) or to the 12 V vehicle electrical system:
- To use the device on the mains place the switch 3 on the symbol shown next to this paragraph.
- To use the device in the car's electrical system place the switch 3 on the symbol shown next to this paragraph.
Note:


- Use the device only with the vehicle at a standstill.
- To turn the device off, push the button 3 in the "OFF" position.
- New vehicles, in particular, have low-voltage protection as standard to protect the electronic components fitted in the vehicle. This can lead to short battery running times and premature interruption of the heating-up process. If necessary, the device will then have to be operated with the engine running.
- Never let the engine of the vehicle run in enclosed areas (e.g. in garages, underground car park, etc.).
5.2 Heating baby food
| Type | Quantity of water (1 teaspoon ≈ 5 ml) | Accessories | |||||
| "Home" mode "Car" mode | |||||||
| ca. 20 °C* | ca. 4 °C** | ca. 20 °C* | ca. 4 °C** | Basket Ring | |||
| Bottle | 150 ml (standard neck) PP | 20 ml | 30 ml | 10 ml | 15 ml | X | X |
| 150 ml (wide neck) PP | 22 ml | 32 ml | 13 ml | 15 ml | X | X | |
| 250 ml (standard neck) PP | 22 ml | 34 ml | 14 ml | 18 ml | X | X | |
| 300 ml (wide neck) PP | 20 ml | 28 ml | 12 ml | 16 ml | X | X | |
| 120 ml (standard neck) glas | 12 ml | 18 ml | 9 ml | 10 ml | X | X | |
| 240 ml (wide neck) glas | 11 ml | 14 ml | 8 ml | 9 ml | X | X | |
| Jar | 125 g / 130 g | 11 ml | 14 ml | 6 ml | 8 ml | X | X |
| 190 g / 200 g | 11 ml | 14 ml | 7 ml | 10 ml | X | X | |
* Contents at room temperature
** Contents at refrigerator temperature
Note:
- The time taken to heat up the food and its temperature will depend on the quantity of water.
- Please place the bottle/jar as near to the centre of the device as possible.
- The quantities of water quoted are a guide to heating liquid to drinking temperature. The different natures of food and of containers mean we are unable to specify an exact quantity of water to heat up. Just experiment, and you will soon find the best quantity of water.
Caution! Do not heat frozen food, as this may cause the jar or bottle to explode. Allow frozen food to thaw in the refrigerator or at room temperature before heating it.
- Measure up the required quantity of water with a suitable measuring container.
Note: The quantity of water evaporating affects the final temperature of the food, so accurate measuring is important.
- Pour the measured quantity of water into the base 8 (see Fig. A).
- Put the open baby bottle or open jar in the basket 2 (see Fig. B)
- If possible, insert the ring 1 on the bottle to limit the escape of water vapor (see Fig.B).
- Check wether you selected the correct mode (see "5.1 Select the operating mode, switching on and off" on page 22).
- Connect the device to the power supply (see Fig. C):
- connect the mains plug 4 to a suitable mains socket.


- plug the vehicle adapter 5 into the 12V power socket of the vehicle.
- Briefly push down the start button 7 until the indicator lamp 6 comes on (see Fig. D).
Now, the device starts vaporising the water to heat up the baby food. As soon as all water has been vaporised the device switches off automatically and the indicator lamp 6 goes out.
Note: The device cannot be switched off using the start button 7. The device can only be switched off prematurely by pulling out the plug.
- Remove the bottle or jar by using the basket 2.
Note:
- If the baby food is not hot enough, put a little more water in the NUK bottle warmer the next time you heat up food.
- If the baby food is too hot, put a little less water in the NUK bottle warmer the next time you heat up food.
-
In "Car" mode, you need to allow much longer heating-up times due to the lower heating output (100 W).
-
After heating: Stir the content of the jar or lightly rotate the bottle. Before feeding your child, check on the inside of your wrist whether the temperature of the food is safe for your baby. A sensible temperature is around 37 °C, which is the same as your own body temperature.
-
To turn the device off, push the button 3 in the "OFF" position.

- Disconnect the device from the power supply after use.
- Allow the device to cool down for at least 15 minutes before its next use.
5.3 Switching the device off early
The device can only be switched off prematurely by pulling out the plug.
Note: After pulling out the plug the device is without power but is still in heating mode. If you put the plug back into a socket the device will heat again until all water has vaporised. It is not a defect if the indicator lamp 1 is alight when the device is switched on. Fill some water in the tank and leave the device switched on until the water has vaporised and the automatic switches the device off.
5.4 Overheating cut-out
The device also has an overheating cut-out to rule out the risk of fire in the event of overheating. If it trips, this device can be replaced by a specialist or by the manufacturer. Contact the relevant service address (see "Contact addresses" on page 130) for this purpose.
6. Cleaning and storing
Warning! To avoid the risk of electric shock, injury or damage:
- take the plug out of the socket before cleaning the device.
- allow the device to cool down before cleaning it.
- never immerse bottle warmer 8 in water.
Caution! Under no circumstances use abrasive, corrosive or scratching cleaning agents, as these could damage the device.
6.1 Cleaning the device
- Clean bottle warmer 8 using a damp cloth. You can also use a little detergent.
- Wipe over with clean water.
- The inner bottle warmer 8 should be wiped out with a cloth after each use to prevent significant limescale build-up.
- Only use the device again when it is completely dry.
6.2 Cleaning the accessories
- Clean basket 2 and ring 1 by hand in the sink or in a dishwasher.
- Do not use the accessories again until they are completely dry.
6.3 Descaling
After a period of use, limescale will build up in the device (depending on the hardness of the mains water where the device is being used).
You should remove this limescale at regular intervals to guarantee the function of the device. Limescale can cause performance to deteriorate considerably.
Caution! Do not use commercially available descalers, pure acetic acid or vinegar essence.
- To get rid of limescale, we recommend pouring 100 ml of white vinegar and 100 ml of boiling water into the device and leaving it to take effect for 30 min.
Caution! Longer periods will not improve descaling but may damage the device in the long term.
- After this time, empty the device.
- Rinse out twice with clean water.
- Wipe dry the device.
6.4 Storing the device
- We recommend that you retain the packaging of the device so that the device can be packed securely if it needs transporting.
- To store the food warmer, clean the device after use and assemble once completely dry.
- Store the device in a dry, cool place.
- Do not place any bottles or other items in the bottle warmer 8 when the device is not being used.
7. Help with problems
Faults can occur in any electrical device. This does not necessarily mean that the device is defective, so please check the list to see whether the fault can be eliminated.

| Problem Reason | Remedy | |
| Device not working. There is no power supply. Check whether the plug is in a socket. | ||
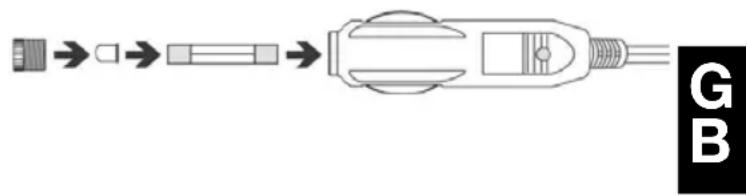
7.1 Replacing the fuse
The vehicle connector 5 has a fuse. If the fuse is defective, you can obtain new fuses of the ∅ 6.3x32, 10 A type from specialist dealers.
To change the fuse, unscrew the knurled nut on the end of the vehicle connector and remove the defective fuse.
Replace the defective fuse with a new fuse and put the vehicle connector back together as shown.
flowchart
graph LR
    A["Component 1"] --> B["Component 2"]
    B --> C["Component 3"]
    C --> D["Component 4"]
    D --> E["Component 5"]
    E --> F["Component 6"]
    style A fill:#f9f,stroke:#333
    style B fill:#f9f,stroke:#333
    style C fill:#f9f,stroke:#333
    style D fill:#f9f,stroke:#333
    style E fill:#f9f,stroke:#333
    style F fill:#ccf,stroke:#333
8. Technical data
Power supply:
- "Home" mode 220-240 V
- "Car" mode 12 V DC,
Power output:
- "Home" mode 500 W
- "Car" mode 100 W
Degree of protection: I
Protection class: IPX0
Designation for vehicle adapter: SAE-J563
Fuse for vehicle adapter: 10 A Typ ∅6, 3x32
$$ \begin{array}{c} \sim / 5 0 - 6 0 \mathrm{Hz} \ \overline {{- - -}} \end{array} $$
9. Disposal
Packaging
When you wish to dispose of the packaging, please observe the relevant environmental regulations for your country.
Equipment
The symbol with the crossed-out rubbish bin on wheels means that within the European Union, the product must be disposed of to a sorted rubbish collection. This applies to the
product and all accessories which are marked with this symbol. Marked products must not be
disposed of via the regular domestic waste but must be handed in to a recycling centre for electrical or electronic devices. Recycling helps to reduce the use of raw materials and to relieve the environment. It is therefore imperative that you follow the disposal regulations applicable in your country.
10. Warranty

In addition to the seller's warranty obligations arising from the contract to purchase, we as the manufacturers provide a warranty of 24 months from purchase of the device as long as the device is used properly and the operating instructions are followed. Evidence of the date of purchase and the type of device should be provided by means of a receipt.
The purchaser's statutory rights are unaffected by this manufacturer warranty.
During the warranty period, we undertake to remedy any defects attributable to poor materials or workmanship. Wear parts are excluded from the warranty.
Minor deviations from specified quality which do not affect the value or usability of the device are not covered by the warranty. We are likewise unable to accept the warranty if the defects on the device are due to transport damage for which we are not responsible, if they are attributable to misuse or lack of care or if the device has been interfered with by persons not authorized by us to do so.
The warranty service will involve repair, replacement of parts or replacement of the device at our discretion. The warranty period will be neither extended nor restarted by the performance of warranty services. The warranty for any spare parts fitted will expire with the warranty for the device as a whole.
Extended or different claims, especially those relating to the making good of damage sustained outside the device, are excluded unless liability is compulsory in law.
We will not accept the costs or risks of transport.
An device sent in without evidence of the purchase date will be treated as a repair. The device will only be repaired following discussion with the customer.
Retain address, article number and batch no. for possible future reference.
Warranty conditions applicable for the country in question apply to devices not bought in Germany.
10.1 Service Centres
Addresses for service can be found in "Contact addresses" on page 130.
Article No.10.256.404
10.2 Supplier
Please note that this address is not an address for service. Contact one of the service centres mentioned above.
MAPA GmbH
11. Declaration of conformity
The device meets all applicable European directives, as well as the relevant national laws implementing them. These are shown in the EU declaration of conformity which can be requested from the manufacturer. The Declaration of Conformity can be found at www.nuk.com.

Sommaire
1. Description de l'appareil .... 31
flowchart
graph LR
    A["Power Supply"] --> B["Battery"]
    B --> C["Cell"]
    C --> D["Cell with Pin 1"]
    D --> E["Cell with Pin 2"]
- in bed-and-breakfast-accommodities.
KARAKA PROMET D.O.O.
Blizanci bb
88260 Citluk
info@karaka-promet.com
BG - BULGARIA
БЕБОЛИНО ООД
German Products Estonia OU
Punane 16-312
13619 Tallinn
www.nuk.ee
ES - SPAIN
Mapa Spontex Iberica S.A.U.
Berkeley Business Park
Wainwright Road
Worcester WR4 9ZS

0845 300 2467
w.nuk.co.uk
GE - GEORGIA
GiSi Ltd
Tsereteli 115a
Tbilisi 0119
e-mail: info@gisi.ge
GR - GREECE
Intrapharma Consumer Health
Magna Business Park, Citywest Road
Dublin 24
United Drug House
IT - ITALY
German Products Lithuania UAB
Lukšio 32
Vilnius
Lithuania
(+370) 65676802
http://www.nuk-baby.lt/
LV - LATVIA
German Products Baltics SIA
Vietalvas iela 1
Riga, LV-1009
Latvija
+371 67278532
e-mail: info@gpbaltics.lv
www.nuk.lv
MK - MACEDONIA
Euroalba Skopje d.o.o.
Bul. Partizanski Odredi 64 g 3/6
1000 Skopje
+389 2 30 65 717
NO - NORWAY
Chrom as
Karoline Kristiansens vei 3
0661 Oslo
Norge
Tel. Kundeservice: 23 34 48 30
Email: kundeservice@chrom.no
PE - PERU
Importado por:
Maresi Foodbroker SRL
Str. 9 Mai Nr. 3
310118 Arad
Romania
Tel.: 0257/ 281 177
Fax: 0257 / 210 211
E-mail: office@maresi.ro
RU – RUSSIA
Artemis Brands (PTY) LTD
P.O. Box 130782
Bryanston 2074
South Africa
+2711 430 5600
Fax: Fax: +2711 885 1184
www.nuk.co.za
SE - SWEDEN
GB Barnartiklar AB
Fägelviksvägen 18
145 53 Norsborg
08 556 35 825
Fax 08 464 98 48
info@gbab.com / www.nuk.se
SI - SLOVENIA
Merit International d.o.o.
Letališka C. 3C
Ljubljana, Slovenia
TEL.+386 1 54 84 300
FAX.+386 1 54 84 304
SK - SLOVAKIA
Mapa Spontex CE s.r.o
Prodašice 4
29404 Dolní Bousov, Czech Republic
SR-SERBIA
YUGLOB d.o.o.
Zrenjaninski put bb (121t)
11211 Beograd-Borca
+381 11 2960-783, 2960-784
office@yuglob.rs
TR - TURKEY
ATAK DIŞ TIC. A.Ş.
Maya Akar Center K:20 Esentepe
Istanbul
212 211 74 00
www.nuk.com.tr
UA - UKRAINE
Імпортер в Україну:
ТОВ «СМАРТИ ФЕМИЛИ»
вул. Боженка б. 19, оф. 308,
м. Одеса
Одеська обл., 65098
тел. (0482) 305-454
UAE - UNITED ARAB EMIRATES
ARABIAN ETHICALS CO
Al Quoz 1
Dubai, United Arab Emirates
04-3392141/02-6733703
MAPA GmbH