TG505 - Weather Station ThinkGizmos - Free user manual and instructions
Find the device manual for free TG505 ThinkGizmos in PDF.
| Product Type | Indoor Weather Station with Projection Clock |
| Brand | ThinkGizmos |
| Model | TG505 |
| Power Supply | 2 AAA 1.5V batteries (not included) or DC 4.5V / 200mA power adapter (included) |
| Display | Backlit LED with projection (turns off after 5s on batteries) |
| Projection | Continuous time projection on wall or ceiling (mains power required) |
| Indoor Temperature Range | 0°C to +50°C |
| Indoor Humidity Range | 20% to 95% RH |
| Temperature Display | °C or °F (toggle using DOWN button) |
| Min/Max Memory | Min/max temperature and humidity (MIN/MAX button) |
| Weather Forecast | 4 symbols: sunny, partly cloudy, cloudy, rainy |
| Calendar | Perpetual from 2001 to 2099 |
| Alarm | Alarm with snooze function (8 min) and auto-off after 2 min |
| Time Format | 12h / 24h (toggle using UP button) |
| Reset | RESET button (clears all settings) |
| Warranty | 1 year (defects in materials or workmanship) |
| Maintenance | Clean with a soft, dry cloth; do not use abrasive products |
| Safety | Keep batteries out of reach of children; observe polarity; do not mix new and old batteries |
Frequently Asked Questions - TG505 ThinkGizmos
User questions about TG505 ThinkGizmos
0 question about this device. Answer the ones you know or ask your own.
Ask a new question about this device
Download the instructions for your Weather Station in PDF format for free! Find your manual TG505 - ThinkGizmos and take your electronic device back in hand. On this page are published all the documents necessary for the use of your device. TG505 by ThinkGizmos.
USER MANUAL TG505 ThinkGizmos
1.1 Projection Clock Features 3
2.
IMPORTANT INFORMATION
2.1 Battery Precautions 4
2.2 Battery Installation 4
2.3 Reset Function 4
3.
TIME AND CALENDAR SETTINGS
3.1 Time Setting 5
3.2 Calendar Setting 5
4.
ALARM SETTINGS
4.1 Setting the Alarm 6
4.2 Activating and Deactivating the Alarms 6
4.3 Snooze Function 6
4.4 Stopping the Alarm 6
5.
TEMPERATURE / HUMIDITY INFORMATION
5.1 ^ C / ^ Temperature Display 7
5.2 Min / Max Temperature / Relative Humidity 7
6.
WEATHER FORECAST
6.1 Weather Symbols 7
PROJECTION AND BACKLIGHT
7.1 Projection Clock and Backlight 7
7.2 Continuous Projection 7
8.
WARRANTY
8.1 Warranty Information 8
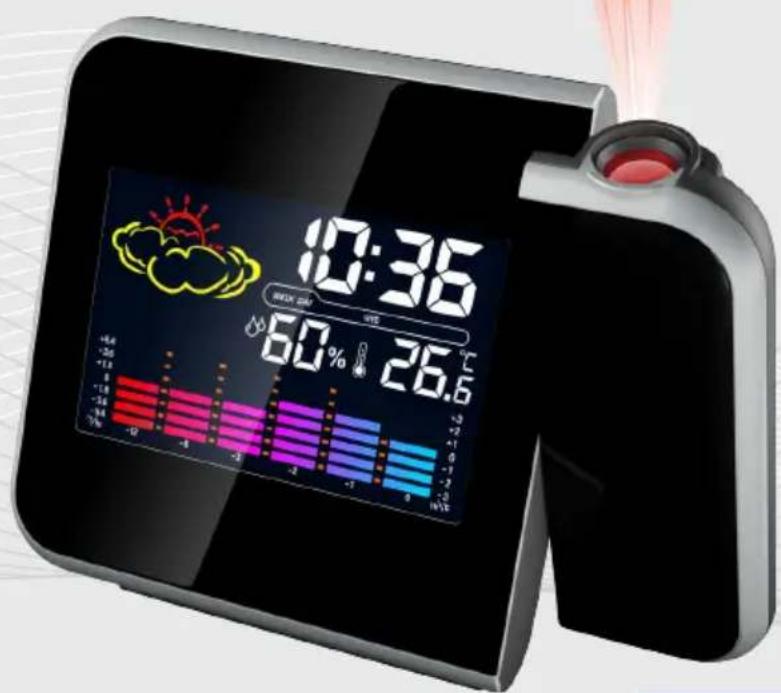
1. PROJECTION CLOCK FEATURES
1.1 Projection Clock Features
- Date and day of week display.
Perpetual calendar: 2001-2099. - Snooze Alarm Clock.
- Weather Symbol: Sunny, Slightly Cloudy, Cloudy, Rainy.
- Temperature display in ^ C / ^ F
Thermometer:
Indoor measurement ranges 0^ to +50^ .
- Temperature trend display.
-
Indoor Hygrometer range: 20% - 95% RH.
Max/Min memory for hygrometer & thermometer. -
LED back light display with projection (auto off after 5 seconds when using batteries).
Battery: 2 × AAA 1.5V (Not included).
DC power supply 4.5VDC 200mA for continuous projection (Included).
2. IMPORTANT INFORMATION
2.1 Battery Precautions
Alkaline batteries recommended.
- Do not use rechargeable batteries.
New and used batteries should not to be mixed.
-
Only batteries of the same or equivalent type as recommended are to be used.
-
Batteries are to be inserted with the correct polarity.
-
Keep batteries away from children.
-
Dispose of exhausted batteries according to local legal requirements. Do not dispose of them by throwing away with normal household rubbish.
2.2 Battery Installation
Gently open the battery compartment located on the rear side of the unit.
- Insert 2 X 1.5V AAA batteries observing the correct polarity, as marked inside the compartment.
- Replace the battery compartment door.
2.3 Reset Function
If the clock is not working properly or does not respond to your input press the "RESET" button located at the rear of the clock. All settings will clear. You must set the correct time, date and alarm settings again.
3. TIME ANDCALENDAR SETTINGS
3.1 Time Setting
- In normal time display, press and hold "up" button for 3 seconds to toggle 12/24 hour display.
-
In normal time mode press and hold the "MODE" button for two seconds, the hour digits will flash.
-
Press the "UP" or "DOWN" button to set the hour.
-
Press the "MODE" to confirm your setting, the minute digits starts to flash.
-
Press the "UP" or "DOWN" button to set the minutes.
- Finally press the "MODE" button to confirm your setting.
3.2 Calendar Setting
- In normal time mode press the "MODE" button once to enter the calendar setting mode.
-
Press and hold the "MODE" button for 2 seconds and the year digits will flash.
-
Press the "UP" or "DOWN" button to set the correct year.
-
Press "MODE" to confirm your setting, the month digit starts to flash.
- Press the "UP" or "DOWN" button to set the correct month.
-
Press "MODE" to confirm your setting, the date digits start to flash.
-
Press the "UP" or "DOWN" button to set the correct date.
- Finally press the "MODE" button to confirm your setting.
4. ALARM SETTING
4.1 Setting the Alarm
Note: While setting the alarm, if no button is pressed for 10 seconds the display will automatically switch to the normal time display.
In normal time mode press the "MODE" button twice to enter the alarm mode.
- Press and hold the "MODE" button for two seconds, the hour digits start to flash.
- Press the "UP" or "DOWN" button to set the hour.
- Press the "MODE" button to confirm your setting.
The minute digits start to flash, press the "UP" or "DOWN" button to set the minutes.
- Press the "MODE" button to confirm your setting.
- Press the" MODE" button to return to the normal time display or the display will automatically return to normal time display after 10 seconds.
4.2 Activating and Deactivating the Alarm
Press the "UP" button to activate or deactivate the alarm, if the alarm is activated the alarm symbol (bell icon) will be displayed on the screen.
4.3 Snooze Function
- When the alarm sounds press the "SNOOZE/LIGHT" button to enter snooze mode.
The alarm will sound again after every 8 minutes.
During the snooze interval the bell symbol will blink.
- The snooze function can be stopped by pressing any button on the back, apart from the "SNZ" button.
4.4 Stopping the Alarm
- When the alarm is sounding press any button on the back, apart from the "SNZ" button, to stop the alarm.
The alarm will automatically stop sounding after 2 minutes.
5. TEMPERATURE/HUMIDITY INFORMATION
5.1 °C/°F Temperature Display
The temperature is displayed either in ^ C / F , in normal time mode press the "DOWN" button to switch between ^ C / F display.
5.2 Max / Min Temperature / Relative Humidity
To toggle indoor max / min temperature & humidity data, press the "MAX/MIN" button:
- Once to show the maximum temperature and humidity values.
- Twice to show the minimum temperature and humidity values.
- Three times to return to the current temperature and humidity levels.
6. WEATHER FORECAST
6.1 Weather Symbols
You will find a weather symbol (as shown below) on the clock face. This is purely an indicator of the weather created by a hygrometer which reacts to the indoor humidity. This is meant as a fun addition to the clock as the reading is affected by indoor conditions such as air conditioning and central heating which will affect the accuracy. There are 4 possible weather symbols shown below:
Sunny Slightly Cloudy Cloudy
Rainy

7. PROJECTION AND BACKLIGHT
7.1 Projection Clock and Backlight
Briefly press the "SNOOZE/LIGHT" button to activate the display lighting for 5 seconds, also the displayed time will be projected onto the surface the projection arm is pointed at the same time
7.2 Continuous Projection
The continuous projection function can only be used by plugging in the supplied AC-DC adaptor. Insert the AC-DC adaptor (4.5V DC 200mA included) jack into the back of the clock and plug the other end into a mains socket. This will enable the clock to project time continuously on the wall or ceiling. Use the adjustable projection arm to display onto appropriate wall or ceiling. Use the focus key to adjust the focus of the projected display.
8. WARRANTY
8.1 Warranty Information
What is Covered:
This warranty covers any defects in materials or workmanship, with the exceptions stated below.
How Long Coverage Lasts:
This warranty runs for 1 Year from the date your Projection Clock is delivered.
What is not covered:
Any problem that is caused by abuse, misuse, or an act of God (such as a flood) are not covered.
What We Will Do:
If the Product proves defective during the warranty period, we will provide you with the instructions for the return, and we will take one of the following actions: (i) replace the Product with a product that is the same or equivalent to the Product you purchased; (ii) repair the Product; or (iii) refund to you the whole of or part of the purchase price of the Product.
How To Get Service:
To obtain instructions on how to obtain service under this warranty, contact our customer service by phone or email. You will find the contact details of our customer service below. Customer service may ask you questions to determine your eligibility under this warranty, and if you are eligible you'll be given instructions for returning the defective Product. If we send you a replacement or repair your Product, we will pay the cost of delivering the replacement or repaired Product to you.
Do not return the item to the original place of purchase, please contact Think Gizmos direct.

Think Gizmos, Unit 19, Lawson Hunt Industrial Park,
Broadbridge Heath, West Sussex, RH12 3JR
Tel.: +44/(0)203 384 8304
help@thinkgizmos.com • www.thinkgizmos.com
Think Gizmos, Unit 19, Lawson Hunt Industrial Park,
Broadbridge Heath, West Sussex, RH12 3JR
Tel.: +44/(0)203 384 8304
help@thinkgizmos.com • www.thinkgizmos.com
TG505 HORLOGE DE PROJECTION
PREVISIONNISTEMÉTÉO
7.2 Projection Continue
Think Gizmos, Unit 19, Lawson Hunt Industrial Park,
Broadbridge Heath, West Sussex, RH12 3JR
Tel.: +44/(0)203 384 8304
help@thinkgizmos.com • www.thinkgizmos.com
Think Gizmos, Unit 19, Lawson Hunt Industrial Park,
Broadbridge Heath, West Sussex, RH12 3JR
Tel.: +44/(0)203 384 8304
help@thinkgizmos.com • www.thinkgizmos.com
TG505 RELOJ DE PROYECCION
PRONÓSTICO DÉL TIEMPO
Manual de usuario
English p 2
Deutsch p 9
Francais p 16
Italiano p 23
Espanol p 42
- 8.
CHARACTERISTICAS DEL RELOJ DE PROYECCION
Think Gizmos, Unit 19, Lawson Hunt Industrial Park,
Broadbridge Heath, West Sussex, RH12 3JR
Tel.: +44/(0)203 384 8304
help@thinkgizmos.com • www.thinkgizmos.com

Meaning of the 'Dustbin' Symbol:
To protect our environment, do not dispose of electrical equipment in with domestic waste.
Please return any electrical equipment that you will no longer use to the collection points provided for their disposal.
This helps to avoid the potential effects of incorrect disposal on the environment and human health.
This will contribute to the recycling and other forms of reutilisation of electrical and electronic equipment.
Information concerning where the equipment can be disposed of can be obtained from your local authority.

"CE" marking states that the product is compliant to European Directives 2014J35/EU Low Voltage Directive (LVD) 2004/108/EC EMC Directive
It is possible to request a full copy of Declaration of compliance from the Distributor:
This product complies with the rules of RoHS Directive(2011/651EU)
This product complies with the rules of Eup Directive(2009/125/EC)
Thinkgizmos is a registered trademark of Paramount Zone Ltd