
TT 1070 E - Turntable Trevi - Free user manual and instructions
Find the device manual for free TT 1070 E Trevi in PDF.
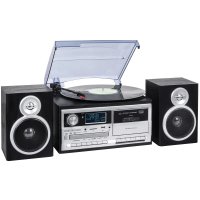
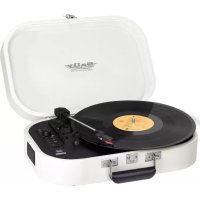
| Product Type | Turntable (record player) with cassette player, CD, AM/FM radio, USB, SD, Bluetooth, NFC |
| Brand | Trevi |
| Model | TT 1070 E |
| Main unit dimensions | 320 x 210 x 290 mm |
| Speaker dimensions | 145 x 210 x 135 mm |
| Power supply | Power adapter 12 V / 1 A (100-240 V ~ 50/60 Hz) |
| Power consumption | 15 W; standby < 1 W |
| Turntable speed | 33 1/3 and 45 RPM |
| Playback functions | Vinyl, cassette, CD, USB, SD/MMC, AM/FM radio, Bluetooth, AUX IN |
| Recording functions | Encoding to USB/SD from vinyl, cassette, radio, CD, AUX; CD copy; manual/automatic split |
| FM radio reception | 87.5 – 108.0 MHz |
| AM radio reception | 522 – 1620 kHz |
| Bluetooth | 2.4 GHz band, max power 2.5 mW, typical range 10 m, NFC compatible |
| Supported audio formats | MP3, WMA (via USB/SD/CD) |
| Remote control battery | CR2025 |
| Connectivity | 3.5 mm headphone jack, 3.5 mm AUX IN, line out (RCA?), external speaker jack, USB port, SD/MMC slot |
| Display | LCD with backlight; ID3 display for MP3 |
| Maintenance and cleaning | Slightly damp soft cloth; do not use solvents or abrasives |
| Safety | Do not expose to water or moisture; do not obstruct ventilation slots; minimum 5 cm free space around the device |
| Auto power off | Standby after 10 minutes without audio signal (CD/vinyl/cassette/USB/SD) |
Frequently Asked Questions - TT 1070 E Trevi
User questions about TT 1070 E Trevi
0 question about this device. Answer the ones you know or ask your own.
Ask a new question about this device
Download the instructions for your Turntable in PDF format for free! Find your manual TT 1070 E - Trevi and take your electronic device back in hand. On this page are published all the documents necessary for the use of your device. TT 1070 E by Trevi.
USER MANUAL TT 1070 E Trevi
AND BLUETOOTH® CONNECTION - User manual and connection
SYSTEME HIFI AVEC TOURNE DISQUE/CD/MP3/USB/SD/RADIO/CASSETTE
WARNING: DO NOT OPEN THE SET. NEITHER CONTROLS OR SPARE PARTS TO BE USED BY THE USER ARE TO BE FOUND INSIDE IT. APPLY TO AUTHORISED TREVI CENTERS FOR SERVICE OPERATIONS.
This is a precision electronic appliance; avoid using it in the following cases:
- Near strong heat sources, such as central heating plants or stoves.
- Listening to high volume for a long time could damage your hearing.
- In very humid places such as bathrooms, swimming pools, etc.
In very dusty places. - In places subject to strong vibrations.
- Position the appliance in such a way that there is always enough room for free air circulation (at least 5 cm).
- Do not block the air inlets.
- Keep the ear speaker during the steps of focusing point and volume adjustments, and in particular to keep the volume to a minimum in the ignition phase.
If any liquid enters the appliance, unplug it immediately from the socket and take it to the nearest TREVI authorised service centre. - Before switching on the appliance, always check that the power cable and the connection cable are properly installed.
- The apparatus shall not be exposed to dripping or splashing water. No objects filled with liquid, such as vases, should be placed on the unit.
- No naked flame sources, such as lighted candles, should be placed on.
- Keep this manual.
CARE AND MAINTENANCE
Use a slightly damp soft cloth for cleaning. Do not use solvents and abrasive substances.
IMPORTANT
This device is designed for home use (not professional use). This appliance has been carefully built to ensure long-lasting perfect performance. However, should any inconvenience occur, please contact your local authorised TREVI Service Centre.
TREVI follows a policy of ongoing research and development. Therefore products may have different features from those described.
TO ACTIVATE THE REMOTE CONRTOL AND BATTERY REPLACEMENT
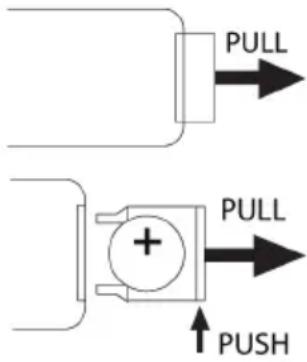
The remote control comes with a cell battery already installed. To activate the battery, remove the transparent tab at the bottom of the remote control. The remote control is now ready to use.
To Replace With a New Battery:
- Remove the battery compartment cover as per the illustration on the right.
- Observe the correct polarity and install a 3V = = lithium battery (CR2025).
- Close the cover.

CAUTIONS ON LASER
This device is equipped with a reading system with laser beam. Although the laser is low power, and with a safety device that prevents it from operating when the door opened always adhere to the following warnings:
- Do not approach the eye to the laser lens with the device opened, the danger of damage to the retina.
- Do not attempt to dismantle or tamper with the laser unit, danger of radiation absorption.

With earphone or headphones use:
To prevent possible hearing damage, limit the amount of time listening at high volumes.
LOCATION OF CONTROL
- Connect External Power Adaptor To External Power Adaptor Jack
- Connect External Speaker Box With The Speaker-Out Jack Of The Unit Back Panel.
- Push The Standby Knob To Switch On The Unit, Standby Indicator (Red Color) Will Be Off. If The Backlight On The LCD Display Lights Up, It Means The Power Supply Is Normal, Now Your System Is Ready For Use.
Setting The Clock
1 When The Standby Indicator (Red Color) Light Up, Unit Is In The Standby Mode.
2 During Standby Mode, Select Between 12H Or 24H Mode: Press And Hold Clock Button For 3-5 Secondss, 12H / 24H Will Be Flashing. Pressing Skip Up Or Skip Down Button To Select 12H / 24H Mode. Press Clock Button Again To Confirm.
3 Setting Hour: Pressing Skip Up Or Skip Down Knob To Select The Correct Hour, Then Press Clock Button Again To Confirm.
4 Setting Minute: After Step 3 Is Completed, Pressing Skip Up Or Skip Down Button To Select The Correct Minute, Then Press Clock Button Again To Confirm.
Setting Alarm
- During Standby Mode, Hold Timer Button For 3-5 Seconds. Setting Alarm Sequence Is "Alarm On Time > Alarm Off Time > Alarm Mode > Alarm Volume".
- Setting Alarm On Time: "On" Is Lighting On The Display
I. Setting Hour: Pressing Skip Up Or Skip Down Button To Select The Correct Hour, Then Press Timer Button Again To Confirm.
ii. Setting Minute: Pressing Skip Up Or Skip Down Button To Select The Correct Minute, Then Press Timer Button Again To Confirm. - Setting Alarm Off Time: "Off" Is Lighting On The Display:
I. Setting Hour: Pressing Skip Up Or Skip Down Button To Select The Correct Hour, Then Press Timer Button Again To Confirm.
ii. Setting Minute: Prssing Skip Up Or Skip Down Button To Select The Correct Minute, Then Press Timer Button Again To Confirm. - Setting Alarm Mode: "Tune" Is Lighting Up On The Display:
- Pressing Skip Up Or Skip Down Button To Select The Alarm Mode.
II. Sequence Is Tune >Cd> Usb >Sd , Press Timer Button Again To Confirm. - Setting Alarm Volume: "V - " Is Lighting Up On The Display:
I. Turning Skip Up Or Skip Down Knob To Select The Alarm Volume, Press Timer Button Again To Confirm. - Setting Alarm Is Completed, The Display Will Show The Setting Again For User's Checking
- "Clock" Icon Is Flashing When Alarm Is In Active. "Clock" Icon Lights Up When Alarm Is Setting Is Stored But Not In Active Yet.
- Cancel Alarm: During Standby Mode, When "Clock" Icon Is On, Press Timer Button, "Clock" Icon Will Be Off.
Snooze Function
Press "Snoopze" Button On The Remote Control When Alarm In Active, Alarm Will Be Slient For 10 Minutes. After 9-10 Minutue Snooze Interval, Alarm Will Be Active Again. Snooze Can Be Used For Repeatedly Within The 1-Hour Alarm Active Interval.
Timer Function
- Push The Standby Knob Till The Standby Indicator (Red Color) Light Off. Unit Is Turning From Standby Mode To Operation Mode.
- When The Unit Is Turned On, Press Sleep Button Repeatedly To Choose The Sleep Time Minutes From 90 > 80 > 70 ...>10 Off.
- Sleep Time Setting Is Stored When The "Sleep" Icon Lights Up On The Display.
- When The Sleep Time Minutes Is Over, Unit Will Be Switched To Standby Mode Automatically.
Radio Tuning
- Press Tuner Button To Activate "Tune" Mode.
- Select The Desired Band By Radio Tuner Button (Am Or Fm) Again.
- Tune To The Required Station By Pressing Skip Up Or Skip Down Button For 1-2 Seconds, And Then Release.
- The Unit Will Start Seeking Automatically And Stop When A Radio Station Is Found.
Manual Preset Radio Stations
- When The Desired Radio Station Is Found, Press Mode Button, Program Number Will Be Flashing.
- Press Preset Up Or Preset Down To Choose The Program Number For Storing The Desired Radio Station.
- Press Mode Button Again To Confirm, Program Number Will Stop To Flash.
- Repeat Step 2 & 3 Until All Desired Radio Stations Is Being Found And Stored
- Press Preset Up Or Preset Down To Choose The Preset Radio Stations.
- The Number Of Stations Can Be Found And Stored Is Depended On The Reception Of Different Area And Countries.
Auto Preset Radio Stations
- During Radio Mode, Press The Tuner Scan Button, The Unit Will Automatically Scan The Radio Frequency. When The Clear Signal Is Found, It Will Automatically Store The Radio Station, Starting From Program Number 1.
- The Number Of Stations Can Be Found And Stored Is Depended On The Reception Of Different Area And Countries.
Fm & Fm-Stereo Reception
- Press "Fm St." Button On The Remote Control To Seltect Fm Mono Or Fm Stereo Mode. When Stereo Signal Are Weak, It Is Preferable To Receive The Program In Mono.
- "St" Icon Light Up On The Display To Show Fm Stereo Mode Is Receiving.
2.Fm : The Receiver Has A Built-In Fm Wire Antenna Hanging At The Rear Cabinet. This Wire Should Be Totally Unraveled And Extended For Best Reception.
Fm & Fm-Stereo Radio Encoding
- Press Tuner Button To Activate "Tune" Mode And Select The Desired Band By Radio Band Button (Am Or Fm).
- Insert Memory Device (Usb Drive, Sd Or MMC Card)
- Press The Rec Button, It Will Take 3-5 Seconds To Read Memory Device. Then Usb Or Sd Icon Will Be Flashing.
- Pressing Skip Up Or Skip Down Button To Select Desired Mode (Usb Or Sd) For Encoding. Then Press The Rec Button Again To Confirm. And The System Is Starting The Encoding Mode After Few Secondss.
- If Only USB Drive, Sd Or Mmc Card Is Inserted, Step 4 Can Be Skipped.
- The Usb Or Sd Icon Will Be Flashing On The Display Durnig Encoding.
- To Finish Encoding, Press Stop Button And Display Will Show "End" And Return To "Tuner" Mode.
Remark:-
- The Recording Speed Is 1:1 And According To The Actual Playing Time Of Fm Or Fm-St Radio
- The Recording Format Is Preset At - Mp3 Bit Rate : 128 Kbps
-During Fm & Fm-Stereo Radio Encoding, Radio Frequency Is Fixied And Cannot Be Tuned
Phono & Encoding
Noted:
-Remove The Stylus Protector.
-Be Sure That The Tone Arm Is Being Detached From The Tone Arm Rest Before Operating And Re-Secured Again Afterwards.
- Press Function Button To Select "Phon" On Display.
- Set The Speed Selector To The Proper Position Depending On The Record To Be Played.
- Place The Record On The Platter, Use The 45 RPM Adaptor If Required.
- Push The Lift Lever Upward To Raise The Tone Arm From The Arm Park, And Then Slowly Move It To The Record Side. The Platter Will Start To Rotate.
- Put Down The Lift Lever To Drop The Tone Arm And Touch The Record Gently. Phono Playing Starts Now.
- Push The Lift Lever Upward To Raise The Tone Arm From The Arm Park, Now Platter Will Still Be Rotating But Phono Playing Will Stop. To Continue The Playing, The User Needs To Put Down The Lift Lever.
- Adjust The Volume To The Desired Level.
- At The End Of Record, The Platter Will Automatically Stop Rotating. Push The Lift Lever Upward To Raise The Tone Arm And Move It To The Arm Park, And Then Put Down The Lift Lever.
- To Stop Manually, Lift The Tone Arm From The Record And Return It To The Arm Park.
Remark : As Some Kind Of Record The Auto-Stop Area Was Out Of The Unit Setting, So It Will Stop Before The Last Track Finishes. In This Case, Select The Auto-Stop Switch To “ Off “ Position, Then It Will Run To The End Of The Record But Will Not Stop Automatically (Turn Off The Unit By Power Button Or Switch Back The Auto-Stop Switch To “ On “ Position To Stop The Platter Rotate). Then Put Back The Tone Arm To The Arm Park.
Phono Encoding
- Press Function Button Repeatedly To Activate "Phono" On Display And Then Insert Memory Device (Usb Drive, Sd Or Mmc Card).
- Press The Rec Button, It Will Take 3-5 Seconds To Read Memory Device. Then Usb Or Sd Icon Will Be Flashing.
- Pressing Skip Up Or Skip Down Button To Select Desired Mode (Usb Or Sd) For Encoding. Then Press The Rec Button Again To Confirm. And The System Is Starting The Encoding Mode After Few Secondss.
- If Only Usb Drive Or Sd/Mmc Card Is Inserted, Step 3 Can Be Skipped.
- The Usb Or Sd Icon Will Be Flashing On The Display Durnig Encoding.
- To Finish Encoding, Press Stop Button And Display Will Show "End" And Return To Phono Mode.
Remark:-
- The Recording Speed Is 1:1 And According To The Actual Flying Time Of The Phono
-The Recording Format Is Preset At - Mp3 Bit Rate : 128 Kbps
Aux In Jack & Encoding
Press Function Button Repeatedly To Activate "Aux" On Display, Then Connect The External Audio Device (Such As Cd Player) Through The Aux In Jack. Audio Signal From The External Audio Device Can Be Played Through The System.
Aux In Encoding
- Press Function Button To Select "Aux" On Display, Then Insert Memory Device (Usb Drive, Sd Or Mmc Card)
- Press The Rec Button, It Will Take 3-5 Seconds To Read Memory Device. Then Usb Or Sd Icon Will Be Flashing.
- Pressing Skip Up Or Skip Down Button To Select Desired Mode (Usb Or Sd) For Encoding. Then Press The Rec Button Again To Confirm. And The System Is Starting The Encoding Mode After Few Secondss.
- If Only Usb Drive Or Sd/Mmc Card Is Inserted, Step 3 Can Be Skipped.
-
The Usb Or Sd Icon Will Be Flashing On The Display Durnig Encoding.
-
To Finish Encoding, Press Stop Button And Display Will Show "End" And Return To "Aux" Mode.
Remark:-
- The Recording Speed Is 1:1 And According To The Actual Flying Time Of The External Audio Device.
- The Recording Format Is Preset At - Mp3 Bit Rate : 128 Kbps
Cassette Tape & Recording
Stop / Eject: Press To Stop All Deck Operation. Press Again To Open The Cassette Door.
Fast Forward: Press To Start, Fast Forward Winding The Tape.
Fast Rewind: Press To Start, Fast Rewind Winding The Tape.
Play: Press To Start Playing Tape.
Pause: Press To Stop Tape Operation Temporarily. Press Again To Resume Playback.
Record: Press Together With Play Button To Start Tape Recording. (Deck A Only).
Playback
- Press Funct Button Repeatedly To Select "Tape" On Display.
- Put In Cassette Tape.
- Press Play Button On Cassette Deck To Start Playback.
- Use Pause Button When You Want To Stop Plackback Temporarily.
- Press Stop / Eject Button On Cassette Deck When Finished.
Recording
- Press Function Button To Select The Desired Mode (Turntable / Cd / Aux / Radio / Usb / Sd / Bluetooth).
- Press Record And Play Button Together On Cassette Deck, Then Signel From Desired Mode Will Be Recorded In Deck A.
Cassette Tape Recording To Usb/Sd
- Press Function Button To Select "Tape" On Display And Then Insert Memory Device (Usb Drive, Sd Or Mmc Card).
- Press The Rec Button; It Will Take 5 Seconds To Read Memory Device. Then Usb Or Sd Icon Will Be Flashing.
- Press Cd 1 - Skip Down Button Or Cd 1 - Skip Up Button To Select Desired Mode (Usb Or Sd) For Recording. Then Press Rec Button Again To Confirm.
- If Only Usb Drive Or Sd/Mmc Card Is Inserted, Step 3 Can Be Skipped.
- Display With Show "Wai" And Then Usb Or Sd Icon Will Be Flashing, Which Means The System Has Started Recording.
- To Finish Recording, Press Rec Button Again And Display Will Show "End" And Return To Tape Mode.
Playback Of Mp3/Wma Song Via Usb Storage Media Or Memory Card
The System Is Able To Decode And Playback All Mp3/Wma File Which Stored In The Memory Media With Usb Connecting Port Or Sd/Mmc Memory Card.
- Plug-In The Usb Plug With The Face Up & Make Sure It Going Into Completely Or Insert The Memory Card In The Direction Of The Arrow As Shown In The Label On The Underside Of The Memory Card Slot Cover. Insert Straight Without Bending.
- Connecting The Usb Upside Down Or Backwards Could Damage The Audio System Or The Storage Media (Usb Thumb Drive / Sd/Mmc Card). Check To Be Sure The Direction Is Correct Before Connection.
- Pressing Function Button Repeatedly To Select "Usb" Or "Card" On Display, Then Insert Memory Device (Usb Drive, Sd Or Mmc Card).
- The System Will Start Reading The Storage Media Automatically After Function Selection, And Display Will Show The Total Number Of Mp3/Wma Files (Eq. 016).
- Then The System Will Start Audio Playback From Desried Device (Usb Or Sd/Mmc) Automatically.
Play / Pause Button
- Press The "Play/Pause" Button Once To Halt Playing, Press It Again To Continue.
Stop Button
- Press Stop Button To End Up Audio Playback, Then Display Will Show The Total Number Of Mp3/Wma Files. And Then User Can Turn "Skip Up" Or "Skip Down" Knob To Select File Forward Or Backward.
Skip Up / Skip Down Button
During Mp3/Wma Playback, Press Skip Up Button Once To Play The Next File. Press And Hold Skip Up Button Continuously To Speed Up Selecting Forward.
During Mp3/Wma Playback, Turn Skip Down Button Once To Play The Previous File. Press And Hold Skip Down Button Continuously To Speed Up Selecting Backward.
Folder Searching
Press Album Down Or Album Up To Search Folder Backward Or Forward.
Repeat Function
During Audio Playback, Press Mode Button Repeatedly To Choose Different Playbac Mode As Below:
Repeat Once > Repeat Album > Repeat All > Random > Introduction
Remark
-If Connect The System To Mp3 Player Via The Usb Socket, Due To Variances In Mp3 Encoding Format, Some Mp3 Player May Not Be Able To Play Via The Usb Socket. This Is Not A Malfunction Of The System.
-There Are Numerous Usb And Sd Device Producers Are. Solution And Format Are Variable Beteen Each Other. Therefore, We Do Not Guarantee This Unit Can Support All Usb And Sd Device From Every Brand.
-SD Card Can Be Suppored Up To 8Gb
Tracks Programming
Up To 99 Tracks Can Be Programmed For Mp3/Wma File And Play In Any Order. Before Use, Be Sure The System Is At Stop Mode Before Programming:
- Set At "Usb" Or "Card" Function, Then Press Stop Button.
- Press Mode Button, "Mem" Will Be Flashing On LCD Display. Moreover, It will Indicate Program No. And Digits For Track No. To Be Programmed.
- Select A Desired Folder By Pressing Skip Up Or Skip Down Button, Then Press Mode Button To Confirm.
- Then Select A Desired Track By Pressing Skip Up Or Skip Down Button, Then Press Mode Button To Confirm.
- Repeat Steps 3 And 4 To Enter Additional Tracks Into The Memory If Necessary.
- When All The Desired Tracks Have Been Programmed, Press "Play/Pause" Button To Play The Tracks In Assigned Order.
- Press Stop Button To Stop Playing Of Programmed Tracks, Press Stop Button Again To Cancel Programming.
Copying Of Mp3/Wma File
The System Allows You To Copy The File From Usb To Sd Or Sd To Usb By 1 File, 1 Folder Or All Files.
I) Copy 1 Track
- Insert The Usb Storage Media Or Sd/Mmc Card, Set In "Usb" Or "Card" Mode.
- Press Rec Button During The Playback Of The Copying Track, Then "One" Will Be Flashing On The Display. Press Rec Button Again To Confirm.
- The Usb Or Sd Icon Will Be Flashing On The Display. Copying Is Performing Now.
- After Completing Of Copy, Unit Will Stop Playback Automatically.
- Display Will Show "End" And Back To Usb Or Sd Mode.
ii) Copy 1 Folder
- Insert The Usb Storage Media Or Sd/Mmc Card, Set In "Usb" Or "Card" Mode & Set At Stop Mode After Unit Reading.
- Press Album Down Or Album Up To Search Desired Folder For Copying.
- Press Rec Button, Then "One" Will Be Flashing On The Display. Pressing Skip Up / Skip Down Button To Select "Dir" On The Display. Press Rec Button Again To Confirm.
- Usb Or Sd Icon Will Be Flashing On The Display. Copying Is Performing Now.
- When The Usb Or Sd Icon Stops Flashing, It Means That The Folder Copying Is Completed.
iii) Copy All Track
- Insert The Usb Storage Media Or Sd/Mmc Card, Set In "Usb" Or "Card" Mode & Set At Stop Mode After Unit Reading.
- Press Rec Button, Then "One" Will Be Flashing On The Display. Pressing Skip Up / Skip Down Button To Select "All" On The Display. Press Rec Button Again To Confirm.
- Usb Or Sd Icon Will Be Flashing On The Display. Copying Is Performing Now.
- When The Usb Or Sd Icon Will Stop Flashing, It Means That All Track Copying Is Completed.
Remark:
-If Press The Rec Button During playback Of Usb Or Sd Mode, The File Will Copy From Usb To Sd Or Sd To Usb.
File Delete From Usb / Sd Card
The System Is Able To Erase The File Stored Inside The Usb Drive Or Sd Card By Following:-
1) Delete 1 Track
- Press And Hold Del Button For 3-5 Seconds During The Playback Of The Desired Track, Then "One" Will Be Flashing On The Display. Press Del Button Again To Confirm.
- "Del" Will Be Shown On The Display.
- "Del" Will Disappear On The Display, It Means The Track Is Deleted.
ii) Delete 1 Folder
-
Insert The Usb Storage Media Or Sd/Mmc Card, Set In "Usb" Or "Card" Mode & Set At Stop Mode After Unit Reading.
-
Press Album Down Or Album Up To Search Desired Folder For Deleting.
- Press And Hold Del Button For 3-5 Seconds, "Del" Will Show On The Display. Pressing Skip Up / Skip Down Button To Select "Dir" On The Display. Press Del Button Again To Confirm.
- "Del" Will Be Shown On The Display. After "Del" Disappears It Means The Desired Folder Is Deleted.
ii) Delete All Track
- Insert The Usb Storage Media Or Sd/Mmc Card, Set In "Usb" Or "Card" Mode & Set At Stop Mode After Unit Reading.
- Press And Hold Del Button For 3-5 Seconds, Then "One" Will Be Flashing On The Display. Pressing Skip Up / Skip Down Button To Select "All" On The Display. Press Del Button Again To Confirm.
- Usb Or Sd Icon Will Be Flashing On The Display. Deleting Is Performing Now.
- When The Usb Or Sd Icon Stops Flashing, It Means That All Track Copying Is Completed.
Remark : All The Files Inside The Usb Storage Media Or Sd Card Will Be Deleted Completely After Confirming To “Del” Button.
Compact Disc (Cd) Playback & Encoding
- Press Function Button Repeatedly To Select "Cd" On Display.
- Press Cd Door Button, Cd Door Will Be Opened, Put The Cd In The Tray And Press Cd Door Button Again, Cd Door Will Be Closed.
- The System Will Start Reading The Cd:
Play / Pause Button
- Press The Play/Pause Button Once To Halt Playing, Press It Again To Continue.
Stop Button
- Press The Stop Button To End Up Audio Playback, Then Display Will Show The Total Number Of Tracks. And Then User Can Turn Skip Up / Skip Down Knob To Select Tracks.
Skip Up / Skip Down Button
During Cd Playback, Press Skip Up Button Once To Play The Next File. Press And Hold Skip Up Button Continuously To Speed Up Selecting Forward
During Cd Playback, Press Skip Down Button Once To Play The Previous File. Press And Hold Skip Down Button Continuously To Speed Up Selecting Backward.
Folder Searching
Press Album Down Or Album Up To Search Folder Backward Or Forward.
Repeat Function
During Audio Playback, Press Mode Button Repeatedly To Choose Different Playbac Mode As Below:
Repeat Once > Repeat Album (Mp3/Wma Format Only) > Repeat All > Random > Introduction
Tracks Programming
Up To 99 Mp3 Tracks & 20 Cd Audio Format Track Can Be Programmed And Played In Any Order. Before Use, Be Sure The System Is At Stop Mode Before Programming:
- Press Functon Button To "Cd" And At Stop Mode
- Press Mode Button, "Mem" Will Be Flashing On LCD Display. Moreover, It will Indicate Program No. And Digits For Track No. To Be Programmed.
- Select A Desired Folder (For Mp3/Wma Disc Only) By Pressing Skip Up Or Skip Down Button, Then Press Mode Button To Confirm.
- Then Select A Desired Track By Pressing Skip Up Or Skip Down Button, Then Press Mode Button To Confirm.
- Repeat Steps 3 And 4 To Enter Additional Tracks Into The Memory If Necessary.
- When All The Desired Tracks Have Been Programmed, Press "Play/Pause" Button To Play The Tracks In Assigned Order.
- Press Stop Button To Stop Playing Of Programmed Tracks, Press Stop Button Again To Cancel Programming.
Copying Of Cd
The System Allows You To Copy The Track From Cd To Usb Or Sd By 1 Track, 1 Folder Or All Files.
I) Copy 1 Track
- Insert The Usb /Sd Storage Media, Press Function Button Repeatedly To "Cd" Mode.
- Press Rec Button During The Playback Of The Copying Track From Cd, Then "One" Will Be Flashing On The Display. Press Rec Button Again To Confirm.
- The Usb Or Sd Icon Will Be Flashing On The Display. Copying Is Performing Now.
- After Completing Of Copy, Unit Will Stop Playback Automatically.
- Display Will Show "End" And Back To Cd Mode.
ii) Copy 1 Folder (For Mp3/Wma Disc Only)
-
Insert The Usb/SD Storage Media, Set In Cd & Stop Mode After Unit Reading.
-
Press Album Down Or Album Up Button To Search Folder For Copying.
- Press Rec Button, Then "One" Will Be Flashing On The Display. Press Skip Up / Skip Down Button To Select "Dir" On The Display. Press Rec Button Again To Confirm.
- Usb Or Sd Icon Will Be Flashing On The Display. Copying Is Performing Now.
- When The Usb Or Sd Icon Stops Flashing, It Means That The Folder Copying Is Completed.
iii) Copy All Track
- Insert The Usb/Sd Storage Media, Press Cd Button To "Cd" Mode.
- Press Rec Button, Then "One" Will Be Flashing On The Display. Press Skip Up / Skip Down Button To Select "All" On The Display. Press Rec Button Again To Confirm.
- Usb Or Sd Will Be Flashing On The Display. Copying Is Performing Now.
- When The Usb Icon Stops Flashing, It Means That All Track Copying Is Completed.
Split Track Function For Usb/Sd Recording For Turntable/Cassette/Aux In
1) Manual Split Operation Procedure: During Usb/Sd Recording, The Usb/Sd Icon Will Flash On The Display. If A New Track Is Required, Press Mode Button On The Unit Or Remote Control, Display Will Show "Ts", Then The Unit Will Stop Recording Momentarily And Resume Again. A New File Will Have Been Created On The Usb/Sd Device Representing A New Track.
2) Auto Split Operation Procedure:
Before Usb/Sd Recording, Select Audio Source, Then Press Mode Button On The Unit Or Remote Control, Display Will Show "T-On", Which Means The Auto Split Function Has Activated. Then Start Usb/Sd Recording, The Unit Can Automatically Detect The Silent Part Between Each Track, And Create A New File To Move On To Start Recording The Next Track.
If Not Required: Press Mode Button On The Unit Or Remote Control Before Usb/Sd Recording, Display Will Show "T-Of", Which Means Auto Split Has Been Deactivated.
Please Note For Auto Split: Several Seconds Of The Beginning Of The Next Track May Not Be Recorded, As The Unit May Take A Few Seconds To Create A New File On The Usb/Sd; And It Can Additionally Be The Case That Some Music Producers Intentionally Add Silent Sections Within One Track. As A Result, This Will Very Likely Make The Unit Consider This Silent Part The Break Between Tracks And Create A New Track On The Recording.
Note For Auto Split: During Usb/Sd Recording From Turntable / Cassette, When The Unit Has Detected Any Particular Silent Part, The Turntable / Cassette Player Will Stop Momentarily. The Turntable / Cassette Player Will Resume Operation Once The Usb/Sd Device Has Begun Creating A New File To Be Recorded.
Bluetooth Connection
Press And Hold Function Button Till LCD Shows "Bt", Then The Unit Is Ready For Connection With Your Bluetooth Device (Such As Mobile Phone).
- Switch On The Bluetooth Function Of Your Bluetooth Device, And Select "Tt1070e" Bluetooth Equipment For Connection.
- After Your Bluetooth Device Is Connected With The Unit Via Bluetooth, Start To Playback Your Device.
This Unit Has Nfc Function Which Can Allow Your Bluetooth Device (Such As Mobile Phone) Connecting With The Unit Automatically.
Switch On The Bluetooth And Nfc Function Of Your Device, Then Put It Near The Logo Within 5Mm On The Front Panel. Your Device Can Automatically Search And Connect With The Unit.
- To Disconnect With The Unit, Put Your Device Near The "Bt/N" Logo Within 5Mm On The Front Panel Again.
Id3 Display
During Mp3 Music Playback, Press Fm St. Button On Th Remote Control, It Can Switch On Or Off Id3 Display. If Id3 Display Is On, It Can Show The Mp3 Details (English Only) Including Tile Name, Artist Name And Album Name During Mp3 Plyback.
Earphone Jack & Line Out Socket
- This System Can Be Connected With Headphone Or External Amplifier / Speaker By 3.5Mm Earphone Jack.
- This System Can Be Connected With External Device (Eg. Amplifier And Speaker) By Line-Out Socket At Rear Cabinet.
Power Saving Feature:
To Save Energy, If There Is No Audio Signal From Cd / Turntable / Cassette / Usb / Sd For A Period Of Over 10 Minutes, Then The Unit Will Automatically Switch To Standby Mode
Technical Specifications
Power supply: 12V 1A power supply with 100-240V ~ 50 / 60Hz power supply
consumption: 15W
Standby: <1W
Reception frequency: FM 87.5 - 108.0 MHz
Reception frequency: AM 522 - 1620 KHz
Transmitting power max Bt: 2.5 mW
Bluetooth transmission band: 2.4 GHz
Unit dimensions: 320 × 210 × 290 ~mm
Speaker dimensions: 145x210x135 mm
NOTES D'EMPLOI
Aux In Jack & Codage
Lecture Et Encodage De Disque Compact (Cd)
Specifications Techniques
Empfangsfrequency: FM 87,5 - 108,0 MHz
Empfangsfrequency:AM522-1620KHz
Precautions for correct disposal of the product.
The symbol shown on the equipment indicates that waste must be disposed of in "separate collection" and so the product must not be disposed of together with urban waste.
The user must take the product to special "separate waste collection centres" provided by local government, or deliver it to the retailer against the purchase of a new product.
Separate collection of waste and subsequent treatment, recycling and disposal operations promotes the production of equipment with recycled materials and limits negative effects on the environment and on health caused by improper handling of waste.
Illegal disposal of the product leads to the enforcement of administrative penalties.
SIMPLIFIED EU DECLARATION OF CONFORMITY
Hereby TREVI Spa declares that the radio equipment type TT 1070 E is in compliance with directive 2014/53/EU.
The full text of the EU declaration of conformity is available at the following internet address https://www.trevi.it/dms/zidi/TREVI/DOCTT1070E.pdf

EN If you will not find your language on the instruction manual, please go on our website www.trevi.it to find it
FR Si vous ne trouvez pas votre langue sur le mode d'emploi, veuillez vous visitor sur notre site Web www.trevi.it de le trouver
DE Wenn Sie ihre Sprache auf die Bedienungsanleitung nicht finden, gehen Sieitte auf unsere Websites www.trevi.it zu finden
ES Si noencuentras tu idioma en el manual de instrucciones, porfavor vaya a notrea pagina web www.trevi.it se encuentra
PT Se você não vai encontrar sua lingua sobre o manual de instruções, por favor, está em meu site www.trevi.it para encontrar a lo


Trevi S.p.A.
Strada Consolare Rimini-San Marino, 62 47924 Rimini (RN) Italy
Tel. 0541/756420 - Fax 0541/756430 - www.trevi.it - e-mail: info@trevi.it

- CARE AND MAINTENANCE
- IMPORTANT
- TO ACTIVATE THE REMOTE CONRTOL AND BATTERY REPLACEMENT
- To Replace With a New Battery:
- CAUTIONS ON LASER
- LOCATION OF CONTROL
- Setting The Clock
- Setting Alarm
- Snooze Function
- Timer Function
- Radio Tuning
- Manual Preset Radio Stations
- Auto Preset Radio Stations
- Fm & Fm-Stereo Reception
- Fm & Fm-Stereo Radio Encoding
- Phono & Encoding
- Phono Encoding
- Aux In Jack & Encoding
- Aux In Encoding
- Cassette Tape & Recording
- Playback
- Recording
- Cassette Tape Recording To Usb/Sd
- Playback Of Mp3/Wma Song Via Usb Storage Media Or Memory Card
- Play / Pause Button
- Stop Button
- Skip Up / Skip Down Button
- Folder Searching
- Repeat Function
- Remark
- Tracks Programming
- Copying Of Mp3/Wma File
- Remark:
- File Delete From Usb / Sd Card
- Compact Disc (Cd) Playback & Encoding
- Copying Of Cd
- iii) Copy All Track
- Split Track Function For Usb/Sd Recording For Turntable/Cassette/Aux In
- Bluetooth Connection
- Id3 Display
- Earphone Jack & Line Out Socket
- Power Saving Feature:
- Technical Specifications
- NOTES D'EMPLOI
- Aux In Jack & Codage
- Lecture Et Encodage De Disque Compact (Cd)
- Specifications Techniques
- Precautions for correct disposal of the product.
- SIMPLIFIED EU DECLARATION OF CONFORMITY
- Trevi S.p.A.
Brand : Trevi
Model : TT 1070 E
Category : Turntable