
PDP170 - Phone PEAQ - Free user manual and instructions
Find the device manual for free PDP170 PEAQ in PDF.

| Product type | DECT Cordless Phone |
| Brand | PEAQ |
| Model | PDP170 |
| Base dimensions (H x W x D) | 145 x 77.74 x 86.68 mm |
| Handset dimensions (H x W x D) | 155 x 46 x 21 mm |
| Weight | Approx. 150 g (handset with batteries) |
| Power supply | Power adapter: input 100-240 V~50/60 Hz, output 6V DC 500 mA |
| Handset batteries | 2 x AAA Ni-MH 1.2 V 750 mAh rechargeable |
| Talk time | Up to 11 hours |
| Charging time | Approx. 16 hours (first charge) |
| Range | Up to 50 m indoors, 300 m outdoors |
| Frequency | 1.881 - 1.898 GHz |
| Display | Backlit LCD display |
| Built-in answering machine | Yes, with recording and remote access |
| Main features | Hands-free, phonebook (120 contacts), SMS, call log, conference, call transfer, eco mode, alarm, timer, appointments |
| Number of handsets possible | Up to 6 handsets |
| Caller ID display | Yes, with name if stored in phonebook |
| Key lock | Yes |
| Cleaning and care | Unplug before cleaning. Use a slightly damp cloth. Do not use solvents or abrasive products. |
| Safety instructions | Do not expose to moisture. Use only the supplied adapter. Replace batteries with identical type. |
| Spare parts and repairability | Rechargeable batteries available. For any repair, contact an authorized service center. |
| Warranty | Refer to the warranty conditions provided with the device. |
Frequently Asked Questions - PDP170 PEAQ
User questions about PDP170 PEAQ
0 question about this device. Answer the ones you know or ask your own.
Ask a new question about this device
Download the instructions for your Phone in PDF format for free! Find your manual PDP170 - PEAQ and take your electronic device back in hand. On this page are published all the documents necessary for the use of your device. PDP170 by PEAQ.
USER MANUAL PDP170 PEAQ
Important safety instructions. Read carefully and keep for future reference.

The lightning flash with arrow head within an equilateral triangle is intended to alert the user to the presence of uninsulated "dangerous voltage" within the product's enclosure that may be of sufficient magnitude to constitute a risk of electric shock to persons and animals.
The exclamation point within an equilateral triangle is intended to alert the user to the presence of important operating and maintenance instructions in the literature accompanying the device.
To reduce the risk of fire or electric shock, do not expose the device to rain or moisture. Do not expose the device to splashes or moisture. Do not place liquid filled objects, e.g. vases, on top of the device.
- To avoid dangerous situations, do not use product for any purpose other than those described in the instructions. Improper use is dangerous and voids the warranty.
- For household use only. Do not use outdoors.
- Danger of suffocation! Keep all packaging material away from children.
Only use under normal room temperature and humidity conditions.
The product is only suitable for use at moderate degrees of latitude. Do not use in the tropics or in particularly humid climates. -
Do not move the product from cold into warm places and vice versa. Condensation can cause damage to the product and electrical parts.
-
Do not use attachments or accessories other than recommended by the manufacturer or sold with this appliance. Install in accordance with this user manual.
- When installing the product, leave sufficient space for ventilation. Do not install in bookcases, built-in cabinets or the like.
- The ventilation should not be impeded by covering the ventilation openings with items, such as newspapers, table-cloths, curtains, etc. Do not insert any objects into the product. Do not place any electronic equipment or toys on the product. Such items could fall from the top and cause product damage and/or personal injury.
- Do not install near any heat sources such as radiators, heat registers, stoves or other appliances (including amplifiers) that produce heat.
- Do not apply excessive force to the front or top, as this could ultimately overturn the product.
- Do not touch, push or rub the surface of the product with any sharp or hard objects.
- Danger! To reduce the risk of fire or electric shock, do not expose this product to rain or moisture.
- The product shall not be exposed to dripping or splashing and no objects filled with liquids, such as vases, shall be placed on the product.
- Care should be taken so that no objects or liquids enter the enclosure through openings.
No naked flame sources, such as lighted candles, should be placed on the product.
Refer all servicing to authorised service agent. Do not attempt to repair the product yourself. Servicing is required when the product has been damaged in any way, such as the supply cord or plug are damaged, liquid has been spilled, objects have fallen into the product, the enclosure is damaged, the product has been exposed to rain or moisture, does not operate normally, or has been dropped.
Before connecting the product to a socket outlet, make sure the voltage indicated on the product corresponds to your local mains.
If the supply cord is damaged, it must be replaced by the manufacturer or its service agent or similarly qualified person in order to avoid hazard.
- Regularly check if the supply cord, product or extension cable is defective. If found defective, do not put the product into operation. Immediately pull the plug.
- Place the supply cord and, if necessary, an appropriate extension cable in such away that pulling or tripping over it is impossible. Do not allow the supply cord to hang down within easy reach.
- Do not jam, bend or pull the supply cord over sharp edges.
Only use the provided adaptor.
- The adaptor power plug is used as the disconnect device; the disconnect device shall remain readily operable. To completely disconnect the power input, disconnect the adaptor power plug.
The product may not function properly or not react to the operation of any control due to electrostatic discharge. Switch off and disconnect the appliance; reconnect after a few seconds.
- Protect the supply cord from being walked on or pinched particularly at the plug, convenience receptacles and the point where it exits from the product.
- Never pull the adaptor power plug by the supply cord or with wet hands.
- Disconnect the adaptor power plug in case of faults during use, during lightening storms, before cleaning and when not using the product for a longer period of time.
- Danger! Before cleaning, switch the product off and disconnect the adaptor power plug from the socket.
- When the product has reached the end of its service life, make it defective by disconnecting the adaptor power plug from the socket and cutting the cord in two.
- Caution! There is danger of explosion from improper replacement of the battery. Replace battery only with the same or equivalent type of battery.
Always exchange the entire set of batteries. - Make sure the battery are correctly inserted. Observe the polarity (+) plus / (-) negative on the battery and the housing. Improperly inserted battery can lead to leakage or, in extreme cases, a fire or an explosion.
- Never expose batteries to excessive heat (e.g. bright sun, fire), and never throw them into fire. The batteries could explode.
The connections must not be short-circuited. - Remove used batteries. Remove the batteries if you know that the product will not be used for a longer period of time. Otherwise, the batteries could leak and cause damage.
- Keep batteries out of reach of small children. If batteries have been swallowed, seek immediate medical attention.
Non-rechargeable batteries must not be recharged. -
Remove the batteries from the product before disposal.
-
If the batteries leak, remove them with a cloth and dispose of them accordingly. Prevent battery acid from coming into contact with skin and eyes. If you do get battery acid in your eyes, flush them thoroughly with lots of water and consult a physician immediately. If battery acid comes into contact with your skin, wash the affected area with lots of water and soap
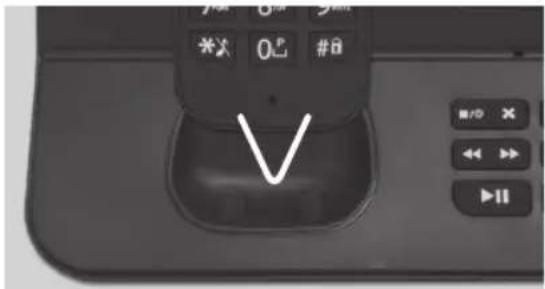
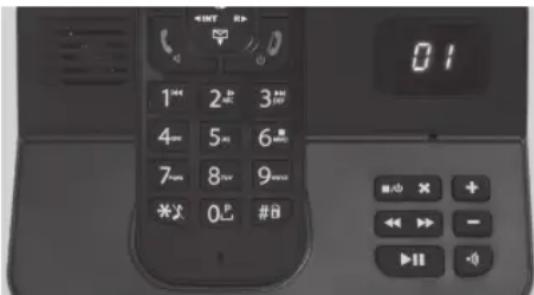
Base station
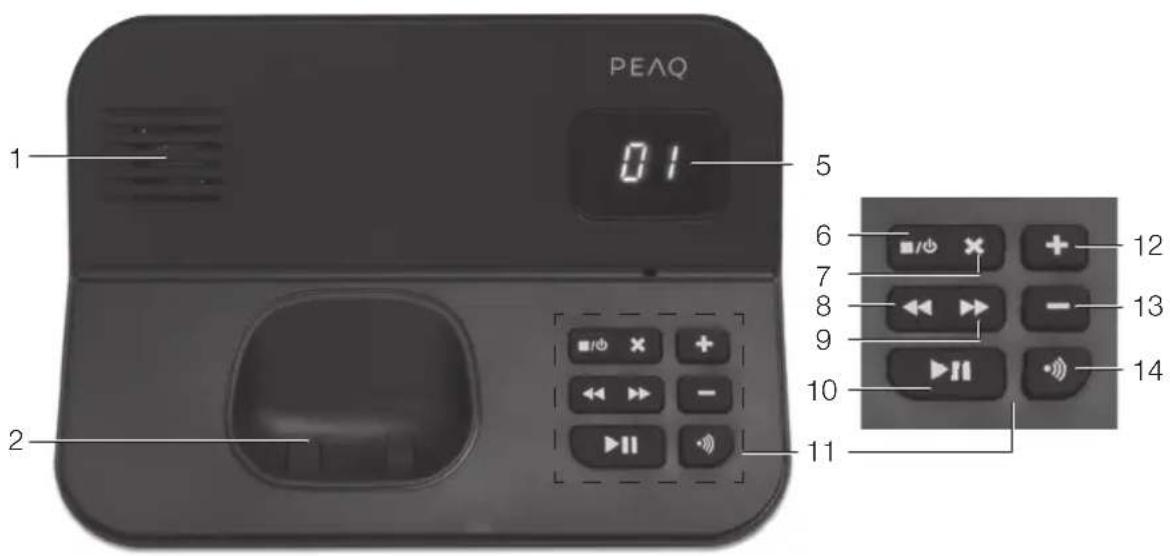

- Speaker
- Charging socket
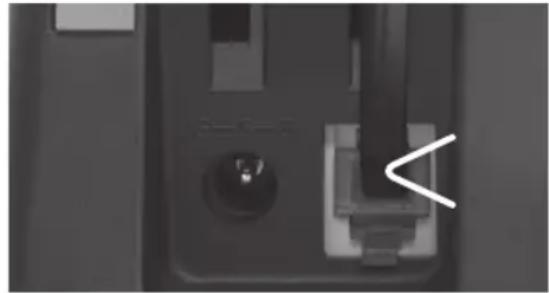
- DC-input jack (bottom side)
- Telephone socket (bottom side)
- Display
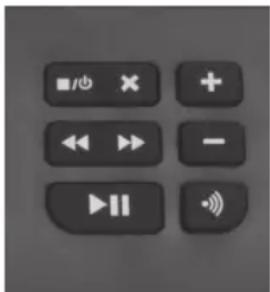
- Answering machine On/Off/Stop
- Delete Voice message X
- Backward (beginning of message/ previous message/ welcome message)
- Forward (next message/ record voice message)
-
Play voice messages/Pause
-
Control panel
- Volume increase +
- Volume decrease -
- Search handset (Pager)
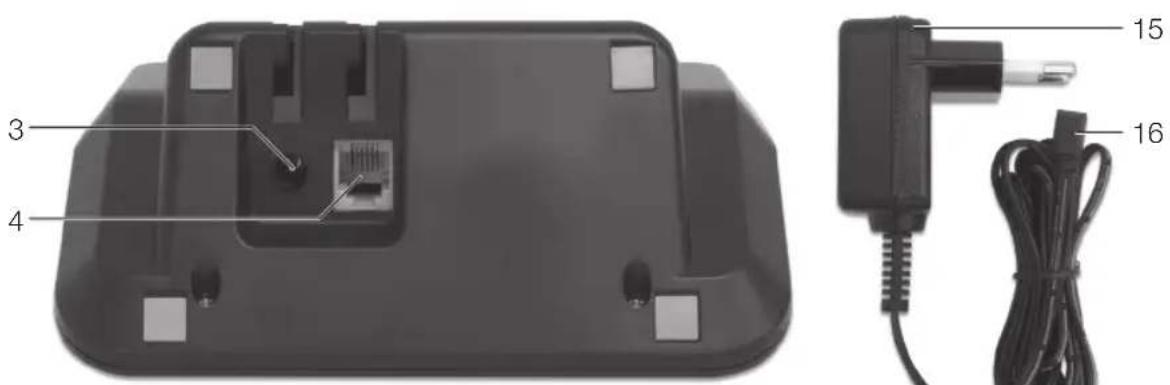
- Charging power supply
- DC-cord with plug
- Phone plug adapters
a. Italy
b. Switzerland
c. Austria
d. Germany
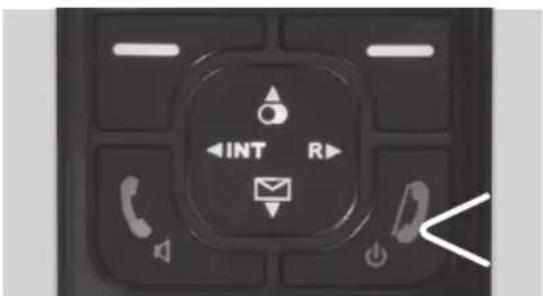
Handset
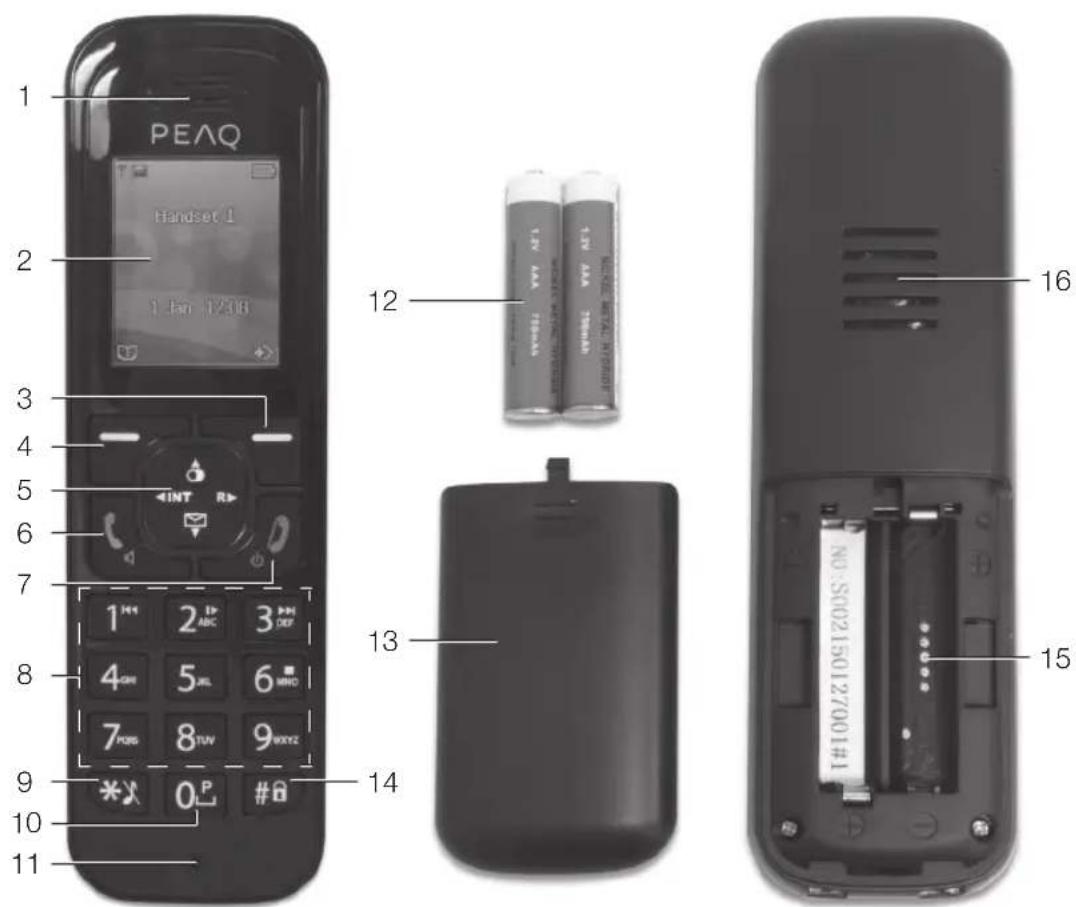
- Speaker
- Display
- Display button right
- Display button left
- Navigation buttons ▲▼▲/ Redial O/ Flash-button R/ Call list / Internal call INT
- Pick up/ Call
- End call, On/Off
- Numeric buttons 1-9
- Star key / Microphone mute
- Numeric button 0/ P
- Microphone
- Batteries
- Battery compartment lid
- Hash key#/key lock
- Battery compartment
- Speaker (hands-free)
Accessories Line connection
1x Dect base station
1x Phone cable
2x Rechargeable batteries
1x Instruction manual
1x Dect handset
1x Power adaptor
4x Phone plug adaptors
Power supply
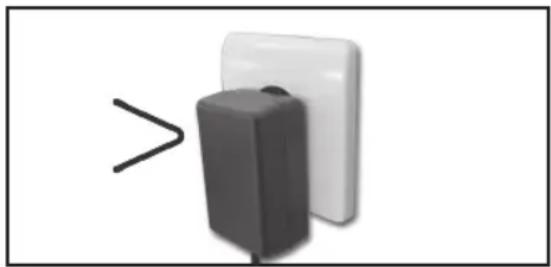
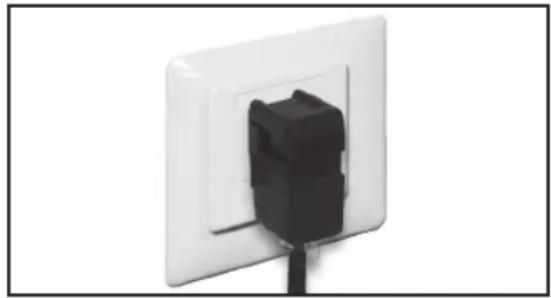
Connect the end of the power adaptor to the DC input jack at the bottom of the base station and the other to a power socket on the wall.
- Connect one end of the line cord to the telephone socket at the bottom of the base station.
- Connect the other end of the line to telephone wall socket.
Depending on your country use one of the provided adapters to connect the cord with the telephone wall socket.
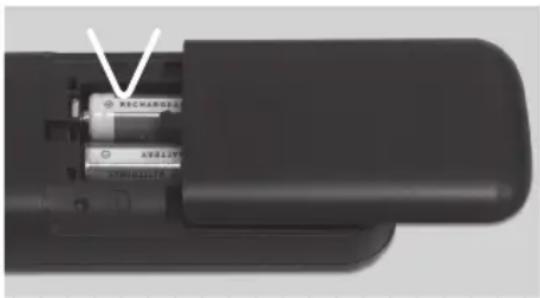
Install batteries
- Open the battery compartment cover.
- Insert the rechargeable batteries (provided) in the correct polarity (+ and -).
- Close the battery compartment.
Place the handset on the base station to charge the handset and you will hear a docking sound.
Notes
- Charge the batteries for 16 hours before first use.
- Replace the handsets in the base or charging unit after use to avoid complete discharge of the batteries. The batteries are designed for continuous charging.
Battery level
The battery icon displays the current battery level.

Note
- When the handset is off the base station/ charger, the bars indicate the battery level.
- Whilst charging the handset on the base station, the bars are flashing.
First stepsCharge the handset
SWITCH ON/OFF THE HANDSET
Press and hold On/Off switch for approx. 2 seconds to switch the handset on or off.
SET THE DISPLAY LANGUAGE
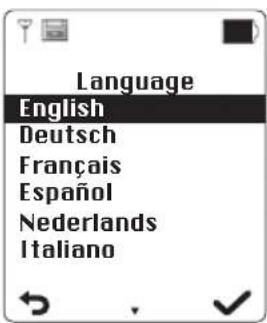
Push the right display button to open the main menu.
- Chose option Settings with the Navigation buttons (▲▼) and confirm with the right display button.
- Chose submenu Language and confirm with the right display button.
- Chose your language and confirm with the right display button.
SET DATE AND TIME
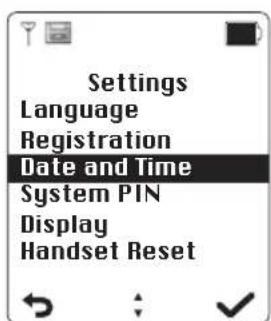
Push the right display button to open the main menu.
- Choose option Settings with the Navigation buttons (▲▼) and confirm with the right display button.
- Choose submenu Date and Time and confirm with the right display button.
- Successively set Year, Month, Day, Hours and Minutes. Confirm each setting with the right display button to come to the next setting.
- Use the Navigation buttons to choose the time format (12 or 24 hours). Confirm with the right display button.
REGISTER THE HANDSET
- Push the right display button to open the main menu.
- Choose option Settings with the Navigation buttons (▲▼) and confirm with the right display button.
- Choose submenu Register and confirm with the right display button.
- Choose the base station where the handset shall be registered and enter the PIN code (factory setting 0000).
- Push and hold button Handset register until a signal tone confirms the registration.
- Push the right display button to open the main menu.
- Choose option Settings with the Navigation buttons (▲▼) and confirm with the right display button.
- Choose submenu Register and confirm with the right display button.
- Enter the PIN code and confirm with the right display button.
- Choose the number of base station and confirm with the right display button.
- A signal tone confirms the deregistration and the display shows "not reg."
Phone call
QUICKCALL
- Press button
- Dial the number once you hear the dialing tone. The number appears on the display and is dialed.
- Press to finish the call or replace the handset on the base station.
BLOCK DIALLING
- Dial a number.
- Press INT to correct the dial number.
- Press and the number will be dialed.
- Press to finish the call or replace the handset on the base station.
REDIAL
- Press
- Press . The previously dialed number will be dialed.
CALL FROM THE REDIAL LIST
- Press The number recently dialed appears on the first place of the display.
- Search the requested number with
- Press and the number shown in display will be dialed.
- Press to finish the call or replace the handset on the base station.
CALL A NUMBER FROM THE PHONEBOOK
The phone has a phonebook in which you can save numbers and names. To call a number from the phonebook:
- Press the left display button and use buttons to choose a number.
- Press and the number shown in display will be dialed.
Pick up a call
The handset starts to ring during an incoming external or internal call. The call symbol appears in the display. The caller's number appears in the display if your telephone line has Caller ID. Consult your telephone company. The name of the caller also appears on the display if:
- the number is stored into the phonebook with name.
-
the network transmits the name along with the phone number.
-
To pick up a call:
Press button to pick up the call.
Pick up the handset from the base station (function only possible when Auto call has been activated).
- Press to finish the call or replace the handset on the base station.
FORWARDING A CALL TO ANOTHER HANDSET
You can forward an external call to the second handset.
- Push button "INTERNAL" is shown in display.
- Choose the number of the other handset to which you want to forward.
- If the other handset answers you can first talk internally.
- Press button End call 0. The call is forwarded to the other handset and your handset finishes the call.
- If the other handset does not answer push "END" to talk back to the external caller.
CONference Call BETWEEN TWO HANDSETS AND EXTERNAL CALLER
You can make conference connection between a external caller and a second handset.
- Push button INTERNAL" is shown in display.
- Choose the number of the other handset to which you want to forward.
-
If the other handset answers choose "CONF".
-
You are now connected with the second handset and the external caller.
Hands-free
This function allows you to make a call without having to hold the handset in your hand.
- Press during a call to activate the hands-free function.
- Press again to deactivate.
Mute
Press during a call to mute the microphone. You can talk without the caller hearing you. Press again to switch on the microphone.
Answering machine
When putting the base station into initial operation, the answering machine is preset with a standardized welcome message. The activated display at the base station shows that the answering machine is activated.
RETRIEVE VOICE MESSAGES VIA HANDSET
- New messages on the answering machine are shown by text message "New message: x" (x=number of new messages) blinking below handset name.
For playing new voice messages push the left display button.
RETRIEVE VOICE MESSAGES VIA BASE STATION

The blinking display of base station shows the number of new messages.
For playing new messages directly push button Play voice messages/Pause
- For deleting the message push button, Delete Voice messageX.
Note:
The number of played messages which were not deleted are permanently shown in display.
REMOTE ACCESS
You can operate your answering machine when you are away from home. Simply make a call to your phone with a phone using tone dialing and enter your 3-digit PIN code.
- Make a call to your home number with a phone using tone dialing.
- Push * twice after you heard the announcement.
-
Enter your PIN code (factory setting: 000).
-
You now have access to your answering machine, and you can now listen to the new messages.
-
Press a key to choose a function. See the Remote access commands table below for a list of available functions.
| Key Function |
| 1 Previous message |
| 2 Play messages |
| 3 Skip to next message |
| 6 Stop playing |
| 7 Delete current message |
REMOTE CONFIGURATION OF ANSWERING MACHINE
You can setup your answering machine when you are away from home.
- Make a call to your home number.
- The answering machine is answering your call.
- Push *-button twice.
- Enter your PIN code (factory setting: 000).
- A signal tone appears and following options are available:
| Key Function | |
| # Record voice message | |
| 0 Delete all messages | |
| 4 Play welcome message | |
| 5 | Record new welcome message |
| 6 Stop recording; stop playing | |
| 8 Turn off answering machine | |
| 9 | Switch between welcome messages; Switch on answering machine1 |
1 If the answering machine is switched off, in answer mode it will answer the call after ringing min. 10 times. After pushing *-button twice you can enter the PIN code and switch on the answering machine.
Symbols shown on display
| Symbol | Function |
| I2 | Missed calls |
| ○ | New text messages (SMS) |
| “New messages: x (x=number of new messages) | New messages on answering machine |
| ○ | Key lock Active: For locking the keys push #-button for 2 seconds. Incoming calls can be picked up as usually. Emergency numbers can be called as well. Deactivate: Deactivate key lock by pushing right display button followed by pushing #-button immediately. |
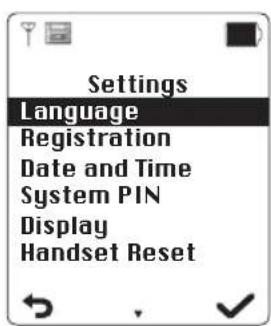
Menu
Press the right display button to show the menu. Use the navigation buttons to choose a menu setting

Settings
LANGUAGE
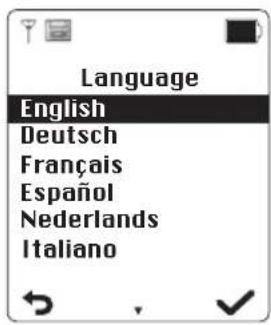
Choose a language with the navigation buttons and press to confirm.
REGISTRATION

HANDSET REGISTER/DE-REGISTER
For details information refer to REGISTER THE HANDSET/ DEREGISTER THE HANDSET in chapter "First steps". You can choose one Base station if there are several available.
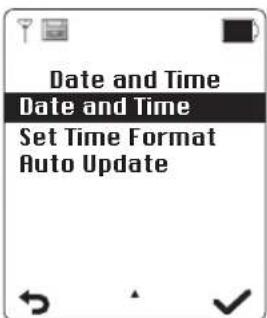
TIME SETTING
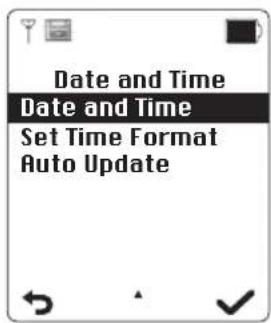
DATE AND TIME
For details information refer to SET DATE AND TIME in chapter "First steps".
SET TIME FORMAT
For details information refer to SET DATE AND TIME in chapter "First steps".
AUTO UPDATE
Switch on/off the automatically time updates.
PIN
To change the default PIN-codes or enter a new code, follow the steps:
- Enter the 4-digit default PIN (0000) and confirm with the right display button.
- Enter a new 4-digit PIN and confirm with the right display button.
- Repeat the new 4-digit PIN to confirm.
- A beep sound will indicated the complete setting.
DISPLAY
Contrast
Possible contrast settings are:
Low
Middle
High
Backlight Time
Possible backlight time settings are: 10s, 20s, 30s or 40s
Name of Handset
To change the default handset name, proceed as follow:
- Press the left display button.
- Enter a new name with the numeric buttons. Toggle between upper and lower case with the star button.
RESETHANDSET
Reset handset will only erase your custom settings. Phonebook, Caller log and SMS will not be reset.
- Press the right display button to reset.
Reset handset to default
Please note that all previous settings will be deleted.
- Press Flash button (R) for least 10 seconds.
- Confirm with the right display button.
RESET BASE
Reset base will only erase your custom settings. Phonebook, Caller log and SMS will not be reset.
- Confirm with the right display button.
- Enter PIN.
RESET BASE TO DEFAULT
Please note that all settings will be erased
- Press INT button for at least 10 seconds.
- Confirm with the right display button.

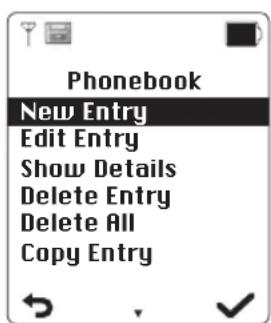
Phonebook
NEW ENTRY
Name, phone number, ringtone and group will be set in sequence.
- Name: Enter a name with the numeric buttons. Toggle between upper and lower case with the star button. Press right display button to save.
- Phone number: Enter the phone number with the numeric buttons. Press right display button to save.
- Ringtone: Assign a ringtone to a new entry. Press right display button to save.
- Group: Assign the new entry to a group. Press right display button to save.
EDIT ENTRY
Edit name, phone number, ringtone and group in sequence. Save one by one after entering by pressing the right button.
SHOWDETAILS
Display the group, the name, the phone number and the assigned ringtone for a selected phonebook entry.
- Dial phone number by pressing the right display button.
- Press left display button to return to phonebook.
DELETE ENTRY
Press the right display button to confirm to delete the selected entry. To cancel press left display button.
DELETE ALL
Press right display button to confirm to delete all phonebook entries. To cancel press left display button.
COPY ENTRY
If more than one handset is registered with the base, you can copy selected phonebook entry to another handset.
- Select the handset to copy the entry.
-
Confirm with the right display button. The display will show "Copying from Handset x" (x=number of handset).
-
Confirm receipt with the right display button.
- To reject receipt press the left display button. The entry will not be copied.
COPY APPEND
If more than one handset is registered with the base, you can copy all phonebook entries to another handset.
Note: Actual entries will not be overwritten.
- Select the handset to copy the entries.
- Confirm with the right display button. The display will show "Copying from Handset x" (x=number of handset).
- Confirm receipt with the right display button.
- To reject receipt press the left display button. The entries will not be copied.
COPY ALL
If more than one handset is registered with the base, you can copy the phonebook to another handset
Note: Actual entries will be overwritten.
- Select the handset to copy the entries.
- Confirm with the right display button. The display will show "Copying from Handset x" (x=number of handset).
- On the other handset the display will shows "Replace all Phonebook Record?".
- Press the right display button to confirm or left button to reject.

Additional features
DIRECTCALL

If this function is enabled, pressing the Dial button or the left display button will establish a connection to the saved phone number.
Note: While enabled, the display will show "Direct Call" underneath the handset name.
New: Enter a phone number.
- On/Off: Enable or disable the direct call function.
- Edit: Edit the saved phone number.
ROOM MONITOR
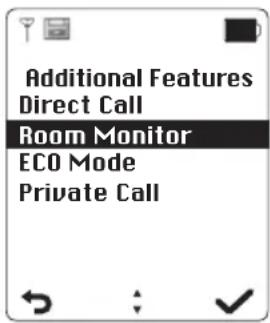
Monitoring a room, while the user is not at home. The user can call home and monitor the room where the handset is located. To do so, the user must save the phone number that he will call from.
While enabled, the display will show "Room Monitor" underneath the date and time.
Note: To use this feature, it's required that both phone lines must have the Caller ID function enabled. If the Room Monitor is enabled on multiple handsets for the same phone number, the handset with the lowest handset ID will respond if a call is made to the room monitor. If no phone number has been saved, the only available menu option will be "New". If a phone number has been saved already, the items "On/Off" and "Edit" will be shown.
- New: Enter a phone number which you will call later.
- On/Off: Enable or disable the room monitor function.
Edit: Edit the saved phone number.
ECO MODE
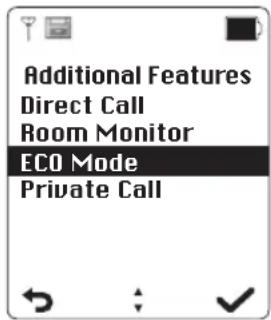
This DECT phone can be operated in low power mode (ECO mode) with reduce RF power. Select the mode "Normal" or "Zero Emission" with the button and confirmed with the right display button.
PRIVATECALL
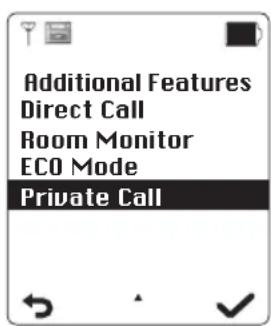
Hide or show your caller ID for outgoing calls. You can select:
Show Number: your caller ID will be shown
- Hide Number: your caller ID will not be shown
Note: It's required that your telephone provider support the Private call function.

SMS
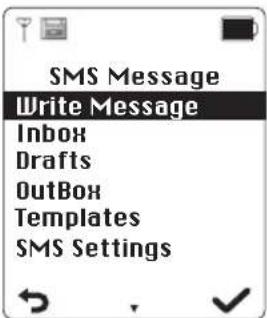
You can receive and send messages (SMS) with this mobile phone.
Requirements:
- Caller IDD function must be enable for this phone line.
- Sending and receiving SMS messages has been enable by your telephone provider.
For detail information please contact your telephone provider.
Options described in the below table are available. Press the right display button to open the overview and select an option with the button. Confirm with right display button.
| Option Explanation | |
| Send • send | SMS • via entering phone number or select contact from phonebook |
| Save SMS • | save SMS in draft |
| Templates • | use templates |
| Delete • delete | SMS |
| Reply • reply to a received SMS | |
| Forward • | forward a read SMS • add additional text into SMS before forward |
| Dial number • | dial number of the sender |
| Save number • | save the sender's number in phonebook • input name, number, ringtone and group in sequence. |
| Delete All • | delete all SMS |
WRITEMESSAGE
Input the SMS with the numeric buttons. Toggle between upper and lower case with the star button. Press left display button to delete text. Press right display button to select further options:
Send
Save SMS
Use templates
INBOX
All received SMS will be saved in inbox until delete.
Select a SMS with the button. Press the right display button to open the SMS.
- Delete
Reply
Forward - Dial number
Save number
Delete all
DRAFT
All draft messages will be saved here. Select a SMS with the button. Press the right display button to open the draft message.
Send to
Save Message
Use Template
- Dial number
- Delete
Delete All
OUTBOX
All outgoing messages will be saved here. Select a SMS with the button. Press the right display button to open the message.
- Send to
Save Message
Use Template - Dial number
- Delete
Delete All
TEMPLATES
Here you can find message templates. Select a template with the button. Press the right display button to open it.
Edit
- Delete
SMS SETTING
To be able to send or receive any text messages you have to register your provider's information. For more information, please contact your network or service provider.
Service Center: add up to 4 service centers
- Send Service: select service center to send message

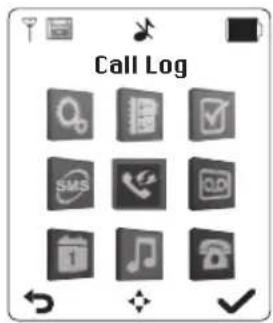
Call Log
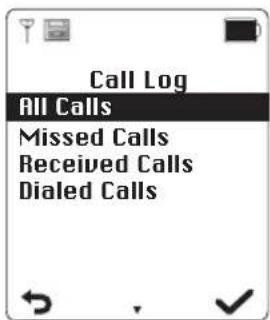
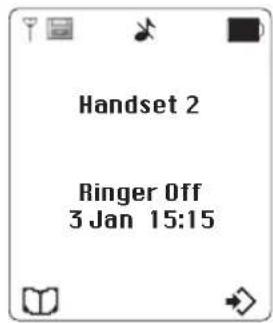
When receiving a call, the number of the caller, the date and the time will be shown on the handset display.
Options described in the below table are available. Press the right display button to open the overview and select an option with the button. Confirm with right display button.
| Option Explanation | |
| Save Number | save the sender's number in phonebook • input name, number, ringtone and group in sequence. |
| Delete • Delete phone number | |
| Delete All • | Delete all phone numbers |
| Show Details • | Shows date and time of call |
ALL CALLS
All calls are listed here.
Select with the button. Press the right display button to confirm.
Save Numbers
- Delete
Delete All
MISSED CALLS
All missed calls are listed here.
Select with the button. Press the right display button to confirm.
Save Numbers
- Delete
Delete All
RECEIVED CALLS
All incoming & received calls are listed here. Select with the button. Press the right display button to confirm.
Save Numbers
Delete
Delete All
DIALED CALLS
All outgoing calls are listed here.
Select with the button. Press the right display button to confirm.
- Save Numbers
Show Details - Delete
Delete All

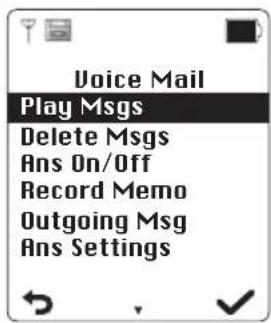
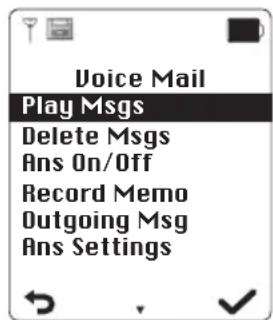
Answering machine (Voice mail)
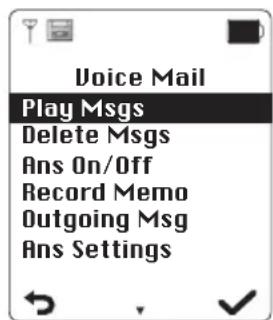
PLAY MESSAGES
Two options are available
- Play New Messages: Plays new messages only. If there are no new messages, a confirmation tone will sound and the display shows "No New Message".
- Play All Messages: If no messages are saved a confirmation tone will sound and the display shows "No Messages".
When playing voice messages pushing left display button will delete current message and pushing right display button will skip to next message.
DELETE MESSAGES
This option allows you to delete all messages. Push the right display to delete all messages.
SWITCHING ON/OFF THE ANSWERING MACHINE
This option allows you to switch the answering machine on or off.
Choose your option with navigation buttons
and confirm with right display button.
Note:
- You can switch on and off the answering machine directly at the base station. For switching on/off push button Answering machine On/Off.
- You can toggle between "Only answer call" ( --> display oo) and "Answer call and record message" ( --> display 00) by pushing button "Answering machine On/Off" for long time.
RECORD MEMO
Choose this option to leave a message. Wait for the welcome message and confirmation tone, leave your message and push right display button to save the message.
Note: Voice memos can also be recorded directly at the base station. Press the Forward button for 2 seconds. Wait for the welcome message and confirmation tone, leave your message and stop recording with Stop button.
WELCOMEMESSAGE
The answering machine is prepared with preinstalled welcome messages. Following options are available:
- Record message: Record an individual welcome message
Play Message: Play recorded message
Note: After recording a message it will be played once directly after recording.
ANSWERING MACHINE SETTINGS
With this option you can configure your answering machine.
Answer Mode
Following options are available
Answer & Record: After welcome message the caller can leave a message.
- Answer only: The welcome message is played but the caller cannot leave a message.
ANSWER DELAY
- Set the number of rings after which the answer machine will answer incoming calls. Set a number between 2 and 9 rings or choose setting "Toll Saver".
- Toll Saver mode: If there are no new messages the answering machine will answer calls after ringing 5 times. If new messages are available incoming calls will be answered after 2 times.
SECURITY CODE
Follow below instructions to change security code of base station:
- Enter the old 3-digit security code (factory setting 000).
- Confirm entry with right display button.
- Enter a new 3-digit security code.
- Confirm entry with right display button and reenter code and confirm entry again. A confirmation tone confirms the change.
Note: You will need this code for remotely playing voice messages.
LANGUAGE
This option is for selecting the language of the answering machine. Choose the language with the navigation buttons and confirm the setting with right display button.

Organizer
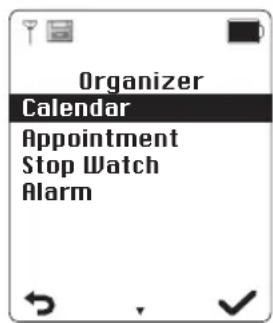
CALENDAR
When choosing this option a calendar will be shown.
APPOINTMENT
Up to 5 appointments can be set. Choose an appointment and push the right display button to Edit or Delete an appointment.
Title
Date
Time
DELETE APPOINTMENT
Select an appointment and confirm with the right display button or push left display button to cancel.
STOPPWATCH
To start the stopwatch push the right display button and to stop the stopwatch push the left display button.
- With the left display button you can stop the stopwatch or resume the measurement.
If the measurement is stopped the time can be reset by pushing the right display button.
The current function of display buttons is shown in display.
ALARM CLOCK
The alarm clock can be set for modes Once, Every Day, Mon-Fr). For turning off alarm clock function select "Off".
- Enter the time and confirm with the right display button.
- Select the alarm tone and confirm with the right display button.
The alarm is activated at the preset time. Push the left display button to stop the alarm. To activate the 5 minutes snooze function push the right display button.

Sound Telephony
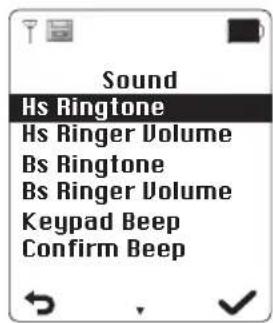
HANDSET RINGTONE (HS RINGTONE)
Set the ringtone for incoming calls.
HANDSET RINGTONE VOLUME (HS RINGER VOLUME)
Adjust the ringtone volume in 5 levels (5: Max.; 1: Min; 0: Off/silent). When choosing the "Off/silent", the silent icon is shown in display.
BASE STATION RINGTONE (BS RINGTONE)
Set the ringtone of base station for incoming calls.
BASE STATION RINGTONE VOLUME (BS RINGER VOLUME)
Adjust the ringtone volume at base station for incoming calls.
KEYPAD BEEP
Choose keypad beep on or off with navigation buttons and confirm with right display button.
CONFIRM BEEP
Choose confirm beep on or off with navigation buttons and confirm with right display button.

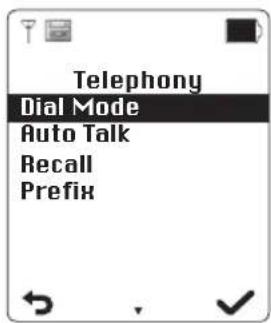
DIAL MODE
There are two options available:
- Tone: Tone dialing or multi-frequency signaling, standard dialing method nowadays
- Pulse: Pulse dialing for older appliances
AUTO TALK
You can select automatically taking calls if the handset is taken from the base station or not.
RECALL
The Flash button is used to forward calls if the telephone is used in a telephone system. The Flash button will cause a short interruption.
Short: interruption cycle 100 ms
- Long: interruption cycle 300 ms
Choose the preferred setting with navigation buttons and confirm with right display button.
Note: If your telephone provider supports special services the flash button can be used e.g. for "Call waiting".
PREFIX
This function allows to automatically dial a prefix number before any external call.
Note: If no prefix number is saved the option "New" is shown. If prefix number is saved the options "On/Off", "Show/Hide" and "Edit" are available.
New: Enter the prefix which shall be used for each external call.
- On/Off: Turn on or off automatic prefix.
Show/Hide:
- Show prefix
- Hide prefix
Edit: Edit the prefix
Cleaning and care
- Unplug the adaptor from the socket before cleaning the unit.
- Attention! Do not let water penetrate into the unit.
Clean the housing with a lightly dampened cloth. - Do not use sharp, scouring or aggressive cleaners.
- Do not use chemicals (such as gasoline or alcohol) to clean the housing.
Technical data
Adaptor : Kings: Y07FF-060-0500G;
: Shenzhen G Credit Technology Co., LTD: HX-AD060050-E01
Input: 100 - 240V 50 / 60Hz
Output: 6 V DC 500 mA
Handset
Batteries : 2 x AAA 1.2 V 750 mAh
Talk time : 11 hours
Charging time : 16 hours
Flash time : 100 ms
Frequency range : 1.881 - 1.898 GHz
Number of channels : 120
Modulation : GFSK
Speech coding : Adaptive Differential Pulse Code Modulation
Emission power : 250 mW MAX.
Range
: 50 m (indoor), 300 m (outdoor)
Dimensions (height x width x depth)
Base station
:145×77.74×86.68mm
Handset
: 155× 46× 21mm
Disposal

Do not dispose of this appliance as unsorted municipal waste. Return it to a designated collection point for the recycling of WEEE. By doing so, you will help to conserve resources and protect the environment. Contact your retailer or local authorities for more information.

Please dispose of batteries in an environmentally friendly manner. Do not put batteries into the household waste. Please use the return and collection systems in your community or contact the dealer where you purchased the product.
- Delete
Reply
Forward - Dial number
Save number
Delete all
BROUILON
Send to
Save Message
Use Template
- Dial number
- Delete
Delete All
ENVOYER
Send to
Save Message
Use Template
- Dial number
- Delete
Delete All
MODELES
Save Numbers
- Delete
Delete All
APPELS MANQUES
Save Numbers
- Delete
Delete All
APPELS RECUS
Save Numbers
- Delete
Delete All
APPELS COMPOSES
Save Numbers
Show Details
- Delete
Delete All

Répondeur
LECTURE DES MESSAGES
RESETTAGGIO BASE TO DEFAULT
- Delete
Reply
Forward - Dial number
Save number
Delete all
BOZZE
Send to
Save Message
Use Template
- Dial number
- Delete
Delete All
IN USCITA
Send to
Save Message
Use Template
- Dial number
- Delete
Delete All
MODELLI
Save Numbers
Delete
Delete All
CHIMATE PERSE
- Save Numbers
- Delete
Delete All
CHIAMATE RICEVUTE
- Save Numbers
- Delete
Delete All
CHIAMATE DIGITATE
Save Numbers
Show Details
- Delete
Delete All

Segreteria Telefonica
Codifica: Adaptive Differential Pulse Code Modulation
IM_PDP170_150518_V05


- Base station
- Handset
- Accessories Line connection
- Power supply
- Install batteries
- Notes
- Battery level
- Note
- First stepsCharge the handset
- SWITCH ON/OFF THE HANDSET
- SET THE DISPLAY LANGUAGE
- SET DATE AND TIME
- REGISTER THE HANDSET
- Phone call
- QUICKCALL
- BLOCK DIALLING
- REDIAL
- CALL FROM THE REDIAL LIST
- CALL A NUMBER FROM THE PHONEBOOK
- Pick up a call
- FORWARDING A CALL TO ANOTHER HANDSET
- CONference Call BETWEEN TWO HANDSETS AND EXTERNAL CALLER
- Hands-free
- Mute
- Answering machine
- RETRIEVE VOICE MESSAGES VIA HANDSET
- RETRIEVE VOICE MESSAGES VIA BASE STATION
- Note:
- REMOTE ACCESS
- REMOTE CONFIGURATION OF ANSWERING MACHINE
- Symbols shown on display
- Menu
- Settings
- LANGUAGE
- REGISTRATION
- HANDSET REGISTER/DE-REGISTER
- TIME SETTING
- DATE AND TIME
- SET TIME FORMAT
- AUTO UPDATE
- PIN
- DISPLAY
- Contrast
- Backlight Time
- Name of Handset
- RESETHANDSET
- Reset handset to default
- RESET BASE
- RESET BASE TO DEFAULT
- Phonebook
- NEW ENTRY
- EDIT ENTRY
- SHOWDETAILS
- DELETE ENTRY
- DELETE ALL
- COPY ENTRY
- COPY APPEND
- COPY ALL
- Additional features
- DIRECTCALL
- ROOM MONITOR
- ECO MODE
- PRIVATECALL
- SMS
- Requirements:
- WRITEMESSAGE
- INBOX
- DRAFT
- OUTBOX
- TEMPLATES
- SMS SETTING
- Call Log
- ALL CALLS
- MISSED CALLS
- RECEIVED CALLS
- DIALED CALLS
- Answering machine (Voice mail)
- PLAY MESSAGES
- DELETE MESSAGES
- SWITCHING ON/OFF THE ANSWERING MACHINE
- RECORD MEMO
- WELCOMEMESSAGE
- ANSWERING MACHINE SETTINGS
- Answer Mode
- ANSWER DELAY
- SECURITY CODE
- Organizer
- CALENDAR
- APPOINTMENT
- DELETE APPOINTMENT
- STOPPWATCH
- ALARM CLOCK
- Sound Telephony
- HANDSET RINGTONE (HS RINGTONE)
- HANDSET RINGTONE VOLUME (HS RINGER VOLUME)
- BASE STATION RINGTONE (BS RINGTONE)
- BASE STATION RINGTONE VOLUME (BS RINGER VOLUME)
- KEYPAD BEEP
- CONFIRM BEEP
- DIAL MODE
- AUTO TALK
- RECALL
- PREFIX
- Cleaning and care
- Technical data
- Dimensions (height x width x depth)
- Disposal
- BROUILON
- ENVOYER
- MODELES
- APPELS MANQUES
- APPELS RECUS
- APPELS COMPOSES
- Répondeur
- LECTURE DES MESSAGES
- RESETTAGGIO BASE TO DEFAULT
- BOZZE
- IN USCITA
- MODELLI
- CHIMATE PERSE
- CHIAMATE RICEVUTE
- CHIAMATE DIGITATE
- Segreteria Telefonica
Brand : PEAQ
Model : PDP170
Category : Phone