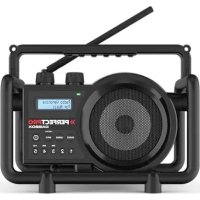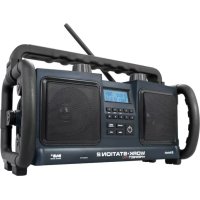
Workstation 2 - Radio PerfectPro - Free user manual and instructions
Find the device manual for free Workstation 2 PerfectPro in PDF.


Frequently Asked Questions - Workstation 2 PerfectPro
User questions about Workstation 2 PerfectPro
0 question about this device. Answer the ones you know or ask your own.
Ask a new question about this device
Download the instructions for your Radio in PDF format for free! Find your manual Workstation 2 - PerfectPro and take your electronic device back in hand. On this page are published all the documents necessary for the use of your device. Workstation 2 by PerfectPro.
USER MANUAL Workstation 2 PerfectPro
IMPORTANT SAFETY INSTRUCTIONS P.2
CONTROLS P.3
POWER SUPPLY P.5
GENERAL FUNCTIONS P.6
USING THE RADIO FOR THE FIRST TIME P.7
DAB MODE (DAB/DAB+) P.8
FM MODE P.10
PRESET STATIONS P.12
MANUALLY SETTING CLOCK P.12
BLUETOOTH MODE P.13
CHARGING A MOBILE PHONE P.15
IMPORTANT SAFETY INSTRUCTIONS
-
Read these instructions.
-
Keep these instructions.
-
Heed all warnings.
-
Follow all instructions
-
Clean only with dry cloth.
-
Do not block any ventilation openings. Install in accordance with the instructions.
-
Do not install near any heat sources such as radiators, heat registers, stoves or other apparatus (including amplifiers) that produce heat.
-
Do not defect the safety purpose of the polarized or grounding - type plug. A polarized plug has two blades with one wider than the other. A grounding type plug has two blades and a third grounding prong. The wide blade or the third prong is provided for your safety. If the provided plug does not fit into your outlet, consult an electrician for replacement of the obsolete outlet.
-
Protect the power cord from being walked on or pinched particularly at plug, convenience receptacles, and the point where they exit from the apparatus.
-
Only use attachments/accessories specified by the manufacturer.
-
Use only with the cart, stand, tripod, bracket, or table specified by the manufacturer, or sold with the apparatus. When a cart is used, use caution when moving the cart/ apparatus combination to avoid injury from tip-over.
-
Unplug this apparatus during lightning storms or when unused for long periods of time.
-
Refer all servicing to qualified service personnel. Servicing is required if the apparatus has been damaged in any, such as power-supply cord or plug is damaged, liquid has been spilled or objects have fallen into the apparatus, the apparatus has been exposed to rain or moisture, does not operate normally, or has been dropped.
-
To reduce the risk of fire or electric shock, do not expose this appliance to rain or moisture.
-
Do not remove the cover; there are no user-serviceable parts inside.
-
No naked flame sources shall be placed on the apparatus.
-
For outdoors use, to avoid electric shock, use battery only during a raining day or the weather is wet. To prevent electric shock, if the radio has been exposed to rain or water, the power supply cord and plug must be completely dried before plugging into the mains socket outlet.
-
The power plug should be close to the apparatus, and easy to be approached that during emergency, to disconnect the power from the apparatus, just unplug the power plug from the AC power slot.
-
The marking information is located at the bottom of the apparatus.
-
This apparatus is provided with protection against splashing water (IP65).
-
In case of malfunction due to electrostatic discharge or fast transient (burst), remove and reconnect the power supply.
-
To prevent possible hearing damage, do not listen at high volume levels for long periods.

Front View
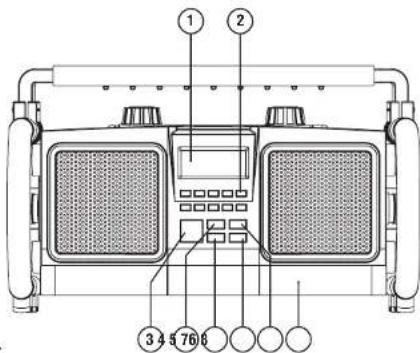
- LCD display
- Preset buttons
- Power On/Off
- Audio source button
- Menu button
- Info button
- Mono/Stereo button
- Bluetooth connected LED light
Top View
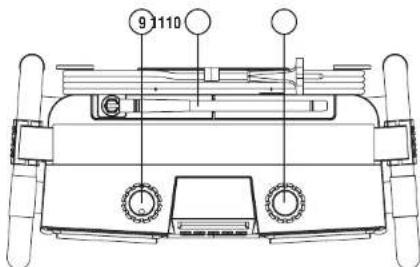
- Volume/Tone control
- Rubber DAB/FM antenna
- Tuning control / Seek station
Back View
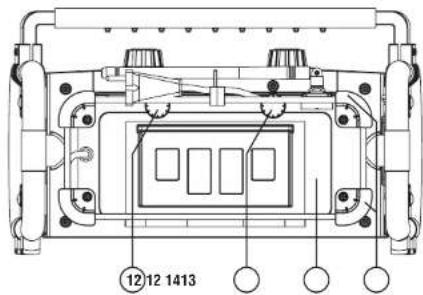
- Battery cover fixtures
- Battery compartment
- Power cord storage
Side View
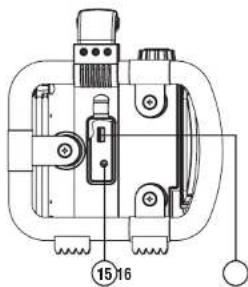
- Aux-in socket and Rubber cover
- USB DC power out socket (5V/0.5A)
POWER SUPPLY
Battery operation
- To open the battery compartment, first turn the battery cover fixtures anti-clockwise to loosen and pull down the battery cover.
- Insert 6 x D size (UM-1) battery with the correct polarity into the compartment. Close the battery cover and fasten the fixtures by turning clockwise.
- If the unit is not to be used for any extended period of time, it is recommended to remove the batteries from the radio. The approximate power level of the batteries is displayed in the LCD display of the radio. When the power level is very low the indication "Battery Low" appears and the battery symbol flashes on the display. The batteries should then be replaced soon to continue normal operation of the radio.
Back up battery
Back up battery is to back up the preset stations and the clock. It is necessary to insert back up battery (2 x AA size / UM-3) for memory back up even if you use AC power supply only. Without the back up battery, time and preset station will get lost if you remove the AC power cord from AC socket or during power failure. Warning: Danger of explosion if battery is incorrectly replaced. Replace only with the same or equivalent type. Do not expose the batteries to excessive heat such as sunshine, fire or the like. Batteries should not be disposed of by incineration and with household waste. Disposable batteries should be taken to a suitable recycling centre if possible.
AC operation
Before plugging the AC power cord into the AC socket, be sure the voltage is correct. If you have batteries in the radio and using the AC power supply, the batteries will automatically be disconnect. AC power cord storage is designed to store the cord when the radio is not in use. Note: In order to disconnect the unit from the mains completely, the AC plug should be removed from the mains socket completely.
GENERAL FUNCTIONS
- Switching on and off
Press the On/Off button to turn the radio on or in standby.
- Switching among DAB / FM / Bluetooth / AUX IN modes
Press the Source button to switch between modes.
- Tuning the Radio
Tune the radio using the Tuning knob on the right.
- Adjusting the Volume
Adjust the volume with the Volume knob on the left.
- Adjusting the Tone
Press the Volume knob on the left and rotate it to adjust the Bass and Treble.
- Selecting Stereo or Mono mode (in FM mode only)
Press the Mono/Stereo button to switch between FM Mono or FM Stereo.
- Anti-Theft-Protection (ATP) System
Press the preset buttons (1-10) to enter the 4-digits numeric passcode.
- Listening music via Bluetooth streaming
Play music from your paired Bluetooth device with your radio.
USING THE RADIO FOR THE FIRST TIME
- Place the radio on a flat surface.
- Carefully extend the antenna located on the top of the radio. Adjust the antenna so it is vertically extending above the radio.
- Plug the AC power cord into the AC socket. The radio will start up and the display will show "WELCOME TO DIGITAL RADIO" for a few seconds. Then the radio will automatically perform an auto scan of the Band III DAB channels and the FM band. The display will show "Scanning" in DAB and "Auto" in FM.
- When the scan is completed, the 10 strongest FM stations will be stored as presets and the available DAB stations will be in the list of stations. The radio will switch to standby with the updated clock and date showing on the display.
- If no signals are found, the clock will not be updated. It may be necessary to relocate the radio to a position with better reception.
DAB MODE (DAB/DAB+)
Operating the radio - DAB
- Carefully extend the antenna. Press the On/Off button to switch on the radio.
- Select the DAB waveband by pressing the Source button.
- The first station in the list of stations found will be played. The display will show the station name. If the radio has been used before, the last used station will be selected.
- If no DAB signals are detected, "No stations available" will be displayed. It may be necessary to relocate the radio to a position with better reception. You should then carry out an auto scan to find stations, please refer to the section "Find new stations - DAB".
Selecting a station - DAB
- Press the On/Off button to switch on the radio.
- Select the DAB waveband by pressing the Source button.
- The display will show "Now tuning" for a few seconds.
- The display shows the name of the radio station currently selected.
- Rotate the Tuning knob to scroll through the list of available stations
- When the desired station name appears on the display, press the Tuning knob to select the station.
Note: If after selecting a station the display shows "No stations available", it may be necessary to relocate the radio to a position with better reception.
Secondary services - DAB
- Certain radio stations have one or more secondary services associated with them.
If a station has a secondary service associated with it, then the secondary service will appear immediately after the primary service as you turn the Tuning knob. - Press the Tuning knob to select the secondary service.
Most of secondary services do not broadcast continually and if the selected service is not available, the radio will re-tune to the associated primary service.
Display modes - DAB
In DAB mode, the radio can display a range of information on the display. Press the Info button to cycle through the various modes.
a. Scrolling text Displays scrolling text message e.g. station information, artist/track name, phone-in number, etc.
b. Signal strength Displays the signal strength of radio reception. The clear unfilled rectangle indicates minimum signal level required for satisfactory reception.
c. Program type Displays the type of station being listened to e.g. Pop, Classic, News, etc.
d. Multiplex name Displays the name of multiplex to which the current station belongs.
e. Channel & frequency Displays the channel number and frequency for the currently tuned DAB station.
f. Bit rate & audio format Displays the digital audio bit rate and audio format.
g. Time & date Displays the current time and date.
Finding new stations - DAB
From time to time, new stations may become available. You may proceed to find new stations as follows:
- In DAB mode, press the Menu button, "Full scan" shows on the display.
- Press the Tuning knob, the radio will perform a scan of the Band III DAB channels. As new stations are found, the station counter on the right-hand side of the display will increase and new radio stations found will be added to the list stored in the radio.
Manual Tuning - DAB
Manual tuning is an alternative method of finding new stations. Instead of scanning the entire Band III channels automatically, you may tune the radio directly to a known DAB channel and store all the multiplex in that channel into the available station list.
- In DAB mode, press the Menu button and rotate the Tuning knob until the LCD display shows "Manual Tune", then press the Tuning knob. The display will show DAB channel and Frequency.
- Rotate the Tuning knob to select the desired channel or Frequency and press the Tuning knob to tune to the chosen frequency.
- When DAB stations in the tuned channel are found, the display will show the name of the station. Any new radio stations found will be added to the list stored in the radio.
- The signal strength display shows the reception of the station. The clear unfilled rectangle indicates minimum signal level required for satisfactory reception. The signal strength bars will go up or down showing the changing signal strength as you adjust the antenna or the position of the radio.
- Repeat step 1 to 4 for other channels with new stations.
- Press the Menu button twice to exit manual tuning and return to normal DAB operation.
Dynamic Range Control (DRC) settings - DAB
DRC can make quieter sounds easier to hear when your radio is used in a noisy environment.
- In DAB mode, press the Menu button and rotate the Tuning knob until "DRC value" appears on the display, press the Tuning knob.
- Rotate the Tuning knob to select required DRC setting (default is OFF).
DRC off DRC is switched off, broadcast DRC will be ignored.
DRC high DRC is sel as sent by broadcaster.
DRC low DRC level is set to 1/2 that sent by broadcaster.
- Press the Tuning the knob to confirm the setting. The display will return to normal radio display.
Note: Not all DAB broadcasts are able to use the DRC function. If the broadcast does not support DRC, then the DRC setting in the radio will have no effect.
Prune stations - DAB
If you move to a different part of the country, some of the stations which were listed may no longer be available. Also, from time to time, some DAB services may stop broadcasting, or may change location or frequency. The Prune stations function will delete the unavailable DAB stations from your station list.
- In DAB mode, press the Menu button, the display shows "Full scan".
- Rotate the Tuning knob until the display shows "Prune".
- Press the Tuning knob to enter the setting.
- Rotate the Tuning knob to select between "Yes" or "No" (default is No). Select "Yes" to enable this function if required, otherwise, select "No".
- Press the Tuning knob to confirm your setting. The display will return to normal radio display.
Note: If you have move the radio to a different part of the country, you should also carry out a search for new stations (please see the section "Finding new stations - DAB").
FM MODE
Operating the radio - FM seek station
- Press the On/Off button to turn on the radio.
- Select the FM waveband by pressing the Source button.
- If this is the first time to switch to FM mode, the station in preset 1 will be played. If the radio has been used before, the last listened station will be played.
- To seek station, press the Tuning knob. The scan stops automatically when it finds a station of sufficient strength.
- After a few seconds, the display will update and show station name if RDS information is being received.
- To find the next station, press the Tuning knob again.
-
To seek stations in an opposite direction, rotate the Tuning knob clockwise (to scan from low frequency to high frequency) or rotate counter clockwise (to scan from high frequency to low frequency), and press the Tuning knob.
-
When the waveband end is reached, the radio will recommence tuning from the opposite waveband end.
Manual tuning - FM
- Press the On/Off button to turn on the radio.
- Select the FM band by pressing the Source button.
- Rotate the Tuning knob to reach the preferred FM station. The radio will change the frequency in steps of 50kHz .
- Rotate the rubber antenna to get the best reception. If the radio is tuned to a station of sufficient signal strength with RDS information present, the display may change to show the station name. 5. When the waveband end is reached, the radio will recommence tuning from the opposite waveband end.
RDS station service - FM
RDS (Radio Data System) is an information system which inaudible digital information is transmitted in addition to the normal FM radio program. When the radio is receiving a RDS station and the reception strength is sufficient, the station name will appear in the display. It may take some time before the RDS information is available.
Calling up RDS information
When you are listening to a FM station with RDS system, repeatedly press the Info button to cycle through the information. This will only function if the reception level is sufficient and clear.
a. Radio text (RT) Displays the message about the station being listened to as ticker text.
b. Program type (PTY) Displays the type of station being listened to, e.g. Pop, Classic, News, etc.
c. Frequency Displays the frequency of the station being listened to.
d. Stereo or Mono Displays Stereo or Mono
e. Signal level Displays the signal strength.
f. Time & date Displays the current time (24 hour clock) and date.
Scan sensitivity setting - FM
The radio will normally scan all stations from FM broadcasts including the weaker signals. However, you may wish the Auto-scan to find only those stations with strong enough signals to give good reception.
- Press the On/Off button to turn on the radio.
- Select the FM band by pressing the Source button.
- Press the Menu button, the display shows "Scan setting".
- Press the Tuning knob.
- Rotate the Tuning knob to select between "All stations" or "Strong station" (default is "All stations"). The "Strong station" option will allow the radio to find strong signals only when scanning.
- Press the Tuning knob to confirm your setting. The display will return to normal radio display.
PRESET STATIONS
Storing preset stations
There are 20 memory presets in the radio, 10 for DAB and 10 for FM. Presets are remembered by the radio in the event of a power failure.
- Press the On/Off button to turn on the radio.
- Press the Source button to select the desired waveband.
- Tune to the required station.
- Press and hold the required Preset button until the radio beeps and shows "Saved".
- Repeat step 3 and 4 for the remaining presets.
- Stations stored in the preset memories can be over-written by following the above procedure.
Recalling preset stations
- Press the On/Off button to turn on the radio.
- Press the Source button to select the desired waveband. Briefly Press the required
Preset button - In FM mode the display will show for example "P1" on top right hand side.
MANUALLY SETTING CLOCK
The clock can only be manually set when the radio is in standby mode. If no buttons are pressed for 5 seconds, the radio will exit the clock setup and the setting is cancelled.
- Press and hold the Time Set knob for 12 seconds until the hour digits flash on the display.
- Rotate the Time Set knob to set the hour.
- Press the Time Set knob to confirm, the minute digits flash.
- Rotate the Time Set knob to set the minute.
- Press the Time Set knob to confirm, the day flashes on the display.
- Rotate the Time Set knob to set the current day.
- Press the Time Set knob to confirm, the month flashes.
- Rotate the Time Set knob to set the current month.
- Press the Time Set knob to confirm, the year will then flash on the display.
- Rotate the Time Set knob to set the current year.
- Press the Time Set knob to confirm, "SYNCLOCK ON" flashes.
- Rotary the Time Set knob to select "SYNCLOCK ON" or "SYNCLOCK OFF".
- Press the Time Set knob to confirm and finish the clock setting.
RDS time synchronisation
If "SYNCLOCK ON" is selected, the symbol " " will show on the clock display. Some RDS stations transmit a time signal. If reception is good and you have selected the "SYNCLOCK ON" option during the time setting, the time will be automatically updated (" " flashes on the display). Time synchronization can take several minutes. The automatic time setting is always activated when the radio is switched from standby to FM broadcasting and receives a RDS station.
BLUETOOTH MODE
Pairing Bluetooth with your mobile phone
- Press the On/Off button to turn on the radio.
- Select Bluetooth mode by pressing the Source button.
- The LCD display will show "Not connected" when radio is not yet paired with your mobile phone.
- In your mobile phone open the Setting menu and select Bluetooth, then select "PP WorkStation 2" in the Bluetooth devices list of your mobile phone (Bluetooth pairing instructions may vary per type of mobile phone, please check your mobile phone manual).
- When Bluetooth pairing is successful, the LCD display will show "BT Connected" in the 1st line, and your mobile's name in the 2nd line for about 2 seconds.
- Finally the LCD display will show the connected mobile phone's name in the 1st line to indicate the connected device to the radio.
Playing music from your mobile phone
- Press the On/Off button to turn on the radio.
- Select Bluetooth mode by pressing the Source button.
- Start playing music by using the media players in the paired mobile phone.
- Playback can be controlled from the mobile phone or by pressing the buttons (preset buttons 3, 4 and 5) on the radio.
- After music playback starts, the name of the song will be displayed in the LCD.
Display modes - Bluetooth
In Bluetooth mode, the radio can display a range of information of the current playing music on the display. Press the Info button to cycle through the various types.
a. Title Displays scrolling song's name of the current playback music.
b. Artist Displays the artist's name of the current playback music.
c. Album Displays the album name of current playback music.
d. Status Displays the playback status. E.g. playing, stopped.
e. Music info Displays the music format and sampling rate of current playing song. E.g. "AAC" is the format of the song; "44100Hz" is the sampling frequency of the song.
f. Time & date Displays the current time and date.
Device List - Connect to the paired device
In the radio, you can select the Bluetooth device from the Device list to connect again. The device names would be shown if the name of the Bluetooth devices were configured in the mobile devices. Please refer to the user manual of your mobile device for the configurations.
The Device list can be checked as below:
1. In Bluetooth mode, press the Menu button to enter the system setting.
2. Rotate the Tuning knob until "Device list" is displayed; press the TUNING knob to select the setting.
3. Rotate the Tuning knob to view the name of the devices.
4. Press the Tuning knob to start Bluetooth reconnection. The speaker will automatically connect to this selected mobile device.
Note: There can be up to 8 device names stored in the Device list memory. If you store more than 8 mobile devices into the Device list memory, the earliest paired device name will be erased.
Note: If you have ever deleted the "PP WorkStation 2" from your connected mobile phone device, the auto reconnection will be unsuccessful.
Restart Bluetooth pairing
The Bluetooth function can be set to operate in different ways as below:
- In Bluetooth mode, press the Menu button to enter the system setting.
- Rotate the Tuning knob to select the "Disconnect BT" option, and press the Tuning knob to select the setting.
- The LCD display will show "Please wait" for a few seconds in order to disconnect the current connection with the mobile phone device.
- The LCD display will show "Not connected" and the radio's Bluetooth is free for any mobile phone device connection as it is in discoverable mode now.
Note: "Disconnect BT" is the option that forces the Bluetooth of this radio to disconnect from your mobile phone and enter the "discoverable mode". This is the way to allow the Bluetooth pairing to another device. If no new device is paired, the Bluetooth will automatically try to connect to the last device when it is switched off and on again.
The Auto-Power management function will be activated in Bluetooth mode. If there is no signal for a period of over 15 minutes, the radio will automatically switch to standby mode. Pressing the On/Off button will wake up the unit.
* Also when the incoming signal from the external device is too low and cannot be detected for a period of over 15 minutes by the Auto-Power management, the radio will switch to standby mode. To prevent this raise the output level on the external device enough to be detected.
Bluetooth LED configuration
- Press the On/Off button to turn on the radio.
- Press the Menu button, and then rotate the Tuning knob until the display shows "System".
- Press the Tuning knob; rotate the Tuning knob until the display shows "Bluetooth LED".
- Press the Tuning knob to enter the Bluetooth LED adjustment menu.
- Rotate the Tuning knob to select "on" (by default) in order to keep Bluetooth LED lightened when connected;
- Or rotate the Tuning knob to select "off" to turn off Bluetooth LED when Bluetooth connection has been established.
- Press the Tuning knob to confirm your choice.
CHARGING A MOBILE PHONE
The USB socket on the left side can provide DC power of 5V/0.5A for charging a mobile phone. Connect the mobile phone to the USB socket with an appropriate cable (not included with this radio). The USB power is available in all modes, including standby mode.
Refer to the user manual or the manufacturer of the mobile phone to verify if it supports charging from an USB power.
The USB socket is suitable for DC power-out only and cannot be used for e.g. playback of music from a USB stick.
Warning: Never use the USB socket in rainy or moist conditions to prevent moist from entering the radio and so to prevent potential short circuit. Always keep the rubber cover well closed under these conditions.
It is recommended to use AC power while charging a mobile phone via USB socket. On DC power it is also possible to charge a mobile phone from the USB socket, however using DC power to charge a mobile phone will consume energy from the batteries and so drain the batteries easily.
A 3.5mm stereo Aux In socket is provided on the side behind the rubber cover, for connecting an external audio device such as MP3 player or CD player (not included).
- Connect a stereo or mono audio source to the Aux In socket
- Press the Source button to select AUX input. Display will show "AUX IN".
- Play the external player.
- Adjust the volume of both the radio and the player for comfortable listening. Notes: Never use the Aux-In socket in rainy or moist conditions to prevent moist from entering the radio. Keep the rubber cover well closed under these conditions.
The Auto-Power management function will be activated in AUX IN mode. If there is no signal* from the Aux-In socket for a period of over 15 minutes, the radio will automatically switch to standby mode. Pressing the On/Off button will wake up the unit.
- Also when the incoming signal from the external device is too low and cannot be detected for a period of over 15 minutes by the Auto-Power management, the radio will switch to standby mode.
To prevent this raise the output level of the external device enough to be detected.
LOUDNESS
The Loudness function enables to get compensation on lower and higher frequency. The effect will be more audible when the radio is on a lower volume level (Dynamic Loudness).
- Press the On/Off button to turn on the radio.
- Press the Menu button, and then rotate the Tuning knob until the display shows "System".
- Press the Tuning knob; rotate the Tuning knob until the display shows "Loudness".
- Rotate the Tuning knob to select between "Loudness On" or "Loudness Off". Press the Tuning knob to confirm the setting and return to normal display.
TONE
The Tone function enables the user to adjust the lower and higher sound frequencies.
- Press the On/Off button to turn on the radio.
- Press and hold the Volume knob for about 3 seconds, the display shows "BASS 0".
- Rotate the Volume knob to set the desire Bass level.
- Press the Volume knob to confirm, the display shows "TREBLE 0".
- Rotate the Volume knob to set the desire Treble level.
- Press the Volume knob to confirm and return to normal display,
METAL TELESCOPIC ANTENNA
You can use this as an alternative antenna for your radio in areas or locations where the radio signal (FM/DAB/DAB+) is weak to very weak.
ATTENTION: The standard antenna on the radio is flexible. The metal antenna is not flexible or bendable and should be used with care. Breaking or bending antennas is not covered by warranty.
Installing: Carefully screw off the standard flexible antenna. First carefully loosen the antenna with an open-end-wrench key (size 14) - turn counter clockwise. Carefully screw on the metal telescopic antenna and softly tighten it with an open-end-wrench key (size 14) - turn clockwise.
ATTENTION: do not use too much force when fixing the antennas as this can damage the screw threat of the antennas or make it break off
LANGUAGES
The menu of the radio can be configured to various languages.
- Press the On/Off button to turn on the radio.
- Press the Menu button, and then rotate the Tuning knob until the display shows "System".
- Press the Tuning knob; rotate the Tuning knob until the display shows "Language".
- Press the Tuning knob to enter the language adjustment menu.
- Rotate the Tuning knob until the desired language appears on the display (default is English).
- Press the Tuning knob to confirm your choice. The display menu will change to the chosen language.
SOFTWARE VERSION
The software display cannot be altered and is just for your reference. You can only view the software version in DAB and FM mode.
- Press the On/Off button to switch on the radio.
- Press the Source button to select FM or DAB mode.
- Press the Menu button until the display shows "Full Scan", and then rotate the Tuning knob until the display shows "System".
- Press the Tuning knob; rotate the Tuning knob until the display shows "SW version".
- Press the Tuning knob to view the software version.
- Press the Tuning knob to back to last menu and press menu to return to the normal radio display.
Note: USB socket inside battery compartment is for upgrading the software of the device if needed.
SYSTEMRESET
If the radio fails to operate correctly, or some digits on the display are missing or incomplete, carry out the following procedure.
-
Press the On/Off button to switch on the radio.
-
Press the Menu button.
- Rotate the Tuning knob until the display shows "System". Press the Tuning knob.
- Rotate the Tuning knob until the display shows "Factory reset". Press the Tuning knob.
- Rotate the Tuning knob to select between "Yes" or "No". Select "Yes" if you wish to reset the radio, otherwise, select "No".
-
Press the Tuning knob to cause the factory reset.
-
A full reset will be performed. All presets and the station list will be erased. All settings will be set to the default values. The display will show "WELCOME TO DIGITAL RADIO" for a few seconds, and then the radio will automatically perform an auto scan of the Band III DAB channels and the FM band, the display will show "Scanning" at DAB and "Auto" at FM.
In case of malfunction due to electrostatic discharge; reset the product as above to resume normal operation. If you are not able to perform the reset operation as above, remove and reconnect all batteries and the power supply.
BACKLIGHT
LCD backlight configuration
- Press the On/Off button to turn on the radio.
- Press the Menu button, and then rotate the Tuning knob until the display shows "System".
- Press the Tuning knob; rotate the Tuning knob until the display shows "LCD backlight".
- Press the Tuning knob to enter the LCD backlight adjustment menu.
- Rotate the Tuning knob to select "on" in order to keep backlight always lightened when the radio is turned on with AC power supply;
- Or rotate the Tuning knob to select "off" (by default) so that the backlight will be lightened for about 10 seconds whenever a button is pressed with AC power supply.
- Press the Tuning knob to confirm your choice.
Note: The LCD backlight option "on" is only functional when the radio is powered by AC power supply. When the radio is powered by battery power supply, the LCD backlight is switched to option "off" - 10 seconds lightened when a button is pressed. When the radio is connected to mains AC power again, the last user setting will be applied again.
ATP PASSCODE
This radio is equipped with an Anti-Theft-Protection system (ATP system). When the ATP system is enabled, a passcode is required for turning on the radio.
- Press the On/Off button to turn on the radio.
- Press the Menu button.
- The display shows "System".
- Rotate the Tuning knob until the display shows "Passcode". Press the Tuning knob. "Enable" or "Disable" will be displayed, to enable ATP, turn and press Tuning knob to select "Enable".
- "Change Passcode" will be displayed, enter a 4-digits numeric passcode by pressing the preset buttons (1-10)
- "Confirm Passcode" will be displayed. Enter a second time the same passcode to re confirm.
- To disable passcode, select "Disable" as previously showed. And re-enter the previous passcode to disable the lock.
When ATP is enabled, and if wrong passcode is entered for three times, a timer will be activated. The next attempt will be possible only after the timer has elapsed. The timer period will be increased with further wrong passcodes.
WARNING: If you choose to activate the passcode, please note your passcode somewhere safe as a memory back-up in case you should forget it. This as there is no way to reset the radio should the passcode be forgotten!
RADIO NAME OPTION
This radio supports customization of the radio's name. If the radio has been named, the name of the radio will be shown when the radio is turned on and when the radio is turned off.
- Press the On/Off button to turn on the radio.
- Press the Menu button, and then rotate the Tuning knob until the display shows "System".
- Press the Tuning knob; rotate the Tuning knob until the display shows "Name". Press the Tuning knob.
- Rotate the Tuning knob to select the letters. The maximum length of new name is 16 letters long.
- Press the Tuning knob to confirm the current selection. By pressing this Tuning knob, the cursor will be moved to next position for selection.
- Press the P3/1 or P4 button to move the cursor to left or right.
- Repeat step 4 to step 6 to edit the new radio name.
- To complete editing the new radio name, you can either edit all the 16 letters or press the Menu button.
- When finishing editing the radio name, the LCD will display "Confirm changes" in the first line, and display "OK" to save the changes or "Cancel" to discard the changes.
- To confirm the changes, rotate the Tuning knob until "OK", and then press the Tuning knob to exit. After this action, the radio will save the new name.
- To cancel the changes, rotate the Tuning knob until "Cancel", and then press the Tuning knob to exit. After this action, the radio will discard the changes and keep the current radio name as for display.
- When next time the radio is turned on, the LCD will show "Welcome" in the first line and the new name in the second line.
- When the radio is turned off, the LCD will show "Goodbye" in the first line and the new name in the second line.
Notes:
- In the name menu, when there is no operation of the panel buttons for more than 20 seconds during editing, the radio will automatically exit the name function without saving any of the changes.
- The default radio name is empty. The new edited name will be lost and go back to default (no name) after executing a factory reset in the menu.
- The radio supports maximum 16 letters as the name of the radio.
WARRANTY
This radio has a 2 year limited warranty.
WARNING! Warranty becomes void once the radio cabinet has been opened or any modifications to the radio have been made!
The terms of the warranty of this radio do not cover the following:
- Damage caused by misuse, abuse, neglect, alterations or unauthorised repair.
- Normal wear and tear.
- Breaking or bending of the metal telescopic antenna.
- Batteries.
TECHNICAL SPECIFICATIONS
Technical data

This device is noise-suppressed according to the applicable EU directives.
This product fulfills the European directives 2006/95/EC, 2005/32/ EC and 2004/108/EC.
This device conforms to the safety regulation DIN EN 60065 (VDE 0860) and therefore the international safety regulation IEC 60065.
Never open the device casing. The manufacturer will not accept any liability for damage resulting from improper handling.
The type plate is located on the bottom of the device.
Environmental note
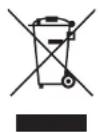
This product has been made from high-quality parts and materials, which can be reused and recycled.
Therefore, do not throw the product away with normal household waste at the end of its life. Take it to a collection point for recycling electrical and electronic device. This is indicated by this symbol on the product, in the operating manual and on the packaging. Please find out about collection points operated by your local authority. Help protect the environmental by recycling used products.

Power supply
Mains operation:
AC 230V~,50/60Hz
Battery operation:
6 x 1,5V (Type IEC LR20 / UM-1 / D-size) on
Battery for Back
2x1,5V (Type LR6/UM-3/AA-size)
Power consumption (mains supply)
Operation: < 33W
Standby: < 1 W
Frequency coverage
FM87.5-108,0
DAB 174,928-239,200 MHz
Bluetooth
Version 3.0 Supports Bluetooth profiles A2DP, AVRCP and HFP
Speaker
Size 2 x 0100mm
Impedance 8 ohms
USB charging
Maximum 5V, 0.5A
Output Power
Nominal 2 x 10W
Aux in socket
03,5mm
CONTENU
CONSIGNES DE SECURITE IMPORTANTES P.2
COMMANDES P.3
ALIMENTATION ELECTRIQUE P.5
FONCTIONS P.6
PREMIERE UTILISATION DE LA RADIO P.7
MODE DAB P.8
MODE FM P.10
PRESELECTION DE STATIONS P.12
REGLAGE MANUEL DE L'HEURE ET DE LA DATE P.13
MODE BLUETOOTH P.14
RECHARGE D'UN TELEPHONE PORTABLE P.16
FAIRE FONCTIONNER LA RADIO-ENTREE AUXILIAIRE P.17
SONORITE P.17
REGLAGE DE LA TONALITE P.18
ANTENNE TELESCOPIQUE EN METAL P.18
SELECTION DE LA LANGUE P.19
VERSION DU LOGICIEL P.19
RDS zender service - FM
DAB 174,928-239,200 MHz