
CDCX30MP - Car stereo AIWA - Free user manual and instructions
Find the device manual for free CDCX30MP AIWA in PDF.
| Product type | Car radio |
| Brand | Aiwa |
| Model | CDCX30MP |
| Category | Car radio |
| Dimensions | 182 (W) x 53 (H) x 155 (D) mm |
| Weight | Approx. 20 g (including remote control) |
| Power supply | 14.4 V DC (11 to 16 V tolerated), negative ground |
| Max output power | 45 W x 4 channels |
| FM frequency range | 87.5 MHz to 108 MHz |
| AM frequency range | 530 kHz to 1,710 kHz |
| CD frequency response | 17 Hz - 20 kHz +0/-3 dB |
| CD signal-to-noise ratio | Greater than 90 dB |
| AUX input | 3.5 mm jack, sensitivity 300 mV |
| Compatible formats | CD, CD-R, CD-RW (audio and MP3) |
| Radio functions | Auto/manual preset, scanning, ATRC |
| CD/MP3 functions | Play, repeat, random, intro, album skip |
| Sound settings | Bass, treble, balance, fader, H-BASS, DSSA, BBE |
| Display | Clock, VU level indicator, illuminable color (blue/red) |
| Remote control | Card remote control with CR2025 lithium battery included |
| Theft protection | Detachable front panel with carrying case |
| Maintenance | Clean the front panel with a soft, dry cloth; clean the connector with alcohol |
| Safety | Same amperage fuse, disconnect battery before installation, do not disassemble (laser risk) |
Frequently Asked Questions - CDCX30MP AIWA
User questions about CDCX30MP AIWA
0 question about this device. Answer the ones you know or ask your own.
Ask a new question about this device
Download the instructions for your Car stereo in PDF format for free! Find your manual CDCX30MP - AIWA and take your electronic device back in hand. On this page are published all the documents necessary for the use of your device. CDCX30MP by AIWA.
USER MANUAL CDCX30MP AIWA
FM/AM Compact Disc Player AUTOESTEREO PARA DISCO COMPACTO CDC-X30MP
OPERATING INSTRUCTIONS
En (English)
For assistance and information visit us on the internet at
www.us.aiwa.com
call toll free 1-800-BUY-AIWA (United States only)
POR FAVOR LEA DETALLADAMENTE ESTE MANUAL DE INSTRUCCIONES ANTES DE CONECTAR Y OPERAR ESTE EQUIPO.
RECUERDE QUE UN MAL USO DE SU APARATO PODRÍA ANULAR LA GARANTÍA.
Owner's Record
For your convenience, record the serial number (you will find them on the bottom side of your set) in the space provided below. Please refer to them when you contact your AIWA dealer in case of difficulty.
Model No. CDC-X30MP Serial No.
PRECAUTIONS
- Use only in a 12-volt DC negative-ground electrical system.
- Disconnect the vehicle's negative battery terminal while mounting and connecting the unit.
- When replacing the fuse, be sure to use one with an identical amperage rating. Using a fuse with a higher amperage rating may cause serious damage to the unit.
- Do NOT attempt to disassemble the unit. Laser beams from the optical pickup are dangerous to the eyes.
- Make sure that pins or other foreign objects do not get inside the unit; they may cause malfunctions, or create safety hazards such as electrical shock or laser beam exposure.
- When your vehicle has been parked in direct sunlight resulting in a considerable rise in the temperature inside, allow the unit to cool off before operating it.
- Keep the volume at a level at which you can hear outside warning sounds (horns, sirens, etc.).
NOTE
This equipment has been tested and found to comply with the limits for a Class B digital device, pursuant to Part 15 of the FCC Rules. These limits are designed to provide reasonable protection against harmful interference in a residential installation.
This equipment generates, uses, and can radiate radio frequency energy and, if not installed and used in accordance with the instructions, may cause harmful interference to radio communications. However, there is no guarantee that interference will not occur in a particular installation. If this equipment does cause harmful interference to radio or television reception, which can be determined by turning the equipment off and on, the user is encouraged to try to correct the interference by one or more of the following measures:
– Reorient or relocate the receiving antenna.
– Increase the separation between the equipment and receiver.
- Connect the equipment into an outlet on circuit different from that to which the receiver is connected.
- Consult the dealer or an experienced radio/TV technician for help.
Caution
The use of optical instruments with this product will increase eye hazard.
CAUTION
Modifications or adjustments to this product, which are not expressly approved by the manufacturer, may void the user's right or authority to operate this product.
Before operation
In addition to ordinary CDs, this unit can play back any CD-R or CD-RW that contains audio titles or MP3 files.
Notes
- NEVER use a CD-R or CD-RW that contains no data or data in the wrong format.
- The unit cannot play back any CD-R or CD-RW that contains no data or data in a format other than MP3.
For more information about MP3, see page 6. - You cannot play a CD-R or CD-RW that is not finalized*.
* A process necessary for a recorded CD-R or CD-RW disc to be played on the audio CD player.
Music discs encoded with copyright protection
This product is designed to playback discs that conform to the Compact Disc (CD) standard.
Recently, various music discs encoded with copyright protection are marketed by some record companies.
Please be aware that among those discs, there are some that do not conform to the CD standard and may not be playable by this product.
For installation and connections, refer to the separate "INSTALLATION AND CONNECTIONS".
CD Notes
- Playing a defective or dusty CD can cause dropouts in sound.
- Hold CDs as illustrated.
- Do NOT touch the unlabeled side.
- Do NOT attach any seal, label or data protection sheet to either side of CD.
- Do NOT expose a CD to direct sunlight or excessive heat.
- Wipe a dirty CD from the center outward with a cleaning cloth.
Never use solvents such as benzine or alcohol.
- This unit cannot play 3-inch (8 cm) CDs.
- NEVER insert a 3-inch CD contained in the adapter or any irregularly shaped CD.
The unit may not be able to eject it, resulting in a malfunction.

TABLE OF CONTENTS
THEFT PROTECTION 2
BASIC OPERATION, AUDIO AND CLOCK ADJUSTMENT .... 3
RADIO OPERATION 4
OTHER FUNCTIONS....9
CARD REMOTE CONTROL 10
TROUBLESHOOTING 11
MAINTENANCE 11
SPECIFICATIONS 11
Note
Some buttons are assigned two or more functions. For detailed descriptions, refer to the related pages.
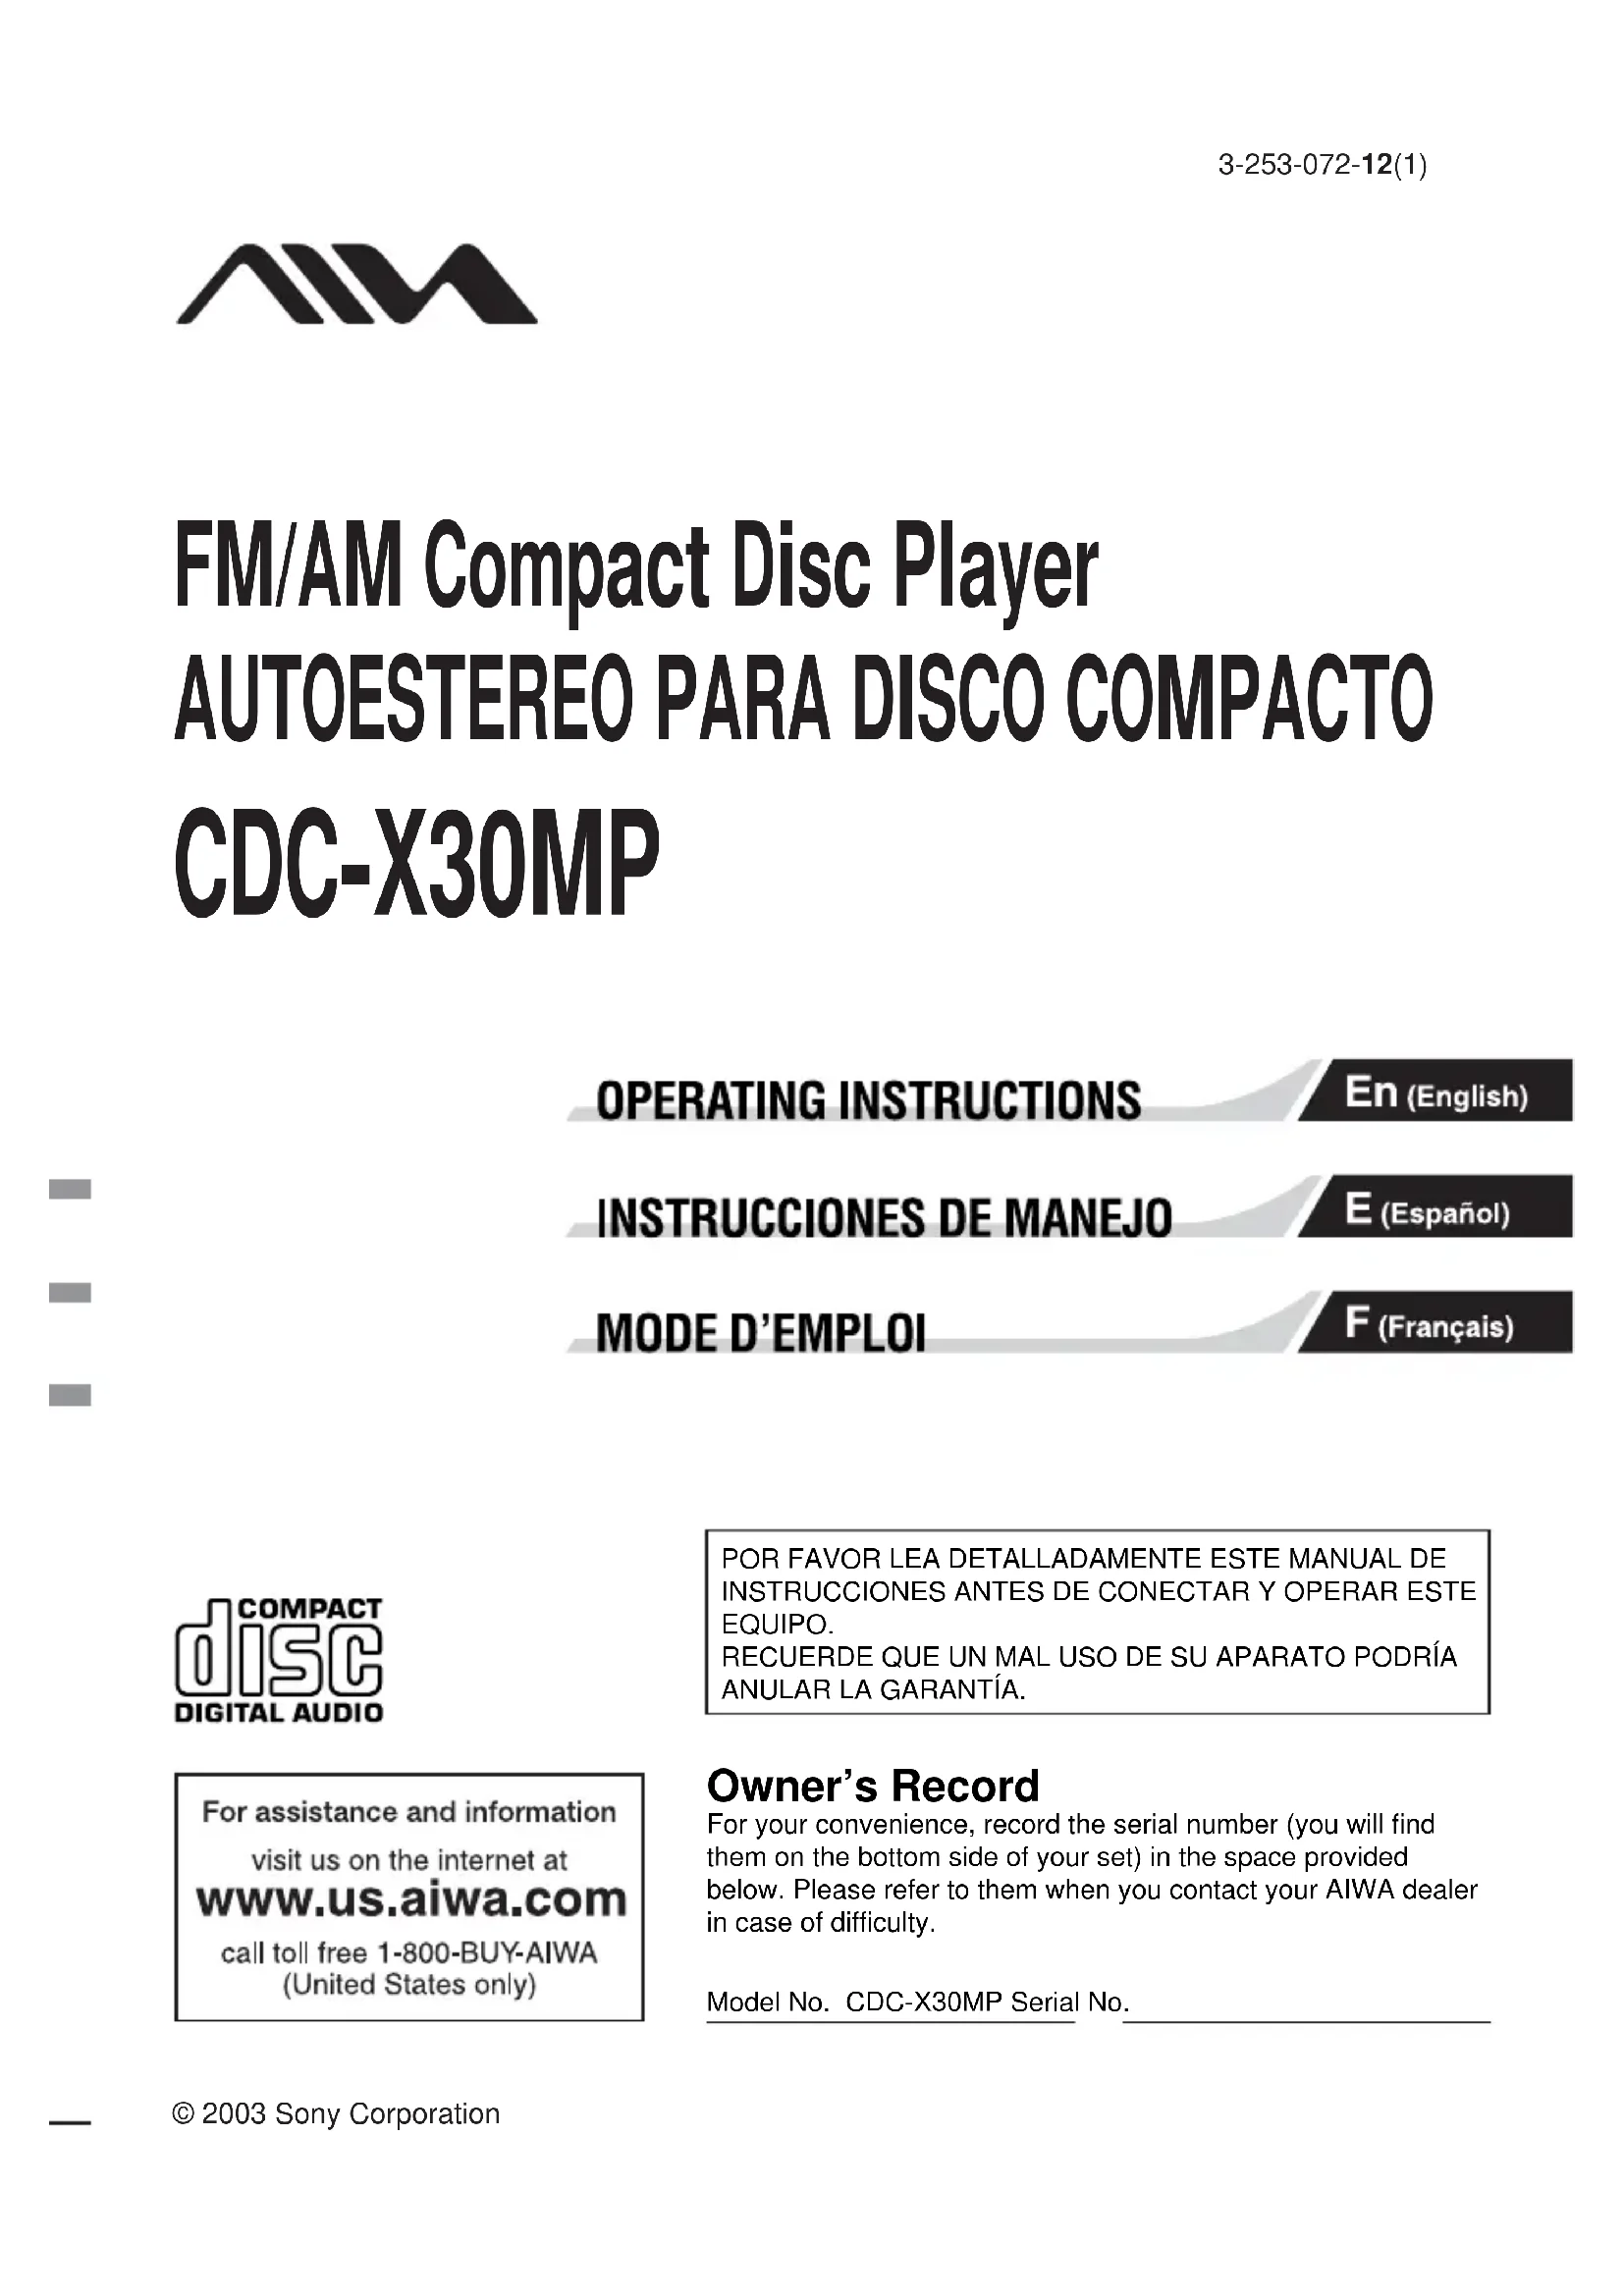
Resetting the unit
Before operating the unit for the first time or after replacing the car battery, you must reset the unit. Press the reset button with a pointed object such as a pencil.
Front panel detached
natural_image
Diagram of a computer monitor rear panel with indicator lights and ports (no text or symbols)Reset button
Note
Pressing the reset button will erase the clock and some memorized functions.
DEMO (Demonstration) mode
The unit has an extra display (DEMO) mode which demonstrates the illumination modes of the unit. The unit switches to DEMO mode automatically if you turn the unit on and leave it as it is for 5 seconds after all the connections have been completed.
To cancel DEMO mode
1 During DEMO mode, press and hold Jog dial (PUSHSOURCE) until "ILL" appears on the display.
2 Press + or - to select "DEMO".
3 Turn Jog dial to select "OFF."
To resume DEMO mode, select "ON" in step 3.
(See the illustration on page 3.)
THEFT PROTECTION
Take the front panel with you when leaving the car, and keep it in the supplied carrying case.
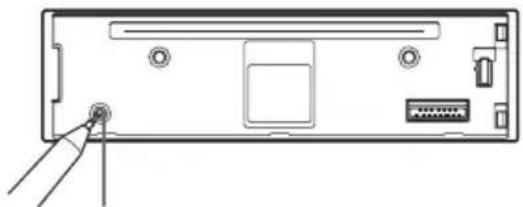
Detaching the front panel
Before detaching the front panel, remove the CD to prevent possible damage to the unit.
1 Press ▲ to remove the CD.
2 Press and hold PWR/ATT until the unit turns off.
3 Press ↑. (Hold the panel with one hand to prevent accidentally dropping it.)
4 Remove the panel.
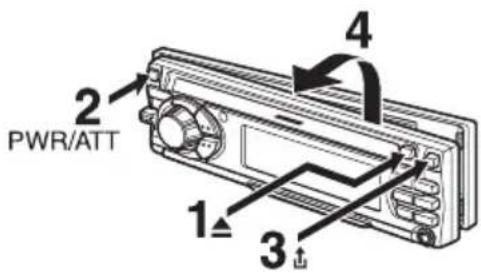
Attaching the front panel
1 Engage the left side of the front panel to the left catch on the unit.
2 Push the panel forward until it locks. Be sure not to press any buttons while you are attaching the panel.
Note
Do not touch the connector on the reverse side of the front panel. This could cause a poor or faulty connection.
BASIC OPERATION, AUDIO AND CLOCK ADJUSTMENT
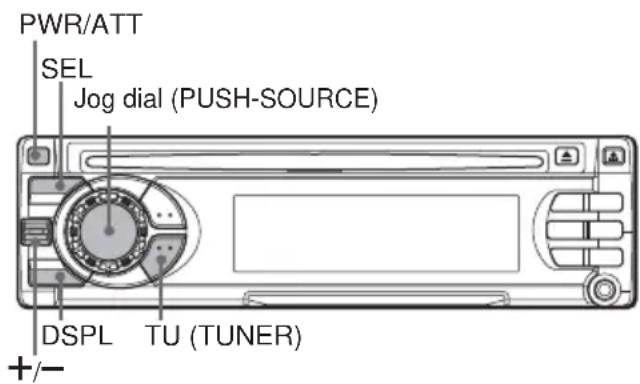
Turning the unit on/off
- You can turn the unit on by pressing any button on the front panel except ▲ and ↑. The unit also turns on when you insert a CD.
- Press and hold PWR/ATT until the unit turns off.
Note
Most operations described in this manual require the unit to be turned on before starting the operation, unless explicitly stated otherwise.
Changing the source mode
1 Press Jog dial (PUSH-SOURCE).
Pressing Jog dial (PUSH-SOURCE) cycles through source modes in the following order:
F1 (F2/F3/A1/A2) → DISC* → AUX IN
* "DISC" does not appear on the display when there is no CD in the unit.
Adjusting the volume
1 Turn Jog dial.
"VOL (volume)" appears on the display.

Muting the sound
1 Press PWR/ATT briefly.
"ATT ON" appears on the display.
To restore volume, briefly press PWR/ATT again.
Adjusting sound
You can select the following modes for adjusting sound depending on the music you listen to: BASS (low frequencies), TRE (high frequencies), BAL (left/right), FAD (front/rear), H-BASS (high bass)*, DSSA (Drivers Sound Stage Adjustment)** and BBE***.
* You can reinforce the bass sound.
** You can adjust sound stage and tone balance to best serve a particular seat in the car.
*** You can enhance the clarity of high-frequency sound.
1 Press SEL repeatedly to select the mode to be adjusted.
Pressing SEL cycles through the modes. The selected mode appears on the display.
2 Turn Jog dial to increase or decrease the level for the selected mode (except for H-BASS, DSSA and BBE).
In H-BASS mode, turn Jog dial to select 1, 2, 3 or OFF.
In DSSA mode, turn Jog dial to select L (for the front left seat), R (for the front right seat) or OFF.
In BBE mode, turn Jog dial to select 1, 2 or OFF.
Notes
- Adjust the level or select an item within 5 seconds, or the selected mode will return to previous state.
- When DSSA is activated, you cannot adjust BAL and FAD.
Aligning the source levels
(Source Level Adjuster)
Volume may vary each time you change the source mode. In this case, you can align each source mode's volume to almost the same level.
1 Press Jog dial (PUSH-SOURCE) or TU (TUNER) repeatedly to select the desired mode.
2 Press DSPL while pressing SEL. "LEVEL 0" appears on the display.
3 Turn Jog dial to adjust the level.
Note
Adjust the level within 5 seconds, or the selected mode will be canceled.
Restoring the factory settings
1 Turn off the unit.
2 Press and hold DSPL until "LEVEL --" appears on the display.
Note
You can restore the factory settings only for VOL, BASS, TRE, BAL, FAD, H-BASS, DSSA and BBE, and aligned source volume levels.
Setting the beep tone
1 Turn off the unit.
2 Press and hold SEL until "BEEP" appears on the display.
3 Turn Jog dial to select ON or OFF.
4 Press SEL.
Setting the clock
1 Press and hold DSPL until the clock indicator flashes on the display.
2 Press + (to set hour) or - (to set minute), and then turn Jog dial.
3 Press DSPL.
Displaying the clock
1 Press DSPL.
To return to the former display, press DSPL again.
RADIO OPERATION
Tuning in to a station
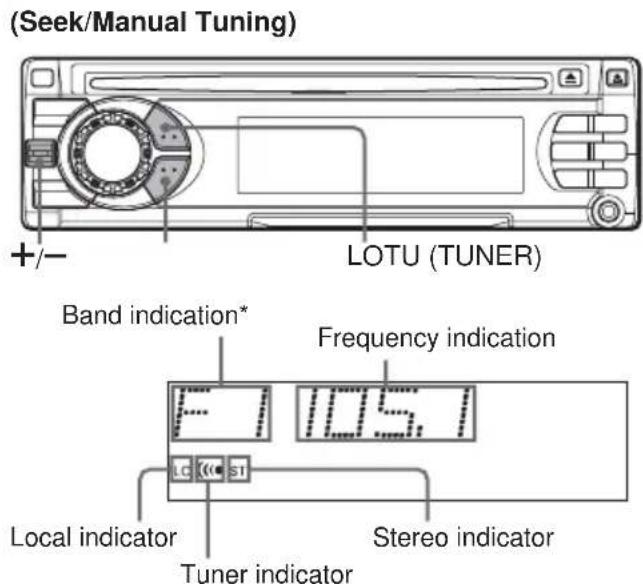
* "F" means FM. "A" means AM.
1 Press TU (TUNER) repeatedly to select the desired band (F1, F2, F3, A1, or A2).
2* Press + (to move to higher frequencies) or — (to move to lower frequencies) to tune in to a station. "ST" appears on the display when an FM station is broadcasting in stereo, and receiving conditions are good.
\*Seek Tuning and Manual Tuning
- Press and hold + or - until Seek Tuning starts. The unit locates a station automatically (Seek Tuning).
To stop Seek Tuning, press + or - again.
- Press + or — repeatedly to search for a desired station while increasing or decreasing the frequency step by step (Manual Tuning).
Monaural mode
When FM signals become weak, or FM reception becomes poor, the unit automatically switches to Monaural mode to reduce noise.
Local mode
Local mode allows you to tune in only to strong stations during Seek Tuning.
1 Press LO before you start seek tuning. "LO" appears on the display.
To return to Distant mode, press LO again.
"LO" disappears and the unit tunes in to all receivable stations.
Using preset stations
You must preset stations before you can tune in to a station using preset station number buttons.
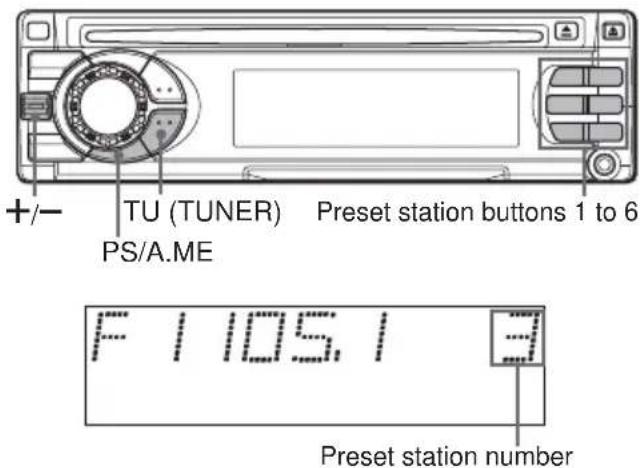
Presetting stations automatically
(Auto Memory)
1 Press TU (TUNER) repeatedly to select the desired band (F1, F2, F3, A1, or A2).
2 Press and hold PS/A.ME until automatic presetting starts.
The unit automatically stores up to 6 stations for each band.
After completion of automatic presetting, the unit tunes in to all the stations stored on the preset station buttons in order (Preset Scan).
To cancel automatic presetting, press PS/A.ME again.
Checking the preset stations (Preset Scan)
1 Press PS/A.ME briefly.
Each preset station will be tuned in for 5 seconds in order.
To cancel Preset Scan, press PS/A.ME again or any preset station button.
Presetting stations manually
(Manual Memory)
1 Press TU (TUNER) repeatedly to select the desired band (F1, F2, F3, A1, or A2).
2 Press + or — to tune in to a desired station (see "Tuning in to a station" as well for another tuning method).
3 Press and hold the desired preset station button until the unit beeps.
Note
A newly preset station replaces the station on the same band that was previously stored on that preset station button.
Tuning in to a preset station
1 Press TU (TUNER) repeatedly to select the desired band (F1, F2, F3, A1, or A2).
2 Press the preset station button on which the desired station is stored.
Active tuning reception control (ATRC)
The unit automatically suppresses FM noise caused by vehicle movement, and maintains sound quality.
CD PLAYER OPERATION
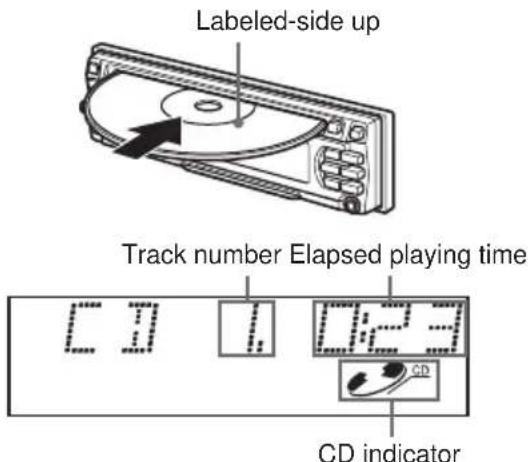
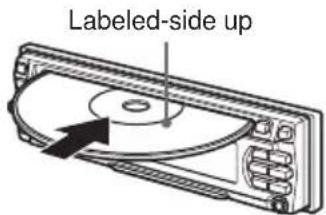
Playing a CD
You can play CDs, CD-Rs and CD-RWs using the procedure described below.
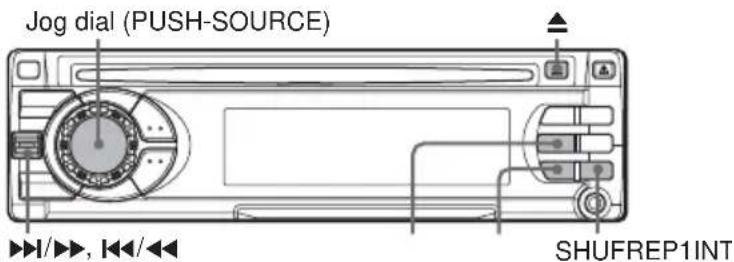
1 Insert a CD.
“DISC” appears on the display.
CD play starts.
If a CD is already inserted, press Jog dial (PUSHSOURCE) repeatedly to select CD play mode.
In normal play, when the last track finishes, the unit returns to the first track and continues to play.
| To | Press |
| Eject a CD | |
| Skip to the next track | I/ |
| Go back to the beginning of the current trackEach extra press skips backward one extra track | / |
| Locate a specific point in a track | Press and hold / or I/ until you find the point. |
Notes
- When you play a CD that is already inserted, CD play starts at the point where it stopped the previous time. A newly inserted CD starts from the first track.
- A CD-R or CD-RW may take some time to start playing back, but this is not a malfunction.
- If a CD-R or CD-RW with no data is inserted, "ERROR03" will appear on the display. The unit cannot play such discs.
Intro Play
You can locate a desired track by monitoring the first 10 seconds of all the tracks on a CD.
1 Press INT during CD play.
"INTRO" appears on the display.
2 Press INT again when the desired track is played.
The unit returns to normal CD play.
One Track Repeat Play
You can play a track repeatedly.
1 Press REP1 during CD play.
"REP1" appears on the display.
To cancel One Track Repeat Play, press REP1 again.
Shuffle Play
You can play all the tracks in random order.
1 Press SHUF during CD play.
"SHUF" appears on the display.
To cancel Shuffle Play, press SHUF again.
Note
During Shuffle Play, pressing ◀◀◀ allows you to skip only to the beginning of the current track, not to the previous track.
Before playing an MP3
The unit can play back MP3* files recorded on CD-ROM or CD-R or CD-RW. MP3 files are played in numerical then alphabetical order. The unit starts playback from the files with a digit at the beginning of the filename.
* An MP3 file (that has the ".mp3" extension) stores audio data compressed using MPEG1, the audio layer-3 file-coding scheme.
Within this section, we refer to what are called "MP3 file" and "folder" in PC terminology as "track" and "album," respectively.
Notes on MP3
- MP3 tracks must be recorded on a disc in a format compliant with ISO 9660. Note, however, that the unit may not play such tracks in the order they were recorded.
- The maximum number of playable tracks is 512 if the disc was recorded in compliance with the ISO 9660 level -1 standard (all names of albums and tracks must be within 12 characters).
The maximum number of playable tracks is 512 if the disc was recorded in compliance with the ISO 9660 level -2 standard (all names of albums and tracks must be within 31 characters). - The maximum allowable depth of nested albums is 8, including the root album (directory).
- The unit can play only tracks having a file extension ".mp3."
- If a disc contains audio tracks plus MP3 tracks, the unit only plays the audio tracks.
- With multisession discs, the unit can play up to 5 sessions. You cannot play an MP3 file having the session that is not closed.
- The unit may not play tracks recorded with a packet-writing utility.
- When playing a track converted with a bit rate of 8 kbps or VBR (variable bit rate), Intro playback may not work properly.
- A non-MP3 track that has the “.mp3” file extension is not played.
Notes on indications in the display
• The following characters are displayed:
- uppercase letters: A to Z
- numerals: 0 to 9
- symbols: space, ", %, ', *, +, comma, -, period, /, <, =, >, @ and _.
- Lowercase letters ("a" to "z") are displayed as uppercase letters ("A" to "Z").
- Symbols such as (, ), [, ], { and } are displayed as "<" or ">".
- Characters which cannot be displayed are shown as “*”.
- Up to 32 characters are displayed for the name of an album or a track.
- When playing MP3 files, the elapsed playing time displayed may not be correct.
- To display up to 30 characters for a track name or an artist name, ID3TAG version 1.x is required.
- Up to 64 characters of information created with ID3 TAG version 2.x can be displayed.
- When playing MP3 files that have tags created with ID3 TAG version 2.4, noise may be heard.
Notes on creating MP3 discs
- Create MP3 tracks with a sampling frequency of 44.1 kHz and a fixed bit rate of 128 kbps.
- Do not record non-MP3 files on discs for MP3.
To play tracks in the order they were
recorded
1 Use writing software capable of recording MP3 tracks in numerical and alphabetical order. For details on using the software, refer to the operating instructions supplied with the software.
2 Use only one album. (Do not create a subalbum within an album.)
3 Include a two- or three-digit number at the beginning of each track name so that the tracks will be played in order.
Example of recommended name structure:
01XXXXX.mp3
02XXXXX.mp3
03XXXXX.mp3
04XXXXX.mp3
05XXXXX.mp3
Avoid using the following name structure:
1XXXXX.mp3
5XXXXX.mp3
10XXXXX.mp3
15XXXXX.mp3
20XXXXX.mp3
(The tracks shown above will be played in wrong order, i.e., "1," "10," "15," "20," and "5.")
Playing an MP3 track
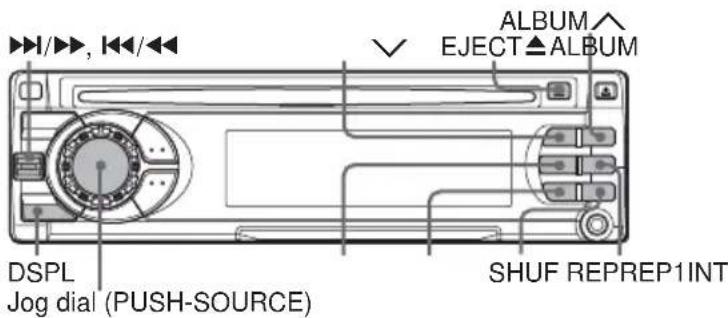
1 Insert a CD-ROM, CD-R or CD-RW for MP3. The unit starts scanning the disc. "DISC" appears on the display. During scanning of the disc, "NOW READING" scrolls across the display.
Notes
- If scanning of CD-ROM, CD-R and CD-RW does not finish within 2 minutes, "CANCEL TO EJECT KEY" or "NO MUSIC" appears depending on the complexity of the folder tree.
- If there are no tracks on the disc, "NO MUSIC" appears.
- Some discs may not play if non-MP3 files are contained in the disc.
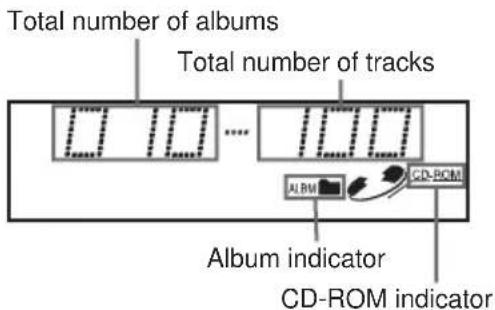
After scanning, the total number of albums and tracks appears on the display, then the unit automatically starts playing the disc from the first track of the first album.
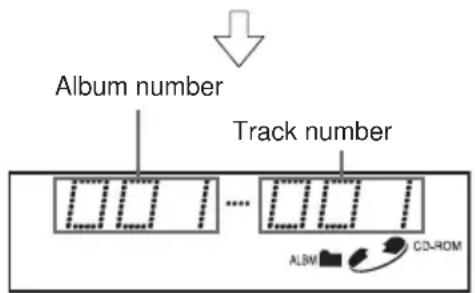
Each time the track is changed, this display appears and remains for about 5 seconds.
After playing the track, the unit plays the next track of the same album.
After playing all the tracks of the album, the unit plays the first track of the next album.
Note
If a disc is already inserted, press Jog dial (PUSHSOURCE) repeatedly to select CD Play mode to start MP3 track play.
To skip tracks and albums
| To | Press |
| Eject a disc | |
| Skip to the next track | |
| Go back to the beginning of the current trackEach extra press skips backward one extra track | |
| Locate a specific point in a track |  |
 | |
| Skip to the next album | |
| Skip to the previous album |
To change the display mode
Press DSPL.
Pressing DSPL cycles through the displays in the following order:
elapsed playing time
→ album name ("AL", album number and folder name)
→ track name* ("TR", track number and file name)
→ ID3 tag information ("TG" and track name)
→ ID3 tag information ("TG" and artist name)
→ ID3 tag information ("TG" and album name)
→ clock
→ elapsed playing time
* If there is no name on the track, "NO TR. NAME" appears.
Intro Play
You can locate a desired track by monitoring the first 10 seconds of all the tracks on the disc.
1 Press INT during MP3 track play.
"INTRO" appears on the display.
2 Press INT again when the desired track is played.
The unit returns to the normal MP3 track play.
Note
The unit scans all the tracks on the disc in order without sorting by album.
Album Repeat Play
You can play an album repeatedly.
1 Press REP during MP3 track play.
"REP" appears on the display.
To cancel Album Repeat Play, press REP again.
One Track Repeat Play
You can play a track repeatedly.
1 Press REP1 during MP3 track play.
"REP 1" appears on the display.
To cancel One Track Repeat Play, press REP1 again.
Shuffle Play
You can play all the tracks in the current album in random order.
1 Press SHUF during MP3 track play.
"SHUF" appears on the display.
To cancel Shuffle Play, press SHUF again.
Notes
- During Shuffle Play, pressing ◀◀◀ allows you to skip only to the beginning of the current track, not to the previous track.
- If you select one of the play modes mentioned above (Intro Play, Album Repeat Play, One Track Repeat Play, or Shuffle Play mode), the mode indication corresponding to the selected play mode (INTRO, REP, REP1, or SHUF) appears.
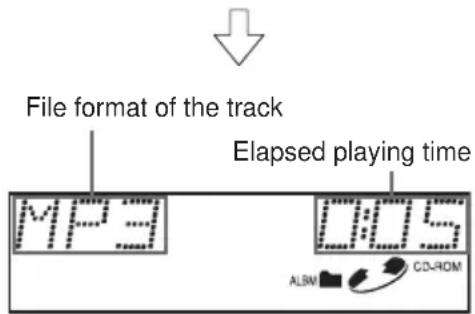
AUXILIARY EQUIPMENT
Listening to a cassette/MD/MP3 portable
player or other equipment
You can listen to equipment connected to the unit. Refer to the operating instructions for the corresponding equipment for more detailed information.
Be sure to remove inserted CDs to prevent possible damage to the unit before connecting the equipment.
natural_image
Front view line drawing of a vintage electronic device casing with control panel and buttons (no text or symbols)AUX jackJog dial
1 Connect a cassette/MD/MP3 portable player or other equipment to the unit's AUX jack (3.5 mm dia.).
2 Press Jog dial (PUSH-SOURCE) repeatedly until "AUX IN" appears on the display.
OTHER FUNCTIONS
PS Jog dial (PUSH-SOURCE)
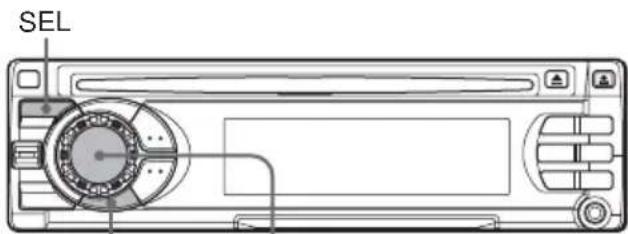
Changing the key illumination color
You can choose blue or red as the key illumination color.
1 Press and hold Jog dial (PUSH-SOURCE) until "ILL" appears on the display.
2. Turn Jog dial to select "1 (for blue)" or "2 (for red)". (PUSH-SOURCE)
Setting the dimmer of the display
1 Press and hold SEL until "DIMMER" appears on the display.
2 Turn Jog dial to select "0 (bright)" or "1 (dimmed)".
Displaying the VU level indicator
1 Turn off the unit.
2 Press and hold PS until "VU" appears in the display.
3 Turn Jog dial to select "ON" (level indicators appear) or "OFF" (level indicators disappear).
4 Press PS.
CARD REMOTE CONTROL
Names of parts
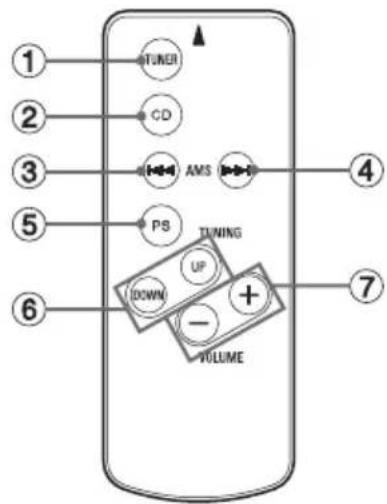
①TUNER button
②CD button
③ AMS (Auto music sensor) ◀◀ button
④ AMS (Auto music sensor) ▶▶▶I button
⑤ PS (preset) button
⑥TUNING UP/DOWN buttons
⑦ VOLUME +/- buttons
Preparations
A lithium battery is installed in the remote control at the factory.
Before you use the remote control, be sure to remove the insulating sheet by simply pulling it out.
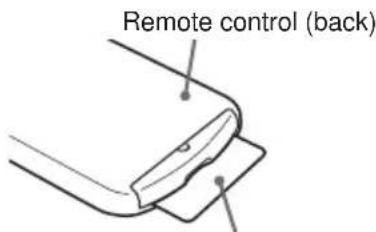
Insulating sheet
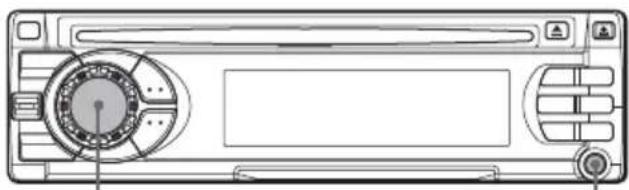
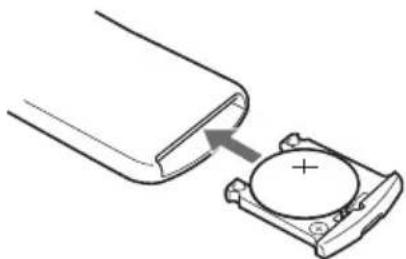
Replacing the battery
1 Insert the tip of a pointed object Ⓐ into the hole Ⓑ and pull out the battery holder to remove the lithium battery (CR2025).
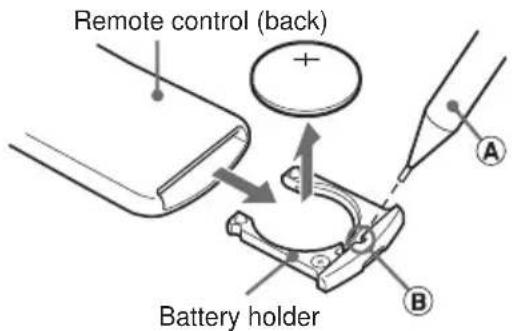
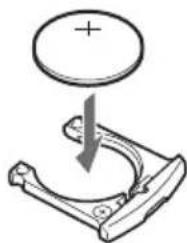
2 Install a new lithium battery (CR2025) with the ⊕ side facing up in the battery holder.
natural_image
Diagram of a mechanical component with a circular top and downward arrow, no text or symbols present3 Push the battery holder into the unit until it clicks.
natural_image
Diagram showing a capacitor with an arrow pointing to its top section, no text or symbols presentNote
When the infrared receptor on the main unit is exposed to direct sunlight, it may not respond to signals from the remote control.
CAUTION
• Lithium battery (CR2025) for the remote control
Replace the battery with Hitachi Maxell, Panasonic or Sony Part No. CR2025 only. Use of another battery may present a risk of fire or explosion.
The battery may explode if mistreated. Do not recharge, disassemble or dispose of in fire.
- Keep the lithium battery out of the reach of children. If swallowed, consult a doctor immediately.
- To prevent a short circuit, never pinch the battery with pliers, etc.
TROUBLESHOOTING
Error code
In the following cases the corresponding error code indication appears. Follow the suggestions below to solve such problems.
ERROR03 Focus error. Check that the CD is loaded properly (right side up, etc.), and the CD contains valid data.
Reset button
If a CD does not operate properly, press the reset button with a pointed object such as a pencil, etc. Note that all your settings will be erased if this button is pressed.
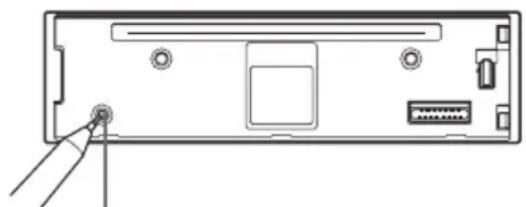
natural_image
Diagram of a computer monitor rear panel with a pointing indicator (no text or symbols)Reset button
MAINTENANCE
Cleaning the front panel
Wipe the surface with a soft, dry cloth. Do not use liquid cleaners or aerosol cleaners.
Cleaning the connector
The connector needs to be cleaned occasionally. Wipe the surface of the connector with a cotton swab slightly moistened with alcohol.
Back of the front panel
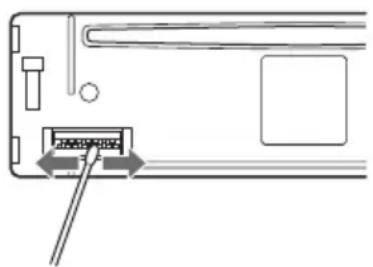
natural_image
Diagram of a device with an inserted port and cable, showing no text or symbolsSPECIFICATIONS
RADIO SECTION
(FM)
Frequency Range: 87.5 MHz – 108 MHz
Usable Sensitivity: 12.7 dBf
50 dB Quieting Sensitivity: 17.2 dBf
IF Rejection: 100 dB
Frequency Response: 30 Hz – 15,000 Hz
S/N Ratio: 70 dB
Stereo Separation: 35 dB at 1 kHz
Alternate Channel Selectivity: 98 dB
Capture Ratio: 3 dB
(AM)
Frequency Range: 530 kHz – 1,710 kHz
Usable Sensitivity: 30 μV (30 dB)
CD SECTION
Frequency Response: 17 Hz - 20 kHz +0/-3 dB
Dynamic Range: More than 92 dB
Channel Separation: More than 60 dB
S/N Ratio: More than 90 dB
Wow/Flutter: Unmeasurable
MP3 Decoding: MPEG 1 Audio Layer 3
AUDIO SECTION
Max. Power Output: 45 W · 4 channels
AUX input
Input sensitivity (load impedance) AUX: 300 mV (10 kΩ)
GENERAL
Power-Supply Voltage: 14.4 V (11 to 16 V)
allowable), DC, negative ground
Load Impedance: 4 Ω
Tone Control:
Bass ± 10 dB at 100 Hz, Treble ± 10 dB at 10 kHz
Preamp Output Voltage (load impedance): 2.2 V (10 kΩ)
Supplied Accessory: Carrying case (1)
CARD REMOTE CONTROL
Dimensions: Approx. 33 (W) · 85 (H) · 7.5 (D) mm
(1^5/16(W) · 3^3/8(H) · ^5/_16(D) inches)
Weight: Approx. 20 g (0.7 oz.) (including battery)
- Specifications and external appearance are subject to change without notice due to product improvement.
BBG
The word "BBE" and the "BBE symbol" are trademarks of BBE Sound, Inc.
Under licence from BBE Sound, Inc.
PRECAUCIONES
natural_image
Diagram of a computer monitor rear panel showing ports, drive, and a cable connector (no text or labels)Botón de reposición
Nota
Nota
1 Coloque un disco compacto.
natural_image
Diagram of a CD or DVD disc with an arrow indicating direction (no text or symbols present)Número de sección
01XXXXX.mp3
02XXXXX.mp3
03XXXXX.mp3
04XXXXX.mp3
05XXXXX.mp3
1XXXXX.mp3
5XXXXX.mp3
10XXXXXX.mp3
15XXXXX.mp3
20XXXXX.mp3
natural_image
Diagram of a CD or DVD disc with an arrow indicating direction (no text or symbols present)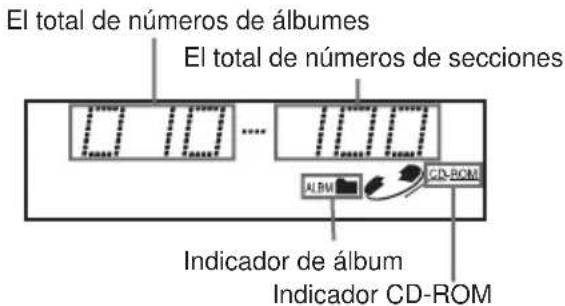
natural_image
Front view of a vintage electronic device casing with control panel and display (no visible text or symbols)Dial de lanzadera (PUSH-SOURCE) Enchufe AUX
natural_image
Diagram of a mechanical component with a circular top and downward arrow, no text or symbols presentnatural_image
Diagram showing a capacitor with an arrow pointing to its top section, no text or symbols presentNota
natural_image
Diagram of a computer monitor rear panel with indicator lights and ports (no text or labels)natural_image
Diagram of a device with an inserted port and cable, showing no text or symbolsESPECIFICACIONES
SECCION DE LA RADIO
(FM)
Remarques relatives aux CD
natural_image
Diagram of a computer monitor rear panel with ports and a cable inserted (no text or labels)Remarque
1 Insérez un CD.
"DISC" s'affiche.
natural_image
Diagram of a CD or DVD disc with an arrow indicating direction (no text or symbols present)natural_image
Front view of a device control panel with buttons and a central rotary knob (no text or symbols visible)Commande Jog (PUSH-SOURCE)
Prise AUX
natural_image
Diagram of a mechanical component with a circular top and downward arrow, no text or symbols presentnatural_image
Diagram showing a mechanical component with an arrow pointing to a circular feature labeled with a plus sign (no text or symbols present)Remarque
natural_image
Diagram of a computer monitor rear panel with indicator lights and ports (no text or labels)natural_image
Diagram of a device with an inserted port and cable, showing no text or symbolsSPECIFICATIONS
SECTION RADIO
(FM)
Aiwa Strategic Accounts Partnership Inc. ("Aiwa") warrants to the original consumer purchaser that this product is free of defects in material and workmanship at the time of purchase.
WARRANTY PERIODS
During the applicable LABOR warranty period, Aiwa will pay labor and service charges for the repair of defects or, at its option, will replace a defective product with a new or remanufactured equivalent product. During the applicable PARTS warranty period, Aiwa will supply at no charge new or rebuilt replacement parts in exchange for defective parts. However, after the LABOR warranty period, all labor and service charges are your responsibility. Replacement parts are warranted for the remainder of the original PARTS warranty period.
The LABOR and PARTS warranty periods for your product are listed below. All warranty periods commence with the purchase date.
Car Audio 1 year 1 year
WHO PERFORMS AIWA'S WARRANTY?
Aiwa's warranty obligations must be performed by an Aiwa Authorized Service Center. For the name of the Aiwa Authorized Service Center nearest to you call toll free 1-800-289-2492 (1-800-BUY-AIWA).
WHAT YOU MUST DO
To obtain warranty performance, you must take the product, or deliver the product freight prepaid, to an Aiwa Authorized Service Center. If shipped, the product must be packaged so that it is protected from possible shipping damage. You must pick up the product when warranty performance is completed or, if you choose, and the product was received by the Service Center during the LABOR warranty period, the repaired product will be returned to you freight prepaid. You must present to the Service Center, or include with your shipment, a dealer's bill of sale, or other original evidence, showing the date and place of purchase and describing the product purchased. Be sure to include your return address and daytime telephone number where you can be reach should the need arise.
WHAT THE WARRANTY DOES NOT COVER
This warranty does not cover (1) products purchased outside of the U.S.A.; (2) product set-up, adjustment of controls, repair of antenna systems outside the unit; (3) removal or reinstallation, batteries, carrying case, AC adapters and other accessories packaged with the product; (4) defects occurring after purchase due to repair or service other than by an Aiwa Authorized Service Center, product modification, accident, misuse, abuse, or negligence; or (5) reception problems caused by signal conditions, or cable or antenna systems outside the unit. This warranty will not apply if the serial number of the unit has been altered or removed.
REPAIR OR REPLACEMENT AS PROVIDED IN THIS WARRANTY IS THE PURCHASER'S EXCLUSIVE WARRANTY REMEDY. IMPLIED WARRANTIES, INCLUDING THE WARRANTIES OF MERCHANTABILITY AND OF FITNESS FOR A PARTICULAR PURPOSE, SHALL NOT EXTEND BEYOND THE DURATION OF THE APPLICABLE PARTS WARRANTY PERIOD. IN NO EVENT SHALL AIWA BE LIABLE FOR INCIDENTAL OR CONSEQUENTIAL DAMAGES IN CONNECTION WITH THIS PRODUCT. Some states do not allow limitations on how long an implied warranty lasts or the exclusion or limitation of incidental or consequential damages, so the above limitations or exclusion may not apply to you. This warranty gives you specific legal rights, and you may also have other rights which may vary from state to state.
IF YOU NEED HELP: For the latest in Product Information, Parts, Service Center listings and F.A.Q. information visit us on the web at www.us.aiwa.com or call 1-800-BUY-AIWA.
For further Aiwa information, please call 1-800-BUY-AIWA.
Visit us on the Internet at www.us.aiwa.com
D 455724401