CTX410 - Car stereo AIWA - Free user manual and instructions
Find the device manual for free CTX410 AIWA in PDF.
| Brand | Aiwa |
| Model | CTX410 |
| Product Type | Car Stereo |
| Dimensions (W x H x D) | 182 x 53 x 155 mm |
| Power Supply | 14.4 V DC (11 to 16 V tolerated), negative ground |
| Max Output Power | 40 W x 4 channels |
| Load Impedance | 4 Ω |
| FM Frequency Range | 87.5 MHz to 108 MHz (in steps of 100 kHz or 50 kHz) |
| AM Frequency Range | 530 kHz to 1710 kHz (in steps of 10 kHz or 9 kHz) |
| Cassette Section | Speed 4.8 cm/s, signal-to-noise ratio 50 dB, response 40 Hz - 14 kHz |
| Tone Control | Bass ±10 dB at 100 Hz, Treble ±10 dB at 10 kHz |
| Preamp Output Voltage | 2.2 V (10 kΩ) |
| Main Functions | FM/AM radio, cassette player, AUX input (3.5 mm jack), "My Information" timer function, detachable front panel |
| Front Panel Cleaning | Soft, dry cloth |
| Playback Head Cleaning | Use a cleaning cassette once a month |
| Connector Cleaning | Cotton swab lightly moistened with alcohol |
| Maintenance and Safety | Disconnect battery before installation; use a fuse of the same amperage; avoid metal objects near the playback head |
| Included Accessories | Carrying bag (1) |
Frequently Asked Questions - CTX410 AIWA
User questions about CTX410 AIWA
0 question about this device. Answer the ones you know or ask your own.
Ask a new question about this device
Download the instructions for your Car stereo in PDF format for free! Find your manual CTX410 - AIWA and take your electronic device back in hand. On this page are published all the documents necessary for the use of your device. CTX410 by AIWA.
USER MANUAL CTX410 AIWA
For your convenience, record the model number and serial number (you will find them on the right side of your set) in the space provided below. Please refer to them when you contact your AIWA dealer in case of difficulty.
Model No. CT-X410
Serial No.
The image contains no text or characters. The horizontal line is a stylistic or background element and must be ignored according to the rules.
Welcome
Thank you for your purchasing this AIWA product. To optimize the performance of this unit, please read through this manual carefully.
In addition to this operating instructions manual, be sure to refer to the separate installation and connections manuals as well.
PRECAUTIONS
- This unit is designed to be operated on a 12-volt DC negative-ground electrical system only.
•To prevent short-circuiting, disconnect the negative car battery terminal until the unit has been mounted and connected completely. - When replacing the fuse, be sure to use one whose amperage rating is identical. Use of a fuse of higher amperage may cause serious damage to the unit.
- Keep screwdrivers, etc. and other metallic or magnetic objects away from the playback head.
- When your car was parked in direct sunlight resulting in a considerable rise in temperature inside the car, allow the unit to cool off before operating it.
- Keep the volume at such a level that you can hear outside warning sounds (horns, sirens, etc.).
Notes on cassettes
Do NOT expose cassettes to direct sunlight, extremely high or cold temperature or moisture. Keep cassettes away from equipment with built-in magnets to avoid unwanted noise or loss of sound quality.
Do NOT touch the tape of a cassette, as any dirt or dust will contaminate the heads.
Be sure to remove any cassette from the unit if you are not using it.
NOTE
This equipment has been tested and found to comply with the limits for a Class B digital device, pursuant to Part 15 of the FCC Rules. These limits are designed to provide reasonable protection against harmful interference in a residential installation.
This equipment generates, uses, and can radiate radio frequency energy and, if not installed and used in accordance with the instructions, may cause harmful interference to radio communications. However, there is no guarantee that interference will not occur in a particular installation. If this equipment does cause harmful interference to radio or television reception, which can be determined by turning the equipment off and on, the user is encouraged to try to correct the interference by one or more of the following measures:
— Reorient or relocate the receiving antenna.
— Increase the separation between the equipment and receiver.
— Connect the equipment into an outlet on circuit different from that to which the receiver is connected.
— Consult the dealer or an experienced radio/TV technician for help.
CAUTION
Modifications or adjustments to this product, which are not expressly approved by the manufacturer, may void the user's right or authority to operate this product.
Caution on the transit protection pad
The unit is shipped with a transit protection pad in the cassette compartment.
Be sure to press EJECT ▲ to remove the pad before operating the unit.
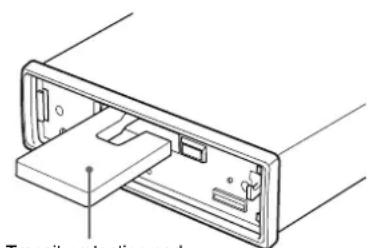
Transit protection pad
TABLE OF CONTENTS
PARTS AND CONTROLS 3
DETACHING AND ATTACHING THE FRONT PANEL 4
SETTING THE CLOCK 5
RADIO OPERATION .... 5
PRESETTING STATIONS 6
MY INFORMATION SWITCH 8
TAPE PLAYBACK 9
SOUND ADJUSTMENTS 10
CONNECTING A PORTABLE CD/MD/MP3 PLAYER OR OTHER EQUIPMENT 12
SETTING THE BEEP TONE 13
MAINTENANCE 13
SPECIFICATIONS 14
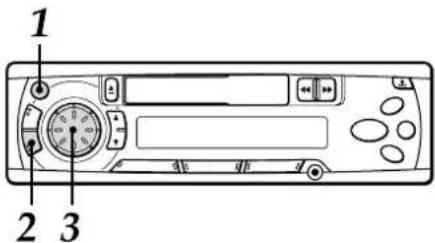
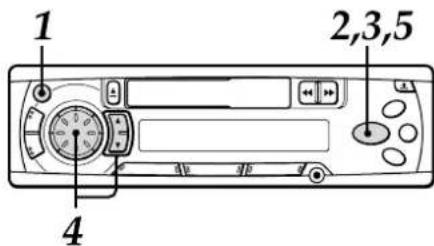
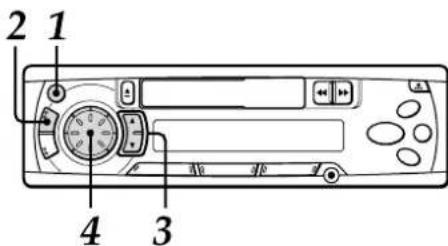
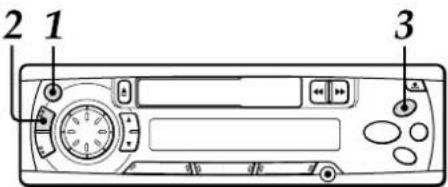
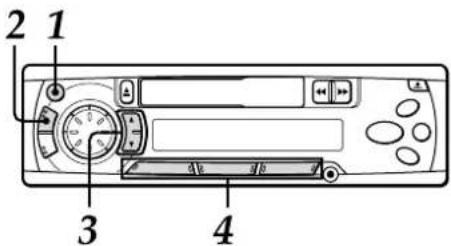
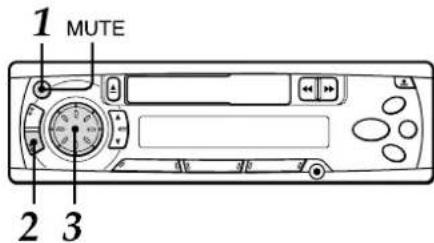
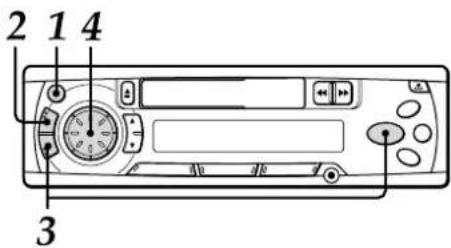
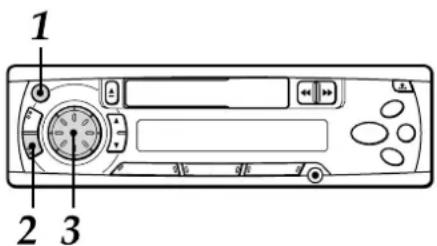
PARTS AND CONTROLS
Front panel
Display window
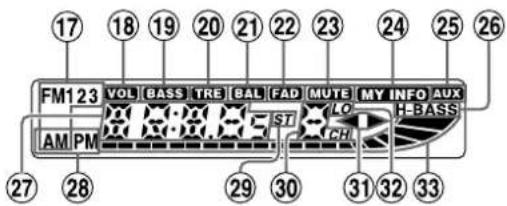
Rear panel
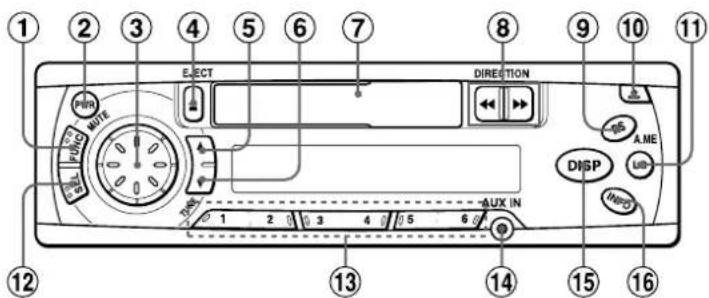
Front panel
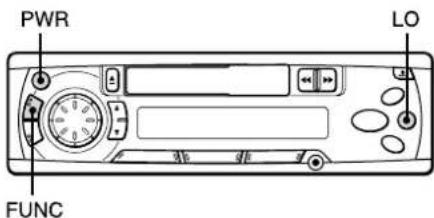
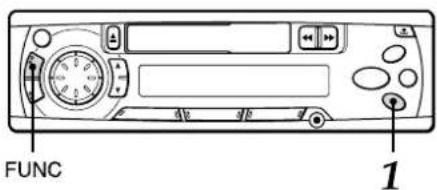
①FUNC (function) button
②PWR (power on/off)/MUTE button
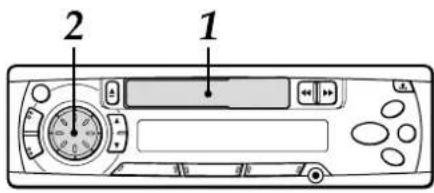
③Jog Dial
④ ▲ (eject) button
⑤ TUNE ▲ button
⑥TUNE ▼ button
⑦Cassette compartment
⑧ DIRECTION ◀◀/▶▶ button
⑨ A.ME (Auto Memory)/PS (Preset Scan) button
⑩ (release) button
⑪LO (local) button
⑫SEL (select) button
⑬ Preset station buttons (1 - 6)
⑭ AUX IN jack (3.5-mm dia.)
⑮ DISP (display) button
⑯INFO (My Information) button
Display window
⑰Band indicator
⑱VOL (volume) indicator
⑲BASS (bass) indicator
⑳TRE (treble) indicator
②1 BAL (balance) indicator
②2FAD (fader) indicator
②3 MUTE indicator
⑳MY INFO (My Information) indicator
⑲AUX indicator
②6H-BASS (High BASS) indicator
⑳Main display section
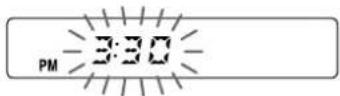
⑳AM/PM (clock) indicator
⑲ST (stereo) indicator
③0 Subdisplay section
③1◀▶ (tape direction) indicators
③2LO (local) indicator
③3 Audio level indicator
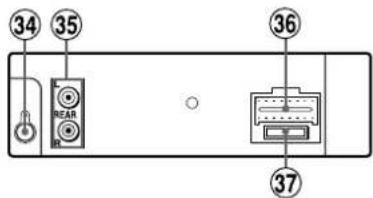
Rear panel
③4 Antenna jack
③5 REAR preout jacks
③6 Power supply/speaker connector
③7Fuse
3 ENGLISH
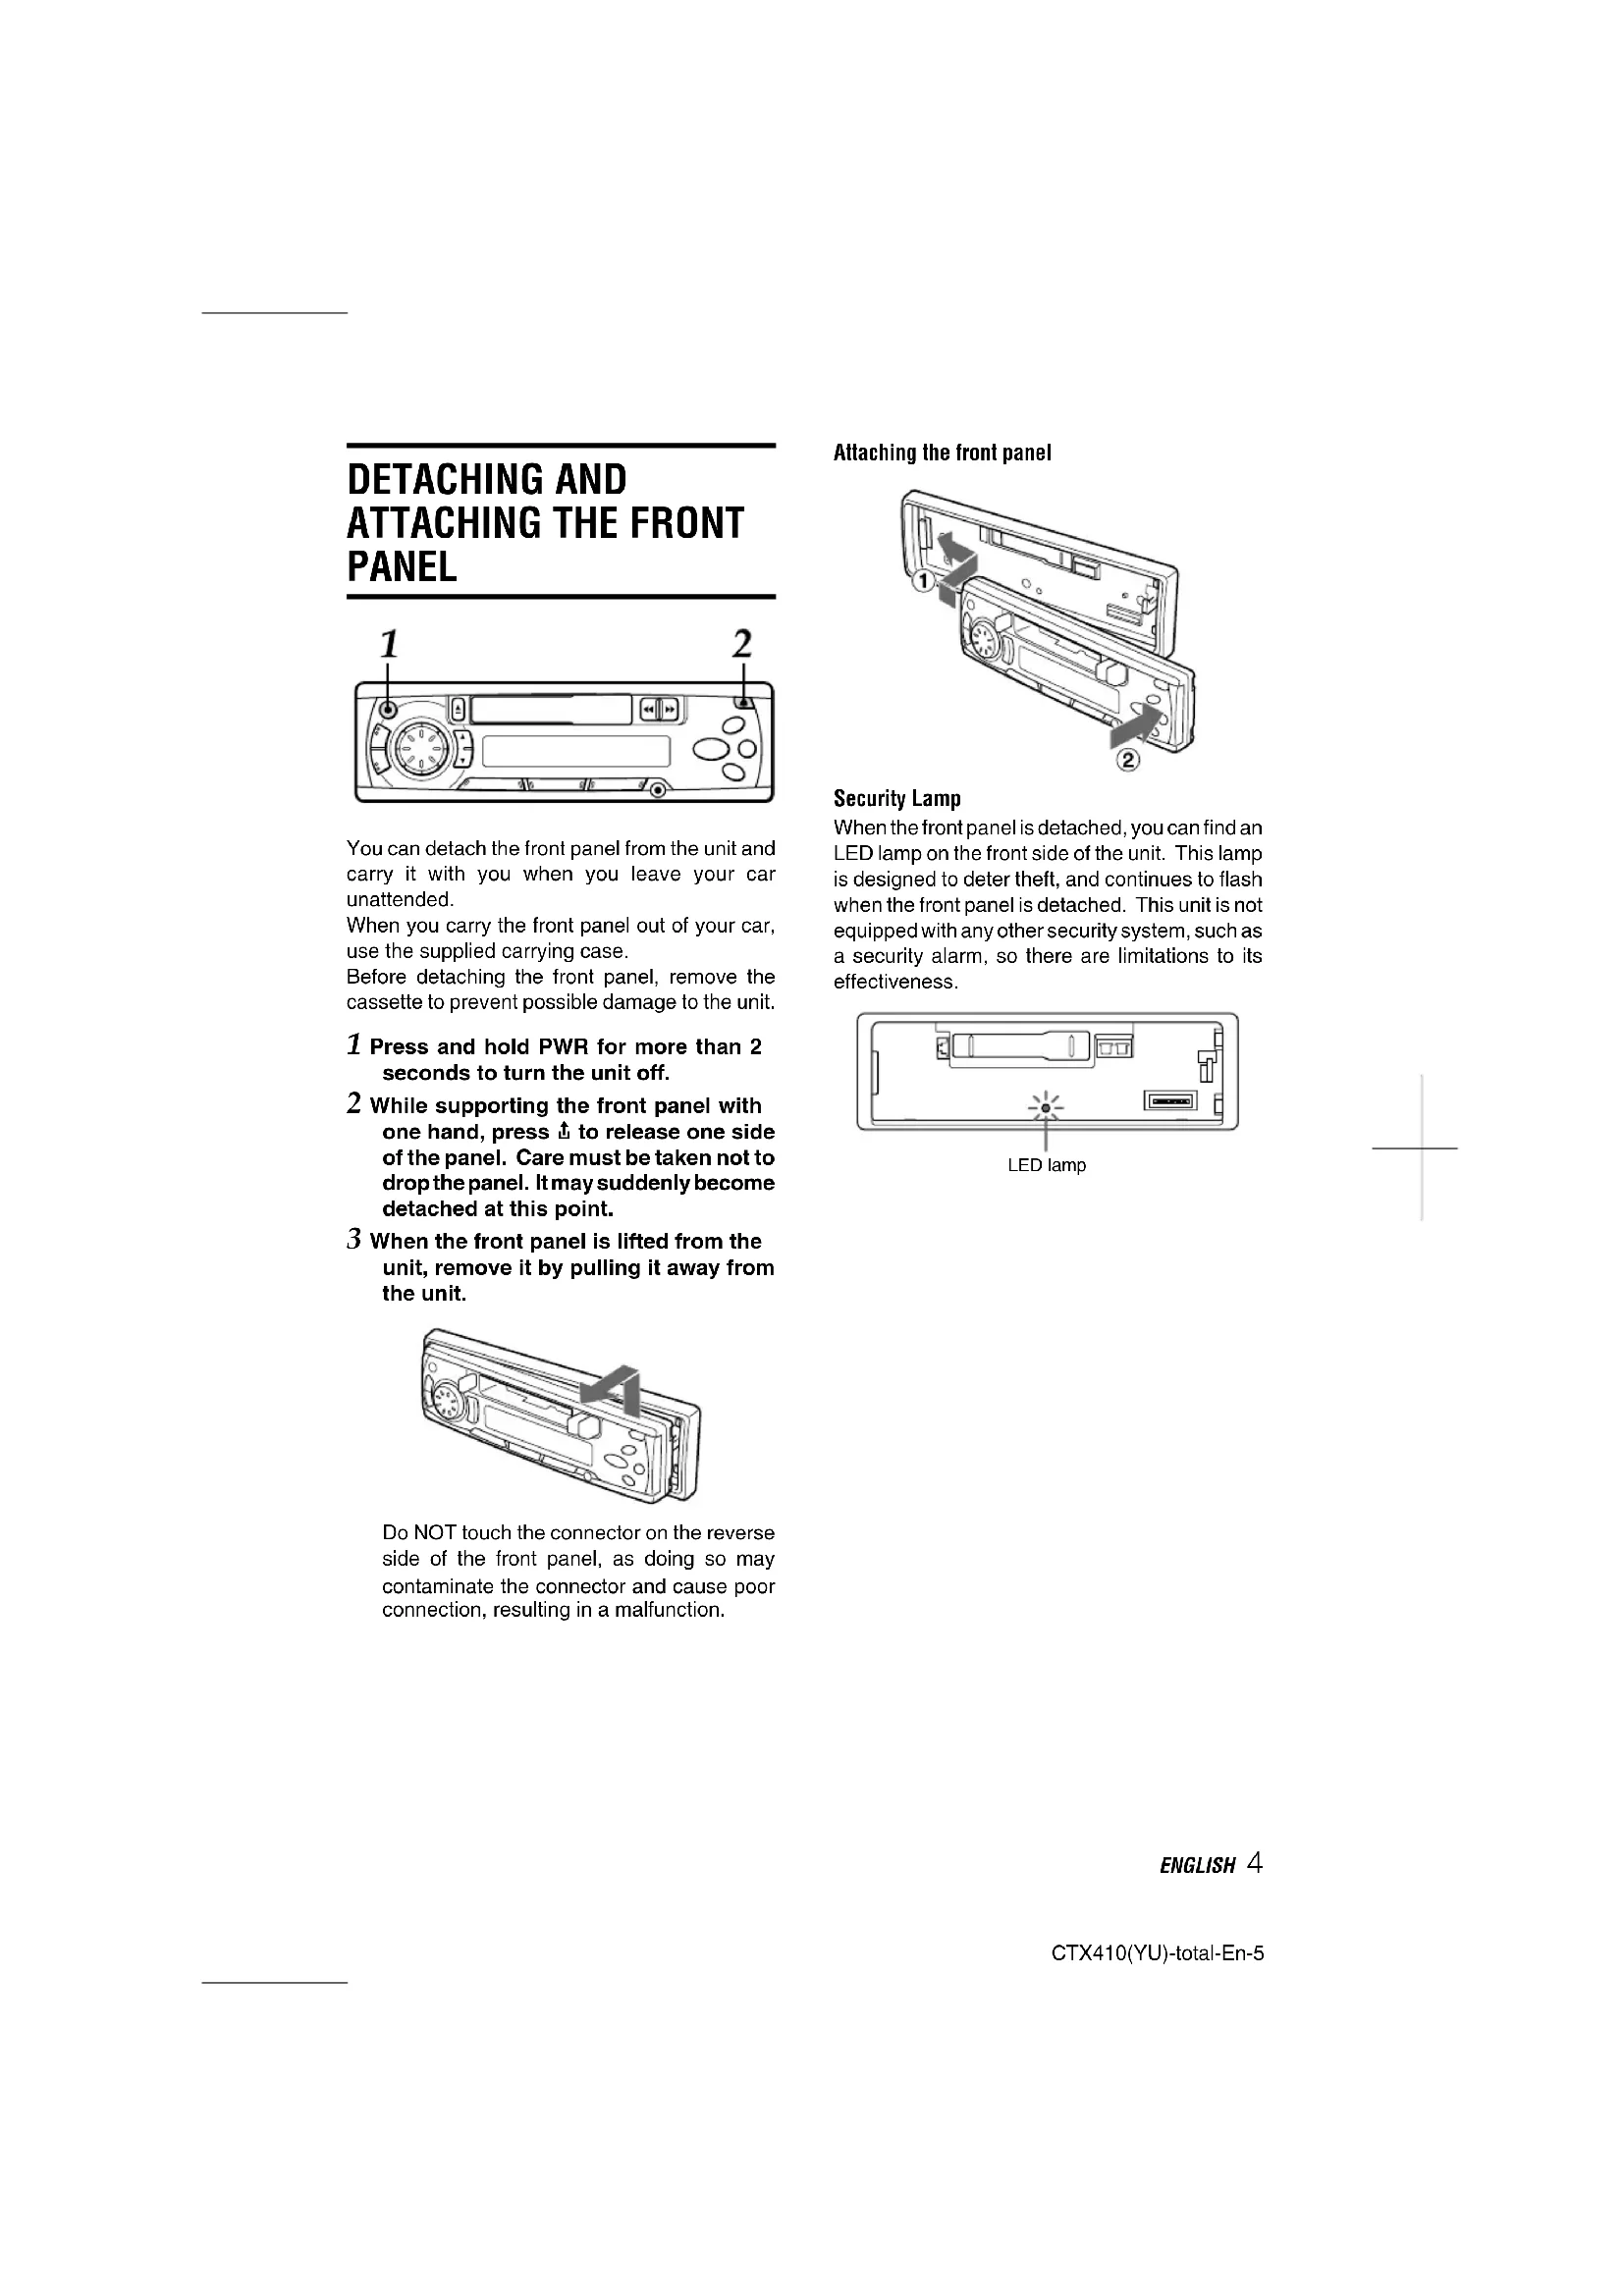
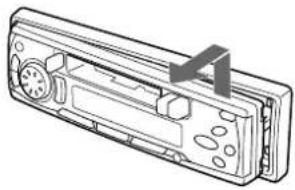
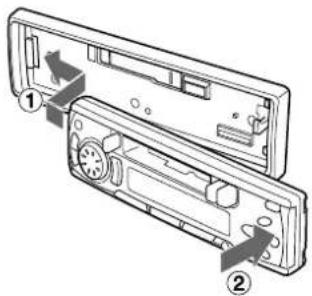
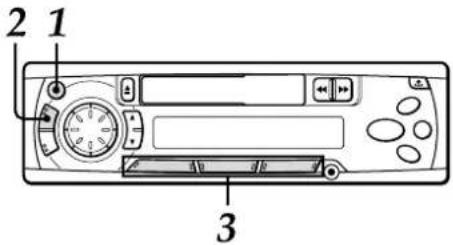
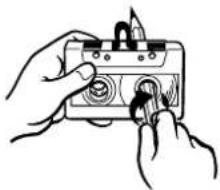
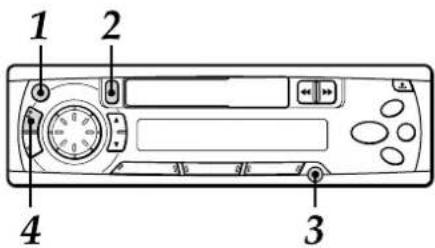
DETACHING AND ATTACHING THE FRONT PANEL
You can detach the front panel from the unit and carry it with you when you leave your car unattended.
When you carry the front panel out of your car, use the supplied carrying case.
Before detaching the front panel, remove the cassette to prevent possible damage to the unit.
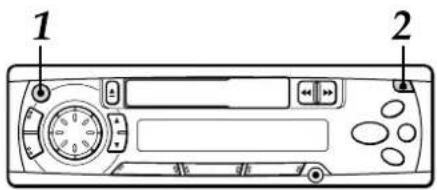
1 Press and hold PWR for more than 2 seconds to turn the unit off.
2 While supporting the front panel with one hand, press ↑ to release one side of the panel. Care must be taken not to drop the panel. It may suddenly become detached at this point.
3 When the front panel is lifted from the unit, remove it by pulling it away from the unit.
natural_image
Line drawing of a car front panel with buttons and dials (no text or symbols)Do NOT touch the connector on the reverse side of the front panel, as doing so may contaminate the connector and cause poor connection, resulting in a malfunction.
Attaching the front panel
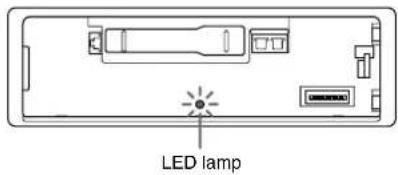
Security Lamp
When the front panel is detached, you can find an LED lamp on the front side of the unit. This lamp is designed to deter theft, and continues to flash when the front panel is detached. This unit is not equipped with any other security system, such as a security alarm, so there are limitations to its effectiveness.
ENGLISH 4
SETTING THE CLOCK
1 Press PWR to turn the unit on.
2 Press DISP to have the clock displayed.
If the clock indication is already displayed, skip this step.
3 Press and hold DISP for more than 2 seconds.
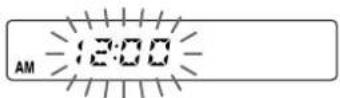
4 Press TUNE ▲, then rotate the Jog Dial to set the hour.
Press TUNE ▼, then rotate the Jog Dial to set the minute.
Rotate the Jog Dial clockwise to go forward. Rotate the Jog Dial counterclockwise to go backward.
5 Press DISP.
The clock starts working from 0 second.
To have the clock displayed when the unit is on Press DISP. To return the unit to its former display, press DISP again.
RADIO OPERATION
1 Press PWR to turn the unit on.
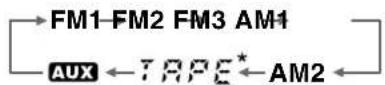
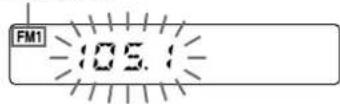
2 Press FUNC repeatedly to select the band from among FM1, FM2, FM3, AM1, and AM2.
The band indicators appear cyclically in order.
- FM1, FM2 and FM3 share the same frequency range.
- AM1 and AM2 share the same frequency range.
Band indicator Frequency indication

3 Press (and hold for more than 2 seconds) either TUNE ▲ or TUNE ▼ to tune in the desired station.
The unit starts scanning and tunes in a station automatically (seek tuning).
Press TUNE ▲ to increase and TUNE ▼ to decrease the frequency.
Press the button again to cancel seek tuning. Repeat the procedure until the desired station is tuned in.
Note
If you press (for less than 0.5 second at a time) either TUNE▲ or TUNE▼, the frequency increase or decrease step by step.
4 Adjust the volume with the Jog Dial.
5 ENGLISH
To turn the unit off
Press and hold PWR for more than 2 seconds. If you press this button for less than 2 seconds, it functions as MUTE.
Note
The unit turns on in the last mode selected when you turned off the unit.
LO (local/DX) button
You can use Local mode when you wish to tune in only strong stations during seek tuning. In Radio mode, press LO to select Local mode. The "LO" indicator lights up.
- Press LO to cancel Local mode and switch to DX (distance) mode.
- The "ST" (stereo) indicator lights up when the tuned-in station is broadcasting in stereo and the reception is good.
FUNC (function) button
Each time you press FUNC, the unit switches to one of the following modes, in cyclic order.
• Tape Play mode (available while a cassette is in the unit)
PRESETTING STATIONS
To preset stations automatically (Auto Memory)
1 Press PWR to turn the unit on.
2 Press FUNC repeatedly to select a desired band from among FM1, FM2, FM3, AM1, and AM2.
FM1 105.
3 Press and hold A.ME/PS for more than 2 seconds to activate the automatic presetting function.
This unit can store up to 6 stations in memory for the preset station buttons 1 to 6 (with the "LO" (local) indicator lit).
If the unit could not find strong stations, the "LO" (local) indicator goes off, and a search begins for weaker stations.
Use this function to automatically preset up to 6 stations each for FM1, FM2, FM3, AM1, and AM2 (up to a total of 30 stations).
- When the auto memory operation is completed, the station assigned to preset station button 1 is tuned in.
• To stop the auto memory operation, press A.ME/PS again.
To check the preset stations (Preset Scan)
- If you wish to check the preset stations, press A.ME/PS for less than 2 seconds. The preset stations stored in memory will be tuned in for 5 seconds each in order.
- To stop this function, press A.ME/PS again or press any of the preset station buttons 1 to 6.
continued
ENGLISH 6
PRESETTING STATIONS
To preset stations manually
You can manually preset stations that have not been selected by an auto memory operation.
1 Press PWR to turn the unit on.
2 Press FUNC repeatedly to select the band from among FM1, FM2, FM3, AM1, and AM2.
3 Tune in the station that you wish to preset with TUNE ▲ or TUNE ▼.
4 Press and hold one of the preset station buttons 1 to 6 for approximately 2 seconds.
While the station you are presetting is being registered in memory, the unit beeps.
The preset station number appears to the right of the frequency indication.
Repeat these procedures to preset up to 6 stations each for FM1, FM2, FM3, AM1, and AM2.
- If you preset a station on a preset station button on which another station of the same band has already been preset, the previously preset station will be erased.
To tune in a preset station
1 Press PWR to turn the unit on.
2 Press FUNC repeatedly to select a desired band from among FM1, FM2, FM3, AM1, and AM2.
3 Press the desired preset station button.
The preset station number appears to the right of the frequency indication.
Active tuning reception control (ATRC)
This unit automatically suppresses FM noise caused by varying signal strength resulting from movement of the car.
- The built-in automatic blending circuit mixes the left and right channel signals according to the strength of the reception. At the same time, the high-cut circuit activates to maintain sound quality.
- If the reception becomes even weaker, the unit automatically switches to Monaural mode to reduce noise.
MY INFORMATION SWITCH
You can timer-activate the radio for a daily radio program. The unit turns on and off in Radio mode at the preset turn-on and turn-off times automatically.
Setting the timer
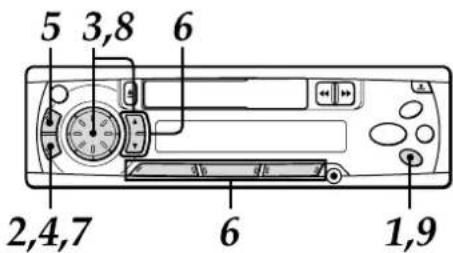
1 With the unit off, press and hold INFO for more than 2 seconds.
The "PO" indication flashes in the display window.

2 Press SEL.
The timer indication flashes.

3 Set the time you wish the unit to turn on in Radio mode.
Press TUNE ▲, then rotate the Jog Dial to set the hour.
Press TUNE ▼, then rotate the Jog Dial to set the minute.
4 Press SEL.
The radio indication flashes.
Band indicator
5 Press FUNC to select the band.
6 Tune in the desired station by pressing TUNE ▲ or TUNE ▼ or one of the preset station buttons 1 to 6.
7 Press SEL.
The timer indication flashes.
8 Set the time you wish the unit to turn off.
Press TUNE ▲, then rotate the Jog Dial to set the hour.
Press TUNE ▼, then rotate the Jog Dial to set the minute.
9 Press and hold INFO for more than 2 seconds.
Your setting is stored in memory, and the unit turns off.
- To cancel a timer setting in progress, press and hold PWR for more than 2 seconds.
continued
ENGLISH 8
MY INFORMATION SWITCH
Activating the timer
1 With the unit on, press INFO.
The "MY INFO" indicator lights up and the timer is activated.
The "MY INFO" indicator flashes between turn-on time and turn-off time.
To cancel the timer
Press INFO again so that the "MY INFO" indicator disappears.
To check the setting
With the unit off, press INFO.
The turn-on time, followed by the radio frequency and the turn-off time, appears in the display window, each for 1 second, then the unit turns off.
Notes
- Even if the unit is in a mode other than Radio mode, the unit switches to Radio mode and tunes in the preset radio program at the preset time automatically. When the program is over, the unit returns to the former mode automatically.
- When this function is activated, TUNE▲/▼,
A.ME/PS, LO, and the preset number buttons do not work for tuning in stations. - Even if the unit is turned off and on, or the front panel is detached and attached, this function is active until turn-off time.
- Even if you are listening to a radio program with this function, pressing FUNC switches the unit to another mode. If you switch modes with FUNC, the unit does not turn off at the turn-off time of the timer.
TAPE PLAYBACK
1 Insert a cassette to start playback.
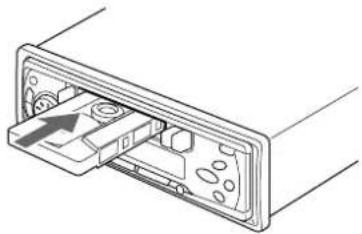
natural_image
Diagram of a device's internal structure showing a connector with an arrow indicating direction (no text or symbols present)If a cassette is already inserted, press FUNC repeatedly to select Tape Play mode to start playback.
Playback starts in the direction that the unit played back previously.
2 Adjust the volume with the Jog Dial.
Press the following buttons to operate tape transport.
| To do this | Press this button |
| Eject the cassette* | |
| Change the playback side | |
| Fast-forward the upper side (▶) of the tapeRewind the lower side (◀) of the tape | |
| Rewind the upper side (▶) of the tapeFast-forward the lower side (◀) of the tape | |
| Stop fast transport and resume playback |
* When you eject the cassette, the unit switches to the previous mode.
** Do not press 📄 or 📃 all the way. Doing so may change the direction of tape transport.
Auto Reverse function
When the end of the tape is reached during playback or fast tape transport, the direction of the tape is automatically reversed, and playback starts on the other side.
Tape direction indications
| Playback Fast-forwardor rewind | ||
| Upper side | [TCB4] |  |
| Lower side | [6484] |  |
Switching modes
When the unit is in a mode other than Tape Play mode, inserting a cassette switches the unit to Tape Play mode automatically.
Before turning the ignition off
Be sure to eject any cassette.
To prevent tape problems
Before inserting a cassette into the unit, make sure that there is no slack in the tape. If necessary, take up the slack by inserting a pencil through the spindle hole and winding.
Tapes of 90 minutes or longer are extremely thin and easily deformed or damaged. They are not recommended.
natural_image
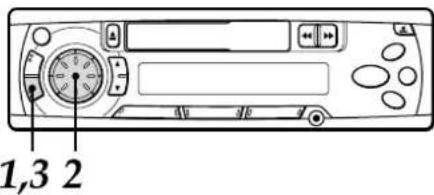
Illustration of hands using a handheld device to adjust or install a component (no text or symbols visible)SOUND ADJUSTMENTS

1 Press PWR to turn the unit on.
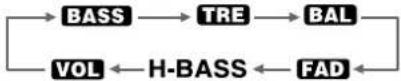
2 Press SEL repeatedly to select the mode that you wish to adjust from: BASS, TRE (treble), BAL (balance), FAD (fader) and VOL (volume).
Each time you press SEL, one of the following indicators appears, in cyclic order.
If you do not proceed with the following step 3 within 5 seconds, the selected mode is canceled, and the indication returns to the current source mode.
3 Rotate the Jog Dial to adjust the level.
Adjust each mode referring to the audio control indications in the display window.
| Counterclockwise | Clockwise | |
| BASS | Decreases the bass level | Increases the bass level |
| TRE | Decreases the treble level | Increases the treble level |
| BAL | Decreases the level of the right speaker(s) | Decreases the level of the left speaker(s) |
| FAD | Decreases the level of the front speakers | Decreases the level of the rear speakers |
| VOL | Decreases the volume level | Increases the volume level |
Without selecting any mode with SEL, only the volume level can be adjusted by rotating the Jog Dial.
continued
ENGLISH 10
SOUND ADJUSTMENTS
MUTE button
Press this button to temporarily lower the volume. Press it again to restore the previous volume. The "MUTE" indicator in the display window flashes while the mute function is active.
H-BASS (High BASS)
You can enjoy music with strong bass sound.
1 Press PWR to turn the unit on.
2 Press SEL repeatedly to select H-BASS (High BASS) mode.

3 Rotate Jog Dial to select on or off.
Select "On" to obtain powerful bass. The "H-BASS" indicator lights up. Select "OFF" to cancel H-BASS.
Source Level Adjuster
You can adjust the output level in each mode to equalize the volume level.
1 Press PWR to turn the unit on.
2 Press FUNC repeatedly to select the desired mode.
3 Press DISP while pressing SEL. The "LA 0" indication appears.

4 Rotate the Jog Dial to adjust the level. Rotate clockwise to increase the output level. Rotate counterclockwise to decrease the output level. If you do not operate the Jog Dial within 5 seconds, this function is canceled, and the indication returns to the current source mode.
Returning to the factory settings
Adjusted settings of VOL, BASS, TRE, BAL, FAD, H-BASS, and source level can be returned to the factory settings with a simple operation.
1 With the unit off, press and hold DISP for more than 2 seconds.
The "LA--" indication appears, and all sound settings are returned to the factory settings.
LA--
CONNECTING A PORTABLE CD/MD/MP3 PLAYER OR OTHER EQUIPMENT
1 Press PWR to turn the unit on.
2 If a cassette is inserted, remove it to prevent possible damage to the unit.
3 Connect a portable CD/MD/MP3 player, etc. via the AUX IN jack (3.5-mm dia.) of the unit.
4 Press FUNC repeatedly to select AUX IN mode to output sound received from the connected equipment.
The "AUX" indicator lights up.
The clock display appears.

- For further information on the portable CD/MD/MP3 player, etc., refer to the operating instructions for that equipment.
ENGLISH 12
SETTING THE BEEP TONE
The unit is preset at the factory to beep each time you press any button on the front panel except ↓, ▲, ◀◀, or ▶▶ (no beep with the Jog Dial). You can mute this beeping by following the procedure below.
1 With the unit off, press and hold SEL for more than 2 seconds. The "BEEP" indication appears.
2 Rotate the Jog Dial to select on or off. The beep function is activated when the "BEEP" indication appears with the audio level indicator lit, and canceled when not displayed.

3 Press and hold SEL for more than 2 seconds. The unit turns off.
MAINTENANCE
Cleaning the front panel
When the front panel is soiled, wipe the surface with a soft, dry cloth.
Cleaning the tape head
Use a cleaning cassette to clean the playback head and capstans approximately once a month. If the head is dirty, the high tones may not be reproduced properly.
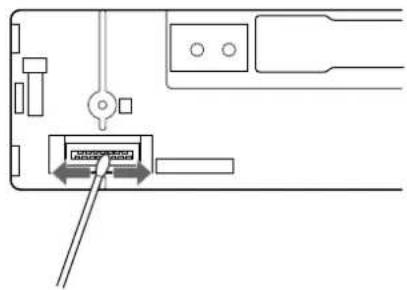
Cleaning the connector
The connector on the reverse side of the front panel needs to be cleaned occasionally. Wipe the surface of the connector with a cotton swab slightly moistened with alcohol.
SPECIFICATIONS
RADIO SECTION
(FM)
Frequency Range: 87.5 MHz – 108 MHz
(100-kHz steps)*
87.5 MHz - 108 MHz
(50-kHz steps)
Usable Sensitivity: 12.7 dBf
50 dB Quieting Sensitivity
17.2 dBf
IF Rejection: 80 dB
Frequency Response: 30 Hz – 15,000 Hz
S/N Ratio: 63 dB
Stereo Separation: 35 dB at 1 kHz
Alternate Channel Selectivity:
70 dB
Capture Ratio: 3 dB
(AM)
Frequency Range: 530 kHz – 1,710 kHz
(10-kHz steps)*
531 kHz - 1,602 kHz
(9-kHz steps)*
Usable Sensitivity: 30 μV (30 dB)
9k□10k
* Set the frequency increment for your area using the switch on the bottom of the unit.
(The switch is set at the factory to the 10k position [for the U.S.A.])
TAPE SECTION
Tape Speed: 4.8 cm/sec. (1 7/8 ips)
S/N Ratio: 50 dB
Frequency Response: 40 Hz – 14,000 Hz
Stereo Separation: 40 dB
FF/REW Time: 190 sec. (C-60)
AUDIO SECTION
Max. Power Output: 40 W × 4 channels
AUX IN input
Input sensitivity (load impedance)
AUX IN: 300 mV (10 kΩ)
GENERAL
Power-Supply Voltage:
14.4 V (11 to 16 V allowable),
DC, negative ground
Load Impedance: 4 Ω
Tone Control: Bass ± 10 dB at 100 Hz
Treble ± 10 dB at 10 kHz
Preamp Output Voltage (load impedance):
2.2 V (10 kΩ)
Installation size: 182 (W) × 53 (H) × 155 (D) mm
(7 1/4 (W) × 2 1/8 (H) ×
6 1/8 (D) inches)
Accessory supplied: Carrying case (1)
Specifications and external appearance are subject to change without notice due to product improvement.
Bienvenidos
natural_image
Technical line drawing of a device casing with ports and a labeled component (no text or symbols)Luz de seguridad
natural_image
Diagram of a device internal component with an arrow indicating direction (no text or symbols)natural_image
Illustration of hands using a power tool to switch a component (no text or symbols visible)AJUSTES DEL SONIDO
H-BASS (graves altos)
1,3 2
natural_image
Pure diagram of a device with no text, numbers, or symbols visibleESPECIFICACIONES
SECCION DE LA RADIO (FM)
natural_image
Technical line drawing of a device's internal structure showing a tray and internal components (no text or symbols)Bourrelet de protection
TABLE DES MATIERES
ORGANES ET COMMANDES 3
RETRAIT ET FIXATION DU PANNEAU AVANT 4
REGLAGE DE L'HEURE 5
FONCTIONNEMENT DE LA RADIO .... 5
PREREGLAGE DE STATIONS 6
FONCTION MES INFORMATIONS 8
LECTURE DE CASSETTE 9
AJUSTEMENTS DU SON 10
RACCORDEMENT D'UN LECTEUR DE CD/MD/MP3 PORTABLE OU D'UN AUTRE
EQUIPEMENT 12
REGLAGE DE LA TONALITE BIP 13
ENTRETIEN 13
SPECIFICATIONS 14
natural_image
Technical line drawing of a device rear panel with buttons and ports (no text or symbols)Témoin de sécurité
Touche LO (local/DX)
natural_image
Diagram of a device showing an open panel with internal components and a directional arrow (no text or symbols)natural_image
Illustration of hands using a cassette tape to interact with a tool (no text or symbols visible)AJUSTEMENTS DU SON